
Все способы:
- Способ 1: Использование средства устранения неполадок
- Способ 2: Перезапуск службы
- Способ 3: Сброс параметров Центра обновления Windows
- Способ 4: Чистка ключей реестра
- Способ 5: Очистка папки с обновлениями
- Способ 6: Проверка компьютера на наличие вирусов
- Способ 7: Проверка целостности системных файлов
- Вопросы и ответы: 8
Способ 1: Использование средства устранения неполадок
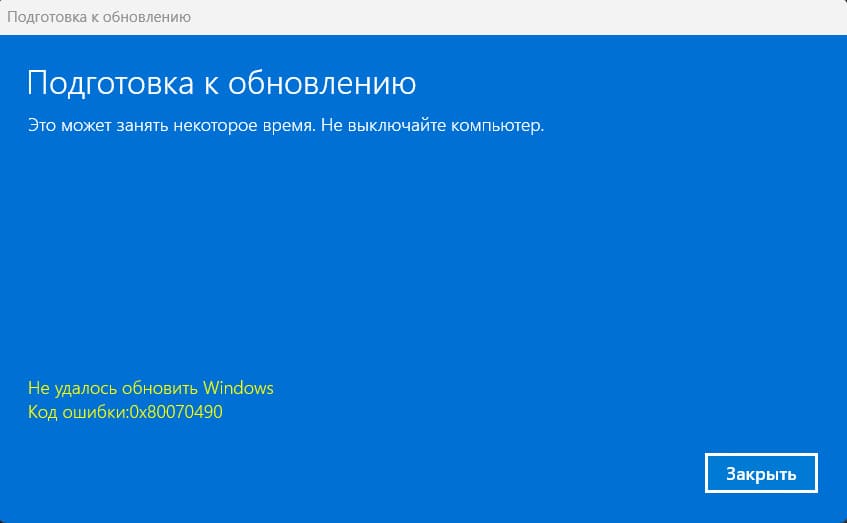
Ошибка с кодом 0x80070490 появляется в Windows 10 во время проверки или установки обновлений и означает, что соответствующее средство работает некорректно из-за определенных причин. Для начала рекомендуется использовать автоматическое средство исправления неполадок, чтобы сэкономить время и силы на самостоятельном поиске решения проблемы.
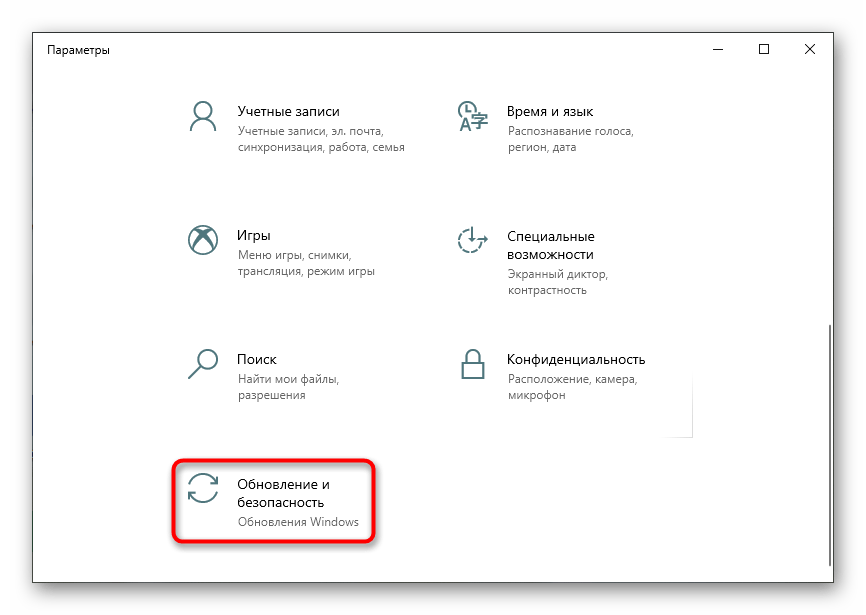
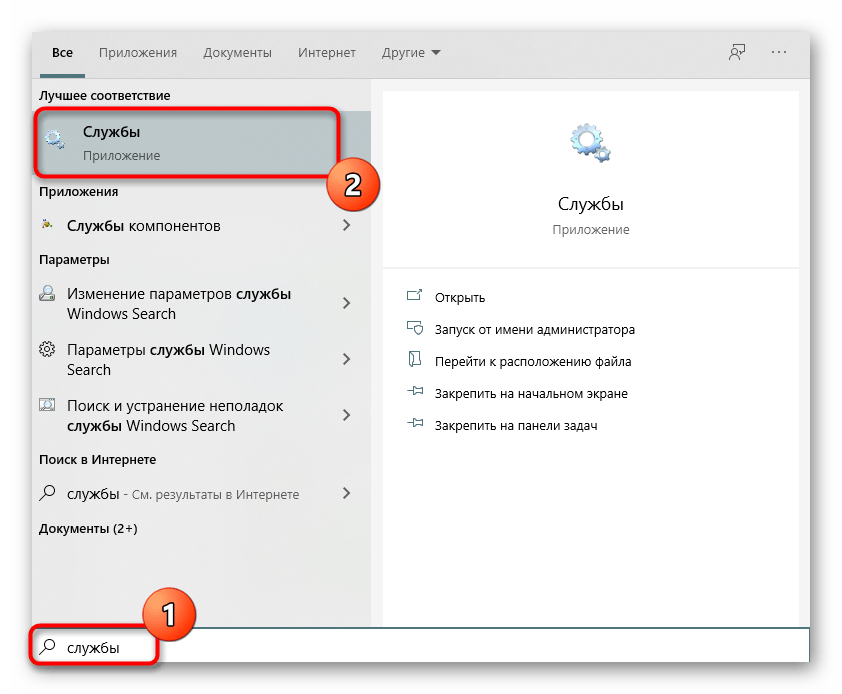
- Для этого откройте «Пуск» и перейдите в «Параметры».
- Там вас интересует категория «Обновление и безопасность».
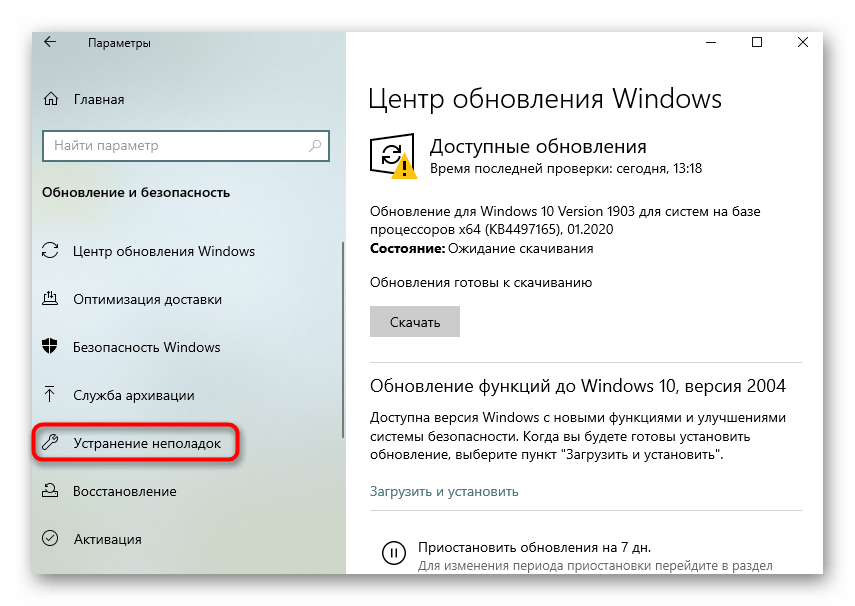
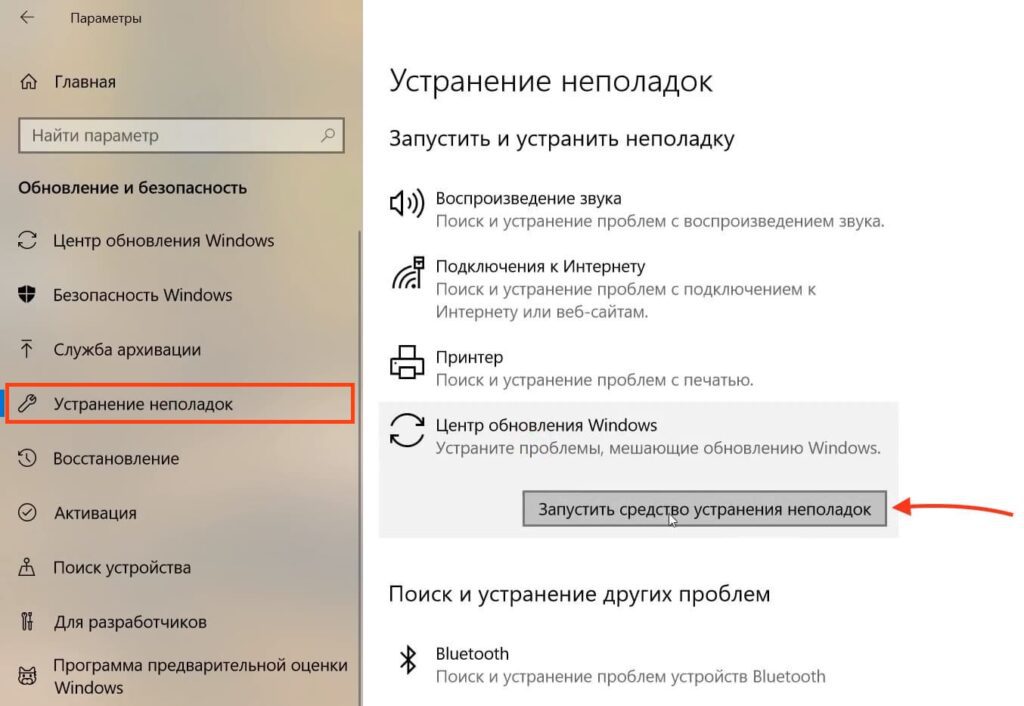
- Через левое меню переместитесь к пункту «Устранение неполадок».
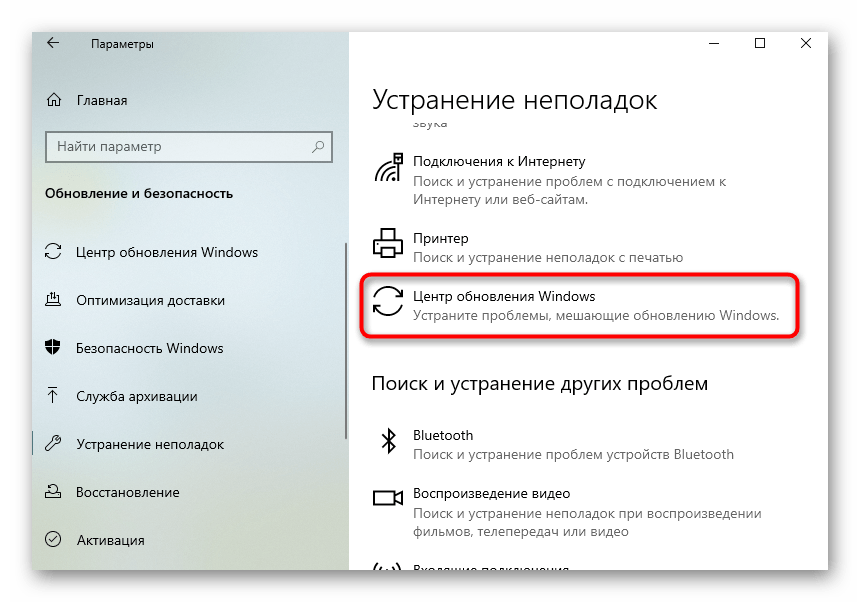
- Выберите категорию «Центр обновления Windows» и запустите это средство обнаружения проблем.
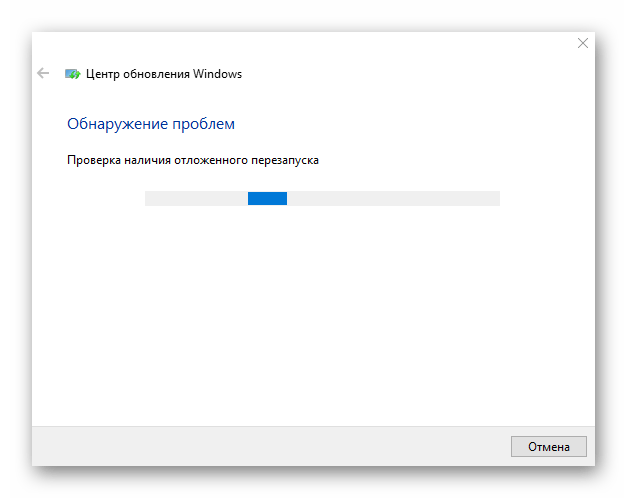
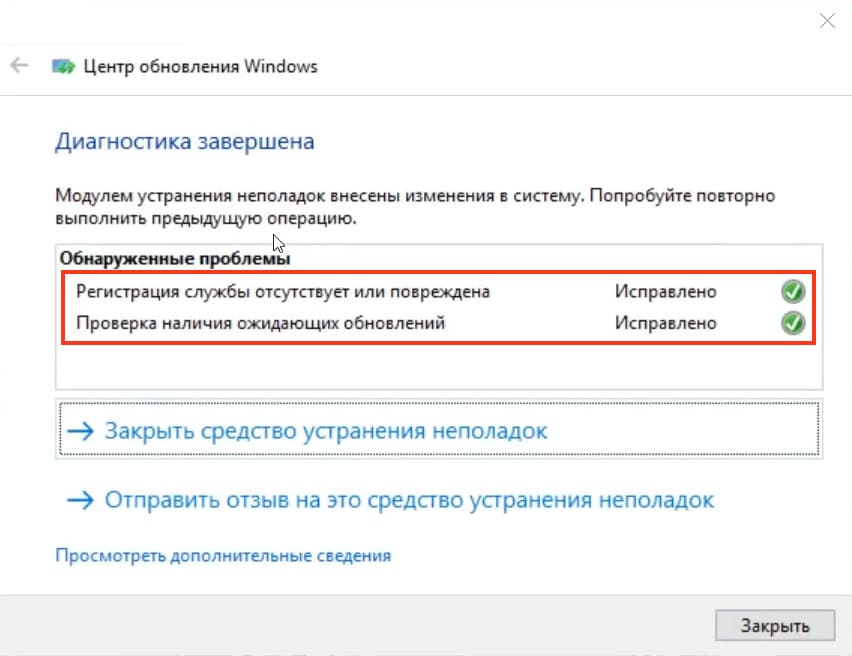
- Дождитесь окончания сканирования и следуйте отобразившимся на экране инструкциям или ознакомьтесь с конечной информацией.
Способ 2: Перезапуск службы
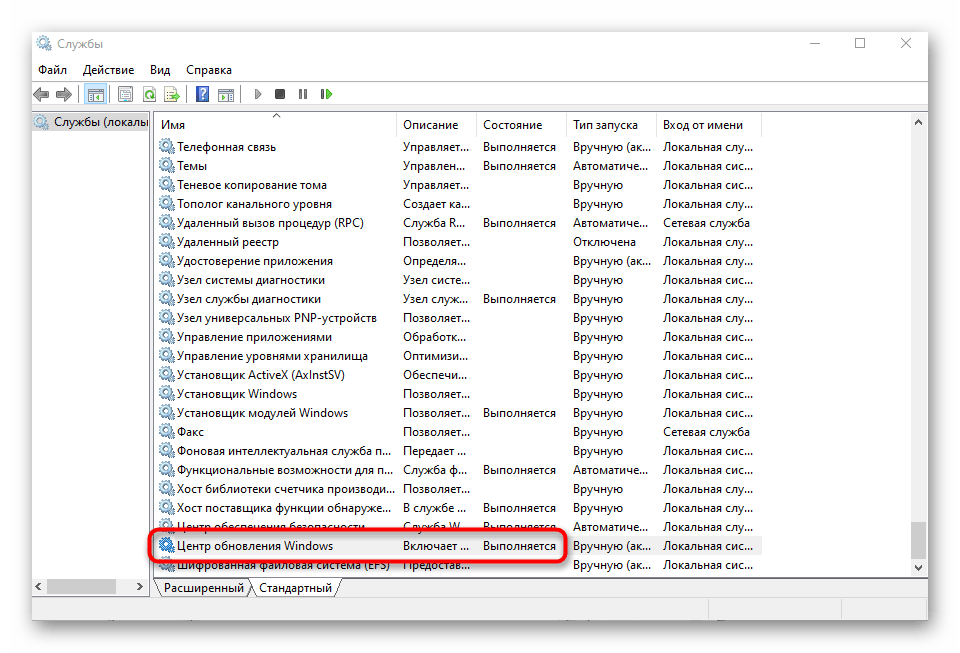
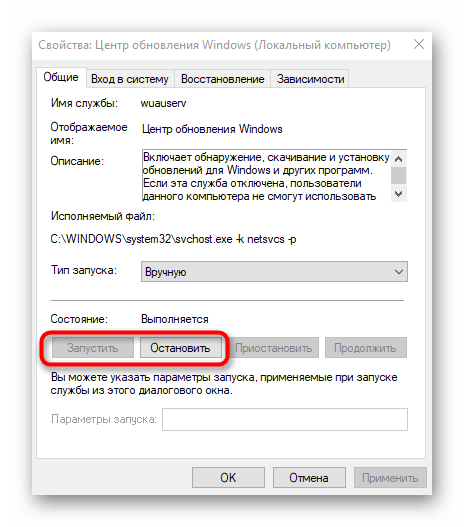
Второй вариант заключается в перезапуске службы, отвечающей за работу Центра обновления Windows. Осуществляется эта операция вручную путем обращения к специально отведенному системному меню, что происходит так:
- Запустите приложение «Службы», что можно сделать, например, через поиск в меню «Пуск».
- Там опуститесь вниз по списку, где дважды кликните по строке «Центр обновления Windows».
- Вручную остановите службу, а затем запустите ее, нажимая на находящиеся в окне кнопки.
После этого переходите к проверке апдейтов или перезагрузите компьютер, чтобы этот процесс начался автоматически. Если ошибка снова появится на экране, приступайте к реализации следующих методов.
Способ 3: Сброс параметров Центра обновления Windows
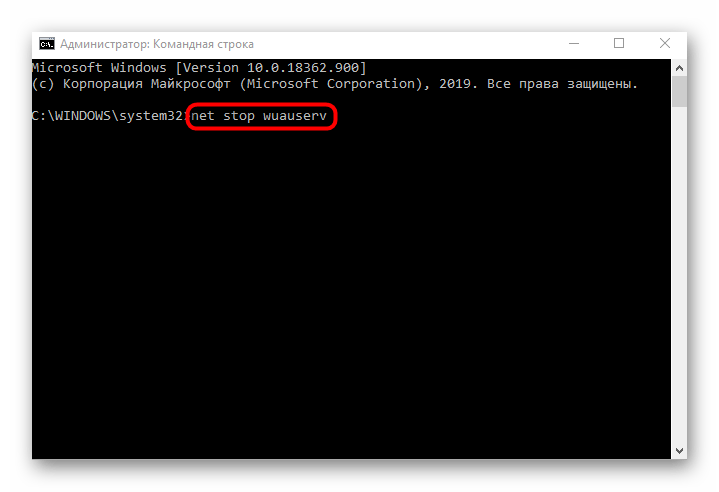
Этот метод заключается в ручном сбросе параметров Центра обновления Windows 10 через консоль путем ввода специальных команд. От вас требуется только запустить саму «Командную строку» от имени администратора, например, отыскав ее через меню «Пуск», а затем поочередно вставить следующие команды.
net stop wuauserv

net stop cryptSvc

net stop bits

net stop msiserver

ren C:\Windows\SoftwareDistribution SoftwareDistribution.old

ren C:\Windows\System32\catroot2 catroot2.old

net start wuauserv

net start cryptSvc

net start bits

net start msiserver
По завершении перезагрузите компьютер, чтобы изменения вступили в силу и проверяйте, насколько эффективными оказались выполненные действия.
Способ 4: Чистка ключей реестра
Иногда в «Редакторе реестра» появляются лишние ключи, которые могут мешать корректной работе Центра обновления Windows, из-за чего и возникает ошибка с кодом 0x80070490. Для ручной проверки и удаления ненужных параметров следует выполнить всего пару шагов.
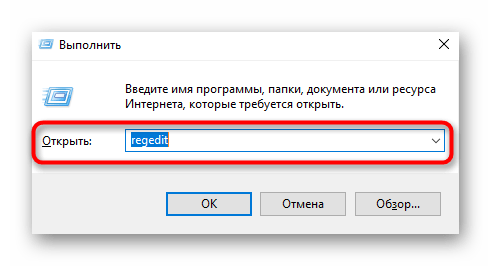
- Откройте утилиту «Выполнить» через стандартную комбинацию клавиш Win + R. Там введите
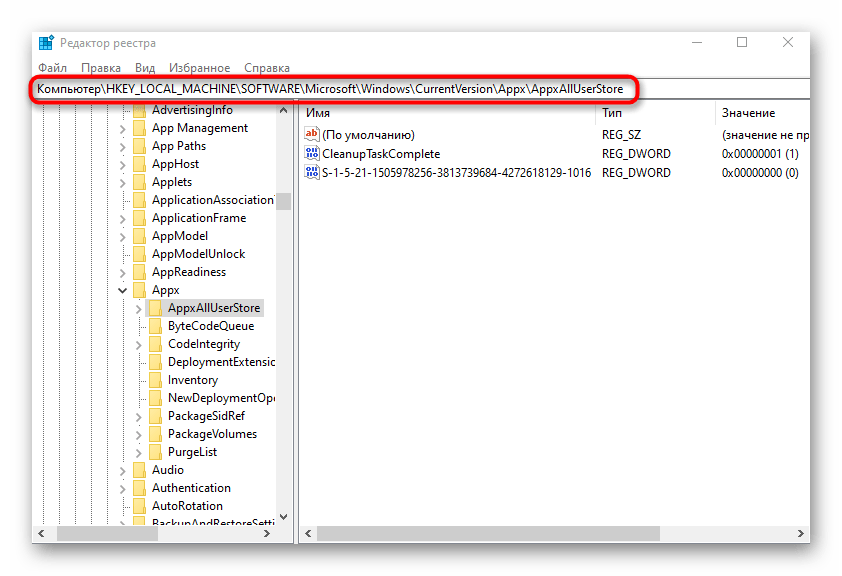
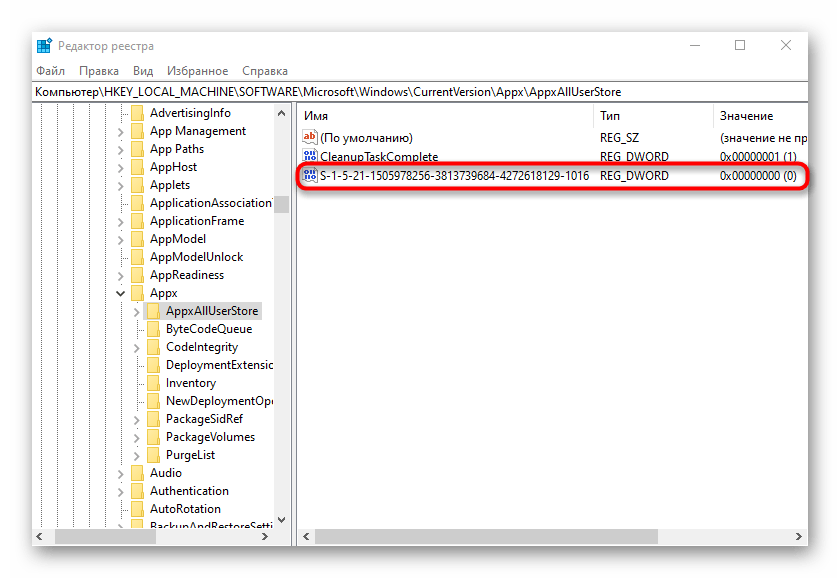
regeditи нажмите на Enter для подтверждения. - Перейдите по пути
HKEY_LOCAL_MACHINE\SOFTWARE\Microsoft\Windows\CurrentVersion\Appx\AppxAllUserStore. - Отыщите там параметры с примерным названием «S-1-7-21-1505974246-3813539684-4277612129-1026» и удалите все их.
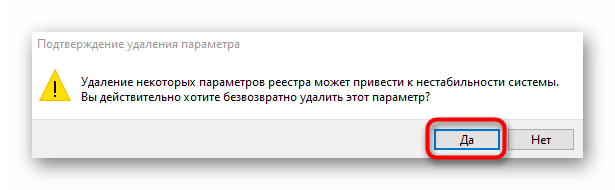
- При появлении системного уведомления подтвердите действие.
Способ 5: Очистка папки с обновлениями
В некоторых случаях ошибка 0x80070490 возникает из-за проблемных файлов апдейтов, которые остались в системной папке. Тогда ее рекомендуется очистить вручную, чтобы исправить все неполадки.
- Для этого откройте системный раздел жесткого диска, перейдите в папку «Windows», щелкните правой кнопкой мыши по директории «SoftwareDistribution» и в появившемся контекстном меню выберите пункт «Переименовать».
- Добавьте в конце
.old, чтобы обозначить старую версию этого каталога, а затем примените изменения нажатием на Enter.
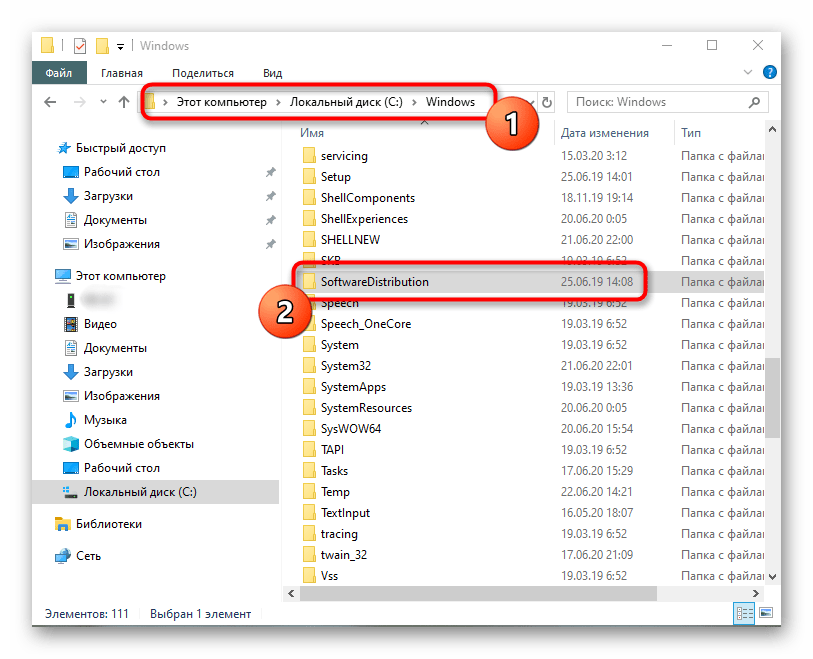
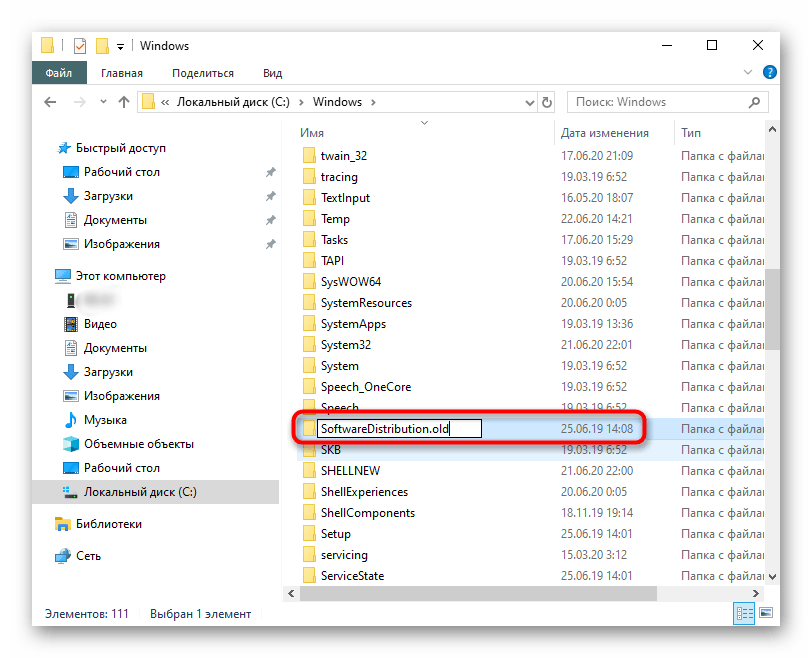
Повторно запустите поиск апдейтов, после чего будет создана еще одна такая же папка. Если все прошло успешно, ее старую версию можно будет удалить. В противном случае ее лучше переименовать обратно.
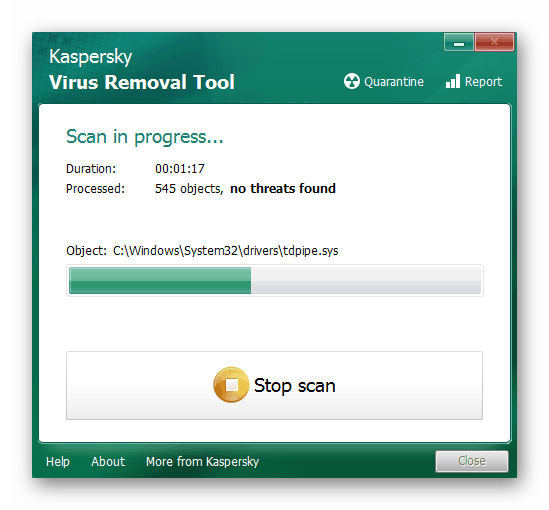
Способ 6: Проверка компьютера на наличие вирусов
Рассматриваемая неполадка могла появиться из-за заражения компьютера вирусами, которые блокируют доступ к службе обновления или воздействуют на определенные системные файлы. Если ничего из перечисленного выше не помогло, рекомендуется проверить ОС на наличие угроз, задействовав оптимальное для этого программное обеспечение. Детальный разбор данной темы вы найдете в другой статье на нашем сайте далее.
Подробнее: Борьба с компьютерными вирусами
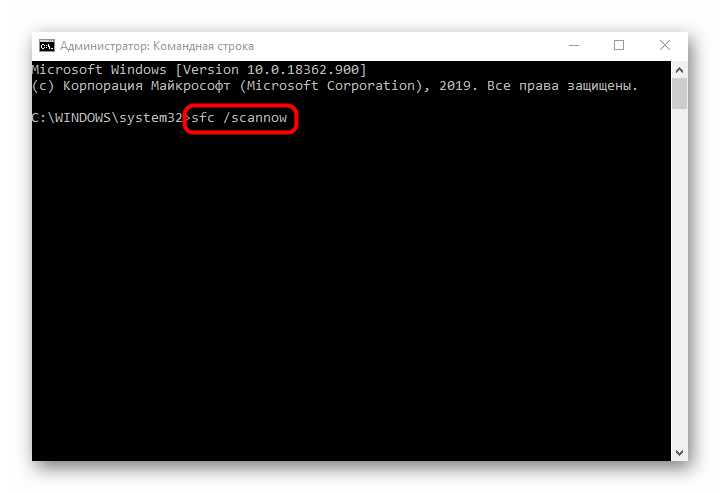
Способ 7: Проверка целостности системных файлов
Последний метод решения — проверка целостности системных файлов. Подобные повреждения встречаются редко, однако ситуация все-таки возможна. Такой анализ осуществляется при помощи системных утилит SFC и DISM. Сначала производится запуск первой, а если сканирование заканчивается ошибкой, придется дополнительно подключить вторую, вернувшись после снова к SFC. Развернуто этом читайте ниже.
Подробнее: Использование и восстановление проверки целостности системных файлов в Windows 10
Наша группа в TelegramПолезные советы и помощь
Способ 1: Использование средства устранения неполадок
Код ошибки 0x80070490 появляется в Windows 10 при проверке или установке обновлений и означает, что соответствующий инструмент не работает должным образом по определенным причинам. Рекомендуем для начала использовать автоматическое устранение неполадок, чтобы сэкономить время и силы на поиск решения проблемы самостоятельно.
— Для этого откройте «Пуск» и перейдите в «Параметры».
— Нас интересует категория «Обновление и безопасность».

— С помощью меню слева перейдите к пункту «Устранение неполадок».

— Нажмите «Центр обновления Windows» и запустите это.

— Дождитесь завершения сканирования и следуйте инструкциям на экране.

Способ 2: Перезапуск службы
Второй вариант — перезапустить службу, отвечающую за запуск Центра обновления Windows. Делается это вручную путем доступа к специальному системному меню, а именно:
— Запустите «Службы» с помощью поиска в «Пуске».

— Оттуда прокрутите список вниз и дважды щелкните строку «Центр обновления Windows».

— Остановите службу вручную, а затем запустите ее, нажав кнопку в окне.

После этого проверьте наличие обновлений или перезагрузите ПК, чтобы обнуления запустились автоматически. Если ошибка опять отобразится на экране, продолжите исправление ошибки с помощью приведенных ниже способов.
Способ 3: Сброс параметров Центра обновления Windows
Данный метод заключается в том, чтобы сбросить настройки обновления Windows 10 вручную из консоли, введя специальные команды. Вам нужно запустить «Командную строку» от администратора, найдя ее в меню «Пуск», а затем вставить следующие команды одну за другой.
net stop wuauserv
net stop cryptSvc
net stop bits
net stop msiserver
ren C:\Windows\SoftwareDistribution SoftwareDistribution.old
ren C:\Windows\System32\catroot2 catroot2.old
net start wuauserv
net start cryptSvc
net start bits
net start msiserver

Когда вы закончите, перезагрузите ПК, чтобы исправления могли запуститься, и проверьте, насколько эффективными были шаги.
Способ 4: Чистка ключей реестра
Периодически в «Редакторе реестра» могут наблюдаться дополнительные ключи, мешающие правильной работе Центра обновления Windows, из-за чего возникает ошибка с кодом 0x80070490. Требуется несколько шагов, чтобы вручную проверить и удалить ненужные настройки.
— Откройте утилиту «Выполнить» через клавиши Win + R. Затем введите regedit и нажмите Enter для подтверждения.

— Следуйте по пути HKEY_LOCAL_MACHINE\SOFTWARE\Microsoft\Windows\CurrentVersion\Appx\AppxAllUserStore.

— Найдите там настройки с примерным названием «S-1-7-21-1505974246-3813539684-4277612129-1026» и удалите их все.

— При появлении уведомления нажмите «Да».

Способ 5: Очистка папки с обновлениями
В некоторых случаях ошибка 0x80070490 возникает из-за проблемных файлов обновления, оставшихся в системной папке. Рекомендуется очистить ее вручную, чтобы устранить все проблемы.
— Откройте системный раздел жесткого диска, откройте папку «Windows», щелкните ПКМ каталог «SoftwareDistribution» и в появившемся всплывающем меню выберите «Переименовать».

— Добавьте .old в конце, чтобы указать отметить старую версию каталога, а далее подтвердите изменения и нажмите Enter.

Снова запустите поиск обновлений, после чего будет создана еще одна папка того же типа. Если все прошло удачно, ее старую версию можно удалить. В противном случае лучше переименовать обратно.
Способ 6: Проверка компьютера на наличие вирусов
Рассматриваемая проблема могла возникнуть из-за заражения ПК вирусом, блокирующим доступ к службе обновлений или затрагивающим определенные системные файлы. Если ничего из вышеперечисленного не подошло, проверьте ОС на вирусы, используя для этого нужный софт.

Способ 7: Проверка целостности системных файлов
Последний метод решения является проверка целостности системных файлов. Такое повреждение встречается редко, но ситуация все же возможна. Такой анализ выполняется с помощью системных утилит SFC и DISM. Сначала запускается первая, и, если сканирование заканчивается с ошибкой, нужно дополнительно подключить вторую, а после этого снова вернуться в SFC.

0
Table of Contents
Overview
The error 0x80070490 usually appears when users try to install Windows updates, upgrade Windows operating system, install an application from Windows Store, and it can be triggered by causes like registry corruption, corrupted files in Component-Based Servicing (CBS) , third-party software coalification, faulty system errors, etc. Error code 0x80070490 can be an extremely broad issue to many Windows users, because it happens to various circumstances. Same error code with different error messages can be totally different problem. Sometimes, even same error message can’t be fixed with identical solution under different Windows versions. Therefore, it seems complicated to solve the problem and that is true in some cases. If you have received the error without knowing causes and effective remedy, you can try steps in this guide which is dedicated to the error in different conditions.
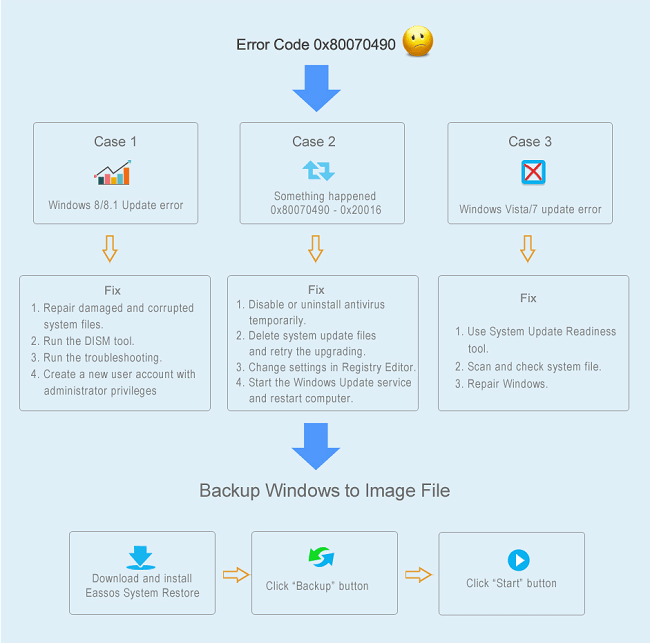
Fix #1: Windows update error
The error is likely to happen when users attempt to install system updates but each story differs from one another, here is one of them: «After I updated system to 8.1, some programs on my computer didn’t work and I had to reinstall them. However, I got an error when trying to install applications like New and Maps. The error message is ‘Something happened and this app couldn’t be installed. Please try again. Error code: ox80070490.’ In order to solve the problem, I’ve even tried uninstalling them and installing again after rebooting system. But that doesn’t work.»
In another case, this update error code appears this way «Windows Store failed to sync machine license. Result code 0x80070490» or «There were problem installing some updates, but we’ll try again later. If you keep seeing this and want to search the web or contact support for information, this may help «. Quite a few users receive the error message after installing Windows 10 or Windows 8.1 update. Windows 8.1 update was released in the year 2014 and it improved user experience greatly in many aspects. Most users are willing to install this update, but this error adds frustration to those who want to install the update.
Solution #1: Repair damaged and corrupted system files
Step 1 Open an elevated command prompt. That means you should run the Command Prompt with administrator level privileges, otherwise in following operation you’ll get message like «You must be an administrator running a console session in order to use the sfc utility». If you are in Windows 8.1 you can right-click on the start button and select Command Prompt (Admin).
Step 2 Type sfc /scannow in Command Prompt and press Enter. Wait for the process to complete and close the window.
Step 3 Restart computer and try to install update again.
Solution #2: Run the DISM tool
If you continue to receive the error, use DISM (Deployment Image Servicing and Management) tool to solve the issue.
Step 1 Open an elevated command prompt using steps in method one.
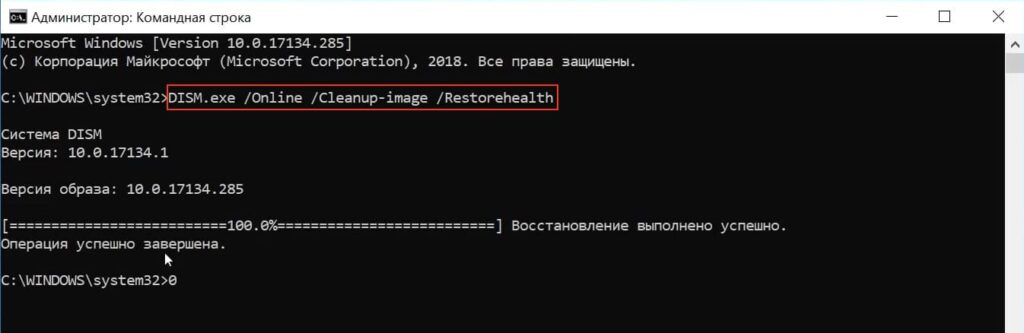
Step 2 Execute «DISM.exe /Online /Cleanup-image /Restorehealth»
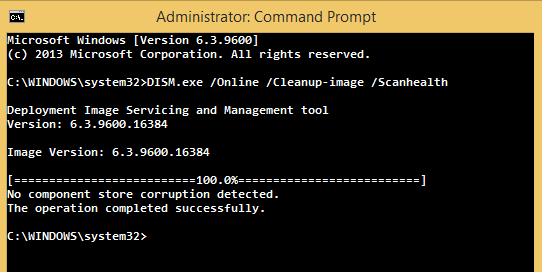
This command makes use of Windows Update to provide files that can be used to fix corruptions, etc. If Windows Update client has been damaged, the repair source should be Windows installation, such as Windows DVD.
Solution #3: Run the update troubleshooter
Step 1 Click Start button and type troubleshooting in search box and select the listed item «Troubleshooting». You’ll get the «Troubleshooting» window from Control Panel. If you are prompted to run as Administrator, click OK.
Step 2 Click «Fix problem with Windows Update» and you’ll get the analyzer and auto-fix troubleshooter. Follow the wizard to fix problem and restart computer when it is done.
Step 3 Retry launching Windows Update and check whether the error is eliminated.
Solution #4: Create a new user account with administrator privileges
Step 1 Open PC Settings and locate Accounts -> Other accounts. Select Add an account and add a new user account to your computer.
Step 2 Select the newly created account and click Edit. Change user type to Administrator on the Editor account step. Click OK.
Step 3 Log on to this new account which has administrator privileges. All applications installed on your PC will be reinitialized and synchronized consistently. Keep this account logged in and switch it to the original account from Start Screen.
Step 4 Now you are in the original account again and try to install updates or apps that reported error.
Fix #2: Windows Vista/7 update error
Windows operating system releases system updates for various versions of Windows very frequently. Updates aim to fix bugs, repair system vulnerabilities, improve or add functions, etc. Users are allowed to change settings related to system update in control panel, such as configure computer to check for updates automatically, download or install update manually, etc. Update service on Windows 7 or Vista computer is relevant to a batch of services, registry settings and file locations on computer, and it is not rare to encounter some errors during installing updates, here is one:
«Error(s) found: Code 80070490 Windows Update encountered an unknown error»
If you keep receiving this update error, it means that file or setting in the CBS (Component Based Servicing) manifest is corrupted or damaged. The role CBS manifest is helping computer identify all kinds of components and settings in Windows. Other reasons that account for the error are system damage, system file issue. Since the cause is simple, it’s easy to fix it as well.
Solution #1: System Update Readiness tool
System Update Readiness tool is provided by Microsoft to help users fix common system problems. It verifies the integrity of resources, detects incorrect manifests, Cabinets, registry data, etc. meanwhile it replaces incorrect files with correct data. It can be downloaded from Microsoft website and installed on any computers running Windows system. Once it is installed you can use it to scan and rectify errors on your computer, then reinstall system updates.
Solution #2: Scan and check system file
Step 1 Press Windows key and R key to open the Run box where you should enter cmd and click OK.
Step 2 Now you get the Command Prompt and type sfc /scannow in it. Press Enter key to execute the command. Do not close it until the scanning is done. During the process of checking system files, you should observe whether there is message telling the CBS is corrupted.

Step 3 If CBS is corrupted, continue running the command Dism /Online /Cleanup-Image /RestoreHealth.
Step 4 When it is done, you should retrying installing Windows updates.
Solution #3: Repair Windows
If the first two methods don’t work, it means there is something wrong with operating system itself, and the problem can be solved by «repairing». To do so, please follow steps in the following section:
Step 1 Close all running programs and restart computer.
Step 2 Put system DVD into disk drive and wait for a while. If it doesn’t start by itself, you need to try these operations: Click «Start» button and enter «G:\setup.exe» in the search box and hit Enter. G is the drive letter of DVD drive and it can be other letter on your computer. In the search result, click Setup.exe.
Step 3 Click Install Now and select «Go online to obtain the latest updates for installation (recommended.).»
Step 4 If you are prompted to provide Windows product key, type it. Next click Update in the window «Which kind of installation do you want?»
Step 5 When the installing process finishes, restart computer again to run Windows Update again and install updated not covered by the DVD.
Fix #3: Something happened 0x80070490 — 0x20016
Here is one of the real stories of the error code found online:
«When I was trying to upgrade my compute from Windows 7 64bit to Window 10, I was stopped by the error ‘something happen 0x80070490 – 0x20016’. This error confused me and I don’t know how to get rid of it. Any help would be appreciated!»
Step 1 Disable or uninstall antivirus temporarily. Check your computer and if your computer installs any antivirus software such as Norton, AVG, McAfee, etc. These programs might be the cause of the problem and you can try disabling or uninstalling them for the moment.
Step 2 Delete system update files or folder and retry the upgrading. Navigate your Windows Explorer following the path «C:\Windows\SoftwareDistribution\Download» and delete all contents in the folder Download, after which you should retry the update.
If you can’t delete contents as expected, you need to stop the update service before performing the deletion. Here is how to stop it manually: Press Windows + R keys and enter services.msc in the searching box and press Enter. Browse the Service window and click «WindowsUpdate». Next click «Stop» on the top-left part.
Step 3 Changes done in Registry Editor. Press Windows + R keys and input regedit and click «OK». Browse Registry Editor with the path «Computer\ HKEY_LOCAL_MACHINE\ SOFTWARE\ Microsoft\ Windows\ CurrentVersion\ WindowsUpdate\ OSUpgrade». Right click mouse and select «New» to create a new DWORD 32 value. Next double click it to change its value to 1.
Step 4 Start the Windows Update service and restart computer.
Step 5 Press Windows + R key and execute «wuauclt.exe /updatenow». Browse control panel «Control Panel > System and Security > Windows Update» Windows Update and Windows» and now you are able to download updates and upgrade computer to Windows 10.
How to backup Windows 10 to an image file?
Windows backup means backing up system to an image file which contains a bit-by-bit copy of entire system, such as the full installation of Windows, system settings, installed programs, personal files, etc. The image file is placed in a partition separated from system drive, so that you can restore Windows from it even when system can’t boot or gets other problems.
Different system backup software has its own type of image file, as the algorithm to compress data differs one from another. Thus you should use the same program that created backup image to restore it. For example, the file extension is .pmf if the image file is created by Isoo Backup (old name Eassos System Restore) small for example 12GB. However, the size of image file created by Windows is quite large, which can be tens of gigabytes and takes more disk space.
Isoo Backup (old name Eassos System Restore) is simple and effective system backup & restore program. It is one-key system backup and restore software, as it requires very simple operations to finish the task. It’s able to make full backup and incremental backup for all versions of Windows. Hence, you can create multiple time point to capture system in different status; meanwhile, you are allowed to restore computer to any of these points.
Step 1 Install Isoo Backup (old name Eassos System Restore) and launch. The installation is easy to follow, as the wizard guides step by step. During the installation, you can choose whether to install boot options and which to install. Boot options are methods that you boot to Isoo Backup (old name Eassos System Restore) and restore system when Windows can’t boot.
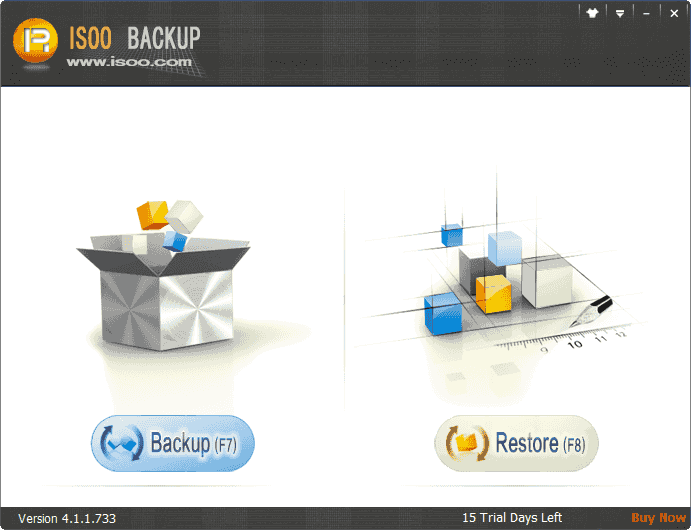
Step 2 Click «Backup» button and click Start button on next interface. If you are specialized in such kind of operations, you can click «Options» to make specific configurations for the backup, such as where to save backup image, how to compress it, whether to backup files in Recycle Bin, etc. As to beginning users, there is no need to get confused by these options, for defaulted settings are good enough to guarantee a great backup.
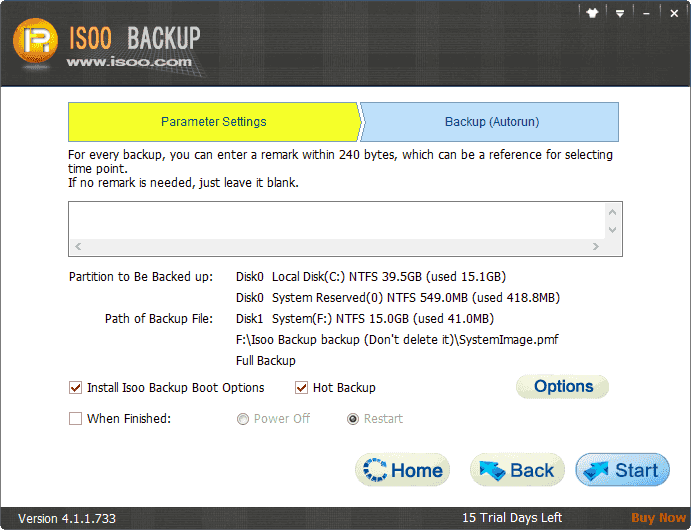
Step 3 The backup software starts to back up automatically and computer restarts when backup completes.
Frequently Asked Questions
1. How do I fix error code 0x80070490?
When you receive the error code while downloading Windows 10 updates, you can try solutions listed below to get it resolved:
- Run the update troubleshooter
- Create a new local account
- Run the SFC scan and CHKDSK commands to check and repair errors in system
2. How do I run the Windows update troubleshooter?
Follow these steps and you can run Windows 10 update troubleshooter:
Step 1. Click Start menu to choose «Settings».
Step 2. Then click Update & Security > Troubleshoot > Additional troubleshooters.
Step 3. Wait for the troubleshooter to finish scanning and restart computer.
3. What is «Windows Setup cannot find a location to store temporary installation files» error?
The error code usually appears when installing Windows 7 operating system and it is displayed with the message «Windows Setup cannot find a location to store temporary installation files. To Install Windows, make sure that a partition on your boot disk has at least 655 megabytes (MB) of free space». When encountering this error, you can try partitioning the hard drive using DiskGenius first, after which you will be able to install Windows smoothly.
4. What is error code 0x8019019a?
The «Something went wrong. We’re sorry, but we weren’t able to do that. Error code: 0x8019019a» usually appears users fail to sing in the Windows 10 Mail app using a Yahoo email. The appearance of the error is triggered by various causes, for example, corrupted/outdated mail app, there is something wrong with the communication module, etc.
Keep Reading
- How to Fix Error Code 0x80004005 in Windows 10/8/7?
- Fix 0x80070002 in Windows update, installer, and Security Client
- How to Fix Error Code 0x80070057 In Windows 10? | 4 Fixes
- How to Fix Error Code 0x80070570 in Windows 10/8/7?
This post will discuss the possible culprits causing the update error 0x80070490 along with seven proper ways to address them. This bug typically occurs when you are signed in using a corrupted user profile. To fix this, create a new user account and delete the existing ones via the registry.

Note: Before proceeding to the solutions listed below, disable third-party antivirus software, and check whether this solves the error 0x80070490. If the issue gets resolved, remove this program on your computer and instead start using the default security application i.e. Microsoft Defender. If not, try the following suggestions sequentially –
1] Create a New User Account
The update error 0x80070490 typically occurs when corruption is associated with the signed-in user profile. To fix this, you should create a new user account using the following steps –
- First of all, navigate to the below path –
Settings (Win + I) > Accounts > Your Info
- Switch to the right side and click “Sign in with a local account instead“.

- Follow the on-screen instructions and sign in using the newly created user ID and password.
Now that you have logged in using a new user account, there should not appear any error while updating Windows.
2] Delete User Profiles via Registry
If the error prevails even after logging in with a new user account, delete the old user profiles via the registry. Here’s how to perform this task –
- Press Win + R to open the Run dialog.
- Type “
regedit” and click OK. - On the registry, navigate to the below path –
HKEY_LOCAL_MACHINE\SOFTWARE\Microsoft\Windows\CurrentVersion\Appx\AppxAllUserStore
- Look for the folder that resembles “S-1-5-21” like –
S-1-5-21-3105168380-3071851799-381973337-1001.

- Right-click on this folder and choose Delete. If there are more than one key identical to the above format, delete all of them.
- Once over, close the registry and restart Windows.
From the next logon, try updating your operating system again.
3] Run the Update Troubleshooter
If creating a new user profile and deleting the existing ones don’t solve the 0x80070490 issue, update the troubleshooter. This tool will tackle the reasons leading to update-related bugs and errors. Here’s how to troubleshoot Windows update –
- Press Win + I to open the Settings menu.
- Navigate Update & Security > Troubleshoot > Additional troubleshooters.
- Click Windows Update, then Run the troubleshooter.

- Follow the on-screen instructions to complete the remaining process.
- When the troubleshooting finishes, Restart your computer.
While on Windows 11 PC, you will not get the troubleshooter setting by following the above steps. You need to follow an alternate path which is as follows –
Settings (Win + I) > System > Troubleshooter > Other Troubleshooters
After reaching the path above, you may find Windows updates under the section – Most frequent. Click the Run button available beside Windows update.

4] Perform SFC/DISM scans
The presence of corrupted system files may also cause the 0x80070490 error during the Windows update. To fix this, you should fully scan your PC using the System File Checker utility program. Here are the essential steps to work on –
- Launch Command Prompt having administrative privileges.
- Type “
sfc/scannow” near the blinking cursor and press Enter.

- Usually, this takes 15-20 minutes to finish the scanning/repairing process.
Note: In certain cases, this may take even more time depending upon the level of corruption.
- Once over, restart your computer so that the changes made come into effect.
Now that you have successfully repaired the damaged core files, use the DISM tool to find any corruption inside the Windows 10 image. All you require is to execute the below code on an elevated console with Admin rights –
DISM.exe /Online /Cleanup-image /Restorehealth

5] Reset Windows Update Services
Many a time, you may address this issue simply by resetting the Windows Update Services. To do so, use these steps –
- Press WinKey + S to launch the Search window.
- Type services in the text bar and hit Enter. Doing so will invoke the Services window.
- Here, scroll down and check if the following services are running or not.
- Background Intelligent Transfer Service
- Cryptographic Services
- MSI Installer
- Windows Update
- The above services should be running for an error-free update process. However, if you find any of these services not running, make a right-click, and hit Start using the context menu.

- Reboot your PC to incorporate the recent changes.
When Windows reloads, check if the error 0x80070490 still occurs or has been resolved.
6] Rename the SoftwareDistribution Folder
The update process may also fail when the SoftwareDistribution folder gets corrupted somehow. So, if you are still struggling with the 0x80070490 error, try renaming this folder to something SD.old.
However, as this folder contains all the information that a Windows update requires, make sure to disable the update services first. To do so, use these steps –
- Use Win + R shortcut to open Run.
- Type
services.mscin the text field and hit OK. - On the Services window, locate and right-click on Windows Update and click “Stop“.
- Now, go to the below location and rename the folder –
SoftwareDistribution.
C:\Windows

- Next, go to the location
C:\Windows\System32and look for the catroot2 folder. Once found, right-click on the same and rename this to catroot2.old. - After renaming folders, go back to the Services window and restart the services you stopped earlier.
- Restart your computer after completing the above steps.
7] Manually Install the Latest Cumulative Update
If you are still getting the 0x80070490 error while updating Windows 10 OS, better attempt this manually. Here’s how to manually download and install the Standalone package on your computer –
- Visit the Windows 10 Update History website and click the specific Build version that you currently have on your PC. If you are getting this error code on Windows 11, navigate to the Windows 11 Update history page instead.
- Scroll down to “In this release” and select the top link. Head over to the right pane and copy the number that starts with “KB” like – KB4577063.

- Now that you have copied the cumulative update number, go to the Update Catalog page, and type this number accurately. Press Enter to view a list of well-matching results.
- If you do know your system architecture, click the Download button next to it. You may get this information by reaching out to the path –
Settings > Update & Security > Windows Update > OS Build Info. - After the download completes, click twice on the setup file to start the installation. Windows may reboot several times during this process, so wait patiently.
- Once over, you won’t get this 0x80070490 error anymore during the Windows Update process.
I hope this article resolves the issue that you were looking for. Please let us know in the comments section what was your issue and which solution worked for you so that it could be useful for other users as well.
В данной статье мы обсудим, что делать, если при обновлении операционной системы Windows вы столкнулись с ошибкой 0x80070490 и как её исправить.
Эта ошибка часто возникает у пользователей, которые пытаются обновить Windows до последней версии с помощью Центра обновления Windows. Основной причиной ошибки является повреждение компонентов менеджера пакетов Component-Based Servicing. В результате установщик не сможет завершить обновление без дополнительных действий со стороны пользователя.
Эта проблема может возникать не только на Windows 10, но и на Windows 11, 8 и 7.
Если у вас Windows 10, попробуйте активировать систему через терминал, следуя нашей инструкции.
Для активации Windows 11, воспользуйтесь другой инструкцией.
Способы исправления
Вариант 1. С помощью инструмента System File Checker
1. Откройте командную строку от имени администратора: введите в строке поиска cmd, щёлкните правой кнопкой мыши и выберите «Запуск от имени администратора».
2. В командной строке введите команду:
sfc /scannow
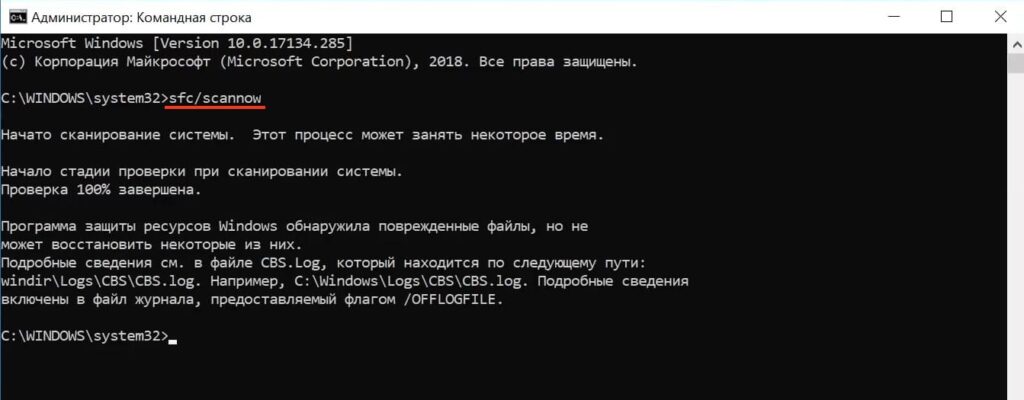
3. Подождите завершения сканирования и перезапустите систему.
Вариант 2. Перезапуск службы Центра обновления Windows
1. Введите в поиске «Службы» и откройте их.
2. Найдите «Центр обновления Windows» и откройте его.
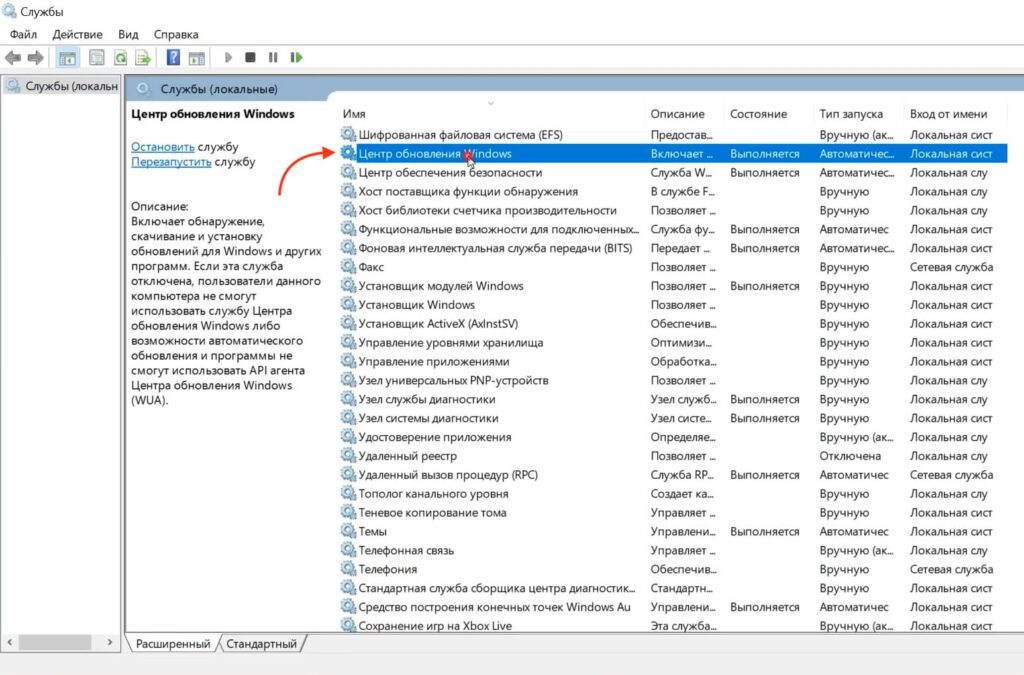
3. Установите тип запуска на «Автоматически», после чего «Остановите» и снова «Запустите службу».
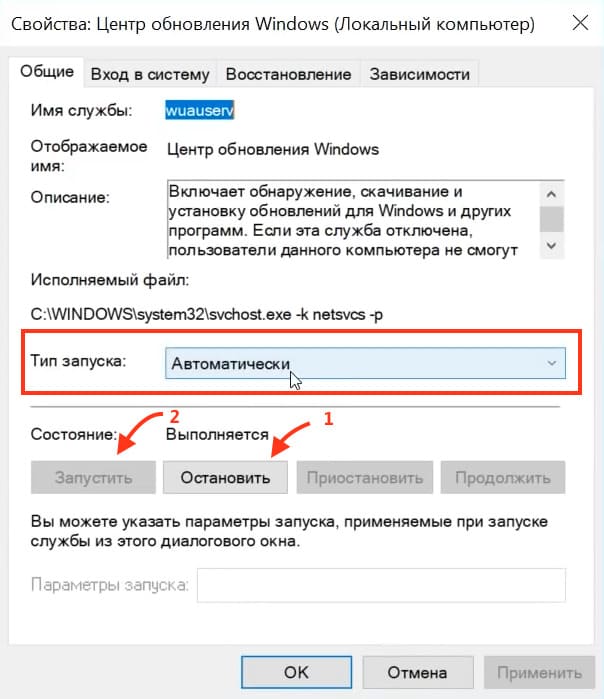
или выберите «Перезапустить».

Вариант 3. Восстановление исходного состояния компонентов Центра обновления Windows
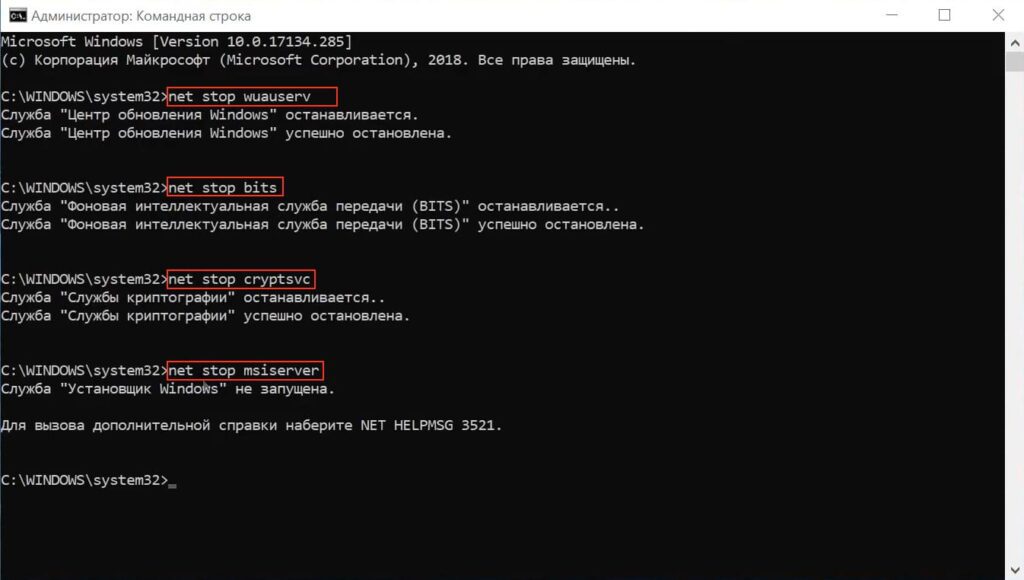
1. Запустите командную строку от имени Администратора.
2. Остановите службы BITS и Центра обновления Windows, вводя следующие команды:
net stop wuauserv
net stop bits
net stop cryptsvc
net stop msiserver
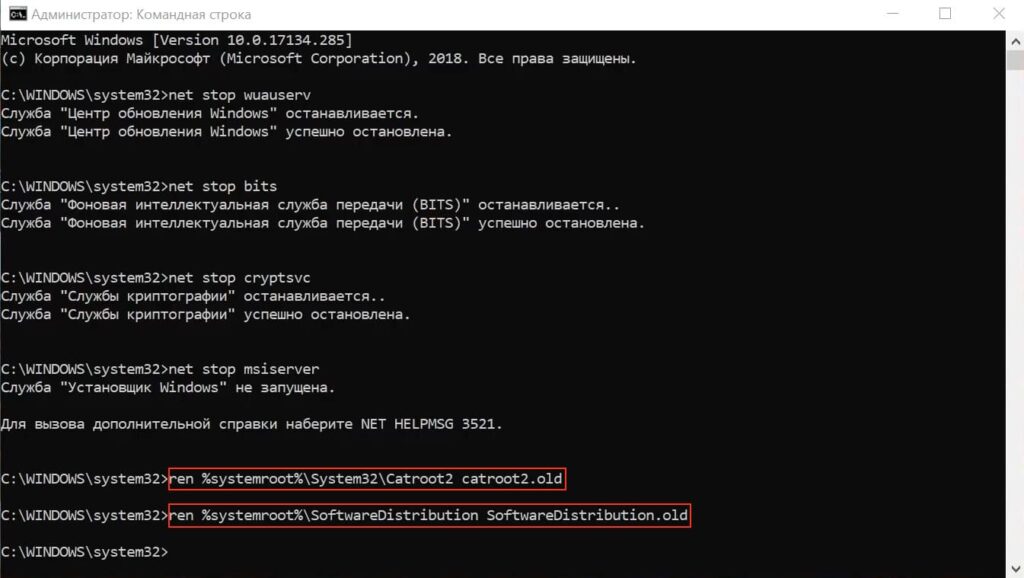
3. Переименовываем резервных копий папок и распространяемого ПО, вводя следующие команды:
ren %systemroot%\System32\Catroot2 catroot2.old
ren %systemroot%\SoftwareDistribution SoftwareDistribution.old
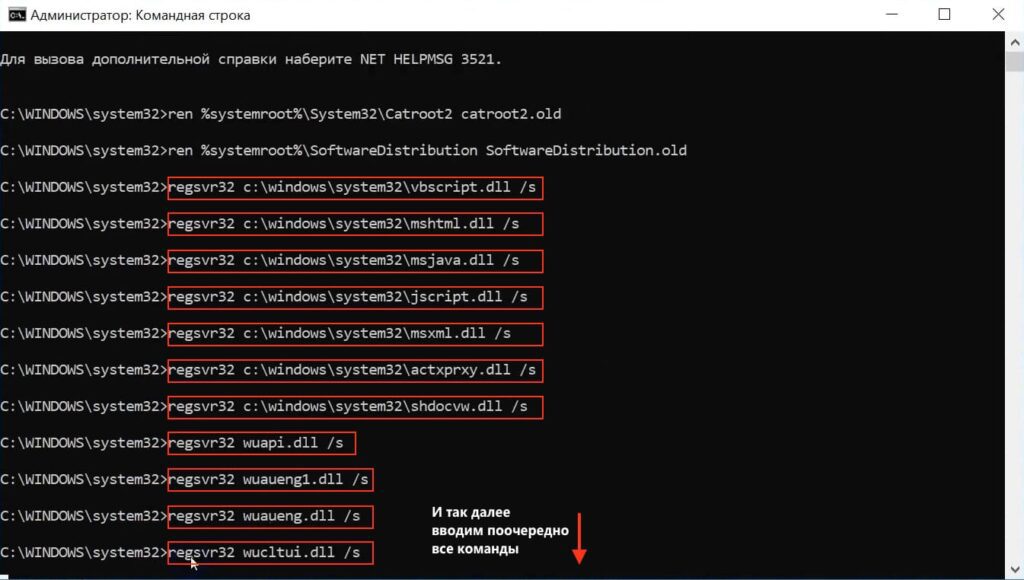
4. Повторно зарегистрируйте все службы BITS и Центра обновления Windows, вводя следующие команды поочередно:
regsvr32 c:\windows\system32\vbscript.dll /s
regsvr32 c:\windows\system32\mshtml.dll /s
regsvr32 c:\windows\system32\msjava.dll /s
regsvr32 c:\windows\system32\jscript.dll /s
regsvr32 c:\windows\system32\msxml.dll /s
regsvr32 c:\windows\system32\actxprxy.dll /s
regsvr32 c:\windows\system32\shdocvw.dll /s
regsvr32 wuapi.dll /s
regsvr32 wuaueng1.dll /s
regsvr32 wuaueng.dll /s
regsvr32 wucltui.dll /s
regsvr32 wups2.dll /s
regsvr32 wups.dll /s
regsvr32 wuweb.dll /s
regsvr32 Softpub.dll /s
regsvr32 Mssip32.dll /s
regsvr32 Initpki.dll /s
regsvr32 softpub.dll /s
regsvr32 wintrust.dll /s
regsvr32 initpki.dll /s
regsvr32 dssenh.dll /s
regsvr32 rsaenh.dll /s
regsvr32 gpkcsp.dll /s
regsvr32 sccbase.dll /s
regsvr32 slbcsp.dll /s
regsvr32 cryptdlg.dll /s
regsvr32 Urlmon.dll /s
regsvr32 Shdocvw.dll /s
regsvr32 Msjava.dll /s
regsvr32 Actxprxy.dll /s
regsvr32 Oleaut32.dll /s
regsvr32 Mshtml.dll /s
regsvr32 msxml.dll /s
regsvr32 msxml2.dll /s
regsvr32 msxml3.dll /s
regsvr32 Browseui.dll /s
regsvr32 shell32.dll /s
regsvr32 wuapi.dll /s
regsvr32 wuaueng.dll /s
regsvr32 wuaueng1.dll /s
regsvr32 wucltui.dll /s
regsvr32 wups.dll /s
regsvr32 wuweb.dll /s
regsvr32 jscript.dll /s
regsvr32 atl.dll /s
regsvr32 Mssip32.dll /s
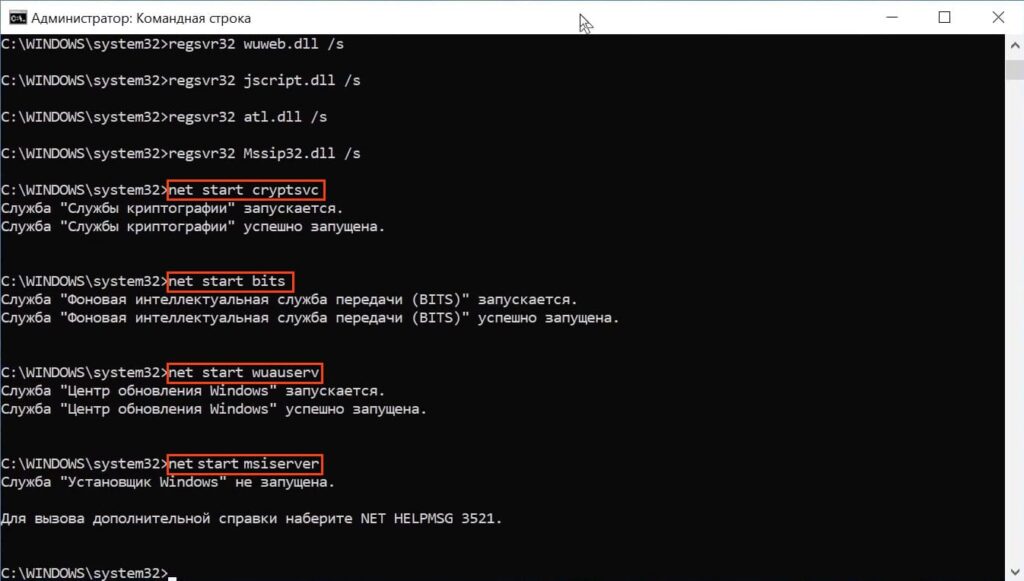
5. После перерегистрации запустите установленные раннее службы:
net start cryptsvc
net start bits
net start wuauserv
net start msiserver
Вариант 4. Восстановление системы
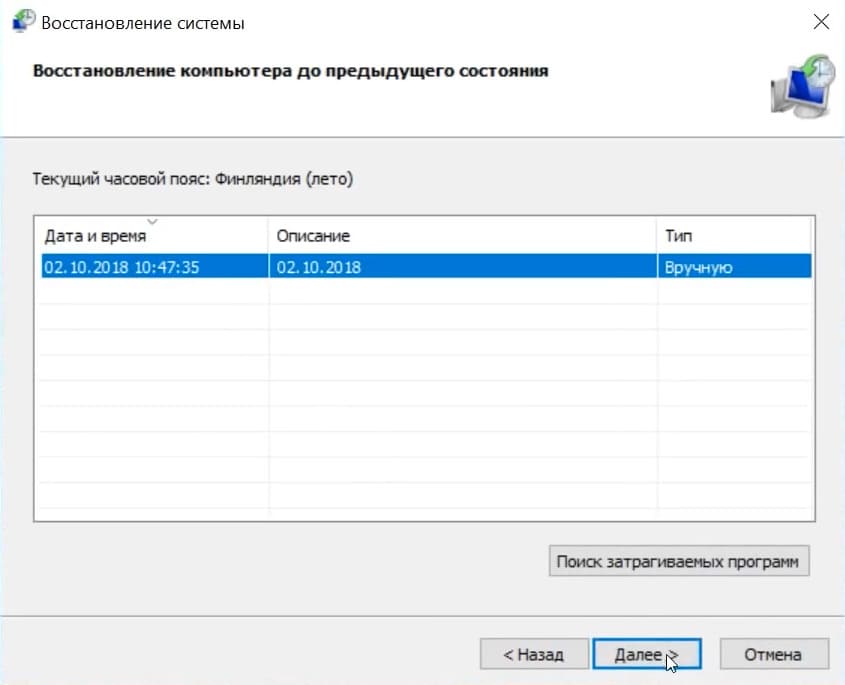
Примечание: Этот способ доступен, только если вы заранее создали точку восстановления в системе Windows.
1. Введите в поиске rstrui, запустите и следуйте инструкциям для выбора точки восстановления системы.
2. Нажимаем «Далее»

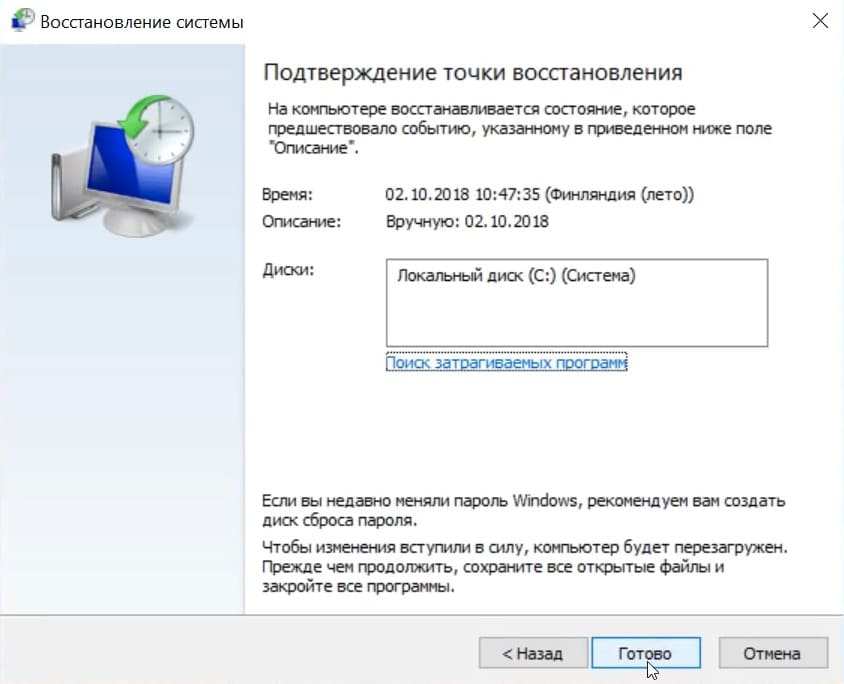
3. Выберите точку восстановления, после нажмите «Далее».
4. Нажимаем «Готово»
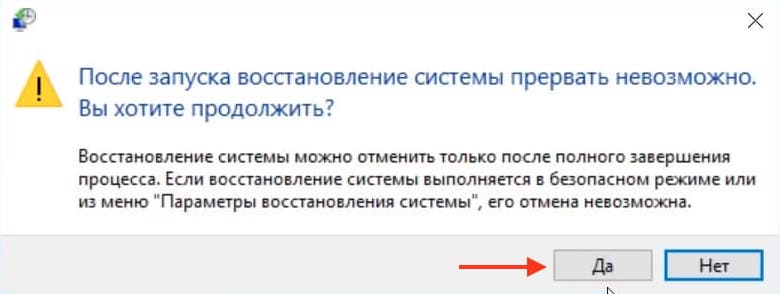
5. После чего появится предупреждение системы, что восстановление невозможно будет прервать. Нажимаем «Да».
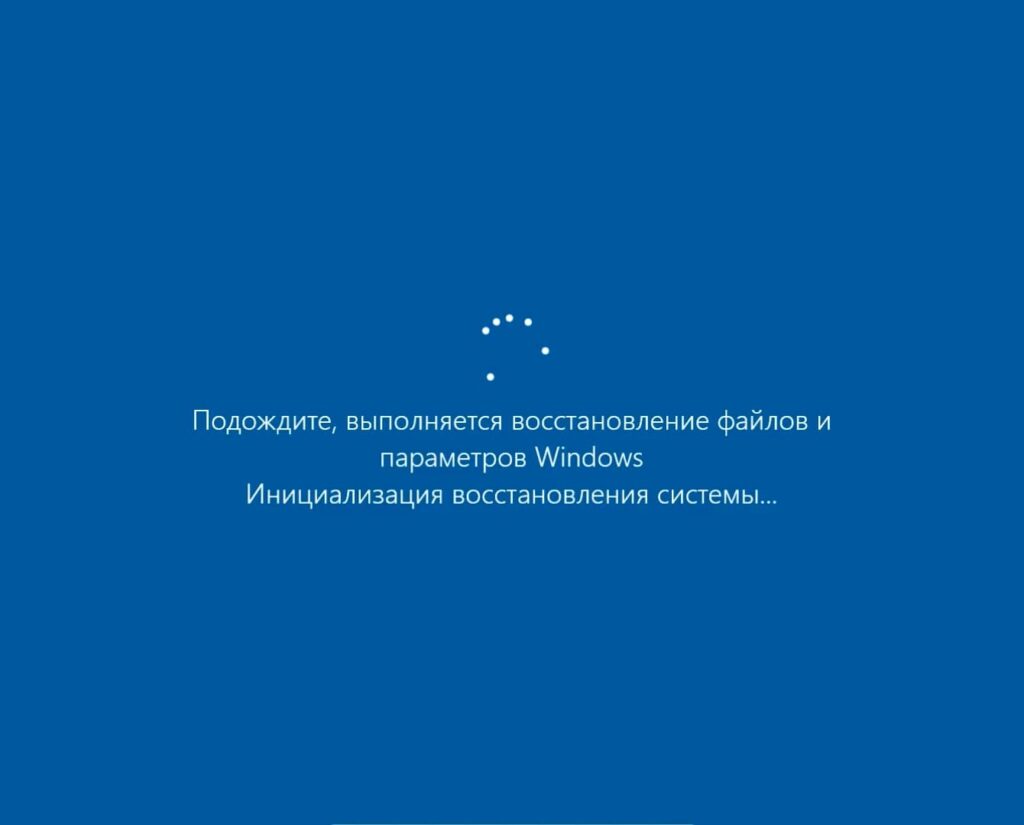
Далее компьютер автоматически перезагрузится, и начнется восстановление системы. Дождитесь окончания процесса.
Вариант 5. Использование инструмента DISM
Примечание: Для правильной работы этого инструмента, компьютер должен быть подключен к Интернету.
1. Откройте командную строку от имени администратора и выполните команду:
DISM.exe /Online /Cleanup-image /Restorehealth
Вариант 6. Использование функции устранения неполадок
1. Откройте «Параметры» => «Обновление и безопасность» => «Устранение неполадок».

2. Найдите «Центр обновления Windows» и запустите средство устранения неполадок.
3. Начнется поиск проблем и при их наличии, нажмите «Применить это исправление»


После чего все проблемы должны быть исправлены
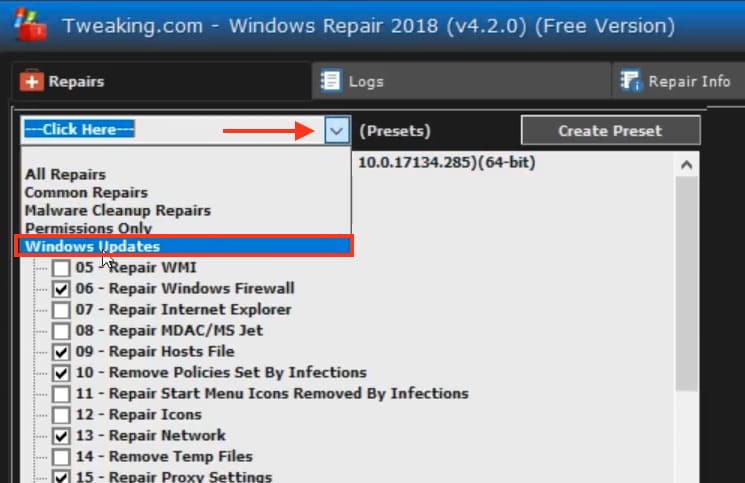
Вариант 7. Сторонняя утилита Windows Repair
Если встроенные утилиты не помогли, можно использовать бесплатную утилиту Windows Repair. Скачать её можно с официального сайта, либо по прямой ссылке.
1. Установите и запустите приложение
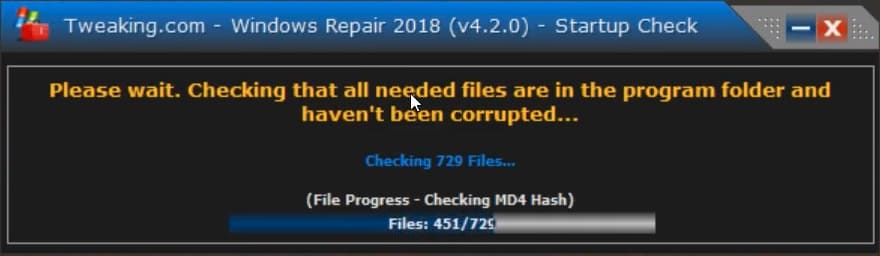
2. Перейдите на вкладку «Repairs», после нажмите «Open Repairs»

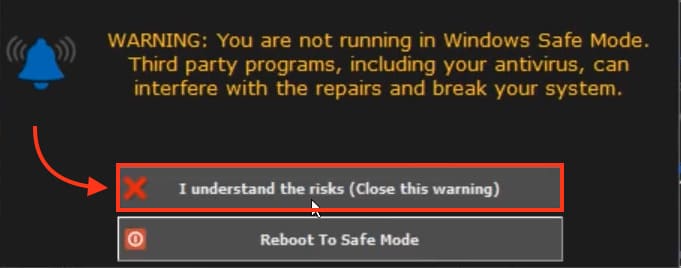
3. Далее вы увидите предупреждение, что вы запустили программу не в безопасном режиме и в таком случае сторонние приложения, включая ваш антивирус, могут помешать исправлению ошибок
Предупреждение можно закрыть, кликнув на «I understand this risks».
4. Из всплывающего меню, выбираете «Windows Updates»
5. Теперь нажимаете «Start Repairs»
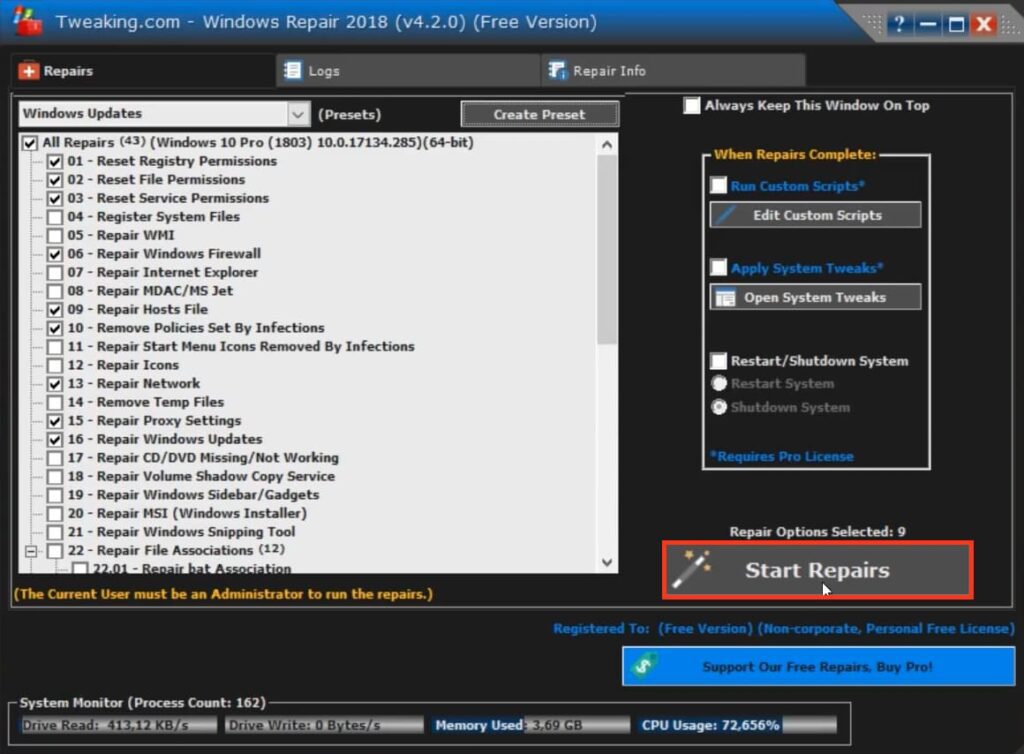
После чего начнется процесс исправление ошибок системы
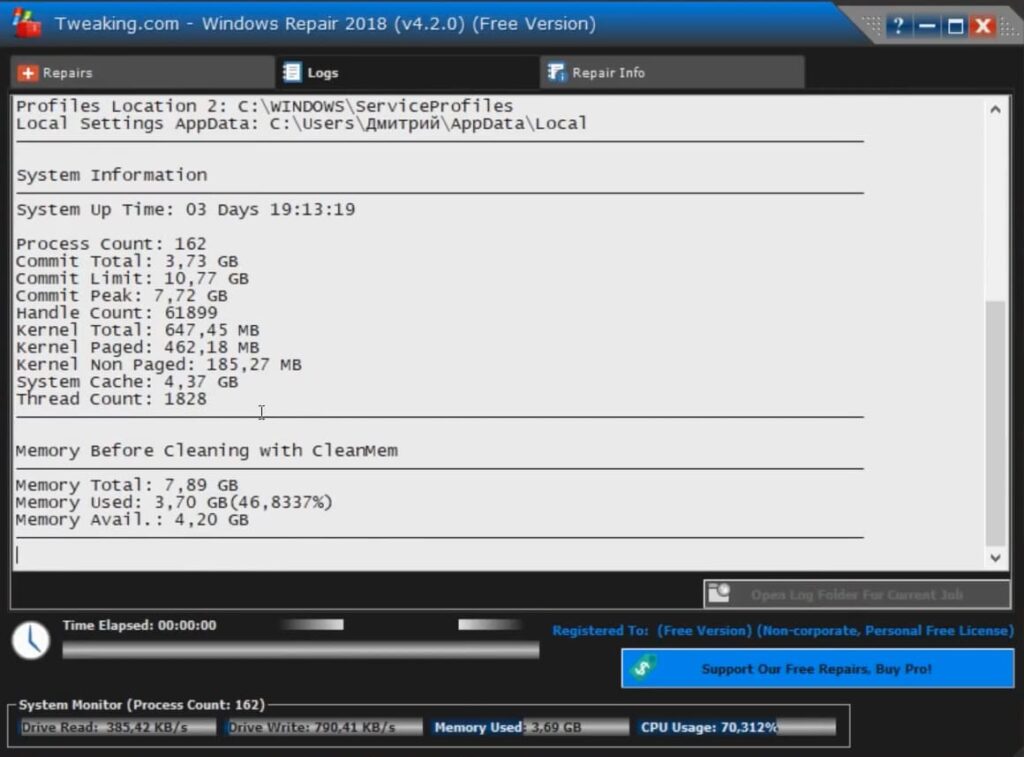
По завершению, вас попросят перезагрузить систему, для того чтобы изменения вступили в силу.
Дополнительные меры
Проверьте компьютер на наличие вирусов и вредоносных приложений, так как они также могут быть причиной возникновения ошибки.
Если все перечисленные способы не помогли, остаётся только переустановка системы или сброс настроек.
Напишите в комментариях, какой из способов вам помог решить проблему и какие ещё способы вы знаете.