
Использование операционных систем Windows 7 и Windows 10 дает возможность пользователю выполнять сложные задачи, работать с файлами, создавать контент. Тем не менее, пользователи часто становятся свидетелями тех или иных ошибок. Распространенной считается ошибка 0x80070091, она появляется при попытке удаления файлов на внешнем HDD или системном диске компьютера. При попытке удаления появляется уведомление о том, что произошла непредвиденная ошибка. Сообщение также указывает, что папка не пуста и выдает код ошибки в виде 0x80070091. Мы разобираемся в том, почему система не удаляет папку 0x80070091 и как можно исправить эту ошибку.
Причины ошибки 0x80070091 в Windows 7, 10
Нет одной определенной причины того, почему данная ошибка появляется при удалении той или иной папки. Это может свидетельствовать о том, что системные файлы повреждены, что в операционной системе есть вирусы или стороннее программное обеспечение блокирует доступ к файловой системе. Несмотря на всю серьезность и количество возможных причин, проблема решается, пользователи могут сделать это самостоятельно, не прибегая к услугам сервисных центров. Есть несколько способов того, как удалить папку и решить возникшую проблему.
Как удалить папку при ошибке 0x80070091?
Если не удалось удалить папку 0x80070091 и ошибка появляется постоянно, то следует изначально сделать простые шаги по решению. Прежде всего, есть смысл в том, чтобы попробовать переименовать папку и перезагрузить систему. Часто после этих действий проблема решается. Такой способ решения актуальный в том случае, если поломка происходит только лишь с одной определенной папкой. Если проблема носит массовый характер по всей системе, то здесь нужен более серьезный подход. Следует перейти к способам решения проблемы ниже.
Способ 1: запускаем проверку системы на наличие ошибок
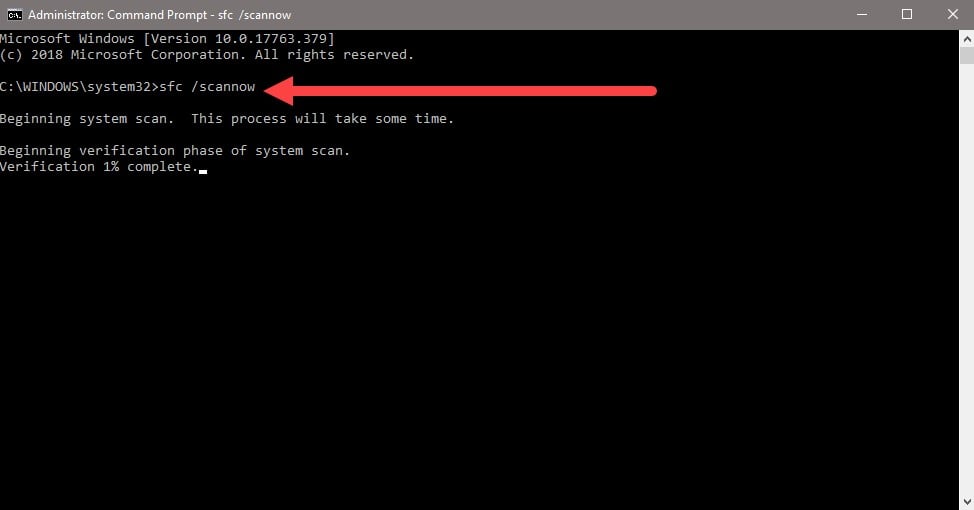
В большом количестве случаев такая ошибка появляется именно по причине того, что в файловой системе возникают ошибки. Благо в операционной системе Windows есть встроенный функционал для запуска проверки система на наличие ошибок. Данный инструмент позволяет проверить систему на наличие ошибок и если они есть, то исправить неполадки в автоматическом режиме. Способ решения довольно простой, поэтому рекомендуется начать именно с него. Чтобы произвести проверку системы на ошибки, необходимо выполнить следующие действия:
- Запустить командную строку с правами администратора.
- Ввести команду sfc /scannow и нажать Enter.
- Ожидать окончания полной проверки системы.
Процесс может быть довольно длительный, все зависит от производительности ПК и состояния операционной системы файлами. После того как проверка будет закончена, необходимо перезагрузить Windows и попытаться удалить ту папку, которая ранее выдавала ошибку. Если удаление произошло успешно и без дополнительных проблем, то можно просто эксплуатировать систему. Если же ошибка снова появилась, то необходимо перейти к следующему пункту для решения.
Способ 2: сканируем диск через chkdsk
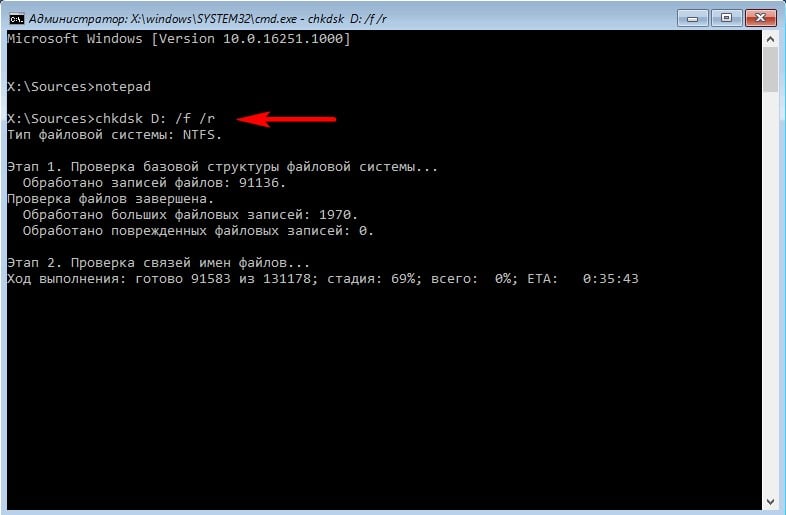
В системе Windows есть еще один встроенный инструмент для проверки файлов и их восстановления. Это более серьезная функция, которая срабатывает при очередной перезагрузке и проверяет все файлы на наличие повреждений. Если запустить правильную команду, то инструмент не просто будет находить саму проблему, но и устранит ее. В большинстве случаев именно проверка через chkdsk дает положительный результат. Данная проверка решает множество системных проблем, ее часто запускают тогда, когда появляются торможения или ошибки во время работы. Чтобы выполнить сканирование chkdsk, необходимо выполнить следующие действия:
- Зайти в командную строку с правами администратора.
- Ввести команду chkdsk /f /r С: (где буква С: это тот диск, который нужно проверить. Посмотрите предварительно, какую букву получил переносной диск, если проблема возникла на нем).
- Если появится сообщение о том, что невозможно выполнить проверку на этом томе, то нажмите «Y», чтобы отключить его и запустить проверку.
- После того как проверка начнется, необходим ожидать ее окончания и загрузки системы, если проверяется системный диск.
Данная проверка может отнимать довольно много времени, если речь идет о диске большого объема со множеством файлом. Но при этом инструмент позволит найти проблемы, восстановит их и создаст отчет, где по желанию можно будет все изучить. Если это не помогло в решении и ошибка продолжает появляется при попытке удаления папки, то следует перейти к следующему способу.
Способ 3: удаляем вирусы
Нередко именно вирусы в операционной системе являются причиной возникновения подобных проблем. Стороннее ПО попросту вмешивается в работу системы, отбирает у пользователя права на удаление или редактирование файлов. Возможно, именно та папка, которую не удается удалить, является зараженной. Вирус мог попасть в систему разными способами, необходимо решать проблему исходя из того, что уже есть. Самым простым решением будет проверка Windows на вирусы. В Windows 10 есть встроенное антивирусное ПО с очень хорошими показателями. Необходимо зайти в «Защитник Windows», после чего выбрать там пункт «Проверка всей системы на наличие вирусов».
Следует помнить о том, что антивирусные базы не должны быть устаревшими, защитник должен быть официальным и поддерживаться разработчиком. После того как программа найдет вирусы, их необходимо удалить. Если это невозможно сделать сейчас, то программа предложит выполнить удаление сразу после перезагрузки. По завершению проверки необходимо обязательно перезагрузить компьютер и попробовать удалить папку, которая ранее не поддавалась этому действию.
Способ 4: используем чистую загрузку Windows
Проблема может скрываться также в сторонних драйверах и программах, которые пользователь самостоятельно установил ранее. Перед тем как удалять все подряд и пытаться таким способом решить проблему, необходимо понять, действительно ли она в этом. Для того чтобы выполнить диагностику, изначально необходимо произвести чистую загрузку Windows. После такой загрузки в системе будут отключено все стороннее ПО, в том числе установленные ранее программы и драйвера. Если после такой загрузки ошибка 0x80070091 больше не появляется, то это уже говорит о том, что проблема найдена. Чтобы выполнить чистую загрузку, выполните следующие действия:
- Запустите командное окно «Выполнить», для этого зажмите клавиши Win + R.
- Введите в окне команду msconfig для входа в системные настройки.
- Перейдите на вкладку «Службы» и выберите там «Скрыть все службы Майкрософт», а потом установите галочку напротив «Отключить все».
- Следуйте в раздел «Запуск», после чего кликните по «Открыть диспетчер задач».
- Поочередно выберите каждый элемент запуска и отключите его.
- Нажмите «ОК» и согласитесь с требованием перезагрузить систему.
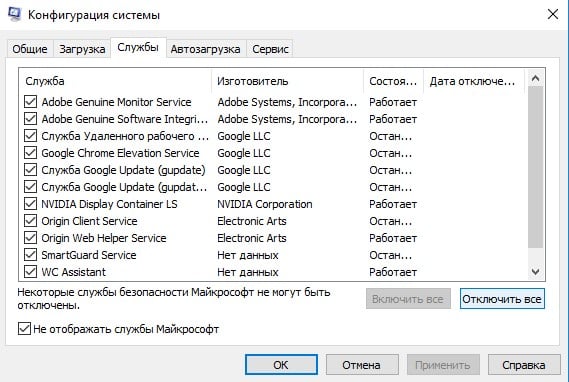
Запуск чистой ОС возможен в Windows 7, 8, 10, после перезагрузки можно будет попробовать убрать папку. Если положительный результат появился, то нужно искать программное обеспечение, которое работает мешает при стандартном запуске операционной системы.
Как можно заметить, самостоятельно решить проблему возможно. Если возникает ошибка 0x80070091 и не получается удалить папку, то необходимо просто попробовать применить вышеперечисленные способы. С этой задачей может справиться даже новичок, который ранее никогда не углублялся в системные настройки своей ОС.
,
If you cannot delete a folder because of error 0x80070091 «The directory is not empty» continue reading below to fix the problem.
Problem in details: When you try to remove a folder, you get that «the folder is not empty», even if it is empty, with error:
1 Interrupted Action
A unexpected error is keeping you from deleting the folder. If you continue to receive this error, you can use the error code to search for help with this problem.
Error 0x80070091: The directory is not empty.

The errors «directory is not empty», «cannot find the file specified», «cannot read from the source file or disk» & «you need permissions to delete a folder/fire», when trying to delete a file or folder, usually indicates a problem with the hard disk, or a permissions problem on the file/folder. To fix these problems, follow the methods below.
How to FIX Error 0x8007009. The directory is empty.
* Note: Before you continue to the methods below, see if you can delete the folder/file in Windows Safe Mode.
- Archive the Folder/File & Delete it.
- Modify Folder/File Owner & Delete it.
- Delete Folder/File with in Command Prompt.
- Check & Repair Disk.
- Delete Folder/File from WinRE.
Method 1. Fix «directory is not empty» by Compressing and Deleting the Folder/File.
The easiest method to remove a folder/file that cannot be deleted, is by compressing it to a archive with WinRAR or the 7-ZIP archiver and deleting it after the compression. To delete a file or folder that cannot be deleted with WinRAR:
1. Download and install WinRAR (if you haven’t already) and during installation choose to install the Legacy context menus.

2. Right-click on the folder/file that you cannot remove and select 7-Zip > Add to archive.

2. At Archive parameters, select to Delete files after archiving and click OK. Then, ask YES to confirm your decision.
")
3. Normally the problematic folder/file will be deleted. Proceed to delete also the created WinRAR archive and you’re done!

Method 2. Modify the Owner of the Folder/File and Delete it.
Another method to resolve the issues mentioned in this post, is to change the owner of the folder or file you are having the problem with, and then delete it. To do that:
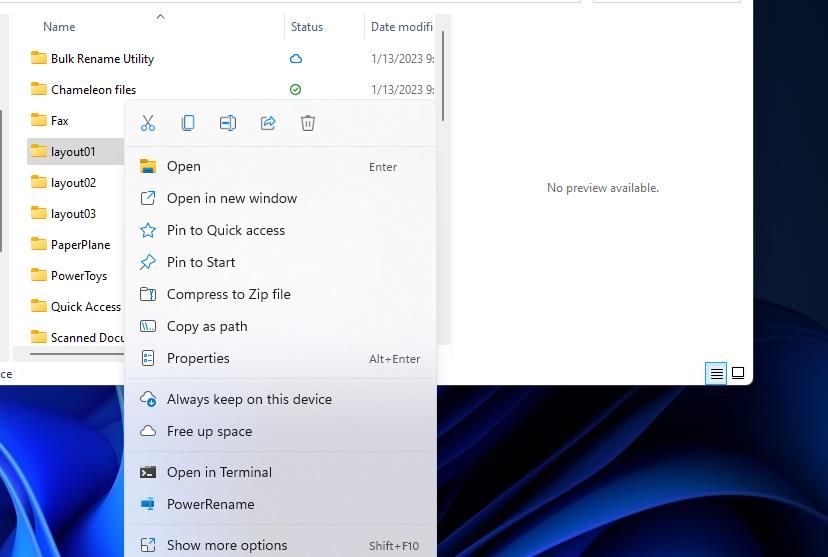
1. Right click at the folder or file that you cannot delete and select Properties.
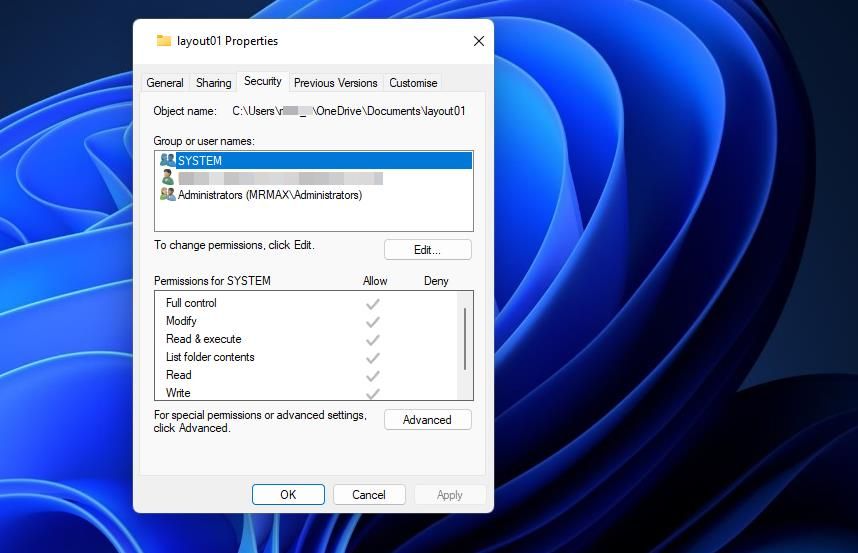
2. Select the Security tab and click Advanced.
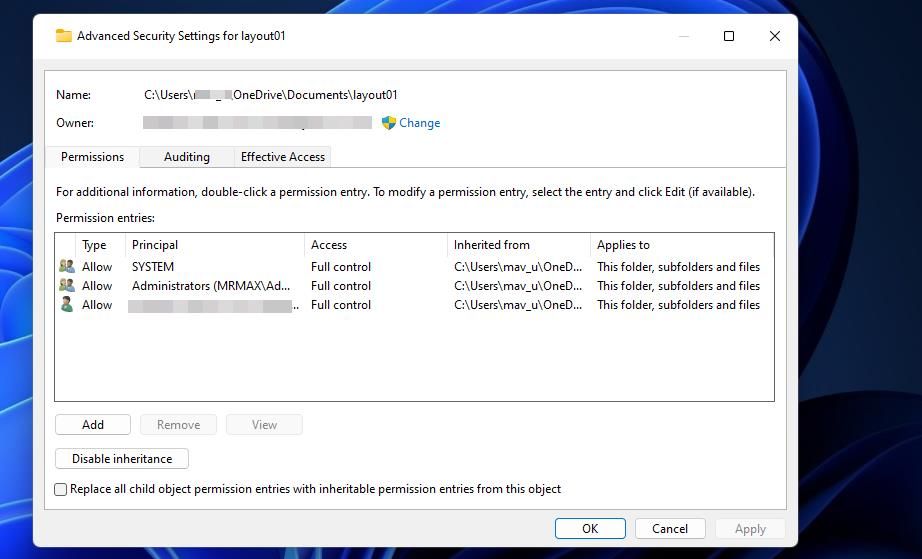
3. Click Change Owner.

4. Type your account username (e.g. «User2») and click OK.

5. Check the «Replace owner on subcontainers and objects» checkbox and click Apply > OK. Then click OK again to close security settings.

6. Now delete the problematic folder/file.
Method 3. Take Ownership and Delete the Folder/File from Command Prompt.
The next method to solve the problems «Cannot Delete File: The Directory is not empty», «Cannot find the file specified» and «You need permissions to delete the folder», is to change the ownership of the file or folder and then to delete it from Command Prompt.
To Delete a FOLDER that cannot be deleted with Command Prompt:
1. Open Command Prompt as Administrator.
2. Take the ownership permissions of the folder that you want to delete, by typing this command:
- takeown /F «Full_Path_Folder_Name» /r /d y
* For example if you want to delete the folder «C:\Folder1», the command will be:
- takeown /F «C:\Folder1» /r /d y
3. Then give this command to take full control permissions at the folder that you want to delete:
- icacls «Full_Path_Folder_Name» /grant Administrators:F /t
* For this example the command will be:
- icacls «C:\Folder1» /grant Administrators:F /t
4. Finally type the following command to delete the folder:
- rd «Full_Path_Folder_Name» /S /Q
* For this example the command will be:
- rd «C:\Folder1» /S /Q

To Delete a FILE that cannot be delete with Command Prompt:
1. In File Explorer Options uncheck the Hide extensions for known file types.
2. Notice the name of the file that you want to delete and its extension. (e.g. «File1.txt»)

3. Now, open Command Prompt as Administrator.
4. Take the ownership on the file that you want to delete, by typing this command:
- takeown /F «Full_Path\Filename.extension«
* For example if you want to delete the file «C:\File1.txt», the command will be:
- takeown /F «C:\File1.txt»
5. Then change the permissions on the file by giving this command:
- icacls «Full_Path\Filename.extension» /grant YourUsername:F
* For example, if your Username is «User2» and want to change the permissions in file «C:\File1.txt», the command will be:
- icacls «C:\File1.txt» /grant User2:F
6. Finally delete the file, with this command:
- del «Full_Path\Filename.extension«
* For example, to delete the «C:\File1.txt» file, the command will be::
- del «C:\File1.txt«

Method 4. Check and Repair Disk.
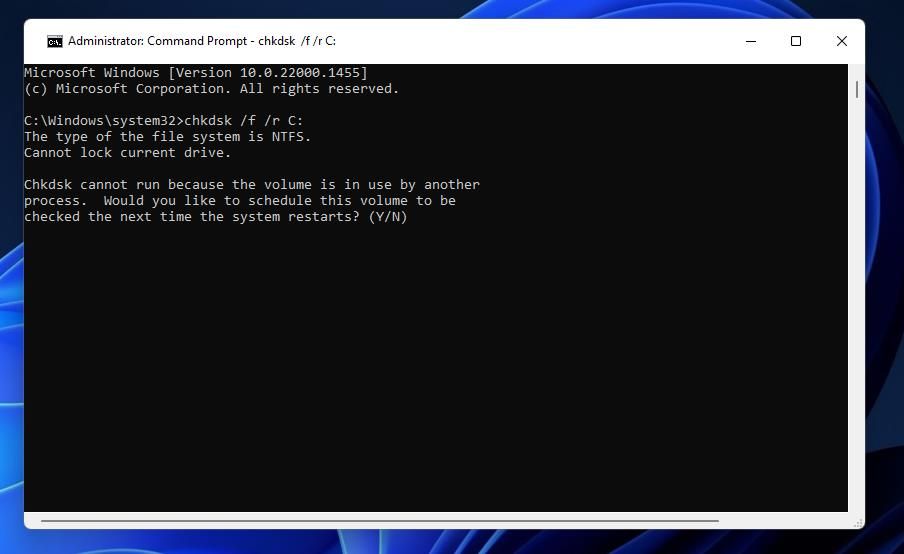
The final method to fix the error 0x80070091 or to solve other problems when deleting a folder/file, is to check the hard disk for errors and to repair them, using the CHKDSK command. To do that:
1. Launch Command Prompt as Administrator.
2. In the command prompt, type the command below and press Enter.*
- chkdsk X: /x /r
* Where X = the drive letter of the disk with the problematic folder or file. For example, if the folder/file is located on disk «C», the command will be:
- chkdsk C: /x /r
3. If you get the prompt to schedule the disk check the next time the system restarts. Press Y (to select Yes) and restart your device to scan and repair the disk errors.

4. When restarting, let Windows complete the disk checking and repairing process and be patient as it will take a long time.
5. Finally, after entering to Windows proceed to delete the file/folder.
Method 5. Delete Folder/File from WinRE.
If you fail to delete a folder or file using the above methods, restart Windows in Windows Recovery Environment and delete the folder/file from there. To do that:
1. Hold down the SHIFT key on your keyboard and with your mouse go to Power > and click Restart.

2. After restart, go to Troubleshoot > Advanced Options > Command Prompt.

3. In command prompt type notepad and press Enter.

4. From the File menu, select Open.

5. Change the Files of type to All Files and then click This PC.

6. Navigate to the location of the folder/file that you want to delete, right-click on it and choose Delete.

7. Now, right-click on an empty space and choose Refresh to ensure that the folder/file is deleted.

8. When done, close all windows and click Continue to Windows 10.
That’s it! Which method worked for you?
Let me know if this guide has helped you by leaving your comment about your experience. Please like and share this guide to help others.
If this article was useful for you, please consider supporting us by making a donation. Even $1 can a make a huge difference for us in our effort to continue to help others while keeping this site free:
- Author
- Recent Posts
Konstantinos is the founder and administrator of Wintips.org. Since 1995 he works and provides IT support as a computer and network expert to individuals and large companies. He is specialized in solving problems related to Windows or other Microsoft products (Windows Server, Office, Microsoft 365, etc.).
Даже новички в компьютерном деле знают, что, если в среде Windows не удаляются папка или файл, значит, нужно либо закрыть использующий их активный процесс (или программу), либо прибегнуть к помощи программ-разблокировщиков типа Unlocker или LockHunter. Однако не всегда таким способом можно удалить неудаляемые данные. Например, когда при их удалении появляется уведомление:
Ошибка 0x80070091 Папка не пуста

{banner_google1}
Однако в данном случае папка как раз таки и была пустой. Из неё без проблем удалилось всё её содержимое, но сама она отправляться в корзину не хотела никак. Такая системная ошибка ещё и может приводить к подвисанию операционной системы. Как удалить проблемный объект в этом случае?
Ошибка 0x80070091 не даст удалить объект ни одним из традиционных способов борьбы с неудаляемыми данными. Не помогут:
- Ни переименование;
- Ни программы-разблокировщики;
- Ни шредер данных;
- Ни полный доступ (с правами TrustedInstaller);
- Ни даже загрузка с внешнего носителя типа LiveDisk.
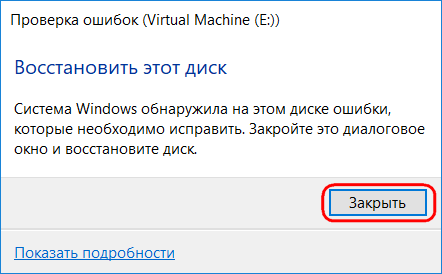
Ошибка 0x80070091 связана с проблемами файловой системы. А таковые решаются с помощью штатного средства проверки дисков Windows. Открываем окно свойств раздела диска, на котором находится неудаляемый объект. Во вкладке «Сервис» жмём «Проверить».
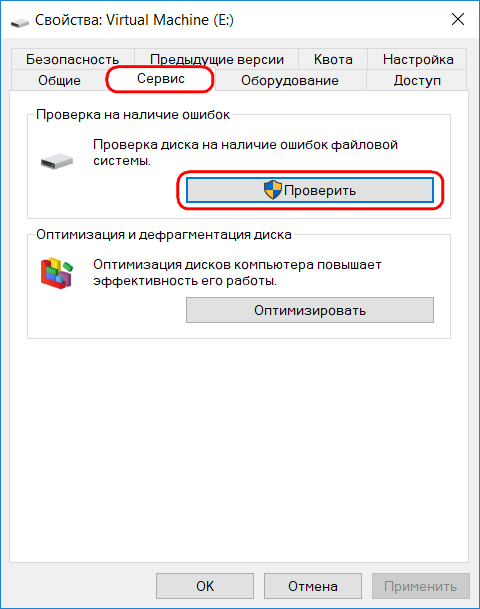
Windows обнаружила ошибки. Жмём «Закрыть».
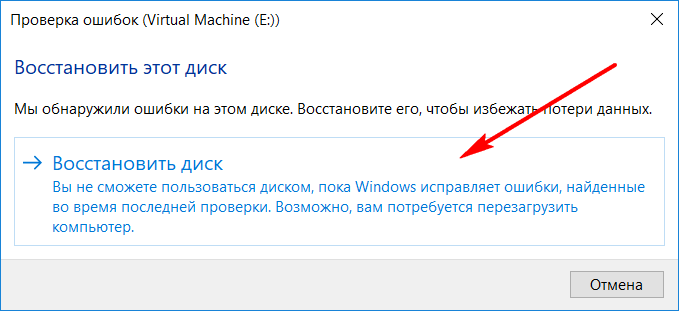
В следующем окне кликаем на единственный возможный вариант «Восстановить диск».
Далее – «Восстановить».
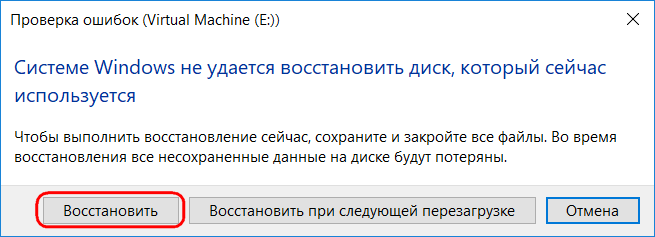
Восстановление прошло успешно. В нашем случае проблемная папка размещалась не на диске (C:\), потому не потребовалось даже перезагрузки компьютера.
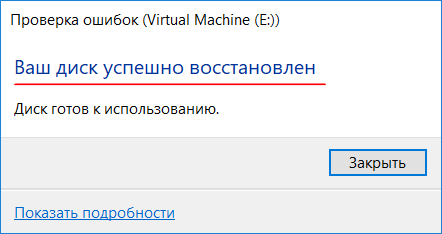
Теперь неудаляемый ранее объект можно удалить обычным способом.
Several users reported getting an error Directory is not empty, error 0x80070091 when attempting to delete a folder inside Windows Explorer. Sometimes, you may also see an error message that reads the following –
The directory is not empty," and you can't delete the folder
Though it is stated in the error message that the directory is not empty, the folder may or may not contain any files. In either case, it is not related to whether there are files or not inside a directory but rather the folder itself is corrupt or contains some faulty files inside it.

Related Post: How to Fix System Restore Error 0x80070091 on Windows 11/10
Now that you know what an error 0x80070091 is, and when it occurs, let’s learn the reasons why it appears, and how to overcome this issue.
1. Rename the directory
When you are unable to open a directory, you may either delete or rename that particular directory. However, in case you don’t have the required permission to perform such tasks on a specific folder, you may launch Command Prompt having admin rights and then execute this code on it.
rmdir /s "folder path"
Note: Make sure to replace the folder path in the above command with the exact folder location inside your Windows PC. For example, rmdir /s C:\Users\username\FolderName.
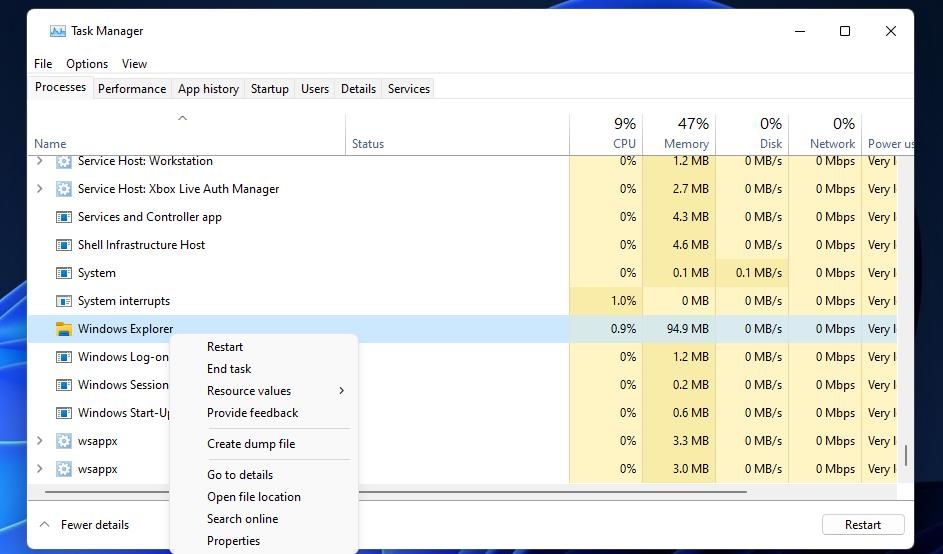
2. Restart Windows File Explorer
At times, you may resolve such errors by simply restarting the File Explorer. For this open Task Manager by pressing Ctrl + Shift + Esc. Locate Windows Explorer under Processes, right-click on it, and select Restart.

Wait for the File Explorer to launch again and when it does happen, check if you can access the directory without any error code 0x80070091.
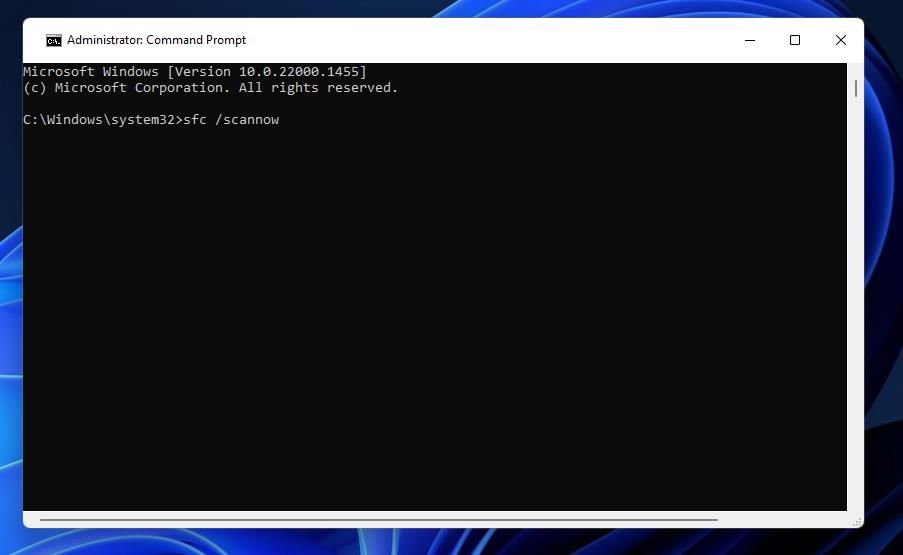
3. Use System File Checker
Missing or corrupt system files and folders may also cause an error “The directory is not empty” 0x80070091 on your computer. If that’s the case, you may use System File Checker and initiate the SFC scan over it.
- Launch CMD as administrator first and execute the below code on it.
sfc /scannow

- Wait for the next 10-15 minutes to let this task complete 100%.
After the SFC scan is over, restart your PC, and check if the error 0x80070091 resolves this way.
4. Check for bad sectors in your HDD
The presence of faulty or bad sectors on your hard disk may also result in this “The directory is not empty” error on your Windows PC. Whether your hard disk is corrupt or not, you may confirm the same by running the Check DISK tool.
Here’s how –
- Press Windows + X, and select Terminal (Admin).
- Use Ctrl + Shift + 2 to launch Command Prompt inside the terminal.
- Copy/paste the following on it and press the Enter key.
chkdsk C: /f /r

- If the root drive differs in your case, replace C: with your actual drive letter.
- Since the root drive is already in use, the CHKDSK command will not initiate.
- Instead, this prompts whether you want to schedule the command when your PC restarts.
- Type Y and press Enter.
Close the CMD window and restart your PC. The CHKDSK will soon resume and start inspecting your hard disk. Wait for this scan to complete and when this is over, you will get to know whether your hard drive is OK or not.
Which Services You Can Safely Disable on Windows 11
5. Get the required Permissions and delete the folder
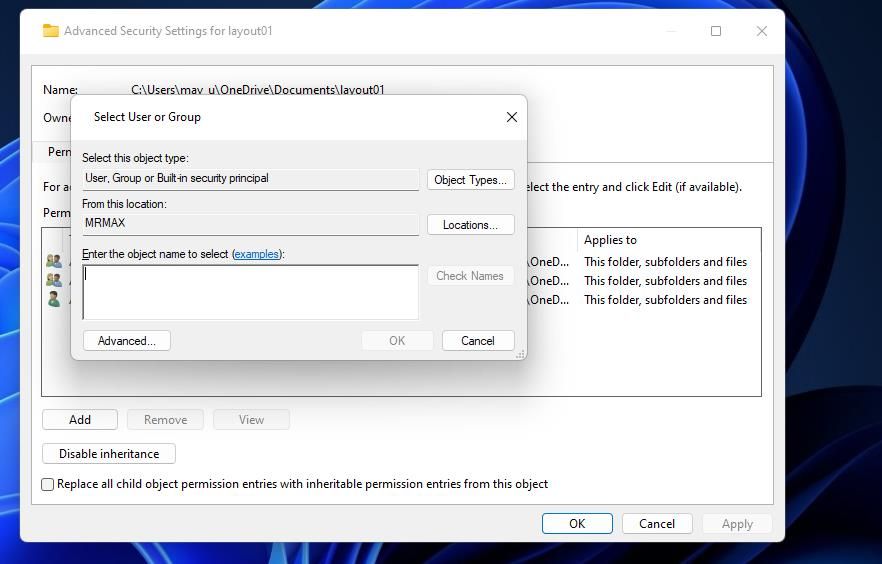
If your hard disk is all good, the 0x80070091 error must be occurring due to not having proper rights over the required folder. Well, in that case, you may get all the required permissions and delete the folder afterward.
- Navigate to the folder containing the directory that is not empty.
- Right-click on the affected folder, and select Properties.
- Go to the Security tab and click Advanced.
- Click Change next to the owner’s name.
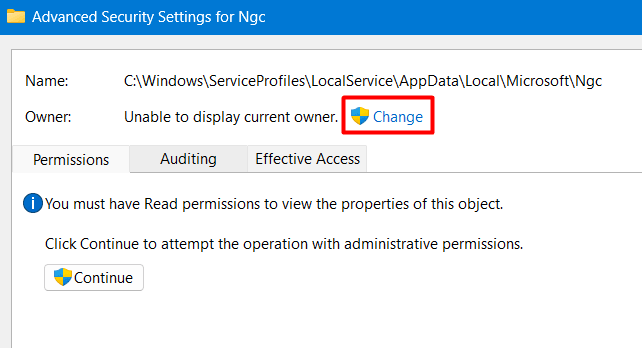
- Enter your Windows user account name, Check Names, and hit OK.
- Select “Replace owner on subcontainers and objects.”

- Click Apply and then OK in Advanced Security Settings.
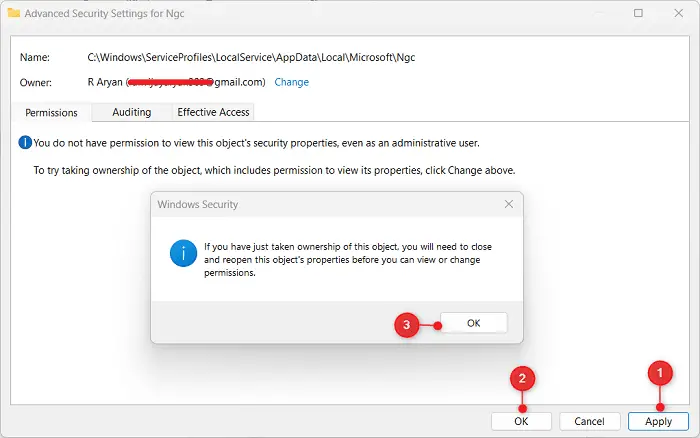
- Click OK to confirm taking ownership of an object.
Close all opened tabs and windows and restart your computer. From the next login, you must be able to delete or rename the directory which was earlier not happening.
Disable Antivirus to Fix Error 0x80070091
Hopefully, the error 0x80070091 must have been resolved by now. If not, this must be due to some security applications interfering with the basic operations in Windows. If that’s the case, you should uninstall third-party antivirus or disable Windows Security (if using it).
In case this does solve the error 0x80070091 on your Windows PC, there must be some malware or viruses on your PC. Well, to resolve the same, you may initiate the Full Scan using Windows Defender or any other antivirus program that you use on your PC.
Error 0x80070091 is a File Explorer issue that occurs for some users when they try to delete folders in Windows 11/10. The error message says, “The directory is not empty,» and you can’t delete the folder that throws the error.
The 0x80070091 message suggests that the error occurs because a folder isn’t empty. Yet, you should be able to erase directories that contain files without any issues. Furthermore, that error can also arise for empty folders. If you’re seeing the same folder error 0x80070091 in Windows, try applying these potential fixes.
1. Try Erasing the Folder With the Command Prompt
The Command Prompt gives users another way to delete folders in Windows 11/10. So, you might be able to erase an affected folder without issues by using the Command Prompt. Using the Command Prompt might be more of a workaround, but at least you’ll get the folder deleted if works.
Run Command Prompt with elevated (administrative) rights. Our guide about running Command Prompt as an administrator includes numerous methods for launching that app. Then input this command and press Enter to delete an affected folder:
rmdir /s "folder path"
You’ll need to replace folder path in that command with the location of whatever directory you need to delete. The location should include a drive letter and a full path for the directory like in this example:
rmdir /s "C:\Users\New folder"

2. Restart Windows File Explorer
Restarting File Explorer can resolve issues that occur with that file manager. However, closing and reopening the Explorer window doesn’t restart the file manager. You’ll need to restart the Explorer process via Task Manager like this:
- To view Task Manager, press Ctrl + Shift + Esc simultaneously.
-
Select File Explorer on the Processes tab.

- Press the Restart button for the selected Explorer process.
3. Scan System Files With an SFC Scan
Error 0x80070091 can be caused by some corrupted system files that need repairing. Running an SFC scan might both detect and repair corrupted system files and fix error 0x80070091 in the process. You can scan with SFC as instructed in our post for running the System File Checker tool.
4. Check for Errors With a Disk Scan
The 0x80070091 error is often due to corrupted or bad hard drive sectors. A lot of users have said they’ve resolved that issue by using the Check Disk (CHKDSK) utility for repairing bad drive sectors. This is how you can check for and repair bad sectors with Check Disk:
- Open up the Command Prompt window with administrative rights.
-
Type in this Check Disk command and press Enter:
chkdsk /f /r C: -
Press Y to schedule the scan for a restart.

- Click Start and select Power > Restart to reboot.
If the folder the 0x80070091 error occurs for isn’t on the C: drive, you’ll need to modify the above command. Replace C: with the letter of the storage drive that includes the affected folder.
5. Modify the Affected Folder’s Permissions
Error 0x80070091 can arise because of insufficient folder permission. You might need to set an affected folder to full permission to resolve error 0x80070091. To do that, change the folder’s permission settings as follows:
-
Open Explorer and right-click the affected folder to select Properties.

- Click the window’s Security tab.
-
Next, press the Advanced button.

-
Click Change beside the owner’s name.

-
Enter your Windows user account name inside the object name text box.

- Then select the Check Names option and OK.
- Click Replace owner on subcontainers and objects to select that setting.
- Press the Advanced Security Settings window’s Apply and OK buttons.
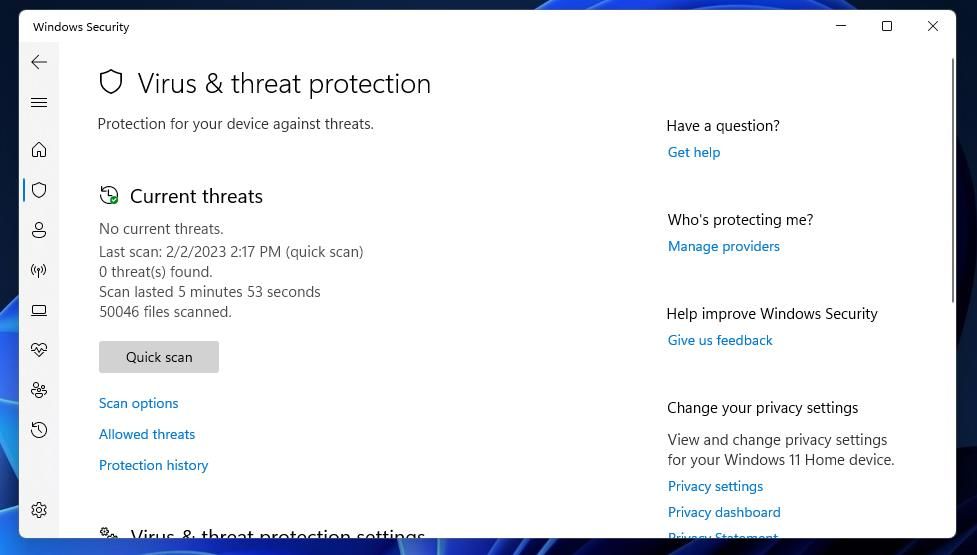
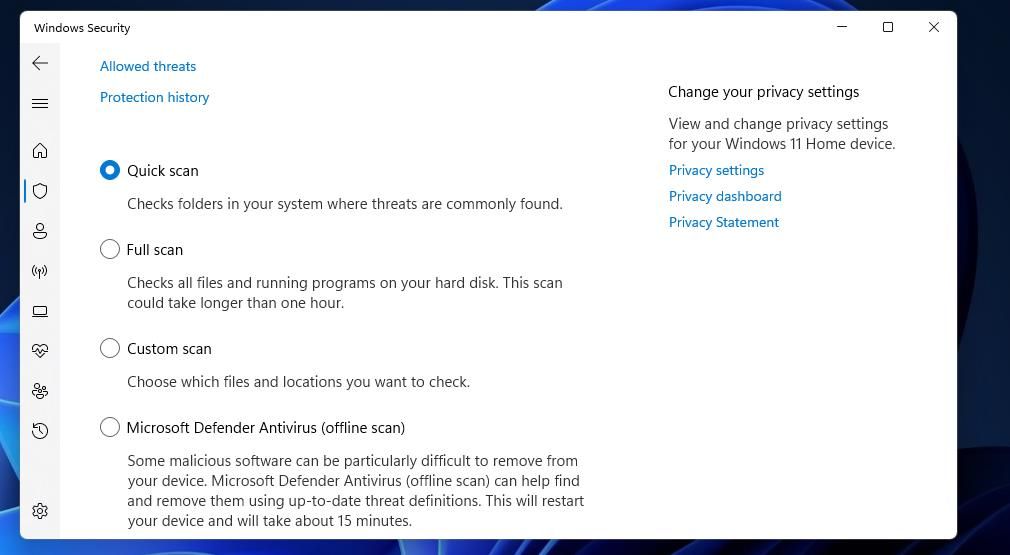
6. Run an Antivirus Scan
Malware could also feasibly be causing error 0x80070091 on your PC. If you’re still trying to fix that issue after going through all the potential fixes above, run an antivirus scan with Windows Security or alternative third-party software. This is how to run a scan with the Windows Security app.
- Double-click a Windows Security (shield) icon in the system tray part of the taskbar.
-
Click Virus & threat protection > Scan options to view all options for scanning.

-
Select the most thorough Full Scan option, which could take more than an hour to finish.

- Press Scan now to start the antivirus scanning.
- Then wait to see if the scan detects anything, and select Remove if it does.
- Click Start actions to apply.
Delete Your Folders in File Explorer Again With These Fixes
You’ll probably be able to delete the folders for which error 0x80070091 occurred after applying those potential solutions. If that error persists, the Windows registry on your PC could be corrupted. To resolve such registry issues, you might need to perform a system restore or even reset Windows 11/10.