
Все способы:
- Способ 1: Встроенное средство устранения неполадок
- Способ 2: Очистка кеша обновлений
- Способ 3: Обновление драйверов
- Способ 4: Диагностика HDD-диска
- Способ 5: Восстановление системных файлов
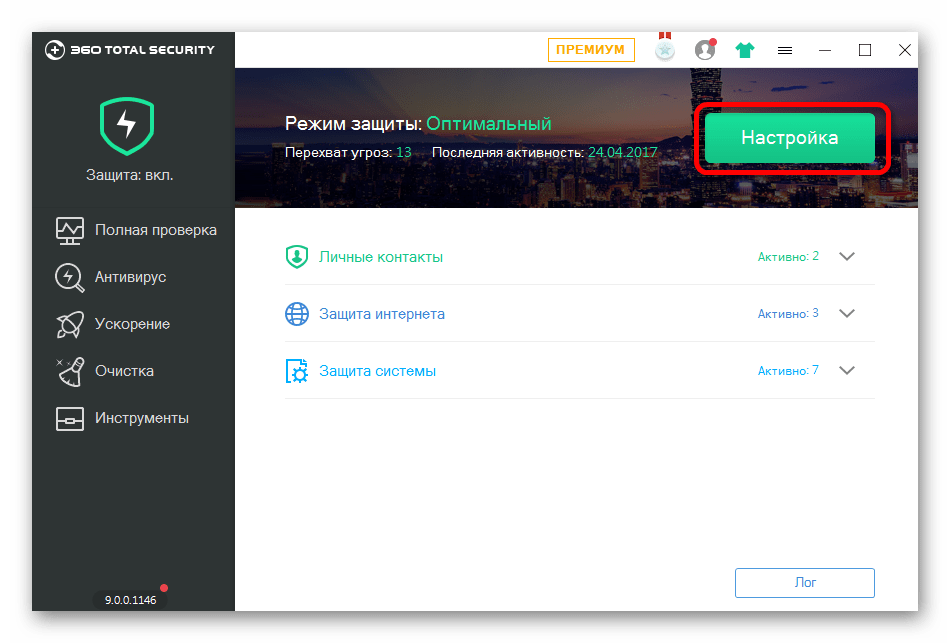
- Способ 6: Отключение стороннего антивируса
- Способ 7: Выполнение чистой загрузки
- Способ 8: Ручная установка обновлений
- Вопросы и ответы: 0
Способ 1: Встроенное средство устранения неполадок
Если во время попытки обновления появляется ошибка под кодом 0x80070017, то в первую очередь стоит использовать автоматическое средство, которое способно найти проблемы в работе «Центра обновления», отвечающего за установку последних версий ОС и патчей.
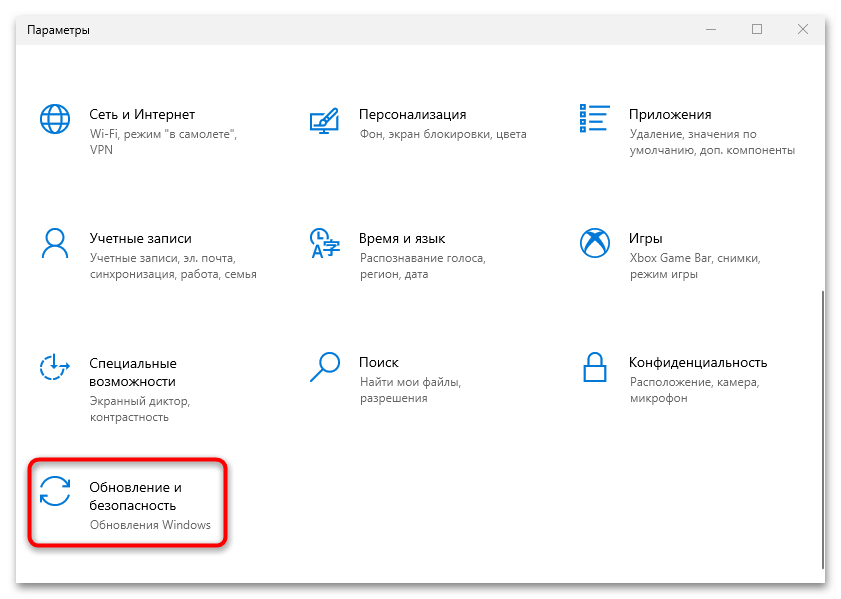
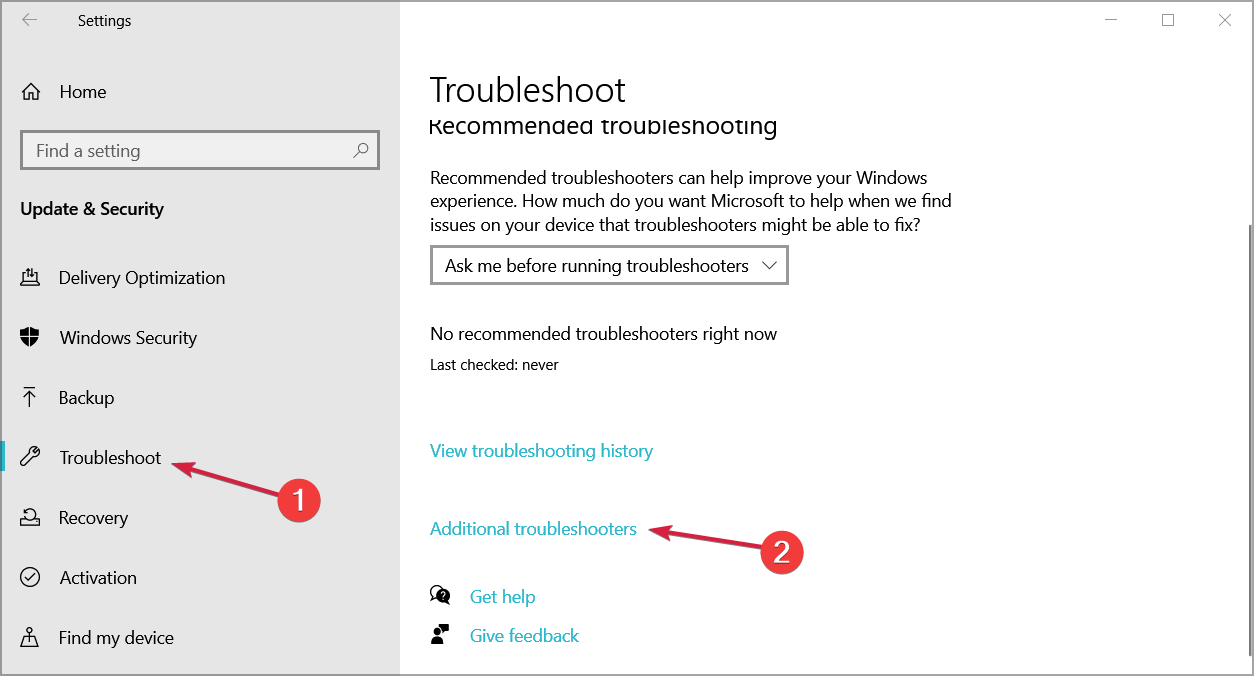
- Нажмите на кнопку «Пуск» и выберите «Параметры» из появившегося меню.
- Перейдите в раздел «Обновление и безопасность».
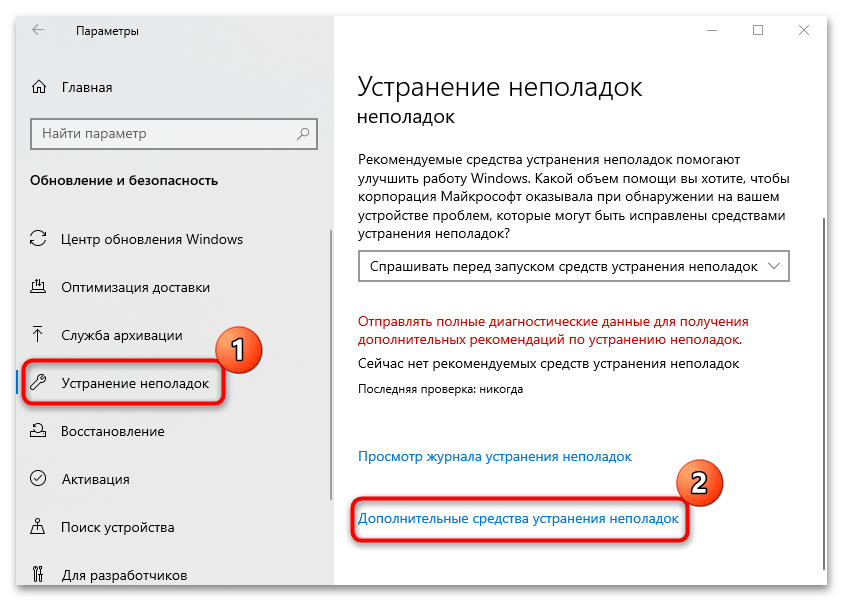
- Далее кликните по вкладке «Устранение неполадок» на панели слева, затем на ссылку «Дополнительные средства устранения неполадок».
- Найдите в списке компонентов «Центр обновления Windows» и нажмите на эту строку – появится кнопка, запускающая встроенное средство.
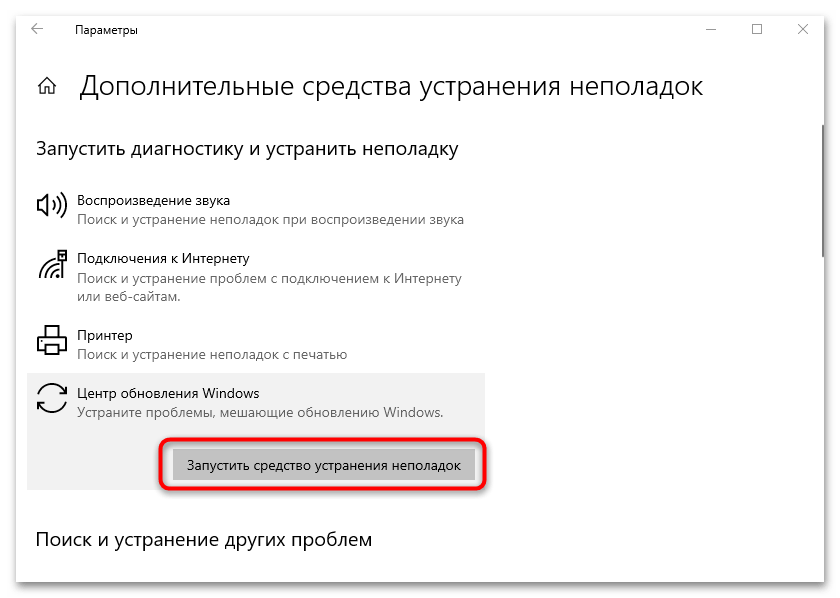
Дождитесь, пока проверка завершится. Если неполадки будут выявлены, вы получите соответствующее уведомление, а также варианты действий по их исправлению.
Способ 2: Очистка кеша обновлений
Если встроенное средство не принесло нужного результата, можете попробовать вручную очистить папки с кешем обновлений, которые хранятся на системном локальном диске. Самый простой способ сделать это – использовать консольные команды. Причем с помощью этого метода вы перезапустите некоторые службы, которые отвечают за обновление системы, включая «Центр обновления»:
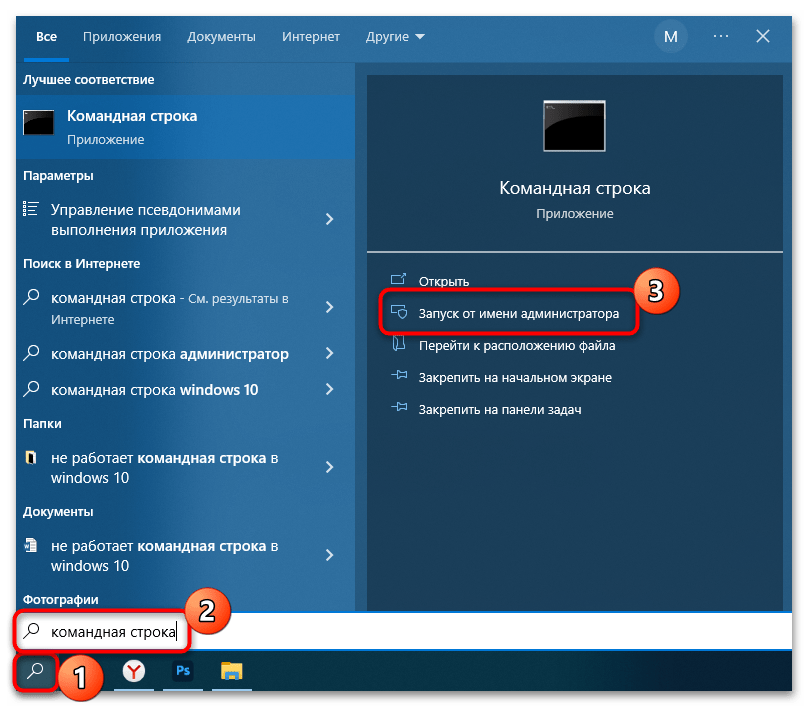
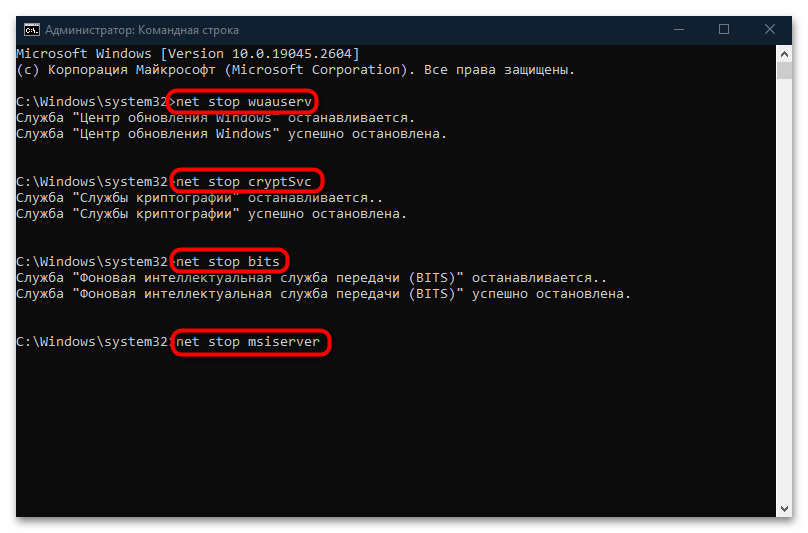
- Запустите «Командную строку» от имени администратора, введя соответствующий запрос в строке системного поиска и выбрав нужный тип запуска из главного меню.
- Приостановите работу некоторых служб, выполнив специальные команды. По очереди вводите следующие запросы, нажимая на клавишу «Enter» после каждого из них:
net stop wuauserv
net stop cryptSvc
net stop bits
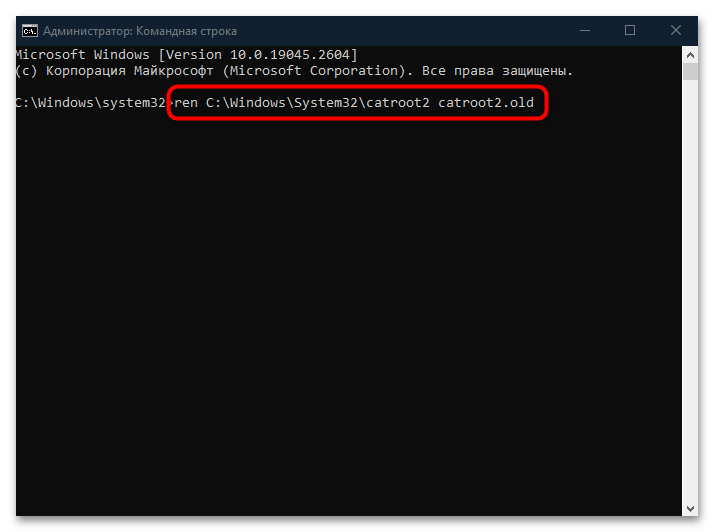
net stop msiserver - Далее переименуйте каталоги с кешем и данными апдейтов, создав таким образом резервную копию. Если даже что-то пойдет не так, то все файлы можно будет восстановить, вернув папкам актуальные имена. Выполните две команды:
Ren C:\Windows\SoftwareDistribution SoftwareDistribution.old
Ren C:\Windows\System32\catroot2 Catroot2.old - Снова запустите все необходимые для автоматического обновления службы, вставив следующие команды и нажав на клавишу ввода после каждой из них:
net start wuauserv
net start cryptSvc
net start bits
net start msiserver
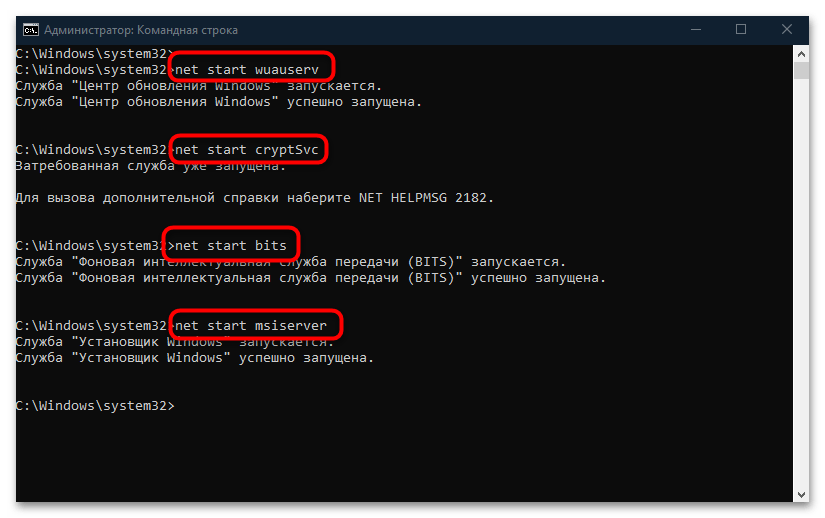
После этого в разделе с обновлениями «Параметров» выполните поиск актуальных апдейтов. При условии, что те будут найдены, начнется их загрузка, а новые папки для хранения файлов система создаст автоматически. Старые впоследствии можно будет удалить, чтобы освободить место на диске.
Способ 3: Обновление драйверов
Попробуйте обновить программное обеспечение для устройств и оборудования, которые используются в системе. Если какие-то драйверы устарели, то это может вызывать различные ошибки при попытке обновить систему. Используйте встроенные средства операционной системы (раздел с обновлениями «Параметров», включая «Необязательные исправления» или «Диспетчер устройств»), а также официальные утилиты от производителей (что особенно актуально для дискретных видеокарт) или специализированные программы. Обо всех способах мы писали более детально отдельно.
Подробнее: Как проверить обновления драйверов в Windows 10

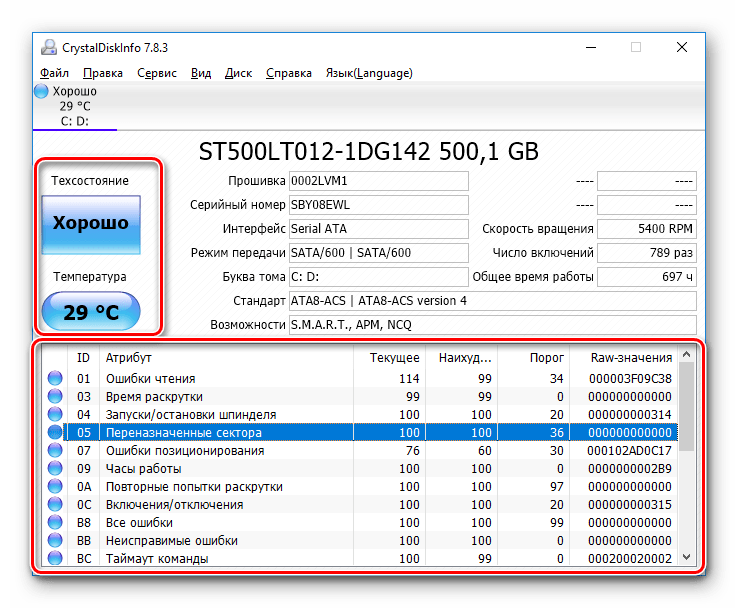
Способ 4: Диагностика HDD-диска
Выполните проверку жесткого диска, если, конечно, именно он, а не SSD, используется в качестве системного раздела. При появлении битых секторов возможны проблемы с установкой различного программного обеспечения, в частности при инсталляции апдейтов для ОС. Переходите по ссылке ниже, чтобы узнать, как выполнить диагностику диска с использованием встроенных и сторонних средств.
Подробнее: Выполнение диагностики жесткого диска в Windows 10
Способ 5: Восстановление системных файлов
Также нередки ошибки и тогда, когда целостность системных файлов по каким-то причинам была нарушена. Например, данные были повреждены в результате деятельности вредоносного ПО или системных сбоев. В Windows 10 встроены и утилиты, с помощью которых можно проверить, так ли это, а также восстановить все в автоматическом режиме. Процедура довольно простая, особенно если следовать инструкции по ссылке ниже.
Подробнее: Использование и восстановление проверки целостности системных файлов в Windows 10

Если после запуска/использования инструмента проверки системных файлов SFC вновь появляется ошибка, воспользуйтесь утилитой DISM для восстановления хранилища (места, откуда SFC берет резервные файлы), затем снова запустите SFC.
Способ 6: Отключение стороннего антивируса
Если вы используете на своем компьютере антивирусное программное обеспечение от сторонних разработчиков, приостановите работу такого софта на время проведения процедуры обновления системы. Вполне вероятно, защитные приложения по ошибке блокируют инсталляцию апдейтов, считая такие действия подозрительными.
Как правило, приостановка работы стороннего антивируса возможна через контекстное меню значка софта в трее. Нажмите на иконку правой кнопкой мыши и выберите пункт «Выход» или «Закрыть». Скорее всего, понадобится еще и подтвердить действие.
Если у вашего приложения такой функции не предусматривается, ознакомьтесь с нашим руководством на сайте, где описан алгоритм действий по деактивации наиболее популярных антивирусов.
Подробнее: Отключение антивируса
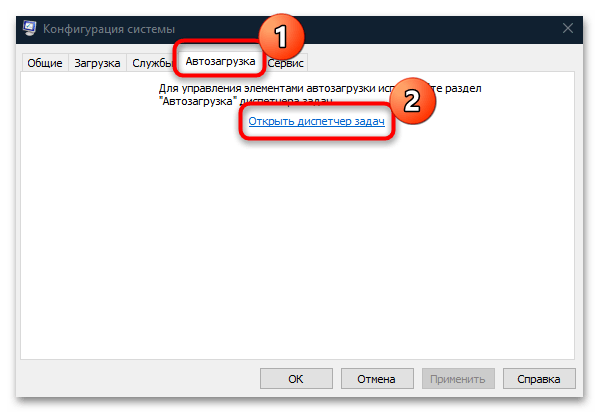
Способ 7: Выполнение чистой загрузки
Ошибки при попытке обновления происходят и из-за конфликта с программным обеспечением, которое дополнительно было установлено. Искать такой софт иногда нет смысла, но можно попробовать выполнить чистую загрузку операционной системы, предварительно отключив сторонние процессы и службы:
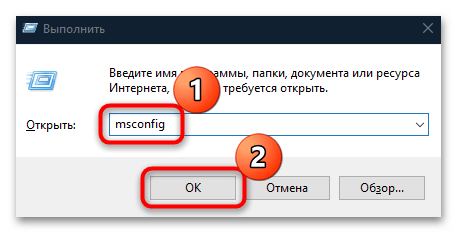
- Одновременно нажмите на клавиши «Win + R», затем в текстовом поле окна «Выполнить» введите
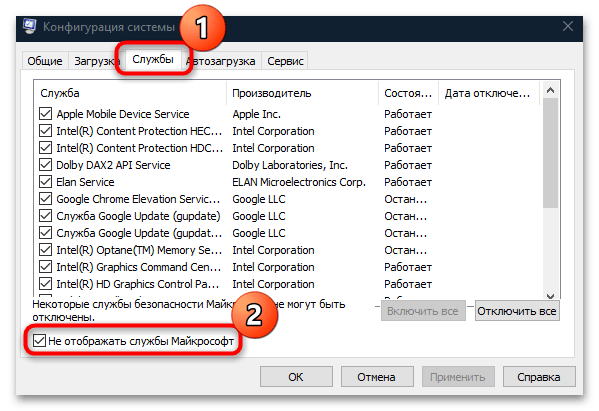
msconfigи нажмите на клавишу «Enter». - На вкладке «Службы» оснастки «Конфигурация системы» отметьте пункт «Не отображать службы Майкрософт».
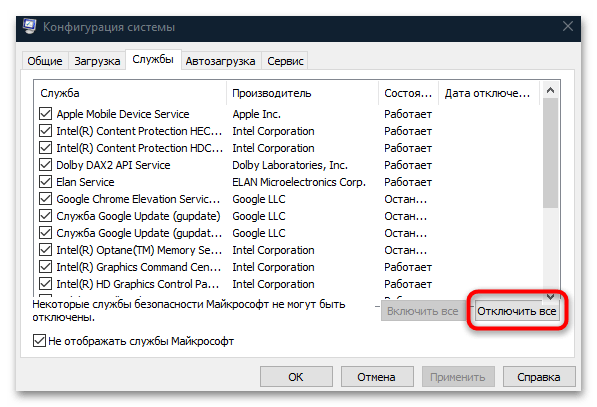
- Убедитесь, что все пункты отмечены, и нажмите на кнопку «Отключить все».
- Затем переключитесь на вкладку «Автозагрузка» и перейдите к другому встроенному средству – «Диспетчеру устройств», нажав на соответствующую ссылку.
- Поочередно отключите все программы, которые запускаются вместе с системой, выбирая каждую из них и нажимая на кнопку отключения.
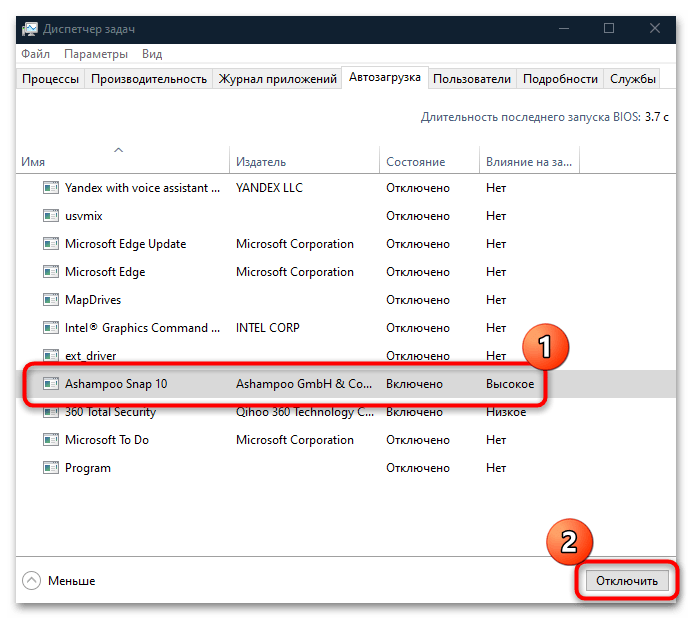
После того как все лишнее отключено, перезагрузите систему, а затем попытайтесь вновь выполнить установку обновлений. Если все прошло успешно, значит, сторонний софт препятствовал этому.
Способ 8: Ручная установка обновлений
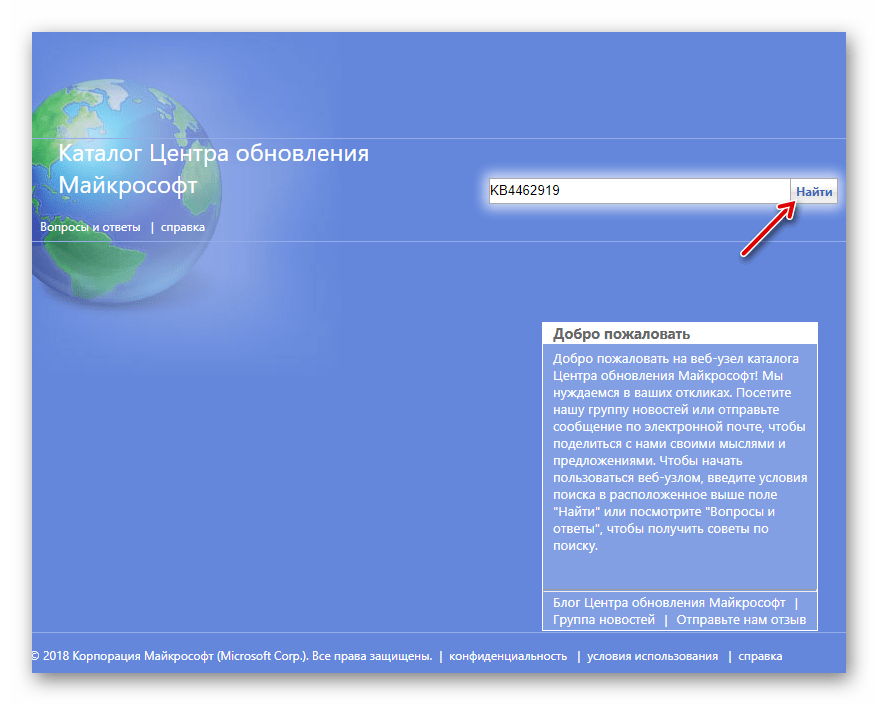
При условии, что вы знаете, с каким именно апдейтом происходит рассматриваемая ошибка, можете установить его вручную. Как правило, все обновления размещаются на официальном сайте Microsoft, откуда можно скачать их, затем, запустив установочный файл, отдельно инсталлировать нужные патчи. Таким образом, вы обойдете «Центр обновления», при использовании которого появляется ошибка под кодом 0x80070017. Рекомендуем изучить этот вопрос более детально, перейдя по ссылке.
Подробнее: Устанавливаем обновления для Windows 10 вручную
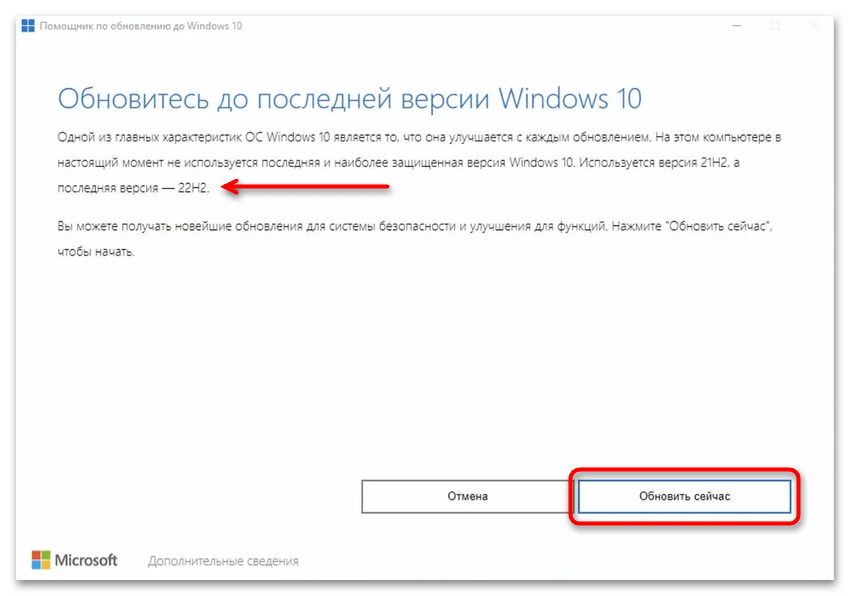
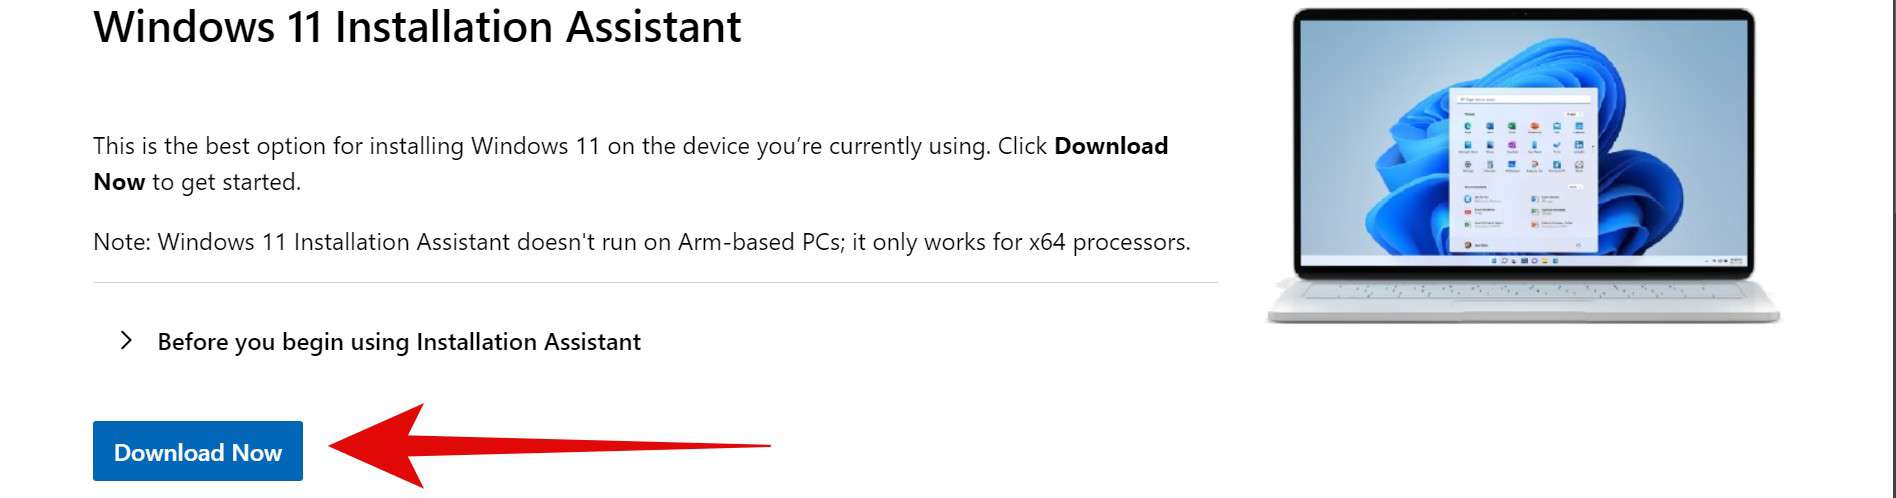
Кроме того, можете воспользоваться утилитой Update Assistant, которую предлагает Microsoft. Она предназначена для помощи в обновлении до актуальной версии «десятки» в обход «Центра обновления Windows». Скачать средство можно с официального сайта, после чего останется его запустить и посмотреть, предлагается ли выполнить обновление. Если да, нажмите на «Обновить сейчас» и дождитесь дальнейших инструкций от приложения.
Скачать Update Assistant с официального сайта
Наша группа в TelegramПолезные советы и помощь
![Error code 0x80070017 while Windows Update [Solution]](https://www.veeble.com/kb/wp-content/uploads/2025/01/windows-error-scaled.jpeg)
If you see error code 0x80070017 while updating Windows, this guide will help you fix this Windows update error. Follow the steps below to ensure a smooth update process.
1. Access Windows Update Settings
- Open the Start Menu and click on Settings.
- Navigate to Update & Security > Windows Update.
- Check if any updates are pending or if the error code 0x80070017 is displayed.

2. Restart and Retry
- Restart your computer.
- After rebooting, navigate back to Windows Update and click Check for Updates.
- Allow Windows to download and install updates.
3. Run Windows Troubleshooter
- Go to Settings > Update & Security > Troubleshoot.
- Select Windows Update and click Run the Troubleshooter.
- Follow the on-screen instructions to detect and fix issues.
4. Reset Windows Update Components
- Copy and paste the following commands to a notepad file.
SC config trustedinstaller start=auto
net stop bits
net stop wuauserv
net stop msiserver
net stop cryptsvc
net stop appidsvc
Ren %Systemroot%\SoftwareDistribution SoftwareDistribution.old
Ren %Systemroot%\System32\catroot2 catroot2.old
regsvr32.exe /s atl.dll
regsvr32.exe /s urlmon.dll
regsvr32.exe /s mshtml.dll
netsh winsock reset
netsh winsock reset proxy
rundll32.exe pnpclean.dll,RunDLL_PnpClean /DRIVERS /MAXCLEAN
net start bits
net start wuauserv
net start msiserver
net start cryptsvc
net start appidsvc- Save the above commands into a batch file with the name Wufix.bat
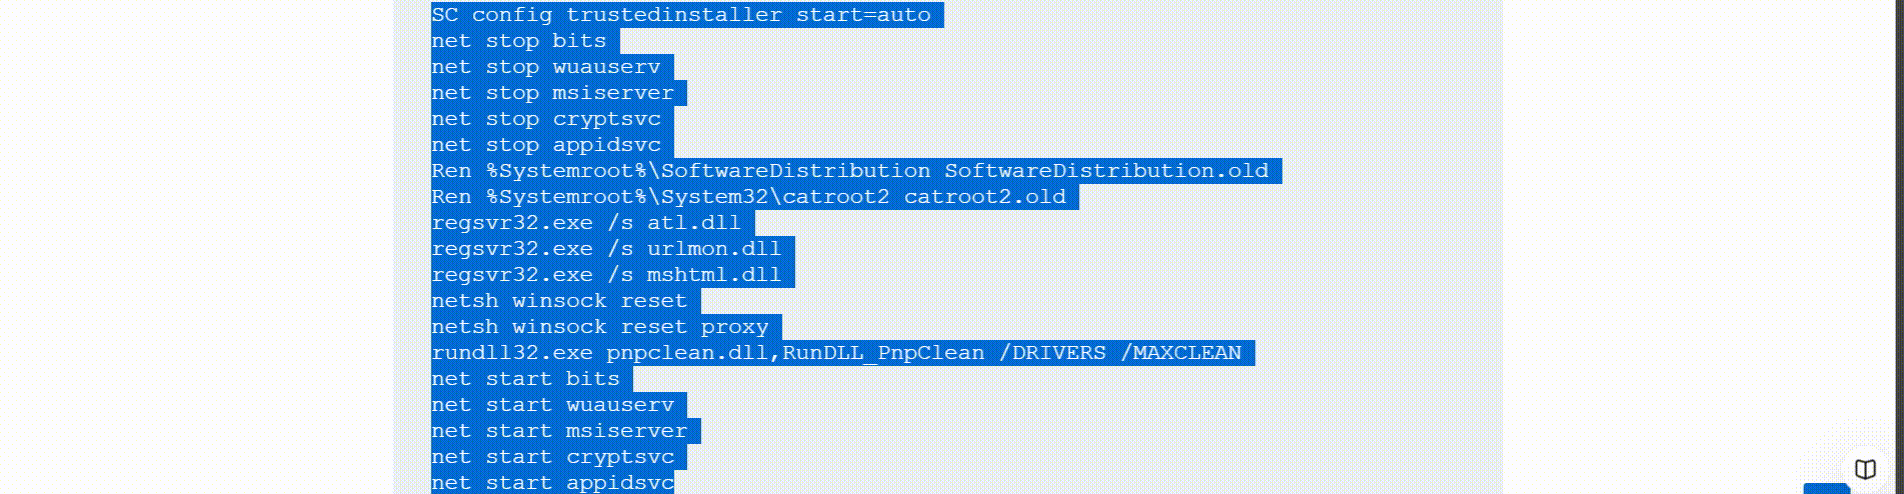
- Right-click on the Wufix.bat file and choose Run as administrator.
- Restart your PC and check for updates again.

5. Run Clean and Repair Commands
- Open Command Prompt as administrator.
- Run these commands to clean up and repair system components:
dism /online /cleanup-image /startcomponentcleanup
sfc /scannow
dism.exe /Online /Cleanup-image /Restorehealth
6. Use Windows Update Assistant
- Download the Windows Update Assistant from the official Microsoft website.
- Run the assistant and follow the instructions to update your system.
Download links for Update Assistant:
Windows 10: https://www.microsoft.com/en-in/software-download/windows10
Windows 11: https://www.microsoft.com/en-in/software-download/windows11
If you’re using Windows for development or testing but want a reliable Linux-based environment, consider Veeble’s Linux VPS Hosting. It’s a secure and cost-effective solution for hosting and development needs.
7. Manually Download Updates
- Note the KB number of the failed update.
- Visit the Microsoft Update Catalog.
- Search for the KB number and download the update manually.
- Install it by double-clicking the downloaded file.
8. Reinstall Windows (As a Last Resort)
If none of the above methods work, you may need to reinstall Windows. Ensure you back up all your data before proceeding.
- Use the Media Creation Tool from the Microsoft website to create a bootable USB.
- Boot from the USB and follow the on-screen instructions to reinstall Windows.
By following these steps, you can resolve the error code 0x80070017. If you’re still experiencing issues, consider consulting a professional or contacting Microsoft Support.
Secure, Scalable & Stress-Free – Managed VPS Built for Growth
Scale your business without server headaches! Our Managed VPS solutions offer robust DDoS protection, real-time threat monitoring, and instant scalability to handle traffic spikes.
Choose Your Plan
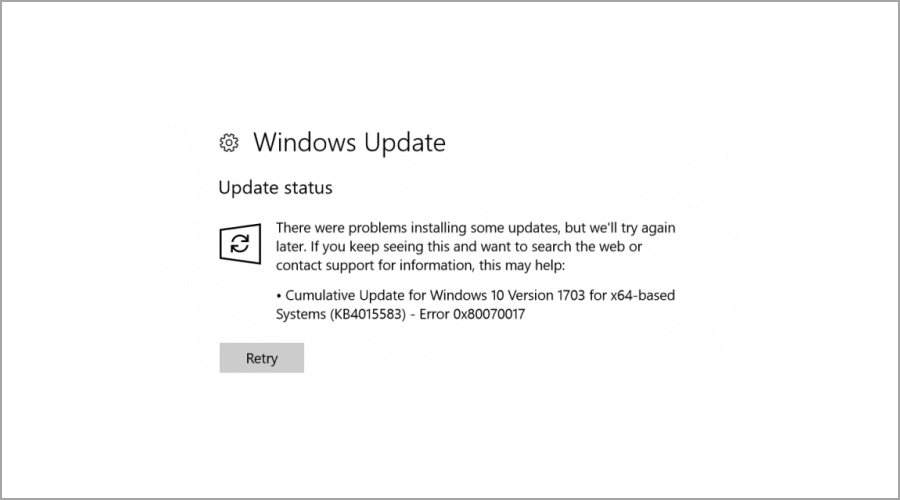
The Windows Update 0x80070017 error is among the most common update issues many users have encountered.
It usually occurs when trying to install the latest updates on your computer or when you intend to upgrade your OS.
Users reported that the installation went into verification mode and failed at 76% with an error message every time. There are several variations of this error that users have reported, and they are the following:
- Windows Update error 0x80070017 – This usually appears while trying to download the latest updates. If that happens, restart Windows Update components and check if that helps.
- Error code 0x80070017 in Windows 7 – According to users, this error can appear on Windows 7. Even if you don’t use Windows 10, most of our solutions are compatible with older OSs, so feel free to try them out.
- 0x80070017 System Restore – This error can sometimes appear while trying to perform a System Restore. However, you should be able to fix the problem simply by disabling your antivirus.
- Windows cannot install the required files 0x80070017
- CRC 0x80070017
What does the error 0x80070017 mean?
Sometimes you might encounter this error when installing a new build. This is usually followed by the message – We couldn’t create a new partition. The cause might be your storage device settings, so check them.
In some instances, you can get Windows cannot install required files, and this message appears if your installation media is damaged, so be sure to repair it.
This error code also appears during updates, followed by the error message – There were some problems installing updates. Luckily, there are ways to fix this problem, and this guide will show you how to do it.
How can I fix the Windows Update error 0x80070017?
Here’s what you should first do:
- Restart your PC a few times, then try again.
- Disconnect all peripherals.
- When updating through Windows Update, disable your Internet connection, and proceed with the installation when the download reaches 100%.
1. Disable your antivirus
- If you have third-party antivirus installed, disable it.
- Press Windows key + S and type defender. Select Windows Security from the list.

- Select Virus & threat protection in the left pane. In the right pane, choose Manage settings.

- Locate Real-time protection and disable it.
- Check if the problem is still there.


If this method solves your problem, be sure to turn back your system protection again after you’re done.
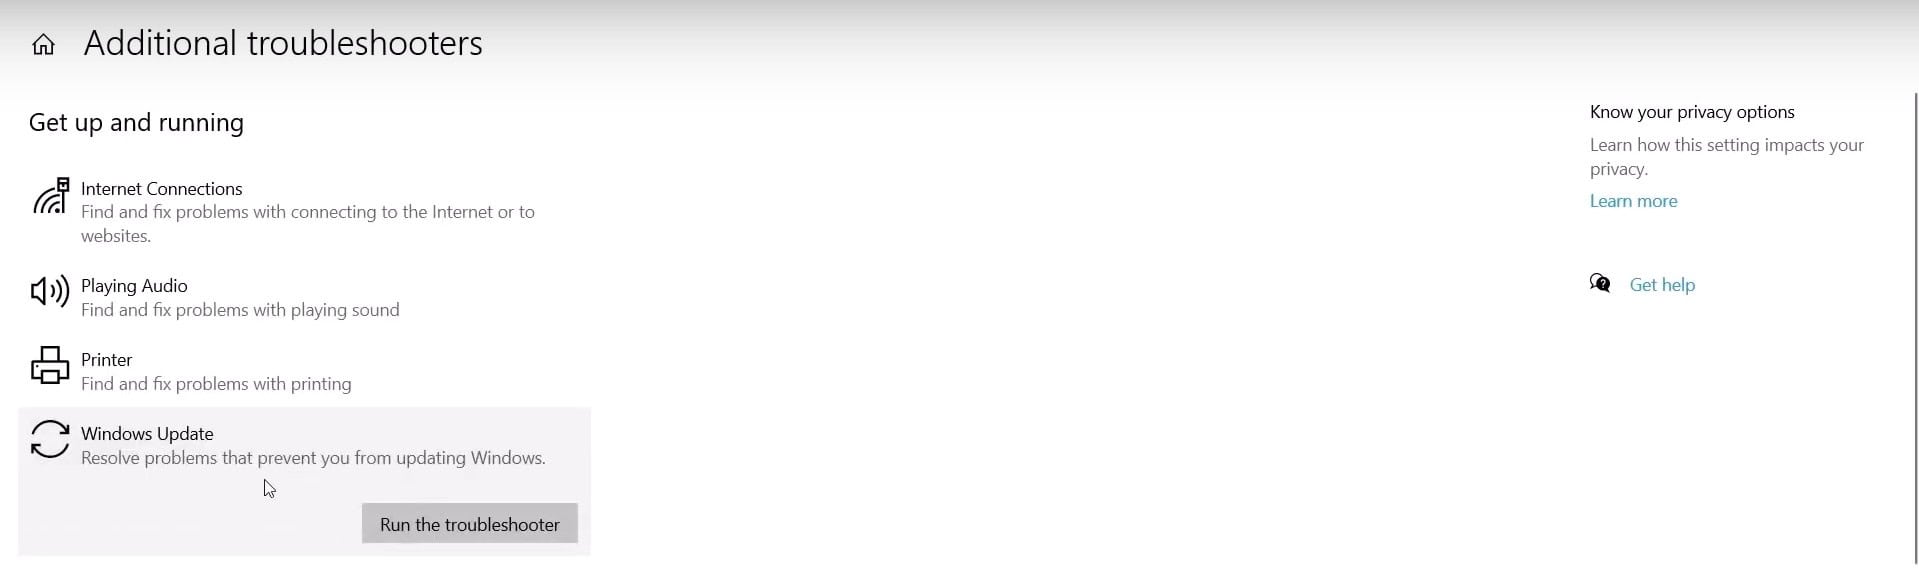
2. Run the Windows Update Troubleshooter
- Press the Windows key + I to open the Settings app.
- When the Settings app opens, navigate to the Update & Security section.

- From the menu on the left, choose Troubleshoot. Then, in the right pane, click Additional troubleshooters.

- Select Windows Update and click on Run the troubleshooter.


You can always opt for an automated system optimization tool. This way, you will accomplish the steps above faster and more securely.
3. Reset your Windows Update components
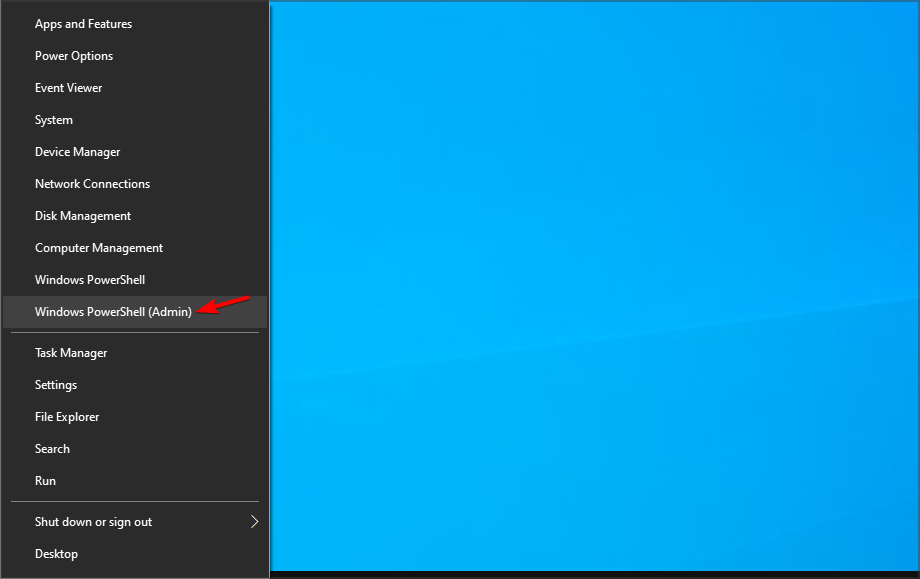
- Press the Windows key + X, then select Windows Powershell (Admin).

- When PowerShell opens, run the following commands one by one (You will have to paste the commands and press Enter):
net stop wuauservnet stop cryptSvcnet stop bitsnet stop msiserverRen C:\Windows\SoftwareDistribution SoftwareDistribution.oldRen C:Windows\System32\catroot2 Catroot2.oldnet start wuauservnet start cryptSvc

If you don’t want to run all these commands manually, you can also create a Windows Update reset script that will restart the services automatically for you.
4. Update your drivers
- Visit your hardware manufacturer’s website.
- Locate your device on the list.
- Go to the Drivers section and download the latest driver.

- Once it’s downloaded, double-click it to install it.
- Do this for all significant components, including your motherboard, chipset, and graphics card.


If you’re having problems manually updating your drivers, you can always use driver updater software to make the process faster and simpler.
5. Install the updates manually
- Go to Microsoft’s Update Catalog website.
- In the search bar, enter the update code. The code should start with KB followed by an array of numbers.

- Once you find the update, click the Download button to download it.
- After downloading the update, double-click the downloaded file to install it.

NOTE
It’s essential to download the update that matches your system’s architecture, so double-check everything before downloading it.
6. Install Windows from a USB flash drive
According to users, error 0x80070017 can appear while trying to install Windows 10. This problem usually occurs due to issues with your installation media or DVD drive.
If you’re having this problem, try replacing your DVD drive or installation media and check if that helps. Alternatively, you can create a Windows 10 bootable USB drive and try installing Windows 10 from a USB flash drive and check if that solves the issue.
Surprisingly, many reported the We couldn’t create a new partition error 0x80070017 while installing Windows, and changing the drive format and recreating the bootable USB did the trick.
- How can I fix Windows 10/11 update error 0x80004005?
- Fix: The installation failed in the safe_os phase
- Windows was unable to create a required installation folder [SOLVED]
7. Run a chkdsk scan
- Press Windows key + X and select Windows PowerShell (Admin).

- Enter the command below and hit Enter. Before you run it, be sure to replace X with the letter that matches your system drive. In almost all cases, that would be C.
chkdsk /f X
- You’ll be asked if you want to schedule a chkdsk scan once the PC restarts.
- Press Y and restart your system.
- Wait for the scan to finish.

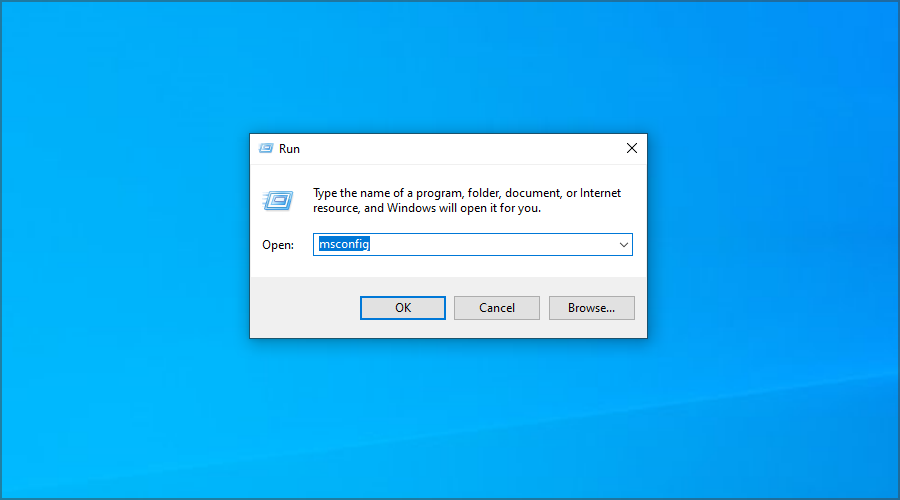
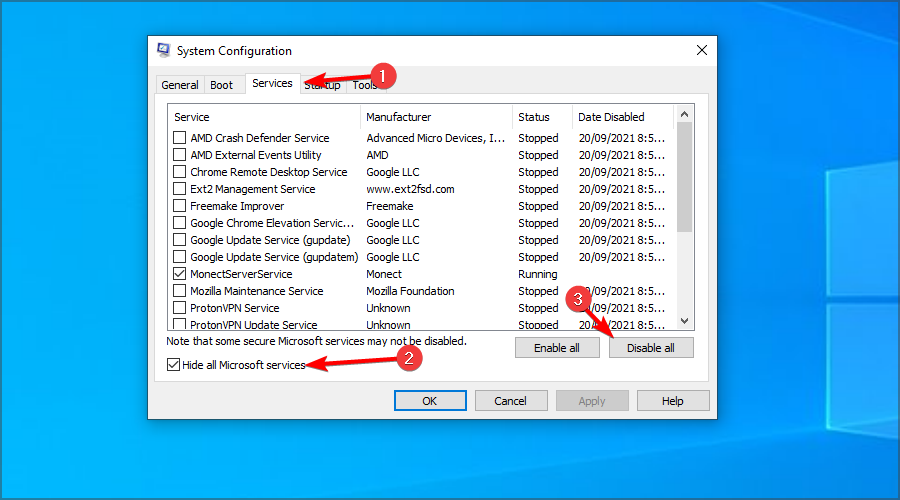
8. Perform a clean boot
- Press the Windows key + R, enter msconfig, and hit Enter.
- Go to the Services tab, check Hide all Microsoft services, and click the Disable all button.
- Now go to the Startup tab, and click on Open Task Manager.
- Disable all startup apps. To do that, right-click the desired application and choose Disable from the menu.
- Once you disable all startup applications, go back to System Configuration window, and click Apply and OK.
- Restart your PC.


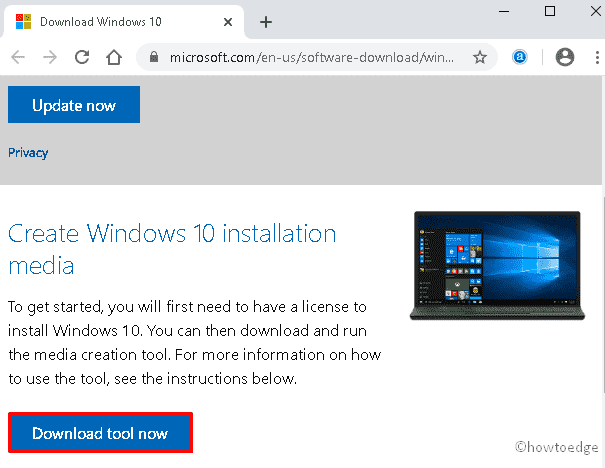
9. Perform an in-place upgrade
- Visit the Windows 10 download page.
- Click on the Download tool now in the Create Windows 10 installation media section.
- Once the tool is downloaded, run it.

- Select Upgrade this PC now, and click Next.

- Wait while the setup prepares the necessary files.
- Select Download and install updates (recommended), and click Next.

- Follow the on-screen instructions until you get to the Ready to install screen.
- Select Change what to keep.
- Choose Keep personal files and apps, and then click Next.

- Follow the on-screen instructions to complete the process.


This process will install the latest version of Windows on your PC while keeping all your applications and file intact.
What is Windows 7 installation error code 0x80070017?
When you see error code 0x80070017, it signifies that while the files are being copied from the disk, they are not moved to the storage disk in the same structure and format.
The error prevents Windows 7 from being installed on the PC and could arise due to issues with the bootable DVD or the disc reader itself. The best solution is installing Windows 7 via a bootable USB drive.
How do I fix Error code 0x80070017 on Windows 11?
The great news is this. If you’ve read the guide, you can fix Error code 0x80070017 on Windows 11 as well. This is true because the fixes that apply to one operating system also apply to the other.
Although minor UI variations occasionally occur, you should generally anticipate the same steps.
Why do Windows Update errors occur?
There are several reasons why these issues occur, but usually, the cause is related to your antivirus or other software interfering with the update process.
In some instances, even specific drivers or devices can lead to problems. Lastly, there’s file corruption, and if your system files are damaged, you might have issues installing updates.
How dangerous are Windows Update errors?
The errors aren’t dangerous, but they will prevent you from installing updates, leading to security issues.
Sometimes, vulnerabilities and bugs are discovered, and this is the only way for Microsoft to patch them, so you must keep your system up to date.
In addition, Windows updates are used to deliver new features to the users, so if you have update errors, you won’t be able to experience them.
How to find the update number?
- Press the Windows key + I to open the Settings app.
- Now go to the Update & Security section.

- You should see the update’s name and the KB number in the brackets.


Each update has a unique KB number, which you can find by following the steps above.
What is the update number used for?
This number is used as a unique identifier, so if a specific update is giving you this problem, feel free to use this number to troubleshoot the issue.
You can also use it to download the update from Windows Update Catalog and install it manually.
Error 0x80070017 can be problematic and prevent you from getting the latest updates, but we hope you solved it using one of our solutions.
If Window Update is not working on Windows 10 after following these steps, we suggest you reset your operating system and check if that helps.
Did you find a way to fix this error? Feel free to share it with us in the comments section below.
Did you experience Error Code 0x80070017 recently while installing the Tuesday patch or upgrading the existing Windows 10 versions? If yes, then read this post to know the exact reasons that cause this bug in the first place along with a few working solutions.
This error message may also appear while attempting to create a system restore point. The presence of corrupt device drivers, missing system files, or an Enabled Firewall may trigger this issue.
There are different ways to resolve the Error Code 0x80070017 depending upon its nature of occurrence – Installation, Update, or System Restore.
Re-create ISO files, Using the online troubleshooter, Disable Firewall, and Reset Windows 10 update components are a few working solutions for this error. If none of the above fixes solve this error, users should fresh install Windows 10 on their devices. Let’s explore these tweaks in detail –
To solve the Windows installation error 0x80070017, use the following workarounds –
- Installation Error
- Update Error
- System Restore Error
Windows Installation Error 0x80070017
Windows 10 users may receive this error message while installing a fresh operating system on their PC. This problem mainly appears either because of a corrupt ISO image or the damaged USB drive itself. To solve this issue, you should perform the below solutions one after another –
1] Re-create the ISO File of Windows 10
First, visit the official Microsoft server and fresh download the ISO file. While doing so, you must format the USB drive at hand and make this bootable using a genuine tool like – Rufus. In case, you are using DVD as the Windows Media, burn the same keeping its settings low to either 4x or 8x. Here’s how to proceed –
- Go to the Microsoft website to download the Media Creation tool.
- When the webpage loads, click the “Download tool now“.
- Open the Download folder and double-click the setup file.
- If the UAC window appears, tap Yes to permit access.
- Here, select the Create installation media (USB flash drive, DVD, or ISO file) For another PC radio button followed by Next.

- On the Windows 10 setup page, select your preferred language, Edition, and Architecture, and hit the Next button again.

- Afterward, choose the ISO file option followed by the Next, this will create the Windows 10 ISO file.
- If you want to use it as the bootable drive for another PC, burn the same into a DVD.
2] Use Microsoft’s Online Troubleshooter
Some of the pre-existing conditions on your system may also prevent the installation of new Windows 10 versions. To detect and resolve such faults, Microsoft provides an in-built Online troubleshooter tool that you can access following the below steps –
- Browse the Official website so as to start the Online troubleshooter.
- Scroll down and select the specific Windows 10 OS that you want to troubleshoot.
- Now, click the Troubleshoot problem updating Windows 10 link.

- Under the Advanced section, you need to opt into a few update-related questions.
- Next, follow the on-screen instruction to complete the remaining steps.
- The Troubleshooter will scan the entire system for any error and report back the same if found.
- Just do as asked above and restart your computer. After the next login, you should be able to install the Windows 10 OS without receiving any error message.
Update Error Code 0x80070017
If you encounter the same bug code i.e. “0x80070017” while installing recent patches, you should try these simple yet effective methods. Here’s how to proceed –
1] Run Windows Update Troubleshooter
The first solution after receiving the error code 0x80070017 is to run the troubleshooter. Just follow these steps –
- Launch the Settings app by pressing Win + I.
- Browse to the below location next –
Update & Security > Troubleshoot > Additional troubleshooters > Windows Update > Run the Troubleshooter
- You need to wait for a few minutes while the system is troubleshooting for any errors.
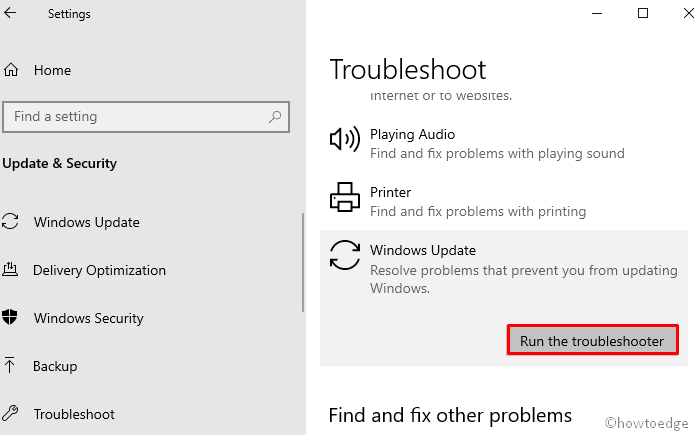
- When the troubleshooter resolves this issue, Restart your PC so as to confirm the recent changes.
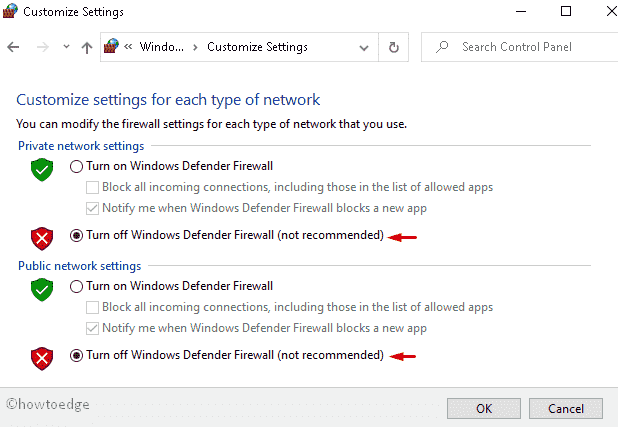
2] Disable third-party Antivirus or Firewall
The presence of viruses or malware on the PC may also lead to the error 0x80070017 stopping any further updates. In such cases, one should disable the Firewall that might block Windows 10 upgrades. Follow the steps below to overcome this issue –
- Jointly press Win & R to cite the Run dialog.
- Type Control Panel In the text area followed by the OK.
- Next, click the Windows Defender Firewall option.
- On the left column, hit the Turn Windows Defender Firewall On or Off link.
- Activate the Turn Off Windows Defender Firewall radio button under both – Private/Public network settings.
- Click OK and after a PC restart, install the pending updates.
3] Reset update components
Sometimes, there may arise corruption in the Windows components causing similar errors. If that’s the case, we suggest resetting the Update components to get rid of the current situation. Here’s how to proceed –
- Press the Windows key and type cmd in the text bar.
- From the available list, right-click on the best match and select Run as administrator.
- If the UAC prompts, tap Yes.
- Before proceeding ahead, you should stop these services from running the following codes on the command prompt –
net stop bits
net stop wuauserv
net stop appidsvc
net stop cryptsvc
- Now, execute the below codes to reset the Windows components –
rmdir %systemroot%\SoftwareDistribution /S /Q
rmdir %systemroot%\system32\catroot2 /S /Q
- Afterward, reset the system’s configuration by running these simple command lines –
netsh winsock reset
netsh winsock reset proxy
- Restart the Windows services that you have previously disabled.
net start bits
net start wuauserv
net start appidsvc
net start cryptsvc
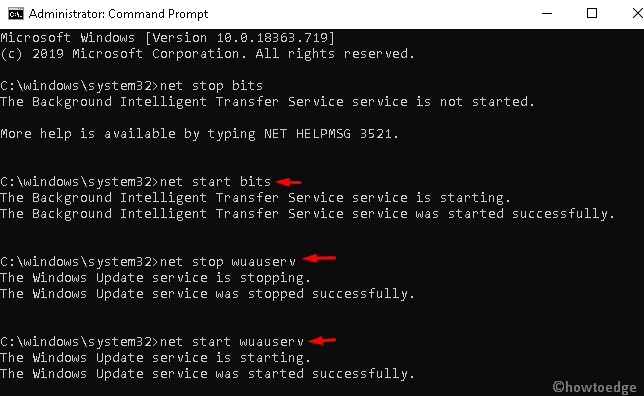
- Finally, Restart your PC and attempt to install the pending updates.
4] Update the Driver
Often, the outdated/corrupt driver generates the error code 0x80070017 during Windows 10 upgrade. To wipe out this problem, you must find the problematic device driver and update the same to its latest version. Here is the complete procedure –
- Jointly press the Wind and X shortcut keys and select Device Manager.
- Here, expand each section and locate the old driver that needs an update.
Note: The yellow exclamation mark next to the driver implies the application has become obsolete.
- Once found, do the right click and choose Update driver on the context menu.
- Click Search automatically for updated driver software.

- Wait for a while as this takes a few minutes to complete, next Reboot the computer.
- Sign in to Windows 10 again and try to download/apply the cumulative updates.
System Restore Error 0x80070017
Some users also report getting the error code 0x80070017 when they try creating a system restore. Here’s how to get rid of this error message during a System Restore –
1] Login into the Safe Mode
If the normal sign-in fails to create a system restore, you should enter the Safe Mode and then approach to create a backup point. This is possible as the safe mode uses only a few applications and drivers restricting any third-party programs. Here’s how to do this –
- Start the Run dialog (using Win & R hotkey), type
msconfig, and tap the OK button. - Head over to the Boot tab and tick Safe boot under the Boot options.
- Next, press OK to enter the Safe Mode on your PC.
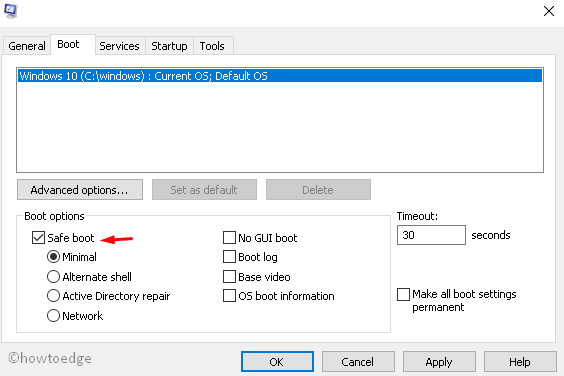
- The system will then reboot and open the PC into safe mode. Since you are here, you won’t get any error messages while creating the restore point.
2] Reset the Repository
If you are still unable to create a backup of Windows 10 OS, resetting the repository may fix this issue. Here’s how to proceed –
- First, start your PC and enter into safe mode without networking.
- Type the command prompt in the search bar and right-click on the top result.
- Using the context menu, select Run as administrator.
- If the UAC prompts, press Yes.
- Copy/paste the following codes and hit the Enter key separately –
net stop winmgmt
winmgmt /resetRepository
- Lastly, Restart your computer and check whether this solves the re-occurring error 0x80070017.
3] Reset Windows 10
If none of the above solutions fix the error code 0x80070017, one should reset Windows 10 using the below steps –
- Right-click on the Windows icon and select Settings.
- Select the Update & Security category thereafter Recovery on the left column.
- Move to the adjacent right-side and click Get Started under Reset this PC section.
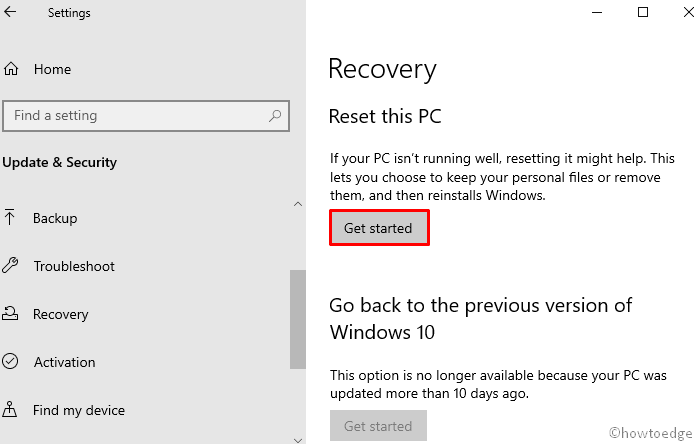
- Click the Keep my files option to save all your personal files. However, doing so will remove all apps and their related settings.

I hope this article helps you to fix the error code 0x80070017 whether it is installation, update or system restore.
Anyone who uses the Windows operating system is bound to face some kind of error at a certain point in time. These errors can even be considered inevitable due to the presence of various components in the OS. In this case, the article will specifically guide you with the error code 0x80070017. The Windows error 0x80070017 is mainly related to corrupt install media. Continue reading to fix 0x80070017 Windows Update error.

Table of Contents
This update error usually occurs under two scenarios. They are:
- When you are attempting to re-install the Windows operating system, or
- When you are trying to install the latest version of Windows Update.
The Windows Update errors are not very dangerous but still, restrict you from downloading updates which eventually cause security concerns. File corruption could be considered the main reason for the error code 0x80070017. Still, several other elements hold responsible for this error. Check out the list given below:
- Defective CD-ROM drive
- Presence of bad sectors in the hard drive
- Faulty Windows Registry.
- Presence of virus infection or malicious threat in your system
- Availability of outdated system driver versions
- Incompatible hardware problems
- Existence of conflict creating antivirus applications
Try out all the following solutions one by one till you get a potential fix for the windows error 0x80070017.
Basic Troubleshooting Methods
There are some simple debugging ways to rectify the system restore error 0x80070017. Hence, perform each of the upcoming troubleshooting steps.
1. Restart PC: The first basic troubleshooting step for any Windows error is restarting your PC. This is because using your system for long hours without rebooting causes RAM issues, slowness, internet connectivity errors, and performance problems. If any of such factors is behind the error code 0x80070017, then simply rebooting your PC could resolve the error.

2. Detach Peripherals: Sometimes the external devices connected to your PC might cause trouble with the error code 0x80070017. It could be a hard drive, modem, CD-ROM, or anything that could be the culprit as they are interrelated with the Windows operating system. Thus, disconnect any issue-causing peripherals. Then, reconnect it once again properly and check if the error still exists.

3. Reconnect to Internet: There might be a scenario like the downloaded installation file has completed 100 percent yet the 0x80070017 windows update error appears while trying to run the setup file. Now, this could be due to internet interference. Hence, disable the internet from your system.
Method 1: Disable Antivirus Application Temporarily (If Applicable)
The transparent and widely-known fact everyone knows about any antivirus is that it protects the computer from any sort of malicious or unknown threat. You could even say it as a guardian angel. Thus, if you experience the error 0x80070017 turn off your antivirus immediately for time being. An alternate way is to uninstall the third-party antivirus application from your desktop permanently if you feel it is of no use in the future. Read our guide on How to Disable Antivirus Temporarily on Windows 10 to turn off antivirus for a certain time. If you need to uninstall Norton or Avast antivirus then check our guide on How to completely Uninstall Norton from Windows 10 and 5 Ways to Completely Uninstall Avast Antivirus in Windows 10.

Also Read: Fix Windows 10 Update Error 0x80070103
Method 2: Run Windows Update Troubleshooter
Usually, a troubleshooter tool in a computer is used as a diagnostic method to find most of the Windows-related error and resolve it automatically or gives out the cause behind the issue. For the error code 0x80070017, a Windows Update Troubleshooter utility is worked out. This solution is simple yet efficient as it can capture the root cause and, in some cases, rectify it without any external input inferences. To perform or know more about this method read our guide on How to Run Windows Update Troubleshooter.

Method 3: Upgrade Device Drivers
Outdated or older versions of the drivers can cause compatibility issues with the Windows update process which thus leads to system restore error 0x80070017 in your PC. Hence, ensure all your drivers are up to date. To verify and update, go to the manufacturer’s website or Microsoft webpage and check if there is the latest news on it. Then, search and find the version compatible with your Windows operating system. Read our guide on How to Update Device Drivers on Windows 10 for updating device drivers. Similarly, check our other guides on How to Update Network Adapter Drivers on Windows 10, 4 Ways to Update Graphic Drivers in Windows 10, and How to Update Realtek HD Audio Drivers in Windows 10 to know more about other drivers as their older versions can also cause complications and errors.

Also Read: How to Delete Win Setup Files in Windows 10
Method 4: Manually Download Updates
If you are struggling with the 0x80070017 or 0xc1900204 windows 10 update error then there is a way to install the Windows update manually via the Windows Update Catalog webpage. To do it, follow the steps given below.
Note: You need the KB number of the specific Windows update version.
1. Go to the official Microsoft Update Catalog website.

2. Enter the KB number on the search dialog box and click Search as shown.

3. Now, choose the specific version you want to download and click its respective Download button.

4. On the Download prompt popup, click the link as shown to download the installation file.

5. Once the setup is downloaded a hundred percent, go to Downloads on your PC. Double-click the setup file to run it.

6. Follow the on-screen instruction closely and finish installing the necessary Window update.
Hope this solution worked out. If not, do not worry. Roll up your sleeves you have got a few more methods to try.
Method 5: Reset Windows Update Components
Sometimes the components present in the Windows Update can cause the error code 0x80070017 if not working properly. To fix these problematic components, you need to reset all the Windows Update-related services. Read our guide on How to Reset Windows Update Components on Windows 10 to reset it.

Once all the commands related to Windows Update reset are executed, restart your PC. Then, check if the 0x80070017 Windows 10 update error still exists.
Also Read: How to Fix Windows Update Error 80072ee2
Method 6: Repair Corrupt Files
Sometimes bad sectors in a hard drive can cause the windows error 0x80070017. This is because disk errors are not uncommon. That is why Windows operating system also has a built-in utility tool called chkdsk to scan, find and fix such errors. Hence, check and verify the hard drive. To know more, check our guide on How to Check Disk for Errors Using chkdsk. Then, follow our guide to repair corrupt files on Windows 10.

Method 7: Perform Clean Boot
Most of the users fail to notice many software services or applications that are running in the background. Sometimes these services when overloaded create conflict and become hostile with other applications. In such a scenario, a clean boot comes to your rescue. The clean boot is a process that initiates the operating system with the least set of drivers or startup programs which in turn helps to identify the trouble-causing application and eliminate it. Now, this method could resolve the 0x80070017 windows update error. Read our guide on How to Perform Clean Boot in Windows 10 to perform this method.

Also Read: Fix Windows Update Error 0x800704c7
Method 8: Install Windows Through Flash Stick
Many users reported that the error code 0x80070017 appears specifically when trying to install the windows 10 operating system. Now, this issue could happen when there is a problem in your installation media or the drive. Thus, replace the respective installation media with a different one and verify if this helps. An alternate way is to install Windows 10 via USB flash drive. To do so, first, you need to have a Windows 10 bootable drive. Check our guide on How to Create Windows 10 Bootable USB Flash Drive to do the same. Once a bootable USB flash drive is created, follow the steps mentioned below:
1. Insert the USB device into your PC. Then, open it and run the Windows 10 setup file.

2. On the displayed Windows prompt, fill in all the details and click Next.
3. Then, click Install Now.

4. Enter the License key if you have one and click Next to proceed further. If not, click I don’t have a product key.
Note: Though you skip the license key, for now, you need to fill it up later mandatorily.
5. Read the License terms and click Accept to proceed further with the installation instructions.

6. Now, choose an option of your own among Upgrade: Install Windows and keep files, settings, and applications and Custom: Install Windows only (advanced).
7. Follow the on-screen instructions and complete the installation process till the end. Once done, finally check if the error persists. Hope it is resolved.
Recommended:
- Fix PUBG Stuck on Loading Screen on Windows 10
- Fix All Cameras are Reserved Error 0xA00f4288 in Windows 10
- Fix Windows 10 Update Error 0XC1900200
- Fix OneDrive Error 0x8007016a in Windows 10
We hope this guide was helpful and you were able to fix Windows Update error code 0x80070017. Let us know which method worked the best. Please feel free to reach out to us for any queries or suggestions via the comment section given below.