
Ошибка 0x80070001 обычно появляется при установке Windows 10, но может затрагивать и тех, кто инсталлирует на свою физическую машину Windows 11 или 7. Что характерно, проявляется проблема практически всегда в виде зависания на определенном уровне установки. У кого-то это 59%, у других – 72%, а бывает и 99%. Повторная попытка обычно не увенчивается успехом, сколько бы пользователь не пытался. Однако в некоторых случаях неполадка возникает и в процессе обновления. К счастью, неполадка не очень серьезная, имеет вполне понятные причины появления, а также способы решения.
Windows не может установить необходимые файлы. Убедитесь, что все файлы, необходимые для установки, доступны, и перезапустите установку. Код ошибки: 0x80070001
Причины ошибки 0x80070001
Существует 2 основные причины ошибки с кодом 0x80070001, точнее даже группы проблем:
- Неполадки носителя. Различные повреждения диска, флешки часто являются первоисточником.
- Повреждение установочного дистрибутива. Сама система для установки каким-то образом была нарушена.
Как исправить ошибку 0x80070001?
Вот ряд действий, которые вам следует попробовать, чтобы прийти к решению проблемы:
- Проверить состояние диска или флеш-накопителя. В случае с диском, нужно обратить внимание на наличие царапин или загрязнений. Если что-то подобное присутствует, то можно попробовать очистить диск или его придется менять. Флешка тоже может выйти из строя, следует проверить ее на другом устройстве.
- Создать новый диск или флешку с установочной записью Windows 7. Обязательно перед этим нужно отформатировать накопитель, так как при наличии старой записи загрузчика наступает конфликт. Он и приводит к появлению этой и некоторых других ошибок.
- При создании диска обязательно использовать медленный прожиг х4. В этом случае накопитель будет создан наиболее правильно.
- Скачать другой ISO. Если повреждены сами файлы, то нужно скачать их с другого источника. Лучше использовать официальный сайт Microsoft, как наиболее надежное место.
Подводя итог, ошибка 0x80070001 не является проблемой самого устройства, по крайней мере в большинстве случаев. Хотя есть отдельные ситуации, когда поврежден или неправильно работает сам DVD-дисковод. В остальных ситуациях нужно просто перезаписать установочщик Windows на другой накопитель и все пройдет без ошибок.
I recently did a fresh install of Windows 10 to the latest version. Unfortunately for me, some software I have uses .NET 3.5. The system will not install it.
I have tried «Turn Windows features on or off».
I have tried the .NET 3.5 installer.
I have tried the .NET 3.5 offline installer.
I have tried the Microsoft utility to automatically repair «problems that block programs for being installed».
I have tried the .NET repair tool.
I have tried the dism command.
I have tried going to «Windows Update».
Everything returns a useless «error 0x80070001».
Windows Update reports:
2019-01 Cumulative Update for .NET Framework 3.5 and 4.7.2 for Windows 10 Version 1809 for x64 (KB4481031) — Error 0x80070001
This is ridiculous. I’m trying to install a version of .NET that is supposed to still be supported and works in every other version of Windows I’ve had for the last 10+ years.
Document Details
⚠ Do not edit this section. It is required for docs.microsoft.com ➟ GitHub issue linking.
- ID: ea654e23-2ec5-637e-99c3-8870b895030c
- Version Independent ID: 9c054590-c5e3-199c-b852-e1a856b4aae7
- Content: Install the .NET Framework 3.5 on Windows 10, Windows 8.1, and Windows 8
- Content Source: docs/framework/install/dotnet-35-windows-10.md
- Product: dotnet-framework
- GitHub Login: @rlander
- Microsoft Alias: mairaw
Recently many users reported receiving an error 0x80070001 when they were trying to use the previously created restore points on their PCs. After you encounter this problem, it becomes quite difficult to update Windows or even perform some basic operations.
To restore your device functionalities, you must perform the solutions provided in this post and see if they address this error code. Let’s explore the workarounds in detail –

What causes Error 0x80070001 in Windows?
This error may occur for different reasons, the most probable ones are listed below –
- Wrongly configured system files or folders
- Corrupted Windows Registry
- Third-party Antivirus interacting with internal files
- You have installed a buggy or faulty application
- After updating your operating system or installing the latest patches on it
If you remember installing any new applications or updating your Windows, consider uninstalling them first. Only when the issue persists, go and try these solutions –
- Purge Windows Cache
- Reset Windows Update Components
- Run System File Checker
- Clear Windows Update download path
1. Purge Windows Cache
When you uninstall an application and don’t restart your PC, some of its files are left behind. With time, they become obsolete, however, they may interact with system files triggering an error code 0x80070001. Or, it could simply mean that your Windows Update cache is full and requires purging. Whatever the scenario in your case, you may resolve it by following these easy steps.
First of all, you need to stop Windows Update before you may purge Windows Cache folder contents. To do so, follow these steps –
- Press the “Win + S” key to launch Windows Search.
- Type “
Services” in the Search box and press Enter. - Inside the Services window, scroll down to Windows Update, right-click over it, and hit Stop.
Now, you may clear the stored cache on your PC –
- Press the “Win + R” keys together to launch the Run dialog box.
- Copy/paste “
%windir%\SoftwareDistribution\DataStore” near the text field, and hit OK. - Doing so will launch Windows Update’s download folder.
- Now, select all files and folders inside it and press the shortcut – Shift + Delete.
- All stored cache will be lost permanently.
Since you have already purged Windows Cache folders, you may now restart the service that you stopped earlier. To do so, launch Windows Update again, right-click on it, and hit the option – Start.
Reboot your PC and check whether the error 0x80070001 is resolved by now. If it is still appearing, move on to the next solution.
2. Reset Windows Update Components
As you are still encountering the error 0x80070001, the update components must have become corrupted somehow. To solve this issue, you must reset Windows update components and restore them to their default states. Here’s what you need to do –
- Launch CMD as administrator.
- When it does, stop all update-related services by running these codes –
net stop wuauserv
net stop cryptSvc
net stop bits
net stop msiserver
- Now that you have disabled all essential services, rename the two cache folders inside Windows by running these two commands –
C:\Windows\SoftwareDistribution SoftwareDistribution.oldC:\Windows\System32\catroot2 Catroot2.old
- Execute this code next to reset the Network settings on your PC –
netsh winsock
- Restart all update services that you have stopped earlier. To do so, run these codes one by one followed by the Enter key separately –
net start wuauservnet start cryptSvcnet start bitsnet start msiserver
- In the end, type “exit” and press Enter to come out of Windows Console.
Restart your PC next and check if this resolves the error code 0x80070001 on your Windows device.
3. Run System File Checker
The presence of corrupted system files and folders may also result in an error 0x80070001 on Windows 11 or 10 PCs. Go and check if that’s the case on your PC. Running SFC is a good way to find and resolve missing or corrupted files/folders automatically on a Windows PC. Here’s how you may run this utility program –
- Right-click on the Windows icon (Win + X) and select Windows Terminal (Admin).
- This will by default load into Windows PowerShell. Press Ctrl + Shift + 2 to launch Command Prompt as administrator.
- On the elevated console, run this command –
sfc /scannow

- Let this tool run as long as it takes to find and repair corrupted files on your PC.
- Once this is over, restart your PC and check if you can now update Windows.
4. Clear Windows Update Download Path
The error 0x80070001 might also appear when the Windows Update Download path is corrupted somehow. If that’s the case, you may clear this path and retry downloading the updates. Here’s how you may perform this task –
- Press Win + R, type “
regedit“, and hit OK. - The UAC windows will appear next, click Yes to proceed ahead.
- Inside the registry, navigate to the following –
HKEY_LOCAL_MACHINE > SOFTWARE > Policies > Microsoft > WindowsUpdate
- Once you are there, search for entries – “
WUServer” and “WIStatus” on the right pane. - Right-click on each one of these entries and delete them.
If there are no such registries there, the download path is all okay. Consider clean installing Windows to fix error code 0x80070001 on your computer next. In case you had created a system restore point previously, you may try that first before fresh installing Windows.
Readers help support Windows Report. We may get a commission if you buy through our links.
Read our disclosure page to find out how can you help Windows Report sustain the editorial team. Read more
Sometimes, you may encounter an error message, Windows cannot install required files with an error code – 0x80070001.
This error may often arise after a Windows Update, or while performing a Windows backup and restore.
What causes error code 0x80070001?
Some of the reasons why you may come across the 0x80070001 error code on your Windows 11 are as below:
- After a Windows update – It can be initiated by a problem with the Windows update components or malfunction in your system.
- A Windows software not installed correctly or failed to install – When a Windows software is incorrectly installed or it did not install at all, you may see the 0x80070001 error.
- Corrupted system files – It’s when the Windows system files are missing or corrupted, you can bump into this error.
- Damaged programs and apps – When the programs and apps on the system are damaged, it can trigger the 0x80070001 error code.
- Corrupted USB or DVD drive – Sometimes, you may see the error message if the installation media is damaged.
What does error code 0x80070001 mean?
If you see the age, Windows cannot install required files message with the error code – 0x80070001, which means, it’s an invalid function.
According to Microsoft, you often encounter this issue when you try to back up a specific library or when you accept the default settings in Windows Backup and Restore.
How do I fix error 0x80070001?
Before you try the primary troubleshooting methods below, here are a few checks you may want to perform:
- Disconnect any external devices.
- Create a new bootable USB drive for Windows 11.
- Run an antivirus scan to check for malware or virus infection on your PC.
- Check your internet connection.
If none of the above methods helps fix the issue, you can try the below workarounds to fix the 0x80070001 error.
1. Clear the Windows Update cache
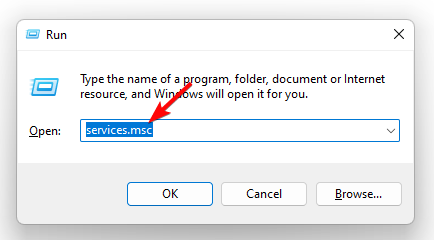
- Press the Win + R shortcut keys, type services.msc in the search bar, and press Ctrl + Shift + Enter keys simultaneously to launch the elevated Services window.

- On the right, under the Names column, locate Windows Update. Right-click on it, then click Stop.

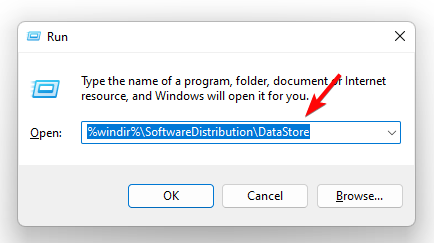
- Again, open the Run dialog by pressing the Win + R keys together.
- Type this command and hit Enter:
%windir%\SoftwareDistribution\DataStore
- This will open Windows Update’s download folder. Select all the contents in this folder and hit Delete.

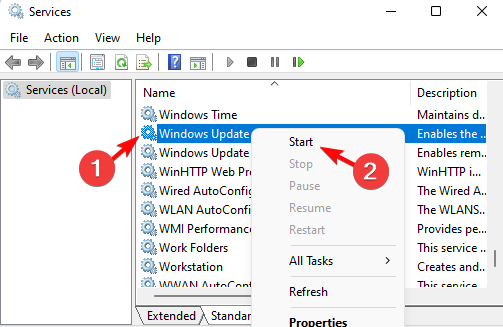
- Now, press the Win + R keys again to launch the Run console, type services.msc, and hit Enter to open the Service manager window.
- On the right, under the list of services, look for Windows Update, right-click on it and select Start.


You have successfully cleared the Windows update cache, and you should not see the 0x80070001 error code again.
2. Reset Winsock Library
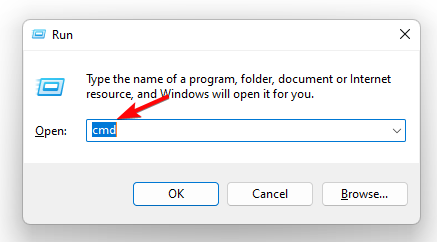
- To open the Run dialog, press the Win + R keys together.
- Type cmd in the search bar, and press the Ctrl + Shift + Enter keys simultaneously to launch the elevated Command Prompt.

- Next, run the below command in the Command Prompt (Admin) and hit Enter:
netsh winsock
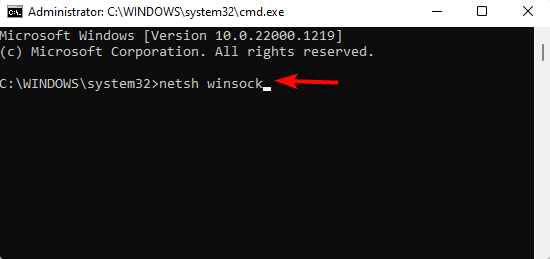
Once the command has been successfully executed, restart your PC and now check the status of your connection. The Windows Update service should be running fine without any errors.
- Windows Update not Showing: Get it Back With 5 Solutions
- 7 Quick and Easy Ways to Fix Windows 11 File System Error
- How to Fix Can’t Type in Command Prompt
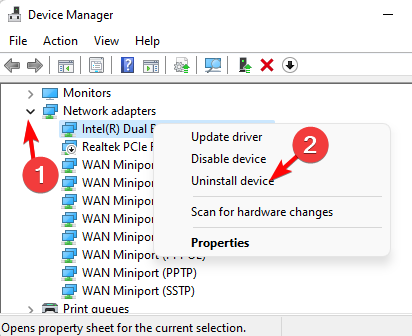
3. Re-install the TCP/IP Stack Protocol
- Press the Win + R shortcut keys to open the Run dialog, type Device Manager, and hit Enter to open the Device Manager window.

- Next, expand the Network adapters section, right-click on your adapter, and select Uninstall device.
- Press Uninstall again in the confirmation prompt to continue.

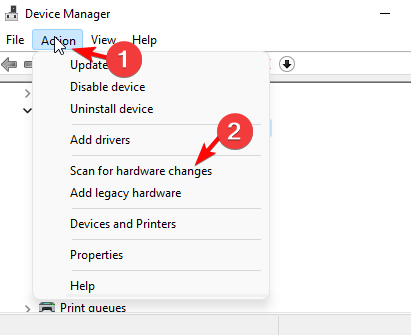
- Now, go to the Action tab in the toolbar, and select Scan for hardware changes. Windows will now scan for the latest version of the network adapter, and re-install the device automatically.


Now, restart your PC and check if you still encounter the message, Windows cannot install required files with the error code – 0x80070001.
You can also repair and restore corrupted system files on your PC using the methods shown in our detailed guide, which is also applicable to Windows 11.
Alternatively, you can also disable the hibernation mode in Windows 11 to increase storage space.
You may also run the disk clean-up tool on Windows 11 to free up disk space and fix the 0x80070001 error.
If you have any other queries related to Windows 11 installation, do leave a message in the comments box below.
Madhuparna Roy
A diploma holder in computers and with a keen interest in technology, Madhuparna is passionate about writing How-to guides and helping people solve the most intricate Windows issues.
It all started with the evolution of mobile phones and Google, and that has now settled with Windows.
The error 0x80070001 generally appears when you try to install or update an operating system, application, or driver. It typically states ‘Windows cannot install required files. The file may be corrupt or missing. Make sure all files required for installation are available, and restart the installation’.
This error indicates that the Windows Installer has failed to copy a required file from the installation media to the hard drive during installation. This could be due to various reasons such as corrupt installation files and incompatibility issues.
Below, we take a look at the troubleshooting methods that can help you resolve this error once and for all. Proceed with the one that fits your situation the best.
1. Convert the disk (If applicable)
If you are encountering the error while trying to install Windows 11 on your system with your OS partition configured to Dynamic disk, then the disk type is causing the problem.
With a dynamic disk, you can create a volume that spans multiple physical disks. It is typically used for advanced storage configurations, such as fault tolerance, software RAID, and multiple boot configurations. However, not all versions of Windows support dynamic disks. This is why, to avoid encountering installation problems when attempting to install Windows, it is recommended to use a basic disk instead of a dynamic disk.
This process can result in data loss so make sure you have backed up the data on the dynamic disk to be safe.
Here is how you can change the disk type to fix the problem:
- Press the Win + R keys together to open Run.
- Type diskmgmt.msc in Run and click Enter.
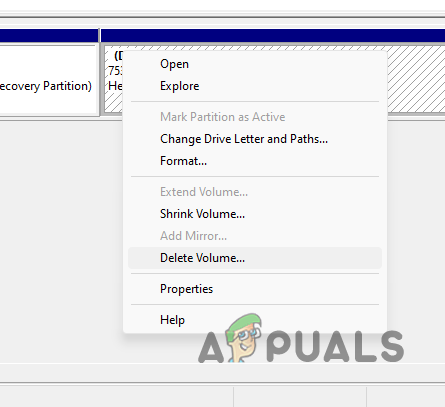
- In the Disk Management window, right-click the volume you want to convert to a basic disk and choose Delete Volume.

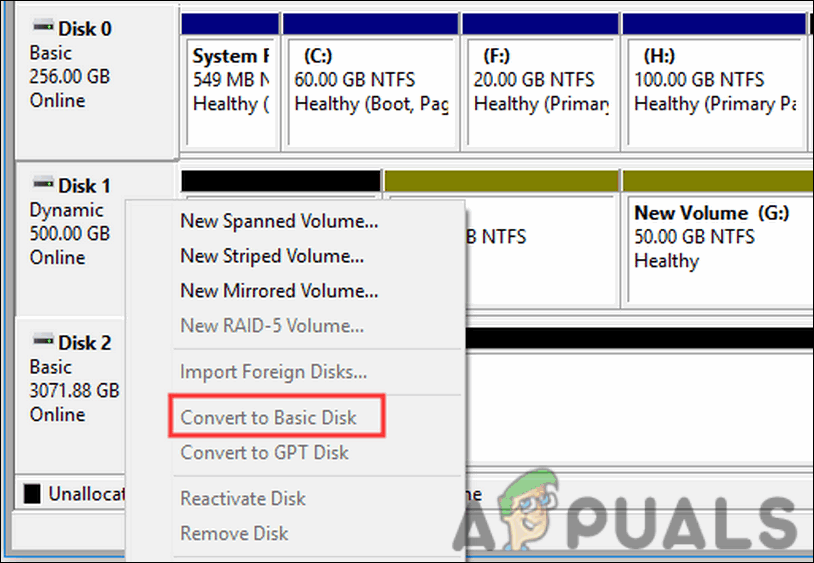
Deleting Volume - Now, right-click the dynamic disk and select Convert to Basic Disk.

Convert to the basic disk - Follow the on-screen instructions to proceed.
- After the conversion process has been completed, you can add new volumes to the basic disk by right-clicking unallocated space and selecting New Simple Volume.
Once this is done, you can try installing the new Windows version. Hopefully, the error will not appear again.
2. Delete the unnecessary files
This error can also pop up if you have insufficient disk space.
As we mentioned earlier, the 0x80070001 error often occurs when Windows cannot copy files from installation media to the hard drive during installation or update. This can happen if there isn’t enough free space on the hard drive to accommodate the installation files.
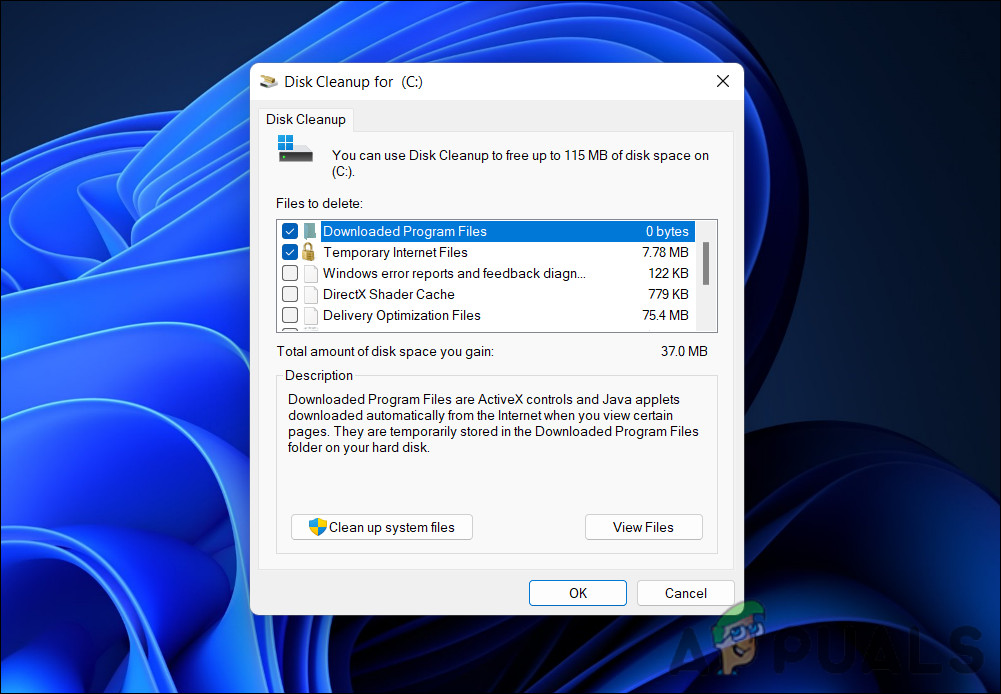
If this scenario is applicable, then this error can be avoided by deleting unnecessary files and freeing up space on the SSD before installing. One easy way of doing this is by using the Disk Cleanup utility of Windows. It is a built-in tool in Windows that allows you to free up space on your hard drive by deleting unnecessary files. The utility scans your hard drive and identifies files that are no longer needed, such as temporary files, log files, cached files, and other system files.
Here is how you can use it:
- Press the Win + S keys on your keyboard to open the Windows Search utility.
- Type Disk Cleanup in the search area and click Open.
- Once you are in the Disk Cleanup window, select the SSD drive that you want to clean up and click OK.
- Next, select the types of files that you want to delete, such as temporary files, recycle bin files, and system files, and click OK.

Run the Disk Cleanup tool - Click Delete Files to begin the cleanup process.
Once the process is completed, close the utility. You can also head over to the Apps & features section of the Windows Settings app and look for the programs you no longer need. Removing them from the system will also free up space to perform new installations easily.
3. Modify Windows Registry
When attempting to install the same version of an operating system on your computer, you may encounter the 0x80070001 error due to old registry files that are causing conflicts. To address this issue, you can verify and fix these files.
Here is how:
- Press the Win + R keys together to open Run.
- Type regedit in the text field of Run and click Enter.
- Click Yes in the User Account Control prompt.
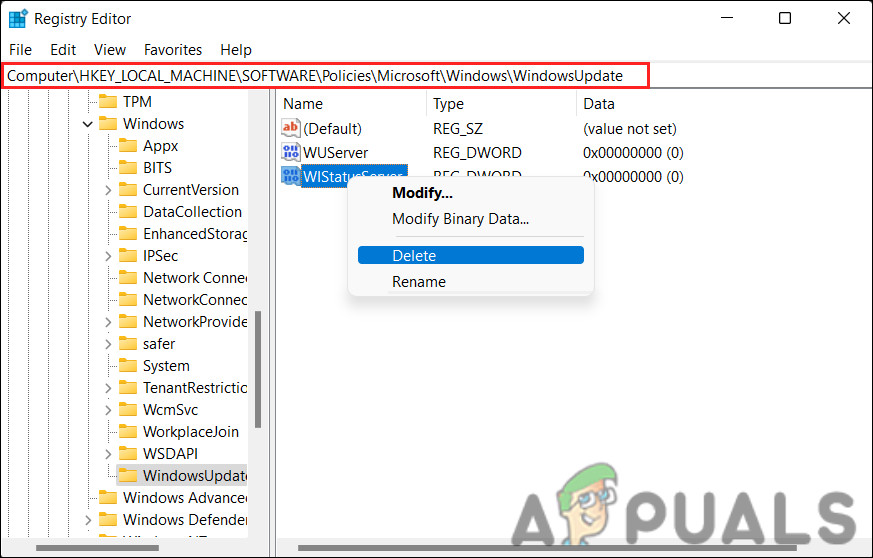
- Once you are inside the Registry Editor, navigate to the location below:
HKEY_LOCAL_MACHINE\SOFTWARE\Policies\Microsoft\Windows\WindowsUpdate
- Move to the right pane and look for WUServer.
- Right-click on it and choose Delete.
- Delete the WIStatusServer value in a similar manner.

Delete the key - Once done, close the Registry Editor and restart your computer.
Upon reboot, try proceeding with the installation again and check if the issue is resolved.
4. Unplug external peripherals
This error can sometimes occur when there are conflicts or compatibility issues between the external peripherals and the installation process.
You can resolve this issue by unplugging all external peripheral devices, including USB drives, printers, cameras, and other devices, before attempting to install or update Windows. After you have completed the installation or update process, you can reconnect the peripherals.
We recommend turning your computer off, removing all the unnecessary peripherals, enabling it back, and then restarting the installation process.
5. Install using Media Creation Tool
Since the error can be caused by corrupted or incomplete installation files, using the Media Creation Tool can help ensure that you have a fresh set of installation files that are not corrupted. This tool allows you to create a bootable USB drive or DVD with the latest version of Windows, which can be used to perform a clean installation or upgrade.
Additionally, the tool may also help identify and address other potential issues that may be causing the error.
6. Reset BIOS
In some cases, conflicts or errors in the BIOS settings can prevent an installation or update from taking place. Resetting the BIOS can help clear any incorrect settings and restore the default configuration, which can potentially resolve the error.
Resetting the BIOS for different computers can be different, depending on their manufacturer and model. In order to reset the BIOS, you usually need to press a key or key combination during the boot process. The key or key combination varies depending on your computer’s manufacturer and model, so it’s a good idea to check the manual or find out more.
You may find a reset BIOS option in different sections of the BIOS setup menu, depending on the manufacturer and model of your computer. However, the option is usually labeled as Reset to Default or Load Factory Defaults.
If you’re not comfortable resetting the BIOS yourself, it’s best to seek the assistance of a qualified technician or the manufacturer’s customer support.