
Did you get the Printer Error 0x00000709 while attempting to set your default device accompanied by a message “Operation could not be completed”?
Several reasons may cause this error to pop up in the first place like outdated device drivers, corrupted registry entries, etc. Sometimes, letting Windows 11/10 auto-manage the default printer can also trigger similar issues.
Recent – How to fix printer error code 6a80 in Windows 10
What does Printer Error 0x00000709 mean?
Error 0x00000709 means that there is already a printer set and configured to use on your Windows PC. If you try to add a second printer, you will encounter an error message that states the following –
Operation could not be completed (error 0x00000709)
You should check if the printer name has been added correctly and if so, whether it is connected to the network or not. In addition to this, this error could also occur when Windows does not let you configure the new printer.
Fix Can’t connect to a network printer, Error 0x00000709
Start with hard resetting your Printer, and modifying the RPC connection settings policy. If the error persists even after this, you may try troubleshooting the Printer, Restarting the Print Spooler service, and a few other fixes.
In case the error still persists, try changing its default settings and updating printer drivers. Consider renaming your Printer name using the Registry if none of the above solutions work to address this error code on your computer.
Note: If you are getting this error code after installing a recent cumulative update, make sure to downgrade to the previous version. For all other reasons, you may follow the below workarounds –
1. Perform a hard reset to solve this 0x00000709 Error
Before you go with any solution, check if you can resolve this issue by hard resetting the Printer. To do so, follow these easy steps –
- Shut down your PC and this will result in your Printer stopping as well.
- Unplug the power cord from your printer and wait for at least 2 minutes.
- Remove any wired connection between your PC and printer as well.
- After the wait time of 2 minutes is over, re-plug the power cord and the connecting wires between your PC and printer.
- If you are on a wireless network, check if your printer is now connected to the same network.
- Launch Command Prompt as administrator next, and run these codes –
net stop spooler
del %systemroot%\System32\spool\printers* /Q
net start spooler
- The first and the last command is there to stop and then restart the Print Spooler service. Whereas, the second command runs to delete any cache files or clear any queued files on your computer.
Now that you have cleared Printer Spooler, restart your PC again. From the next login, check if you can print documents or connect to a network printer without getting into some error code.
2. Configure the RPC Connection Settings
The next possible to this problem is by modifying a group policy inside your computer titled “RPC Connection Settings”. You may attempt this solution only if you are on Windows Editions Pro, Enterprise, or other premium editions.
Note: Windows 11/10 Home users can’t use this solution. If you are on such an edition, skip this solution, and proceed to the next one.
Follow the below steps on how to configure this policy in Windows –
- Launch the Run dialog by pressing Win + R.
- Type “
gpedit.msc” without quotes on it, and hit OK. - When the group policy window opens up, navigate to the below path inside it –
Computer Configuration > Administrative Templates > Printers
- Head over to the right pane, and double-click on “Configure RPC connection settings“.
- Tick the Enabled radio button, and select the following using their respective drop-down menus –
- Protocol to use for outgoing RPC connections: RPC over named pipes
- Use Authentication for Outgoing RPC Connections: Authentication Enabled
- Click Apply and then OK to confirm the recent changes and restart your computer.
Sign back into your device again and check if this resolves the error code 0x00000709 on your PC. If you encounter this error code again, re-open Group Policy and this time select “RPC over TCP” using the drop-down menu next to Protocol to use for outgoing RPC connections.
If this doesn’t work as well, try once again with “Authentication Disabled” under the Use Authentication for Outgoing RPC Connections. Play with settings carefully, as one of these configurations should resolve this issue for your printer.
3. Rename the Printer in the Registry Editor
An error 0x00000709 mostly occurs because of the presence of old files from previous printer installation(s). So, when you change the Printer name inside the registry, this might resolve this error code on your Windows PC. Here’s how to perform this task –
- Press Windows + R to launch the Run dialog.
- Type Regedit on it, and hit OK.
- When the registry editor opens up, navigate to the below path –
Computer\HKEY_CURRENT_USER\Software\Microsoft\Windows NT\CurrentVersion\Windows
- Head over to the right pane and locate the Device entry. Right-click on this entry, and select Modify.
- A pop-up window will appear next. Add your printer name first inside the Value data field. Make sure to leave other detail as it is.

Click OK and close the registry. This might result in an error stating – “Cannot edit Device: Error writing the value’s new contents”. If that’s the case, you must set the permissions for this key. Here’s how to do that –
- Go to the left pane, right-click on the Windows folder, and select Permissions from the context menu.

- Go to the Group or user names section, and select Restricted.
- Again, go to the Permissions for Restricted section and mark the checkbox next to the Full Control and Read option.
- Finally, click on Apply and then OK.
Now that you received permissions for the restricted users, re-follow the above steps to add your Printer name inside the Value data field of the “Device” entry.
Reboot your computer and check if this resolves the current printer issue on your Windows PC.
4. Uninstall Recent Cumulative update
This error once appeared after users installed the latest cumulative update, Oct 2021 Security patch i.e. KB5006670 on their PCs. Microsoft has acknowledged this issue and resolved it by providing a non-security update KB5007262 on Windows 11 and KB5007253 on Windows 10.
If you received a fresh error 0x00000709, installing the above patches won’t do any good. Instead, what you can do is roll back to the previous Windows 11/10 Build version. Here’s how to remove recent cumulative updates from your computer.
Note: If you had installed some other cumulative update and started getting this error code, uninstall that update.
- Press Win + I to launch the Settings window.
- Go to Update & Security > Windows Update next.
- Click the “View update history” option on the right pane.

- Here, you will find an option – “Uninstall updates”, click on it.
- You will be redirected to the Installed updates on the Control Panel.
- Click “Uninstall a program” on the left pane. A list of all recent patch updates will appear on the right side.
- Scroll and locate “KB5006670”, right-click on it, and hit the option – Uninstall.
- When the warning message comes into the display, hit Yes.
- Your device will restart immediately afterward, and start removing the chosen update.
- Wait for this cumulative update to be removed successfully.
After this cumulative update uninstalls, restart your PC again, and see if you can now connect to a network printer.
How can I remove an update using CMD?
Uninstalling a cumulative update is quite easy using the Command Prompt. However, you need to launch this tool as an administrator to make any system-level changes.
- Use Win + X and choose Windows Terminal (Admin).
- Press Ctrl + Shift + 2 to enter the CMD screen on Windows 11.
- Copy/paste the below command and press Enter –
wusa /uninstall /kb:5006670
Note: Do change “5006670” with the actual number of Cumulative Update after which you started getting into an error code 0x00000709.
Command Prompt will immediately start downgrading your device to a previous Build version. Wait for this downgrade and once it is over, check if the problem resolves.
5. Run Printer Troubleshooter
Troubleshooting is another effective solution to fix error 0x00000709 when other fixes don’t work. Here’s how to initiate this tool on a Windows PC –
- Press Win + R to launch the Run dialog box.
- In the search box, type the following code and press the Enter key –
msdt.exe /id PrinterDiagnostic
- On the following page, click on the Next button as shown in the below snapshot.

- Do as this troubleshooter says, and you will overcome the Printer error in no time.
6. Disable the Windows 10 managing Printers automatically
Windows 10 works on users’ behalf and auto-manages the available printers. If you are facing the 0x00000709 error, you should disable this optional feature by opening the local settings on your PC. Here’s how to perform this task –
- Launch Settings using the Win + I key combinations.
- Select Devices thereafter Printers & Scanners.
- Switch to the right pane and unmark the checkbox against “Let Windows manage my default printer“.

- Close all running windows and Restart your PC to save the changes made so far.
7. Configure PointAndPrint registry
If the problem persists even after applying the above fixes, check if this is occurring because of the registry entry – PointAndPrint. You may configure this DWORD entry by opening the Command Prompt as admin. here’s how you may modify this key on the registry –
- Open CMD as an administrator.
- When the Windows console opens up, copy/paste the following –
reg add "HKEY_LOCAL_MACHINE\Software\Policies\Microsoft\Windows NT\Printers\PointAndPrint" /v RestrictDriverInstallationToAdministrators /t REG_DWORD /d 1 /f
- Press Enter and see if this command runs successfully.
- If it does, restart your PC.
The error 0x00000709 should disappear from the next login.
8. Update the Printer Drivers
The presence of obsolete printer drivers may also result in Error 0x00000709 on Windows 10 PC. To rule out this section, you must update all the Print drivers using the below steps –
- Right-click on the Win Icon and select Device Manager.
- On the following screen, expand the arrow next to the “Universal Serial Bus Controllers”.
- When this section opens up, right-click again on the “USB composite device” and tap Update driver. See the Snapshot below –

- Next, choose “Search automatically for updated driver software”.
- The System will take care of the remaining things. Wait for a while and let the Device Manager do its task.
Conclusion
I hope the above solutions indeed help you to overcome the printer 0x00000709 on your Windows 11/10 PC. Let us know in the comment section which solution exactly works in your case.
-
Home
-
News
- How to Fix Windows 11 Pro 23H2 Error 0x00000709?
By Daisy | Follow |
Last Updated
When you connect a shared printer on Windows 11 Pro 23H2, you may receive the Operation could not be completed (error 0x00000709) pop-up message. This post from MiniTool introduces how to remove the Windows 11 Pro 23H2 error 0x00000709.
Many users complain that they receive the Windows 11 Pro 23H2 error 0x00000709 when connecting the shared printer. The following are the 2 forums:
I have an issue I am unable to solve. It’s a new Dell Optiplex 7010 and Dell can’t help with this. I don’t have a support contract with MS so here I am. It is running Windows 11 23H2 fully up to date. I added one network printer (by IP or hostname didn’t matter) that is not shared, just a standard network printer that works fine. No issue with it working but I get the error pop up at every logon. No employee will want to deal with this.Microsoft
There seems to be an issue in sharing printers from Windows 11 (23H2) to previous versions of Windows. If I try to access the properly shared printer on Windows 11 from Windows 7 OS, double clicking on the printer gives a 0x00000709 error, and trying to connect to a printer gives a «Can’t connect to the printer» error.https://www.ntlite.com/
If you are facing the same problem, follow the below 5 ways to solve it.
Fix 1: Run the Windows Printer Troubleshooter
You can fix the Windows 11 Pro 23H2 printing error 0x00000709 by running Windows 11 built-in troubleshooter. Here is how to do that:
1. Press the Windows key + I key to open the Settings application.
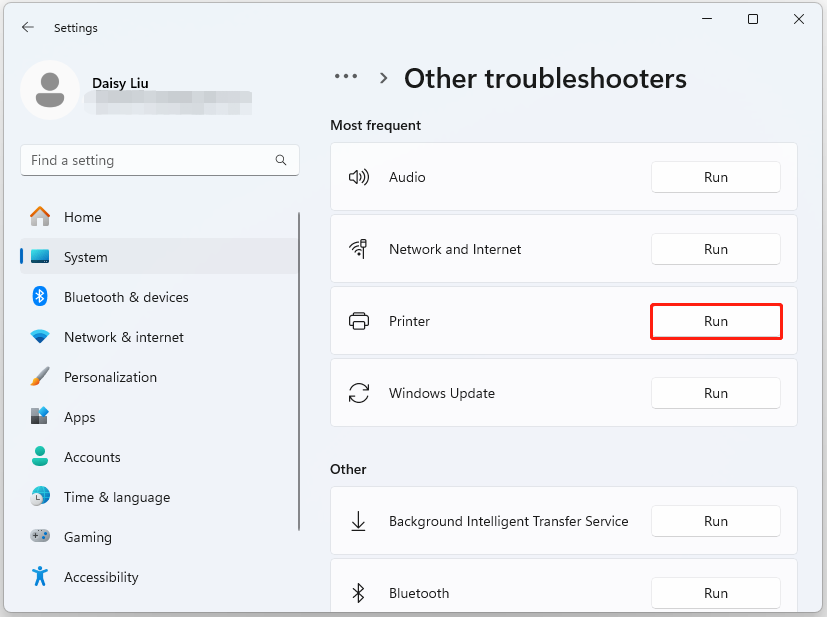
2. Go to System > Troubleshoot > Other troubleshooters.
3. Find Printer and click the Run button.
Fix 2: Change RPC Connection Settings
To fix the error 0x00000709 Operation could not be completed on Windows 11 Pro 23H2, you can change RPC connection settings.
1. Press the Windows + R keys together to open Run. Then, type gpedit.msc in it.
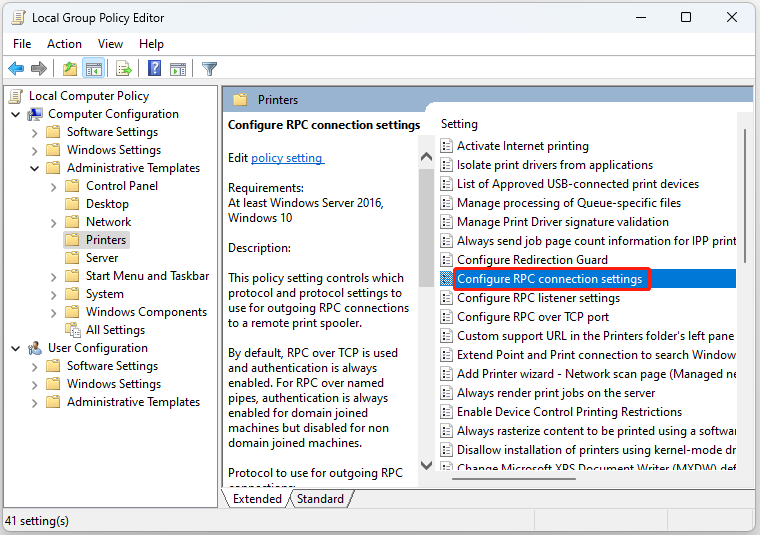
2. In the left-sidebar, select Administrative Templates > Printers.
3. Find and double-click Configure RPC connection settings.
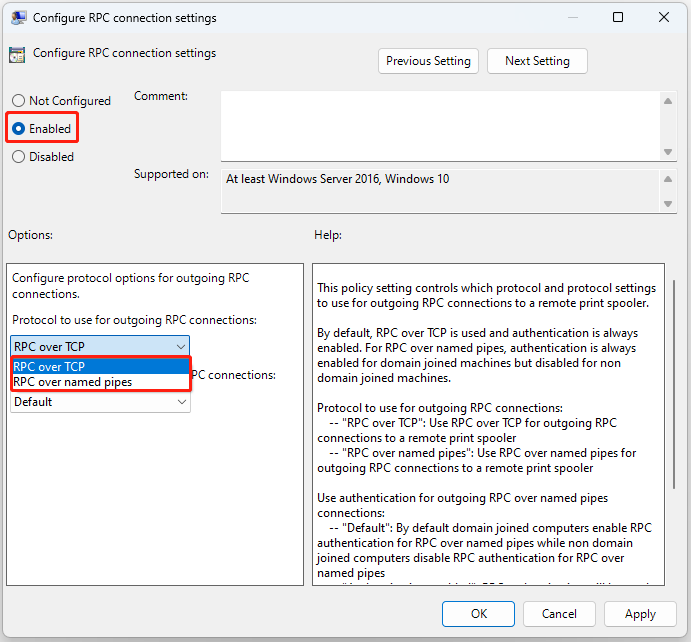
4. Then, choose the Enabled option. Select RPC over named pipes from the drop-down menu. Then, click Apply > OK.
Fix 3: Change the Registry
You can also change the registry items to fix the “Windows 11 Pro 23H2 error 0x00000709”. Follow the guide below:
1. Press the Windows + R keys together to open Run. Then, type regedit in it.
2. Go to the following path:
HKEY_LOCAL_MACHINE\Software\Policies\Microsoft\Windows NT\Printers\RPC
3. On the right side, find and double-click RpcUseNamedPipeProtocol. If you can’t see it, right-click on space and select New > DWORD (32-bit) Value, and name it RpcUseNamedPipeProtocol.
4. Two values need to be configured:
RpcOverTcp (default) – set it to 0.
RpcOverNamedPipes – set it to 1.
Fix 4: Restart Print Spooler service
You can restart the Printer Spooler Service to fix the Windows 11 Pro 23H2 error 0x00000709.
1. Type Services in the Search box to open it.
2. Find Printer Spooler and right-click it to select Restart.
3. Try to connect to the printer again after the service restarts.
Fix 5: Uninstall the Rcently Update
If you receive the Windows 11 Pro 23H2 printing error 0x00000709 after installing the recent update, you should uninstall it. To do that, follow these steps:
Tips:
It’s recommended to back up files before uninstalling the recent update since Windows update is a common reason for computer failure and data loss. The free backup software – MiniTool ShadowMaker is a suitable tool that allows you to back up files/systems/disks/partitions within 30 days for free.
MiniTool ShadowMaker TrialClick to Download100%Clean & Safe
1. Press Windows + I to open Settings.
2. Go to Windows Update > Update history.
3. Under Related settings, click Uninstall updates.

4. Find the most recent update in the Control Panel app by checking its installation date. Once it has been located, right-click it and click Uninstall.
Final Words
To sum up, this post has introduced 5 useful methods to fix the Windows 11 Pro 23H2 error 0x00000709 when connecting the shared printer. If you meet the same issue, you can try the methods mentioned above.
About The Author
Position: Columnist
Having been an editor at MiniTool since graduating college as an English major, Daisy specializes in writing about data backups, disk cloning, and file syncing as well as general computer knowledge and issues. In her free time, Daisy enjoys running and going with friends to the amusement park.
Решение вопроса:

1.Нажимаем на сочетание клавиш Win + R, вводим gpedit.msc:
2.Перейдем в Конфигурация компьютера > Административные шаблоны > Принтеры

3.Выбираем «Настроить параметры подключения RPC»

4.Ставим переключатель на Включено
5.Протокол, используемый для исходящих подключений RPC — «RPC через именованные каналы»
6.Подключаемся к принтеру.
Эта информация оказалась полезной?
Как можно улучшить этот ответ?
Предыдущий вопрос
Следующий вопрос
Like the previous version, Windows 11 users are also complaining to struggle when trying to connect to printer after they update to 22H2. Instead of establishing connection to the device, a message appears for them – “Operation could not be completed (error 0x00000bc4). No Printers were Found”.
Description of error code 0x00000bc4 is ERROR_PRINTER_NOT_FOUND. Sometimes, 0x00000709 (ERROR_INVALID_PRINTER_NAME) may also appear. Both problems started after upgrading the system to Windows 11 22H2. Fortunately, there are solutions to these shared network printer issues so nothing to worry about. We have earlier written – Fix Printer Allows only Default Settings after upgrade to Windows 11 22H2.
Windows 11 22H2 Printer Error 0x00000bc4 and 0x00000709
Here is how to fix Error 0x00000bc4 Printer 0x00000709 in Windows 11 22H2 –
Way-1: Using Group Policy
This problem occurs because of a Group Policy, Configure RPC Connection settings which came with Windows 11 22H2. In brief, this policy allows you to configure protocol options to use for Outgoing RPC connections.
22H2 built-in configuration prevents Windows from detecting your network printers. This setting wipes out the existing printers and adding them manually triggers error 0x00000bc4. Changing the policy setting as follow will fix the error –
- Click on – Sart.
- Type – gpedit.msc.
- Hit Enter to open Local Group Policy Editor.
- Navigate to
Administrative Templates > Printers > Configure RPC connection settings- On Configure RPC connection settings window, check Enabled.
- In the Options section, click on the drop-down.
- Select – RPC over named pipes.
- Click – Apply and OK.
This policy helps:
This policy setting controls which protocol and protocol settings to use for outgoing RPC connections to a remote print spooler.
By default, RPC over TCP is used and authentication is always enabled. For RPC over named pipes, authentication is always enabled for domain joined machines but disabled for non domain joined machines.
Protocol to use for outgoing RPC connections:
— “RPC over TCP”: Use RPC over TCP for outgoing RPC connections to a remote print spooler
— “RPC over named pipes”: Use RPC over named pipes for outgoing RPC connections to a remote print spoolerUse authentication for outgoing RPC over named pipes connections:
— “Default”: By default domain joined computers enable RPC authentication for RPC over named pipes while non domain joined computers disable RPC authentication for RPC over named pipes
— “Authentication enabled”: RPC authentication will be used for outgoing RPC over named pipes connections
— “Authentication disabled”: RPC authentication will not be used for outgoing RPC over named pipes connectionsIf you disable or do not configure this policy setting, the above defaults will be used.
Way-2: Through modifications in Registry
The same printer error 0x00000bc4, 0x00000709 can be solved by simply changing Registry entries in the following way –
- Press Windows and R keys.
- Type – Regedit.exe.
- Hit Enter to launch the Registry Editor.
- Select Yes on the User account control dialog.
- Browse below string and reach the entry RPC –
HKEY_LOCAL_MACHINE\Software\Policies\Microsoft\Windows NT\Printers\RPC- Double-click on RpcOverNamedPipes and enter Value data 1.
- In the same way, change the value data of RpcOverTcp (default) to 0.
- Close the Registry Editor and restart your computer.
Methods:
Way-1: Using Group Policy
Way-2: Through modifications in Registry
That’s all!!