
Очень распространенная проблема при установке Распространяемого пакета Visual C++ 2015 и 2017 в Windows 7 и 8.1 — неопознанная ошибка 0x80240017 после запуска файла установки vc_redist.x64.exe или vc_redist.x86.exe с сообщением «Настройка не завершена», причем разобраться, в чем именно дело и как исправить ситуацию подчас бывает сложно. Примечание: если
В этой инструкции подробно о том, чем может быть вызвана такая ситуация, как исправить ошибку 0x80240017 и установить Visual C++ Redistributable в Windows 7 или 8.1. Примечание: если вы уже всё испробовали, но ничего не помогает, можно использовать неофициальный способ установки библиотек, который описан в конце инструкции Как скачать и установить Visual C++ 2008-2017 Redistributable, с большой вероятностью установка пройдет без ошибок.
Исправление ошибки 0x80240017 при установке компонентов Visual C++ 2015 и 2017
Чаще всего причиной неопознанной ошибки 0x80240017 при установке распространяемых компонентов Visual C++ 2015 (2017) являются те или иные неполадки Центра Обновлений Windows 7 или Windows 8.1.

Если вы каким-то образом блокировали или отключали центр обновлений Windows, использовали «активаторы» — всё это может привести к рассматриваемой проблеме.
В том случае, если ничто из указанного не делалось, а на компьютере или ноутбуке установлена чистая лицензионная Windows, сначала попробуйте следующие простые методы решения проблемы:
- При наличии стороннего антивируса или файрволла временно отключите его и попробуйте временно его отключить и повторить установку.
- Попробуйте использовать встроенное устранение неполадок: Панель управления — Устранение неполадок — Устранение неполадок Центра обновления Windows, в разделе «Система и безопасность» или «Просмотр всех категорий».

- Установите обновление KB2999226 для вашей системы. Если при установке обновления возникнут проблемы, далее будет описан возможный путь решения. Скачать KB2999226 можно с официального сайта:
- https://www.microsoft.com/ru-RU/download/details.aspx?id=49077 — Windows 7 x86 (32 бита)
- https://www.microsoft.com/ru-ru/download/details.aspx?id=49093 — Windows 7 x64
- https://www.microsoft.com/ru-ru/download/details.aspx?id=49071 — Windows 8.1 32-бит
- https://www.microsoft.com/ru-RU/download/details.aspx?id=49081 — Windows 8.1 64-бит

Если ничто из этого не сработало, либо не удалось исправить ошибки Центра управления и установить обновление KB2999226, попробуйте следующие варианты.
Дополнительные способы исправить ошибку
Если при устранении неполадок были выявлены ошибки центра обновления, но они не были исправлены, попробуйте такой метод: запустите командную строку от имени администратора, а затем по порядку введите следующие команды, нажимая Enter после каждой из них:
net stop wuauserv
net stop cryptSvc
net stop bits
net stop msiserver
ren C:\Windows\SoftwareDistribution SoftwareDistribution.old
ren C:\Windows\System32\catroot2 catroot2.old
net start wuauserv
net start cryptSvc
net start bits
net start msiserver
Затем вновь попробуйте выполнить установку компонентов Visual C++ нужной версии. Подробнее про исправление ошибок центра обновления Windows вручную.
На некоторых системах с Windows 7 и 8.1 вы можете получить сообщение о том, что обновление KB2999226 не применимо к вашему компьютеру. В этом случае попробуйте сначала установить компоненты «Универсальная среда выполнения C для Windows 10» (не обращайте внимание на название, сам файл предназначен именно для 7-ки, 8 и 8.1) с официального сайта https://www.microsoft.com/ru-ru/download/details.aspx?id=48234, затем перезагрузить компьютер и повторить попытку установки обновления.
Если и это не помогло, для установки обновления KB2999226, можно использовать такие шаги:
- Скачайте файл обновления с расширением .msu с официального сайта.
- Распакуйте этот файл: его можно открыть с помощью обычного архиватора, например, 7-Zip успешно это делает. Внутри вы увидите несколько файлов, один из них — файл .CAB с указанием номера обновления, например, Windows6.1-KB2999226-x64.cab (для Windows 7 x64) или Windows8.1-KB2999226-x64.cab (для Windows 8.1 x64). Скопируйте этот файл в удобное расположение (лучше не на рабочий стол, а, например, в корень диска C:, так будет проще вводить путь в следующей команде).

- Запустите командную строку от имени администратора, введите команду (используя свой путь к файлу .cab с обновлением): DISM.exe /Online /Add-Package /PackagePath:C:\Windows6.1-KB2999226-x64.cab и нажмите Enter.
- Похожий путь, но без предварительной распаковки файла .msu — команда wusa.exe путь_к_файлу_обновления.msu в командной строке, запущенной от имени администратора и без каких либо параметров.

И наконец, если всё пройдет успешно, то обновление будет установлено. Перезагрузите компьютер и проверьте, появляется ли неопознанная ошибка 0x80240017 «Настройка не завершена» при установке Visual C++ 2015 (2017) в этот раз.
Microsoft Visual C++ programs are one of the critical components of your Windows device. These packages ensure that the system operates smoothly without any issues.
So, it’s advisable to update these packages whenever you run into various system-related problems. However, you might often bump into the error code 0x80240017 while trying to update or install the Microsoft Visual C++ programs.
Now, let’s check out how you can tackle the error code 0x80240017.
1. Quick Fixes for the Microsoft Visual C++ Install Error 0x80240017

Here are a few quick fixes for this issue:
- Restart your device: One of the easiest solutions is to restart your PC immediately when you bump into this error.
- Update your apps: Some apps on your device might be responsible for the Microsoft Visual C++ Install Error 0x80240017. So, updating those software programs could help resolve this issue.
- Clean your PC: Sometimes, performing a simple disk clean-up could help remove the system issues that are causing this error.
If neither of those work, it’s time to go more in-depth.
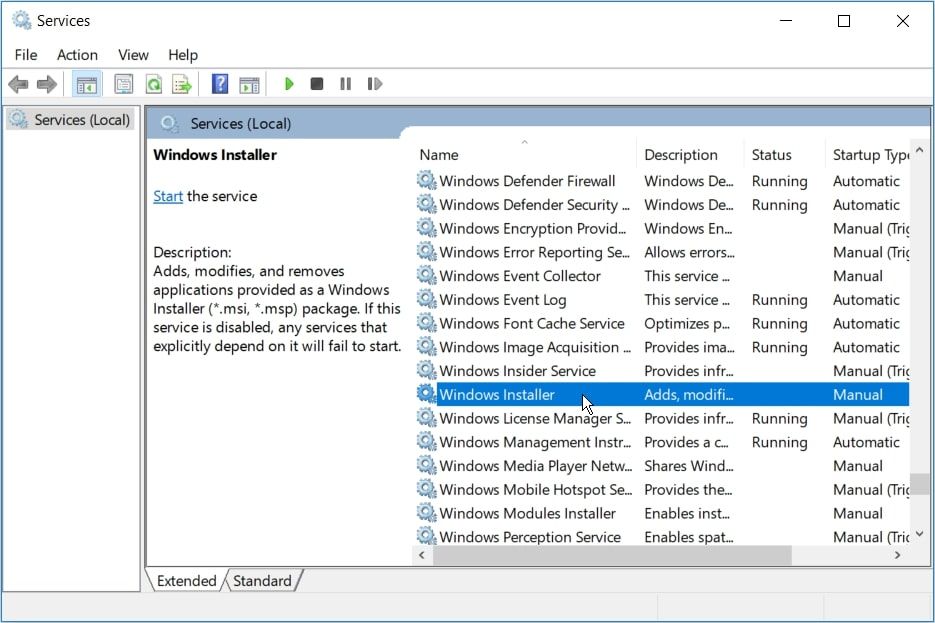
2. Enable the Windows Installer Service
Since this is an installation error, the main issue might be coming from the Windows Installer service. For example, the Windows Installer service could be disabled. So, let’s check out how you can enable this service to tackle this problem:
- Press Win + R to open the Run command dialog box.
- Type services.msc and click Enter to open the Services window.
- Locate the Windows Installer option and double-click on it.
Next, follow these steps to finalize the process:
- Click the Startup type drop-down menu and select Manual.
- Press the Start button to enable the service.
- Finally, press Apply, press OK, and then restart your device to save these changes.
3. Re-Register the Windows Installer Service
Re-registering the Windows Installer service could also help resolve the problem. So, let’s check out how you can re-register the Windows Installer Service via the Command Prompt:
- Press Win + R to open the Run command dialog box.
- Type CMD and press Ctrl + Shift + Enter to open an elevated Command Prompt.
- Type the following command and press Enter to temporarily disable the Windows Installer service:
msiexec /unreg
When the process is complete, re-register the Windows Installer service by following these steps:
- Open the Command Prompt as per the previous steps.
- Type the following command and press Enter to re-register the Windows Installer service:
msiexec /regserver
Wait for the process to complete and then restart your device to save these changes.
4. Install the Microsoft Visual C++ Programs in Safe Mode
You could also tackle this problem by installing the Microsoft Visual C++ Programs in safe mode. Here’s how:
- Press Win + I to open the System Settings.
- Select Update & Security from the options.
- Next, select the Recovery option on the left-hand side pane.
- Click the Restart Now button under the Advanced Startup option.
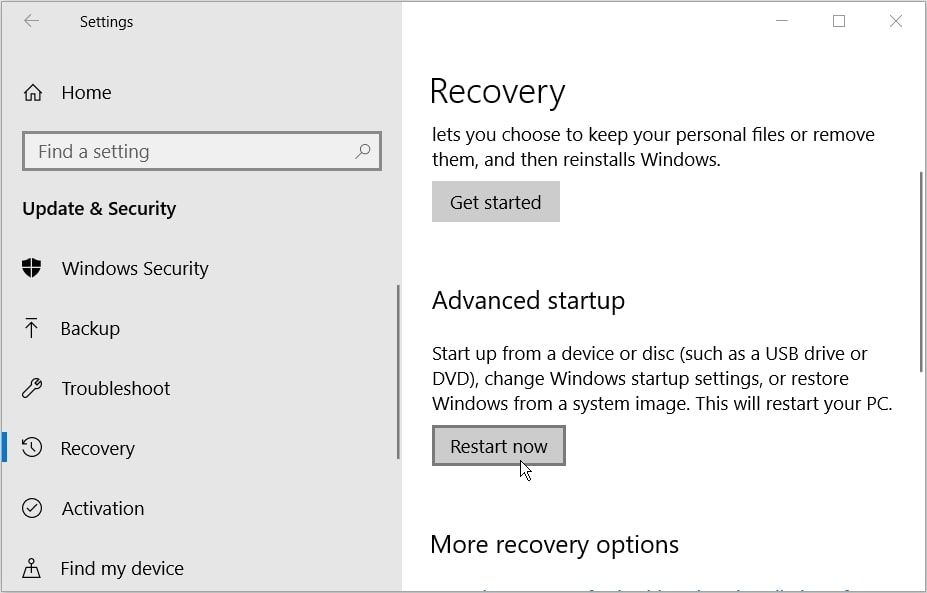
On the Recovery Environment window, navigate to Advanced options > Startup Settings and then press Restart. Finally, click the F4 key to boot your device in Safe Mode. From there, try installing the Microsoft Visual C++ Programs and see if this resolves the problem.
5. Use the Microsoft Program Install and Uninstall Troubleshooter
The Microsoft Visual C++ installation error might be caused by corrupted registry keys. In this case, the Microsoft Program Install and Uninstall troubleshooter could resolve the issue.
The Microsoft Program Install and Uninstall Troubleshooter will scan and repair corrupted registry keys. Additionally, the tool will also help get rid of other issues that could disrupt your installations.
So, here’s how you can use the Microsoft Program Install and Uninstall Troubleshooter to tackle this issue:
- Download the Program Install and Uninstall troubleshooter from the Microsoft website.
- Open the troubleshooter and click the Next button to proceed.
- Select the Installing option.
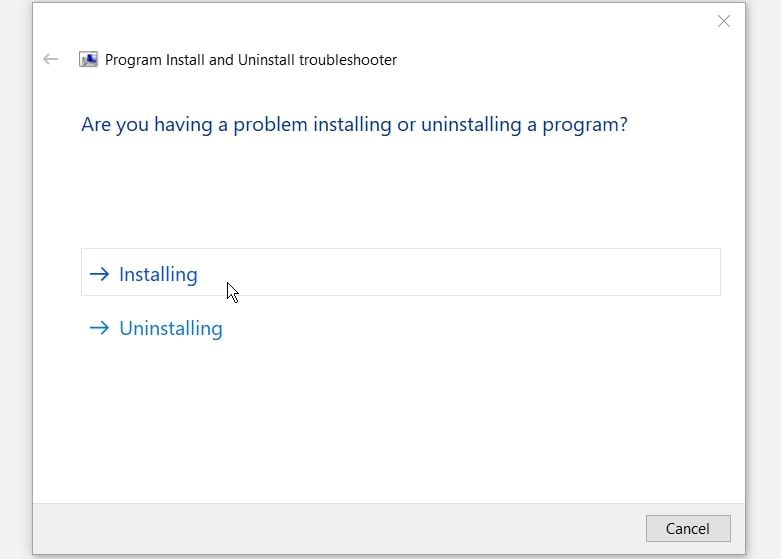
Next, select the Microsoft Visual C++ programs from the apps list and then click Next. If you can’t find these programs on the list, click the Not listed option and then search for the programs manually. Follow the on-screen steps to complete the process.
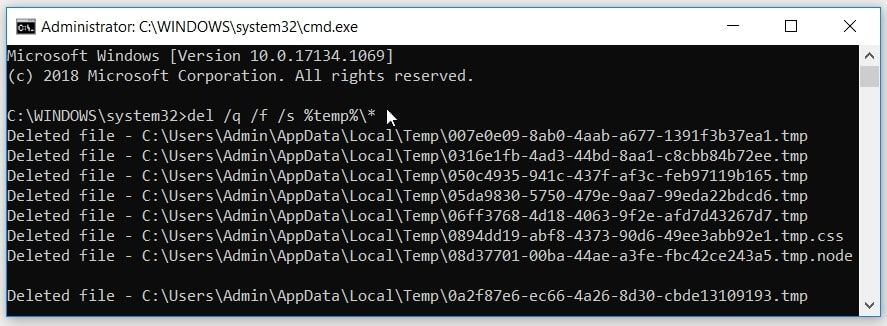
6. Delete Redundant Files in the Temp Folder
When you use your Windows device, the system regularly creates temp (temporary) files that hold information for certain tasks. When those tasks are complete, the temp files become redundant and consume disk space. Additionally, these temp files might cause various system issues like the one you’re currently facing.
So, you could resolve this problem by deleting the temp files. Here’s how:
- Press Win + R to open the Run command dialog box.
- Type CMD and press Shift + Ctrl + Enter to open an elevated Command Prompt.
- Type the following command and press Enter to remove the temp files:
del /q /f /s %temp%\*
7. Fix Corrupted System Files
In most cases, an installation error like this one is caused by faulty system files. To resolve the problem, you could repair or replace corrupted system files with the DISM and SFC tools.
Let’s take a look at how you can use the DISM tool to resolve this problem:
- Press Ctrl + Shift + Esc to open the Task Manager.
- Click the File tab and select Run new task.
- Type CMD in the search box and then check the Create this task with administrative privileges box.
- Press OK to run an elevated Command Prompt.
- Next, type the following command and press Enter to run a DISM scan:
DISM /Online /Cleanup-Image /ScanHealth
When the process is complete, type the following command and press Enter:
DISM /Online /Cleanup-Image /RestoreHealth
Wait for the process to complete and then restart your device. Finally, run an SFC scan through these steps:
- Open an elevated Command Prompt by following the previous steps.
- Type the following command and press Enter:
sfc /scannow
Wait for the process to complete and then close the Command Prompt. From there, restart your device to save these changes.
8. Restore Your Device

You can tackle most system issues by using the Windows restore point tool. This feature handles Windows errors by undoing the recent changes on your PC. So, the tool could get rid of the bugs that are currently preventing you from installing the Microsoft Visual C++ programs.
If you’ve created a restore point on your device, here’s how you can use it to get rid of this issue:
- Type Control Panel in the Start Menu search bar and select the Best match.
- Click the View by drop-down menu and select Small icons.
- Select System from the Control Panel menu items.
- Next, click the System protection option on the right-hand side pane.
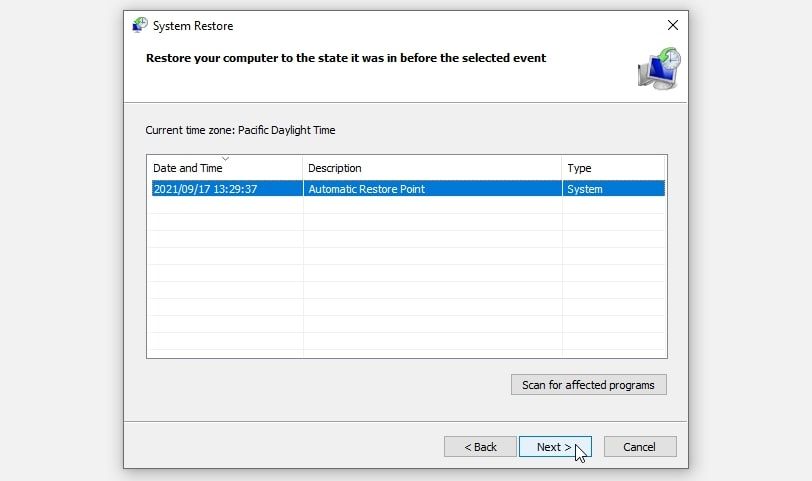
- Navigate to the System Protection tab, click the System Restore button, and then press Next.
- Select a restore point from the list and click Next. Follow the on-screen steps to finalize the process.
From there, go ahead and try downloading the Microsoft Visual C++ programs again.
Easily Update or Install Microsoft Visual C++ Programs Again
When the Microsoft Visual C++ programs are missing or corrupted, you’d need to update or reinstall these packages. Doing this will ensure that your device operates smoothly. But if you’re encountering issues while installing these programs, then try any of the solutions we’ve covered.
Download Windows Speedup Tool to fix errors and make PC run faster
If you are getting the error code 0x80240017, Unspecified error when trying to install Microsoft Visual C++ Redistributable Package on your Windows 11 or Windows 10 PC, then this post is intended to help you with the most suitable solutions you can apply to successfully resolve the issue.

When you encounter this issue, you’ll receive the following full error message with code;
Setup Failed
One or more issues caused the setup to fail. Please fix the issues and then retry setup. For more information see the log file.
0x80240017 – Unspecified error
What is error code 0x80240017?
The 0x80240017 error code typically appears after a failed Windows update or after a failed installation of Visual C++ Redistributable Packages for Visual Studio. In some rare cases, the issue might also be produced by a 3rd-party antivirus conflict.
If you have encountered the Unspecified error code 0x80240017 on your Windows 11/10 device when installing Microsoft Visual C++ redistributable package, you can try our recommended solutions below in no particular order and see if that helps to resolve the issue.
- Run Program Install and Uninstall Troubleshooter
- Run DISM scan
- Install the package in Clean Boot state
- Delete Temporary Files on PC
- Re-register Windows Installer service
Let’s take a look at the description of the process involved concerning each of the listed solutions.
Before you try the solutions below, check for updates and install any available pending bits on your Windows 11/10 device and also make sure to change the Date and Time on your PC if the Windows Clock Time is wrong, then see if the error reappears when you try the Visual C++ install operation again.
1] Run Program Install and Uninstall Troubleshooter

You can begin troubleshooting to fix the Unspecified error code 0x80240017 on your Windows 11/10 device when installing Microsoft Visual C++ redistributable package by running the Program Install and Uninstall Troubleshooter from Microsoft. This tool can fix corrupted registry keys and is designed to help you automatically repair issues when you’re blocked from installing or removing programs on Windows 11/10 system.
2] Run DISM scan

This solution requires you to run a DISM scan natively and if DISM fails with error codes 0x800f081f, 0x800f0906, or 14098, then you may need to configure your Windows 11/10 system to use an alternative repair source, via a Group Policy setting.
Alternatively, you can use a Windows installation as the repair source, or use a Windows side-by-side folder from a network share or from a removable media, such as the Windows DVD, as the source of the files to run DISM Offline.
3] Install the package in Clean Boot state

This solution requires you to Clean Boot your system to remove any conflicts that may occur during the Visual C++ package installation – and then run the package installation in that system state. Basically, the clean boot will start your Windows 11/10 computer with the minimum required drivers and programs.
You can download the latest Microsoft Visual C++ Redistributable Packages here at Microsoft Download Center. Simply search for them using the search bar. To install all you may download and use Visual C++ Runtime Installer. It is available for download here. It is a batch file installer that includes all Visual C++ Libraries.
Related: Fix Microsoft Visual C++ Runtime Library errors
4] Delete Temporary Files on PC

To clear the Temp folder on your computer, do the following:
- Press the Windows key + R to invoke the Run dialog.
- In the Run dialog box, type temp, and then hit Enter.
- Next, press CTRL + A to select all files and folders.
- Then press the DELETE key on the keyboard or right-click the highligted content, and then tap or click Delete on the context menu.
- If you are notified that some files or folders are in use, select Skip.
Afterwards, see if the Visual C++ installation completes without issues. Otherwise, continue with the next solution.
5] Re-register Windows Installer service

If you’re having the issue installing any software on your Windows 11/10 PC, it’s likely that the MSI service is not enabled. In this case, ensure that the Windows Installer Service is enabled. However, if the MSI service is enabled, you can unregister and re-register Windows Installer Service.
Do the following:
- Press Windows key + R to invoke the Run dialog.
- In the Run dialog box, type cmd and then press CTRL + SHIFT + ENTER to open Command Prompt in admin mode.
- In the command prompt window, type the command below and hit Enter to temporarily unregister the Windows Installer service:
msiexec /unreg
- Once the command is processed successfully and you get the success message, input the following command and hit Enter to register the Windows Installer once again:
msiexec /regserver
After the second command is processed successfully, restart your computer once again, and try the redistributable package installation again.
Any of these solutions should work for you!
Related post: Fix error 0x80070666 when installing Microsoft Visual C++.
How do I fix Microsoft Visual C++ 2017 setup failed?
A basic fix for Microsoft Visual C++ 2017 setup failed on your Windows 11/10 PC, is to uninstall all the existing Visual C++ Redistributable items in Programs and Features or via the Settings app. After that, reboot your computer and re-download the Microsoft Visual C++ Redistributable for Visual Studio 2017 to try again.
Obinna has completed B.Tech in Information & Communication Technology. He has worked as a System Support Engineer, primarily on User Endpoint Administration, as well as a Technical Analyst, primarily on Server/System Administration. He also has experience as a Network and Communications Officer. He has been a Windows Insider MVP (2020) and currently owns and runs a Computer Clinic.
Fix Microsoft Visual C++ 2015 Redistributable Setup Fails Error 0x80240017: If you are facing the error code “0x80240017 – Undefined error” when trying to install Microsoft Visual C++ 2015 Redistributable Setup then don’t worry as today we are going to see how to fix this error. Visual C++ 2015 Redistributable is required for various app or programs to run, and if you don’t have the Redistributable package installed on your PC then you might not be able to access those apps. So without wasting any time let’s see How to Fix Microsoft Visual C++ 2015 Redistributable Setup Fails Error 0x80240017 with the help of the below-listed guide.

Table of Contents
Make sure to create a restore point just in case something goes wrong.
Method 1: Download Windows 7 Service Pack (SP1) Update
Select your Language then click on Download button. On the next page either select “windows6.1-KB976932-X64” or “windows6.1-KB976932-X86” according to your system architecture.
windows6.1-KB976932-X64 – For 64-bit System
windows6.1-KB976932-X86 – For 32-bit System

Once you have downloaded and install the Windows 7 Service Pack (SP1) Update, simply restart your PC to save changes. Now from Programs and Features window, make sure to completely remove Microsoft Visual C++ 2015 Redistributable package and then follow the below-guide.

1.Download Visual C++ Redistributable for Visual Studio 2015 from Microsoft Website.
2.Select your Language from the drop-down and click on Download.

3.Select the vc-redist.x64.exe (for 64-bit Windows) or vc_redis.x86.exe (for 32-bit Windows) according to your system architecture and click Next.

4.Once you click Next the file should start downloading.
5.Double-click on the download file and follow the on-screen instruction to complete the installation.

6.Reboot your PC to save changes and see if you’re able to Fix Microsoft Visual C++ 2015 Redistributable Setup Fails Error 0x80240017.
If you’re still facing the error message then install Microsoft Visual C++ Redistributable Update:
If repairing or re-installing Visual C++ Redistributable for Visual Studio 2015 didn’t fix the problem then you should try to install this Microsoft Visual C++ 2015 Redistributable Update 3 RC from Microsoft website.

Method 2: Perform Clean Boot
Sometimes 3rd party software can conflict with Microsoft Visual C++ and therefore, you may face Setup Fails Error 0x80240017. In order to Fix Microsoft Visual C++ 2015 Redistributable Setup Fails Error 0x80240017, you need to perform a clean boot in your PC and diagnose the issue step by step.
Method 3: Make sure Date and Time of your PC is Correct
1.Right-click on date and time on the taskbar and then select “Adjust date/time“.
2.Make sure to Turn on the toggle for “Set Time Automatically”.

3.For Windows 7, click on “Internet Time” and tick mark on “Synchronize with an Internet time server.”

4.Select Server “time.windows.com” and click update and “OK”. You don’t need to complete update. Just click OK.
Setting correct date & time should Fix Microsoft Visual C++ 2015 Redistributable Setup Fails Error 0x80240017, if not then continue.
Method 4: Delete Temporary Files from your PC
1.Press Windows Key + R then type temp and hit Enter.

2.Click on Continue to open the Temp folder.
3.Select all the files or folders present inside the Temp folder and permanently delete them.
Note: To permanently delete any file or folder, you need to press Shift + Del button.
Method 5: Re-register Windows Installer service
1.Press Windows Key + R then type the following and hit Enter:
msiexec /unregister

Note: When you hit Enter, it won’t show anything so don’t worry.
2.Again open Run dialog box and then type “msiexec /regserver” (without quotes) and hit Enter.
3.This would successfully Re-register Windows Installer service and should fix your issue.
Method 6: Run DISM Tool
1.Press Windows Key + X and select Command Prompt(Admin).
2.Type the following command in cmd and hit enter after each one:
Dism /Online /Cleanup-Image /CheckHealth
Dism /Online /Cleanup-Image /ScanHealth
Dism /Online /Cleanup-Image /RestoreHealth

3.Let the DISM command run and wait for it to finish.
4. If the above command doesn’t work then try on the below:
Dism /Image:C:\offline /Cleanup-Image /RestoreHealth /Source:c:\test\mount\windows
Dism /Online /Cleanup-Image /RestoreHealth /Source:c:\test\mount\windows /LimitAccess
Note: Replace the C:\RepairSource\Windows with the location of your repair source (Windows Installation or Recovery Disc).
5.Reboot your PC to save changes and see if you’re able to Fix Microsoft Visual C++ 2015 Redistributable Setup Fails Error 0x80240017.
Method 7: Install Windows8.1-KB2999226-x64.msu
1.Make sure to uninstall Visual C++ Redistributable for Visual Studio 2015 from your system.
2.Navigate to the following path:
C:\ProgramData\Package Cache\
3.Now here you need to find the path which would resemble something like this:
FC6260C33678BB17FB8B88536C476B4015B7C5E9\packages\Patch\x64\Windows8.1-KB2999226-x64.msu
2.Once you find file, open Command Prompt (Admin) and type the following command one by one and hit Enter after each one:
C:
mkdir tmp
mkdir tmp\tmp
move C:\ProgramData\Package Cache\FC6260C33678BB17FB8B88536C476B4015B7C5E9\packages\Patch\x64\Windows8.1-KB2999226-x64.msu c:\tmp
expand -F:* c:\tmp\Windows8.1-KB2999226-x64.msu c:\tmp\tmp
dism /online /add-package /packagepath:c:\tmp\tmp\Windows8.1-KB2999226-x64.cab
Note: Make sure to Replace “FC6260C33678BB17FB8B88536C476B4015B7C5E9” and file name “Windows8.1-KB2999226-x64.msu” according to your system.

3.Once finished, reboot your PC to save changes.
If you’re still facing the issue then you can manually download and install the Windows8.1-KB2999226-x64.msu directly from Microsoft website.

Recommended:
- Fix USB Tethering Not Working in Windows 10
- SOLVED: Your PC ran into a problem and needs to restart
- Fix The program can’t start because api-ms-win-crt-runtime-l1-1-0.dll is missing
- Enable Adobe Flash Player on Chrome, Firefox, and Edge
That’s it you have successfully learned How to Fix Microsoft Visual C++ 2015 Redistributable Setup Fails Error 0x80240017 but if you still have any questions regarding this tutorial then feel free to ask them in the comment’s section.
The 0x80240017 error code is a frequently encountered issue during the update of built-in apps and programs in Windows 10/11. Specifically, when installing Visual C++ Redistributable Packages for Visual Studio 2013 or Visual Studio 2015, many users have reported experiencing the 0x80240017 Unspecified Error.
The error code 0x80240017 in Windows 10/11 is usually caused by a change in your system after installing a third-party application. The problem is not limited to a single Windows version, as it has been reported to occur on Windows 7, Windows 8.1, and Windows 10/11.
It can also happen if something in the registry has changed after a reboot and you do not have the necessary system permissions.
This troubleshooting guide will show you how to resolve this error once and for all.
What Is the 0x80240017 – Unspecified Error?
The 0x80240017 error can occur when attempting to install the Microsoft Visual C++ Redistributable Packages or when using Windows Store on Windows 8 or 8.1, though users who prefer Windows 10/11 have also reported the problem. The issue usually lies within the Windows Registry – some bugs may be present, or some files may be missing.
The error message usually reads as follows:
Microsoft Visual C++ 2015 Redistributable (x86) – 14.0.23026
Setup Failed
One or more issues caused the setup to fail. Please fix the issues and then retry setup. For more information see the log file.
0x80240017 – Unspecified error
Because of the 0x80240017 error, it may be difficult to install software updates, download apps, or make any other changes to your computer. Furthermore, your computer may become slightly unresponsive, and it may be unable to recognize certain external devices, such as gaming equipment.
While fixing the 0x80240017 error can be difficult, we have prepared instructions for you – just carefully follow the steps below.
What Causes the Windows Update Error 0x80240017?
There are several factors that might contribute to the appearance of the 0x80240017 error, and we’ve outlined each one of them here to help you understand more about the issue:
- You are attempting to install an incomplete Visual C++ Redistributable Package. This error typically occurs because the user is attempting to install the package using a corrupted installer. This is commonly reported with application installers that provide the user with the Visual C++ Packages. The solution in this case is to download the full Visual C++ Package version from Microsoft’s website.
- A Visual C++ Redistributable Package has been installed on Windows v6.1. This error message has also been reported to occur when the target operating system is Windows v6.1. The problem arises because the Visual C++ Redistributable Packages were only intended to be installed on Windows 7 or later. In this case, upgrading to Service Pack 1 is the solution.
- The PC lacks the Universal C Runtime update. If your Windows version lacks the Universal C Runtime update, you may receive the error message. Installing this update has been reported to be effective in cases where the error occurs during the installation of a Python distribution.
- Windows Update has already downloaded the necessary Visual C++ Redistributable Package. The error message can also be seen if the Windows Update component has downloaded but failed to install the required Visual C++ package. The solution in this instance is to install any pending updates.
- There is a corrupted or incomplete Visual C++ Redistributable installation. The error can also occur if the user has an existing corrupted or incomplete Visual C++ installation. The solution in this case is to uninstall any existing Visual C++ installations before reinstalling the required one from the official download page.
- Some DLLs are missing. It is possible that some DLL files on your computer are missing, which is why the error occurred while attempting to install a Visual C++ Redistributable Package.
- Your Windows OS is outdated. Your Windows may be outdated, which triggers the issue on your computer. It is likely to be resolved as soon as you update the OS.
- Installation glitches have occurred on your PC. It’s possible that the installation has gone wrong and you won’t be able to install the software from the package. You can try alternative methods of installing the Visual C++ redistributable to resolve the issue.
If you’re having trouble resolving the 0x80240017 error, this article will provide you with a list of tried-and-true troubleshooting steps. You’ll find methods that other users have used to resolve the issue down below.
How to Fix the Windows 10/11 Update Error 0x80240017
Before you proceed with any troubleshooting solution, prep your computer by running a reliable PC repair tool that deletes junk files and optimizes your processes. Once done, apply the following fixes.
Fix #1: Download the Visual C++ Redistributable Installation Package Again
Because the problem usually occurs after an application installer prompts you to install a Visual C++ Redistributable Package, it’s possible that the installer is out of date or has not been downloaded properly.
Several users who encountered that problem reported that it had been resolved after re-downloading the Visual C++ Redistributable Package from the official channels. When some of them attempted to use the newly downloaded installer, the 0x80240017 Unspecified Error did not appear.
Here’s a step-by-step guide to downloading and installing the required Visual C++ Redistributable Package from Microsoft’s servers:
- Navigate to the download link for the Visual C++ Redistributable Package that you need to install:
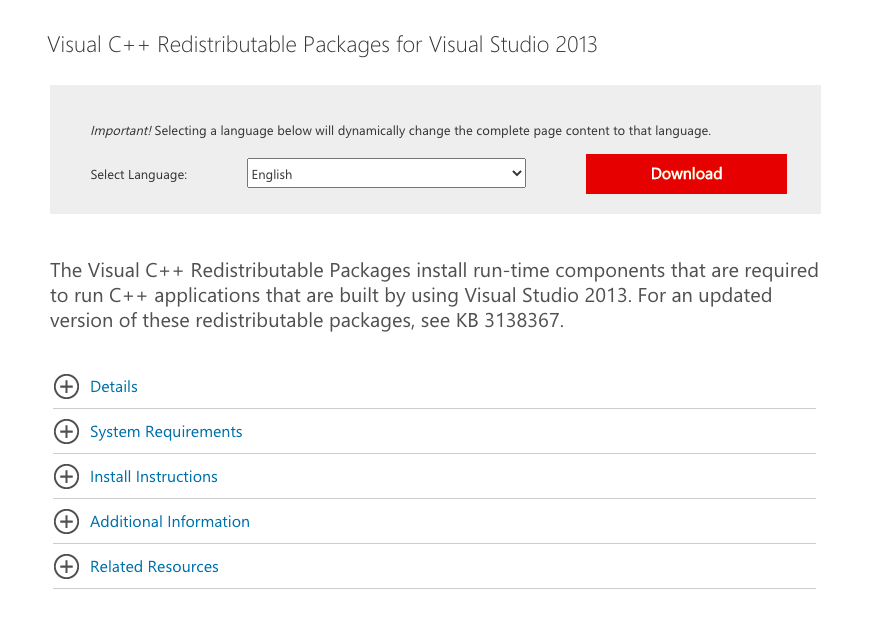
- Visual C++ Redistributable Package for Visual Studio 2013
- Visual C++ Redistributable Package for Visual Studio 2015
- When you arrive at the download page, choose your installation language and click the Download button to begin the download.
- Choose the appropriate installer for your operating system architecture. If you have a 64-bit version of Windows, check the box associated with vc-redist.x64.exe. Otherwise, check the vc-redist.x32.exe box. Then click Next to begin the download.
- To finish the installation, run the installation executable and follow the on-screen prompts.
If the 0x80240017 Unspecified Error persists, proceed to the next method below.
Fix #2: Install Windows 7 Service Pack 1

According to some users, the problem can also occur when attempting to install the Visual C++ Redistributable Packages for Visual Studio 2013 or 2015 on Windows v6.1 (Build 7600: Service Pack 0). The error appears in this case because the two redistributable packages are intended to be installed on Windows 7 Service Pack 1 or later.
A couple of users who were in a similar situation reported that the problem had been resolved after installing Service Pack 1. Here’s a quick guide on how to do it:
- To download Service Pack 1, follow this link, select your language, and then click the Download button.
- Uncheck everything except the primary ISO file on the next screen. After that, click the Next button to begin the download.
- After downloading the ISO file, go to this link and click the Download button to get the WinCDEMU 4.1 tool. This tool will be used to install the Service Pack 1 upgrade.
- Open the WinCDEmu installation executable and click the Install button to install the tool on your computer.
- After installing the tool, click Install to add the necessary system software.
- To complete the installation of WindowsCDEmu, restart your computer.
- After the next startup, navigate to the location where you downloaded the ISO file, right-click on it, and choose Select driver letter & mount.
- To mount the ISO file, select the letter of the drive you’ll be creating, set Disc type to Data disc, and click OK.
- Follow the on-screen instructions to complete the installation while the Windows 7 Service Pack 1 image is mounted.
- After installing Service Pack 1, restart your computer and check to see if the error has been resolved by attempting to install the Visual C++ Redistributable Package again.
Fix #3: Install the Universal C Runtime Update
Several users who received this error after being prompted by Python’s installer (or another application) to install the necessary redistributable package reported that the problem was resolved once they installed the Universal C Runtime update for their Windows version.
Here’s a quick guide to doing so:
- Navigate to this page and download the update package for your Windows version.
- On the next screen, choose your language and click the Download button to begin the download.
- To install the Universal C Runtime update, run the installation executable and follow the on-screen prompts. When the process is finished, restart your computer and check to see if the error has been resolved.
Fix #4: Install All Pending Updates
A few users who encountered the 0x80240017 Unspecified Error when attempting to install a Visual C++ Redistributable Package after being prompted to do so by Python (or a similar distribution) reported that the problem had been resolved after installing pending Windows updates.
As it turns out, this problem can occur if a Visual C++ Redistributable Package is downloaded but not installed by the Windows Update component. If this scenario applies to you, follow the steps below to install pending Windows updates and resolve the 0x80240017 Unspecified Error:
- To open the Run dialog box, press the Windows key + R. Then, in the Settings app, type “ms-settings:windowsupdate” and press Enter to open the Windows Update screen.
- If you’re using a Windows version prior to Windows 10/11, use the “wuapp” command instead.
- Click Check for updates on the Windows Update screen, then follow the on-screen prompts to install all pending Windows updates.
- When prompted to restart, do so, and then check the Windows Update screen to see if there are any other pending updates.
- Install the Microsoft Visual C++ Redistributable package again and check to see if the error message has gone away.
Fix #5: Uninstall Previous Microsoft Visual C++ Redistributable Packages
According to some affected users, the problem could also occur if one of your current Microsoft Visual C++ redistributable installations is corrupt. Several users reported that the error message had disappeared after uninstalling existing Microsoft Visual C++ installations.
Before attempting to reinstall the required Visual C++ Redistributable Package, here’s a quick guide to uninstalling any existing Microsoft Visual C++ Redistributable Packages:
- To open the Run dialog box, press the Windows key + R.
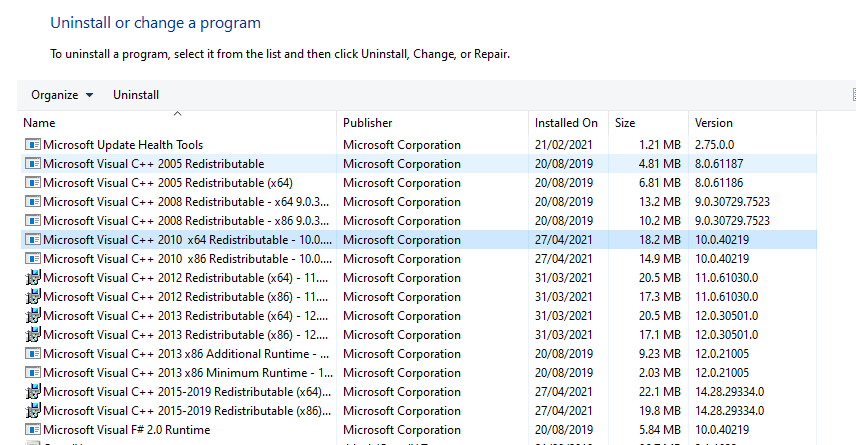
- Then, to open the Programs and Features screen, type “appwiz.cpl” and press Enter.
- Navigate to the right-hand pane of the Programs and Files screen, right-click on the Microsoft Visual C++ Redistributable Package, and select Uninstall.
- Click Uninstall in the next menu and follow the on-screen instructions to remove the Microsoft Visual C++ Redistributable Package.
- If you have multiple Microsoft Visual C++ installations, repeat steps 2 and 3 for each one.
- Restart your computer once you’ve successfully uninstalled all Microsoft Visual C++ installations.
- At the next startup, download and install the necessary Microsoft Visual C++ installations from one of the following links and check to see if the problem has been resolved:
- Visual C++ Redistributable Package for Visual Studio 2013
- Visual C++ Redistributable Package for Visual Studio 2015
Fix #6: Install Visual C++ in Safe Mode
Some programs and services are not allowed to run in safe mode. As a result, if a certain service prevents the installation of the Visual C++ software, it will no longer do so.
Follow the instructions below:
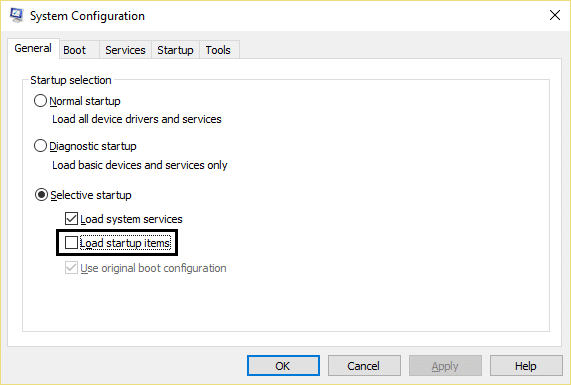
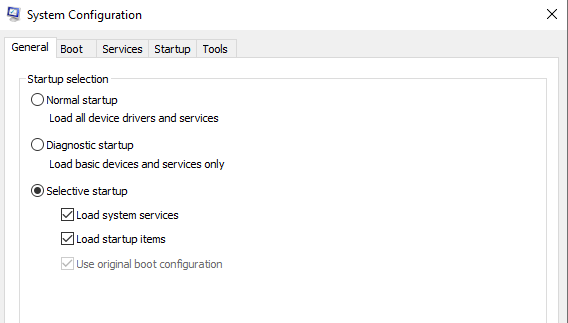
- Press Win + R to open the Run prompt, then type msconfig and press Enter.
- Go to the General tab and make sure the Selective Startup option is ticked off.
- Make sure that only the Load System Services option is selected.
- Select Services > Hide all Microsoft Services > Disable All.
- Click Apply.
In this mode, try installing the Visual C++ software and see if you still get the 0x80240017 Unspecified Error.
Final Solution: Perform a Repair Install
If you’ve gotten this far without a result, there’s a good chance you’re experiencing this problem as a result of system corruption. There are a few methods for removing file corruption and resolving the 0x80240017 Unspecified Error, but many users have reported that the problem was resolved after they performed a repair install.
A repair install is a non-destructive procedure that allows you to refresh all Windows-related components while preserving your files and applications. A repair install, as opposed to a clean install, allows you to keep all of your personal data, including photos, music, videos, user preferences, and any installed third-party applications.
Give us some love and rate our post!