
Download Windows Speedup Tool to fix errors and make PC run faster
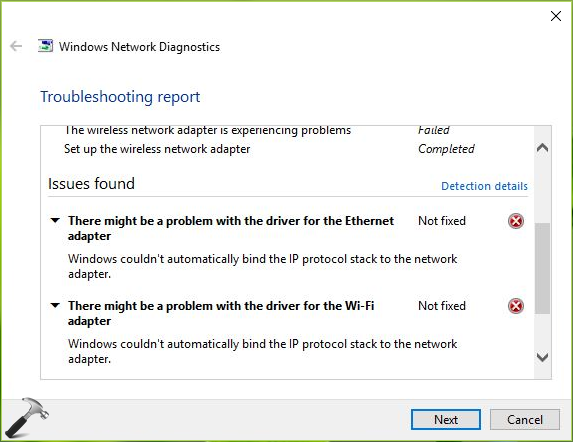
If Windows couldn’t automatically bind the IP protocol stack to the network adapter, There might be a problem with the driver for the Ethernet/Wi-Fi adapter error. You will see this error message upon running the Network Diagnostics Troubleshooter on Windows. If you receive this error, then this post will help you.
Microsoft has been building smart and sophisticated Troubleshooters that can detect the root cause of a problem with the system and if possible, fix it automatically. A possible issue with network connectivity is when the modem and router are working fine, and all other devices, except for the computer are connecting to the internet, being connected through the same router.

Windows couldn’t automatically bind the IP protocol stack to the network adapter
In this case, the built-in troubleshooter gave an error instead of fixing the issue, which means we would have to fix it manually. It is believed that this error occurs after the user makes changes to the network settings of the computer.
If you are facing this error, I suggest you go through the list of fixes and see which you want to try and in which order.
1: Update Windows
The issue could be with the drivers as suggested in the error. To isolate this probability, you could update Windows and restart the system. Updating Windows, updates the drivers as well.
2: Update the drivers from the manufacturer’s website
Since, the error message specifies that the issue is with the drivers, before moving any further, we need to be sure that this cause is isolated. If a Windows Update does not fix the problem, try re-installing the network adapters from the manufacturer’s website. Please contact the manufacturer for more information on the same.
3: Reset the Network Adapter settings
The Network Adapter settings might have changed recently. To reset them to default, you could reset TCP/IP and see if that works for you.
4: Change a few Adapter settings
If resetting the Adapter settings does not work, you could try changing a few of them to the most recommended ones. The process would be as follows:
1] Press Win + X, and in the list that pops up, select Control Panel. Open the Network and Sharing Center. It might be under the category Network and internet.
2] Click Change Adapter Settings in the left pane. Right-click the adapter in use (Ethernet or Wi-Fi) and click on Properties.
In the list, locate “The network uses the following items,” and ensure that the following items are checked – and uncheck all other options:
- Client for Microsoft Networks
- QoS packet scheduler
- File and Printer Sharing
- Internet Protocol v6
- Internet Protocol v4
- Link-Layer Topology Discovery Mapper I/O driver
- Link-Layer Topology Discovery Reminder.
5: Disable the IP Helper Service
1] Press Win + R and type “services.msc” in the Run window. Press Enter.
2] The list of services is arranged in alphabetical order. Scroll to IP Helper Service and right-click on it. Select Properties.
3] Set the startup type to “Disabled” and click Apply to save the settings.
4] Change the service status to Stop and save the settings by clicking on OK.

I am sure that something here will help you.
Read: Ethernet connection not working in Windows.
Karan is a B.Tech, with several years of experience as an IT Analyst. He is a passionate Windows user who loves troubleshooting problems and writing about Microsoft technologies.
How to Fix «Windows couldn’t automatically bind the IP protocol stack to the network adapter» Error in Windows 10?
If your Windows 10 Network Diagnostics presents you with the «Windows couldn’t automatically bind the IP protocol stack to the network adapter» error message, read this article to fix this error.
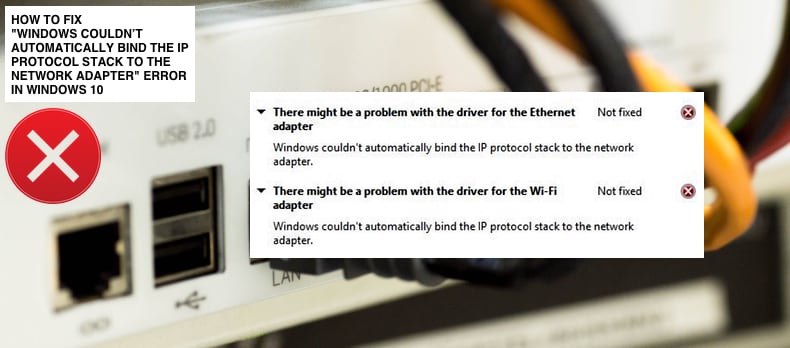
Windows 10 Troubleshooters are usually able to fix problems automatically. However, they can also only show errors but can’t fix them. If you have problems connecting to the Internet, a Windows troubleshooter may show a message, saying:
There might be a problem with the driver for the Ethernet adapter
or
There might be a problem with the driver for the Wi-Fi adapter
This Error message is usually followed by an explanation message, stating:
Windows couldn’t automatically bind the IP protocol stack to the network adapter.
In many cases, a Windows Troubleshooter can’t fix the underlying problems causing these error messages.
Among various possible causes for this error, a VPN (Virtual Private Network) client might be the cause of this error. To fix this problem, you might need to disable the VPN client or uninstall it completely.
You might also need to reset Windows Sockets, edit Windows Registry, and update Network adapter drivers. This guide outlines several methods to fix the «Windows couldn’t automatically bind the IP protocol stack to the network adapter» error.
Video on How to Fix «Windows couldn’t automatically bind the IP protocol stack to the network adapter» Error:
Table of Contents:
- Introduction
- Reset Your IP and Clear DNS Cache
- Check Adapter Options
- Update Your Network Adapter
- Change WLAN AutoConfig Service’s Startup Type
- Shut Down Your Computer Using Shift Key
- Edit Registry
- Video on How to Fix «Windows couldn’t automatically bind the IP protocol stack to the network adapter» Error
Download Computer Malware Repair Tool
It is recommended to run a free scan with Combo Cleaner — a tool to detect viruses and malware on your device. You will need to purchase the full version to remove infections. Free trial available. Combo Cleaner is owned and operated by Rcs Lt, the parent company of PCRisk.com read more.
Reset the IP and Clear DNS Cache
This method includes entering and executing «netsh» and «ipcofig» commands into Command Prompt. Netsh is a command-line scripting utility that allows you to, either locally or remotely, display or modify the network configuration of a computer that is currently running.
Netsh also provides a scripting feature to run a group of commands in batch mode against a specified computer.
Ipconfig is a command-line tool that displays the current configuration of the installed IP stack on a networked computer. Using this tool, we can flush and reset the contents of the DNS client resolver cache and renew the DHCP configuration.
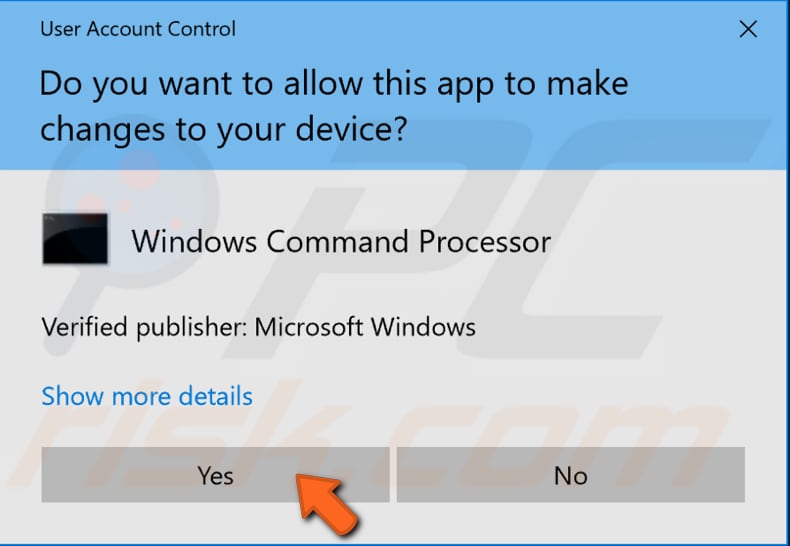
The commands require an elevated Command Prompt opened with administrator privileges. To open elevated Command Prompt, type «command prompt» in Search and right-click on the «Command Prompt» result. Choose «Run as administrator» to run it with administrative privileges.
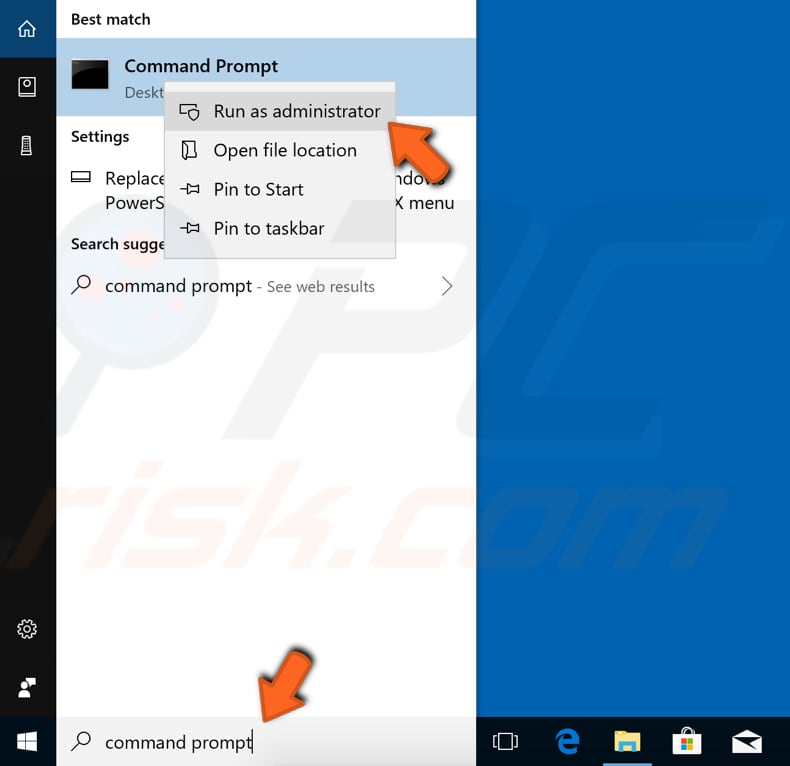
When you select «Run as administrator», a User Account Control prompt will appear asking if you allow the Command Prompt to make changes to your computer. Click «Yes».
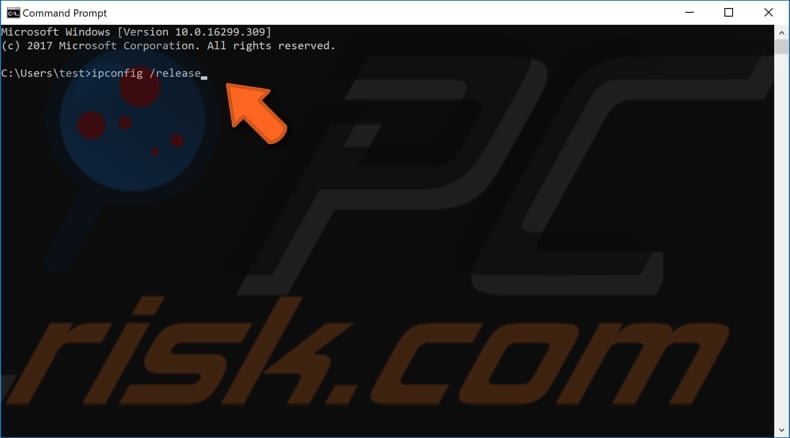
Elevated Command Prompt will appear. In the Command Prompt window, type these commands:
netsh winsock reset
netsh int ip reset
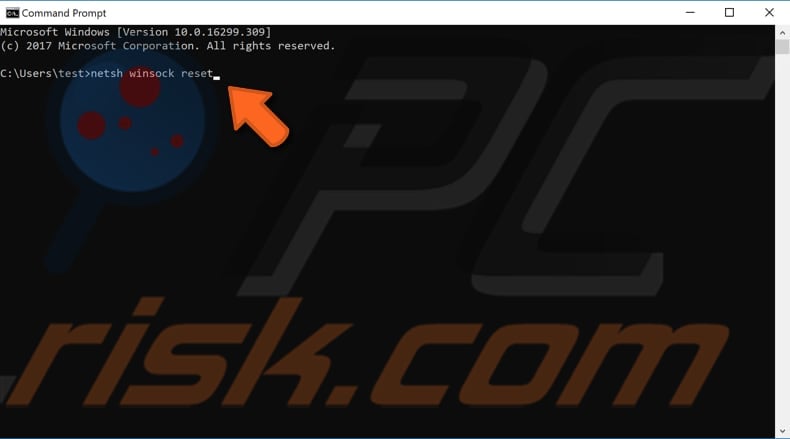
Command Prompt will display a message stating that you must restart the computer to complete the reset after executing the first command — ignore it and execute both commands by pressing Enter after each. Restart the computer and then type these commands:
ipconfig /release
ipconfig /flushdns
ipconfig /renew
Press Enter on the keyboard after entering each command. When all commands are executed, restart the computer and see if this fixes the «Windows couldn’t automatically bind the IP protocol stack to the network adapter» error.
[Back to Table of Contents]
Check Adapter Options
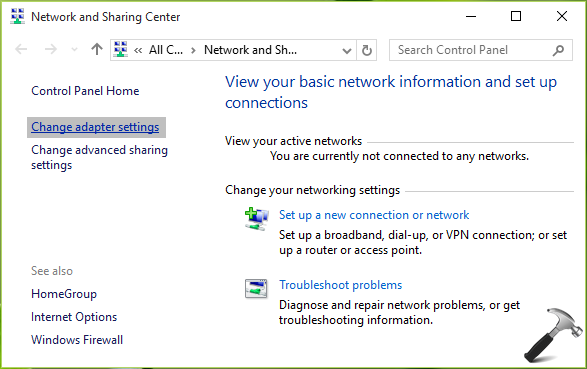
A simple adapter options check might fix the problem. Go to Network and Sharing Center by right-clicking the Network icon on the taskbar near the clock and selecting the «Open Network & Internet settings» option from the contextual menu.

This will get you to the Status window — click «Change adapter options» under Change your network settings.
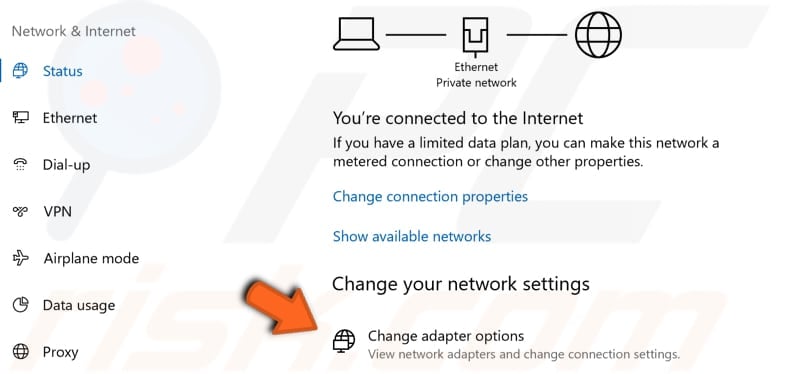
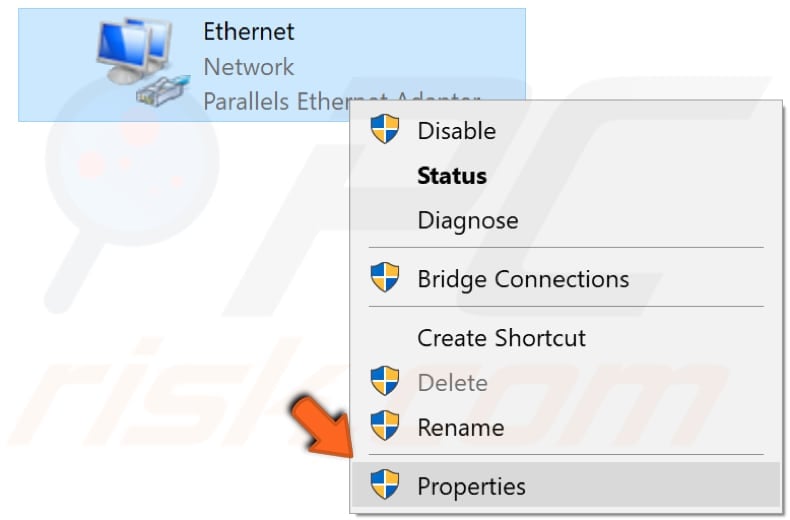
In the Network Connections window, right-click the connection experiencing the «Windows couldn’t automatically bind the IP protocol stack to the network adapter» error and select «Properties».
In the connection properties window, you will see a list of items used by your connection. Ensure that these items are checked and uncheck the items that are not mentioned:
Client for Microsoft Networks
File and Printer Sharing for Microsoft Networks
QoS packet scheduler
Internet Protocol Version 4 (TCP/IPv4)
Microsoft LLDP Protocol Driver
Internet Protocol Version 6 (TCP/IPv6)
Link-Layer Topology Discovery Mapper I/O driver
Link-Layer Topology Discovery Responder
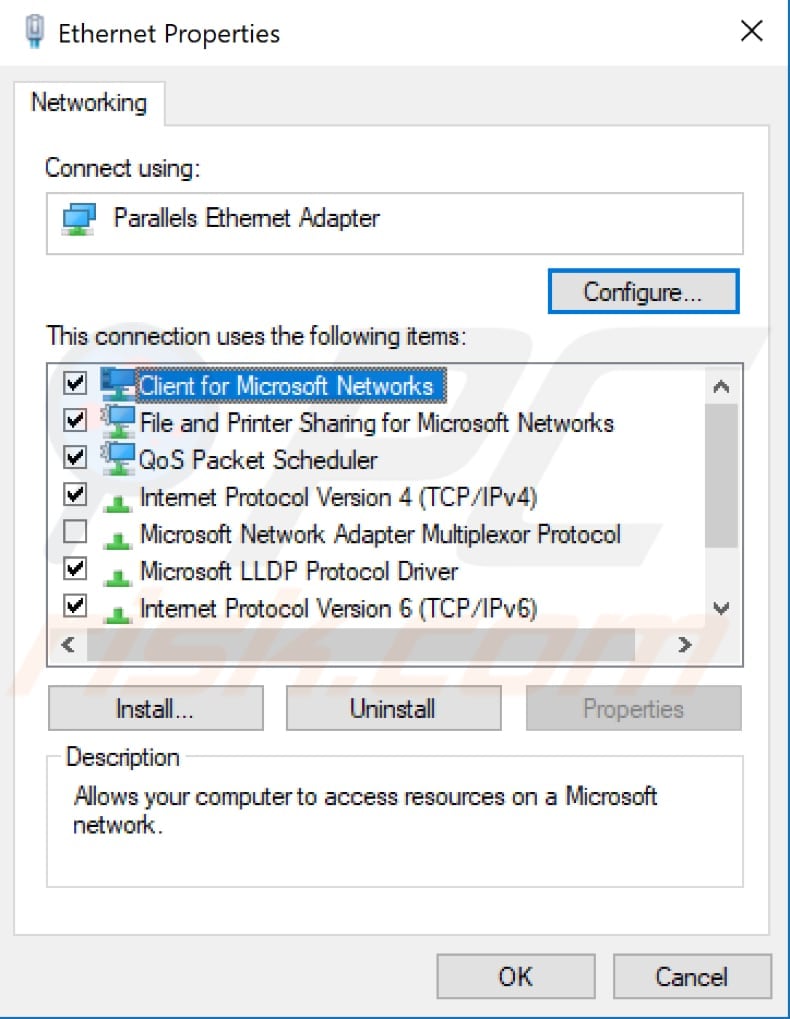
Click «OK» to save the changes made (if any) and close the network connection properties window. See if this fixes the «Windows couldn’t automatically bind the IP protocol stack to the network adapter» error.
[Back to Table of Contents]
Update Your Network Adapter
This problem might be caused by an old or incorrect driver. In this case, you need to get an updated/new driver for your network adapter. There is an easy way to do this automatically with Snappy Driver Installer or manually, using a Device Manager. Either way, you will need a computer with a working Internet connection to download the drivers or to download the Snappy Driver Installer.
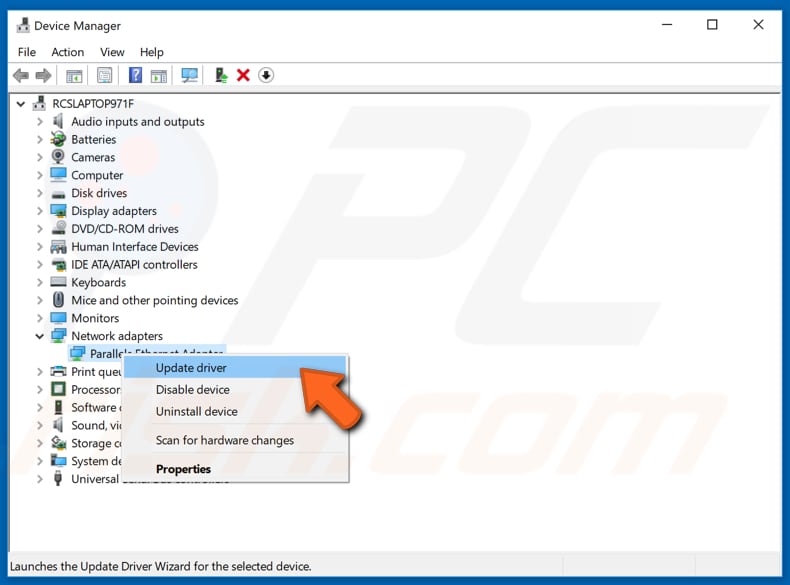
To update drivers manually, go to the network adapter manufacturer website and download the latest driver. Copy it to a USB drive. Go to Device Manager (type «device manager» in Search and open it). Expand the «Network adapters» section, select your network adapter, and right-click on it. Then, choose «Update Driver».
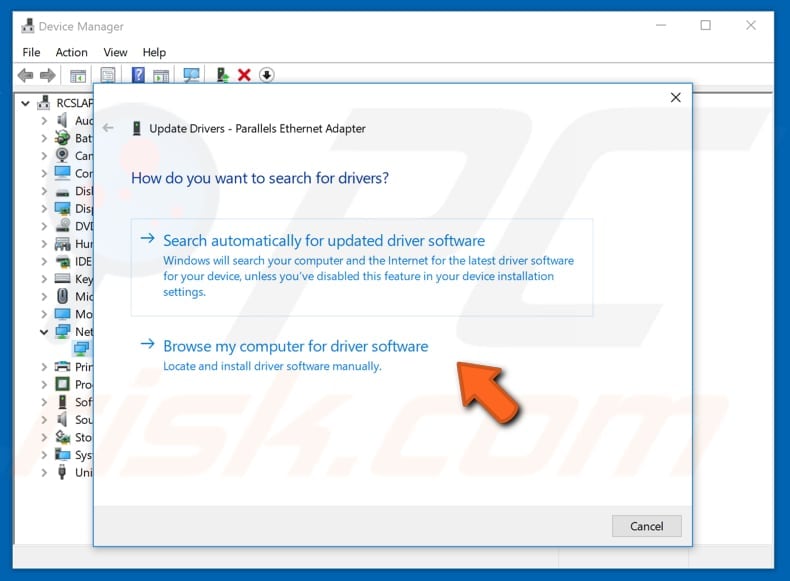
You will be asked how you wish to search for drivers and provided with two options: 1) search automatically for updated driver software; 2) browse your computer for driver software.
The first option requires an Internet connection (choose the second option since you have problems with your Internet connection). Locate the driver on the USB drive and follow the instructions.
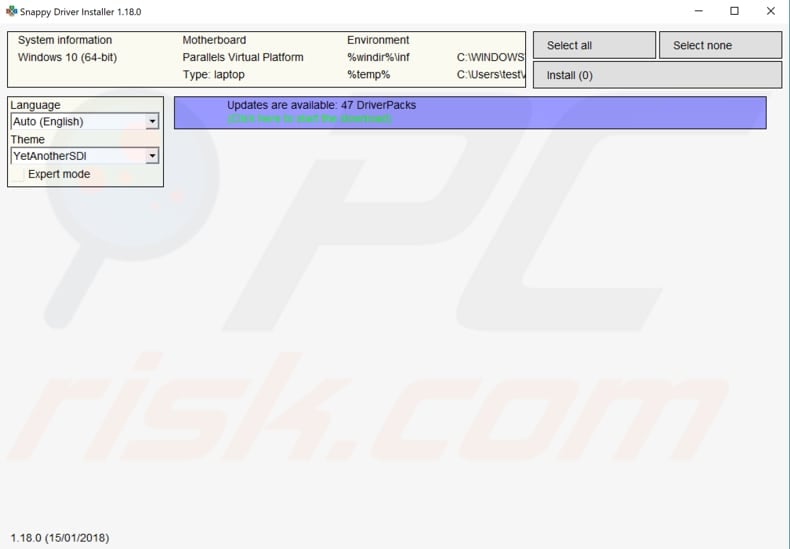
To update drivers automatically, you can use a downloaded Snappy Driver Installer. This is a powerful free driver updater tool for Windows that can store its entire collection of drivers offline. Having offline drivers gives Snappy Driver Installer the ability to have access to fast driver updates, even if there is no active Internet connection. You can download Snappy Driver Installer from here.
After you have finished updating and installing drivers (manually or automatically), restart Windows for them to take effect. Try to connect to the Internet to see if you still receive the «Windows couldn’t automatically bind the IP protocol stack to the network adapter» error.
[Back to Table of Contents]
Change WLAN AutoConfig Service’s Startup Type
Windows Services (also known as services.msc) are used to modify how Windows services run on your system. These services are responsible for running available programs and managing many system settings and resources. You can modify a service’s settings for security, troubleshooting, and performance-related reasons.
One of these services is WLAN AutoConfig, which provides the logic required to configure, discover, connect and disconnect from a wireless local area network as defined by standards. It also contains the logic to turn your computer into a software access point so that other devices or computers can connect to your computer wirelessly using a WLAN adapter that can support this.
Some users have reported that changing WLAN AutoConfig service’s startup type fixed the «Windows couldn’t automatically bind the IP protocol stack to the network adapter» error.
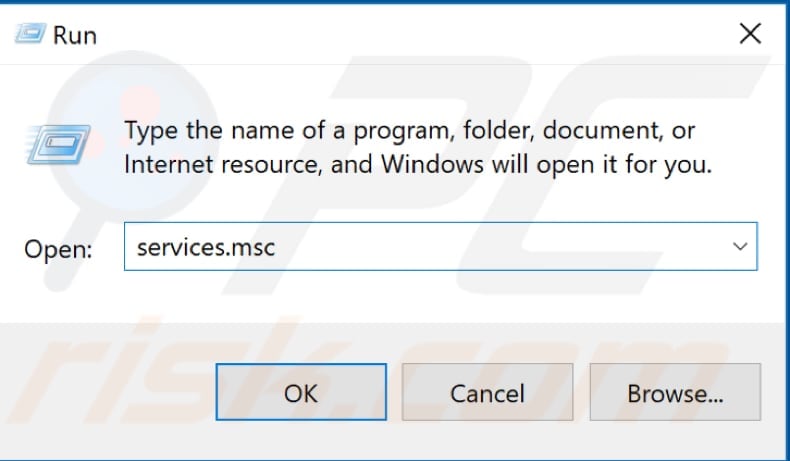
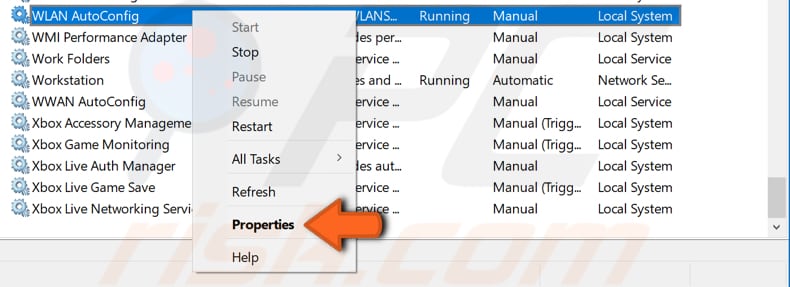
To change it, press the Windows (Win) key + R, or simply right-click Start and select «Run» from the contextual menu. Type «services.msc» in the Run dialog box and press Enter or click «OK».
Find the WLAN AutoConfig service in the services list (press W on your keyboard, which is quicker, and scroll down until you find this service) and right-click it. Select «Properties» from the contextual menu.
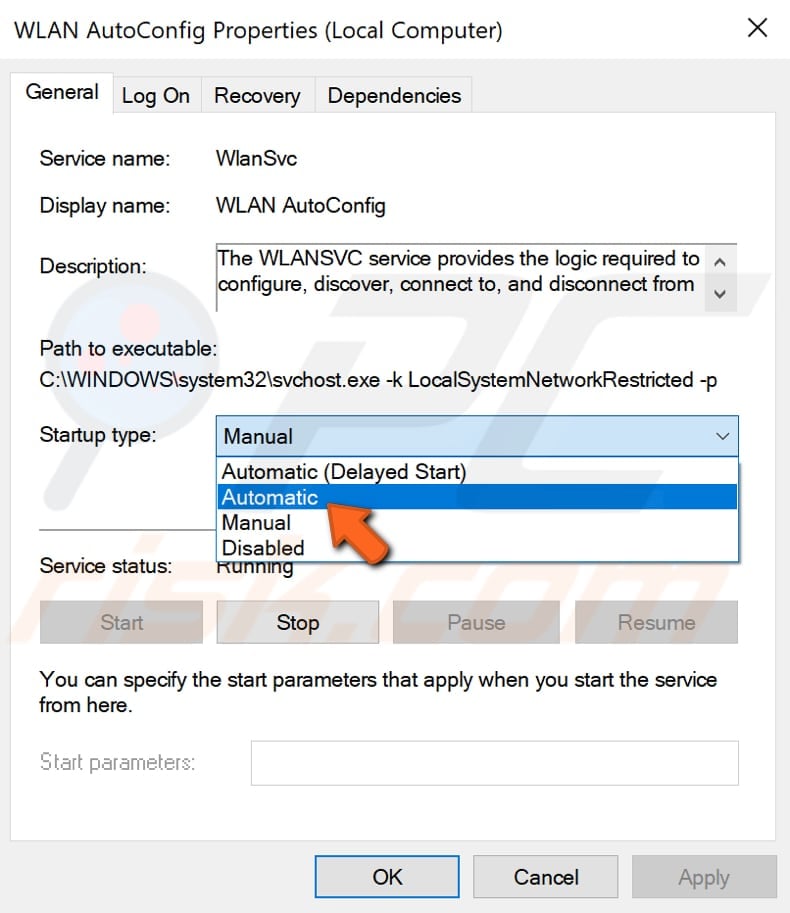
In the WLAN AutoConfig Properties (Local Computer) window, find «Startup type» and set it to «Automatic». Click «Apply» to save the changes and close all Services windows.
Restart the computer and see if this fixes the «Windows couldn’t automatically bind the IP protocol stack to the network adapter» error.
[Back to Table of Contents]
Shut Down Your Computer Using Shift Key
If you have already tried to restart your computer (or tried to shut it down the usual way), you could also try to shut it down using the Shift key by clicking the «Shut down» option while holding the Shift key pressed.
This might sound improbably, but some users have reported that this simple solution fixed the «Windows couldn’t automatically bind the IP protocol stack to the network adapter» error.
Shut down the computer using the Shift key, wait for a minute, and then turn it on again — see if this solves the problem.

[Back to Table of Contents]
Edit Registry
Windows Registry is a collection of databases of configuration settings in Microsoft Windows operating systems. It stores much of the information and settings for software programs, hardware devices, user preferences, operating system configurations, and much more. Many of the options exposed in the registry are not accessible elsewhere in Windows.
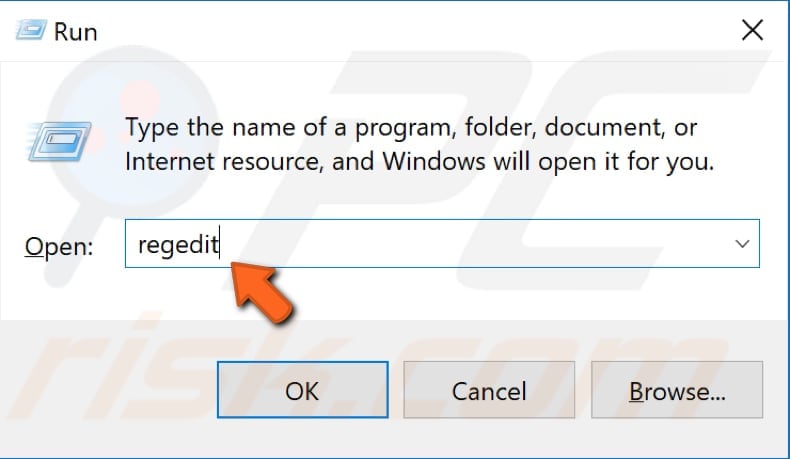
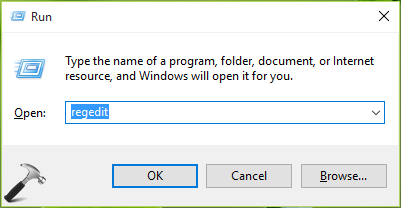
To edit the registry, use Windows Registry Editor by opening the Run dialog box (press Windows [Win] key + R or right-click Start and select «Run») and type «regedit». Press Enter or click «OK».
Now follow this path: «HKEY_LOCAL_MACHINE\SOFTWARE\Microsoft\Windows NT\CurrentVersion\NetworkCards». Expand the «NetworkCards» key. You will see folders numbered 2, 3, 4, and so on (in our case, it is just the 2).
You can see which adapter the registry sub-key corresponds to by looking at the Description REG_SZ file and the adapter’s name in the «Data» column. Double-click the «ServiceName» REG_SZ file and copy its value data.
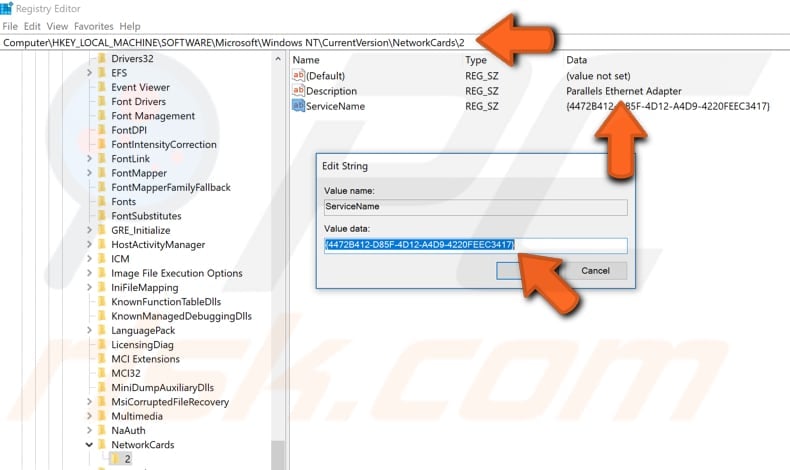
Now follow this path: «HKEY_LOCAL_MACHINE\SYSTEM\CurrentControlSet\Services\Tcpip\Parameters\Interfaces\Value Data of ServiceName string». Replace «Value data of ServiceName string» with the value data you copied from the ServiceName REG_SZ file and paste the whole directory into the Registry Editor bar.
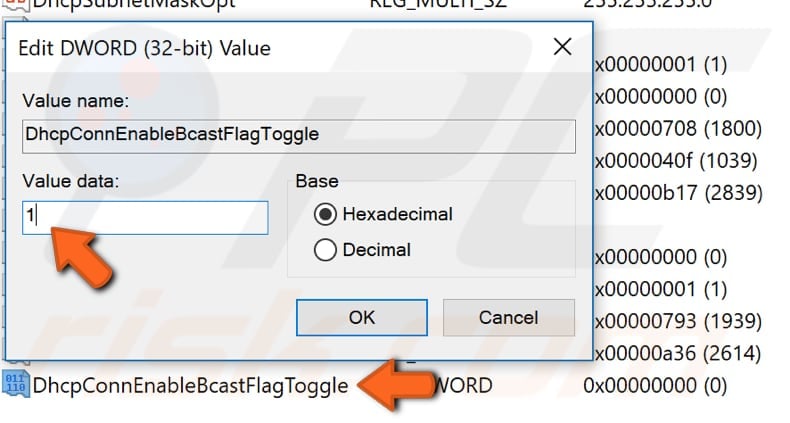
Right-click the empty space on the right pane and select «New», then «DWORD (32-bit) Value» and name it «DhcpConnEnableBcastFlagToggle».
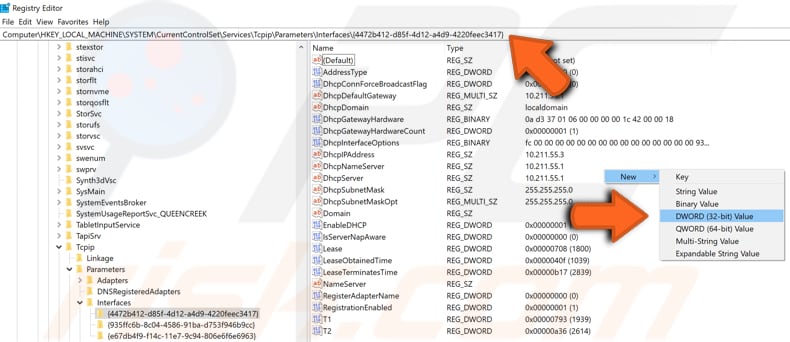
Double-click the newly-created DhcpConnEnableBcastFlagToggle registry and set «Value data» to 1. Click «OK» to save the changes.
Exit Registry Editor and restart the computer — see if this fixes the «Windows couldn’t automatically bind the IP protocol stack to the network adapter» error.
We hope this article was helpful, and one of the solutions fixed the «Windows couldn’t automatically bind the IP protocol stack to the network adapter» error.
If you know of other solutions to this problem not mentioned in our guide, please share them with us by leaving a comment below.
[Back to Top]
We all know that Windows 11 comes with built-in troubleshooters that helps you to deal various issues on your system. Recently, I came around a network related problem on my Windows 10 Pro machine. In this scenario, there were no Internet connectivity on my system though the router was working perfectly and other devices were able to connect it. Using built-in Windows troubleshooter for network issues, I finally found the root cause for the problem. The Windows Network Diagnostics enlisted Windows couldn’t automatically bind the IP protocol stack to the network adapter error but couldn’t fix it.
As the built-in troubleshooter was unable to fix the issue, we need to fix it manually. The reason behind this problem is that Windows is unable to get IP address using Dynamic Host Configuration Protocol (DHCP) discover packets. On some systems having this issue, it might be possible that third-party Virtual Private Network (VPN) clients or network tools installed are causing this problem. The first step to solve the problem is to remove these third-party clients and reset Windows Sockets. If the issue still persists, try these fixes:
Page Contents
Fix: Windows couldn’t automatically bind the IP protocol stack to the network adapter in Windows 11/10
Fix 1: Via Network Adapter Properties
1. Right click on network icon on taskbar and select Open Network and Sharing Center.
2. In the Network and Sharing Center window, click Change adapter settings link.
3. Next, in the Network Connections window, right click on the network adapter with which you’re facing issue and select Properties.

4. Moving on, in your network adapter property sheet, under This connection uses the following items section, keep only these entries checked and uncheck remaining ones:
- Client for Microsoft Networks
- File and Printer Sharing for Microsoft Networks
- QoS packet scheduler
- Link-Layer Topology Discovery Responder
- Internet Protocol Version 4 (TCP/IPv4)
- Link-Layer Topology Discovery Mapper I/O driver
- Microsoft LLDP Protocol Driver
- Internet Protocol Version 6 (TCP/IPv6)
Click OK and close Network and Sharing Center. You can now check the status of the issue and it must be resolved by now. If it isn’t, carry on the steps provided in FIX 2.
Fix 2: Using Registry Editor
🛈 Registry Disclaimer: If you’re new to editing registry entries, it is recommended to create a System Restore point first.
1. Press + R and type regedit in Run dialog box to open Registry Editor. Click OK.
2. In the Registry Editor window, navigate to following registry key:
HKEY_LOCAL_MACHINE\SOFTWARE\Microsoft\Windows NT\CurrentVersion\NetworkCards
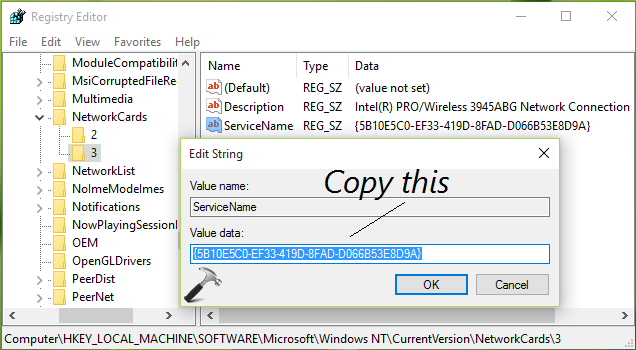
3. Expand the NetworkCards registry key and you’ll see some key numbered 2, 3 and so on. For each of these registry sub-key, in the corresponding right pane, you’ll see Description registry string (REG_SZ). Using Description’s Value data, you can identify to which adapter the registry sub-key corresponds. So in this way, when you spot your network adapter’s registry sub-key, double click on ServiceName registry string (REG_SZ) and copy its Value data. This data will be required in next step.
4. Now navigate to this registry key:
HKEY_LOCAL_MACHINE\SYSTEM\CurrentControlSet\Services\Tcpip\Parameters\Interfaces\<Value Data of ServiceName string>
Replace <Value Data of ServiceName string> with the value we copied in previous step.
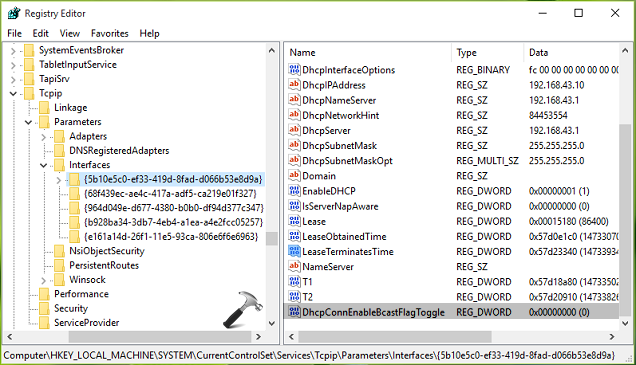
5. In the right pane, do a right click and select New > DWORD Value. Name the newly created registry DWORD (REG_DWORD) as DhcpConnEnableBcastFlagToggle. Double click on it to modify its Value data:
6. Put the Value data equals to 1 and click OK. Close the Registry Editor and reboot, the problem should be fixed after a restart.
Video fix
Here’s the video illustration of above mentioned fix:
Hope this helps!
RELATED ARTICLES
Распознавание голоса и речи на C#
UnmanagedCoder 05.05.2025
Интеграция голосового управления в приложения на C# стала намного доступнее благодаря развитию специализированных библиотек и API. При этом многие разработчики до сих пор считают голосовое управление. . .
Реализация своих итераторов в C++
NullReferenced 05.05.2025
Итераторы в C++ — это абстракция, которая связывает весь экосистему Стандартной Библиотеки Шаблонов (STL) в единое целое, позволяя алгоритмам работать с разнородными структурами данных без знания их. . .
Разработка собственного фреймворка для тестирования в C#
UnmanagedCoder 04.05.2025
C# довольно богат готовыми решениями – NUnit, xUnit, MSTest уже давно стали своеобразными динозаврами индустрии. Однако, как и любой динозавр, они не всегда могут протиснуться в узкие коридоры. . .
Распределенная трассировка в Java с помощью OpenTelemetry
Javaican 04.05.2025
Микросервисная архитектура стала краеугольным камнем современной разработки, но вместе с ней пришла и головная боль, знакомая многим — отслеживание прохождения запросов через лабиринт взаимосвязанных. . .
Шаблоны обнаружения сервисов в Kubernetes
Mr. Docker 04.05.2025
Современные Kubernetes-инфраструктуры сталкиваются с серьёзными вызовами. Развертывание в нескольких регионах и облаках одновременно, необходимость обеспечения низкой задержки для глобально. . .
Создаем SPA на C# и Blazor
stackOverflow 04.05.2025
Мир веб-разработки за последние десять лет претерпел коллосальные изменения. Переход от традиционных многостраничных сайтов к одностраничным приложениям (Single Page Applications, SPA) — это. . .
Реализация шаблонов проектирования GoF на C++
NullReferenced 04.05.2025
«Банда четырёх» (Gang of Four или GoF) — Эрих Гамма, Ричард Хелм, Ральф Джонсон и Джон Влиссидес — в 1994 году сформировали канон шаблонов, который выдержал проверку временем. И хотя C++ претерпел. . .
C# и сети: Сокеты, gRPC и SignalR
UnmanagedCoder 04.05.2025
Сетевые технологии не стоят на месте, а вместе с ними эволюционируют и инструменты разработки. В . NET появилось множество решений — от низкоуровневых сокетов, позволяющих управлять каждым байтом. . .
Создание микросервисов с Domain-Driven Design
ArchitectMsa 04.05.2025
Архитектура микросервисов за последние годы превратилась в мощный архитектурный подход, который позволяет разрабатывать гибкие, масштабируемые и устойчивые системы. А если добавить сюда ещё и. . .
Многопоточность в C++: Современные техники C++26
bytestream 04.05.2025
C++ долго жил по принципу «один поток — одна задача» — как старательный солдатик, выполняющий команды одну за другой. В то время, когда процессоры уже обзавелись несколькими ядрами, этот подход стал. . .

The “Windows could not automatically bind the IP protocol stack to the network adapter” is an error that appears on your PC when the network adapter is not working properly. The biggest giveaway is the disturbed internet connection, where the internet stops working out of nowhere.
Another instance of this error is encountered when you try switching between regular and VPN connections.
The IP address of your network plays a crucial role in the smooth functioning of the internet. Therefore, when there is an issue with the VPN servers or while uninstalling VPN when it becomes difficult for your PC to bind the IP back to your network adapter, you face a “Windows couldn’t automatically bind the IP protocol stack to the network adapter” error.
Some other issues that cause the error are –
- Network adapter settings
- DNS Cache
- Incompatible network adapter drivers
Fortunately, all these issues can be resolved. Keep reading as we reveal that the ultimate fixes to Windows could not automatically bind the IP.
How to Fix Windows Couldn’t Automatically Bind the IP Error on Windows?
To fix the issue, identifying the core reason is a must. However, as multiple reasons may cause the error, you have no other option than to try a bunch of fixes one after the other. Check out the fixes below and apply them using the steps given.
Fix 1 – Change the Network Adapter Settings to Default
Step 1 – Press Win+R to open the Run search.
Step 2 – In the Run search, use the command ncpa.cpl to open the adapter menu.
Step 3 – Select the adapter that you are connected to and right-click on it to find Properties.

Step 4 – In the Properties pop-up, navigate to the Network tab and put an enable mark for the following –
- File and Printer Sharing for Microsoft Networks
- QoS packet scheduler
- Link-Layer Topology Discovery Responder
- Internet Protocol Version 4 (TCP/IPv4)
- Link-Layer Topology Discovery Mapper I/O driver
- Internet Protocol Version 6 (TCP/IPv6)
- Microsoft LLDP Protocol Driver
- Client for Microsoft Networks

Step 5 – After enabling all of these, click OK to save the changes.
Read Also: Fixed – Your Computer Appears to Be Correctly Configured, But the Device or Resource Is Not Responding
Fix 2 – Ensure the WLAN AutoConfig Service is Running
Step 1 – Press Win+R to bring up the Run search.
Step 2 – In the Run search, use the command Services.msc

Step 3 – Find the WLAN AutoConfig service and double-click on it to check its status.

Step 4 – Change the Startup type of the service to Automatic so that it starts running every time you start your PC.
Step 5 – Click the Start button to initiate the WLAN AutoConfig service.
Fix 3 – Reset Winsock and Flush DNS
Step 1 – Go to the Start Menu and search for Command Prompt.

Step 2 – Use the Run as administrator option to launch the CMD window.
Step 3 – In the cmd window, use the command – netsh winsock reset.

Step 4 – After you have run the command, use the next command – netsh int ip reset.
Step 5 – The above two commands will reset the Winsock for your PC. Simply restart your PC for the changes to take effect.
Step 6 – After you have restarted the PC, relaunch the CMD window using the admin privileges.
Step 7 – To flush the DNS cache, use the following commands one after the other (press enter after each) –
- ipconfig /release
- ipconfig /flushdns
- ipconfig /renew
Step 8 – After you have performed all the steps, you can restart the PC and try checking if the Windows couldn’t automatically bind the IP protocol stack to the network adapter error is resolved or not.
Read Also: Ways to Fix The Requested URL Was Rejected Browser Error
Fix 4 – Update Network Adapter Driver
Step 1 – Download the Advanced Driver Updater.
Step 2 – Click the Start Scan Now button to initiate the scan.

Step 3 – The scan searches for outdated drivers on your PC.
Step 4 – Check the results to find the network adapter listed there.

Step 5 – Click on Update all to clear all the outdated drivers.
Fix 5 – Use a System Reset as a Last Resort
Step 1 – Press Win+I to open the System Settings.
Step 2 – In System Settings, use the command look for recovery options.

Step 3 – Use the Reset this PC button to initialize the process in the recovery option.
Step 4 – Follow the shown steps on the screen to choose your reset mode and continue resetting the system.
After trying all these fixes, you will be relieved that Windows could not automatically bind the IP protocol stack to the network adapter error is resolved. Also, ensure that you have uninstalled and removed all the components of your VPN client, as that is the primary reason behind the occurrence of this error.
You might not need to apply all the fixes depending on the reason; the fixes work differently for everyone. To resolve the issue all you have to do is try the fixes until your problem is resolved.
With that, we have reached the end of this post. Thanks for reading. Good luck!
Recommended :
Fixed – No Internet Virgin Media