
Наводим порядок на рабочем столе
Если куча ярлыков на рабочем столе мешает вам наслаждаться прекрасной картинкой, то в Windows 10 есть множество способов их аккуратно разместить так, чтобы они были всегда под рукой, но не мозолили глаза.
Начнем с основных и очевидных способов размещения ярлыков, постепенно углубляясь в персонализацию Windows 10.
Некогда столь не любимые плитки дают простор кастомизации. Размещение на начальном экране не нравится многим из-за необходимости нажимать кнопку «Пуск»
Если в меню «Пуск» не хватает места, то его можно увеличивать и уменьшать, цепляя за края.
Самый очевидный способ — закреплять ярлыки на панели задач. Не всем он нравится, так как ярлыки мешаются с тем, что запущено.
Для включения полноэкранного меню «Пуск» надо перейти в «Параметры» -> «Персонализация» -> «Пуск» и включить параметр «Открывать меню «Пуск» в полноэкранном режиме«.
Тут можно с лихвой дать волю фантазии, распределяя ярлыки фигурами, по группам, давая названия группам.
На панели задач в самом низу можно создавать дополнительные панели задач, группируя там ярлыки. К примеру, создаем папку «Игры» в любом желаемом месте. Кидаем туда ярлыки. Нажимаем ПКМ на панели задач -> Панели -> Создать панель инструментов…
Далее выбираем нашу папку и получается следующая картина
Снова не устраивает, что надо делать лишний клик для доступа к ярлыкам? Ок. Нажимаем ПКМ на панели задач. Снимаем галочку с пункта «Закрепить панель задач«. Выдвигаем панель «Игры» и получается следующее:
Если нажать на нашу панель правой кнопкой мыши, то можно включить крупные значки,
можно убрать подписи,
можно убрать заголовок
Также в этом режиме, когда не закреплена панель задач, можно ее увеличить потянув за верхний край. В конце настройки не забудьте вернуть галочку «Закрепить панель задач»
Таким образом можно добавлять сколько угодно панелей задач по разным группам
Если у вас низкое разрешение экрана, ноутбук, то можно оставить маленькие значки дополнительной панели и сделать такие же значки на основной панели. Тогда больше ярлыков влезет и не надо будет увеличивать размер панели задач.
Там же можно сделать, чтобы панель задач автоматически скрывалась, можно изменить ее расположение, чтобы она была сверху, слева или справа.
Удивительно, но рабочий стол умудряются захламлять даже многочисленными рабочими/учебными файлами Word, Excel и т.д, хотя казалось бы для них есть папка «Документы».
Видимо не все знают, но в современных MS Office доступ ко всем последним офисным файлам легко получить как с главного экрана приложения, так и через ПКМ по ярлыку, хоть в «Пуск», хоть в панели задач.
В папку «Документы» можно быстро перейти через меню «Пуск» и через ПКМ на проводнике
В указанное выше подменю можно добавить еще ряд папок. Достаточно перейти в параметры меню «Пуск» (мы там включали полноэкранный «Пуск») и нажать на синюю надпись в самом низу «Выберите какие папки будут отображаться в меню «Пуск».
Аннотация
В этой статье описано, как упорядочить, переместить и изменить значки на рабочем столе.
Дополнительная информация
Упорядочение и перемещение значков
Чтобы Упорядочить значки по имени, типу, дате или размеру, щелкните правой кнопкой мыши пустую область на рабочем столе и выберите команду Упорядочить значки. Щелкните команду, которая указывает, как вы хотите упорядочить значки (по имени, по типуи т. д.). Если вы хотите, чтобы значки автоматически упорядочивались, нажмите кнопку Автоматическое упорядочение. Если вы хотите упорядочить значки самостоятельно, щелкните элемент автоматически упорядочить , чтобы снять флажок.
Удаление значков
Некоторые значки — это сочетания клавиш для работы с программами на компьютере. В левом нижнем углу значков сочетаний клавиш обычно есть стрелка. Если вы не хотите использовать ярлык на рабочем столе, щелкните значок, а затем перетащите его в корзину. Это действие удаляет только ярлык, но не программу, на которую оно указывает. Вы также можете щелкнуть правой кнопкой мыши значок, а затем выбрать команду Удалить , чтобы удалить ярлык с рабочего стола.
Некоторые значки, такие как Сетевое окружение, Корзинаи Мой компьютер , удалить нельзя.
Изменение изображений значков
У некоторых значков есть возможность изменить рисунок, представляющий значок. Этот параметр доступен не для всех значков. Чтобы изменить рисунок значка, выполните указанные ниже действия.
-
Щелкните правой кнопкой мыши значок и выберите пункт Свойства.
-
Откройте вкладку ярлык (если она доступна) и нажмите кнопку изменить значок.
-
Щелкните значок, который вы хотите использовать в списке, нажмите кнопку ОК, а затем — кнопку ОК.
Если в списке нет значков, изготовитель может не предоставлять дополнительные значки. Чтобы найти другие значки, выполните те же действия, что и на другом значке, найдите его исходный файл (обычно это ICO-файл), а затем вернитесь к исходному значку, который вы хотите изменить. Выполните те же действия, но при нажатии кнопки » изменить значок » найдите расположение исходного файла на другом значке.
Примечание: для настройки значков можно использовать сторонние инструменты.
Чтобы получить дополнительные сведения об изменении изображений значков, щелкните следующий номер статьи, чтобы просмотреть статью в базе знаний Майкрософт:
253689 Не удается изменить значки папок по умолчанию в проводнике Windows
TweakUI
Примечание: TweakUI является неподдерживаемым средством. Ниже приведены сведения, которые можно получить только в информационных целях. Служба поддержки продуктов Майкрософт не может ответить на вопросы о TweakUI.
Если вы используете Windows Power-User, вы можете использовать TweakUI 1,33 для управления значками. Однако это неподдерживаемый инструмент. Внимательно прочтите документ, который сопровождается TweakUI, прежде чем загружать и использовать средство.
Чтобы получить дополнительные сведения о поиске дополнительных сведений о значках, щелкните приведенные ниже номера статей базы знаний Майкрософт.
262885 Значки на рабочем столе неправильно отображаются при изменении параметров
132668 Значки случайным образом меняются на разные значки
Нужна дополнительная помощь?
Нужны дополнительные параметры?
Изучите преимущества подписки, просмотрите учебные курсы, узнайте, как защитить свое устройство и т. д.
Our Windows desktop is often our go-to location to put files and folders, especially if we want quick and convenient access. As a result, our desktops could look like a massive heap of clutter – a hodgepodge of files on screen.
In part this is the fault of the operating system; the Desktop appears first in just about every file save dialog making it an incredibly handy place to stow “just a couple of files”. Unfortunately, these couple of files quickly accumulate into so much more. Your desktop quickly ends up looking like chaos.
It doesn’t have to be that way. Organizing your Windows desktop is a lot easier than cleaning up real-life clutter, and you don’t even have to stop using the Desktop as your default organizing space. In this article, we will show you how to get your Windows desktop organized so that it’s clutter-free, efficient, and convenient.
(Just need a short-term fix for a crowded desktop without doing a major reorganization? You might try our tutorial on how to shrink your desktop icons, although that’s only a temporary fix.)
Windows has some built-in features for organizing files and folders, which might just be what you need. For a more robust solution, there are some third-party packages which you can use to group desktop icons into specific categories. Let’s have a closer look at both of these solutions.
Organizing the Desktop Icons With Folders
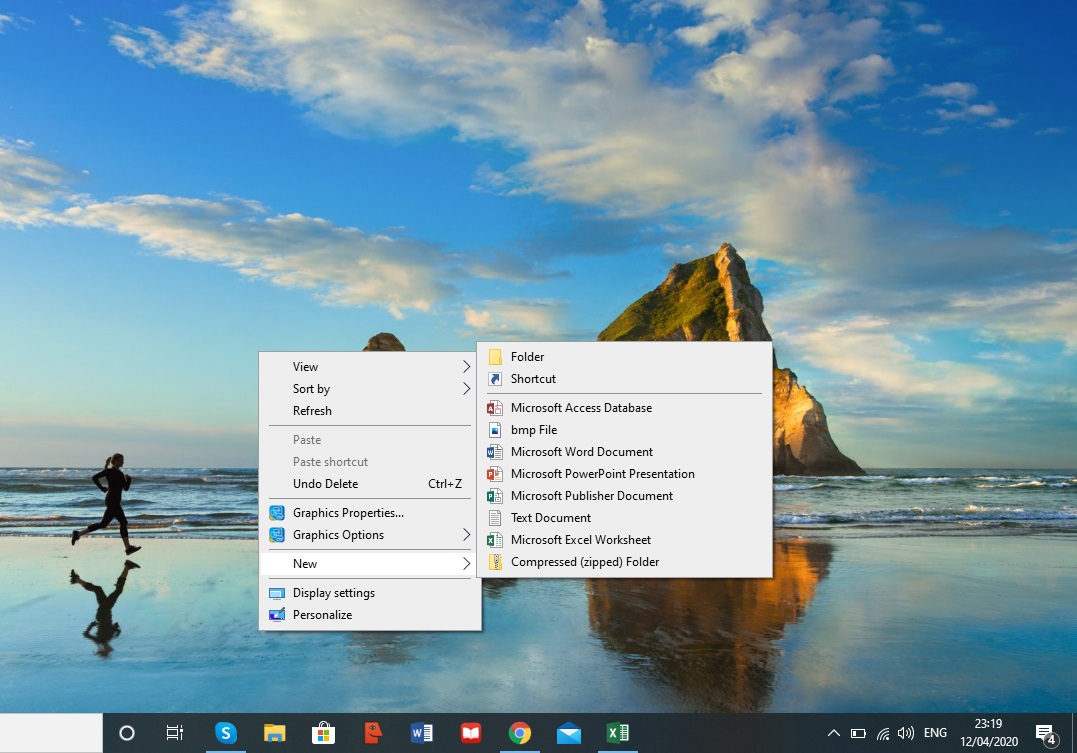
The most straightforward way of getting your desktop under control is to use folders. Adding new folders to the desktop is simple. First, right-click on the desktop, and select New. Then, click on Folder from the drop down to create an empty folder.
It’s a good idea to name the folder when you make it to be more organized. But in case you forget, you can always rename it by right-clicking on the folder and selecting Rename. You can then type in a name for it. Remember that you are trying to make your desktop more organized, and the least thing you want is seeing your folders named New Folder, New Folder (2), New Folder (3), and so on.
Now you can drag and drop the appropriate desktop shortcuts into your new folder. This will save the files in your folder instead of having them scattered around your screen. You could add any number of folders to the desktop for alternative shortcut categories such as applications, utilities, multimedia software, and so on. Then you could move the icons into the folders as in the snapshot below.
If you have a lot of files on your desktop, getting them organized can be difficult, especially if they start overlapping. One useful technique is to use the built-in sorting functions of Windows 10 to sort your files by type. This will put all the files of the same type together, so that for example if you have a “Movies” folder, doing a sort by type will put all the video files in one place. This way, you can you can easily group-select and drag them to your “Movies” folder. Just right-click on the desktop, click Sort by -> Item type.

Third-Party Tools
Nimi Places
The built-in folder system for Windows is simple and effective, but it isn’t feature-rich. One feature you might want to have is the ability to see inside folders without having to open them, just to remind you whats in there. You can create folders like that using a third-party tool called Nimi Places. It is a portable software package that you can use to add folder groups to the desktop. Open this page and click “Download Nimi Places” and save the executable. Then click on the .exe file and select “Extract Nimi Places” to launch the software.
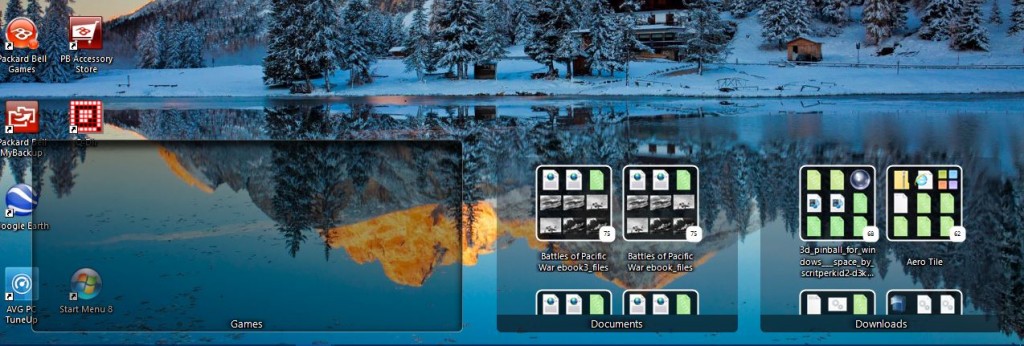
Nimi Places launches with four ready-made container groups for Applications, Games, Documents, and Downloads. You can copy and paste desktop shortcuts into those boxes by right-clicking an icon and selecting “Copy.” Then right-click inside one of the container boxes and click “Paste” to add the copied shortcut to it.
You can also drag the containers to re-position them on the desktop. However, there is a tendency for you to drag them around the screen by accident. To avoid this, just right click on a container and click Lock. You can unlock them the same way, by right-clicking the container and selecting Unlock.
To add your own group containers to the desktop, click the Nimi Places icon in the system tray. This will open the window as shown in the screenshot below. Click the + button at the bottom right to make a new container. Then click Place, and select one of your desktop shortcut folders. That will add the folder container to the desktop, and you can open the shortcuts it includes from there.

You can resize the containers by clicking dragging their borders with the mouse. Note that you can also scroll through the contents of larger containers with a scroll bar by clicking the right side of a container and then dragging its scroll bar up and down.
To edit the containers’ titles, right-click on the title bar at the top of the container box. Then, select the Rename container option, which opens the text box below. Enter an alternative title for the container there.

The software has some other customization options for the containers. To see them, right-click a container and select Appearance and Theme from the sub-menu. This will let you choose some alternative backgrounds for the containers.

ToolBox
ToolBox is another third-party package you can use to group your desktop icons. You can download the program from here. Click tbox285.zip to save its Zip. Then open the Zip folder in File Explorer and click Extract all to extract the contents of the folder. When you’ve extracted the Zip file’s contents, you can run ToolBox from there.
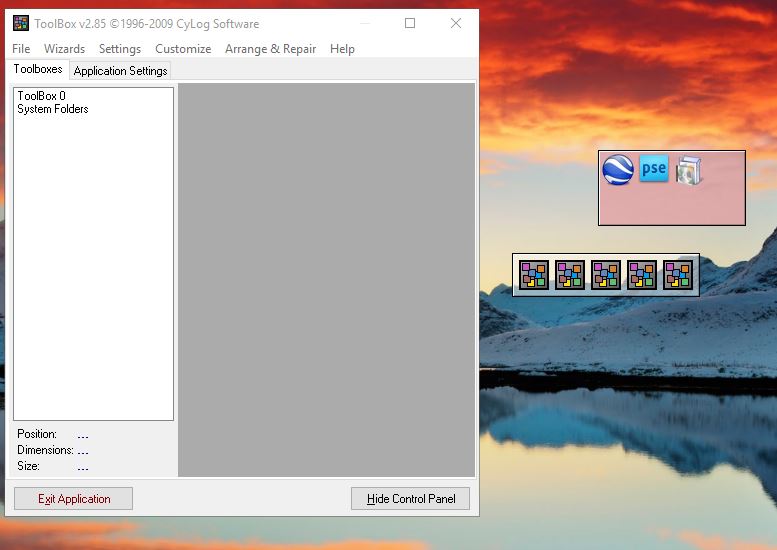
Now you can set up new icon boxes for the desktop by right-clicking the ToolBox icon on the system tray and selecting New Toolbox. That adds a box to the desktop as you can see in the screenshot below. Drag desktop icons into the box or boxes to organize them.
To further customize those desktop icon boxes, right-click one and select Toolbox Properties from the contextual menu. That opens the window in the snapshot directly below. There, you can resize the boxes, alter their colors, and apply new effects to them.
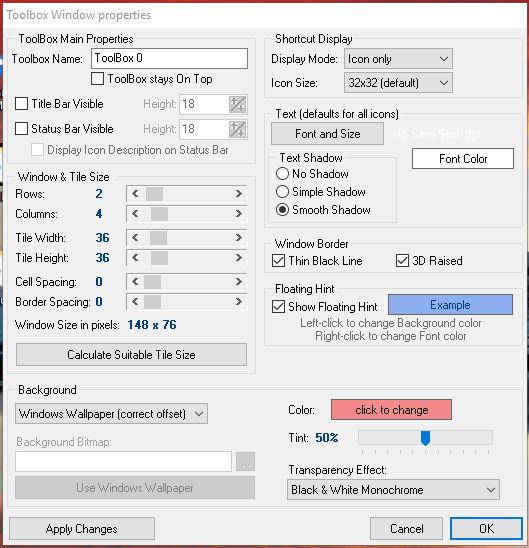
To resize the icon boxes, drag the bars under Window & Tile Size. Drag the Rows bar to expand or contract the height of the box. Alternatively, you can drag the Columns bar right or left to alter the width.
You can alter the colors of the boxes by clicking the box next to Color. That will open a color palette from which you can choose other colors. Or you can add some background wallpaper to the box by selecting Bitmap from the drop-down menu and pressing the … button beside the Background Bitmap path box.
You can include the title at the top the box by clicking the Title Bar Visible check box (or hide the title by unchecking it). Enter new titles for the box in the Toolbox Name text box at the top of the window.
Once you’re done, click the Apply Changes button to apply any newly selected settings.
The Toolbar Control Panel lists all your icon boxes. You can right-click a box and select Toolbar Control Panel to open the window shown below. The Toolboxes tab lists the desktop icon boxes. You can a delete a box by right-clicking its title there and selecting Delete Toolbox. Click Settings > Save all toolbox settings to quickly save all the shortcuts, effects, and desktop positions of the icon boxes.

In addition, you can also set up boxes that include system tray shortcuts. The Toolbar Control Panel includes a Wizards menu at the top. Select that to open a small menu where you can set up a system folder, drive, and megapack shortcut box.
With Windows 10 folders, Nimi Places, and ToolBox, you can now effectively group your desktop icons and organize shortcuts. You might also look at app launchers as a way to clear up a cluttered desktop, as covered in our How to add new app Launchers to Windows 10 article.
Панель задач Windows 10 — элемент системы, не слишком поддающийся тонкой настройке и не сильно изменившийся в плане функциональности в сравнении с предыдущими версиями операционной системы, отсюда и множество сторонних приложений для настройки панели задач, про одно из них — TaskbarX (позволяет размещать значки по центру, менять прозрачность панели задач) я писал не так давно, есть и другие.
В этом обзоре — ещё одна бесплатная программа для модификации панели задач: TaskbarGroups, предназначенная для группировки значков панели задач в своего рода папки, применимая и к значкам рабочего стола.
Использование Taskbar Groups для организации ярлыков
Программа Taskbar Groups полностью бесплатная и с открытым исходным кодом, пока — не финальная версия, русский язык интерфейса отсутствует. Тем не менее, использование утилиты не должно оказаться сколько-нибудь сложным.
Скачать программу можно с GitHub разработчика https://github.com/tjackenpacken/taskbar-groups/releases — нажимаем по пункту «Assets» в последней версии, загружаем ZIP-файл с Portable-версией программы, распаковываем и запускаем (может появиться предупреждение о запуске приложения неизвестного издателя). Дальнейшие шаги:
- В главном окне программы нажимаем «Add taskbar group» (добавить группу панели задач).

- Откроется окно создания новой группы. Верхнее поле — для задания имени группы. Справа пункт «Width», служит, судя по всему, для настройки ширины группы при раскрытии (можно посмотреть на итоговом скриншоте).

- Пункт Add group icon позволяет добавить иконку группы (файлы png, можно с прозрачностью, jpg и другие). Я в качестве теста нарисовал простую иконку PNG с прозрачным фоном и назначил её.
- Пункт «Add new shortcut» служит для добавления новых значков (ярлыков) в группу панели задач — добавляем нужные элементы, указывая исполняемые файлы .exe. Если вы не знаете где находится исполняемый файл той или иной программы, можно нажать правой кнопкой мыши по её ярлыку и выбрать пункт «Расположение файла», либо, если программа расположена в меню Пуск — правый клик — дополнительно — Перейти к расположению файла, затем открываем свойства ярлыка и снова открываем «Расположение объекта».
- По завершении добавления, нажимаем «Save». В результате в главном окне программы вы будете видеть созданные вами группы, с возможностью удалить ненужные или создать новые.


Дальнейшие действия: все созданные группы будут находиться в папке Shortcuts в папке с программой Taskbar Groups и, чтобы разместить их на панели задач, мы можем нажать правой кнопкой мыши по ярлыку и выбрать пункт «Закрепить на панели задач».

Ярлык появится в выбранном нами расположении, а при нажатии на него появится возможность выбора любого ярлыка из группы, как на изображении ниже (при первом использовании возможно появление окна SmartScreen):
Если ничего выбирать не требуется, а нужно скрыть всплывающую панель — просто нажмите по значку группы второй раз. Ярлыки работают не только на панели задач, но и при размещении на рабочем столе или в папке:

Утилита простая, совершенно не требовательная к ресурсам компьютера и, если проверять онлайн на вирусы, чистая (одно обнаружение от не очень известного антивируса — судя по всему, ложное срабатывание). Возможно, кому-то из читателей пригодится.
Organizing your Windows desktop could be a challenge, especially if you need to work with many icons on-screen. You’ll need desktop organization software to manage icons on Windows 11,10,8 & 7 PC.
The desktop icon organizer ensures you get to see important icons in one place and manage their functions with ease. That’s why this article provides information about 9 software to organize desktop icons with ease.
We have tried and tested several desktop software and listed them according to their features and other essential information.
1. Wincmder Shellex
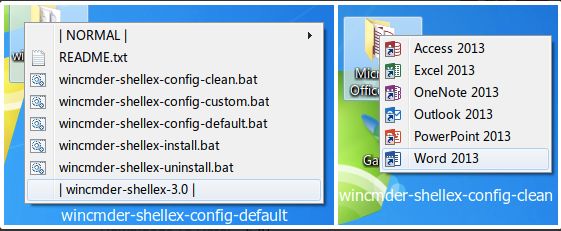
The Wincmder Shellex offers multiple cool ways to organize desktop icons on Windows 10/11 PC. It features an advanced context menu with several options users need to organize icons on their Windows easily.
Main Wincmder Shellex Features
- The content viewer allows you to view everything in a folder after a few clicks
- The context menu comes with essential organizational options
- Runs with Windows Shell to effect deep de-cluttering of your Windows environment
- A sleek interface makes navigation and organization easy
Get It Here
2. Icon Configuration Utility
Users keen to take advantage of top software to organize desktop icons will fancy what this app has to offer Windows 11 and 10 PCs.
Main Icon Configuration Utility Features
- Position definer to move old icons on the desktop to a different location
- Comes with icon sharpness support so all items look extra-clear in different screen resolutions
- Icon pattern definer for new and existing items
- Supports a context menu with more organization options
Get It Here
3. Iconoid
The Iconoid app provides users with multiple customization options and several great features required to organize your Windows with ease.
Main Iconoid Features
- Customization options allow users to change the color, text font, background, and other elements of icons
- Allows users to set icon position and restore items to a previously-saved location
- The hidden tool allows you to set icons to hide after a predefined time
- Users can change desktop options and other major parts of their Windows home screen
Get It Here
4. ToolBox

Users of the ToolBox app can conveniently define several essential parameters required to organize a Windows 11 desktop with ease. It comes with great features like cell creation, box placement, an advanced icon manager, and so much more.
Main ToolBox Features
- Detailed parameter definition to better organize your desktop
- Icon manager allows you to add and remove items on your Windows with ease
- Cell creation to make new cells for programs and other items that are in one category
- Allows box creation and placement anywhere on your desktop screen
Get It Here
5. FSL Launcher

The FSL Launcher comes with special tabs and advanced features you need from a Windows 10 desktop icon organizer.
Main FSL Launcher Features
- Hide tool makes it easy to keep your organizer until it is needed
- 3+ special tabs to make organization easy
- Group manager allows users to create, arrange, and remove items from your Windows environment
- Allows you to place it anywhere on your screen for easy access
Get It Here
6. Stick

You’ll love what Stick has to offer if you’re all in for customization ease from a Windows desktop organizer. The app allows users to do much more to keep their Windows environment neater and easier to manage.
Main Stick Features
- Comes with 5+ themes to ease customization of your icon organizer
- Transparency settings allow you to see icons how you want them on your Windows environment
- Supports customization options to help users change the size of icons, remove or add files, share content, etc.
- Anywhere pin means you can place the organizer out of sight on your screen for hassle-free access
Get It Here
7. SideSlide

You can easily manage your Windows desktop and hide the SideSlide organizer until you need it. The app also comes with a quick view tool that allows users to keep tabs on icons across Windows folders.
Main SideSlide Features
- Allows the addition and management of 5+ file types along with desktop icons
- The retractable interface goes away when not in use to keep your screen clutter-free
- The hover view function allows you to quickly see the content of any icon or object on your Windows
- Hotkeys make smooth operation easier than ever
Get It Here
8. Nimi Places
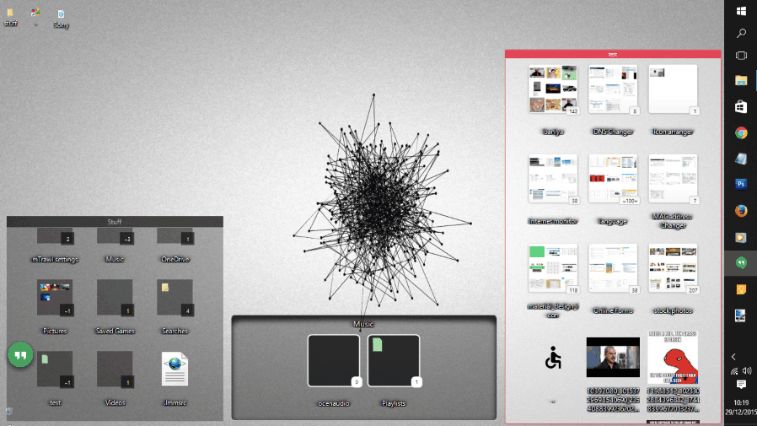
Using Nimi Places makes it easy to arrange desktop icons on Windows and quickly preview content in folders with relative ease.
Main Nimi Places Features
- Allows users to organize icons on the desktop with its signature box format
- Folder formation to keep boxes of icons in a neat format
- Quick preview of PNG, JPEG, PDF, and other document formats in boxes
- Allows customization of different icons according to themes and other settings
Get It Here
9. Rainmeter
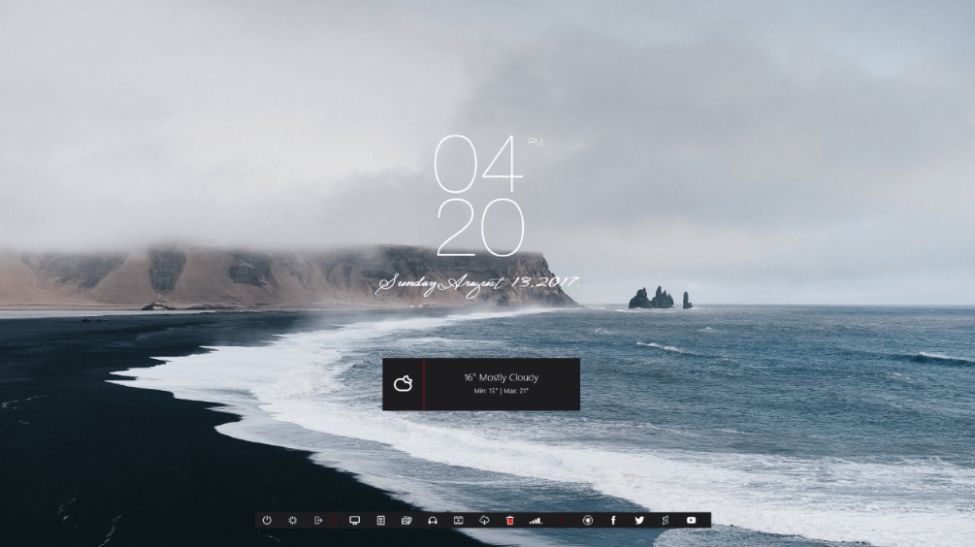
The Rainmeter app comes with several handy features Windows users need to manage their desktop icons with ease. It comes with multiple skins, an editor, customization extensions, and other great tools.
Main Rainmeter Features
- Free and paid custom skins to provide unique looks for Windows desktops
- Easy-access icon docks to organize items on your desktop without hassle
- Comes with an editor so users can tweak the appearance of different icons on their desktop
- Customization extensions provide more tools to edit and manage icons on your Windows desktop
Get It Here
FAQs
How do I organize my desktop icons?
You can organize your desktop icons when you right-click a blank area on your Windows’ device home screen. Next, tap on Arrange icons and click a command to arrange your icons by their type, name, date, and much more.
Does Windows have a desktop organizer?
Windows has several Desktop organizers capable to create multiple user areas and manage content on your device’s home screen. Such organizers usually have functions that can place links in ranges and allows users to resize, move, and drop icons within a defined area on their Windows device.
How do I group icons on a Windows desktop?
You can arrange group icons on Windows Desktop when you right-click any blank area on your computer’s home screen. Next, you can click the command that indicates how you want icons arranged. You can also arrange icons automatically when you click ‘Auto Arrange’ among.
Also Read
- 9 Best GEDCOM File Viewers for Windows PC
- 9 Best Free DXF Viewer For Windows PC
- 10 Best Log Viewer Software for Windows PC
- 9 Best STEP File Viewer for Windows PC
- 7+ Best Icon Editor Software For Windows PC
- 9 Best Free Icon Packs For Android