Windows Server 2025 brings exciting new features and enhancements to the Windows Server family, but before you can enjoy its power, you need to get it installed in a virtual environment. Oracle VirtualBox is a free, open-source virtualization tool that allows you to run multiple operating systems on a single machine. In this blog post, we’ll walk you through the process of installing Windows Server 2025 in Oracle VirtualBox, from setting up the VM to completing the installation.
Table of Contents
System Requirements:
Before proceeding with the installation, let’s check the system requirements for Windows Server 2025.
Windows Server 2025 Requirements:
To run Windows Server 2025, your host machine should meet the following minimum system requirements:
- Processor: 1.4 GHz 64-bit processor or faster
- RAM: 2 GB minimum (4 GB or more recommended)
- Hard Drive Space: 32 GB minimum (64 GB or more recommended)
- Graphics: DirectX 9 graphics device with a WDDM 1.0 driver
- Network: Ethernet adapter with a connection to the Internet
- Other: UEFI firmware with Secure Boot enabled (optional but recommended for security)
Additional Tools:
- Oracle VM VirtualBox: Download it from Oracle’s official website
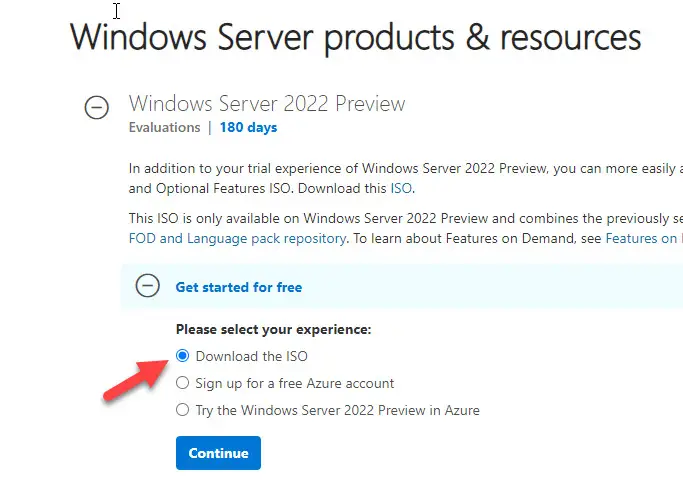
- Windows Server 2025 ISO: Download the ISO file from Microsoft’s Evaluation Center website or through your Volume Licensing Service Center.
Step-by-Step Guide to Install Windows Server 2025 in Oracle VirtualBox:
Step 1: Install Oracle VirtualBox
If you haven’t already installed Oracle VirtualBox, follow these steps:
- Download Oracle VirtualBox from here.
- Run the installer and follow the installation wizard. It’s a straightforward process and usually just requires accepting the default options.
a
Step 2: Create a New Virtual Machine
Now, let’s create new virtual machine for Windows Server 2025.
Open Oracle VirtualBox and click the New button at the top of the window.

Name your virtual machine (e.g., “WS2025”).
Select the Operating System Type:
- Choose Microsoft Windows as the OS.
- Set the version to Windows Server 2025 (64-bit)
Click Next to continue.

.
Memory Allocation:
- Allocate at least 4 GB of RAM (recommended).
- Select the number of processor cores you want to allocate to the virtual machine. Choose an appropriate amount based on your system’s capabilities and the requirements of your workload.
- Make sure Enable EFI (special OSes only) is checked, as Windows Server 2025 might require UEFI support.
Click Next to continue.

.
Create a New Virtual Hard Disk:
- Choose Create a virtual hard disk now.
- Set the virtual hard disk size to at least 100 GB (you can increase this if needed).
Click Next to continue.

.
On Summary page, review your selection and if it is OK then click on Finish to create a new virtual machine for Windows Server 2025 installation.

.
Step 3: Adjust VM Settings
Before starting the installation, we need to modify some VM settings:
Click on your VM (WS2025) in the VirtualBox Manager and click the Settings button.

.
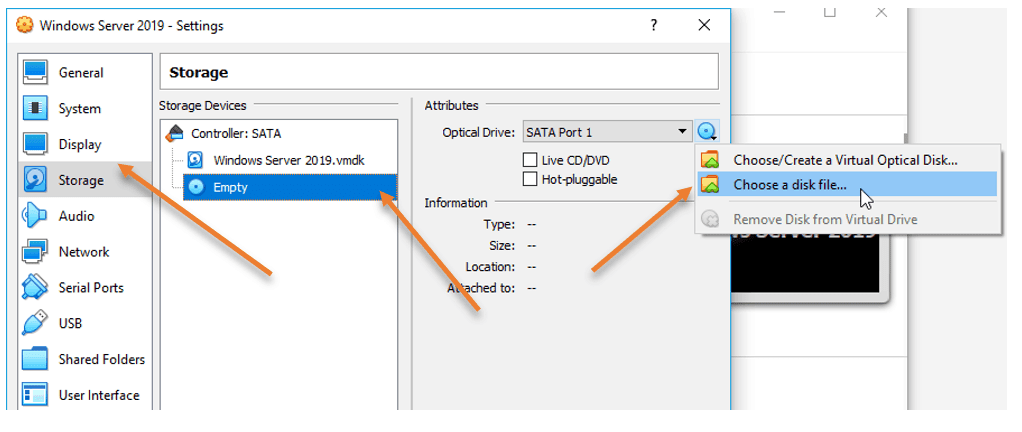
Under Storage:
- Click on the Empty drive under the Controller: SATA section.
- On the right, click the disk icon and select Choose a disk file….

.
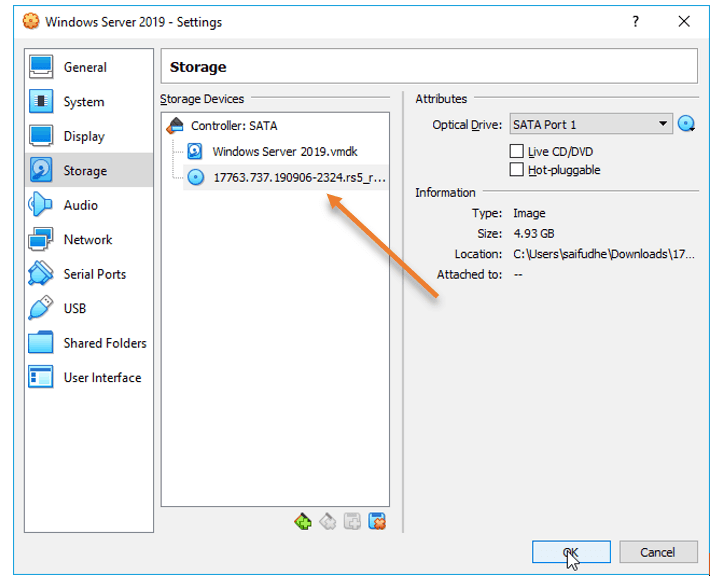
Select the Windows Server 2025 Evaluation ISO file you downloaded earlier. Click Open to attach the ISO image to the selected VM.


.
Under Network:
Set the Adapter 1 to Bridged Adapter for internet access if you need it. Otherwise, use Host-only Adapter. Click OK to apply the settings and close the Settings window.

.
Step 4: Start the Virtual Machine and Begin Installation
Now that your VM is configured, let’s start the installation. Select the VM (WS2025) and click Start.

.
Press any key on your keyboard to boot the VM from the attached ISO file, and the Windows Server 2025 installation will start.


.
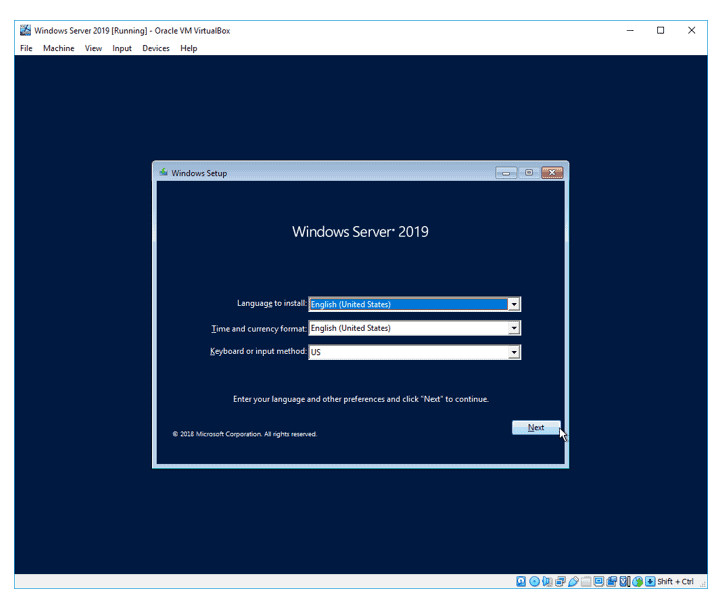
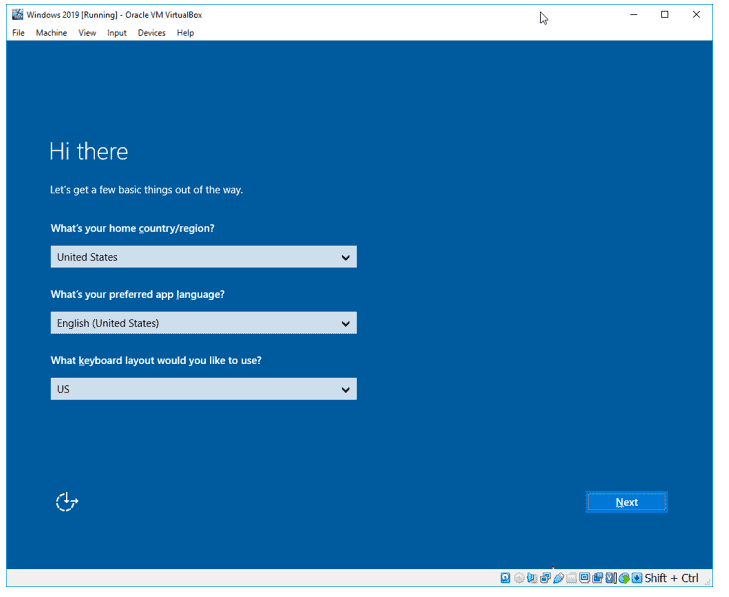
Upon booting, the following screen will appear, allowing you to select the language, and time and currency format. Click Next to Continue.

.
Select the keyboard input method and click Next.

.
On the “Select Setup Option” page, choose the “Install Windows Server” option to perform a clean installation. Also, check the box labeled “I agree everything will be deleted, including files, apps, and settings.”
Click Next to initiate the installation process.

.
If prompted, enter your Windows Server 2025 product key to activate the system. This prompt will not appear if you’re using the Windows Server 2025 Evaluation ISO image.
Next, you’ll be prompted to select the version of Windows you want to install. Choose the appropriate edition of Windows Server 2025 from the available options. The first option is the Server Core version, while the second option includes Desktop Experience for a GUI-based Windows Server.
For this example, we’ll select Windows Server 2025 Standard (Desktop Experience), which offers the full graphical environment.

.
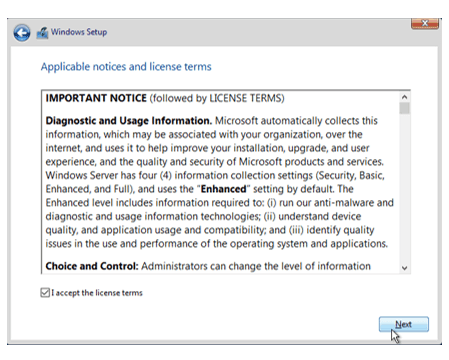
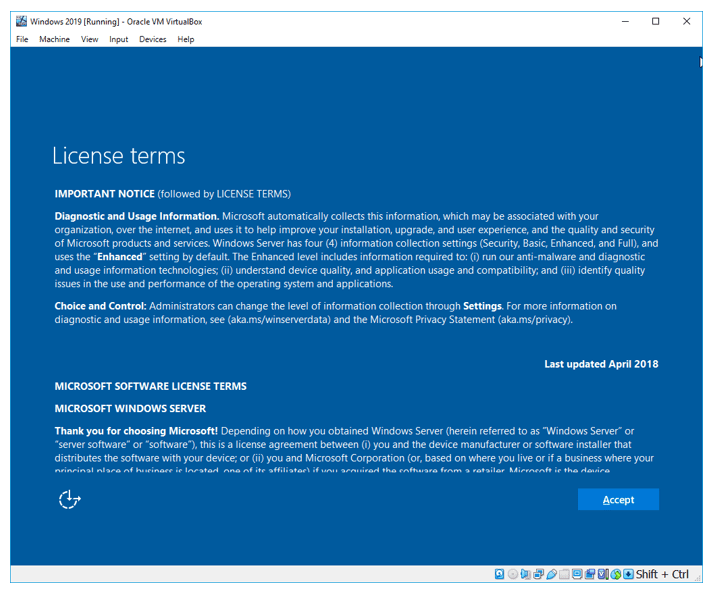
Read the license agreement, then click Accept.

.
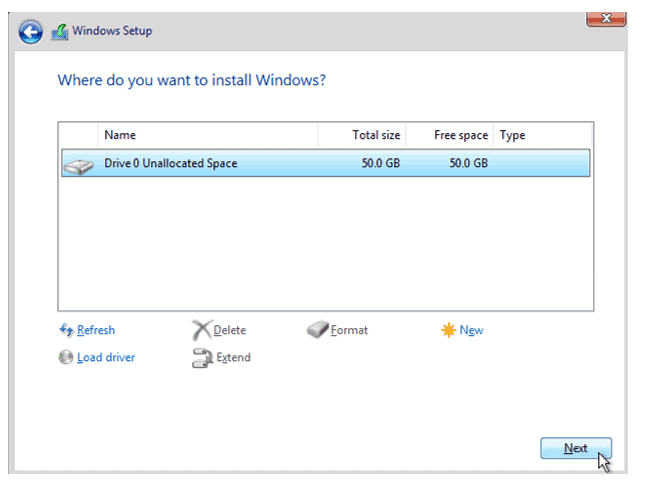
You will now be prompted to select a disk or partition to install Windows Server. If the disk is unallocated, you may need to format it.
You can optionally create new one partition or use total available size. Click Next to proceed.

.
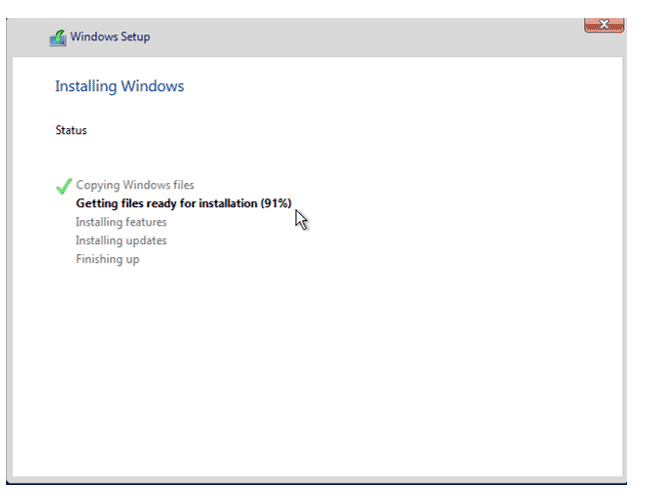
Now you are ready to start the Installation process. Click Install to begin installing windows by copying the files from ISO image to the hard disk and then expanding the files on the hard disk. During the installation process, your system will restart multiple times. This may take up to 10 to 15 minutes to complete.


.
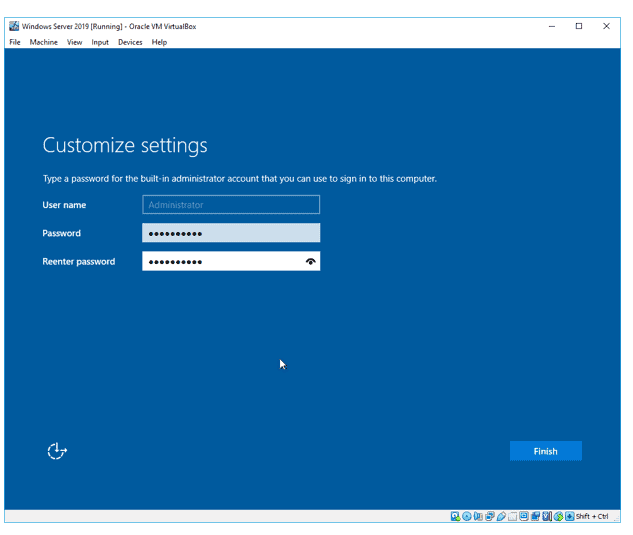
Once the installation is complete, your server will automatically reboot and boot into Windows Server 2025 OS and you will be asked with set a new password for Administrator.
Set password for the built-in Administrator and click Finish.

.
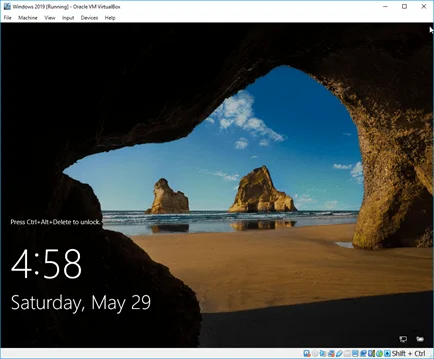
Once the system is ready, press Ctrl + Alt + Delete and type a password for the administrator account you set up in the previous step to sign in to this computer.


.
On the “Send diagnostic data to Microsoft” page, select the “Required Only” option and click “Accept” to send only the necessary diagnostic data.

.
After successfully logging in, the desktop will appear, and the Server Manager Console will load. A “Try Windows Admin Center” popup will appear; click on “Don’t show this message again” and close the popup.

.
At this point, you have successfully installed Windows Server 2025 with Desktop Experience on Oracle VirtualBox.


.
Conclusion:
Congratulations! You’ve successfully installed Windows Server 2025 on Oracle VirtualBox. By following these simple steps, you now have a fully functional virtual machine running Windows Server 2025. You can begin exploring the new features, configurations, and tools that come with this version, all while keeping your physical system safe. Enjoy experimenting!
If you have any questions or encounter any issues, feel free to drop a comment, and I’ll be happy to assist you!
Post Views: 13
In a previous post I’ve covered the process of setting up a Windows Server 2019 VM in VirtualBox. So I’ve figured that I should add one to cover the creation of a Windows Server 2022 VM in VirtualBox as well.
Prerequisites
- Oracle VirtualBox – I’m currently using version 6.1.40
- Windows Server 2022 evaluation ISO
- Sufficient drive space – In my example I’ll be creating two dynamically allocated virtual disks (C drive – 50GB, D drive – 40GB)
The host, aka my PC, is running Windows 11 build 22621.963, but the process is the same on Windows 10.
Creating the VM in VirtualBox
This time, I’ll cover both the GUI way of creating the VM as well as the PowerShell steps in a single post.
If you want to go straight to the PowerShell steps click here.
Via the GUI
I create a new, blank VM.

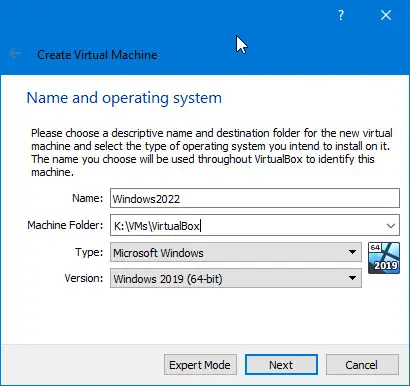
Once the “Create Virtual Machine” window opens, I switch to “Expert Mode” so that I can configure the RAM and system drive in one go.

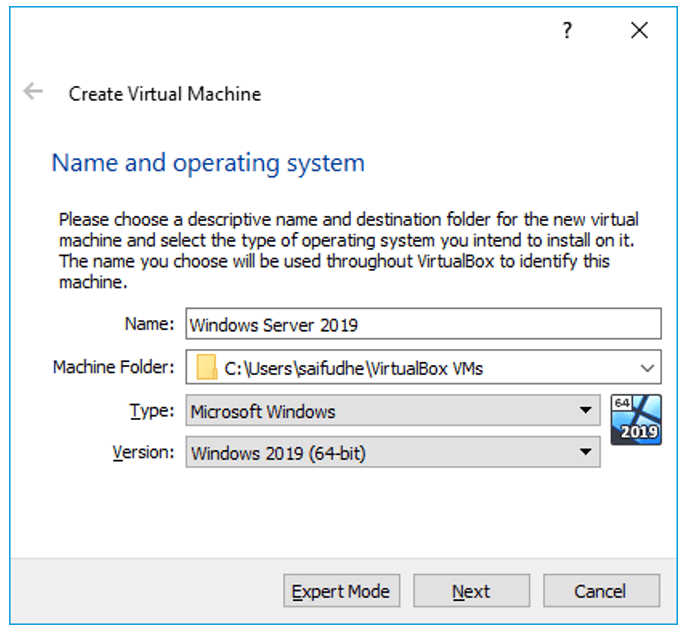
Afterwards, I specify the name of the VM, the directory in which its base folder should reside, the OS type and version. Since VirtualBox 6.1.40 doesn’t have “Windows Server 2022” as a version, I’ll pick “Windows Server 2019” instead.
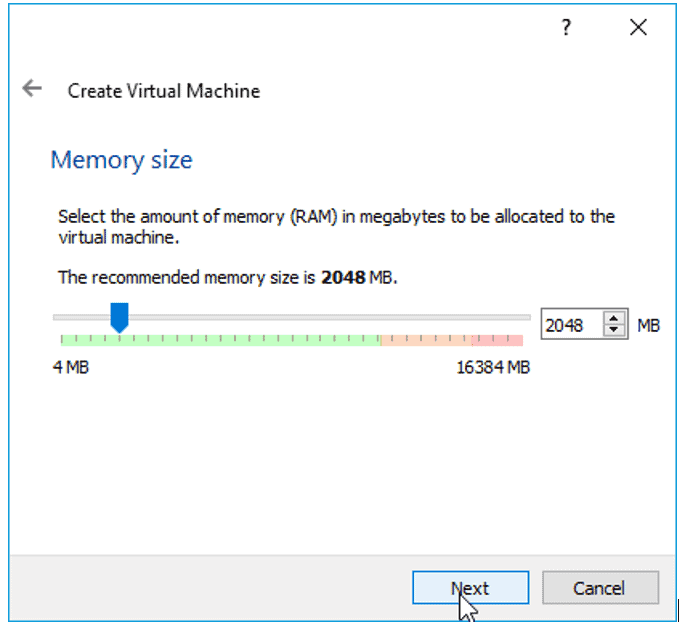
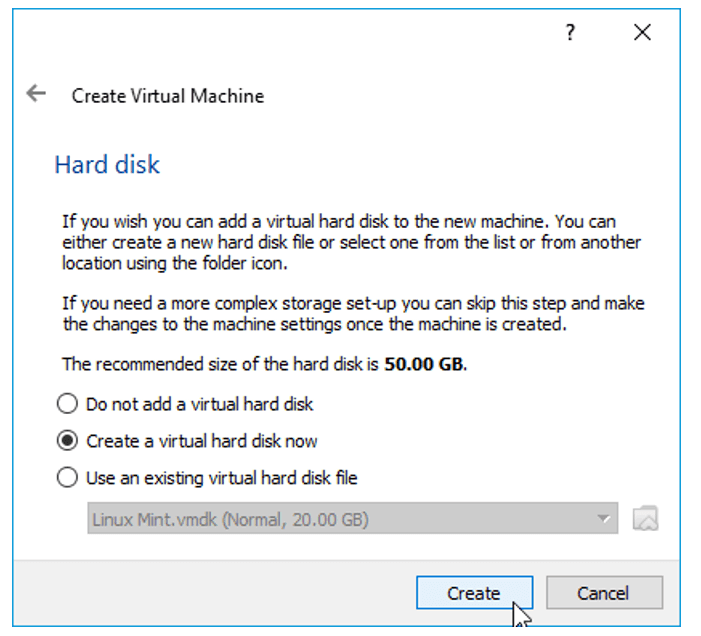
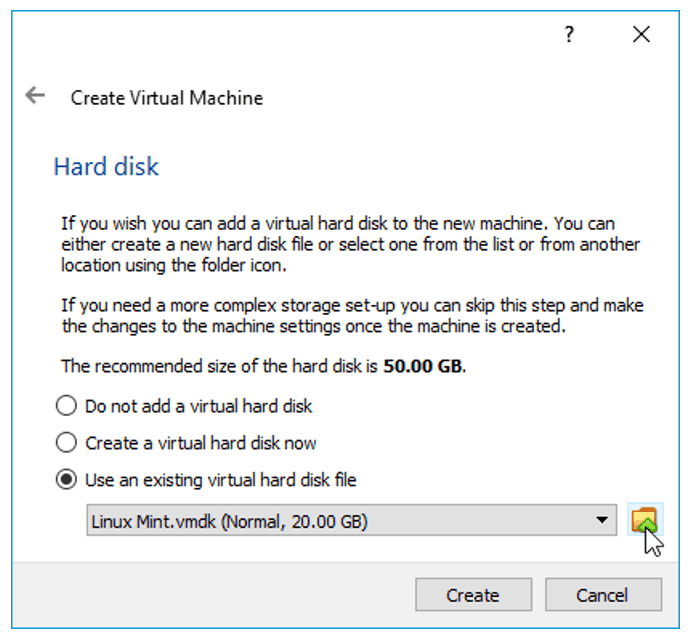
I’ll also set the machine’s RAM to 8GB and opt to create a virtual hard disk now, and press “Create”.

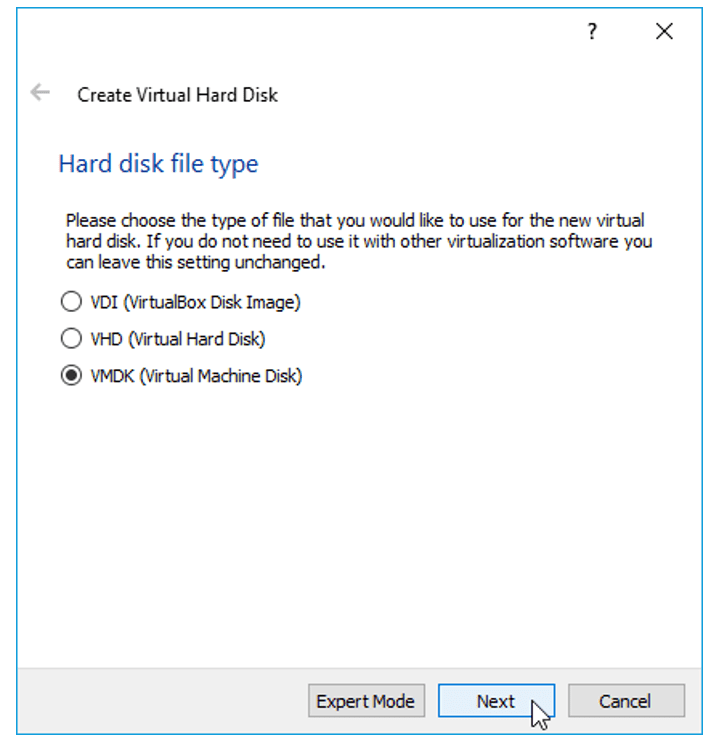
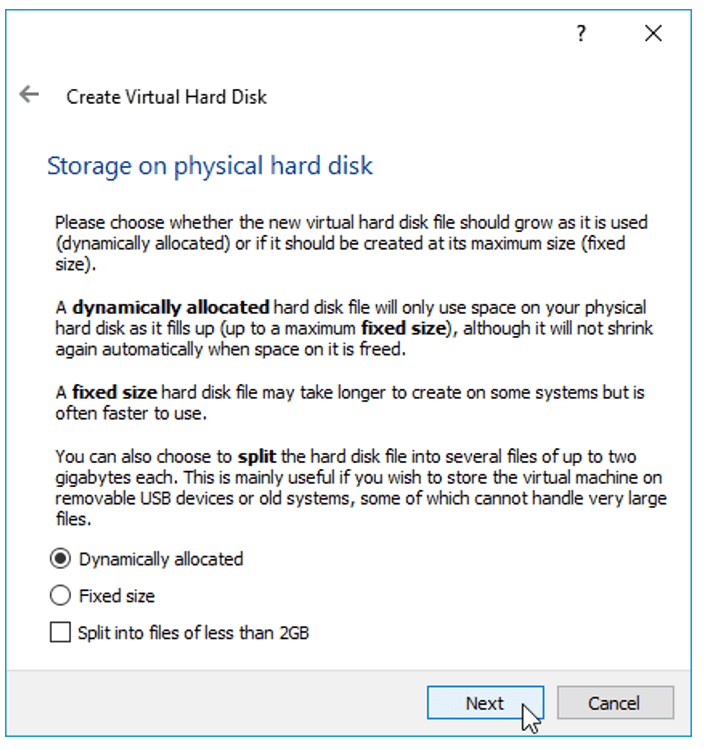
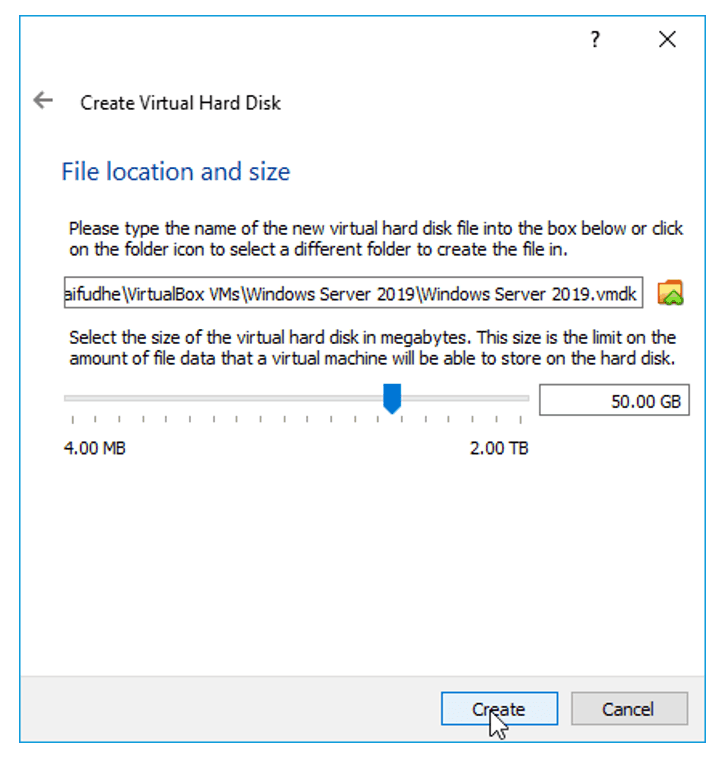
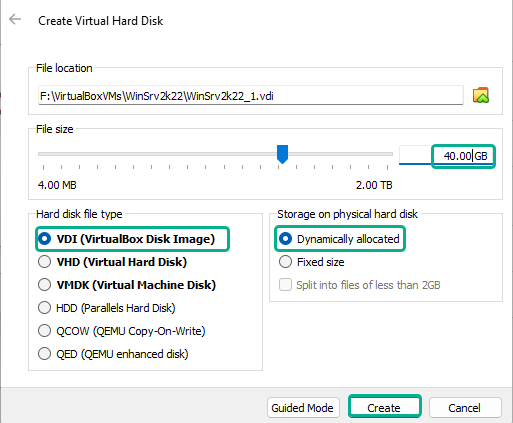
In the “Create Virtual Hard Disk” window I just go with the defaults:
- File size – 50GB
- Hard disk file type – VDI
- Storage on physical disk – Dynamically allocated
And I click on “Create”.

At this point the VM is created, but there are a few more things I like to set up before I start installing the OS.
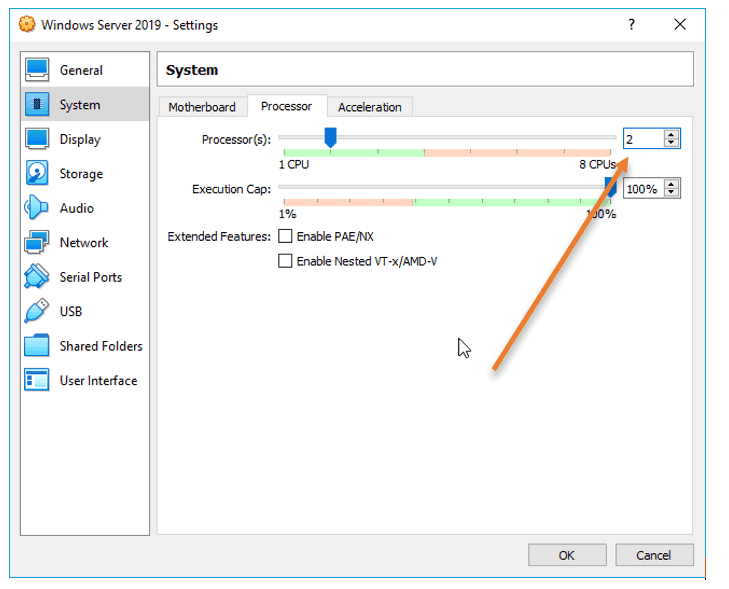
So right click on the VM and go to “Settings”

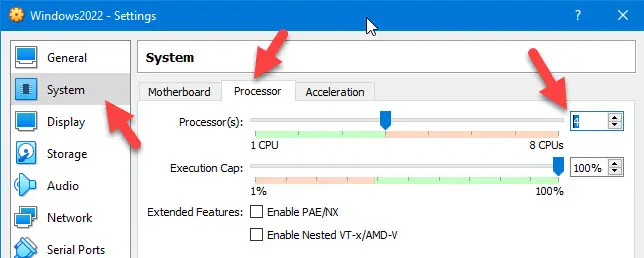
In the “Processor” tab of the “System” section, I set the number of CPUs to 4.

Now to add a second virtual disk drive – this will be the 40GB D drive.
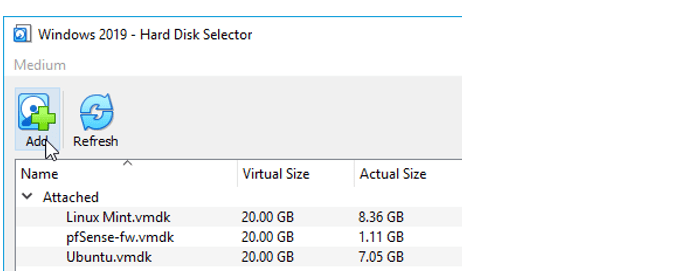
I go into the “Storage” section, increase the SATA controller’s port count from 2 to 3 (as per VirtualBox recommendations) and press the “add hard disk” button.

In the “Hard Disk Creator” window I press the “Create” button.

Once the windows switches to expert mode, I set the size to 40GB, validate the file location matches with the VM’s base directory and leave the defaults selected for hard disk file type and storage on physical hard disk, and then click on “Create”.
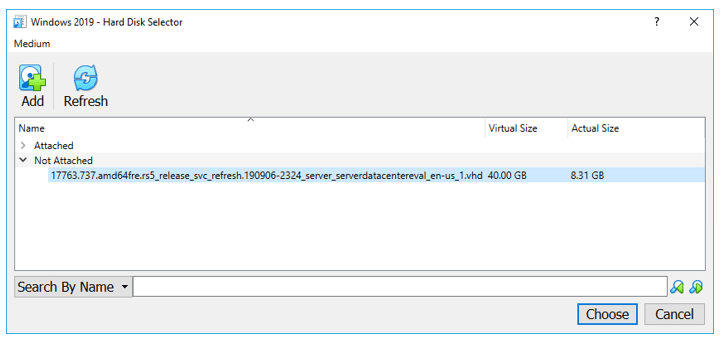
Now, in the “Hard Disk Selector” window I select the newly created virtual hard disk and then click on “Choose”.

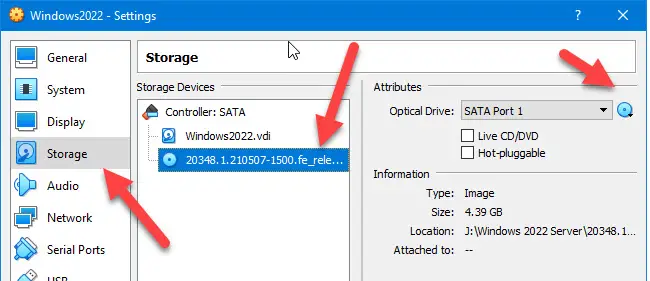
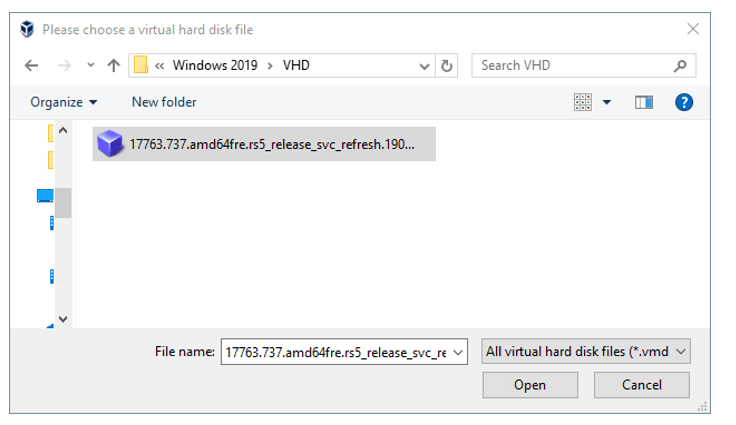
While I’m in the “Storage” section, I’ll also attach the Windows Server 2022 Evaluation ISO by selecting the optical drive, expanding the disk drop-down menu and clicking on “Choose a disk file…”.
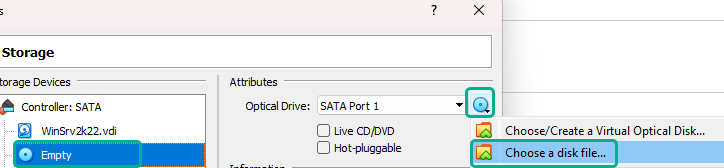
This opens up a file explorer window in which I navigate to where the “Windows_SERVER_2022_EVAL_x64FRE_en-us.iso” file resides so that I can attach it to the VM’s optical drive.

Afterwards, I navigate to the Network section set the network as bridged so the VM is accessible from the rest of the LAN.

At this point I can click “Ok” in the settings window so that the changes are saved.
I then start the VM.

And proceed with the OS installation process.
Via PowerShell
I open PowerShell and, to make things easier, append VirtualBox’s installation directory to the PATH environment variable.
|
$Env:Path += «;C:\Program Files\Oracle\VirtualBox\» |
Since VirtualBox 6.1.40 doesn’t have “Windows Server 2022” as a version, I’ll search for the OS ID for Windows Server 2019 instead.
|
VBoxManage list ostypes | Select-String -Pattern «Windows» | Select-String -Pattern «2019» -Raw |

I then use that OS ID to create and register an empty VM.
|
VBoxManage createvm —name WinSrv2k22 —ostype Windows2019_64 —register |
Take note of the location of the VM’s settings file location since that directory will also be the VM’s base directory.

Afterwards add CPU cores, RAM, and VRAM. Set the graphics controller, and set the network type as bridged as well as specifying the name of the host’s NIC that will be used.
|
VBoxManage modifyvm WinSrv2k22 —cpus 4 —memory 8192 —vram 128 ` —graphicscontroller vboxsvga —nic1 bridged ` —bridgeadapter1 «Intel(R) Ethernet Controller I225-V» |
Add a SATA storage controller, specify the controller’s chipset, port count, and set it as boot-able.
|
VBoxManage storagectl WinSrv2k22 —name «SATA» —add sata ` —controller IntelAHCI —portcount 3 —bootable on |
Create the virtual disk file that will eventually become the C drive.
|
VBoxManage createhd —filename F:\VirtualBoxVMs\WinSrv2k22\WinSrv2k22.vdi ` —size 51200 —variant Standard |
Add a second virtual disk file (optional).
|
VBoxManage createhd —filename F:\VirtualBoxVMs\WinSrv2k22\WinSrv2k22_1.vdi ` —size 40960 —variant Standard |
Attach the two disks to the storage controller.
|
VBoxManage storageattach WinSrv2k22 —storagectl «SATA» —port 0 ` —device 0 —type hdd —medium F:\VirtualBoxVMs\WinSrv2k22\WinSrv2k22.vdi |
|
VBoxManage storageattach WinSrv2k22 —storagectl «SATA» —port 1 ` —device 0 —type hdd —medium F:\VirtualBoxVMs\WinSrv2k22\WinSrv2k22_1.vdi |
Now, I can attache the Windows Server 2019 Evaluation ISO.
|
VBoxManage storageattach WinSrv2k22 —storagectl «SATA» —port 2 —device 0 ` —type dvddrive ` —medium C:\Users\Vlad\Downloads\Windows_SERVER_2022_EVAL_x64FRE_en-us.iso |
And start the VM in order to proceed with the OS install process.
|
VBoxManage startvm WinSrv2k22 |
Installing Windows Server 2022 on the empty VirtualBox VM
Once the VM boots, I can select the language and regional settings and click on “Next”

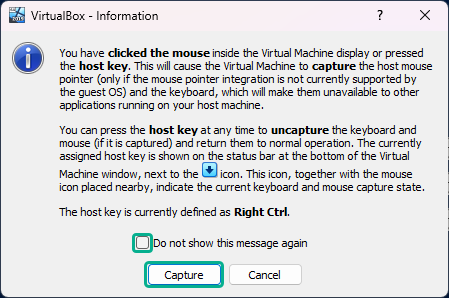
If this pops up, just check the “do not show this message again” box and click on “Capture”. Just remember to press right Ctrl whenever you want to move the mouse outside the VM window.
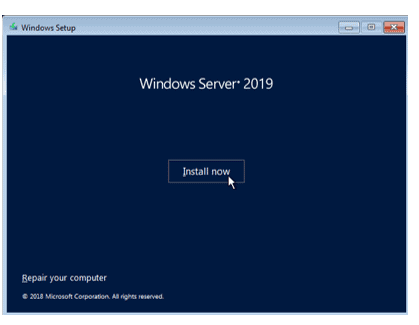
In the next prompt click “Install Now”

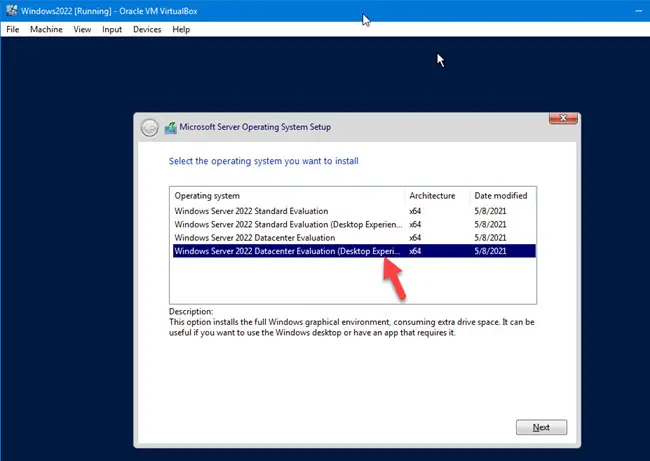
For this VM, I opt to install the Windows Server 2022 Standard Evaluation (Desktop Experience) version.

In the next window I read and accept the software license terms, and proceed with the installation process.
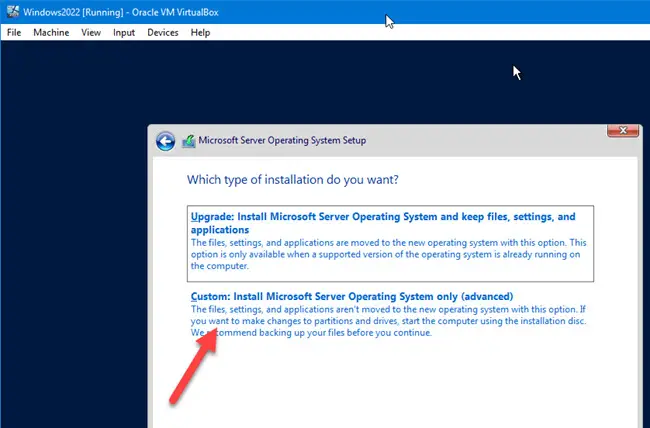
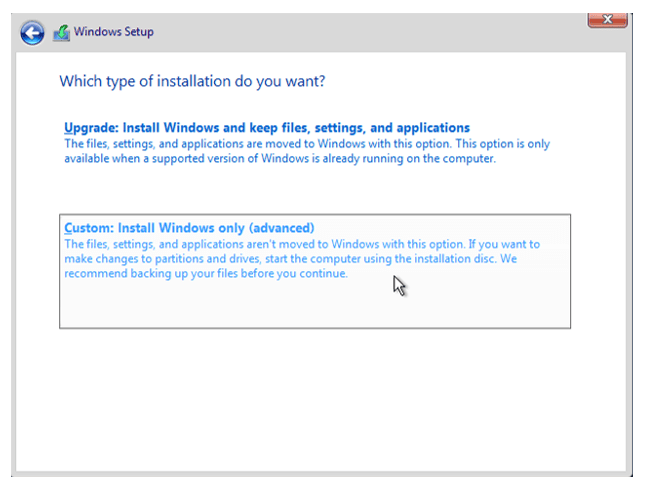
For installation type I click on “Custom”, because there’s really no previous version of the OS to upgrade from.

I then proceed with the partition configuration part.
First, I select the drive (Drive 0) that’s going to end up being the system drive, click on “New” and then “Apply” in order to create a new partition.

Click “Ok” on the prompt informing me about the creation of additional system partitions.
I then repeat the same steps for the second drive (Drive 1).
And now I select the partition (Drive 0 Partition 2) on which the OS should be installed and click on “Next” to begin the installation.

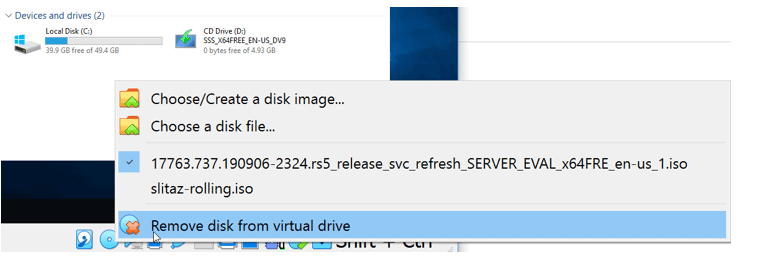
After the install process finishes, the VM reboots and a prompt to “press any key to boot from CD/DVD” appears, I just wait for the prompt to time-out since I want to boot directly in Windows.
Once the OS boots up, it asks to set up a password for the Administrator account.

I type a password, confirm it and press “Finish”.
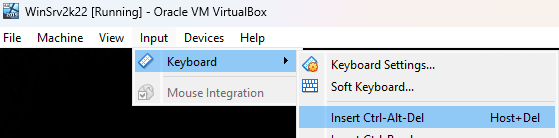
At the logon screen I send the Ctrl+Alt+Del input to the VM. This can also be done with the right Ctrl+Del keys.


 Go to the settings of the newly created virtual machine and edit the processor settings. Increase the processor cores to 2 or more. By default, it will create the VM with a single-core, which may not be enough to install the desktop experience version of the Windows 2022 server.