
deveshdba
get sum oracle stuffs
This article shows the steps for Installing Oracle 11gR2(11.2.0.1.0) database software on Windows 2003 Server
Follow the steps mentioned below:
Copy media to system and unzip,
This creates a “database” directory
- Go to the database directory
run the installer
- Setup.exe
Unselect check box for receiving oracle support updates, click next, Accept warning about security notifications, click yes
Select option to “select database software only”, click next
Select “server class” install to simplify the process, click next.
Select type of database Installation as “Single Instance database Installation”
Select the languages in which your product will run,
Select Database edition you want to install,
Accept the default locations to reflecting the D:\app location, select a service name and an administrative password, note both on your worksheet, click next
The install will perform some system checks
The install proceeds
When it completes click ok
The installation completes and presents the address for Enterprise Manager, click close
Краткое содержание:
1. Установка Oracle Server 10gR2 на ОС семейства Windows (10.2.0.1-10.2.0.4)
2. Установка патча для Oracle Server 10g (10.2.0.5)
3. Обновление утилиты OPatch
4. Установка промежуточного патча (10.2.0.5 Patch 10)
5. Создание службы прослушивания (Listener)
6. Создание БД для Oracle10g с помощью Database Configuration Assistant
Подробная документация по установке Oracle® Database Installation Guide 10g Release 2 (10.2) for Microsoft Windows (x64) и Oracle® Database Installation Guide 10g Release 2 (10.2) for Microsoft Windows (32-Bit).
Внимание! В случае установки разных версий Oracle на одном сервере, следует осуществлять установку в отдельно созданный ORACLE_HOME. На Windows ОС следует также сделать резервную копию системного реестра (выполнить экспорт реестра для ключа HKLMSOFTWAREORACLE).
Внимание! Возможны конфликты между Oracle и установленным программным обеспечением по обеспечению безопасности (антивирусами или брандмауэрами (firewall)). Конфликты разрешаются либо отключением (удалением) данного ПО, либо грамотной его настройкой.
Внимание! Настоятельно рекомендуется, сразу после установки OracleServer, не перезагружая компьютер, перейти к установке патча.
Рекомендуется следующая последовательность действий:
— Установить Oracle, отказаться от создания БД в процессе установки (не перезагружать компьютер после установки Oracle).
— Установить патч для Oracle.
— Создать БД.
— Произвести дополнительные настройки Oracle (если это необходимо).
Порядок установки Oracle.
1. Скачать дистрибутив Oracle — Oracle Database Software Downloads. Распаковать zip-файлы и запустить …Disk1setup.exe (если дистрибутив находится на DVD, тогда файл setup.exe расположен в подпапке database). Сначала запустится консольное окно, из которого запустится сам инсталлятор.
Появляется окно «OracleDatabase10g Installation – Installation Method».
2. В этом окне выбрать метод установки «Advanced Installation». Далее нажать кнопку «Next» (Рисунок 1).

Рисунок 1. Окно «OracleDatabase10g Installation – Installation Method».
Появляется окно «Oracle Universal Installer: Select Installation Type» (Рисунок 2).
3. Выбрать тип установки «Standard Edition».
4. Нажать кнопку «Product Languages…».
На экране появляется окно «Language Selection» (Рисунок 2).
5. Выбрать русский и английский языки (English и Russian).

Рисунок 2. Окно «OracleDatabase10g Installation – Installation Method».
6. Нажать кнопку «ОК».
На экране появляется окно «AvailableProducts».
7. Нажать кнопку «Next».
Появляется окно «Oracle Universal Installer: Specify Home Detail» (Рисунок 3).
8. В поле «Name» выбрать из списка название для ORACLE_HOME.

Рисунок 3. Окно «Oracle Universal Installer: Specify Home Detail».
9. В поле «Path» с помощью кнопки «Browse…» выбрать путь, куда будет установлен Oracle (ORACLE_HOME).
Примечание. Эти параметры могут быть произвольными, по усмотрению пользователя. На примере (Рисунок 3) видно, что Name = OraDb10g_home1, а Path = C:oracleproduct10.2.0db_1.
10. Нажать кнопку «Next».
На экране появляется окно «Oracle Universal Installer: Product-Specific Prerequisite Checks» (Рисунок 4).
11. Проводится автоматическая предварительная проверка минимальных требований для установки и настройки выбранных компонентов.
12. Если проверка пройдена успешно (на рисунке показано успешное завершение проверки), нажать Next.
Появляется окно «Oracle Universal Installer: Select Configuration Option» (Рисунок 5).
Пользователю выдается сообщение о создании БД во время установки. Необходимо отказаться от этого предложения.

Рисунок 4. Окно «Oracle Universal Installer: Product-Specific Prerequisite Checks».

Рисунок 5. Окно «Oracle Universal Installer: Select Configuration Option».
13. Выбрать вариант «Install database Software only» (Рисунок 5).
14. Нажать кнопку «Next».
На экране появляется окно с суммарной информацией об установке: «Oracle Universal Installer: Summary» (Рисунок 6).

Рисунок 6. Окно «Oracle Universal Installer: Summary».
15. Проверить правильность выбранных параметров.
16. Нажать кнопку «Install».

Рисунок 7. Окно «Oracle Universal Installer: Install».
Появляется окно «Oracle Universal Installer: Install» (Рисунок 7), идет процесс копирования файлов.
В данном окне отображается текущее состояние процесса. Требуется дождаться завершения процедуры установки.
После успешного завершения процедуры копирования появляется окно «Oracle Universal Installer: End of Installation» (Рисунок 8).

Рисунок 8. Окно «Oracle Universal Installer: End of Installation».
17. Нажать кнопку «Exit».
18. В появившемся окне нажать «Да».
19. Перезагрузить компьютер.
Внимание! Если сразу после установки OracleServer планируется установить патч – НЕ ПЕРЕЗАГРУЖАЙТЕ компьютер сейчас, перезагрузите его только после установки патча.
2. Установка патча для Oracle Server 10g
Инструкция по установке патча входит в дистрибутив самого патча, обычно это файл README.html.
Примечание: Если БД была создана до установки патча то к ней тоже необходимо применить патч. Как это сделать, см. инструкцию по установке патча, обычно это файл README.html.
Порядок установки патча для СУБД Oracle.
1. Проверьте, и если необходимо остановите все службы Oracle (имена таких служб начинаются со слова Oracle, например OracleService).
Чтобы остановить службу необходимо выполнить команду «Пуск – Настройки – Панель управления – Администрирование – Службы». В появившемся окне «Службы» правой кнопкой мыши нужно кликнуть на название службы и выбрать команду «Стоп» (Рисунок 9).

Рисунок 9. Остановка службы Oracle.
2. Скачать архив патча (для 10.2.0.5 это — p8202632_10205_WINNT.zip). Распакуйте архив и запустите setup.exe.
Сначала появится консольное окно, из которого запуститься сам инсталлятор.
Затем на экране отобразится окно «OracleUniversalInstaller: Welcome» (Рисунок 10).
Рисунок 10. Окно приветствия.
4. Нажать кнопку «Next».
Появится окно «Oracle Universal Installer: Specify Home Details» (Рисунок 11).

Рисунок 11. Окно «Oracle Universal Installer: Specify Home Details».
5. В поле «Name» – выбрать ORACLE_HOME — тот самый, в который установлен Oracle.
6. Нажать кнопку «Next».
Отображается окно «Oracle Universal Installer» (Рисунок 12).

Рисунок 12. Окно «Oracle Universal Installer».
7. Нажать кнопку «Next».
Отображается окно «Email Address Not Specified» (Рисунок 13).

Рисунок 13. Окно «Email Address Not Specified».
8. Нажать кнопку «Да».
Отображается окно «Oracle Universal Installer: Product-Specific Prerequisite Checks» (Рисунок 14).

Рисунок 14. Окно «Oracle Universal Installer: Product-Specific Prerequisite Checks».
Проводится автоматическая предварительная проверка минимальных требований для установки и настройки выбранных компонентов.
9. Если проверка пройдена успешно (на рисунке показано успешное завершение проверки), нажать кнопку «Next».
Отображается окно «Oracle Universal Installer: Summary» (Рисунок 15).

Рисунок 15. Окно «Oracle Universal Installer: Summary».
10. Проверить правильность выбранных параметров. Нажать кнопку «Install».

Рисунок 16. Окно «Oracle Universal Installer: Install».
Появляется окно «Oracle Universal Installer: Install» (Рисунок 16), идет процесс копирования файлов.

Рисунок 17. Окно «Oracle Universal Installer: Configuration Assistants».
В данном окне отображается текущее состояние процесса. Требуется дождаться завершения процедуры копирования.
После успешного завершения процедуры копирования появляется окно «Oracle Universal Installer: Configuration Assistants» (Рисунок 17).
Идет процесс настройки, необходимо дождаться окончания процесса.
После успешного завершения процедуры настройки появляется окно «Oracle Universal Installer: End of Installation» (Рисунок 18).

Рисунок 18. Окно «Oracle Universal Installer: End of Installation».
11. Нажать кнопку «Exit».
12. В появившемся окне нажать «Да». Патч установлен.
3. Обновление утилиты OPatch
Для обновления утилиты OPatch нужно осуществить следующие операции.
1. Сохранить старую версию Opatch (на всякий случай). Для этого достаточно переименовать папку на сервере:
С:oracleproduct10.2.0db_1OPatch
в папку:
С:oracleproduct10.2.0db_1OPatch_old.
2. Скачать самую последнюю версию OPatch. Это можно сделать с помощью статьи — How To Download And Install The Latest OPatch Version [ID 274526.1]. Распаковать папку OPatch в С:oracleproduct10.2.0db_1.
3. Проверить версию OPatch.
Для этого.
Запустить CMD (команда «Пуск – Выполнить» – набрать в командной строке cmd и нажать «Enter») и выполнить следующие команды:
C:>cd C:oracleproduct10.2.0db_1OPatch
C:oracleproduct10.2.0db_1OPatch>set ORACLE_HOME=C:oracleproduct10.2.0db_1
C:oracleproduct10.2.0db_1OPatch>opatch lsinventory
В результате должен получиться такой вывод:
Invoking OPatch 10.2.0.5.1
Oracle Interim Patch Installer version 10.2.0.5.1
Copyright (c) 2010, Oracle Corporation. All rights reserved.
Oracle Home : C:oracleproduct10.2.0db_1
Central Inventory : C:Program FilesOracleInventory
from : n/a
OPatch version : 10.2.0.5.1
OUI version : 10.2.0.5.0
OUI location : C:oracleproduct10.2.0db_1oui
Log file location : C:oracleproduct10.2.0db_1cfgtoollogsopatchopatch2011-
07-14_14-50-41PM.log
Patch history file: C:oracleproduct10.2.0db_1cfgtoollogsopatchopatch_hist
ory.txt
Lsinventory Output file location : C:oracleproduct10.2.0db_1cfgtoollogsopa
tchlsinvlsinventory2011-07-14_14-50-41PM.txt
———————————————————————————
Installed Top-level Products (2):
Oracle Database 10g 10.2.0.1.0
Oracle Database 10g Release 2 Patch Set 4 10.2.0.5.0
There are 2 products installed in this Oracle Home.
There are no Interim patches installed in this Oracle Home.
———————————————————————————
OPatch succeeded.
Примечание. Здесь нужно обратить внимание на строку «OPatch version: 10.2.0.5.1» версия должна быть 10.2.0.5.1.
4. Установка промежуточного патча
Для установки промежуточного патча нужно осуществить следующие операции.
1. Скачать архив промежуточного патча. Обычно внутри этого архива, содержится папка с номером патча, для 10.2.0.5 Patch 10 это — 12429523. Эту папку нужно разархивировать в С:oracleproduct10.2.0db_1.
2. Запустить CMD (команда «Пуск – Выполнить» – набрать в командной строке cmd и нажать «Enter») и выполнить следующие команды:
C:Documents and SettingsАдминистратор>cd C:oracleproduct10.2.0db_112429523
C:oracleproduct10.2.0db_112429523>set ORACLE_HOME=C:oracleproduct10.2.0db_1
C:oracleproduct10.2.0db_112429523>set path=C:oracleproduct10.2.0db_1OPatch;%path%
C:oracleproduct10.2.0db_112429523>opatch apply
Начнется установка патча. В процессе установки последовательно будет задано три вопроса (ответить соответственно: Enter, y, y)
…
Provide your email address to be informed of security issues, install and
initiate Oracle Configuration Manager. Easier for you if you use your My
Oracle Support Email address/User Name.
Visit http://www.oracle.com/support/policies.html for details.
Email address/User Name:
Нажать Enter
You have not provided an email address for notification of security issues.
Do you wish to remain uninformed of security issues ([Y]es, [N]o) [N]: y
OPatch detected non-cluster Oracle Home from the inventory and will patch the lo
cal system only.
Please shutdown Oracle instances running out of this ORACLE_HOME on the local sy
stem.
(Oracle Home = ‘C:oracleproduct10.2.0db_1’)
Is the local system ready for patching? [y|n]
Нажать y
User Responded with: Y
…
Успешная установка должна завершиться сообщением:
…
Return Code = 0
The local system has been patched and can be restarted.
OPatchsucceeded.
…
Для проверки установленного патча выполнить следующую команду:
C:oracleproduct10.2.0db_112429523>opatch lsinventory
В выводе должны быть следующие строки:
…
Interim patches (1) :
Patch 12429523 : applied on Thu Jul 14 15:17:34 MSD 2011
Unique Patch ID: 13849673
Created on 20 Jun 2011, 2:20:35 hrs
Bugsfixed:
12429523, 11066597, 9935787, 10236704, 11853331, 9545597, 9825461
8411930, 6651220, 7026523, 8882576, 9360157, 10068982, 10173237, 10324526
8332730, 7516536, 11814891, 9871302, 6055658, 12363485, 10220194
7592673, 10202758, 9735237, 10052339, 12332703, 8666117, 9145204
9824435, 11703718, 7280234, 9269536, 10132870, 9094926, 9323583, 10144882
9860769, 9488247, 10306945, 9532911, 9184754, 11657004, 9656004, 8528171
10191707, 8943287, 11727013, 10407744, 11930680, 8966823, 10160615
12328268, 11731165, 9215341, 10159846, 11076894, 10269717, 10091171
9061785, 8211733, 8412426, 9020537, 9024850, 9150282, 10010310, 7602341
8865718, 11737047, 11675638, 10111381, 9368502, 8660422, 9032322
9295217, 10224187, 10080775, 9841679, 8977287, 10054513, 10220046
9577583, 10352672, 8277300, 8394351, 8350262, 9949948, 9879181, 9469117
10017048, 8771916, 10155684, 6694396, 10308274, 10312160, 10157402
8434467, 9668086, 9980062, 6151936, 10091698, 8228796, 9699654, 10114856
9978573, 10156303, 5575218, 9081686, 10196895, 10080735, 5519322, 6768114
6904068, 7045446, 7452759, 7612454, 8684595, 8811401, 9109487, 9320130
9337325, 9362218, 9390484, 9548269, 9770451, 10155843, 9047975, 8663644
7708267, 6086930, 9539556, 9355794, 8264642, 9495669, 6975402, 9659614
9387574, 9320786, 9793452, 9024737, 9196440, 8970313, 9308296, 9663844
10058290, 6402302, 7519406, 8224558, 8487143, 8544696, 8546356, 8664189
8996060, 9261837, 9577921, 9586637, 9646836, 9683239, 9711859, 9713537
9714832, 9726739, 9747153, 9772888, 9870614
…
5. Создание службы прослушивания (Listener)
Для того чтобы соединяться с БД, используя сетевые протоколы, необходим процесс прослушивания (Listener). Для его реализации необходимо создать соответствующую службу. Для этого нужно выполнить следующие действия.
1. Выполнить команду: «Пуск – Все программы – Oracle — <ORACLE_HOME> – Configuration and Migration Tools – Net Configuration Assistant».
На экране появляется окно приветствия «Net Configuration Assistant: Welcome» (Рисунок 19).

Рисунок 19. Окно «Net Configuration Assistant: Welcome».
2. В данном окне выбрать пункт «Listener configuration».
3. Нажать кнопку «Следующий».
Появляется окно «Net Configuration Assistant: Listener Configuration, Listener».

Рисунок 20. Окно «Net Configuration Assistant: Listener Configuration, Listener».
4. В данном окне выбрать пункт «Add».
5. Далее нажать кнопку «Следующий».
На экране появляется окно «Net Configuration Assistant: Listener Configuration, Listener Name» (Рисунок 21).

Рисунок 21. Окно «Net Configuration Assistant: Listener Configuration, Listener Name».
6. Задать имя для процесса прослушивания. По умолчанию предлагается «LISTENER», рекомендуется его не менять.
7. Нажать кнопку «Следующий».
На экране появляется окно «Net Configuration Assistant: Listener Configuration, Select Protocols» (Рисунок 22).

Рисунок 22. Окно «Net Configuration Assistant: Listener Configuration, Select Protocols».
8. Выбрать сетевой протокол для процесса прослушивания. По умолчанию предлагается TCP, рекомендуется его не менять.
9. Нажать кнопку «Следующий».
На экране появляется окно «Net Configuration Assistant: Listener Configuration, TCP/IP Protocol» (Рисунок 23).

Рисунок 23. Окно «Net Configuration Assistant: Listener Configuration, TCP/IP Protocol».
10. Выбрать порт для TCP/IP протокола. По умолчанию предлагается 1521, рекомендуется не менять его.
11. Нажать кнопку «Следующий».
На экране появляется окно «Net Configuration Assistant: Listener Configuration, More Listeners?» с предложением о создании еще одной службы (Рисунок 24).
Рисунок 24. Окно «Net Configuration Assistant: Listener Configuration, More Listeners?».
12. Выбрать пункт «No».
13. Нажать кнопку «Следующий».
На экране появляется окно «Net Configuration Assistant: Listener Configuration Done» (Рисунок 25).
Создание процесса прослушивания завершено.

Рисунок 25. Окно «Net Configuration Assistant: Listener Configuration Done».
14. Нажать кнопку «Следующий».
На экране появляется окно «Net Configuration Assistant: Welcome» (Рисунок 26).

Рисунок 26. Окно «Net Configuration Assistant: Welcome».
15. Нажать кнопку «Готово».
Служба Listener создана и запущена.
Для проверки: открыть список служб и найти запись: Oracle<HOME_NAME>TNSListener (Рисунок 27).

Рисунок 27. Проверка запуска службы.
Для проверки работоспособности процесса прослушивания, можно использовать консольную утилиту lsnrctl. При выполнении команды status в этой утилите должен выполняться вывод на экран подобный тому, что показан на рисунке (Рисунок 28).

Рисунок 28. Проверка работоспособности службы.
6. Создание БД для Oracle10g с помощью Database Configuration Assistant
Для реализации данной процедуры необходимо выполнить следующие операции.
1. Запустить Database Configuration Assistant с помощью команды «Пуск – Все программы – Oracle — <ORACLE_HOME> – Configuration and Migration Tools – Database Configuration Assistant».
На экране появляется окно приветствия «Database Configuration Assistant: Welcome» (Рисунок 29).

Рисунок 29. Окно «Database Configuration Assistant: Welcome».
2. Нажать кнопку «Следующий».
На экране появляется окно «Database Configuration Assistant, Step 1 of 12: Operations» (Рисунок 30).

Рисунок 30. Окно «Database Configuration Assistant, Step 1 of 12: Operations».
3. Выбрать пункт «Create a Database».
4. Нажать кнопку «Следующий».
На экране появляется окно «Database Configuration Assistant, Step 2 of 12: Database Templates» (Рисунок 31).
5. Выбрать пункт «Custom Database».
6. Нажать кнопку «Следующий».

Рисунок 31. Окно «Database Configuration Assistant, Step 2 of 12: Database Templates».
На экране появляется окно «Database Configuration Assistant, Step 3 of 12: Database Identification» (Рисунок 32).

Рисунок 32. Окно «Database Configuration Assistant, Step 3 of 12: Database Identification».
7. В данном окне задать имя базы. Для этого в поле «Global Database Name» введите имя БД – loc10.
8. В поле SID рекомендуется ввести уникальный идентификатор базы данных — uspd.
9. Нажать кнопку «Следующий».
На экране появляется окно «Database Configuration Assistant, Step 4 of 12: Management Options» (Рисунок 33).

Рисунок 33. Окно «Database Configuration Assistant, Step 4 of 12: Management Options».
10. Задать средство администрирования базы. Проставить отметку в поле «Configure the Database with Enterprise Manager».
11. Проставить отметку в поле «Use Database Control for Database Management».
12. Нажать кнопку «Следующий».
На экране появляется окно «Database Configuration Assistant, Step 5 of 12: Database Credential» (Рисунок 34).

Рисунок 34. Окно «Database Configuration Assistant, Step 5 of 12: Database Credential».
13. Задать пароли для системных пользователей (здесь в примере для всех системных пользователей задается одинаковый пароль).
14. Для приведенного примера — сделать отметку в поле «Use the Same Password for All Accounts». Если пароли задаются различные – необходимо использовать отметку в поле «Use Different Passwords».
15. Нажать кнопку «Следующий».
На экране появляется окно «Database Configuration Assistant, Step 6 of 12: Storage Options» (Рисунок 35).
16. Задать механизм хранения файлов базы (в данном примере задается файловая система), для данного примера проставляется отметка в поле «File System».

Рисунок 35. Окно «Database Configuration Assistant, Step 6 of 12: Storage Options».
17. Нажать кнопку «Следующий».
На экране появляется окно «Database Configuration Assistant, Step 7 of 12: Database File Locations» (Рисунок 36).

Рисунок 36. Окно «Database Configuration Assistant, Step 7 of 12 :Database File Locations».
18. Задать местоположение файлов базы (в данном примере используются пути по умолчанию), для данного примера проставляется отметка в поле «Use Database File Locations from Template».
19. Нажать кнопку «Следующий».
На экране появляется окно «Database Configuration Assistant, Step 8 of 12: Recovery Configuration» (Рисунок 37).

Рисунок 37. Окно «Database Configuration Assistant, Step 8 of 12: Recovery Configuration».
20. Задать опции восстановления базы (в данном примере опции восстановления не используются).
Сделать отметку в поле «Specify Flash Recovery Area».
В поле «Flash Recovery Area» указывается путь к папке, в которую по умолчанию осуществляется резервное копирование с помощью утилиты RMAN, а также сохраняются архивные копии журнальных файлов.
По умолчанию папка располагается в {ORACLE_BASE}flash_recovery_area. Можно изменить этот путь и явно задать папку для резервного копирования.
В поле «Flash Recovery Area Size»задается лимит на размер указанной папки (лучше сделать его равным объему всего жесткого диска).
Отметка в поле «Enable Archiving» включает режим архивирования журнальных файлов.
ВНИМАНИЕ! При достижении лимита папки «Flash Recovery Area» (т.е. при её полном заполнении) база данных остановится, и будет ожидать выделения свободного места. Поэтому, если нет возможности следить за заполнением этой папки, – НЕ ВКЛЮЧАЙТЕ РЕЖИМ АРХИВИРОВАНИЯ ЖУРНАЛЬНЫХ ФАЙЛОВ, т.е. не ставьте отметку в поле «Enable Archiving»
21. Нажать кнопку «Следующий».
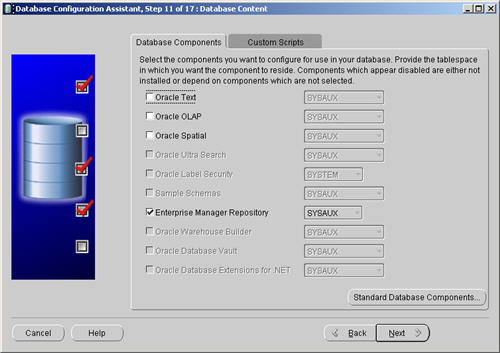
На экране появляется окно «Database Configuration Assistant, Step 9 of 12: Database Content» (Рисунок 38).

Рисунок 38. Окно «Database Configuration Assistant, Step 9 of 12: Database Content».
22. Выбрать компоненты базы так, как представлено на рисунке (Рисунок 38).
23. Нажать кнопку «Standard Database Components…».
На экране появляется окно «Standard Database Components» (Рисунок 39).
Рисунок 39. Окно «Standard Database Components».
24. Снять отметки в полях, как показано на рисунке (Рисунок 39).
25. Нажать кнопку «ОК». Управление вернется в окно «Database Configuration Assistant, Step 9 of 12: Database Content» (Рисунок 38).
26. Нажать кнопку «Следующий».
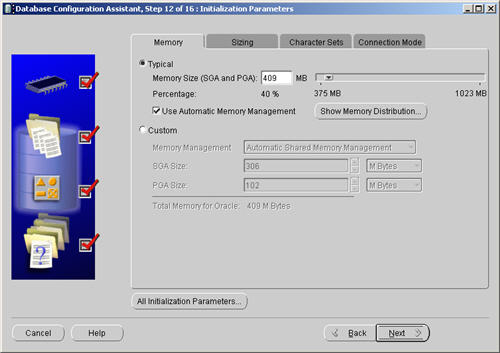
На экране появляется окно «Database Configuration Assistant, Step 10 of 12: Initialization Parameters» (Рисунок 40).

Рисунок 40. Окно «Database Configuration Assistant, Step 10 of 12: Initialization Parameters».
27. На закладке «Memory» задать способ распределения и размер памяти, для этого: проставить отметку в поле «Typical», в поле «Percentage» задать количество физической памяти, которое будет выделено для Oracle. Обычно это 70%. Если на сервере кроме Oracle запущены другие ресурсоёмкие процессы, выбрать нужно число меньше 70%.
Внизу закладки в строке «Total Memory for Oracle», выводится количество памяти, которое будет выделено для Oracle. По значению в этой строке можно понять, понадобится ли серверу использовать файл подкачки из-за нехватки памяти. О мониторинге и оптимизации распределения памяти читайте в документации Oracle (см. Oracle Database Performance Tuning Guideand Reference).

Рисунок 41. Окно «Database Configuration Assistant, Step 10 of 12: Initialization Parameters». Закладка «Memory».
28. В окне «Database Configuration Assistant, Step 10 of 12: Initialization Parameters» на закладке «Sizing» выбрать размер блока БД (Рисунок 42). Размер блока БД следует выбирать не менее 8Кб. Для OLTP 8Кб для WH 16Кб.
29. В поле Block Size ввести нужное значение (8192или 16384).

Рисунок 42. Окно «Database Configuration Assistant, Step 10 of 12: Initialization Parameters». Закладка «Sizing».
30. В окне «Database Configuration Assistant, Step 10 of 12: Initialization Parameters» на закладке «Character Sets» выбрать кодировку для БД (Рисунок 43). Кодировка должна быть «CL8MSWIN1251». По умолчанию выбрано «Use the default». Если при этом указана правильная кодировка, то менять ничего не нужно. На рисунке показана пример ситуации, если бы была указана неправильная кодировка (Рисунок 43). В этом случае нужно выбрать «Choose from the list of character sets» и в списке выбрать правильную кодировку «CL8MSWIN1251».

Рисунок 43. Окно «Database Configuration Assistant, Step 10 of 12: Initialization Parameters». Закладка «Character Sets».
31. В окне «Database Configuration Assistant, Step 10 of 12: Initialization Parameters» (Рисунок 44) на закладке «Connection Mode» выбрать «Dedicate Server Mode».

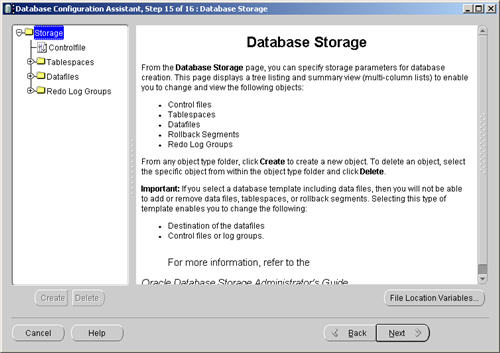
Рисунок 44. Окно «Database Configuration Assistant, Step 11 of 12: Database Storage».
32. Нажать кнопку «Следующий».
На экране появляется окно Database Configuration Assistant, Step 11 of 12: Database Storage (Рисунок 45).

Рисунок 45. Окно «Database Configuration Assistant, Step 11 of 12: Database Storage».
33. Слева выбрать пункт «Controlfile».
34. Задать местонахождения контрольного файла. По умолчанию предлагается создать три контрольных файла. Если у вас один жесткий диск, нет смысла создавать более двух контрольных файлов. Если дисков несколько, тогда можно для надежности указать еще один или два файла, но на других дисках. Для этого нужно откорректировать путь в поле «File Directory».
35. В данном окне слева выбрать пункт «Tablespaces». Поставить курсор на табличное пространство «USERS».
36. В секции «Datafiles» двойным кликом кликнуть на пиктограмму в виде листа бумаги (Рисунок 46).

Рисунок 46. Окно «Database Configuration Assistant, Step 11 of 12: Database Storage». Пункт «Tablespaces».
Появляется окно «Edit Datafile» (Рисунок 47).
37. На закладке «General». В поле «File Size» ввести размер файла данных 100 Мб.
38. Перейти на закладку «Storage».
Рисунок 47. Окно «Edit Datafile».
39. В окне «Edit Datafile» на закладке «Storage» включить режим автоувеличения для файла данных (Рисунок 48).
40. Поставить отметку в поле «Automatically extend data file when full (AUTOEXTEND)».
Рисунок 48. Окно «Edit Datafile». Закладка «Storage».
41. В поле «Increment» ввести шаг приращения 100 Мб.
42. В секции «Maximum Size» отметить «Unlimited».
43. Нажать кнопку «OK».
Управление возвращается в окно «Database Configuration Assistant, Step 11 of 12: Database Storage»
44. Нажать кнопку «Следующий».
На экране появляется окно «Database Configuration Assistant, Step 12 of 12: Creation Options» (Рисунок 49).
45. Нажать кнопку «Готово».

Рисунок 49. Окно «Database Configuration Assistant, Step 12 of 12: Creation Options».
Появляется окно «Confirmation».
46. Проверить правильность установленных параметров.
47. Нажать кнопку «OK».
Рисунок 50. Окно «Confirmation».
Открывается окно «Database Configuration Assistant». Идет процесс создания БД. Дождитесь завершения.
Рисунок 51. Окно «Database Configuration Assistant».
После завершения процесса откроется окно «Database Configuration Assistant» (Рисунок 52).
Создание базы данных завершено.
Запишите WEB-адрес для Database Control.
Нажмите Exit.

Рисунок 52. Окно «Database Configuration Assistant».
Всё. База данных создана и запущена.
Home » Articles » 11g » Here
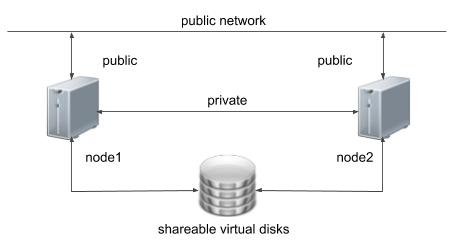
This article describes the installation of Oracle 11g release 1 (11.1) RAC on Windows 2003 Server Standard Edition using VMware Server with no additional shared disk devices.
- Introduction
- Download Software
- VMware Server Installation
- Virtual Machine Setup
- Guest Operating System Installation
- Oracle Installation Prerequisites
- Install VMware Client Tools
- Create Shared Disks
- Clone the Virtual Machine
- Install the Clusterware Software
- Install the Database Software and Create an ASM Instance
- Create a Database using the DBCA
- TNS Configuration
- Check the Status of the RAC
Introduction
One of the biggest obstacles preventing people from setting up test RAC environments is the requirement for shared storage. In a production environment, shared storage is often provided by a SAN or high-end NAS device, but both of these options are very expensive when all you want to do is get some experience installing and using RAC. A cheaper alternative is to use VMware Server to fake the shared storage.
Using VMware Server you can run multiple Virtual Machines (VMs) on a single server, allowing you to run both RAC nodes on a single machine. In addition, it allows you to set up shared virtual disks, overcoming the obstacle of expensive shared storage.
Before you launch into this installation, here are a few things to consider.
- The finished system includes the host operating system, two guest operating systems, two sets of Oracle Clusterware, two ASM instances and two Database instances all on a single server. As you can imagine, this requires a significant amount of disk space, CPU and memory. To complete this installation I used a dual 3.0G Xeon server with 4G of memory.
- This procedure provides a bare bones installation to get the RAC working. There is no redundancy in the Clusterware installation or the ASM installation. To add this, simply create double the amount of shared disks and select the «Normal» redundancy option when it is offered. Of course, this will take more disk space.
- During the virtual disk creation, I always choose not to preallocate the disk space. This makes virtual disk access slower during the installation, but saves on wasted disk space.
- This is not, and should not be considered, a production-ready system. It’s simply to allow you to get used to installing and using RAC.
Download Software
Download the following software.
- VMware Server
- Oracle 11g Release 1 (11.1) CRS and DB software
VMware Server Installation
For this article, I used CentOS 5 as the host operating systems. To use Windows as the host operating system, simply run the executable installation file and ignore the following VMware Server installation information.
First, install the VMware Server software. On Linux you do this with the following command as the root user.
# rpm -Uvh VMware-server-*.rpm
Preparing...                ########################################### [100%]
   1:VMware-server          ########################################### [100%]
#
Then finish the configuration by running the vmware-config.pl script as the root user. Most of the questions can be answered with the default response by pressing the return key. The output below shows my responses to the questions.
# vmware-config.pl
Making sure services for VMware Server are stopped.

Stopping VMware services:
   Virtual machine monitor                                 [  OK  ]

You must read and accept the End User License Agreement to continue.
Press enter to display it.

VMWARE, INC.
SOFTWARE BETA TEST AGREEMENT

*** Editied out license agreement ***

Do you accept? (yes/no) yes

Thank you.

Configuring fallback GTK+ 2.4 libraries.

In which directory do you want to install the mime type icons?
[/usr/share/icons]

What directory contains your desktop menu entry files? These files have a
.desktop file extension. [/usr/share/applications]

In which directory do you want to install the application's icon?
[/usr/share/pixmaps]

Trying to find a suitable vmmon module for your running kernel.

The module bld-2.6.9-5.EL-i686smp-RHEL4 loads perfectly in the running kernel.

Do you want networking for your virtual machines? (yes/no/help) [yes]

Configuring a bridged network for vmnet0.

The following bridged networks have been defined:

. vmnet0 is bridged to eth0

All your ethernet interfaces are already bridged.

Do you want to be able to use NAT networking in your virtual machines? (yes/no)
[yes]

Configuring a NAT network for vmnet8.

Do you want this program to probe for an unused private subnet? (yes/no/help)
[yes]

Probing for an unused private subnet (this can take some time)...

The subnet 172.16.210.0/255.255.255.0 appears to be unused.

The following NAT networks have been defined:

. vmnet8 is a NAT network on private subnet 172.16.210.0.

Do you wish to configure another NAT network? (yes/no) [no]

Do you want to be able to use host-only networking in your virtual machines?
[yes] no

Trying to find a suitable vmnet module for your running kernel.

The module bld-2.6.9-5.EL-i686smp-RHEL4 loads perfectly in the running kernel.

Please specify a port for remote console connections to use [902]

Stopping xinetd:                                           [  OK  ]
Starting xinetd:                                           [  OK  ]
Configuring the VMware VmPerl Scripting API.

Building the VMware VmPerl Scripting API.

Using compiler "/usr/bin/gcc". Use environment variable CC to override.

The installation of the VMware VmPerl Scripting API succeeded.

Do you want this program to set up permissions for your registered virtual
machines?  This will be done by setting new permissions on all files found in
the "/etc/vmware/vm-list" file. [no] yes

Generating SSL Server Certificate

In which directory do you want to keep your virtual machine files?
[/var/lib/vmware/Virtual Machines] /u01/VM

Do you want to enter a serial number now? (yes/no/help) [no] yes

Please enter your 20-character serial number.

Type XXXXX-XXXXX-XXXXX-XXXXX or 'Enter' to cancel:  ENTER-YOUR-SERIAL-NUMBER

Starting VMware services:
   Virtual machine monitor                                 [  OK  ]
   Virtual ethernet                                        [  OK  ]
   Bridged networking on /dev/vmnet0                       [  OK  ]
   Host-only networking on /dev/vmnet8 (background)        [  OK  ]
   NAT service on /dev/vmnet8                              [  OK  ]
   Starting VMware virtual machines...                     [  OK  ]

The configuration of VMware Server e.x.p build-22874 for Linux for this running
kernel completed successfully.

#
The VMware Server Console is started by issuing the command «vmware» at the command prompt, or by selecting it from the «System Tools» menu.
On the «Connect to Host» dialog, accept the «Local host» option by clicking the «Connect» button.
You are then presented with the main VMware Server Console screen.
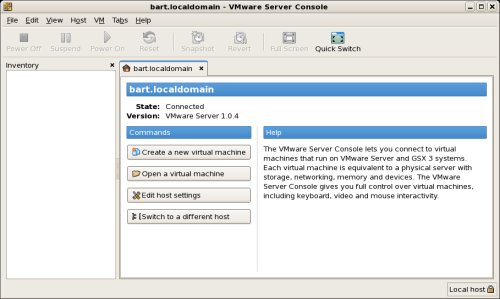
The VMware Server is now installed and ready to use.
Virtual Machine Setup
Now we must define the two virtual RAC nodes. We can save time by defining one VM, then cloning it when it is installed. In this article I use Linux as my host operating system, so all the file paths are UNIX style paths. If you are using a Windows host operating system you would expect to use Windows style paths to the various VMware files, so adjust the paths as necessary.
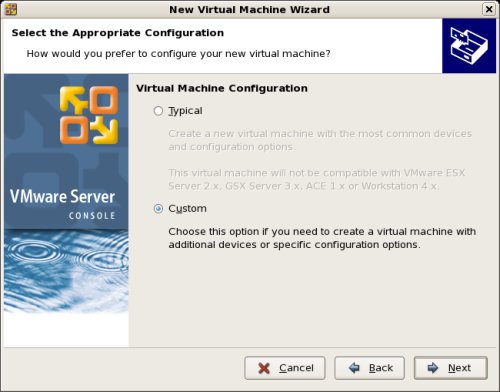
Click the «Create a new virtual machine» button to start the «New Virtual Machine Wizard». Click the «Next» button onthe welcome page.
Select the «Custom» virtual machine configuration and click the «Next» button.
Select the «Windows» guest operating system option, and set the version to «Windows Server 2003 Standard Edition», then click the «Next» button.
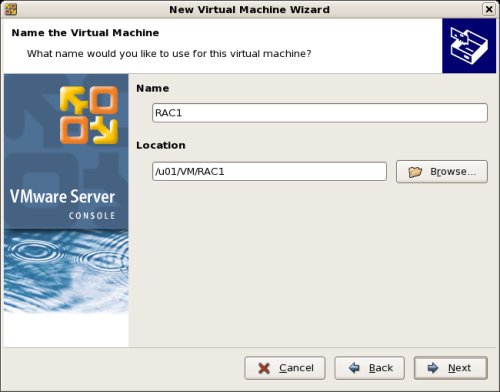
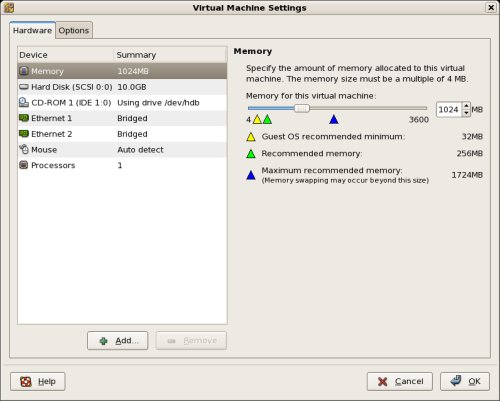
Enter the name «RAC1» and the location should default to «/u01/VM/RAC1», then click the «Next» button.
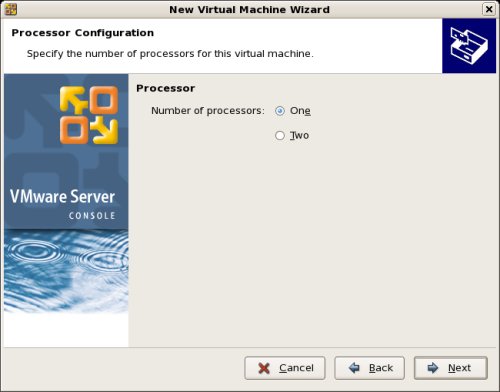
Select the required number of processors and click the «Next» button.
Uncheck the «Make this virtual machine private» checkbox and click the «Next» button.
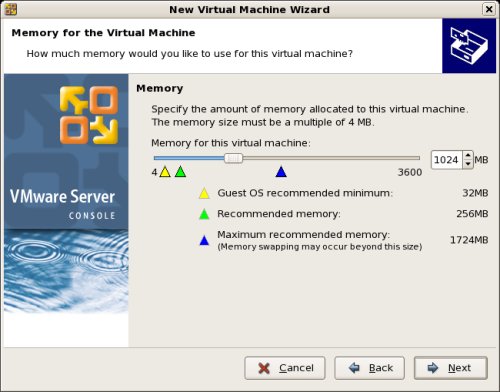
Select the amount of memory to associate with the virtual machine. Remember, you are going to need two instances, so don’t associate too much, but you are going to need approximately 1 Gig (1024 Meg) to compete the installation successfully.
Accept the «Use bridged networking» option by clicking the «Next» button.
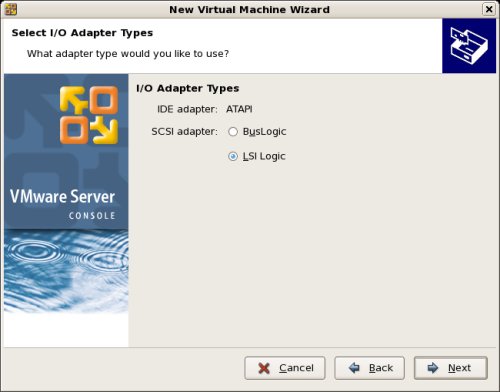
Accept the «LSI Logic» option by clicking the «Next» button.
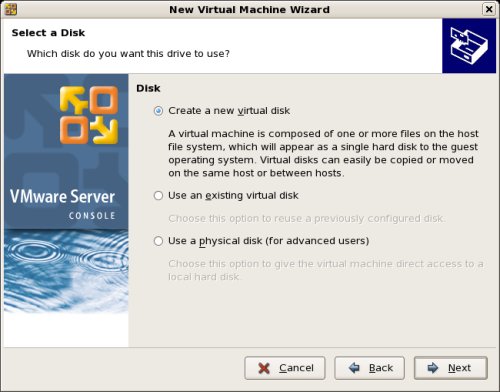
Select the «Create a new virtual disk» option and click the «Next» button.
Accept the «SCSI» option by clicking the «Next» button. It’s a virtual disk, so you can still use this option even if your physical disk is IDE or SATA.

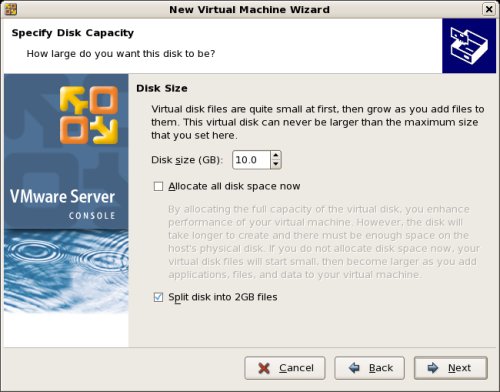
Set the disk size to «10.0» GB and uncheck the «Allocate all disk space now» option. The latter will make disk access slower, but will save you wasting disk space.
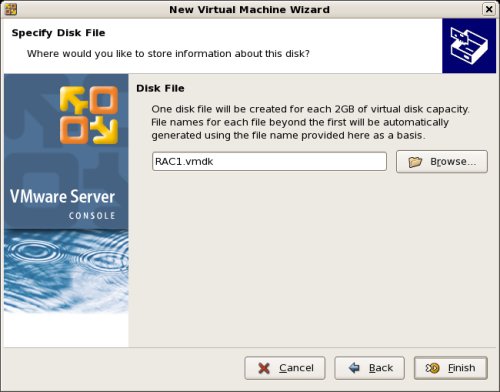
Accept «RAC1.vmdk» as the disk file name and complete the VM creation by clicking the «Finish» button.
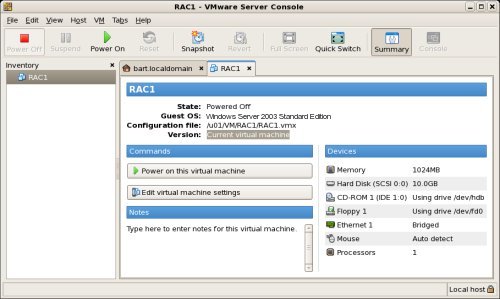
On the «VMware Server Console» screen, click the «Edit virtual machine settings» button.
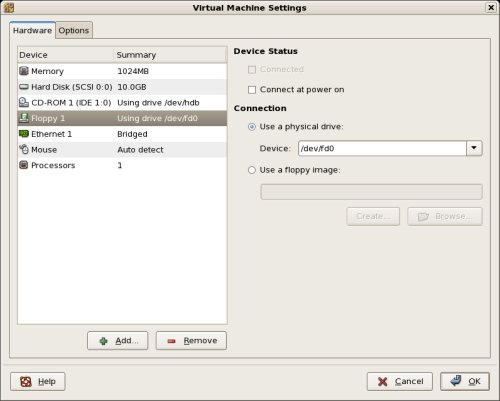
On the «Virtual Machine Settings» screen, highlight the «Floppy 1» drive and click the «- Remove» button.
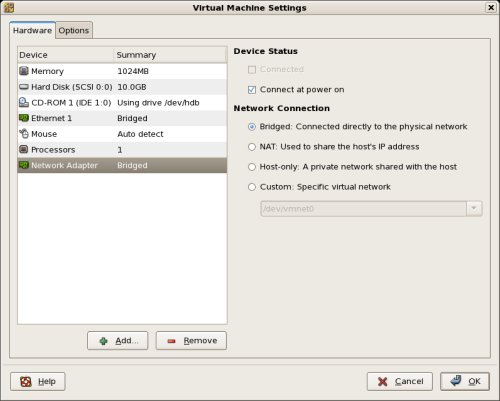
Click the «+ Add» button, select a hardware type of «Ethernet Adapter», then click the «Next» button.
Accept the «Bridged» option by clicking the «Finish» button.
Finish by clicking the «OK» button on the Virtual Machine Settings dialog.
The virtual machine is now configured so we can start the guest operating system installation.
Guest Operating System Installation
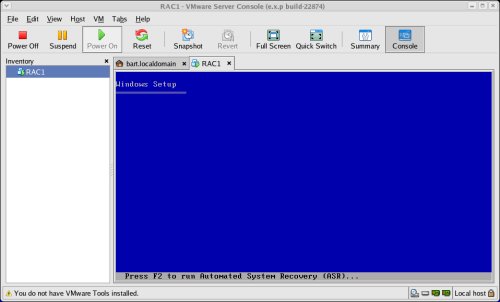
Place the first Windows 2003 SE disk in the CD drive and start the virtual machine by clicking the «Power on this virtual machine» button. The right pane of the VMware Server Console should display a boot loader, then the Windows installation screen.
Continue through the Windows installation as you would for a normal server. To be consistent with the rest of the article, the following information should be set during the installation.
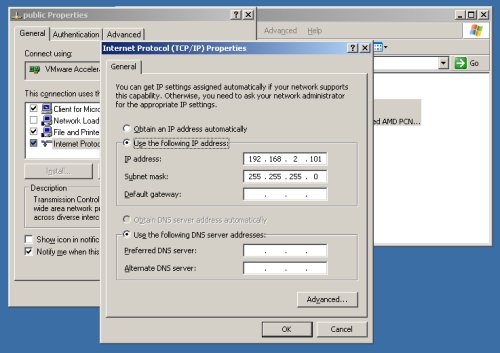
- hostname: RAC1
- IP Address eth0: 192.168.2.101 (public address)
- IP Address eth1: 192.168.0.101 (private address)
You are free to change the IP addresses to suit your network, but remember to stay consistent with those adjustments throughout the rest of the article.
Oracle Installation Prerequisites
Perform the following steps whilst logged into the RAC1 virtual machine.
Amend the «C:\windows\system32\drivers\etc\hosts» file to contain the following information.
127.0.0.1       localhost.localdomain   localhost
# Public
192.168.2.101   rac1.localdomain        rac1
192.168.2.102   rac2.localdomain        rac2
#Private
192.168.0.101   rac1-priv.localdomain   rac1-priv
192.168.0.102   rac2-priv.localdomain   rac2-priv
#Virtual
192.168.2.111   rac1-vip.localdomain    rac1-vip
192.168.2.112   rac2-vip.localdomain    rac2-vip
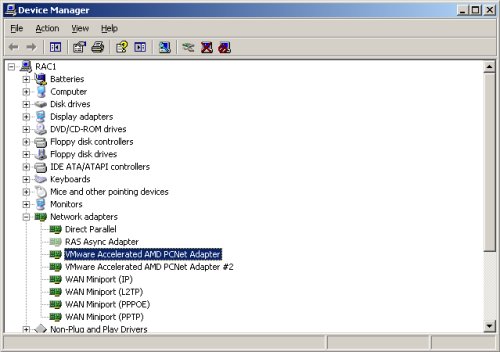
VMware sometimes creates additional network adapters, which will prevent the clusterware from loading. Delete any additional adapters as follows. Open a command prompt on RAC1 and issue the following commands.
set devmgr_show_nonpresent_devices=1
devmgmt.msc
On the resulting «Device Manager» screen, pick the «View > Show hidden devices» menu option.
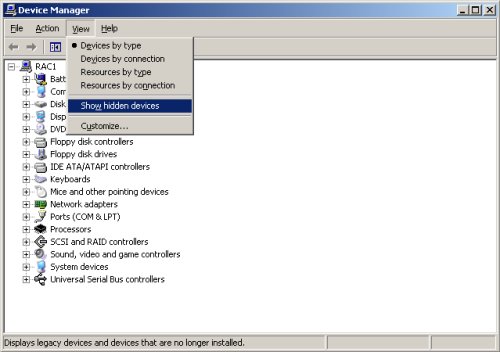
Now check for extra network adapters. You would expect two, but if there are more than this, uninstall the greyed out adapters.
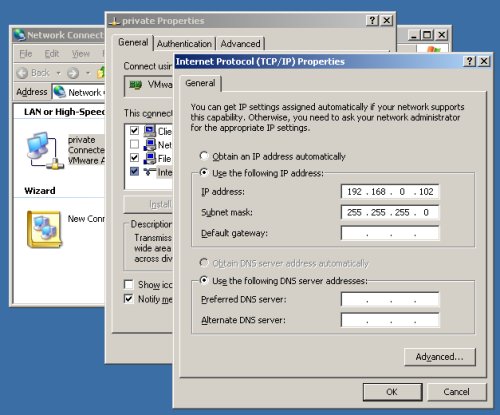
Open the «Network Connections» screen (Start > All Programs > Accessories > Communications > Network Connections). Rename the two connections to «public» and «private» respectively, making sure you apply the names to the appropriate connections.
Check that the network settings are correct for both connections.
The Clusterware installation is very sensitive, so make sure you read the Checking Network Requirements section of the documentation, and make any necessary changes.
In addition to the configuration mentioned above, the documentation suggests two more configuration changes that I did not find necessary on VMware Server. Even so, it is advisable to make the changes.
First, ensure the public interface is first in the bind order.
- Open the «Network Connections» dialog by right-clicking on the «My Network Places» icon and selecting the «Properties» menu option.
- Select the «Advanced > Advanced Settings…» menu option.
- On the «Adapters and Bindings» tab, make sure the public interface is the first interface listed.
- Accept any modifications by clicking on the «OK» button and exiting the «Network Connections» dialog.
Second, disable Windows Media Sensing for TCP/IP.
- Backup the Windows registry.
-
Run the Registry Editor (Regedt32.exe) and find the following key.
HKEY_LOCAL_MACHINE\System\CurrentControlSet\Services\Tcpip\Parameters
-
Add the following registry value.
Value Name: DisableDHCPMediaSense
Data Type: REG_DWORD -Boolean
Value: 1
- This change will not take effect until the computer is restarted.
Next, install the VMware client tools.
Install VMware Client Tools
Login on the RAC1 virtual machine, then select the «VM > Install VMware Tools…» option from the main VMware Server Console menu.
Click the «Install» button on the subsequent screen.
Click the «Next» button to continue.
Accept the «Typical» option by clicking the «Next» button.
Click the «Install» button to continue.
Set the hardware acceleration when prompted by clicking the «Yes» button and following the instructions on the subsequent screens.
Once the installatin is complete, click the «Finish» button.
The VMware client tools are now installed.
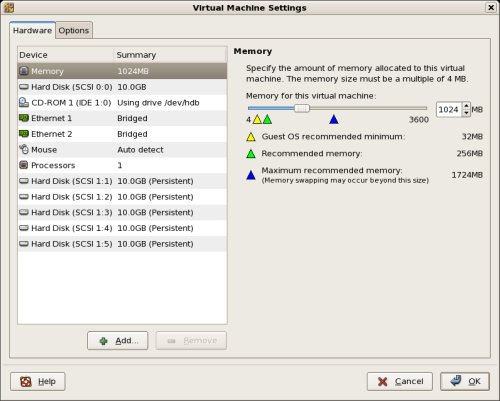
Create Shared Disks
Shut down the RAC1 virtual machine and create a directory on the host system to hold the shared virtual disks.
# mkdir -p /u01/VM/shared
On the VMware Server Console, click the «Edit virtual machine settings» button. On the «Virtual Machine Settings» screen, click the «+ Add» button.
Click the «Next» button on the welcome screen, then select the hardware type of «Hard Disk» and click the «Next» button.
Accept the «Create a new virtual disk» option by clicking the «Next» button.
Accept the «SCSI» option by clicking the «Next» button.
Set the disk size to «10.0» GB and uncheck the «Allocate all disk space now» option, then click the «Next» button.
Set the disk name to «/u01/VM/shared/ocr.vmdk» and click the «Advanced» button.
Set the virtual device node to «SCSI 1:1» and the mode to «Independent» and «Persistent», then click the «Finish» button.
Repeat the previous hard disk creation steps 4 more times, using the following values.
- File Name: /u01/VM/shared/votingdisk.vmdk
Virtual Device Node: SCSI 1:2
Mode: Independent and Persistent - File Name: /u01/VM/shared/asm1.vmdk
Virtual Device Node: SCSI 1:3
Mode: Independent and Persistent - File Name: /u01/VM/shared/asm2.vmdk
Virtual Device Node: SCSI 1:4
Mode: Independent and Persistent - File Name: /u01/VM/shared/asm3.vmdk
Virtual Device Node: SCSI 1:5
Mode: Independent and Persistent
At the end of this process, the virtual machine should look something like the picture below.
Edit the contents of the «/u01/VM/RAC1/RAC1.vmx» file using a text editor, making sure the following entries are present. Some of the tries will already be present, some will not.
disk.locking = "FALSE"
diskLib.dataCacheMaxSize = "0"
diskLib.dataCacheMaxReadAheadSize = "0"
diskLib.dataCacheMinReadAheadSize = "0"
diskLib.dataCachePageSize = "4096"
diskLib.maxUnsyncedWrites = "0"

scsi1.present = "TRUE"
scsi1.virtualDev = "lsilogic"
scsi1.sharedBus = "VIRTUAL"

scsi1:1.present = "TRUE"
scsi1:1.mode = "independent-persistent"
scsi1:1.fileName = "/u01/VM/shared/ocr.vmdk"
scsi1:1.deviceType = "plainDisk"
scsi1:1.redo = ""

scsi1:2.present = "TRUE"
scsi1:2.mode = "independent-persistent"
scsi1:2.fileName = "/u01/VM/shared/votingdisk.vmdk"
scsi1:2.deviceType = "plainDisk"
scsi1:2.redo = ""

scsi1:3.present = "TRUE"
scsi1:3.mode = "independent-persistent"
scsi1:3.fileName = "/u01/VM/shared/asm1.vmdk"
scsi1:3.deviceType = "plainDisk"
scsi1:3.redo = ""

scsi1:4.present = "TRUE"
scsi1:4.mode = "independent-persistent"
scsi1:4.fileName = "/u01/VM/shared/asm2.vmdk"
scsi1:4.deviceType = "plainDisk"
scsi1:4.redo = ""

scsi1:5.present = "TRUE"
scsi1:5.mode = "independent-persistent"
scsi1:5.fileName = "/u01/VM/shared/asm3.vmdk"
scsi1:5.deviceType = "plainDisk"
scsi1:5.redo = ""
Start the RAC1 virtual machine by clicking the «Power on this virtual machine» button on the VMware Server Console. When the server has started, log in so you can partition the disks.
Prior to partitioning the disks on Windows Server 2003, you must enable disk automounting. I didn’t need to do this, but I guess it makes sense to do as you’re told. To enable automounting do the following command at the command prompt, then restart the server.
C:\> diskpart
DISKPART> automount enable
DISKPART> exit
C:\>
When the server restarts, open the «Computer Management» dialog (Start > All Programs > Administrative Tools > Computer Management) and click on the Disk Management tree node. This action should initiate the «Initialize and Convert Disk Wizard». Click the «Next» button to continue.
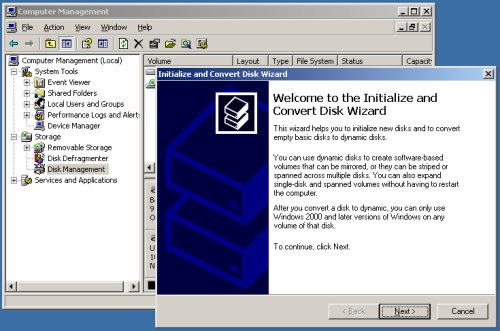
Initialize all 5 disks by clicking the «Next» button.
Don’t convert any of the disks. Make sure all 5 disks are unchecked, then «Next» button.
Complete the process by clicking the «Finish» button.
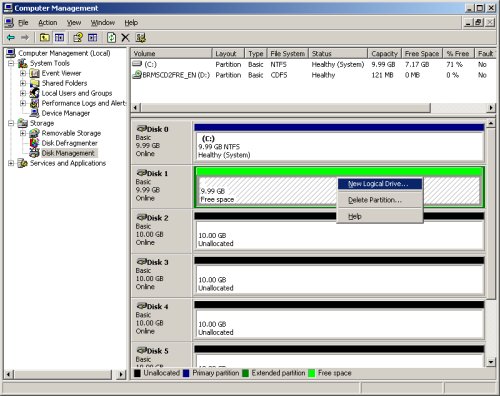
Right-click on «Disk 1» and select the «New Partition…» option to start the «New Partition Wizard».
Click the «Next» button to continue.
Select the «Extended partition» option, then click the «Next» button.
Accept the default partition size by clicking the «Next» button.
Complete the partition by clicking the «Finish» button.
The partition will now be displayed with a green bar. Right-click on the partition and select the «New Logical Drive» option to restart the «New Partition Wizard».
Click the «Next» button to continue.
Accept the «Logical drive» option by clicking the «Next» button.
Accept the default partition size by clicking the «Next» button.
Select the «Do not assign a drive letter or drive path» option, then click the «Next» button.
Select the «Do not format this partition» option, then click the «Next» button.
Complete the logical drive by clicking the «Finish» button.
The drive should now be displayed as a healthy drive with a blue bar.
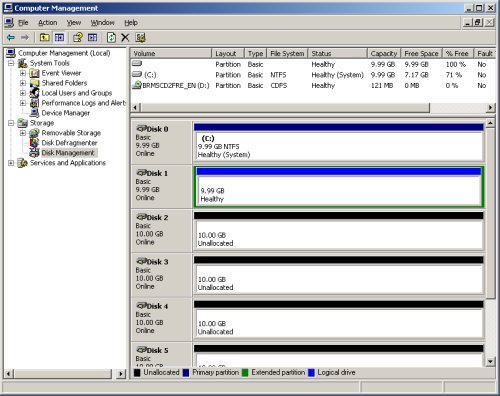
Repeat the previous partitioning steps for the remaining 4 disks.
The shared disks are now configured.
Clone the Virtual Machine
The current version of VMware Server does not include an option to clone a virtual machine, but the following steps illustrate how this can be achieved manually.
Shut down the RAC1 virtual machine and copy the RAC1 virtual machine using the following command.
# cp -R /u01/VM/RAC1 /u01/VM/RAC2
Edit the contents of the «/u01/VM/RAC2/RAC1.vmx» file, making the following change.
displayName = "RAC2"
Ignore discrepancies with the file names in the «/u01/VM/RAC2» directory. This does not affect the action of the virtual machine.
In the VMware Server Console, select the File > Open menu options and browse for the «/u01/VM/RAC2/RAC1.vmx» file. Once opened, the RAC2 virtual machine is visible on the console. Start the RAC2 virtual machine by clicking the «Power on this virtual machine» button and click the «Create» button on the subsequent «Question» screen.
Open the «Network Connections» screen (Start > All Programs > Accessories > Communications > Network Connections). Amend the IP Addresses of both connections to the correct values for the RAC2 node.
The cloning process sometimes alters the network connection setup, so repeat the steps mentioned previously for removing extra network adapters and renaming the connections.
Open the «System Properties» dialog (Start > Control Panel > System), click on the «Computer Name» tab and click the «Change» button. Enter the name «rac2» then click the «OK» button.
Click all subsequent «OK» buttons to exit the «System Properties» dialog and restart the server when prompted.
Once the RAC2 virtual machine has restarted, start the RAC1 virtual machine. When both nodes have started, check they can both ping all the public and private IP addresses using the following commands.
ping -c 3 rac1
ping -c 3 rac1-priv
ping -c 3 rac2
ping -c 3 rac2-priv
At this point the virtual IP addresses defined in the hosts file will not work, so don’t bother testing them.
It’s a good idea to take a snapshot of the virtual machines, so you can repeat the following stages if you run into any problems. To do this, shutdown both virtual machines and issue the following commands.
# cd /u01/VM
# tar -cvf RAC-PreClusterware.tar RAC1 RAC2 shared
# gzip RAC-PreClusterware.tar
The virtual machine setup is now complete.
Install the Clusterware Software
Start the RAC1 and RAC2 virtual machines. The Oracle Clusterware for Windows is very sensitive, so before you start, check the network connection setup on each machine again. Remove and extra network adapters, rename the connections appropriately and check the nodes ping correctly. Make sure your network configuration matches the Checking Network Requirements section of the documentation.
Start the Oracle installer on RAC1.
On the «Welcome» screen, click the «Next» button.

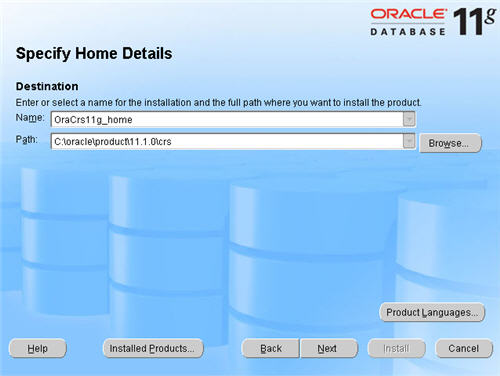
Enter the appropriate name and path for the Oracle Home and click the «Next» button.
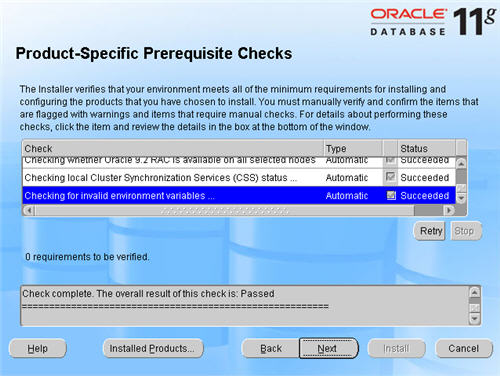
Wait while the prerequisite checks are done. If you have any failures correct them and retry the tests before clicking the «Next» button.
The «Specify Cluster Configuration» screen shows only the RAC1 node in the cluster. Click the «Add» button to continue.
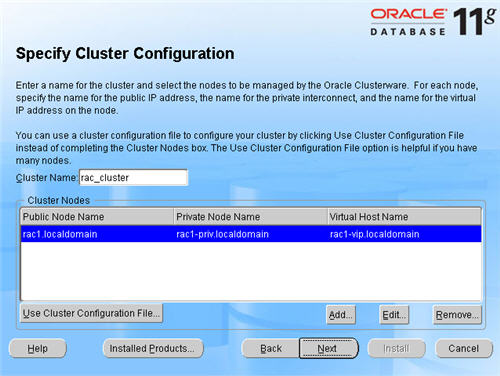
Enter the details for the RAC2 node and click the «OK» button.
Click the «Next» button to continue.
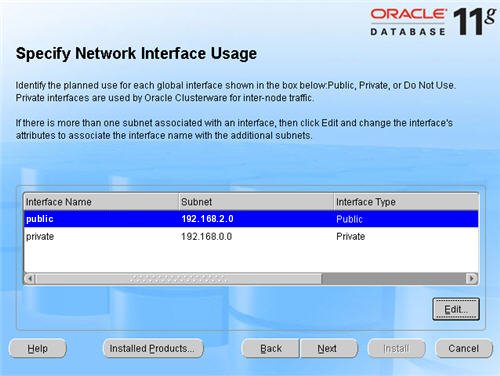
The «Specific Network Interface Usage» screen defines how each network interface will be used. Highlight the «public» interface and click the «Edit» button.
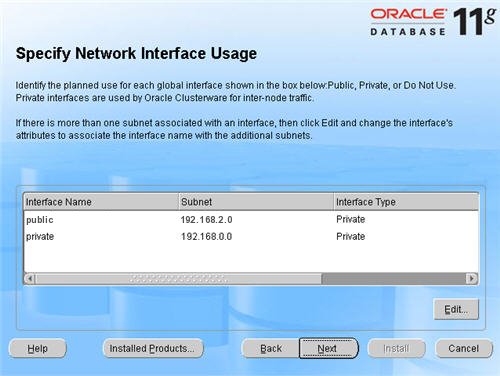
Set the «public» interface type to «Public» and click the «OK» button.
Leave the «private» interface as private and click the «Next» button.
On the «Cluster Configuration Storage» screen, highlight disk 1 and click the «Edit» button.
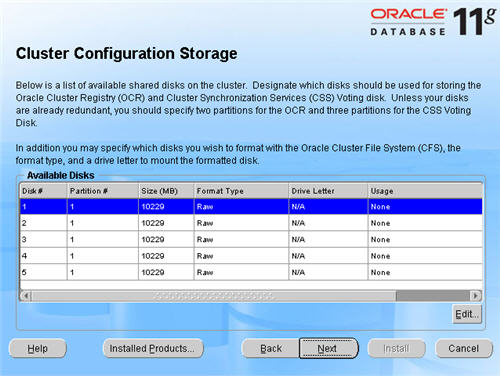
Select the «Place OCR(Primary) on this Partition» option and click the «OK» button.
Highlight disk 2 and click the «Edit» button. Select the «Place Voting Disk on this Partition» option and click the «OK» button.
On the «Cluster Configuration Storage» screen, click the «Next» button and ignore the redundancy warnings by clicking the «OK» button.
On the «Summary» screen, click the «Install» button to continue.
Wait while the installation takes place.
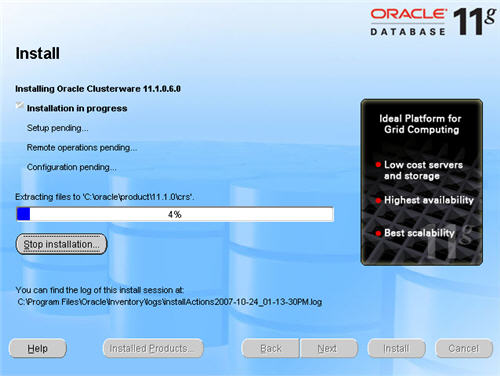
Wait while the configuration assistants run.
Click the «Exit» button to leave the installer.
It’s a good idea to take a snapshot of the virtual machines, so you can repeat the following stages if you run into any problems. To do this, shutdown both virtual machines and issue the following commands.
# cd /u01/VM
# tar -cvf RAC-PostClusterware.tar RAC1 RAC2 shared
# gzip RAC-PostClusterware.tar
The clusterware installation is now complete.
Install the Database Software and Create an ASM Instance
Start the RAC1 and RAC2 virtual machines, login to RAC1 and start the Oracle installer.
On the «Welcome» screen, click the «Next» button.
Select the «Enterprise Edition» option and click the «Next» button.
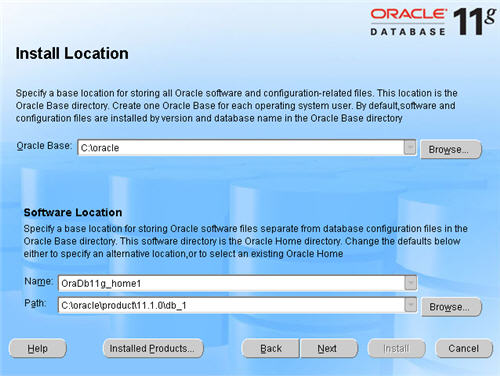
Enter the path for the Oracle Base along with the name and path for the Oracle Home and click the «Next» button.
Select the «Cluster Installation» option and make sure both RAC nodes are selected, then click the «Next» button.
Wait while the prerequisite checks are done. If you have any failures correct them and retry the tests before clicking the «Next» button.
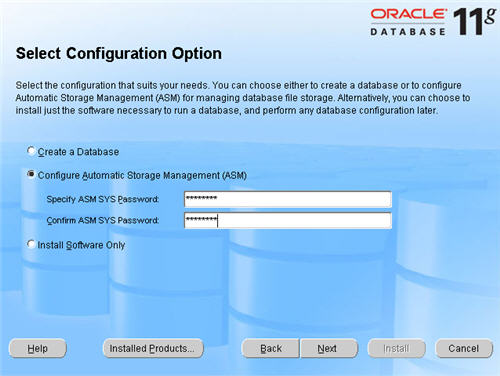
Select the «Configure Automatic Storage Management (ASM)» option, enter the SYS password for the ASM instance, then click the «Next» button.
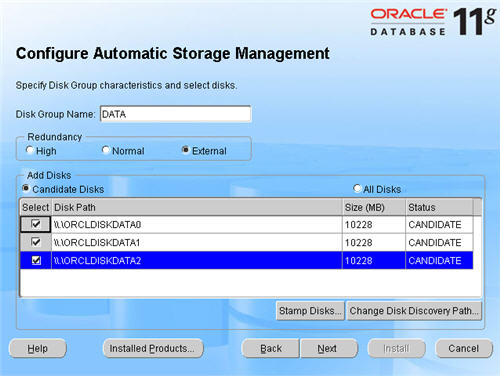
Select the «External» redundancy option (no mirroring) and click the «Stamp Disks…» button.
Select the «Add or change label» option and click the «Next» button.
Highlight disks 3-5 and click the «Next» button. Remember, disk0 is the OS, disk1 is the OCR location and disk2 is the voting disk.
Confirm your selection by clicking the «Next» button.
Complete the disk stamp by clicking the «Finish» button.
Select the candidate disks and click the «Next» button.
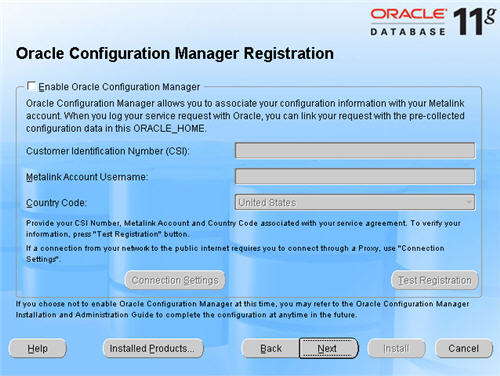
Click the «Next» button to avoid the Oracle Configuration Manager registration.
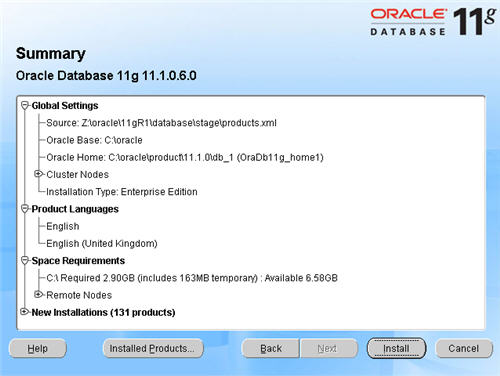
On the «Summary» screen, click the «Install» button to continue.
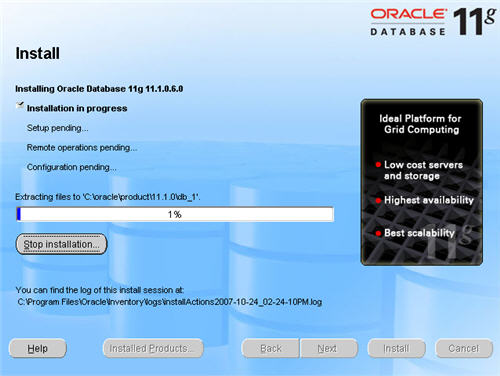
Wait while the database software installs.
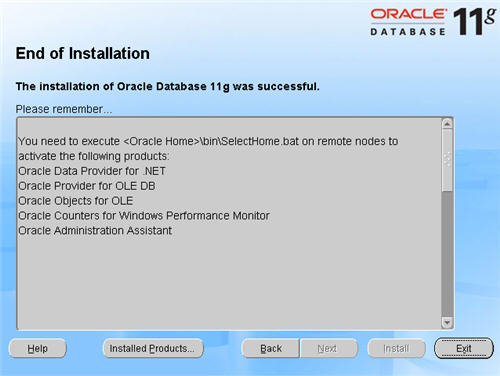
Once the installation is complete, wait while the configuration assistants run.
Execute the suggested scripts, then click the «Exit» button to leave the installer.
It’s a good idea to take a snapshot of the virtual machines, so you can repeat the following stages if you run into any problems. To do this, shutdown both virtual machines and issue the following commands.
# cd /u01/VM
# tar -cvf RAC-PostASM.tar RAC1 RAC2 shared
# gzip RAC-PostASM.tar
The database software installation and ASM creation step is now complete.
Create a Database using the DBCA
Start the RAC1 and RAC2 virtual machines, login to RAC1 start the Database Configuration Assistant (Start > All Programs > Oracle — OraDb11g_home1 > Configuration and Migration Tools > Database Configuration Assistant).
On the «Welcome» screen, select the «Oracle Real Application Clusters database» option and click the «Next» button.
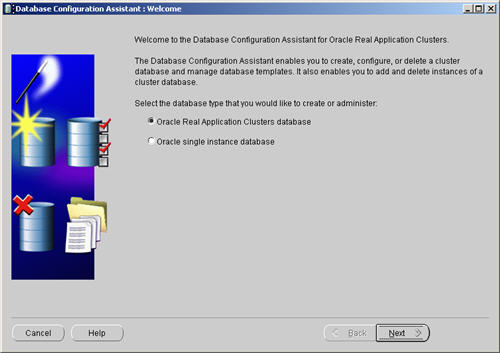
Select the «Create a Database» option and click the «Next» button.

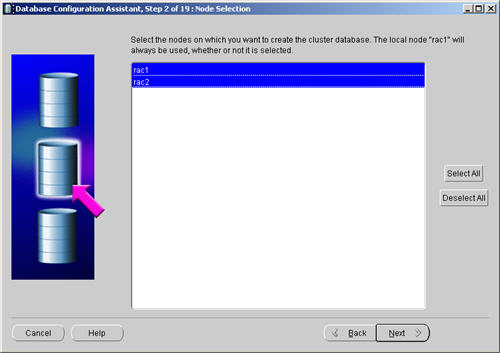
Highlight both RAC nodes and click the «Next» button.
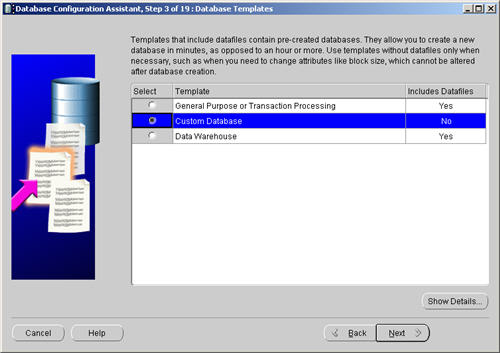
Select the «Custom Database» option and click the «Next» button.
Enter the values «RAC.WORLD» and «RAC» for the Global Database Name and SID Prefix respectively, then click the «Next» button.
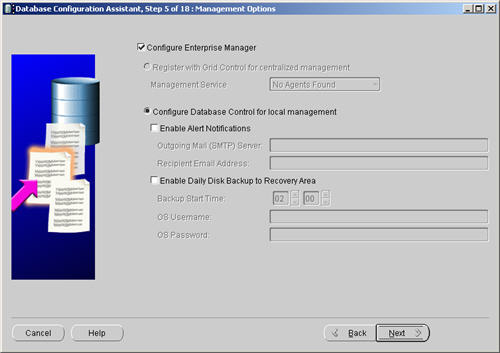
Accept the management options by clicking the «Next» button. If you are attempting the installation on a server with limited memory, you may prefer not to configure Enterprise Manager at this time.
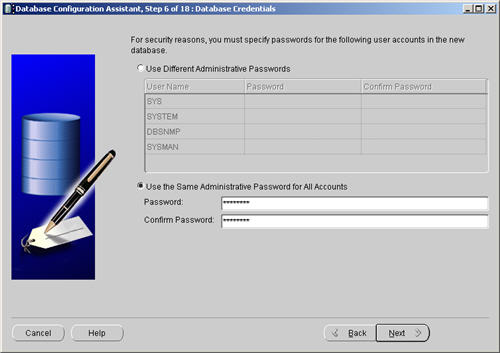
Enter database passwords then click the «Next» button.
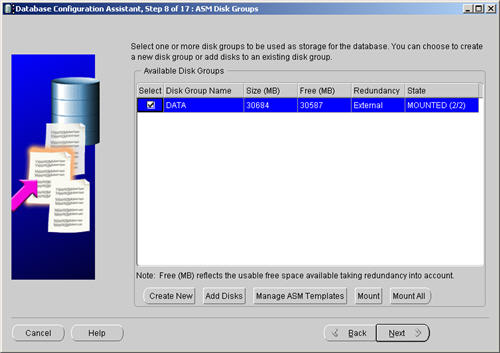
Select the «Automatic Storage Management (ASM)» option, then click the «Next» button.
Select the «DATA» disk group, then click the «Next» button.
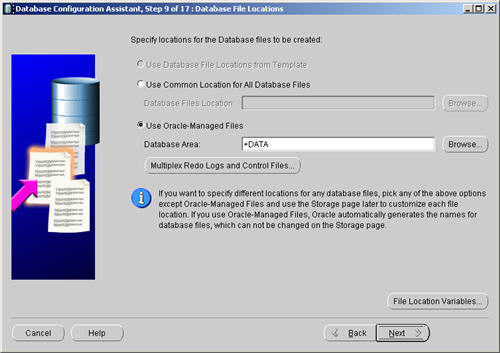
Accept the «Use Oracle-Managed Files» database location by the «Next» button.
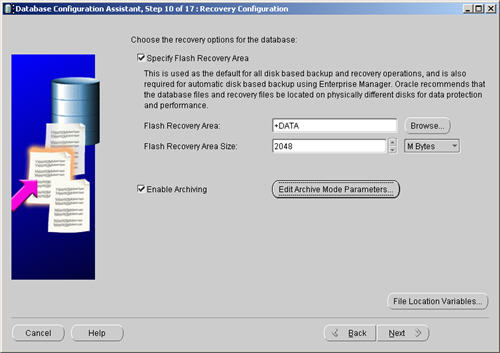
Check both the «Specify Flash Recovery Area» and «Enable Archiving» options. Enter «+DATA» as the Flash Recovery Area, then click the «Next» button.
Uncheck all but the «Enterprise Manager Repository» option, then click the «Standard Database Components…» button.
Uncheck all but the «Oracle JVM» and «Oracle XML DB» options, then click the «OK» button, followed by the «Next» button on the previous screen. If you are attempting the installation on a server with limited memory, you may prefer not to install these at this time.
Accept the «Typical» memory management option by clicking the «Next» button.
Accept the enhanced security settings by clicking the «Next» button.
Accept the enabled automatic maintenance tasks by clicking the «Next» button.
Accept the database storage settings by clicking the «Next» button.
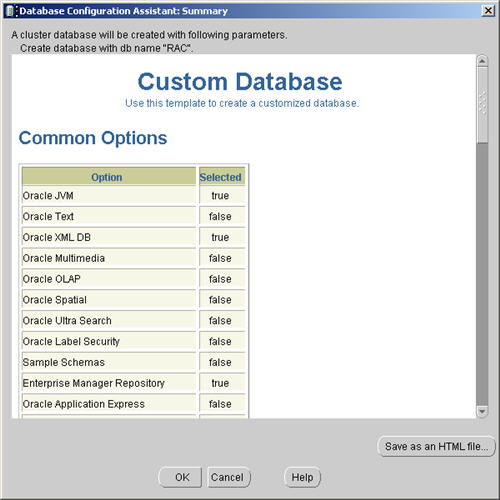
Accept the database creation options by clicking the «Finish» button.

Accept the summary information by clicking the «OK» button.
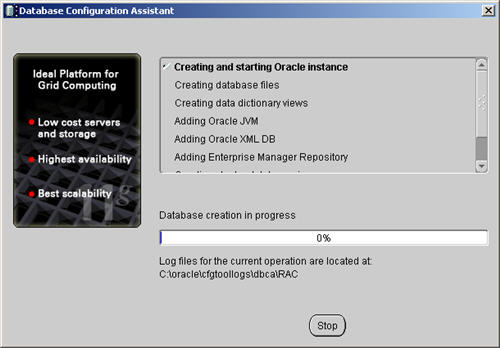
Wait while the database is created.
Once the database creation is complete you are presented with the following screen. Make a note of the information on the screen and click the «Exit» button.
The RAC database creation is now complete.
TNS Configuration
Once the installation is complete, the «%ORACLE_HOME%\network\admin\listener.ora» file on each RAC node will contain entries similar to the following.
LISTENER_RAC1 =
  (DESCRIPTION_LIST =
    (DESCRIPTION =
      (ADDRESS = (PROTOCOL = IPC)(KEY = EXTPROC1521))
      (ADDRESS = (PROTOCOL = TCP)(HOST = rac1-vip)(PORT = 1521)(IP = FIRST))
      (ADDRESS = (PROTOCOL = TCP)(HOST = 10.1.10.191)(PORT = 1521)(IP = FIRST))
    )
  )
The «%ORACLE_HOME%\network\admin\tnsnames.ora» file on each RAC node will contain entries similar to the following.
RAC =
  (DESCRIPTION =
    (ADDRESS = (PROTOCOL = TCP)(HOST = rac1-vip)(PORT = 1521))
    (ADDRESS = (PROTOCOL = TCP)(HOST = rac2-vip)(PORT = 1521))
    (LOAD_BALANCE = yes)
    (CONNECT_DATA =
      (SERVER = DEDICATED)
      (SERVICE_NAME = RAC.WORLD)
    )
  )

LISTENERS_RAC =
  (ADDRESS_LIST =
    (ADDRESS = (PROTOCOL = TCP)(HOST = rac1-vip)(PORT = 1521))
    (ADDRESS = (PROTOCOL = TCP)(HOST = rac2-vip)(PORT = 1521))
  )

RAC2 =
  (DESCRIPTION =
    (ADDRESS = (PROTOCOL = TCP)(HOST = rac2-vip)(PORT = 1521))
    (CONNECT_DATA =
      (SERVER = DEDICATED)
      (SERVICE_NAME = RAC.WORLD)
      (INSTANCE_NAME = RAC2)
    )
  )

RAC1 =
  (DESCRIPTION =
    (ADDRESS = (PROTOCOL = TCP)(HOST = rac1-vip)(PORT = 1521))
    (CONNECT_DATA =
      (SERVER = DEDICATED)
      (SERVICE_NAME = RAC.WORLD)
      (INSTANCE_NAME = RAC1)
    )
  )
This configuration allows direct connections to specific instance, or using a load balanced connection to the main service.
C:\>sqlplus / as sysdba

SQL*Plus: Release 11.1.0.6.0 - Production on Wed Oct 24 18:53:22 2007

Copyright (c) 1982, 2007, Oracle.  All rights reserved.


Connected to:
Oracle Database 11g Enterprise Edition Release 11.1.0.6.0 - Production
With the Partitioning, Real Application Clusters, OLAP, Data Mining
and Real Application Testing options

SQL> CONN sys/password@rac1 AS SYSDBA
Connected.
SQL> SELECT instance_name, host_name FROM v$instance;

INSTANCE_NAME    HOST_NAME
---------------- ----------------------------------------------------------------
rac1             RAC1

SQL> CONN sys/password@rac2 AS SYSDBA
Connected.
SQL> SELECT instance_name, host_name FROM v$instance;

INSTANCE_NAME    HOST_NAME
---------------- ----------------------------------------------------------------
rac2             RAC2

SQL> CONN sys/password@rac AS SYSDBA
Connected.
SQL> SELECT instance_name, host_name FROM v$instance;

INSTANCE_NAME    HOST_NAME
---------------- ----------------------------------------------------------------
rac2             RAC2

SQL>
Check the Status of the RAC
There are several ways to check the status of the RAC. The srvctl utility shows the current configuration and status of the RAC database.
C:\>srvctl config database -d RAC
rac1 RAC1 C:\oracle\product\11.1.0\db_1
rac2 RAC2 C:\oracle\product\11.1.0\db_1

C:\>

C:\>srvctl status database -d RAC
Instance RAC1 is running on node rac1
Instance RAC2 is running on node rac2

C:\>
The V$ACTIVE_INSTANCES view can also display the current status of the instances.
C:\>sqlplus / as sysdba

SQL*Plus: Release 11.1.0.6.0 - Production on Wed Oct 24 18:53:22 2007

Copyright (c) 1982, 2007, Oracle.  All rights reserved.


Connected to:
Oracle Database 11g Enterprise Edition Release 11.1.0.6.0 - Production
With the Partitioning, Real Application Clusters, OLAP, Data Mining
and Real Application Testing options

SQL> SELECT * FROM v$active_instances;

INST_NUMBER INST_NAME
----------- ------------------------------------------------------------
          1 RAC1:rac1
          2 RAC2:rac2

SQL>
Finally, the GV$ allow you to display global information for the whole RAC.
SQL> SELECT inst_id, program, sid, serial# FROM gv$session;

   INST_ID PROGRAM                                SID    SERIAL#
---------- ------------------------------- ---------- ----------
         1 ORACLE.EXE (q001)                      110          1
.
.
         1 racgimon.exe                           170         14
         2 ORACLE.EXE (PZ99)                      111         87
.
.
         2 racgimon.exe                           170         11

83 rows selected.

SQL>
If you have configured Enterprise Manager, it can be used to view the configuration and current status of the database using a URL like «https://rac1.localdomain:1158/em».

For more information see:
- Oracle Database 11g Release 1 (11.1) RAC Installation On Linux Using VMware Server
- Installation Guide for Microsoft Windows
- Clusterware Installation Guide for Microsoft Windows
- Real Application Clusters Installation Guide for Microsoft Windows
Hope this helps. Regards Tim…
Back to the Top.
Oracle has been available on Windows Server since Windows NT shipped in 1994. In that time there have been many changes to Oracle as features have been added and improved. One of the most significant improvement to Oracle on Windows has just been introduced (this was a year ago they supported 64 bit AMD/EM64T) without much fanfare or publicity. This is the introduction of Oracle 10g on Microsoft Windows Server x64.
The Intel x86 architecture was introduced in 1978 as a 16-bit processor. This was replaced in 1986 with a 32-bit version. I don’t think that anyone expected the 32-bit architecture to hang around this long. The 32-bit architecture allowed for up to 4 GB of virtual address space and 4 GB of RAM. This was later improved to allow 64 GB of RAM with PAE, but the virtual memory (process address) limit remained at 4 GB.
This remained in effect (for the PC server platform) until the introduction of the AMD Opteron and Intel EM64T processors. The EM64T and Opteron processors can access up to 256 Terabytes of virtual memory (248 bytes). The architecture allows this limit to be increased to a maximum of 16 exabytes (264 bytes). The EM64T and Opteron processors can currently address up to 1 Terabyte of physical memory ( 240 bytes). The architecture allows this limit to be increased to a maximum of 4 petabytes (252 bytes).
The table below shows some of the general maximum memory addressable by Windows 32 bit and 64 bit:
| General Memory Limits | 32-bit | 64-bit |
|---|---|---|
| Total Virtual Address Space | 4 GB | 16 TB |
| Virtual Address Space per 32-bit process | 2GB (3 GB if system is booted with /3gb switch) | 4GB if compiled with /LARGEADDRESSAWARE 2GB otherwise |
| Virtual Address Space per 64-bit process | Not applicable | 8 TB |
| Paged Pool | 470 MB | 128 GB |
| Non-Paged Pool | 256 MB | 128 GB |
| System Cache | 1 GB | 1 TB |
| Physical Memory and CPU Limits | 32-bit | 64-bit |
| Windows Compute Cluster Server 2003 | NA | 32 GB / 1-4 CPUs |
| Windows Server 2003 Standard Edition | 4 GB / 1-4 CPUs | 32 GB / 1-4 CPUs |
| Windows Server 2003 Enterprise Edition | 64 GB / 1-8 CPUs | 1 TB / 1-8 CPUs |
| Windows Server 2003 Datacenter Edition | 64 GB / 1-32 CPUs | 1 TB / 1-64 CPUs |
Oracle is made up of many independent processes (or threads) that perform independent functions. The server processes are created when a user connects into the Oracle instance and does work on behalf of the user such as retrieving data from the SGA, or reading data from the data files, modifying data in the SGA and presenting data back to the user. The background processes do work on behalf of the Oracle instance and consist of things such as the DB writer, Log writer, archiver, system and process monitors and many others. These are independent entities that make the Oracle RDBMS work.
In most operating systems the above mentioned entities are processes. In Oracle for Windows these entities are threads. The difference between a process and a thread is how memory is used. In essence, a thread is a subcomponent of a process. A process has its own memory and registers and acts somewhat independently. With the Intel x86 architecture a process can address up to 2 GB of memory, or 3 GB if the /3GB flag is used upon Windows startup. The operating system loads the process’s memory and registers into the CPU and start the process running. Whenever the process’s time slice is up or it puts itself to sleep waiting on an I/O or other resources the CPU unloads the process, loads another process’s memory and registers and starts it up. This is known as a process or context switch. The number of context switches per second can be seen in perfmon under the system object. A context switch is a very expensive operation.
In order to make this more efficient, Oracle was developed to use the Windows thread architecture. A thread is a subcomponent of a process. With a thread, multiple entities can use the same process, thus avoiding context switches. The process allocates the memory and each thread has a pointer into the same memory. The downside of using threads is that all Oracle entities, such as the server processes and background processes share the same 3 GB address space. This has caused an issue with memory, since each Oracle server process and background process can consume significant memory. The end result is that the number of Oracle user sessions can be limited on Windows.
If you were to look into the task manager on a Windows system running Oracle you would see a process called oracle.exe is made up of a number of threads (20-30, depending on what options you are using). If you expand the columns to include thread count Oracle 10g supports asynchronous I/O to all files on Windows Server 2003 x64 bit. Also logical and raw file partitions are fully supported (faster than NTFS) Internal file I/O is 64 –bit and the maximum file size is 64GB (max. DB size is 4 petabytes).
So, as you can see, the decision to use Windows threads for Oracle has turned out to be somewhat of a liability, since the virtual memory address space limitation has caused the number of supported sessions to be somewhat limited. However, the upside is that the reduction of contexts switches provides a performance improvement.
With the switch from Oracle 32-bit to Oracle 64-bit the virtual memory limitation is no longer an issue. With no more session limitations and the additional advantages that you get from Oracle on Windows such as Active Directory integration, ease of use and stability it has become a great platform for Oracle.
The move to 64 bit is easy. There is complete interoperability between 32 bit clients and 64 bit servers and vice-versa. Also there is improved performance, availability and scalability on the 64 bit platform. TPC (http://www.tpc.org) has several benchmarks for database workloads performed on 32 bit and you can compare these with the ‘free’ performance gains on 64 bit platform without changing any code.
Please refer to http://www.oracle.com/technology/tech/windows/faq.html for supported Oracle DB versions with Windows Server 64 bit. In future blog entries I will elaborate on this topic in more detail and cover additional areas around Oracle on Windows.
I will explain how to install Oracle RAC 10g on Windows Server 2003 x64 Edition. I will tell installation step by step. You can find here for wide explain of that installation.

1 – VMware Configuration
- Add New Bridge Network.
- Add New Virtual Disks That 1 GB OCR, 1 GB Voting, 30 GB DATA, 30 GB DATA, 30 FRA on SCSI 1 (Different SCSI FROM Local Disk C (SCSI0)) on NODE1 and Set Virtual.
- Install Windows Server 2003.
2 – Windows Server 2003 Preconfiguration Before Oracle Installation
- Windows Update Complete.
- Vm Tool Install and Vm Tool Configuration Select Time Synchronization.
- Network Alias Set PublicLAN and PrivateLAN And Set IP Addresses, After PublicLAN Set Primary From Network Advanced Options.
- Regedit > HKEY_LOCAL_MACHINE\System\CurrentControlSet\Services\Tcpip\Parameters New DWORD > DisableDHCPMediaSense Value=1
- Change Computer Name Set NODE1
- Set Remote Connection Allow
- Create “oracle” User And Set Administrator Role
- Hosts File Write Usable VIP, Private and Physical IP Adres and Alias.
- Services.msc Distributed Transaction Coordinator Set Stop And Start Type Manual.
3 – Clone VM Machine and VM Configuration For NODE2
- Clone VM Machine And Set Name NODE2
- Delete Virtual Disk From SCSI 1
- Set Existing Virtual Disks From Node1 Disks on SCSI 1 on NODE2
4 – Windows Server 2003 Configuration For NODE2
- Change IP Addresses for Public and Private Connection.
- Change Computer Name Set NODE2.
- Check Hosts File.
- Check DisableDCHPMediaSense.
- Check Distributed Transaction Coordinator.
- Check VM Tool and Time Sync.
5 – Install Clusterware Software
- Run Cluvfy Batch Script For Check Your Configuration.
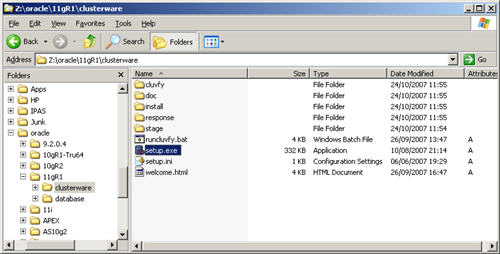
- Run clusterware/setup.exe
- Add Node2 Ip Addresses.
- Determine Private and Public Addresses.
- Determine Ocr, Voting Disks.
- Next For Complete Installation
- Run crs/BIN/vipca.bat For VIP IP Address Configuration.
6 – Install Lastest Patch
- Run Disk1/setup.exe
- Select Crs home
- Next For Complete Install
- Install patch102.bat
- Run Cluvfy For Clusterware Installation Check.
7 – Install ASM Software
- Run database/setup.exe
- Change Oracle Home, Set ASM.
- Select Two Nodes.
- Install Software Only.
- Next For Complete Installation.
8 – Install Lastest Patch
- Run Disk1/setup.exe
- Select ASM home
- Next For Complete Install
9 – Install Listener For ASM
- Run asm_1/BIN/netca
- Select Cluster Configuration.
- Next For Complete Install.
10 – Stamp Disks For ASM
- Run asm_1/BIN/asmtoolg.exe
- Select Data Label’s Disks.
- Set Alias DATA
- Next For Complete Install.
- Run asm_1/BIN/asmtoolg.exe
- Select Fra Label’s Disks.
- Set Alias FRA
- Next For Complete Install.
11 – Create ASM Instance
- Run asm_1/BIN/dbca
- Select Configure Automatic Storage Management.
- Set Passwords.
- Select Data and Fra Labels.
- Next For Complete Install.
12 – Install Oracle Software
- Run database/setup.exe
- Select Oracle Home (db_1)
- Select Two Nodes.
- Install Software Only.
- Next For Complete Installation.
13 – Install Lastest Patch
- Run Disk1/setup.exe
- Select DB home
- Next For Complete Install
14 – Create DB Instance
- Run db_1/BIN/dbca
- Select Create Database.
- Set SID.
- Set Passwords.
- Select ASM For Storage.
- Select DATA For Data Label.
- Select FRA For Flash Recovery Area.
- Next For Complete Install.
And Finish.
You can check your configuration with cluvfy. If you want to install Oracle RAC, you have to use this Document.