
This guide goes over using a Custom ISO, Removing Windows 10 Components, and Optimizing Windows 10 Settings.
Custom ISO
The whole purpose of a custom ISO is to make the initial install as slim as possible. You don’t have to uninstall bloat if it never gets installed to begin with!
Easiest Method NTLite ($30) — https://www.ntlite.com/
Free Method MSMG Toolkit — https://msmgtoolkit.in/
How to Make a Custom Windows 10 ISO with MSMG Toolkit Video
Microsoft Method for Custom ISO (Advanced Users Only)
Downloading in Installing ADK (Microsoft Image Tools) https://docs.microsoft.com/en-us/windows-hardware/get-started/adk-install
Using sysprep from Microsoft https://docs.microsoft.com/en-us/windows-hardware/manufacture/desktop/sysprep—generalize—a-windows-installation
I highly recommend a video by Craft Computing going over Windows Deployment Services if you are interested in this method — https://youtu.be/PdKMiFKGQuc
Installing Windows 10 and Removing Components
The Full AME Experience. Most people will NOT want to do this as it will remove functionality from Windows 10, that you CAN NOT put back in. Some of the components can be taken out in the Custom ISO phase, but this takes it to another level.
Note: I do NOT recommend this for MOST machines
Components Removed
- Windows Update
- Windows Store
- Media Player Functions
- Telemetry
- Windows Activation (YOU MUST Activate Windows Before this Tweak!) If you fail to do this, you will have a watermark you can’t get rid of
- DirectX 12
Source files for Tweaks https://ameliorated.info/ or my GitHub mirror https://github.com/ChrisTitusTech/windows-lite-2004
Installation Overview
- Install Windows 10 (Stock or Custom ISO)
- Activate Windows 10 and Disconnect from Internet afterwards
- Run
amelioration_2004.batas Admin and Pre-Amelioration - Reboot to Linux (I recommend Linux Mint)
- Run
sudo ./ameliorate_2004.shin Terminal on Live Linux USB - Reboot back to Windows
- Run
amelioration_2004.batas Admin and Post-Amelioration
Driver Installation
Recommend using the Offline Snappy Driver Installer https://sdi-tool.org/. This is about 50 GB, but has every driver you need.
AME Step-by-Step Documentation
https://wiki.ameliorated.info/doku.php?id=documentation_2004
Running Updates
- Download Latest Servicing Stack Update (Check Month — Windows verison- Architecture x64) https://www.catalog.update.microsoft.com/Search.aspx?q=Servicing%20Stack%20Update%20Windows%2010
- Download Cumulative Update (Check Month/Version/Arch AND Run After rebooting above) https://www.catalog.update.microsoft.com/Search.aspx?q=Cumulative%20Update%20Windows%2010
Extract Updatesexpand -F:* .\Windows10SSU.msu C:\Update1dism /online /add-package /packagepath=C:\1\Windows10.0-SSU.cab
Rebootexpand -F:* .\Windows10Cumulative.msu C:\Update2dism /online /add-package /packagepath=C:\2\Windows10.0-Cumulative.cab
Reboot and Rundism /online /Cleanup-Image /StartComponentCleanup
Note: File Names change and will be different from above!
Optimizing Windows 10 Settings
To finish things off we do some custom tweaks with the Official CTT Windows 10 Toolbox. This is something I have been customizing for years and refining every single month to work on any Windows 10 Installation.
iex ((New-Object System.Net.WebClient).DownloadString('https://git.io/JJ8R4'))
What this script can do
- Installs Chocolatey, Notepad++, Irfanview, VLC, Java, and asks if you want Adobe Reader or Brave.
- Removes all Windows Store Apps EXCEPT office, xbox, and WSL.
- Removed Telemetry
- Disables Cortana
- Deletes various schedules tasks that rebloat the system
- Removes Other Bloatware (Candy Crush, etc.)
- Fixes problems that other scripts causes (lock screen and personalization options restricted)
Based on User feedback, this no longer uninstalls OneDrive or Office.
Toolbox Walkthrough Video
Windows Services to Disable
- Windows Defender & Firewall
- Windows Mobile Hotspot Service
- Bluetooth Support Service
- Print Spooler (Required for Printing)
- Fax
- Remote Desktop Configuration and Remote Desktop Services
- Windows Insider Service
- Secondary Logon
- Downloaded Maps Manager
- Touch Keyboard and Handwriting Panel Service
- Offline Files
- Windows Connect Now
- Remote Registry
- Application Layer Gateway Service
- Smart Card
- Windows Image Acquisition
- Security Center
- Connected User Experiences and Telemetry
- Retail Demo Service
- Windows Media Player Network Sharing Service
- AllJoyn Router Service
- Geolocation Service
- Windows Biometric Service (Required for Fingerprint logon)
- Program Compatibility Assistant Service
- Enterprise App Management Service
Проблема современных дистрибутивов Windows — изобилие ненужного софта и скрытых процессов, которые захламляют систему. Скачивание сборок со сторонних ресурсов несёт риск нестабильной работы и появления «недокументированных» функций. Лишь самостоятельно созданный образ способен гарантировать качество, стабильность и надёжность.
В этом материале речь о двух проектах, что позволят гуманитарию без глубоких технических знаний легко создать собственный дистрибутив Windows. Рассмотрю UUP Dump и Generate Autounattend.xml — решения, что автоматизируют и упрощают процесс кастомизации Windows 10/11.

Зачем создавать Windows 10/11 дистрибутив
Этот материал создавался как шпаргалка для использования в будущем. Регулярно в интернете попадаются интересные проекты, о которых редко говорят, и они часто забываются. Моё хобби требует регулярной переустановки системы на персональных компьютерах с тонкой оптимизацией, чтобы обеспечить их стабильную работу на долгие годы без вмешательства. Вопросы удаления мусора из Windows, создание ISO образа Windows, кастомизация Windows, удаление ненужных компонентов Windows регулярно всплывают то тут, то там.
Использование официального лицензионного дистрибутива соответствует многим моим требованиям, но страдает из-за переизбытка ненужного софта и скрытых процессов. Сборки, созданные энтузиастами, интересны с точки зрения оптимизации и экономии времени, но часто содержат множество «недокументированных» функций, которые выходят за рамки допустимого. Постоянный поиск баланса между надёжностью и оптимизацией заставляет экспериментировать и тратить много времени, но, кажется, я нашёл отличный способ создать дистрибутив через «конструктор» на базе официальных пакетов. Инструменты от Microsoft в сочетании с продвинутым сообществом дают впечатляющий результат.
Сегодня я рассмотрю два независимых проекта, которые помогут создать свой дистрибутив без глубоких знаний в программировании и с учётом ваших конкретных потребностей.
Приложенные скриншоты имеют разрешение 1920*ххх. Если вам что-то не видно, просто нажмите на изображение, чтобы увеличить его.
UUP Dump — создание Windows ISO
Вот отредактированный текст: Unified Update Platform — единая платформа обновления. Это официальный инструмент от Microsoft, который позволяет вручную обновлять лицензионные дистрибутивы. Каждый месяц Microsoft выпускает новый дистрибутив, включающий в себя часть системных обновлений. Ключевой акцент — именно часть.
На момент написания данного материала актуальной сборкой считается Microsoft Windows 10 version 22H2 build 19045.5247 (обновление за декабрь 2024 года). Однако через UUP можно получить Windows 10 version 22H2 (19045.5435). Это лишь один из примеров несоответствия между официальной сборкой и актуальной версией. И таких случаев немало.
Microsoft уже два года не обновляет предустановленный системный софт, из-за чего после установки придётся дополнительно загрузить около 2 ГБ обновлений. Кроме того, неактуальные программы часто удаляются с ошибками или другими проблемами. На базе существующей официальной инфраструктуры был создан проект Dump, о котором речь пойдёт далее.

На главной странице вам сразу предлагают скачать готовые сборки с описанием их возможностей. Уникальность проекта заключается в том, что все сборки на 100% состоят из официальных файлов без какого-либо постороннего вмешательства. В официальный дистрибутив официальными инструментами интегрированы официальные обновления.
Если у вас нет желания углубляться, просто выберите опцию «скачать» и наслаждайтесь готовым решением. Но для энтузиастов предусмотрена возможность настроить дистрибутив под себя, выбирая, какие компоненты будут добавлены. Именно здесь раскрывается ГЛАВНЫЙ потенциал сайта.
Далее выбираем нужную редакцию дистрибутива. В моём случае это последняя версия Windows 10. Можно было бы взять сборки из веток Insider или Preview, но мне важна стабильность.

Открывается список всех доступных вариантов данного дистрибутива. Здесь выбираем подходящий — самый последний на момент создания материала. При этом важно соблюдать соответствие архитектуры и разрядности системы.

После выбора нужного дистрибутива начинается процесс создания скрипта, который соберёт все файлы в одном месте и интегрирует их в дистрибутив. Вам будет предложено ответить на несколько вопросов, которые определят параметры будущей сборки. Всё предельно просто и интуитивно понятно.
Первым делом система уточнит язык. Выбираем необходимый и нажимаем «Далее».

Следующим шагом предлагается выбрать издание дистрибутива. С ненужных вариантов можно снять галочки. Точнее сказать, крайне рекомендую снять галочки с тех редакций, которые вам не понадобятся.
Если вы не используете официальные ключи активации от Microsoft и планируете активировать систему альтернативными способами, то сборка со всеми вариантами установки вам не нужна.

Вот разница между галочками. Один дистрибутив со всеми редакциями весит 4.1 гб, второй — только 3.43 гб.

На следующей странице задаются правила создания установочного образа. Здесь можно расставить галочки по своему усмотрению. Лично я предпочитаю, чтобы скачанные файлы сразу были интегрированы в дистрибутив, а затем создан ISO-образ для установки системы.
Если вы планируете внести какие-либо изменения или провести дополнительные манипуляции, можете выбрать альтернативные варианты.

Справа расположен блок, в котором отображаются все загружаемые обновления и файлы для формирования дистрибутива. Если вы планируете создать свою уникальную сборку, этот блок можно открыть и отредактировать, точнее, изменить скрипт, где перечислены необходимые файлы.
После завершения всех настроек нажимаем кнопку «Создать пакет для скачивания». На ваш компьютер загрузится скрипт, который можно вручную проверить на наличие вредоносного кода, а затем запустить. Именно на этом этапе становится очевидной безопасность и открытость проекта, что внушает 100% доверие.
Все скрипты весят около 20 кб, открываются в один клик и содержат полный перечень ваших выбранных параметров.

При запуске скрипта автоматически скачивается клиент с GitHub и весь необходимый софт. Проект aria2 широко известен в интернете и также имеет открытый исходный код.
Вы можете отслеживать весь процесс загрузки и создания дистрибутива от самого начала и до самого конца, что добавляет уверенности в прозрачности и безопасности.

Процесс скачивания всего необходимого напрямую зависит от скорости вашего интернета, так как на другом конце находятся серверы Microsoft с полным безлимитом. У меня этот процесс занял около 20 минут. После загрузки всех файлов (которые вы можете проверить в отдельной папке) начинается автоматический процесс интеграции и создания образа. От вас не требуется больше никаких действий. Просто расслабьтесь и наслаждайтесь процессом.

Autounattend.xml — автоматизация установки Windows
Это сайт для создания файла «ответов» при установке Windows. Автоматический процесс, встроенный в саму операционную систему, доступен любому желающему. И снова перед нами простой и понятный интерфейс с подробными объяснениями — от того, как действовать, до того, где поставить галочку и откуда её убрать.
Вокруг этого сайта образовалось большое сообщество, и на нем уже имеется сотни готовых файлов. Просто загрузил — и забыл.

Возможности подобного подхода безграничны. Сообщество постоянно находит новые лазейки и добавляет их в генератор. Если что-то не устраивает или вызывает вопросы, вы можете пропустить целые блоки — это никак не повлияет на конечный результат. Мне нравится раздел «твиков»: просто ставишь нужные галочки в тех местах, где считаешь нужным.
Сайт переведён через плагин, в оригинале он на английском.

Пояснения по каждому пункту, если вы с чем-то незнакомы.
Моя любимая часть — выпиливание мусора во время установки. Шах и Мат нехорошим людям.

Здесь стоит сделать пояснение, так как многие не до конца понимают. Существуют сторонние утилиты, которые редактируют дистрибутив «на ходу», но у них есть проблема — в сети нет исходников для Windows 10/11 и документации по их структуре и взаимосвязям. Эти утилиты и их разработчики часто работают методом «тыка», что может нарушать структуру, созданную Microsoft. Очередное обновление от мелкомягких может просто не вписаться в такую сборку, и всё может «полететь в Вальгаллу».
Риски при использовании сторонних утилит сведены к минимальному, но, несмотря на это, часто возникают баги и жалобы на нестабильную работу. В отличие от них, «Файл ответов» использует только документированные возможности и исключает любые проблемы, если только Microsoft сама не ошибётся.
Особенность файла autounattend.xml в том, что его можно создать только один раз и использовать в любых ваших сборках. Windows 10 больше не добавляет новых функциональных возможностей, поэтому файл будет актуален всегда, на все времена. Если же вы используете Windows 11, на сайте генератора есть возможность загрузить свой файл и отредактировать его с учётом новых изменений. Это невероятно удобный инструмент.
Пошаговое создание Windows 10/11 образа
Алгоритм достаточно простой. Сначала создаём дистрибутив с обновлённой системой. Весь процесс у меня занял примерно 50 минут — от момента захода на сайт до получения ISO-образа. Затем записываем образ на флешку. Некоторые пользователи могут воспользоваться утилитами для редактирования образов, но я предпочитаю записывать на флешку без лишних телодвижений.
После этого генерируем (или скачиваем) файл autounattend.xml и помещаем его в корень флешки. Всё. Ваша Windows, настроенная под ваши личные предпочтения, готова.
Telegram-канал @overclockers_news — теперь в новом формате. Подписывайся, чтобы быть в курсе всех новостей!
In this detailed tutorial, I’ll walk you through the process of creating a custom Windows 10 ISO file specifically optimized for gaming. This custom setup eliminates unnecessary Windows apps and background processes, ensuring a streamlined operating system that enhances your gaming experience.
Key Takeaways
- Minimal Windows Apps: The custom ISO removes all non-essential apps from Windows 10.
- Essential Background Apps Only: Background activity is limited to Settings and Windows Security.
- Reduced Process Load: The system runs fewer processes, optimizing performance for gaming.
Requirements
Before you begin creating your custom Windows 10 ISO, ensure you have the following:
- Official Windows 10 ISO: Downloaded from the Microsoft website.
- Virtualization Software: VMware Workstation Player or VirtualBox installed on your system.
- Sufficient Storage Space: At least 50GB of free space on your hard drive for creating and storing the ISO file.
- Internet Connection: Required for downloading necessary tools and updates during the process.
- Administrative Privileges: Ensure you have administrator rights on your PC to run the required commands and install software.
Preparing for Custom ISO Creation
1. Download the Official Windows 10 ISO
Start by downloading the official Windows 10 ISO from Microsoft. If you’re using a Chromium-based browser like Google Chrome, Microsoft Edge, or Thorium, you can modify the browser’s network conditions to mimic Chrome OS and access the ISO file directly:
- Press F12 to open Developer Tools.
- Click on the three dots, then More Tools > Network Conditions.
- Uncheck the box under User Agent and select Chrome OS from the dropdown.
- Press F5 to reload the page, and you’ll be able to download the ISO file.

For detailed instructions, check out these guides:
- How to Download the Windows 10 ISO Without Media Creation Tool
- How to Download Windows 10 ISO File from Microsoft
Once the ISO file is downloaded, create a new folder on your desktop called VMShare and copy the ISO file into this folder.

2. Set Up a Virtual Environment
You’ll need a virtualization tool like VMware Workstation Player or VirtualBox. VMware is used in this guide, but you can choose the one you’re most comfortable with.

For assistance, you can refer to these guides:
- How to Enable Virtualization on Your PC
- How to Install VMware on Windows 11 and 10 (Video Tutorial)
- How to Download & Install VirtualBox
Creating the Virtual Machine in VMware
To create your custom Windows 10 ISO, follow these detailed steps to set up the virtual machine (VM) in VMware:
1. Create a New Virtual Machine:
- Open VMware and select Create a new virtual machine.
- Choose the option I will install the operating system later, then click Next.
- In the Guest Operating System selection, leave Microsoft Windows selected.
- Set the version to Windows 10 64-bit, then click Next.

2. Name the Virtual Machine and Set the Location:
- You can leave the Name and Location at their default settings or customize them as needed. Click Next to proceed.

3. Configure Disk Capacity:
- Keep the disk capacity settings at their default values. VMware will typically recommend a sufficient size based on your selections. Click Next, then click Finish to create the virtual machine.

4. Adjust Virtual Machine Settings:
- Before launching the VM, right-click on the newly created virtual machine and select Settings.
- Memory: Adjust the memory allocation based on your computer’s specifications. For optimal performance, set it to 8 GB (8192 MB).
- Processors: Increase the number of processors to 4 for better performance.
Note: These instructions are tailored to the hardware in my computer. If your system has lower specifications, be sure to adjust the virtual machine settings accordingly.

5. Mount the Windows 10 ISO:
- In the Settings window, select CD/DVD (SATA) from the list of devices.
- Click on Use ISO image file, then click Browse to navigate to the location where you saved the Windows 10 ISO file (inside the VMShare folder on your desktop).
- Select the ISO file and click Open.

6. Add a New Hard Disk:
- At the bottom of the Settings window, click on Add to add new hardware.
- Choose Hard Disk and click Next.
- Select the recommended Virtual Disk Type based on your system’s capabilities. For example, if your system supports NVMe, select that option.
- Create a new virtual disk, leaving the default settings, and click Next, then Finish.
Note: You now have two hard disks within your virtual machine—one for the Windows installation and the other for saving the custom Windows 10 image file.

7. Launch the Virtual Machine:
- With the configuration complete, click OK to save the settings and return to the VMware interface.
- Start the virtual machine by clicking on the Power on this virtual machine button.
- Be ready to press Spacebar when prompted to boot from the ISO file, ensuring the Windows installation process begins.

8. Maximize and Interact with the VM:
- Maximize the VM window for better visibility.
- If you encounter issues with the mouse not working inside the VM, press Ctrl + Alt to regain control of the mouse, or click inside the VM window to interact directly.

These steps will ensure that your virtual machine is properly configured, allowing you to proceed with the installation of Windows 10 and the creation of your custom gaming-optimized ISO file.
Install Windows 10
Proceed with a standard Windows installation on the virtual machine. Choose the Windows 10 edition you prefer, as this will be the base for your custom ISO. In this guide, I used Windows 10 Pro.
For a step-by-step walkthrough on Installing Windows 10 check out the Running the Windows Installation section in my guide on How to Install Windows 10: Ultimate Step-by-Step Guide. Clicking on the link above or the image below will automatically direct you to the correct section of the guide.

Customizing Windows 10
Debloating Windows for Gaming Optimization
Once you’ve installed Windows 10 on your virtual machine, the next crucial step is to debloat the operating system to optimize it for gaming. This process involves removing unnecessary apps, services, and background processes, significantly reducing system load and improving performance. Here’s a detailed guide on how to debloat your Windows 10 installation:
1. Assess the Current System Load:
- Begin by checking the initial process count of your fresh Windows 10 installation.
- Right-click on the taskbar and open Task Manager to view the processes. On a typical out-of-the-box Windows 10 Pro installation, you may see around 140 processes running.
- The goal is to reduce this number by removing unneeded components.

2. Launch PowerShell to Run Debloating Scripts:
- Right-click on the Start button and select Windows PowerShell (Admin), then confirm by clicking Yes.
- In the PowerShell window, run the following command to launch the Chris Titus Tech Windows Utility:
irm https://christitus.com/win | iex - This utility will install necessary dependencies, including Chocolatey, and launch a set of tools designed to help optimize Windows.

3. Configure Windows Updates and Tweaks:
- In the utility, go to the Updates tab and select Security Recommended Settings to ensure that only essential security updates are installed, avoiding unnecessary feature updates that could bloat the system.
- Navigate to the Tweaks tab and select the Recommended Desktop Tweaks. This will adjust various system settings to enhance performance. Feel free to select any other tweaks you think might be applicable to your system.
- Activate the Ultimate Performance Plan by clicking on the corresponding button. This power plan is optimized for maximum performance.

4. Adjust Control Panel Settings:
- Open Control Panel, switch to View by: Small icons, and navigate to Power Options.
- Click on Show Additional Plans and activate the Ultimate Performance Plan. Set the power options to Never for sleep settings to ensure uninterrupted gaming performance.
- Go to User Accounts and adjust the User Account Control (UAC) settings to reduce unnecessary prompts and interruptions.

5. Run the Tweaks and Restart:
- With the desired settings selected, return to the Chris Titus Tech Windows Utility and click on Run Tweaks.
- These tweaks will disable or remove certain Windows features, such as Microsoft Edge.
- After the tweaks are applied, restart the virtual machine to ensure all changes take effect.

6. Install Essential Applications:
- After the restart, open PowerShell as an administrator again and relaunch the Chris Titus Tech Windows Utility.
- Install the necessary applications for your gaming setup. I chose to install Thorium (a Chromium-based browser) and Floorp (a Firefox-based browser) but these are just examples, you can install any application you want on your custom Windows ISO, not just browsers.

7. Remove Unwanted Apps and Clean Up:
- Once your essential applications are installed, further streamline the system by removing any remaining unwanted apps.
- Use O&O AppBuster to uninstall all preinstalled Windows apps.
- Download and run AppBuster, select Actions > Select all Windows apps, and then click Remove.

- Uninstall the Microsoft Store using the following PowerShell command, but only if you do not plan on using it (e.g., for games like Minecraft):
Get-AppxPackage *Microsoft.WindowsStore* | Remove-AppxPackage - Remove any other unnecessary shortcuts, such as Microsoft Edge and Cortana, from the taskbar and Start menu. Clean up the desktop by removing the Recycle Bin and other icons as preferred.
8. Recommended Windows 10 Settings
There are also several Windows 10 settings you can change to optimize your system and enhance your user experience. They are easy to implement and can make a big difference in performance and privacy. Here’s a breakdown of my recommended settings:
- Create a Shortcut for This PC:
- Open File Explorer, drag “This PC” to the desktop, and pin it to the taskbar for quick access.
- Disable Notifications:
- Go to Settings > System > Notifications & Actions and turn off unnecessary notifications.
- Disable Tablet Mode:
- Go to Settings > System > Tablet and set it to “Never use tablet mode.”
- Set Default Apps:
- Go to Settings > Apps > Default Apps and choose your preferred default applications (e.g., Google Chrome, iTunes, VLC Media Player).
- Disable Unnecessary Startup Items:
- Go to Settings > Apps > Startup and disable startup items you don’t need, like Microsoft OneDrive and Microsoft Edge.
- Adjust Sign-in Options:
- Go to Settings > Accounts > Sign-in options and uncheck the option to automatically reopen apps after restart.
- Disable Xbox Game Bar (Optional):
- Go to Settings > Gaming > Xbox Game Bar and turn it off. Optionally, disable Game Mode as well.
- Adjust Privacy Settings:
- Go to Settings > Privacy and turn off unnecessary sliders under various categories. Adjust diagnostics and feedback settings, and clear activity history.
- Disable Background Apps:
- Go to Settings > Privacy > Background Apps and turn off all background apps.
- Turn Off App Diagnostics:
- Go to Settings > Privacy > App diagnostics and disable the app diagnostics feature.

For a more detailed breakdown of these settings, check out the Recommended Tweaks section in my guide on How to Install Windows 10: Ultimate Step-by-Step Guide. Clicking on the link above will automatically direct you to the correct section of the guide.
9. Finalize the Debloating Process:
- Finally, revisit the Task Manager to check the number of running processes. After the debloating process, your system should be running significantly fewer processes, around 50, which is ideal for gaming.
- You can now restart your virtual machine to ensure all tweaks and changes are fully implemented.

By following these steps, you’ll have a clean, minimalistic Windows 10 installation optimized for gaming, free from unnecessary bloatware and background processes that could hinder performance.
Preparing and Capturing the Custom Windows 10 ISO
Creating and Formatting the Data Partition
After setting up your virtual machine, installing and customizing Windows 10, the next crucial step is to create and format a new partition that will be used to store your custom Windows image. Follow these detailed instructions to configure the partition correctly:
1. Open Disk Management:
- Click on the Start button and type Disk Management into the search bar.
- Select Create and Format Hard Disk Partitions from the search results to open the Disk Management tool.

2. Initialize the New Disk:
- Upon opening Disk Management, you will be prompted to initialize the new disk that was added to the virtual machine.
- Leave the default partition style set to GPT (GUID Partition Table), and click OK to proceed.
- This action will prepare the disk for use, making it visible in the Disk Management window.

3. Create a New Simple Volume:
- In the Disk Management window, locate the new disk, which will be displayed as unallocated space.
- Right-click on this unallocated space and select New Simple Volume from the context menu.

4. Configure the Volume Settings:
- The New Simple Volume Wizard will launch. Click Next to proceed through the initial steps, keeping the default settings for volume size.
- When you reach the step to assign a drive letter, it’s generally best to accept the default letter.

5. Set the Volume Label:
- The most important step in this process is to assign a volume label. In the Volume Label field, type Data.
- This label will help you easily identify the partition later when saving your custom Windows image.

6. Complete the Partition Setup:
- Click Next to proceed, and then click Finish to complete the setup.
- The Disk Management tool will format the partition and it will be ready for use.

7. Verify the Partition in File Explorer:
- Once the partition is created, open File Explorer and navigate to This PC.
- You should now see three drives: Local Disk C (your Windows installation), DVD Drive (containing the mounted ISO), and Data (the newly created partition).

This Data partition is where you will save your custom Windows image during the next steps of the process. It is crucial to have this partition correctly labeled and formatted to ensure a smooth and organized workflow as you create your custom ISO.
Capturing the Custom Windows Image Using DISM
To capture your customized Windows installation into an image file, follow these steps to navigate the Advanced Startup options and use the DISM tool effectively:
1. Access Advanced Startup Options:
- Launch Settings from the Start menu.
- Navigate to Update & Security, then click on the Recovery tab.
- Under Advanced Startup, click on Restart Now. This will reboot your system into the Advanced Recovery options.

2. Open Command Prompt in Recovery Mode:
- In the Advanced Recovery menu, select Troubleshoot.
- Click on Advanced Options, then select Command Prompt.
- Your system will restart, and you will be prompted to choose your user account. If your account has a password, enter it; otherwise, just click Continue to proceed to the Command Prompt.

3. Identify the Windows Installation Drive:
- In the Command Prompt, type
C:and press Enter to navigate to the C drive. - Type
dirand press Enter to list the contents of the C drive. Verify if this is your Windows installation drive by checking for familiar folders like Windows, Users, and Program Files. - If the C drive isn’t the correct drive, try other drive letters by typing, for example,
E:followed bydiruntil you find the correct drive that contains the Windows installation.

4. Locate the Data Partition:
- Once you’ve confirmed the Windows installation drive, identify the data partition by typing
D:and pressing Enter. - Type
dirand press Enter to ensure that this drive is the empty data partition you created earlier. This is where you will save your custom Windows image file.

5. Navigate to the Root Directory:
- To prepare for the capture command, type
X:and press Enter to return to the root partition used by the Command Prompt in recovery mode.

6. Run the DISM Capture Command:
- In the Command Prompt, type the following command to capture your custom Windows installation into an image file:
dism /capture-image /imagefile:D:\install.wim /capturedir:C:\ /name:Windows10
- D: is the drive letter where your data partition is located, and the image file will be saved as
install.wim. - C: is the drive letter of your Windows installation that you want to capture.

7. Wait for the Image Creation to Complete:
- The DISM tool will begin capturing the Windows installation, which may take some time. Patience is key here as the process could take a while depending on your system’s speed.
- Once the operation is complete, you will see a message confirming that the operation was successful.

8. Exit and Turn Off the Virtual Machine:
- After the image has been successfully created, type
exitand press Enter to close the Command Prompt. - You will be returned to the recovery options screen. From here, select Turn off your PC to shut down the virtual machine.

By following these steps, you’ll have successfully captured your customized Windows 10 installation into an image file, which you can later use to create a bootable ISO or deploy on other systems.
Configuring VMware for Custom ISO Creation
Enabling Shared Folders in the Virtual Machine
After turning off the virtual machine, the next step is to configure shared folders to access the necessary files from your host computer. Follow these steps to enable and configure shared folders in VMware:
1. Reopen the Virtual Machine Software:
- After turning off the virtual machine, the software might close automatically. Reopen VMware or your chosen virtualization software.

2. Configure Shared Folders:
- Select your virtual machine from the list, right-click on it, and select Settings.
- Click on the Options tab at the top of the Settings window.
- Under Shared Folders, select Always Enabled.
- Click on Add, then click Next to begin adding a shared folder.
- Under Host Path, click Browse and navigate to the VMShare folder on your desktop.
- Select the VMShare folder, click OK, then click Next.
- Ensure that Enable this share is selected, then click Finish to complete the setup.

3. Adjust Hardware Settings:
- After configuring shared folders, go back to the Hardware tab in the Settings window.
- Under CD/DVD (SATA), uncheck the box labeled Connect at Power On.
- Click OK to save these changes.

4. Relaunch the Virtual Machine:
- With the settings configured, click the Power on this virtual machine button to start the VM.
- Maximize the virtual machine window for better visibility.

Installing VMware Tools and Accessing the Shared Folder
Once the virtual machine is running again, the next step is to install VMware Tools and ensure the shared folder is accessible. This will allow you to create a bootable ISO from your custom Windows image.
1. Install VMware Tools:
- In the virtual machine window, click on the Player tab at the top.
- Select Manage, then click on Install VMware Tools. This will insert the VMware Tools installer into the virtual machine.

2. Run the VMware Tools Installer:
- Open File Explorer within the virtual machine.
- Locate the VMware Tools drive, which will appear as a mounted CD or DVD drive.
- Double-click on the VMware Tools drive to start the installation process.
- Follow the prompts and install VMware Tools using the default settings.

3. Restart the Virtual Machine:
- Once the installation is complete, click Finish and you will be prompted to restart the virtual machine. Click Yes to restart.

4. Enable Network Discovery:
- After the virtual machine restarts, open File Explorer and click on the Network tab.
- If prompted, enable Network Discovery by clicking OK and then selecting Turn on Network Discovery from the ribbon at the top.

5. Access the Shared Folder:
- Navigate to This PC in File Explorer and return to the Network tab.
- Look for VMware-host in the list of network computers. Double-click on it, then open Shared Folders.
- You should now see the VMShare folder that was set up on your host computer’s desktop. This folder contains the original Windows 10 ISO file used earlier in the guide.

By following these steps, you will have successfully configured shared folders, installed VMware Tools, and ensured that your custom Windows image is ready to be accessed and converted into a bootable ISO file.
Making Your Custom Windows Image Bootable
After creating your custom Windows image, the next step is to make it bootable by integrating it into an ISO file. This process involves using AnyBurn, a lightweight tool that allows you to edit ISO files. Follow these detailed steps to create a bootable custom Windows 10 ISO:
1. Download and Install AnyBurn:
- Open a web browser and visit AnyBurn.com.
- On the homepage, click on the Download button.
- Choose the free 64-bit version and download it to your computer.
- Once the download is complete, open the installer.
- Agree to the license terms by clicking I Agree and proceed with the installation using the default settings.
- After the installation is complete, close the browser and launch AnyBurn.

2. Open and Edit the ISO File:
- In the AnyBurn interface, click on Edit Image File to begin editing your ISO.
- You’ll need to locate the ISO file you saved in the VMShare directory. Click on the Network tab in the AnyBurn file browser, then select VMware-host.
- Navigate through the folders until you find the ISO file saved on your local computer. This is the original Windows 10 ISO file you used at the beginning of the process.
- Select the ISO file and click Open. Click Next to proceed to the editing phase.

3. Modify the ISO File:
- Once the ISO file is open in AnyBurn, you need to modify its contents.
- Double-click on the Sources folder to open it. This folder contains numerous files, all organized alphabetically.
- Locate the existing install file, which could be named install.esd or install.wim. This file contains the Windows image currently used by the ISO.
- Select the install file and click on Remove, then confirm by clicking Yes. This action deletes the default Windows image from the ISO.

4. Add Your Custom Windows Image:
- After removing the original install file, you need to add your custom Windows image to the ISO.
- Click on Add and navigate to the Data partition or drive where you saved your custom install.wim file earlier.
- Select your custom install.wim file and click Open to add it to the Sources folder in the ISO.
- Scroll down within the Sources folder to verify that the install.wim file has been added correctly.

5. Save and Rename Your Custom ISO:
- Click Next to proceed to the final step of saving your modified ISO file.
- AnyBurn will prompt you to name your new ISO file. It’s a good idea to rename it something descriptive, like Windows 10-Debloated, to differentiate it from the original ISO.
- Choose the VMShare directory on your desktop as the save location to keep everything organized.
- Click Create Now to start the process of generating your custom ISO file. This may take some time, depending on your system’s speed.

6. Complete the Process:
- Once the creation process is finished, AnyBurn will display a success message. You can now close AnyBurn.
- At this point, you can shut down the virtual machine, as the process within the VM is complete.
- Open the VMShare folder on your desktop, where you will now see two ISO files: the original Windows 10 ISO and your newly created Windows 10-Debloated ISO.

Your custom Windows 10 ISO is now bootable and ready to be used. You can create a bootable USB drive with this ISO or use it to install Windows on a virtual machine or physical hardware to test it out.
For detailed instructions, check out my guide on How to Install Windows 10: Ultimate Step-by-Step Guide.

Conclusion
With your custom Windows 10 ISO ready, you’re set to enjoy a more efficient, gaming-optimized system. This ISO strips away unnecessary components, focusing solely on enhancing your gaming performance and is already set up with your customized settings and preferred programs.
Frequently Asked Questions (FAQ)
1. Why should I create a custom Windows 10 ISO for gaming?
Creating a custom Windows 10 ISO allows you to remove unnecessary apps and background processes, optimizing your system specifically for gaming. This can result in better performance, reduced system load, and a cleaner user experience.
2. Can I use this method to create a custom ISO for purposes other than gaming?
Yes, the process can be adapted for other uses, such as creating a streamlined work environment or a privacy-focused operating system. The customization steps can be tailored to your specific needs.
3. Do I need to use VMware or VirtualBox to create the custom ISO?
While using a virtual machine is recommended for safety and convenience, it’s not strictly necessary. You can use a physical installation of Windows on a separate drive, but this carries more risk if errors occur during the process.
4. What should I do if the DISM command fails during the capture process?
If the DISM command fails, check that you have sufficient disk space and that all commands are entered correctly. Ensure the correct drive letters are used for the image file and the Windows installation. Reboot the virtual machine and try again if necessary.
5. Can I add additional software or drivers to my custom ISO?
Yes, you can install additional software or drivers during the customization process before capturing the image. However, keep in mind that adding too many components can increase the ISO’s size and potentially impact system performance.
Are you tired of spending hours setting up your Windows 10 system every time you reinstall it? We’ve all been there, frustrated with the endless cycle of downloading and installing software.
Don’t worry – we’re here to guide you through the process of creating a custom Windows 10 ISO with pre-installed software, saving you time and effort.
Think the relief of having all your important programs already included in your Windows 10 installation, ready to go as soon as you boot up your system. No more searching for each application individually or dealing with compatibility issues. Our skill in customizing Windows ISOs will boost you to streamline your setup process and improve your user experience.
Join us on this voyage to simplify your Windows 10 installation and optimize your workflow. We understand the struggles you face when setting up a new system, and we’re here to provide you with a solution that meets your needs. Let’s plunge into this customization voyage hand-in-hand and unpack the full potential of your Windows 10 operating system.
Key Takeaways
- Research and preparation are critical when creating a custom Windows 10 ISO with pre-installed software.
- Identify important software, ensure compatibility, and verify licenses before proceeding with customization.
- Choose core software carefully, use customization tools, and seek expert advice for a successful ISO customization.
- Follow a structured process of selecting software, using customization tools, consolving settings, and testing the custom ISO thoroughly.
- Thoroughly test the custom Windows 10 ISO for smooth installation, proper functionality, compatibility, and performance.
- Documentation of issues and solutions during testing is important for refining and improving the custom Windows 10 ISO further.
Research and Preparation
When considering creating a custom Windows 10 ISO with pre-installed software, research and preparation are key to a successful outcome. To begin, we must identify the important programs that will streamline our workflow and improve productivity.
Here are the key steps to take during the research and preparation phase:
- Identify the software: Determine the tools and applications that are critical for your daily tasks and work requirements.
- Compatibility check: Ensure that the software you choose is compatible with Windows 10 to avoid any issues during installation.
- License verification: Confirm that you have the necessary licenses for the software you plan to include in your custom ISO.
By conducting thorough research and meticulous preparation, we can adjust our Windows 10 experience to suit our specific needs and optimize our workflow efficiently. External resources can also be useful in guiding us through this process. It’s beneficial to refer to trusted technology websites for ideas and recommendations on important software and customization tips.
Choosing Software and Tools
When Choosing Software and Tools for your custom Windows 10 ISO, it’s super important to select programs that align with your needs and preferences.
Here are some tips to help you make smart decisionss:
- Identify Core Software: Determine the important software required for your workflow, such as productivity tools, utility programs, or creative applications.
- Check Compatibility: Ensure that the software you choose is compatible with Windows 10 to avoid any issues post-installation.
- Verify Licenses: Ensure that you have the proper licenses for the software you plan to include in your custom ISO to avoid any legal implications.
- Consider Customization Tools: Investigate customization tools that can help streamline the process of creating a personalized Windows 10 ISO with pre-installed software.
- Seek Expert Advice: Visit trusted technology websites for ideas on the best software options and tools to improve your Windows 10 experience.
After all, the key to a successful custom Windows 10 ISO lies in selecting the right mix of software and tools adjusted to your specific requirements.
For more information on software selection and customization tools, check out this helpful guide on Windows Central.
Customizing Windows 10 ISO
When customizing a Windows 10 ISO with pre-installed software, it’s super important to have a clear plan in place.
Here are some key steps we can follow to create a adjusted Windows 10 ISO:
- Choose Core Software: Select important software that meets your specific needs, ensuring compatibility with Windows 10.
- Verify Licenses: Make sure all software included in the custom ISO has valid licenses to avoid any legal issues.
- Investigate Customization Tools: Use tools like NTLite, WinReducer, or PowerShell scripts to customize and streamline the installation process.
- Seek Expert Advice: Consult reputable technology websites like Windows Central for guidance and best practices on customizing Windows 10 ISO.
For detailed guidance on software selection, customization tools, and expert tips on creating a custom Windows 10 ISO, check out this informative guide on Windows Central.
Creating the Custom ISO
When creating a custom Windows 10 ISO with pre-installed software, it’s super important to follow a exact process.
Here’s how we can go about it:
- Select the desired software: Choose the core software that you want pre-installed on the Windows 10 ISO. Ensure that you have the necessary licenses to include this software.
- Use customization tools: Investigate tools like NTLite or WinReducer to help you customize the Windows 10 ISO. These tools offer a range of options to adjust the ISO to your specific needs.
- Consolve settings: Adjust settings such as user preferences, system configurations, and personalization options to create a customized experience for users.
- Integrate drivers: Make sure to integrate the required drivers into the ISO to ensure compatibility with a wide range of hardware.
For more in-depth guidance on creating a custom Windows 10 ISO, you can refer to the detailed resources available on Windows Central.
Their expert advice and tutorials can provide useful ideas into the customization process.
Testing the Custom Windows 10 ISO
When it comes to testing the custom Windows 10 ISO, it is critical to ensure that everything works seamlessly.
Here are some steps we recommend taking:
- Installation: Install the custom Windows 10 ISO on a test machine to verify if the installation process is smooth and error-free.
- Functionality: Test each pre-installed software to check if they function as intended and are properly integrated into the system.
- Compatibility: Verify the compatibility of the custom Windows 10 ISO with various hardware configurations to ensure a broad range of devices can support it.
- Performance: Assess the total performance of the system after installing the custom ISO to identify any potential issues or improvements needed.
Throughout the testing phase, it’s super important to keep detailed records of any issues encountered and the solutions put in place.
This documentation will be useful for refining the custom Windows 10 ISO further.
For more in-depth guidance on testing custom Windows 10 ISOs, you can refer to resources from Windows Central for expert ideas on quality assurance processes.
After all, thorough testing is critical to giving a reliable and optimized custom Windows 10 ISO for your needs.
- Author
- Recent Posts
Stewart Kaplan has years of experience as a Senior Data Scientist. He enjoys coding and teaching and has created this website to make Machine Learning accessible to everyone.
В одном из наших прошлых материалов мы рассмотрели состав предустановленного ПО в Windows 10, а также некоторые вопросы связанные с его управлением и настройками меню Пуск. Вопреки распространенному мнению большую часть программ можно удалить штатными методами, а использование PowerShell вообще дает полный контроль. Но есть одно но! Все вносимые изменения касаются только локального ПК и локального профиля пользователя, что не подходит если вам нужно развернуть Windows 10 на некоторое число компьютеров, в этом случае лучшим способом будет создание собственного, заранее настроенного образа.
Онлайн-курс по устройству компьютерных сетей
На углубленном курсе «Архитектура современных компьютерных сетей» вы с нуля научитесь работать с Wireshark и «под микроскопом» изучите работу сетевых протоколов. На протяжении курса надо будет выполнить более пятидесяти лабораторных работ в Wireshark.
В рамках данной статьи мы не предполагаем глубокой модификации установочного образа, ограничившись выбором набора предустановленного ПО, собственными настройками меню Пуск и некоторыми «твиками» в системном реестре. В большинстве случаев этого достаточно, чтобы облегчить жизнь системного администратора и упростить процесс настройки рабочих станций после установки ОС.
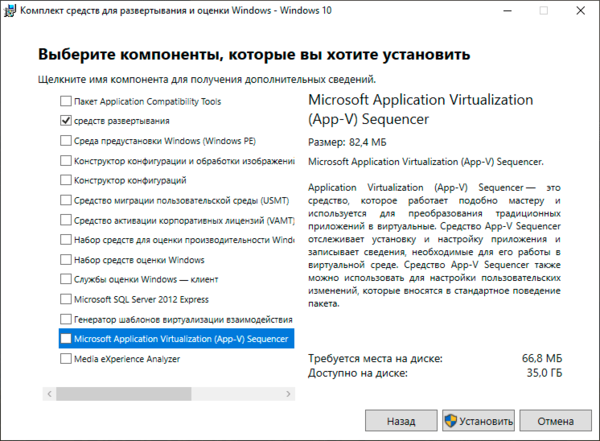
Для работы нам понадобится оригинальный образ Windows 10 содержащий файл install.wim, образы со сжатым и зашифрованным файлом install.esd нам не подойдут. Также скачайте и установите на рабочем ПК Windows Assessment and Deployment Kit (ADK), из всего набора инструментов нам потребуются только Средства развертывания.
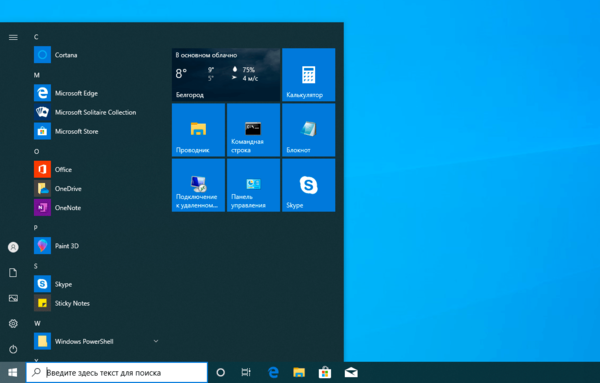
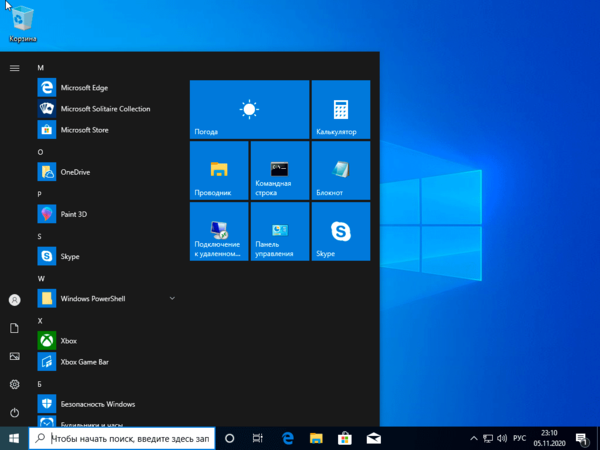
Кроме образа нам также потребуется шаблон предварительно настроенного меню Пуск. Это можно сделать на любой рабочей станции, но проследите, чтобы в набор плиток не попали отсутствующие в образе приложения. На наш взгляд лучше всего произвести тестовую установку с целевого образа на виртуальную машину, настроить там меню Пуск и выполнить экспорт настроек. Ниже показан один из примеров такой настройки, набор приложений в нем выбран произвольно, поэтому настраивайте меню именно так, как нужно вам.
После того, как вы все настроили сделайте экспорт настроек командой PowerShell:
Export-StartLayout -Path D:\LayoutModification.xmlГде D:\LayoutModification.xml — расположение целевого файла.
Также, в настройках меню Пуск по умолчанию включена опция Иногда показывать предложения в меню «Пуск», которая время от времени выводит в самом верху ссылки на приложения Магазина и устанавливает их при клике на значок. Чтобы избежать такого поведения необходимо внести некоторые изменения в реестр. Поэтому подготовим файл импорта: создадим обычный текстовый документ со следующим содержимым и сохраним его как import.reg.
Windows Registry Editor Version 5.00[HKEY_USERS\TMP\Software\Microsoft\Windows\CurrentVersion\ContentDeliveryManager]
"SubscribedContent-338388Enabled"=dword:00000000
При желании вы можете добавить в этот файл и другие «твики», однако это выходит за рамки данной статьи. Обратите внимание, что мы импортируем изменения в несуществующую ветку HKEY_USERS\TMP, куда мы подключим ветвь HKEY_USERS\.DEFAULT из образа. Если же вам нужно внести изменения в другие ветви реестра образа, то добавьте в файл импорта необходимые псевдонимы. Напомним, что вы можете подключить файл реестра в любое место системного реестра собственной машины, назначив ему уникальное имя.
Теперь создадим набор рабочих папок, их следует располагать ближе к корню файловой системы и использовать короткие пути. В нашем случае это будут папки:
- D:\iso — здесь будут располагаться файлы образа
- D:\mnt — сюда будет развернут образ при монтировании
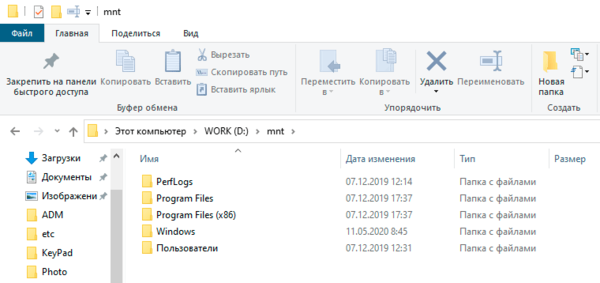
- D:\tmp — для размещения дополнительных файлов, таких как шаблон меню и файл импорта реестра
После чего скопируем в D:\iso содержимое образа установочного диска. Как правило, образ содержит сразу несколько редакций Windows 10 и нам необходимо выяснить их набор и номер требуемой редакции, для этого выполним в PowerShell с правами администратора (здесь и далее используется среда PowerShell, если не указано иного) следующую команду:
Get-Windowslmage -ImagePath "D:\iso\sources\install.wim"Где вам потребуется указать путь к файлу install.wim распакованного образа. В выводе вы получите перечисление всех редакций в образе:
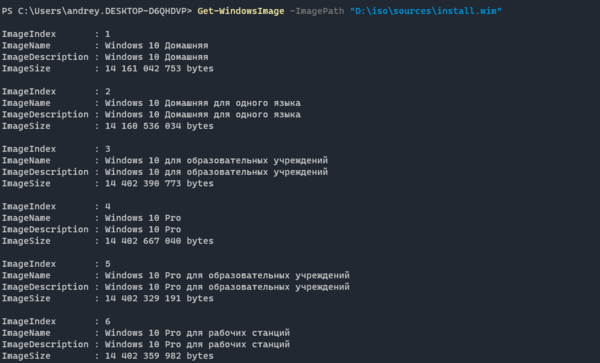
В нашем случае нас интересует редакция Pro под номером 4. Выполним ее монтирование:
Mount-WindowsImage -ImagePath "D:\iso\sources\install.wim" -Index 4 -Path "D:\mnt\"В параметрах команды мы указываем путь к файлу install.wim образа, индекс необходимой редакции и директорию монтирования, в которой появится содержимое по составу, напоминающее системный диск Windows.
Теперь, когда образ смонтирован, перейдем к встроенному ПО. Сначала получим список предустановленного ПО образа и выясним имена пакетов, для этого выполним:
Get-AppxProvisionedPackage -Path "D:\mnt\" | Format-Table DisplayName, PackageName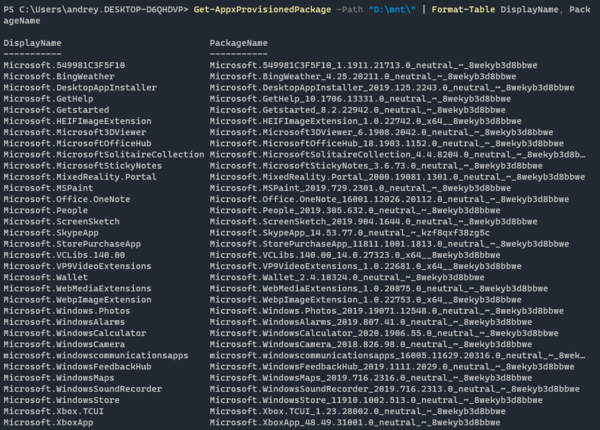
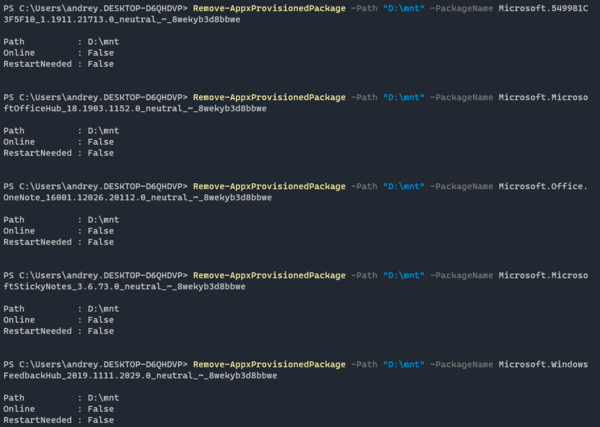
Большинство приложений имеют понятные имена, за исклчением Cortana, которая скрывается за наименованием Microsoft.549981C3F5F10. Чтобы удалить приложение из образа воспользуемся командой:
Remove-AppxProvisionedPackage -Path "D:\mnt" -PackageName Microsoft.549981C3F5F10_1.1911.21713.0_neutral_~_8wekyb3d8bbweВ данном случае мы удаляем Cortana. Мы не будем давать каких-либо рекомендаций по составу предустановленного ПО, каждый решает этот вопрос самостоятельно, с учетом собственных потребностей и предпочтений. В нашем примере мы также удалили приложения Office, OneNote, Sticky Notes и Feedback Hub.
Для изменения шаблона меню Пуск нам нужно просто скопировать файл LayoutModification.xml в нужное место образа:
copy D:\tmp\LayoutModification.xml D:\mnt\Users\Default\AppData\Local\Microsoft\Windows\Shell\LayoutModification.xmlИ напоследок выполним импорт файла реестра. Прежде всего подключим к реестру рабочей машины ветвь HKEY_USERS\.DEFAULT образа:
reg load HKEY_USERS\TMP D:\mnt\Users\Default\NTUSER.DATВ нашем случае мы подключили данную ветвь в HKEY_USERS\TMP, который указан в нашем файле импорта. После чего импортируем в реестр содержимое файла:
reg import D:\tmp\import.regПо завершению операции ветвь реестра следует отключить:
reg unload HKEY_USERS\TMPВсе необходимые изменения выполнены, поэтому размонтируем образ с сохранением внесенных изменений:
Dismount-WindowsImage -Path "D:\mnt\" -Save
После выполнения данной команды содержимое директории D:\mnt будет очищено, а все изменения будут применены к файлам распакованного образа в D:\iso. Все что нам остается — это собрать новый ISO-файл, для этого воспользуемся Средой средств развертывания и работы с образами, запустите одноименную консоль с правами администратора и выполните в ней следующую команду:
oscdimg -h -m -o -u2 -udfver102 -bootdata:2#p0,e,b"D:\iso\boot\etfsboot.com"#pEF,e,b"D:\iso\efi\microsoft\boot\efisys.bin" -lMyISO "D:\iso" "D:\Win10.iso"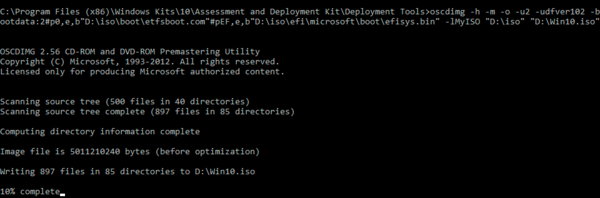
На первый взгляд — достаточно страшное «заклинание», но не будем пугаться раньше времени. В параметрах bootdata мы передаем пути к файлам etfsboot.com и efisys.bin в папке образа, которые отвечают за EFI-загрузчик. Ключ -l задает имя образа, которое указывается без пробелов, затем перечисляем папку с образом и место расположения итогового ISO-файла.
Если вы используете для установки флеш-накопитель, то просто можете скопировать на него содержимое папки D:\iso с заменой файлов.
Теперь можно выполнить пробную установку и убедиться, что все настроено именно так, как мы задумывали:
Как видим, собрать собственный образ Windows 10 несложно, у нас все это заняло не более получаса, где основное время заняло монтирование/размонтирование образа и создание ISO-файла.
Онлайн-курс по устройству компьютерных сетей
На углубленном курсе «Архитектура современных компьютерных сетей» вы с нуля научитесь работать с Wireshark и «под микроскопом» изучите работу сетевых протоколов. На протяжении курса надо будет выполнить более пятидесяти лабораторных работ в Wireshark.