
Для работы проектов iXBT.com нужны файлы cookie и сервисы аналитики.
Продолжая посещать сайты проектов вы соглашаетесь с нашей
Политикой в отношении файлов cookie
С популяризацией соревновательных игр геймеры со всего мира стали искать нетипичные способы превзойти оппонента. Потому как давно известно, что личностные качества и опыт — это лишь малая часть, влияющая на возможность победы. В этом материале вы узнаете, как оптимизировать Windows для получения идеальной плавности, чтобы стать быстрее всех в соревновательных играх!
Содержание
- Внимание!
- Актуальность драйверов
- Установка и обновление
- Геймерская настройка Windows
- Мышь и клавиатура
- Cкрытые настройки реестра
- Сглаживание мыши и отклик наведения
- Скорость курсора
- Приоритет исполнения и задержка ввода
- Перенос исполнения ввода
- DPC Latency
- Лишнии устройства и задержка
- Звук
- Электропитание
- Парковка ядер
- Твик приоритета прерывания
- Мышь и клавиатура
- Meltdown/Spectre/Zombieload
- Пинг
- Системные таймеры и Hpet
- Заключение
Внимание!
Гайд рассчитан на создание игровой системы с минимальным внесением изменений в работу ОС, так что вы можете без опасений что-то сломать, следовать всем рекомендациям.
Актуальность драйверов
Нельзя приступать к оптимизации, не будучи уверенным в актуальности драйверов нашего ПК. Ведь известно, что от свежести драйверов зависит не только правильность работы устройства, но и производительность всей системы в целом.
Установка и обновление
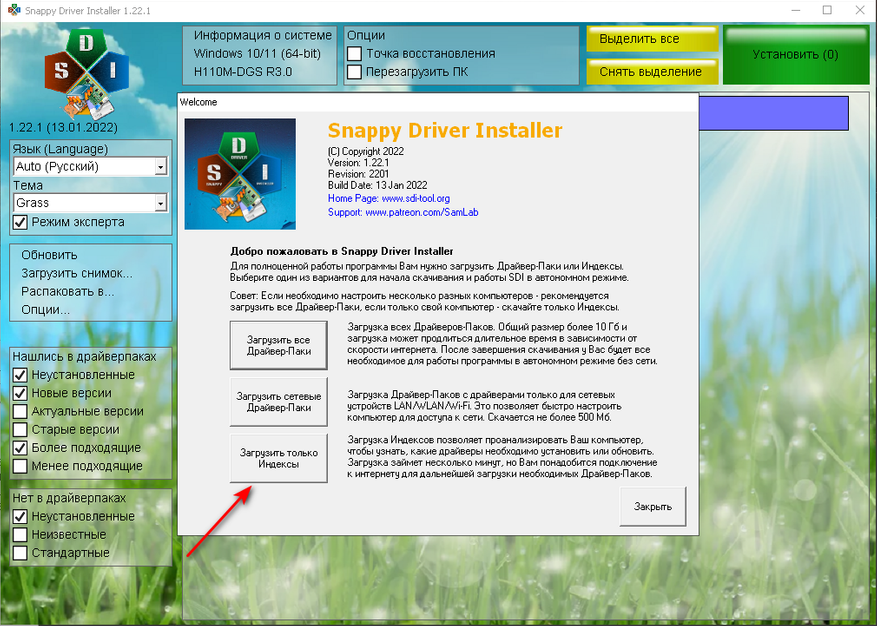
- Скачиваем и устанавливаем желаемую версию Snappy Driver Installer.
- Извлекаем файлы архива в любую папку.
- Запускаем файл SDI_x64_R2000.exe (64-bit) или SDI_R2201.exe (32-bit). (Желательно от имени администратора).
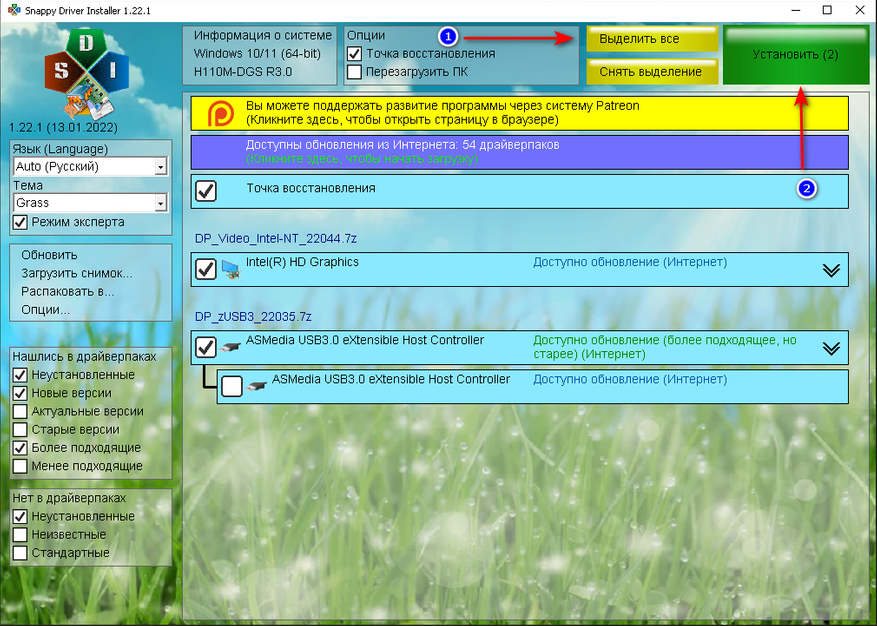
- Производим индексацию оборудования.
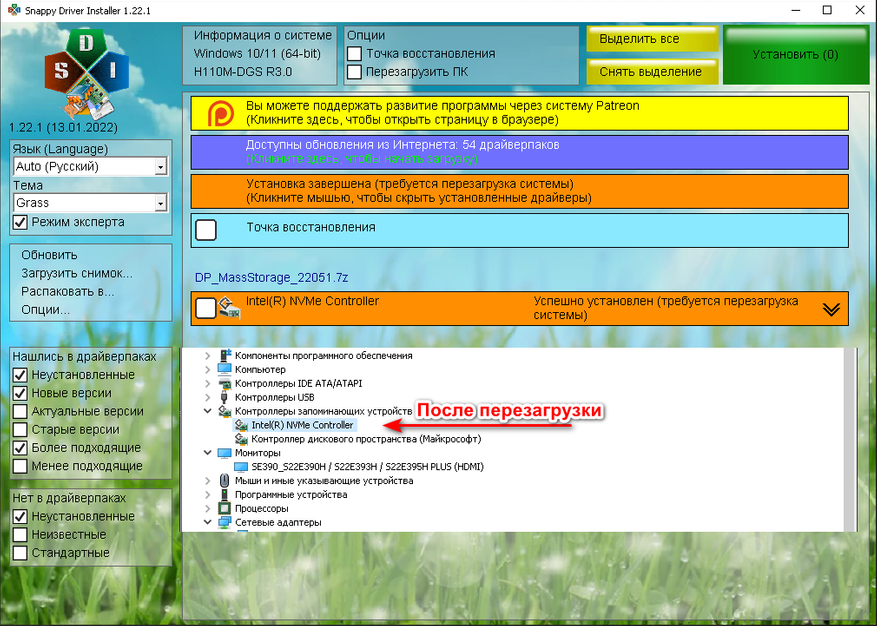
- Выполняем установку всего, что нашлось и перезагружаем ПК.
PS. Более подроно о установке драйвера и чем он является, вы всегда можете найти здесь.
После установки всех драйверов необходимо выполнить «правильную» найстройку устройств ввода и Windows. Что я имею в виду?
Геймерская настройка Windows
В современных версиях операционной системы Windows часто не учитывается геймерская направленность, потому как сама ОС изначально заточена для разных задач. Выполним по порядку базовые настройки ОС для геймера.
Мышь и клавиатура
Отключим мешающие алгоритмы поведения мыши для повышения точности её наводки и срабатывания в игре.
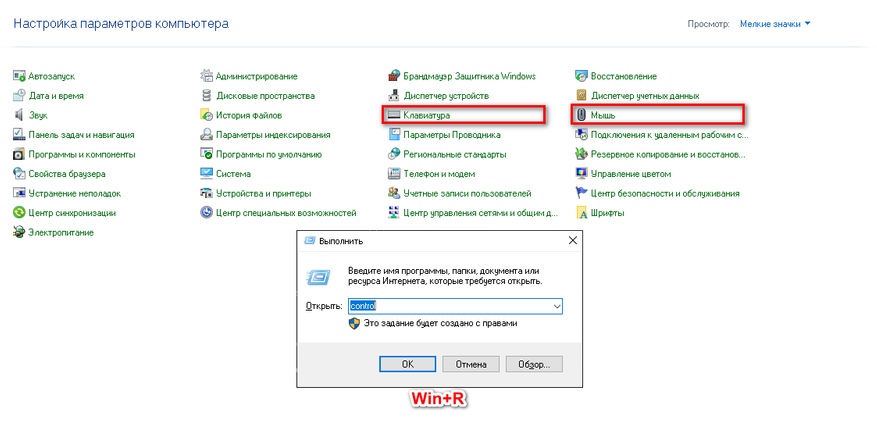
- Нажимаем Win+R и в появившемся окне вводим команду control.
- В старой панели управления заходим в выделенные разделы.
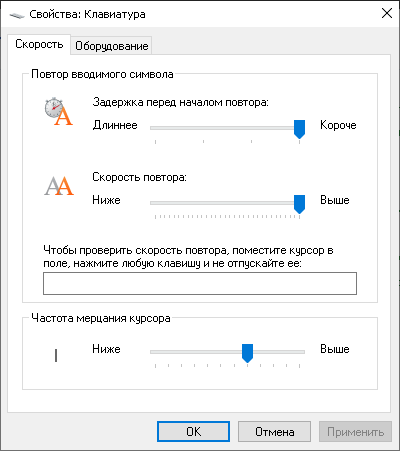
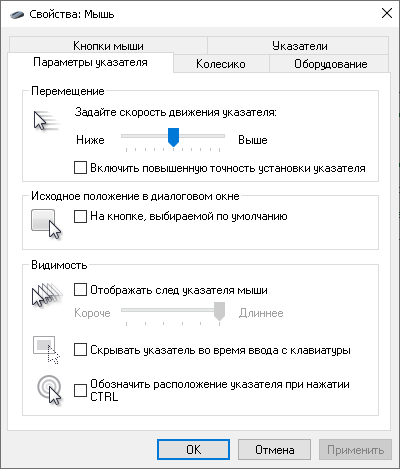
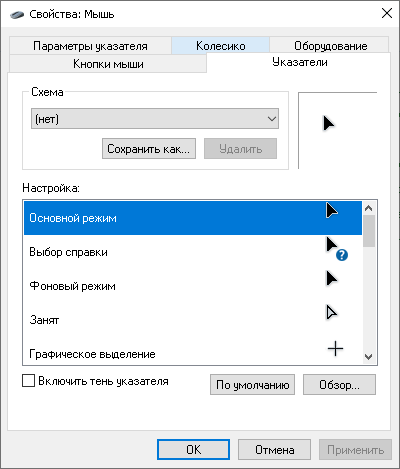
Снимаем галочки, что отвечают за акселерацию и лишние темы мыши, и повышаем скорость работы клавиатуры.
По идее, большинство гайдов на этом и заканчиваются. Но есть проблема. Даже выполнив все эти действия, мы не получим правильного перемещения нашего грызуна и желаемого отклика. Чтобы всё исправить, необходимо задействовать скрытые настройки в реестре.
Cкрытые настройки реестра
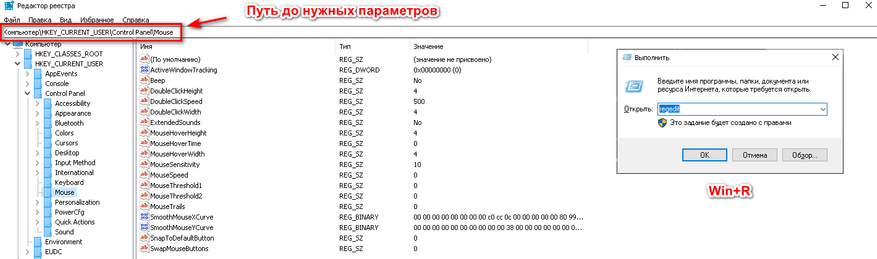
Вновь задействуем Win+R и вводим команду regedit. В появившемся окне поэтапно вносим изменения ниже. Правда если вам лень заниматься всей этой магией вручную, то вы всегда можете запустить этот файл (от администратора) в котором я уже прописал все настройки заранее.
Сглаживание мыши и отклик наведения
Windows Registry Editor Version 5.00

[HKEY_CURRENT_USER\Control Panel\Mouse]
"MouseSpeed"="0"
"MouseThreshold1"="0"
"MouseThreshold2"="0"
Эти параметры отключат повышенную точность указателя, когда скорость курсора увеличивается вслед за физическим увеличением скорости передвижения грызуна в руке. Зачем это нужно? При стандартных настройках мышка сама доводится до нужного объекта, если вы немного ошиблись или не довели. Для шутеров подобное поведение грызуна приносит большие проблемы с прицеливанием. Дополнительно советую также изменить параметр «MouseHoverTime»=«0» — это помогает убрать задержку при наводке на объекты в системе.
Windows Registry Editor Version 5.00

[HKEY_CURRENT_USER\Control Panel\Mouse]
"SmoothMouseXCurve"=hex:\
  00,00,00,00,00,00,00,00,\
  C0,CC,0C,00,00,00,00,00,\
  80,99,19,00,00,00,00,00,\
  40,66,26,00,00,00,00,00,\
  00,33,33,00,00,00,00,00
"SmoothMouseYCurve"=hex:\
  00,00,00,00,00,00,00,00,\
  00,00,38,00,00,00,00,00,\
  00,00,70,00,00,00,00,00,\
  00,00,A8,00,00,00,00,00,\
  00,00,E0,00,00,00,00,00
В Windows 10 существует старый баг, когда разница между физическим перемещением мыши и перемещением курсора зависит от масштабирования экрана. Чтобы исправить ситуацию, принудительно изменим параметры SmoothMouseXCurve и SmoothMouseYCurve, которые отвечают за ускорение мыши по горизонтали и вертикали в режиме масштабирования 1 к 1.
Скорость курсора
Windows Registry Editor Version 5.00

[HKEY_CURRENT_USER\Control Panel\Mouse]
"MouseSensitivity"="10"
Этот параметр отвечает за скорость перемещения курсора, его не рекомендуется изменять, ибо от него зависят многие параметры для расчёта движения мыши. Он всегда должен быть равен 10.
Приоритет исполнения и задержка ввода
Windows Registry Editor Version 5.00

[HKEY_LOCAL_MACHINE\SYSTEM\CurrentControlSet\Services\mouclass\Parameters]
"MouseDataQueueSize"=dword:00000014

[HKEY_LOCAL_MACHINE\SYSTEM\CurrentControlSet\Services\kbdclass\Parameters]
"KeyboardDataQueueSize"=dword:00000014
Параметры MouseDataQueueSize и KeyboardDataQueueSize отвечают за количество информации, которая может храниться в буфере драйвера мыши и клавиатуры. Чем меньше значение, тем быстрее новая информация будет обрабатываться. Принцип работы похож на очередь кадров в видеокарте, когда мы принудительно убираем фоновую подготовку очереди кадров, чтобы сразу получать настоящий. В нашем случае оптимальным значением будет 20.
Windows Registry Editor Version 5.00

[HKEY_LOCAL_MACHINE\SYSTEM\CurrentControlSet\Services\mouclass\Parameters]
"ThreadPriority"=dword:0000001f

[HKEY_LOCAL_MACHINE\SYSTEM\CurrentControlSet\Services\kbdclass\Parameters]
"ThreadPriority"=dword:0000001f
Выставим обработку драйверов клавиатуры и мыши в режиме реального времени.
Windows Registry Editor Version 5.00

[HKEY_CURRENT_USER\Control Panel\Accessibility]
"StickyKeys"="506"

[HKEY_CURRENT_USER\Control Panel\Accessibility\ToggleKeys]
"Flags"="58"

[HKEY_CURRENT_USER\Control Panel\Accessibility\Keyboard Response]
"DelayBeforeAcceptance"="0"
"AutoRepeatRate"="0"
"AutoRepeatDelay"="0"
"Flags"="122"
Вновь отключим дополнительную задержку при нажатии клавиш мыши и клавиатуры, а также уберём залипание при двойном нажатии Shift.
Дополнительная часть самого муторного гайда подошла к концу. Переходим к следующему пункту настроек.
Перенос исполнения ввода
Вторым важным изменением, которое следует применить для мыши и клавиатуры — это выполнить перенос исполнения задач ввода с первого ядра CPU и активировать серверный режим опроса устройств (MSI). Зачем это нужно? Всё дело в задачах Windows, что обрабатываются первым ядром с устаревшим режимом прерывания. Такой режим работы устройства создаёт очередь исполнения и может вызывать задержки.
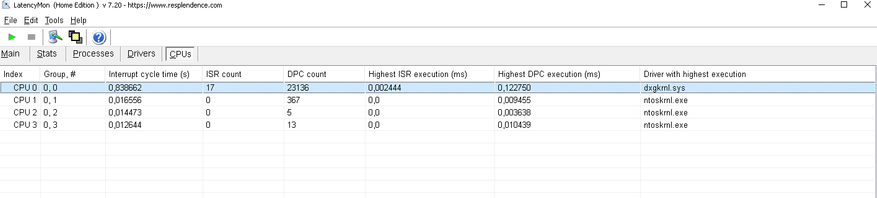
Посмотреть что крутится на первом ядре, можно с помощью Latency Moon. Выполним перенос.
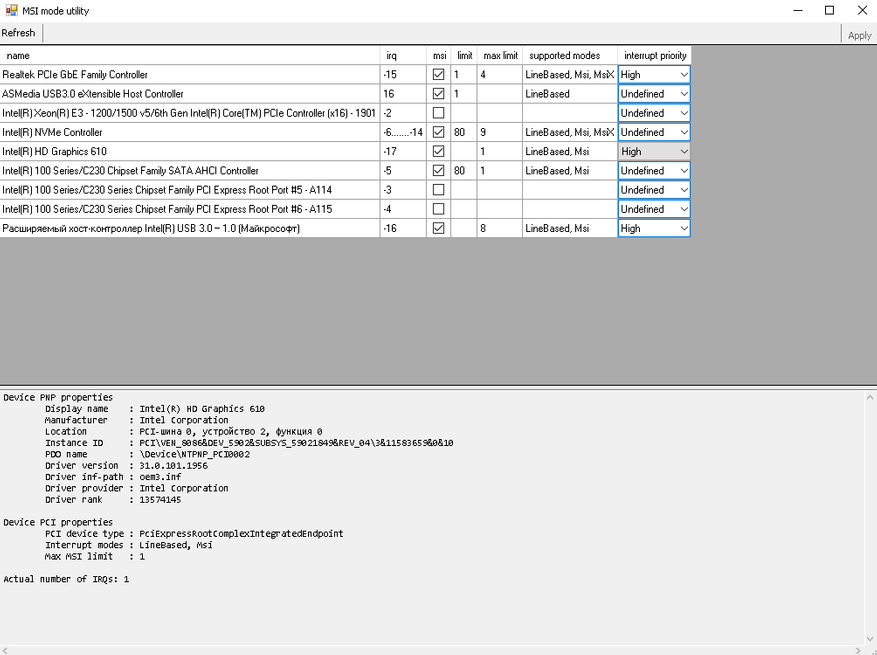
- Скачиваем и извлекаем файлы в любую папку.
- Запускаем файл MSI_util_v3.exe. (Желательно от имени администратора).
- Активируем режим MSI для, где есть надпись LineBased, Msi, MsX.
- Выставляем приоритет High для мыши.
- Применяем изменения (Apply) и перезагружаем ПК.
Таким нехитрым образом, мы задействовали серверный режим опроса устройств и немного прибавили плавности. Перейдём к переносу задачи с первого ядра.
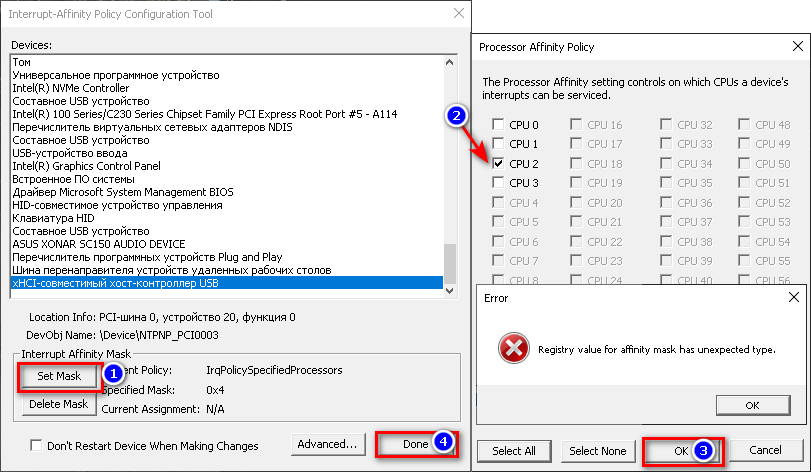
- Скачиваем и извлекаем файлы.
- Запускаем файл intPolicy_x64.exe (Желательно от имени администратора).
- Находим в списке нужные устройства и кликаем пару раз. Если вышла ошибка, то это устройство поддерживает перенос.
- Переходим к редактированию через Set Mask и выделяем нужное ядро, применяем.
- Перезагружаем ПК.
Поздравляю! Если скука вас ещё не съела, то вы весьма сильны желанием стать быстрее всех. Шутка. Мы почти завершили редактирование параметров, влияющих на задержку ввода. Перейдём к DPC Latency.
DPC Latency
Чтобы не нагружать вас технической информацией, вам лишь следует знать, что чем ниже показатели DPC Latency, то тем выше плавность системы. Сравнить её можно с резким увеличением герцовки монитора. Фокус и состоит в том, что герцовка не увеличивается, а плавность прибавляется. Посмотреть свою задержку можно с помощью Latency Moon.
Лишнии устройства и задержка
Ранее я уже писал, какая Windows не геймерская ОС, которая так и ждёт, чтобы вставить очередную палку в колёса бедному геймеру. Система почему-то считает, что отключение устройства от питания или его затормаживание во время игры — это совершенно нормально. Отключим такое странное поведение и удалим лишние устройства.
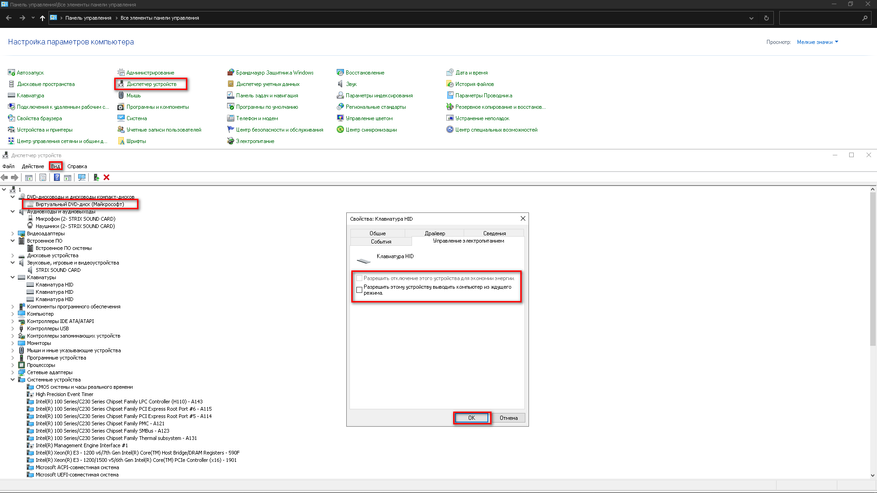
- Заходим в диспетчер устройств.
- Вид, показать скрытые устройства.
- Удаляем все серые устройства из списка.
- Для всех остальных через правый клик убираем галочки в разделе управления.
- Перезагружаемся.
После перезагрузки вы сразу почувствуете увеличение плавности, так как система уже не будет заниматься управлением поведения наших устройств.
Звук
Переходя к теме звука, сто́ит отметить его весомую значимость в плане влияния на задержки ввода, так как всё, что выше 44100 Гц, начинает почему-то несоизмеримо грузить систему, если у вас нет отдельной звуковой карты. Я не знаю, связано ли это с усложнением синусоиды сигнала, но на технических форумах часто ссылаются на саму схему реализации звука в Windows. Ладно, всё это рассуждения, а нам пора переходить к исправлению проблемы.
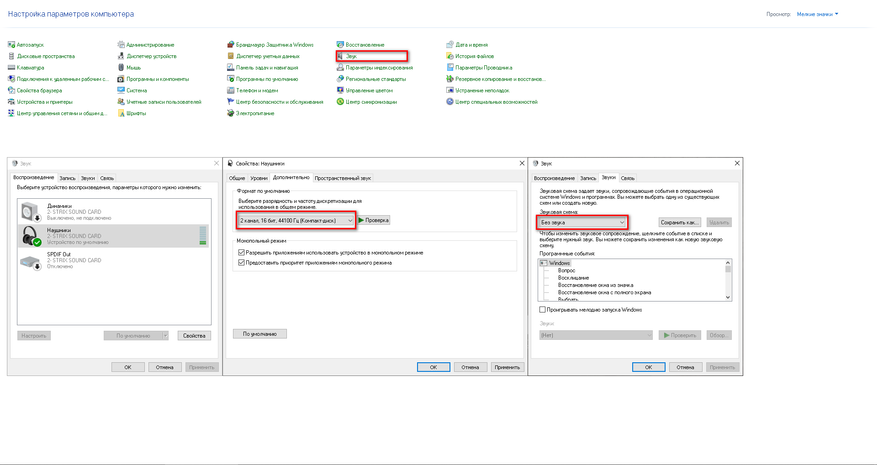
- Переходим в старой панели управления во вкладку звук.
- Отключаем все неиспользуемые устройства, кроме вывода звука и микрофона.
- Через правый клик по активному устройству изменяем качество выводимого звука до 44100 Гц и аналогично у микрофона.
- Во вкладке звуки выставляем профиль без звука для отключения системных звуков Windows.
После данных измеений вы вновь должны ощутить прибавку в плавности.
Электропитание
Как я уже писал ранее, о Создатель, а это уже третий раз, что Windows ни разу не геймерская ОС и не заточена под нужды геймера. В настройках электропитания Windows содержатся механизмы, которые могут влиять на плавность и стабильность во время игровой сессии. К значимым механизмам, мешающих геймеру, можно отнести парковку ядер, настройки электросбережения, а также небольшие параметры, отвечающие за различные таймеры/функции, которые также влияют на DPC Latency.
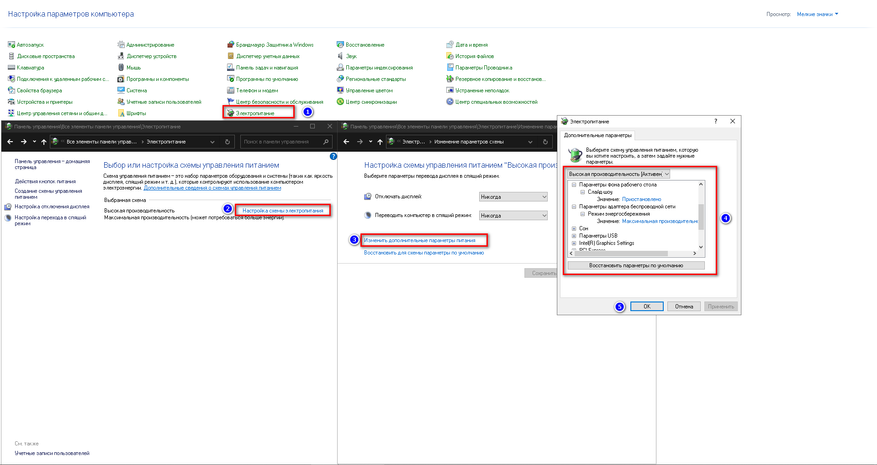
Прежде чем приступать к исправлению, необходимо отредактировать параметры реестра для получения возможности изменения скрытых настроек. В этом нам поможет бесплатная утилита Power Settings Explorer.
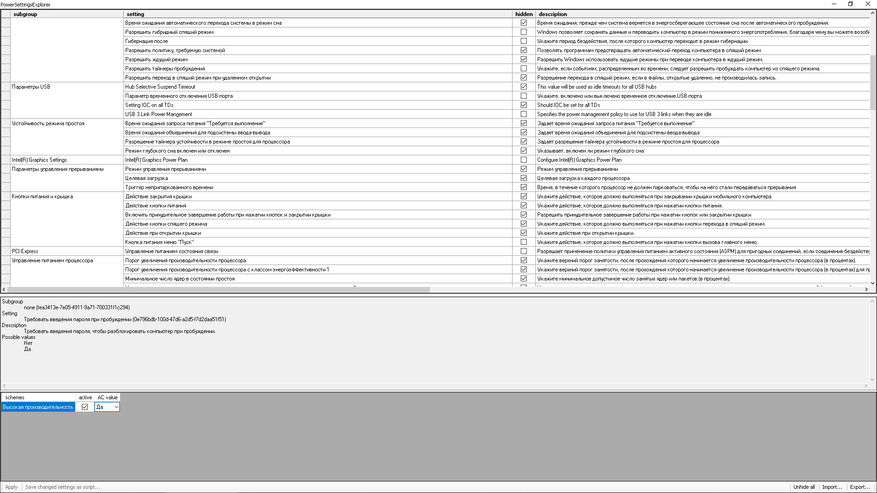
- Скачиваем и извлекаем файлы.
- Запускаем файл PowerSettingsExplorer.exe (Желательно от имени администратора).
- Находим в списке USB3 Link Power Management, разрешить состояния снижения питания
и NVIDIA Display Power Settings Technology (если у вас карта Nvidia). - Снимаем галочки и переходим к редактированию схемы электропитания.
Переходя к схеме редактирования электропитания, желательно удалить все схемы, кроме «Высокая производительность».
Вводим в CMD команды:
powercfg -delete a1841308-3541-4fab-bc81-f71556f20b4a
powercfg -delete 381b4222-f694-41f0-9685-ff5bb260df2e
Параметры электропитания:
- Жёсткий Диск — Отключать жёсткий диск через — Состояния (мин): 0 мин.
- Internet Explorer — Частота таймера JavaScript — Значение: Максимальная производительность.
- Параметры фона рабочего стола — Слайд-шоу — Значение: Приостановлено.
- Параметры адаптера беспроводной сети — Режим энергосбережения — Значение: Максимальная производительность.
- Сон — Сон после — Значение: Никогда.
- Cон — Разрешить таймеры пробуждения — Значение: Никогда.
- Параметры USB — Параметры временного отключения USB-порта — Значение: Запрещено.
- Параметры USB — USB 3 Link Power Mangement — Значение: Off.
- PCI Express — Управление питанием состояния связи — Значение: Откл.
- Управление питанием процессора — Разрешить состояние снижения питания — Значение: Выкл.
- Управление питанием процессора — Минимальное состояние процессора — Настройка: 100%.
- Управление питанием процессора — Политика охлаждения системы — Значение: Активный.
- Управление питанием процессора — Максимальное состояние процессора — Настройка: 100%.
- Экран — Отключить экран через — Значение: Никогда.
- Экран — Время ожидания до отключения экрана блокировки — Значение: 0 Мин.
Некоторые параметры могут отсутствовать или дополняться в зависимости от оборудования. Всё, что нам теперь осталось сделать со схемой электропитания — это отключить парковку ядер.
Парковка ядер
В Windows со времён Windows Vista, если я не ошибаюсь, существует механизм парковки ядер, который был призван обеспечить продление жизни ноутбуков путём отключения или снижения производительности ядер процессора. В игровых сессиях работа этого алгоритма может привести к падению FPS. Чтобы избежать этой проблемы, необходимо вновь лесть в реестр, но мы воспользуемся бесплатной утилитой Unpark-CPU.
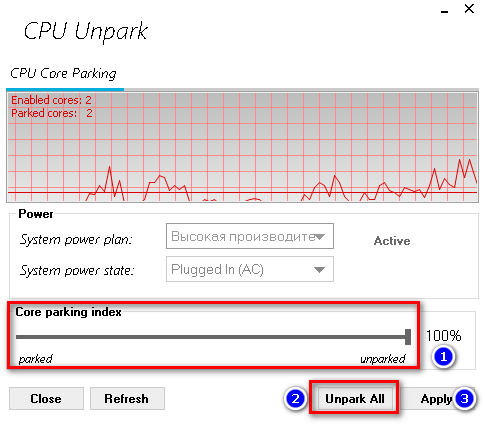
- Скачиваем и извлекаем файлы.
- Запускаем файл UnparkCpu.exe (Желательно от имени администратора).
- Передвинем ползунок в правую сторону.
- Нажимаем Unpakr All и применить (Apply).
- Перезагружаем ПК.
С доведением до ума настроек электропитания мы закончили. Можно переходить к отключению заплаток процессора.
Твик приоритета прерывания
Windows Registry Editor Version 5.00

[HKEY_LOCAL_MACHINE\SYSTEM\CurrentControlSet\Control\PriorityControl]
"IRQ8Priority"=dword:00000001
Это небольшой твик для установки повышенного приоритета прерывания. Вновь используем regedit или готовый файл.
Meltdown/Spectre/Zombieload
В своё время много шума наделало обнаружение уязвимостей для процессоров Intel и AMD, но ещё больший шум наделали патчи, которые «исправляли» дыры с существенной потерей производительности CPU. Если вы не Джеймс Бонд и не читаете этот материал с рабочего ПК, то смело отключайте патчи, ибо кто им дал право резать наш FPS.
Windows Registry Editor Version 5.00

; отключение патчей Meltdown и Spectre
[HKEY_LOCAL_MACHINE\SYSTEM\CurrentControlSet\Control\Session Manager\Memory Management]
"FeatureSettings"=dword:00000001
"FeatureSettingsOverride"=dword:00000003
"FeatureSettingsOverrideMask"=dword:00000003

; отключение патча Zombieload v2
[HKEY_LOCAL_MACHINE\SYSTEM\CurrentControlSet\Control\Session Manager\Kernel]
"DisableTsx"=dword:00000000
Опять вносим наши изменения в параметры реестра через regedit или скачиваем и применяем заранее готовый файл. После перезагрузки мы должны получить прибавку в работе процессора от 5 до 30% в зависимости от поколения CPU. Перейдём к пингу.
Пинг
Windows очень любит надёжность, поэтому она плевать хотела на то, что вы геймер, ибо её алгоритмы задействованы на подтверждение получения и отправки пакетов с одной лишь ей ве́домой логикой задержки. Заставим систему сделать упор на скорость приёма и отправку пакетов.
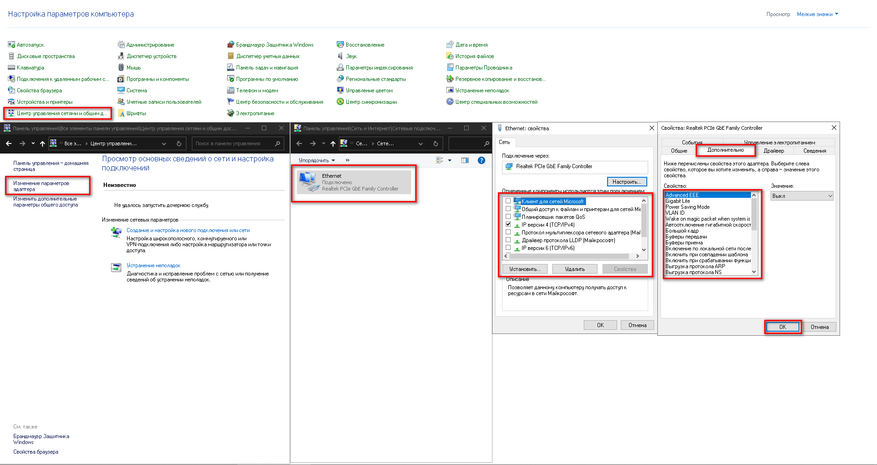
- Переходим в старой панели управления во вкладку центр управления.
- Изменить параметры адаптера.
- Через правый клик по активному устройству нажимаем свойства.
- Убираем все галочки кроме (TCP/IPv4).
- По кнопке настроить, во вкладке дополнительно, отключаем электросбережения.
- Применяем.
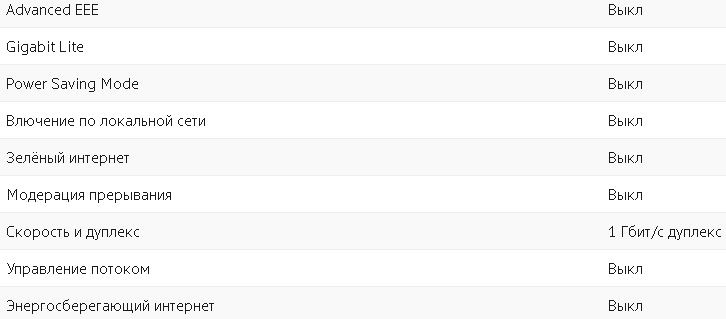
Это основные параметры, которые отвечают за торможение интернета. Я напоминаю, что в зависимости от производителя и новизы сетевого адаптера, некоторых из них может и не быть. Перейдём к завершающему шагу настроек интернета.
Windows также через реестр регулирует работу интернета вне зависимости от настроек вашей сетевой карты. Таких параметров пара сотен, и изменять их вручную — это ад. Воспользуемся бесплатной утилитой TCP Optimizer 4.
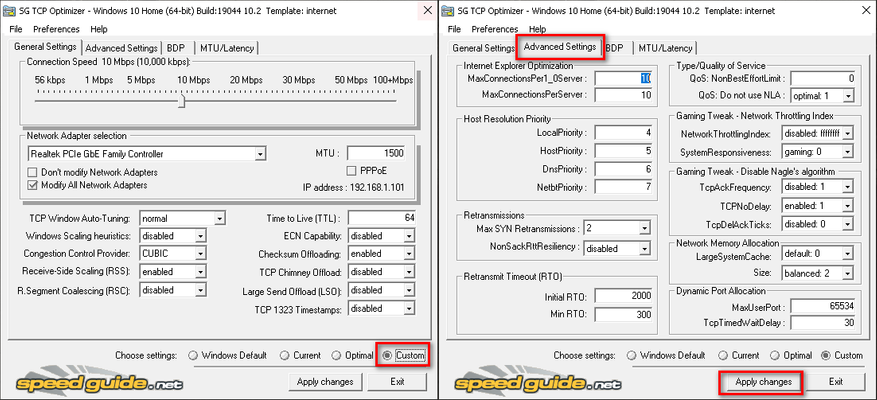
- Скачиваем и запускаем TCPOptimizer.exe (Желательно от имени администратора).
- Выставляем в интерфейсе программы Optimal или как на скриншоте.
- Применяем.
- Перезагружаем ПК.
Мы выполнили изменение множества настроек, отвечающих за отклик и время жизни пакета, не говоря уже об изменении алгоритма передачи, и добились снижения итогового пинга. Настройку интернета для геймера можно официально объявить закрытой. Перейдём к последним пунктам.
Системные таймеры и Hpet
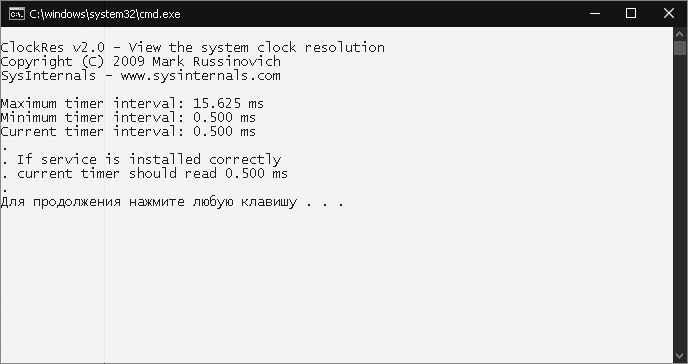
Разрешение таймера по умолчанию в Windows составляет 15,6 мс — это является весьма высоким значением, которое приводит к лишнему энергопотреблению и траты впустую большого количества вычислительных мощностей — замедляя работу вашего компьютера! Хотя некоторые мультимедийные программы и игры сами могут фиксировать значение таймера для увеличения производительности, но они никогда не выставляют его меньше 1 мс. Чтобы исправить эту проблему и принудительно назначить время таймера для повышения производительности и отклика, а также чтобы не возиться с лишним ПО, выполним установку фоновой службы, которая и станет отвечать за наш таймер.

- Скачиваем и извлекаем файлы на диск.
- Переходим в папку и запускаем файл Installer.bat (Желательно от имени администратора).
- Выбираем в списке желаемый таймер, я советую 2.
- Дожидаемся окончания установки. (После установки не удалять!).
- Можно закрыть ПО.
Значение нынешнего таймера после установки можно проверить нажав 8 в интерфейсе ПО.
С постоянным таймером закончили. В Windows существует ещё множество таймеров, отвечающих за производительность. Одним из главных можно назвать Hpet. Конечно, в интернете бытует мнение, что его лучше не трогать, но главное — не отключать его в BIOS, а в самой Windows это даже нужно делать для избавления от стартеров и для увеличения FPS.
Вводим в CMD команды:
bcdedit /set disabledynamictick yes
bcdedit /set useplatformtick yes
Отключаем в диспетчере устройств таймеры.
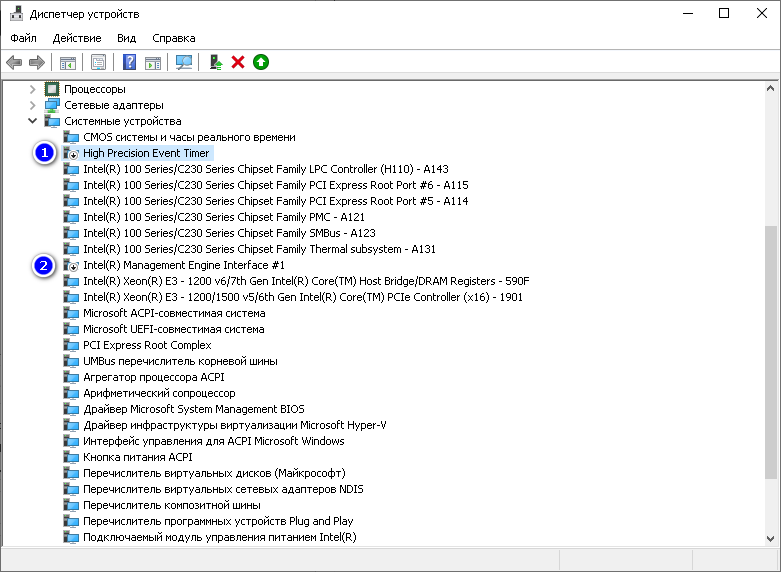
Иногда он может быть подписан как High Precision Even Timer или Высокоточный таймер событий. Аналогично советую отключить Intel Management, ибо он также сильно тормозит систему. Перезагружаем ПК и проверяем драйверы через Snappy Driver Installer. Там должны будут появиться наши таймеры. Обновляем таймеры и вновь отключаем их в диспетчере устройств.
Фанфары, гром и молния! Поздравляю с завершением сокращённого гайда по оптимизации Windows без поломки. Вы можете гордиться собой! Вы были упорны и стали быстрее всех!
Заключение
Кто-то назовёт автора сумасшедшим и не простит отсутствия итогов всего ада выше, но я могу поставить честь и совесть, а также 14-летний опыт оптимизации Windows-систем, что выполнив все эти действия, вы станете быстрее всех! Конечно, можно было бы применить ещё некоторые твики и ПО для очистки и удаления телеметрии, но тогда бы гайд разросся ещё больше, и был бы шанс поломать систему. В общем, пользуйтесь и будьте быстрее всех.
The performance of your computer is extremely important when it comes to enjoying video game’s the way they were meant to be played. Things like slow frame rates and high ping can ruin the gaming experience. And when it comes to competitive online play, your computer’s performance could be the difference between winning and losing.
If you find the performance of your computer lagging when playing video games, there are a couple of things you can do to improve it. We’re going to discuss five Registry hacks that can give your PC a performance boost in the gaming department.
But First, Before You Edit the Windows Registry…
While looking for registry hacks to improve your PC’s performance, you may get suggestions to use a Registry cleaner. We advise you to not bother with registry cleaners, as they provide no noticeable performance improvement and may even mess up the registry.
Furthermore, we advise that you create a system restore point. This will create a snapshot of the state your computer is in at that time. In the event something goes wrong while editing the registry, you can use the system restore point you created to return your PC to a previous working state.
5 Registry Hacks to Improve Gaming Performance on Your Windows PC
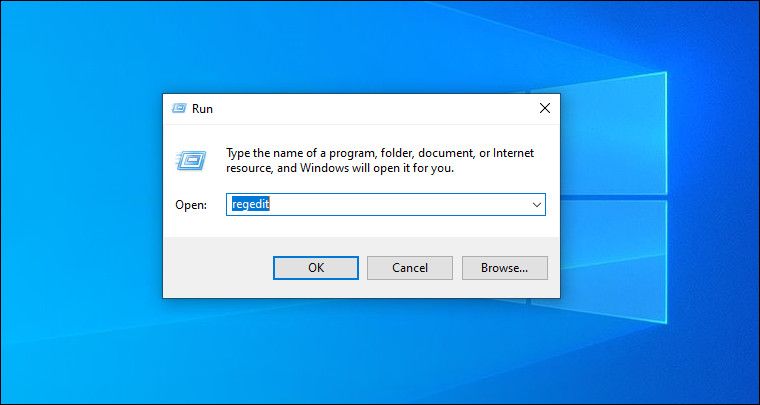
To carry out these hacks, you’re going to need to launch the Windows Registry Editor. The easiest way to do that is to press Win + R to open Windows Run. In the text box, type regedit and then click OK. Then, click Yes on the UAC prompt to open the Registry Editor.
Now you can go ahead and use the Registry Editor to make gaming smoother on your Windows PC with the tweaks below.
1. Disable Fast Startup
Fast Startup may make your Windows PC load faster, but it also prevents it from fully shutting down. During a shutdown, the feature logs out every user, closes all the programs, and puts the rest of the system in a hibernation state before finally turning off the computer.
Coming out of this hibernation state when booting up can cause some processes to misbehave, which can make your PC slower than normal. This is not good for gaming, as this can negatively impact a game’s frames per second (FPS).
To disable Fast Startup, open the Registry Editor and navigate to HKEY_LOCAL_MACHINE > SYSTEM > CurrentControlSet > Control > Session Manager > Power. Double-click the HyperBootEnabled entry, change Value data to 1, and click OK.
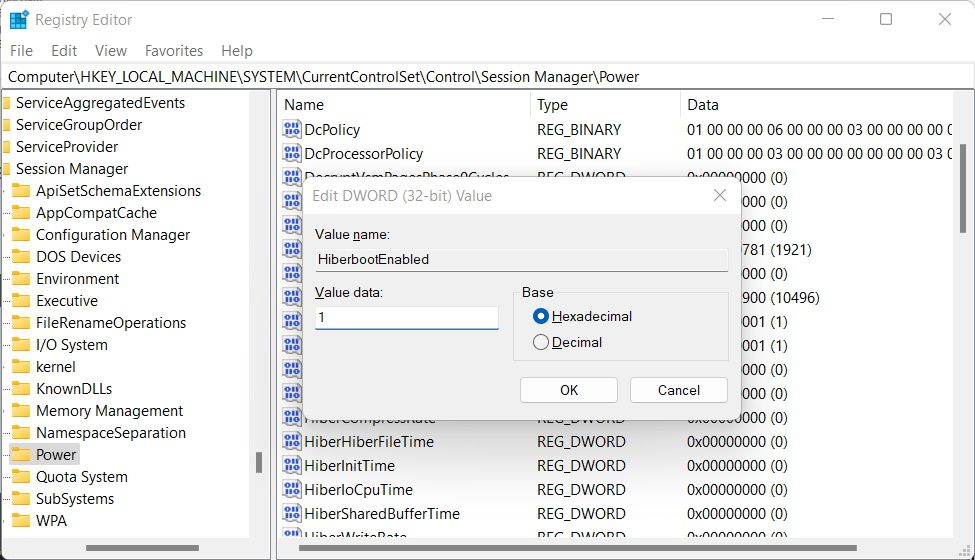
Be advised that disabling Fast Startup will increase the boot time for your Windows machine. However, it could be worth it if you get the best gaming performance out of it.
2. Disable Power Throttling
Power Throttling causes the CPU to slow down so it doesn’t consume too much battery power. Unfortunately, this can come with a small but noticeable performance loss.
Particularly, when it comes to gaming, a throttled CPU can limit the potential of the GPU, creating what is known as a bottleneck. That’s because the GPU is running at a speed higher than what the CPU can handle, which can negatively impact a game’s frame rate.
To disable Power Throttling, open the Registry Editor and navigate to HKEY_LOCAL_MACHINE > SYSTEM > CurrentControlSet > Control > Power > PowerThrottling. Double-click the PowerThrottlingOff entry, change Value Data to 1, and click OK.
In some cases, you can go to the Power key in the Registry Editor and not find the PowerThrottling key inside it. If that’s the case, you can disable Power Throttling through the Local Group Policy Editor as well.
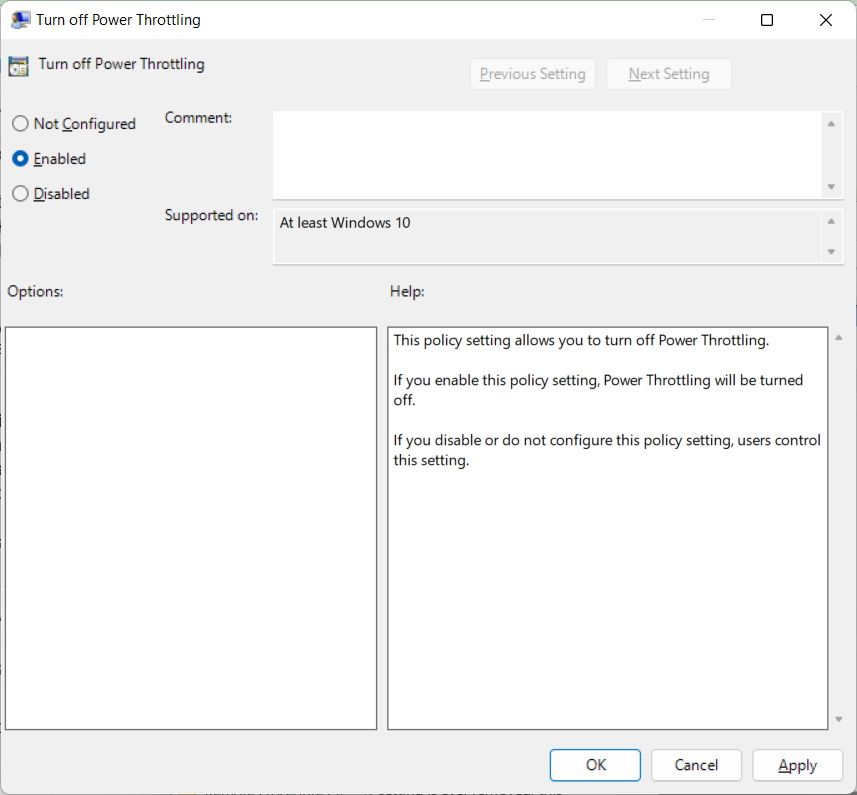
To do that, press Win + R, type gpedit.msc in the text box, and hit the Enter key. In the Group Policy Editor, navigate to Computer Configuration > Administrative Templates > System > Power Management > Power Throttling Settings. Then, double-click the Turn off Power Throttling policy.
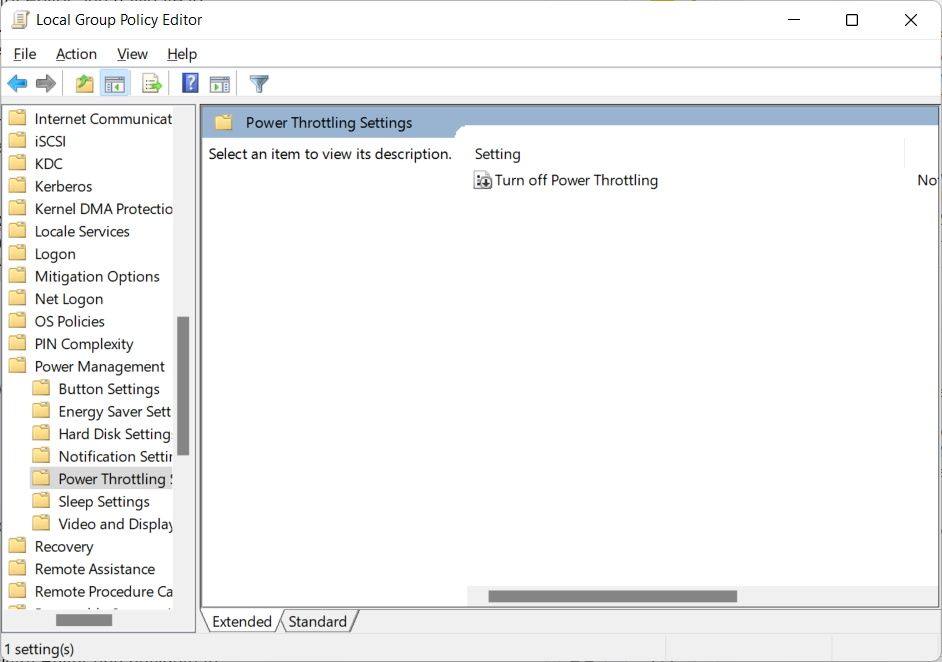
Click on the Enabled radial button and then click OK to close the dialog box to apply the policy.
This will disable Power Throttling, meaning Windows will no longer throttle the CPU, among other things, when trying to conserve battery power.
3. Disable Nagle’s Algorithm
Windows uses Nagle’s Algorithm to reduce the number of packets sent over a network by combining them into a larger one. This can cause problems when the packets are small, meaning it will take longer to build them up enough to be sent as one large chunk.
While this technology initially sounds useful, it can increase the ping of some online games. As such, if you’re experiencing high ping in a game, disabling Nagle’s Algorithm can help.
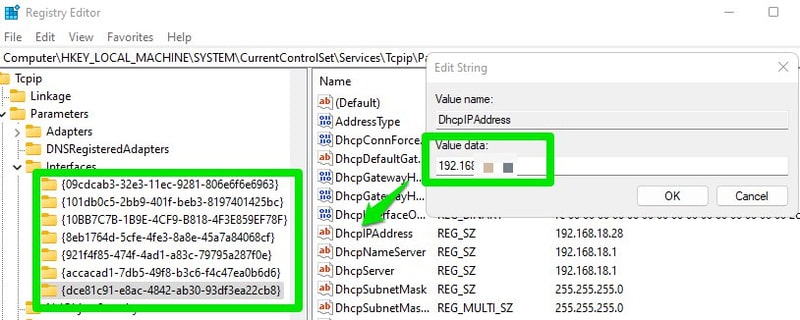
To do that, open the Registry Editor and navigate to HKEY_LOCAL_MACHINE > SYSTEM > CurrentControlSet > Services > Tcpip > Parameters > Interfaces. The goal here is to find the interface (those keys named with different characters in between curly brackets) for the connection you’re using. So, go through each one and look at the value for the DhcpIPAddress entry.
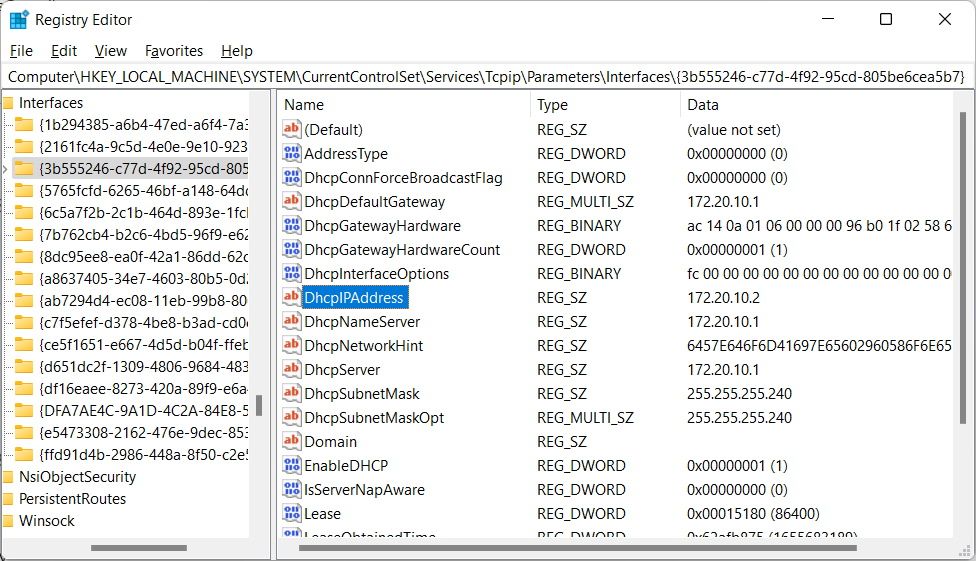
The value for this entry should match your internet connection’s IPv4 address.
To get the connection’s IPv4 address, press Win + S to open Windows Search. Then, type control panel in the search box and click on Control Panel in the search results.
In the Control Panel, head to Network and Internet > Network and Sharing Center and click on the link next to Connections for the internet connection you’re gaming with.
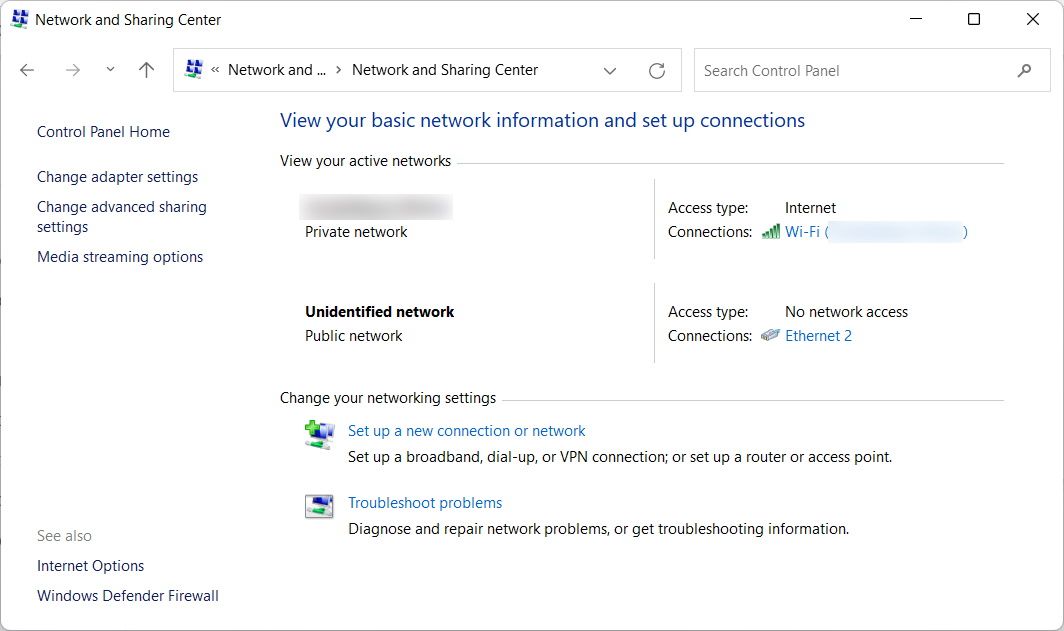
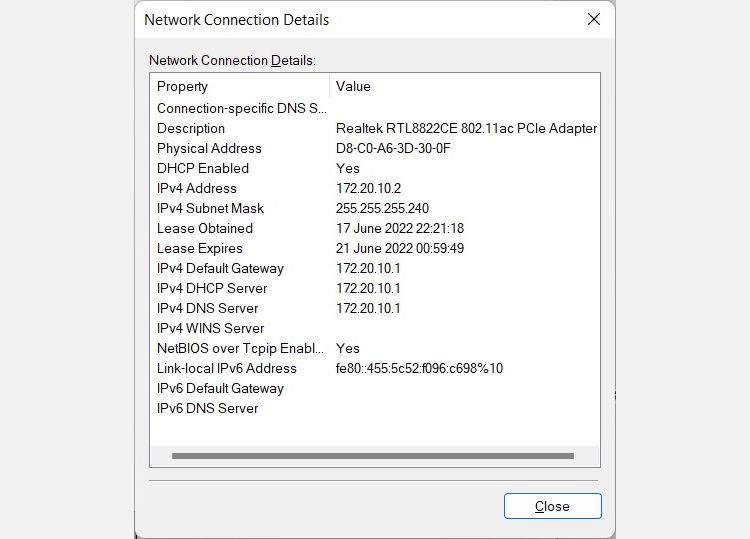
Click the Details button.
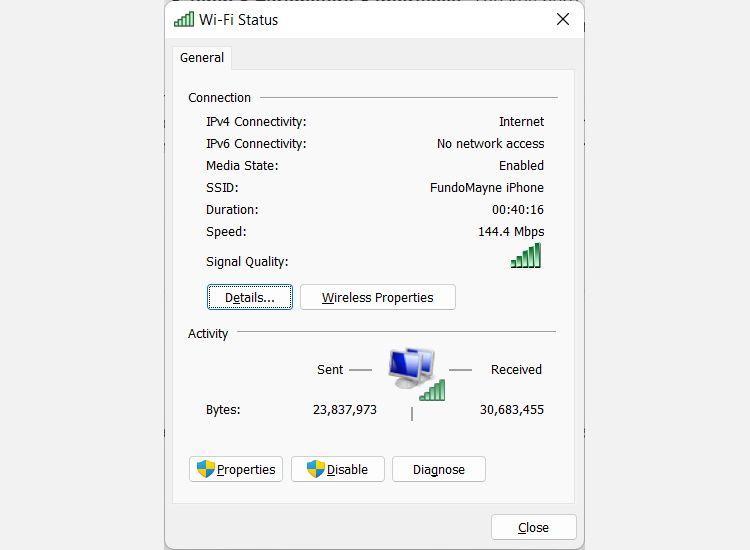
Check the IP address next to IPv4 address.
Once you find a match, right-click the interface and select New > DWORD (32-bit) Value.
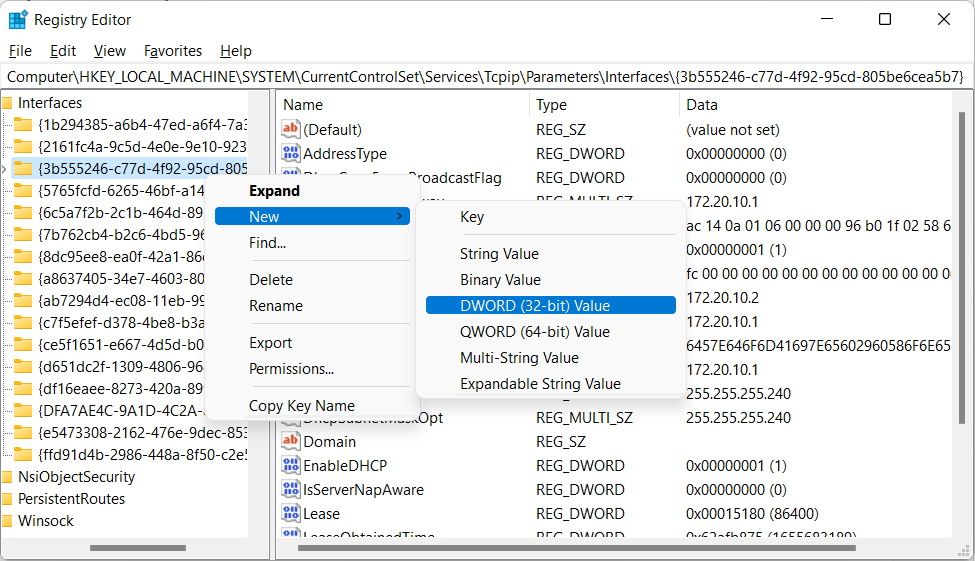
Name this new entry TcpNoDelay. Then, create another one the same way and name it TcpAckFrequency. Double-click on them one by one and change Value Data to 1 for both entries.
4. Disable Network Throttling
To keep the internet connection stable on your PC, Windows will sometimes throttle your network, which can reduce its speed. For online gaming, this can result in a higher ping. You can rectify that by disabling Network Throttling.
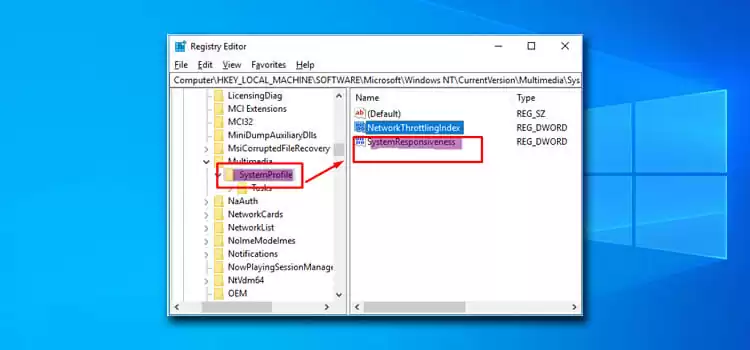
To do that, open the Registry Editor and navigate to HKEY_LOCAL_MACHINE > SOFTWARE > Microsoft > Windows NT > CurrentVersion > Multimedia > SystemProfile. Double-click the NetworkThrottlingIndex entry, change Value Data to ffffffff, and click OK.
5. Prioritize Gaming Tasks
Windows has a service known as Multimedia Class Scheduler service (MMCSS). Its job is to ensure that multimedia applications, such as games, get priority access to more CPU power when they’re performing time-sensitive tasks. And with a couple of Registry tweaks, you can tell MMCSS to give games a much higher priority.
To do this, launch the Registry Editor and navigate to HKEY_LOCAL_MACHINE > SOFTWARE > Microsoft > Windows NT > CurrentVersion > Multimedia > SystemProfile > Tasks > Games. Here, we are going to change the Value data of the following entries (double-click to open them):
- GPU Priority: Change it to 8.
- Priority: Change it to 6.
- Scheduling Category: Change it to High.
Enjoy Improved Gaming Performance on Your Windows PC
Tweaking the Registry to get the results you want is not that hard, but you need to know what you’re doing. Try out some of these Registry hacks, and see which ones give your PC the improved gaming performance you’ve been looking for. If they don’t work or cause problems just return the entries to their original values.
Gaming performance depends on a lot of things. Obviously, the hardware specs you have (processor, RAM, and graphics card) play the most vital role in computer performance, smoothness, and the quality of gameplay. But beyond these, you can push your existing system harder to gain some extra performance in gaming. Registry tweaks are one of these ways to achieve that. In this article, we’re going to dig deep into the topic of how to improve gaming by editing the registry editor for gaming. By the end of this article, you will know How to Improve Gaming by Editing Registry and the best regedit settings for gaming.
As gaming is very much dependent on the graphics system of your PC. So, updating the drivers are a must. You can find and update drivers manually to get the best output from your system. You can check the task manager also to know more about the system resources.
What is Registry Editor?
Registry editor or Windows Registry is kind of like a long database, with paths and their respective values that determine the low-level settings of Windows, its drivers, UI, and many more features to optimize Windows. While editing the registry can be great for troubleshooting and optimizing, you must be cautious while doing so because you tweak the wrong values might create lots of issues with your computer. So, before doing this, we suggest you backup your data or the entire system and know the best Regedit tweaks for gaming to operate the PC in game mode. You can also set the Regedit GPU priority to optimize Windows in game mode there. It’s best to back up the registry before editing.
To launch the registry editor, press Windows key + R to open Run, then type “Regedit” and hit enter to enter into regedit for gaming. You can also search for it in the windows search bar.
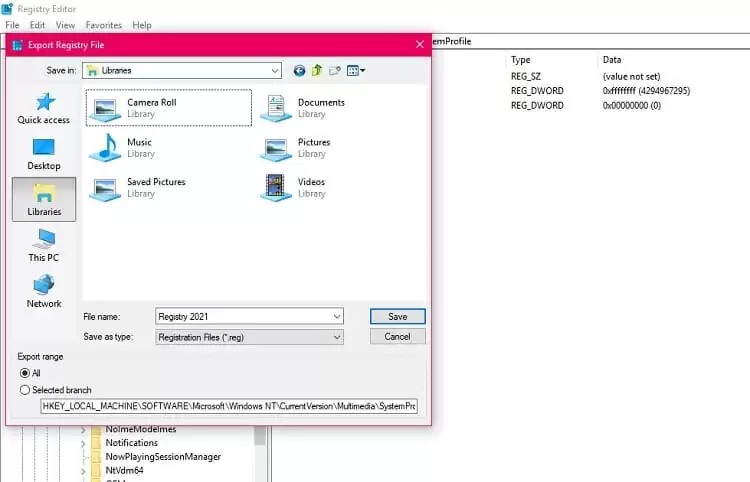
To back up your existing registry, go to File > Export, select Export Range as All, rename, and save your registry in the desired folder.
Now that we’ve launched and backed up the registry editor, it’s time to improve gaming for game mode by editing the registry and optimize Windows. You won’t see a huge difference in performance, but the general experience, fps drops, and other sectors should be improved towards the gaming experience.
If you do gaming on a laptop then you can increase the FPS also. Online gaming is very much popular. You should have a good internet connection. So, you must choose the best ethernet cable. You should also ping a port to check the connection’s stability and latency.
Now, go to these specified locations by scrolling or directly copying and pasting them on the location box of your registry editor or Regedit gaming editor, and edit the Regedit gaming tweaks given value. You may find one or two of them missing, dependent on your system. You can leave those. Note that all values given here are Hexadecimal by default.
Go to:
HKEY_LOCAL_MACHINE\SOFTWARE\Microsoft\Windows\CurrentVersion\DriverSearching
Here on the right side, you can see SearchOrderConfig. Double click on it and set the value data to 0, then click OK.
SearchOrderConfig = 0
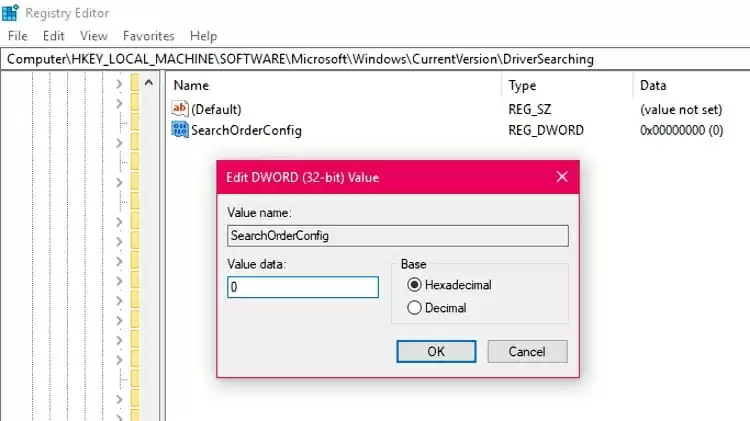
It turns on automatic driver searching when needed.
If you’re manually going into each directory, just click once on the “DriverSearching” folder to display its respective values.
HKEY_LOCAL_MACHINE\SYSTEM\CurrentControlSet\Control\Session Manager\Power
Here, choose
HiberBootEnabled = 0
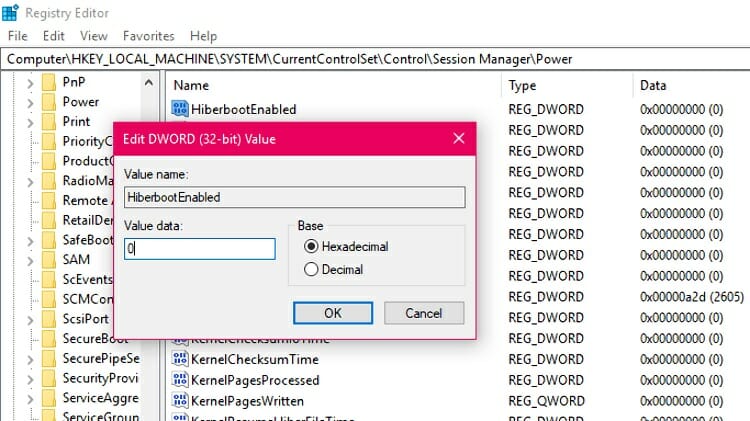
It disables the Windows Fast Startup feature. Fast Startup (or Fast Boot) is a combination of shutdown and hibernation, and it lets the computer boot up faster. You may know that you can also boot into safe mode. However, this process is known to create some issues regarding the computer not shutting down properly. Disabling Fast Startup slows the starting of PC, but improves its performance.
HKEY_LOCAL_MACHINE\SYSTEM\CurrentControlSet\Control\Power\PowerThrottling
Here, choose
PowerThrottlingOff = 1
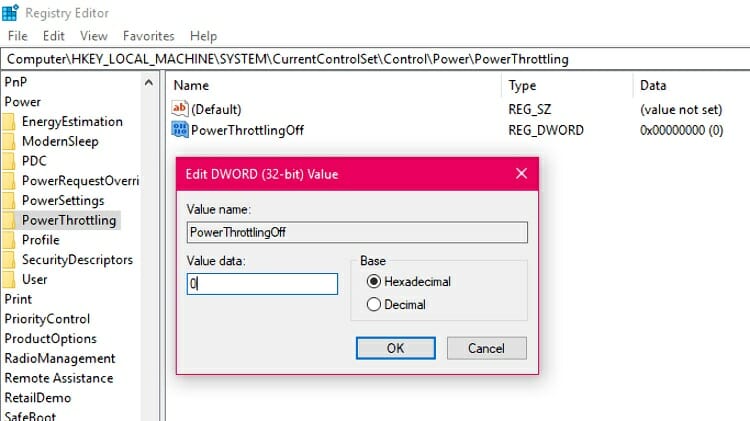
It prevents the computer from pushing other apps including the background apps into the suppressed state and triggers high performance. If you can’t find this registry key, you can alternatively go to Group Policy by searching it in the Windows search. Here, go to Administrative Templates > System > Power Management > Power Throttling Settings > Turn off Power Throttling (double click on it) and choose Enabled.
HKEY_LOCAL_MACHINE\SOFTWARE\Microsoft\Windows NT\CurrentVersion\Multimedia\SystemProfile
Here, choose
NetworkThrottlingIndex = ffffffff
SystemResponsiveness = 0
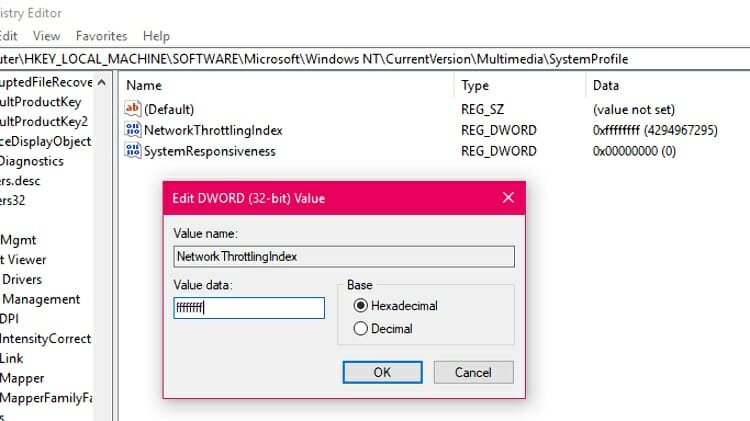
(For NetworkThrottlingIndex, type “f” 8 times in the value data. Then click OK. The bracketed value should show 4294967295)
By setting the value to “ffffffff”, you are completely disabling the network throttling which prevents non-general network traffic. It also lowers ping while playing multiplayer games. You can set up a gaming router for a pro online gaming experience. You can increase ping or decrease ping also.
HKEY_LOCAL_MACHINE\SOFTWARE\Microsoft\Windows NT\CurrentVersion\Multimedia\SystemProfile\Tasks\Games
Here you have to edit multiple values.
GPU Priority = 8
Priority = 6
Scheduling Category = High
SFIO Priority = High
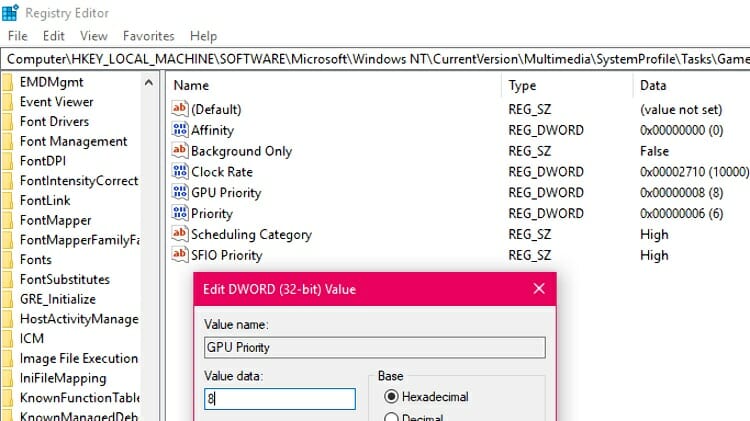
These values register the games into high priority mode while active.
HKEY_LOCAL_MACHINE\SOFTWARE\Microsoft\PolicyManager\default\ApplicationManagement\AllowGameDVR
Here, choose
Value = 0
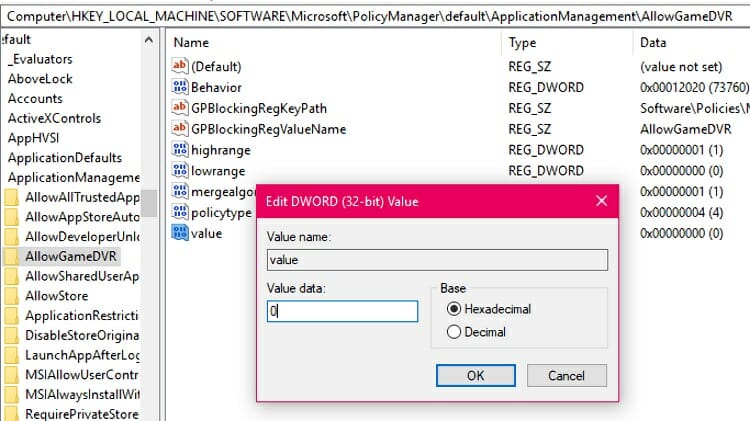
This disables the Game DVR system that often interferes with the actual game. If you use Game DVR, don’t change this value.
HKEY_LOCAL_MACHINE\SYSTEM\CurrentControlSet\Control\Power
Choose:
HibernateEnabled = 0
This disables the hibernate feature to save some resources. Again, if you rely on hibernation often, don’t change the value.
Computer\HKEY_CURRENT_USER\Control Panel\Desktop
Choose:
MenuShowDelay = 0
This determines how long you wait for a menu to show up in milliseconds. The default value 400 means 400 milliseconds of lag. You can use 20 or so if you don’t want instant showing.
Computer\HKEY_LOCAL_MACHINE\SYSTEM\CurrentControlSet\Control
Here, set
WaitToKillServiceTimeout = 2000
This key controls how long Windows waits before shutting down to close the services properly.
HKEY_LOCAL_MACHINE\SYSTEM\CurrentControlSet\Control\Power\PowerSettings\54533251-82be-4824-96c1-47b60b740d00\943c8cb6-6f93-4227-ad87-e9a3feec08d1
Here, set
Attributes = 2
Computer\HKEY_CURRENT_USER\Control Panel\Mouse
Set
MouseHoverTime = 10
This controls the time before the pop-up menu opens when you hover your mouse cursor on a folder or file. Reducing this from 400 to 10 decreases the time needed to do so.
After applying these registry tweaks, restart your system to take the effects. You can also go further by tweaking the power settings, changing it to High Performance, altering the processor power management settings, overclock RAM, or optimize RAM, allocate more RAM but those will be mentioned in another article. To know about RAM and VRAM, check this article.
In Case If Anything Goes Wrong during registry tweaks for gaming…
Like mentioned before, the editing registry value can sometimes go wrong if you change the wrong values. That’s why we’ve shown you how to back up your registry edit beforehand. Now, if anything goes wrong, you can use those backups to get your Windows registry values back to their original cases.
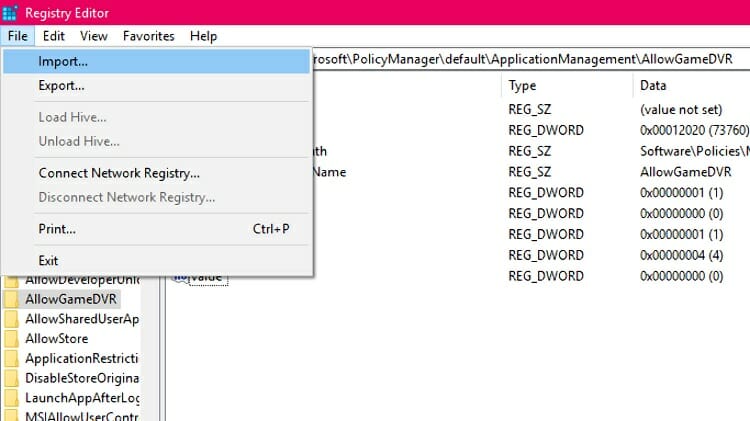
For that, just go to File > Import in the registry editor, and then locate the previously backed up registry file and click OK. You can also double click on the registry file, click Yes on the confirmation window, and your backed-up registry will be imported.
These are the best things you can do to increase gaming performance by windows 10 gaming performance tweaks and registry hack. But you cannot expect to get the best output by just editing the registry tweak app. You must keep your Windows update regularly. We also suggest automatic update of OS should be enabled. Also if you have a hard drive instead of an SSD, you should get an SSD. We suggest you get the best or GPU from Nvidia or AMD for better gaming mode. Also, check the graphics setting if the games run in a low fps mode. We can suggest two of them:
Nvidia graphics card:
AMD graphics card:
Conclusion
In this article, we’ve mentioned the proper steps on how to improve gaming by editing registry app values in Windows operating system. Though there are a lot of ways you can improve game performance like using a G-sync monitor. We’ve also discussed the effects of changing each registry app item, backing up, and importing the registry if needed. By following these steps properly, you should see some moderate level of improvement in gaming performance, frames per second, and the general Windows performance overall. Windows 10 registry tweaks for gaming is one of the best things you can do for better gaming experience without changing any hardware.
You can tweak some additional settings for a better gaming experience like check mouse acceleration, network adapter, integrated GPU, System memory, etc.
However, if you still find it ineffective on windows 10 registry tweaks to improve performance or you’re facing severely low performance in gaming, you might need to invest in some better hardware. Try upgrading your graphics card and stress test the GPU and installing a sufficient amount of ram, upgrading the CPU, or stress test the CPU, or even overclocking the CPU and RAM. You can also increase the VRam of your computer. Check your power supply before going on major upgrades and overclocking options, as it should be able to handle the stress of the new and more powerful setup you’re installing. If you are an online gamer, then you must have good internet speed to achieve low input lag for a better and convenient experience.
Subscribe to our newsletter
& plug into
the world of technology
Draft and Proofreader Literature buff. Working with words is right up my alley. Technology, gadgets and audio devices attract me. Hence I am with Tech Dimension. Books, and a cup of coffee, are the ideal winter night for me.
Provide feedback
Saved searches
Use saved searches to filter your results more quickly
Sign up
For gaming optimally on your PC, there is just so much Windows Settings or the Control Panel can provide. If you want to take complete control, you should use some Windows Registry hacks to improve gaming.
Windows Registry is like a digital filing cabinet for your PC where Windows records all the Windows settings and changes. Unlike the UI-based Settings, Windows doesn’t police the Registry to ensure users don’t mess up anything. So it has no limit on how you can modify the system.
Any changes you make to it are done at your own risk. If you are willing to take the risk, you can take full advantage of this freedom and fully optimize your PC resources and network to get the best gaming experience.
In this post, I’ll share some Windows Registry hacks that will ensure your PC gives the best gaming experience that it is capable of. And don’t worry, I’ll provide all the instructions you need to safely apply these hacks.
Managing Windows Registry
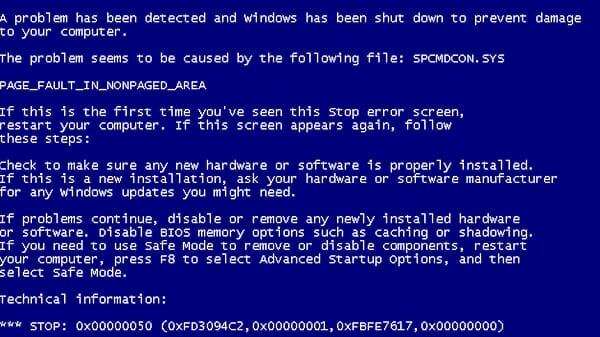
Before I tell you how to apply these hacks, you must know how to properly access and manage the Registry. An incorrect change in the registry can negatively impact Windows or even fully corrupt it, and it can be quite difficult to fix a broken Registry.
Below I am going to tell you how to access, backup, and navigate Windows Registry. Make sure you follow the instructions as is to avoid any issues.
Access Windows Registry
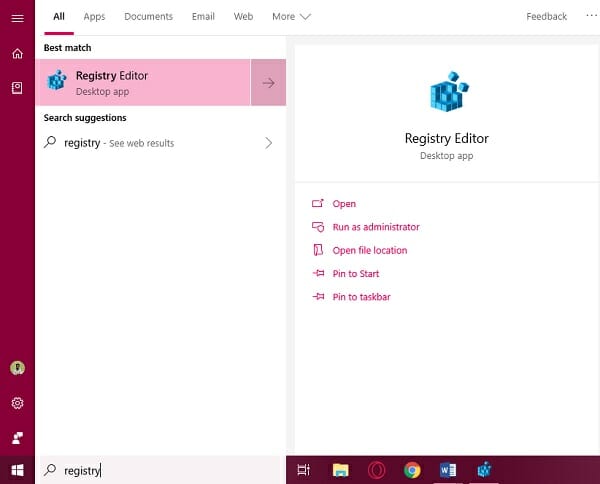
The easiest way to open the Windows Registry is to search for registry in Windows Search and open the Registry Editor app. However, a more reliable method would be to use the Run command instead since Windows Search can be disabled. Just press the Windows+R keys and type regedit in the Run dialog to open the Registry.
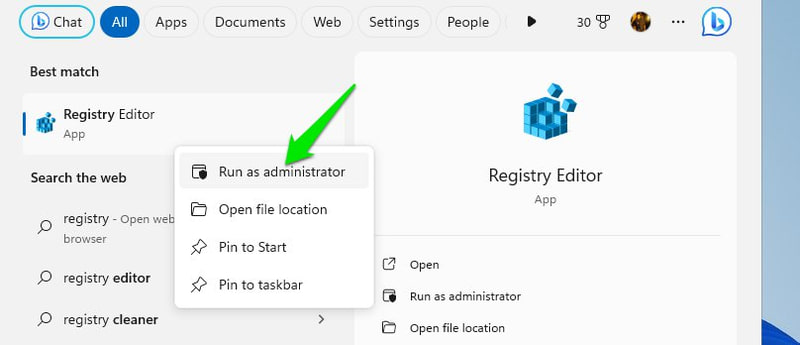
You may also open the Registry as administrator by right-clicking the app and selecting Run as administrator. This will ensure you can edit all the entries and don’t face any restrictions while editing. However, it isn’t necessary as Windows can just ask you to give administrator permissions when an entry requires it.
Backup Windows Registry
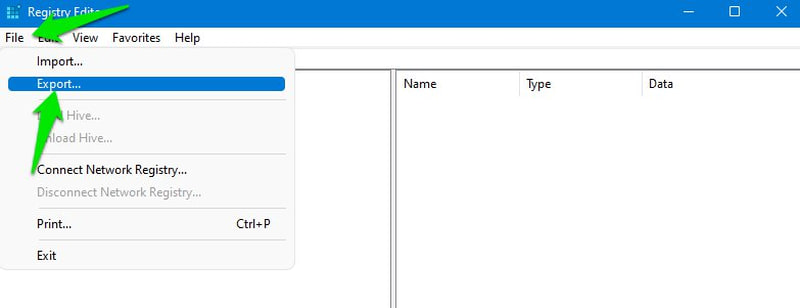
Before making any edits, it’s crucial to back up the Registry to ensure you can fix it in case of an incorrect entry. Thankfully, it’s really easy to do that. Once the Registry opens, click on the File menu and select Export from it. Save this file somewhere safe so you can access it later.
When you need to restore the Registry, click on the File menu again and select Import to import this saved file. You can also use a Registry cleaner app as most have backup and restore features.
Navigating Windows Registry
Windows Registry is organized like a hierarchical tree using keys, subkeys, and values. There are five main keys and many subkeys with their own values. You can create new keys and values as required.
To access a specific key, you’ll have to open all the parent keys to reach it. You can either do this manually by clicking on each key or copy/paste the key location in the search bar at the top.
To make things easier for you, I’ll give you the exact location of the keys that you need to edit for each hack. You can just copy/paste it in the search bar right where Computer\ is written and the Registry will open the exact location.
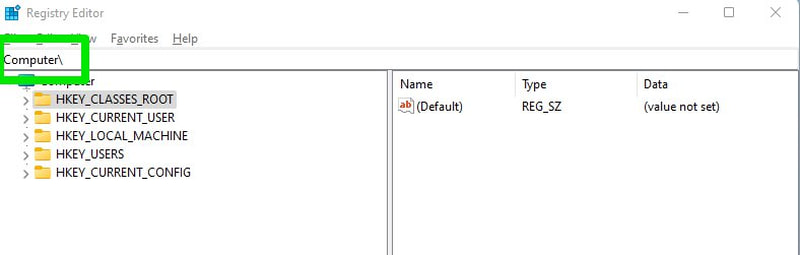
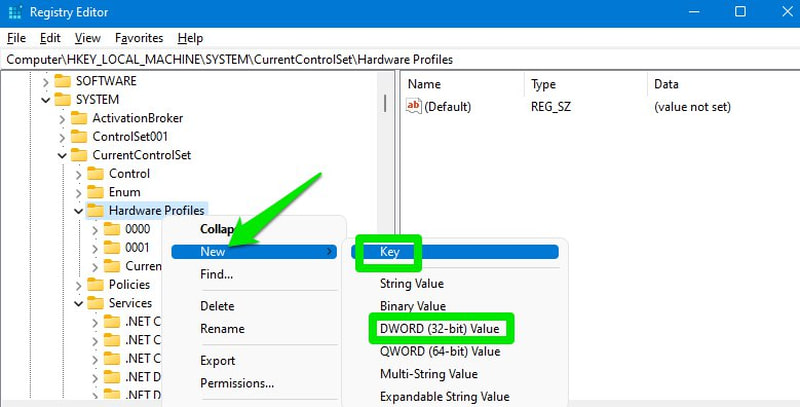
And if you need to create a new key here, right-click on the key and select New > Key. If you want to create a new DWORD value instead, then right-click on the key and select New >DWORD (32-bit) Value.
When changes are made, most of them are applied immediately. However, many require you to restart the PC or at least logoff and then log on again. I’ll recommend you restart your PC after applying the below hacks.
Disable Power Throttling
Windows throttles CPU power in different situations to save power. Even though you should be more concerned about this if you are optimizing gaming on a laptop, it can happen to desktop users too, depending on power settings. This can be really bad for games as not only does it affect the CPU performance, but the GPU too.
Since it can lead to the GPU running faster than the CPU, it can create a bottleneck situation where overall performance is negatively affected. To avoid this, you can disable power throttling in the registry. Here’s how:
In the Registry, move to the below-mentioned location.
HKEY_LOCAL_MACHINE\SYSTEM\CurrentControlSet\Control\Power\PowerThrottling
In the PowerThrottling key, there will be a PowerThrottlingOff entry in the right panel. Open it and change its value to 1.
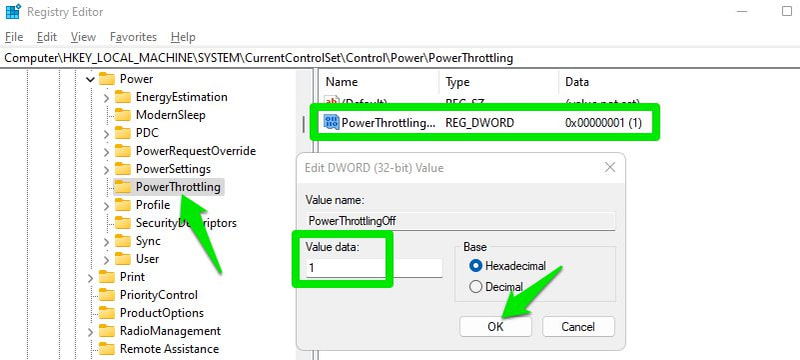
If the entry isn’t there, then create a new DWORD (32-bit) Value entry under PowerThrottling and name it PowerThrottlingOff. Once created, change its value to 1.
Turn Off Network Throttling
Windows has a default mechanism to throttle the network under certain circumstances; it mainly affects non-media content. However, depending on your network speed and usage, it can also affect gameplay and lead to high ping and spikes. It’s better to just disable this feature to avoid a chance of it messing up your gameplay.
To do so, move to this location in the Registry:
HKEY_LOCAL_MACHINE\SOFTWARE\Microsoft\Windows NT\CurrentVersion\Multimedia\SystemProfile
Here double-click on NetworkThrottlingIndex and set its value to ffffffff.
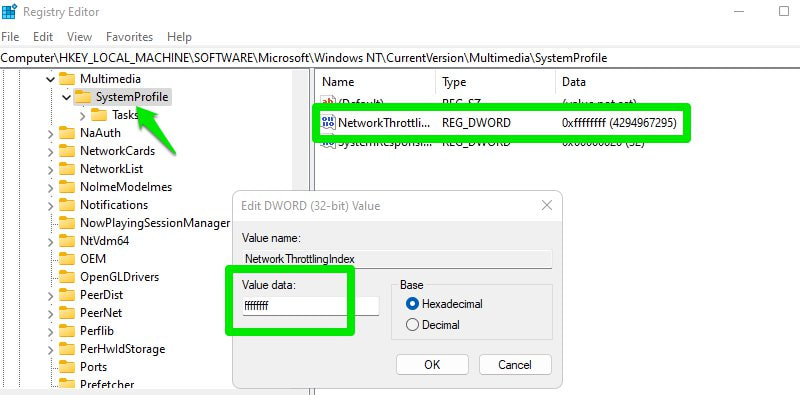
If you notice problems with network usage of background processes after this change, you can always change this value back to 10.
Optimize TCP
Transmission Control Protocol (TCP) is a protocol that governs how computers establish connections and reliably exchange data over networks, ensuring data arrives correctly and in the right order. Optimizing TCP directly improves your connection bandwidth usage, lowers latency, and stabilizes the connection.
For gaming, this means improved ping (especially to servers far away), and a lower chance of ping spikes, lag, and disconnections. If you are still using the default Windows TCP settings, then there are a bunch of TCP optimizations you can make to improve your online gaming experience.
First, open the below location in the Registry:
HKEY_LOCAL_MACHINE\SYSTEM\CurrentControlSet\Services\Tcpip\Parameters
Here in the right column, there are multiple entries that you can adjust to optimize TCP. Below I am listing all of them with the optimized values that you should apply. Just double-click on an entry, select Decimal, and then change the value to the optimum one.
DefaultTTL > 64
GlobalMaxTcpWindowSize > 65535
MaxUserPort > 65534
Tcp1323Opts > 1
TcpMaxDupAcks > 2
TCPTimedWaitDelay > 30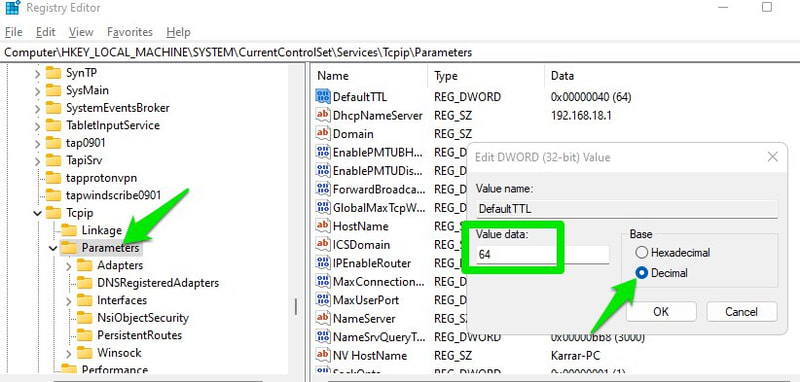
Disable CPU Core Parking
When there is less load on the CPU, Windows can turn off CPU cores to conserve power and minimize heat. If you are looking for the best gaming experience, turning off this feature can slightly improve performance.
However, you should only do this when even slightly smoother experience matters to you. Windows, by default, is really good at handling the cores, so it won’t affect your gameplay significantly. Below are some possible issues core parking introduces:
- The parking and unparking process adds slight latency, which is noticeable in fast-paced games.
- Before disabling a core, Windows may migrate its processes to another core, which can introduce slight latency.
- The game FPS may fluctuate.
- It can create a bottleneck situation for games that depend on the CPU, as the GPU runs at a higher power than the CPU.
- Many games that utilize multiple cores may not be optimized to work well with core parking. They may not use full CPU power even though they can.
If heat and power efficiency aren’t a problem for you, then you may disable core parking from the Registry.
Move to the below-mentioned location:
HKEY_LOCAL_MACHINE\SYSTEM\CurrentControlSet\Control\Power\PowerSettings\54533251-82be-4824-96c1-47b60b740d00\0cc5b647-c1df-4637-891a-dec35c318583
Here change the value of Attributes entry to 0.

Prioritize Games
In the Registry, you can tell Windows to prioritize games when allocating CPU and GPU resources. This will not only ensure stable performance with minimum stutters but could also improve overall game performance if other processes were affecting it.
Open up this location:
HKEY_LOCAL_MACHINE\SOFTWARE\Microsoft\Windows NT\CurrentVersion\Multimedia\SystemProfile\Tasks\Games
Here, you need to change the value of multiple entries, as I list below:
Affinity > f
Background Only > False
Background Priority > 1
GPU Priority > 8
Priority > 6
Scheduling Category > High
SFIO Priority > High
SFIO Rate > 4
If Background Priority and SFIO Rate are not available here, then create two new DWORD Value entries and add the names and values, respectively.
Decrease Maximum Pre-rendered Frames
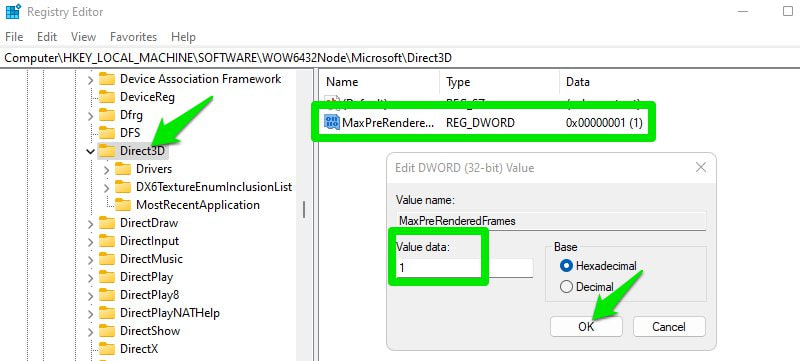
If your CPU is good enough to handle your gaming needs, then you can decrease maximum pre-rendered frames to reduce input latency. By default, the GPU renders some frames in advance before showing them on the screen. This ensures that games don’t stutter in case the CPU has to perform a different task that could delay the frame.
If you know your CPU can handle both the game and secondary tasks without a problem, then you can decrease this number to decrease the slight latency this introduces.
Go to this location in the Registry:
HKEY_LOCAL_MACHINE\SOFTWARE\WOW6432Node\Microsoft\Direct3D
Here, create a new DWORD (32-bit) Value entry and name it MaxPreRenderedFrames. Once created, change its value to 1, which will mean that only 1 frame is pre-rendered.
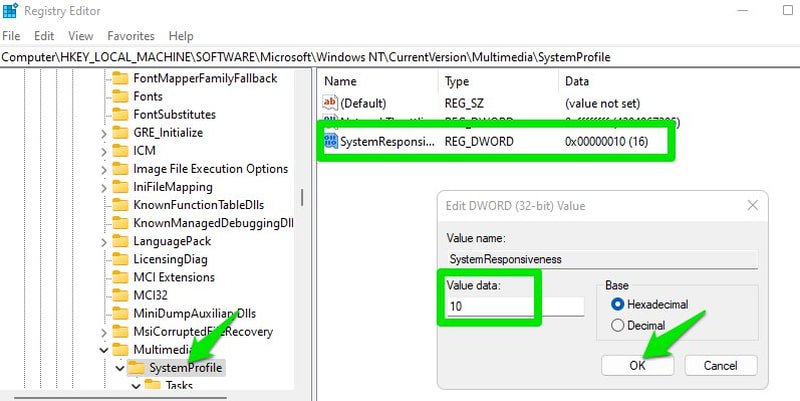
Increase System Responsiveness
Another option that creates a balance between foreground (games) and background tasks. By default, Windows makes sure that 20% of CPU resources are reserved for low-priority tasks.
You can further decrease this to 10% to free up more resources for foreground processes like games. However, it could affect background tasks if the game utilizes all the resources, and 10% isn’t enough, so be careful.
Move to this location in the Registry:
HKEY_LOCAL_MACHINE\SOFTWARE\Microsoft\Windows NT\CurrentVersion\Multimedia\SystemProfile
Here change the value of SystemResponsiveness to 10.
Turn Off Nagle’s Algorithm
By default, Windows uses Nagle’s Algorithm that ensures network efficiency by storing small packets and sending them as large packets instead. This saves bandwidth and prevents network congestion. However, in online gaming, this behavior also introduces latency as the network waits for sufficient packets to accumulate before sending them.
I will recommend you experiment with this to see if it actually improves your in-game ping or not. If it doesn’t, you should keep it enabled to ensure your network stays efficient.
To disable Nagle’s Algorithm, you need to know your IPv4 address first. To find out, press the Windows+R keys and type cmd in the Run dialog to open the Command Prompt. Here use the ipconfig/all Command Prompt command. This will show lots of information about the network. Take note of the IPv4 Address here.
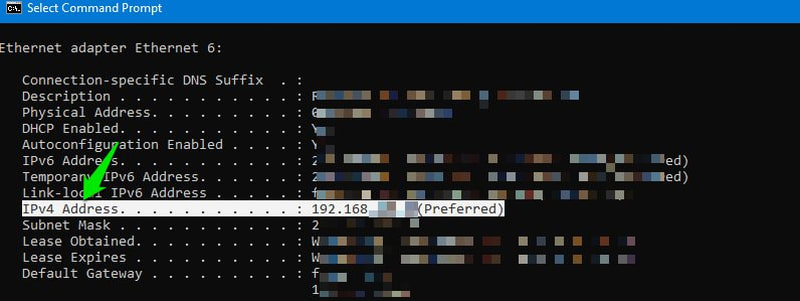
Afterward, open the below-mentioned location in the Windows Registry:
HKEY_LOCAL_MACHINE\SYSTEM\CurrentControlSet\Services\Tcpip\Parameters\Interfaces
There will be a bunch of interface keys. Open each one and look at the DhcpIPAddress value of each. You need to find the one that has the DhcpIPAddress value the same as your IPv4 address.
Once found, create two DWORD (32-bit) Value entries inside that interface key and then name them TcpNoDelay and TcpAckFrequency. Afterward, change the value of each to 1 to disable Nagle’s Algorithm.
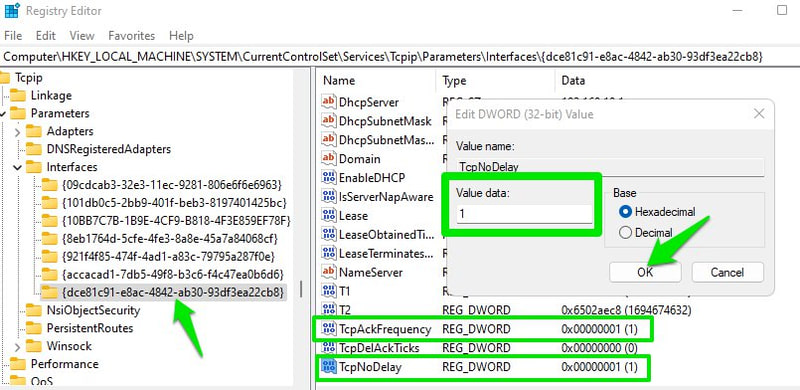
If this doesn’t improve your in-game ping, make sure you delete both of these new entries to enable Nagle’s Algorithm.
Ending Words
I have personally applied all of these hacks, and I can see a noticeable improvement in both the in-game ping and performance. Talking about performance, I didn’t achieve any noticeably higher FPS, probably because I have already optimized Windows Settings to boost performance. Although I suddenly see no stutters in games that used to stutter when heavy VFX was used.