
The BCD Store file is usually located in the Boot folder of a Windows 7/8.1/10 OS’s System Reserved partition;
which in many cases will not even have a drive letter assigned to it. So if you really want to see where these system files are located, you’ll first need
to go into Disk Management and give that partition a drive letter. (Note: Some OS distributions, such as the ‘Embedded Standard’ editions, do not have a
separate System Reserved partition.) Apart from possibly needing to add a drive letter, all system files are by default hidden from view, so you’ll also
need to change the Folder Settings to show hidden system files. But, since the BCD file is kept open by the OS, you wouldn’t be able to open
it to look at it anyway! However, you can use the BCDEDIT program to make a backup copy of the BCD file which you
can then open with a hex editor (to see everything) or even NOTEPAD (to see all the readable characters). [Contents of a real BCD file are linked below.]
Because you need Administrator privileges to access the BCD file with BCDEDIT. So, be sure to run the Command Prompt using a RIGHT-CLICK and selecting: («Run as administrator»).
The following is what you
would typically see when entering the command bcdedit all by itself:
C:\>bcdedit

Windows Boot Manager
--------------------
identifier              {bootmgr}
device                  partition=\Device\HarddiskVolume1
description             Windows Boot Manager
locale                  en-US
inherit                 {globalsettings}
default                 {current}
resumeobject            {ad68f292-2870-11e3-9c80-856fbacd7f33}
displayorder            {current}
toolsdisplayorder       {memdiag}
timeout                 30

Windows Boot Loader
-------------------
identifier              {current}
device                  partition=C:
path                    \Windows\system32\winload.exe
description             Windows 7
locale                  en-US
inherit                 {bootloadersettings}
recoverysequence        {ad68f294-2870-11e3-9c80-856fbacd7f33}
recoveryenabled         Yes
osdevice                partition=C:
systemroot              \Windows
resumeobject            {ad68f292-2870-11e3-9c80-856fbacd7f33}
nx                      OptIn
Note that the Boot Manager program (bootmgr) is often located in a volume without a drive letter, such as in this example, but it could
have one. If there were only one partition on the drive, then it would appear in the C: partition.
The following is a dump of a Windows™ 7/8 (or Vista) Administrator console (Command Prompt window) after entering «help bcdedit» («bcdedit /?» will give the same):
BCDEDIT - Boot Configuration Data Store Editor

The Bcdedit.exe command-line tool modifies the boot configuration data store.
The boot configuration data store contains boot configuration parameters and
controls how the operating system is booted. These parameters were previously
in the Boot.ini file (in BIOS-based operating systems) or in the nonvolatile
RAM entries (in Extensible Firmware Interface-based operating systems). You can
use Bcdedit.exe to add, delete, edit, and append entries in the boot
configuration data store.

For detailed command and option information, type bcdedit.exe /? <command>. For
example, to display detailed information about the /createstore command, type:

     bcdedit.exe /? /createstore

For an alphabetical list of topics in this help file, run "bcdedit /? TOPICS".

Commands that operate on a store
================================
/createstore    Creates a new and empty boot configuration data store.
/export         Exports the contents of the system store to a file. This file
                can be used later to restore the state of the system store.
/import         Restores the state of the system store using a backup file
                created with the /export command.

Commands that operate on entries in a store
===========================================
/copy           Makes copies of entries in the store.
/create         Creates new entries in the store.
/delete         Deletes entries from the store.

Run bcdedit /? ID for information about identifiers used by these commands.

Commands that operate on entry options
======================================
/deletevalue    Deletes entry options from the store.
/set            Sets entry option values in the store.

Run bcdedit /? TYPES for a list of datatypes used by these commands.
Run bcdedit /? FORMATS for a list of valid data formats.

Commands that control output
============================
/enum           Lists entries in the store.
/v              Command-line option that displays entry identifiers in full,
                rather than using names for well-known identifiers.
                Use /v by itself as a command to display entry identifiers
                in full for the ACTIVE type.

Running "bcdedit" by itself is equivalent to running "bcdedit /enum ACTIVE".

Commands that control the boot manager
======================================
/bootsequence   Sets the one-time boot sequence for the boot manager.
/default        Sets the default entry that the boot manager will use.
/displayorder   Sets the order in which the boot manager displays the
                multiboot menu.
/timeout        Sets the boot manager time-out value.
/toolsdisplayorder  Sets the order in which the boot manager displays
                    the tools menu.

Commands that control Emergency Management Services for a boot application
==========================================================================
/bootems        Enables or disables Emergency Management Services
                for a boot application.
/ems            Enables or disables Emergency Management Services for an
                operating system entry.
/emssettings    Sets the global Emergency Management Services parameters.

Command that control debugging
==============================
/bootdebug      Enables or disables boot debugging for a boot application.
/dbgsettings    Sets the global debugger parameters.
/debug          Enables or disables kernel debugging for an operating system
                entry.
Note: What you see above is exactly how a Vista/Win7/8 display appears; and, yes, the word «Command» in the last heading was spelled wrong by
Microsoft, it should be plural (Commands) just like all the others. And if there really was only one, then the word «control» should have
had an ‘s’ after it! This was still true for a Windows 7 SP1 install we examined, and even Windows 8.1. Is this a case of «If it ain’t
broke, don’t fix it!»? Apparently, the cost of qualifying a revised program outweighs this grammatical error.
And even though Windows™ 10 added six new commands (shown in white below), they
doubled the same grammatical error (shown in red). Now it’s incorrect for both of the last two command types:
BCDEDIT - Boot Configuration Data Store Editor

The Bcdedit.exe command-line tool modifies the boot configuration data store.
The boot configuration data store contains boot configuration parameters and
controls how the operating system is booted. These parameters were previously
in the Boot.ini file (in BIOS-based operating systems) or in the nonvolatile
RAM entries (in Extensible Firmware Interface-based operating systems). You can
use Bcdedit.exe to add, delete, edit, and append entries in the boot
configuration data store.

For detailed command and option information, type bcdedit.exe /? <command>. For
example, to display detailed information about the /createstore command, type:

     bcdedit.exe /? /createstore

For an alphabetical list of topics in this help file, run "bcdedit /? TOPICS".

Commands that operate on a store
================================
/store          Used to specify a BCD store other than the current system default.
/createstore    Creates a new and empty boot configuration data store.
/export         Exports the contents of the system store to a file. This file
                can be used later to restore the state of the system store.
/import         Restores the state of the system store using a backup file
                created with the /export command.
/sysstore       Sets the system store device (only affects EFI systems, does
                not persist across reboots, and is only used in cases where
                the system store device is ambiguous).

Commands that operate on entries in a store
===========================================
/copy           Makes copies of entries in the store.
/create         Creates new entries in the store.
/delete         Deletes entries from the store.
/mirror         Creates mirror of entries in the store.

Run bcdedit /? ID for information about identifiers used by these commands.

Commands that operate on entry options
======================================
/deletevalue    Deletes entry options from the store.
/set            Sets entry option values in the store.

Run bcdedit /? TYPES for a list of datatypes used by these commands.
Run bcdedit /? FORMATS for a list of valid data formats.

Commands that control output
============================
/enum           Lists entries in the store.
/v              Command-line option that displays entry identifiers in full,
                rather than using names for well-known identifiers.
                Use /v by itself as a command to display entry identifiers
                in full for the ACTIVE type.

Running "bcdedit" by itself is equivalent to running "bcdedit /enum ACTIVE".

Commands that control the boot manager
======================================
/bootsequence   Sets the one-time boot sequence for the boot manager.
/default        Sets the default entry that the boot manager will use.
/displayorder   Sets the order in which the boot manager displays the
                multiboot menu.
/timeout        Sets the boot manager time-out value.
/toolsdisplayorder  Sets the order in which the boot manager displays
                    the tools menu.

Commands that control Emergency Management Services for a boot application
==========================================================================
/bootems        Enables or disables Emergency Management Services
                for a boot application.
/ems            Enables or disables Emergency Management Services for an
                operating system entry.
/emssettings    Sets the global Emergency Management Services parameters.

Command that control debugging
==============================
/bootdebug      Enables or disables boot debugging for a boot application.
/dbgsettings    Sets the global debugger parameters.
/debug          Enables or disables kernel debugging for an operating system
                entry.
/hypervisorsettings  Sets the hypervisor parameters.

Command that control remote event logging
=========================================
/eventsettings  Sets the global remote event logging parameters.
/event          Enables or disables remote event logging for an operating
                system entry.
BCD Editor EXAMPLES:
If you ask for help on the «/export» switch, you’ll see:
C:\>bcdedit /export /?

bcdedit /export <filename>

This command exports the contents of the system store into a file.  This file
can be used later to restore the state of the system store.  This command is
only valid for the system store.

<filename>          The filename to be used as the destination for the export.
                    If the filename contains spaces, it must be enclosed in
                    quotation marks ("").

Example:

The following command exports the system store to the specified file:

    bcdedit /export "C:\Data\BCD Backup"
So we tried the following and saw it was successful:
C:\>bcdedit /export "C:\Users\<your user name>\Documents\bcdtemp.bin"
The operation completed successfully.
After examining this backup file in our Documents folder (using HxD), our first reaction was: «Man,
this thing appears to be full of all kinds of needless ‘gunk’!»
It even saves the path and filename to this backup file
,
inside the file
itself
!
Then we compared it to the original BCD file by making a copy of that file while the OS was offline (connected as a slave drive to a
different OS), and found there were MANY differences! So, the ‘backup copy’ is not really a true copy. And the differences go well beyond simply
changing the path name of its location.
So why is this file so ‘cluttered’ compared to the Windows XP boot.ini file? Its first 4 bytes
are a big clue: «regf«. Reason: The BCD file has the same format as a Windows Registry hive! (For example, the NTUSER.DAT
file begins with the same 4 bytes.) And in fact, once a Windows Vista/7/8 OS has actually started booting-up, it loads the BCD file into the Windows Registry
at: HKEY_LOCAL_MACHINE\BCD00000000.
BOOTMGR Experiments:
What happens if we change the NT Disk Signature on a Windows 7 disk drive?
To test this, we used a disk editor to alter the bytes at offsets 0x1B8 through 0x1BB in the MBR (first sector of the disk drive) by simply
adding 1 to each byte. If you attempt to boot a PC after doing that, you’ll see the following BLACK error screen:
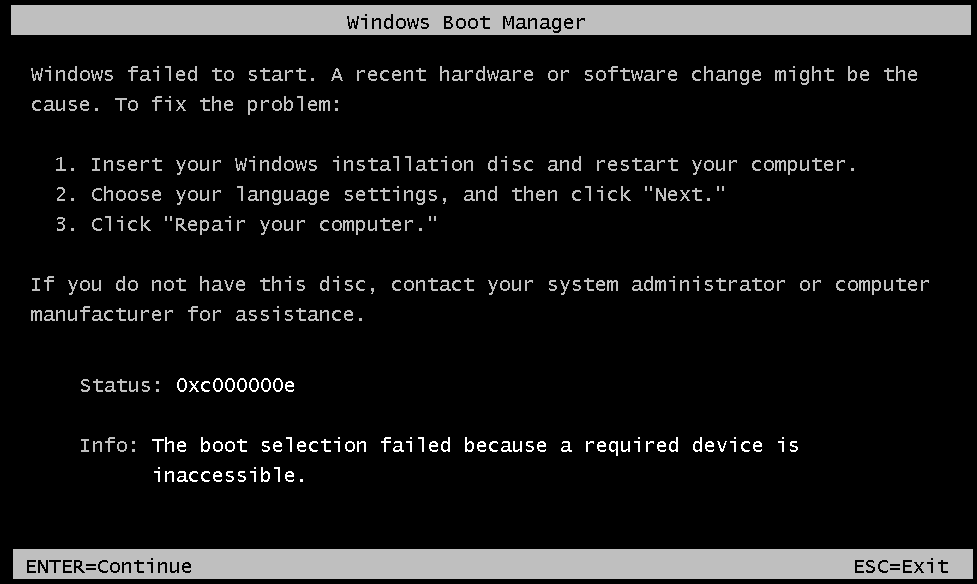
In previous Windows versions, the OS would still boot up this way; even though there was the
possibility some program that used the Disk Signature could then have problems. Note: The same error message, with Status: code of 0xc000000e,
will also be displayed if we change those NT Sig. bytes to all zeros! Only if you edit these bytes back to their original values will the PC boot-up again.
It’s also possible to see such an error if your PC is somehow directed to start booting from a drive other than the normal boot drive, and the BCD
Store on that drive points to the first drive, which will obviously contain a different Disk Sig. than what is stored in that drive’s BCD. Most PC BIOS have
a ‘Boot Menu’ (often accessible using the F12 key at boot-up) which temporarily makes whatever drive you select, be the first drive on the PC, so a
Windows 7, 8.1 or 10 OS on that drive will not have this error! (Note: Unless you plan on always keeping an original Windows OS drive
and a new Windows OS drive
both connected
to your PC, you should never do a new OS install with any other drives connected
to the PC!) Why? Because new Windows OS installs often make changes to a primary disk drive, even when installed to a secondary drive! Disconnect all
but the disk drive you intend to install a new Win OS on, and in the future you will be able to boot-up the new drive all by itself (or using a Boot Menu key)
without it depending upon some primary disk drive you decided to remove, or that has failed.
NOTE: The error shown above is a function of the bootmgr program! We know this, because the same error message will be displayed after
altering the NT Disk Signature on a drive that has had its entire C: Volume (where the actual Windows OS resides) removed! So, the Boot
Manager must check the NT Disk Signature before it even looks for the presence of the C: Volume.
But how does bootmgr know what those hex
bytes should be?
Answer: After examining both our copy and the original BCD file, we found the NT Disk Signature there, in the same
order as found in the MBR Sector, no less than 9 times. For our small test install of a new Windows 7 OS, this shows
where those bytes occurred (highlighted with a pink background color); along with all the other data contained in a BCD Store file.
Note: The \Boot folder of your System Reserved partition will also contain a few LOG files: BCD.LOG, BCD.LOG1 and BCD.LOG2, but the numbered files are often empty. This LOG file is a copy of the BCD file, having the same location
written inside it and all the general indications of a BCD Registry file, but about half its bytes may be different.
Have fun examining your own backup BCD copy.
Why is it so difficult to move the C: Volume under Windows 7 or later?
To clarify: Under most previous Windows installs, such as Windows 98, people who performed multi-booting or simply had many different partitions on their
PCs often used a program called Partition Magic to shrink or even completely rearrange the layout of partitions on their disk drives. But attempting
to change where the C: Volume begins under Windows 7 results in a similar BLACK screen error as above; including the same exact message: «Info: The boot selection failed because a required device is inaccessible.» But with a different code: «Status: 0xc0000225.«
[Note: This is true whether the correct location
is specified in the Partition Table or not; same Status code will be shown in either case. In fact, we doubt that bootmgr even looks at the
Partition Table, provided it can find the C: volume where it is supposed to be!]
This problem is similar to the one above (concerning the NT
Disk Signature), but involves the exact sector location of the C: drive’s partition.
Windows Boot Sector stored?
The reason for the question being: Although we can find our drive’s NT Disk Signature in the BCD Store, we can
not find a sector location for the C: drive! Before searching, we had thought only the
BCD file would need to be updated if we moved the C: Volume. We knew how partitions are referenced in a Windows REGISTRY (see NTFS Disk Signature), but could not find any similar bytes; other than the 4 bytes of the NT Disk Sig., in our BCD file! So how
does bootmgr know where the sector offset location of a C: drive should be, and prevent booting from an OS volume we simply moved and did
not resize; even though the data in both the Partition Table and its Boot Sector (Hidden Sectors which give us sector offset to Boot Sector) have
already been updated?
NOTE: All of the following is still under construction . . .
mainly because we have yet to find a solution that allows one to effectively move where a Windows 7 OS’s C: drive partition begins! After using a Microsoft
install DVD to REPAIR such a drive, although it did allow us to boot-up that drive and use it, the repair did not change anything permanently! After
attempting to boot-up the drive again, the same error message is displayed, no matter how many times we used the DVD to ‘repair’ the drive!!.
So what prevents a Windows 7 OS from booting-up if we change where its partition begins; even though we make sure the data in the partition table, as well as that volume’s Boot Sector, have had the size and location of the
partition changed correctly? Those were the only changes needed in any previous Windows version, yet doing so for a Windows 7 OS, results in a ‘blue
screen’ (actually a ‘BLACK-screen’), stating the OS cannot be located!
Could it be as simple as the OS already having accessed the REGISTRY; with much of the system already running in Memory, it then finds the offset stored
there does not match the values in the Partition Table and/or Boot Sector, so it gives us essentially a false message, stating: «The boot selection
failed because a required device is inaccessible.»? Yet, the bootmgr program could only know that if it did find and
access the Registry.
Other Experiments:
2. We next carried out the following steps on a copy of our Windows 7 OS install in order to verify our theory about why Windows 7 does this:
A) Copy the hidden file bootmgr and various folders (including «Boot\enUS» and «Boot\Fonts») from the
«System Reserved» partition to the root directory of the C:\ drive. Note: Five or six files must be ‘skipped’ when doing this, because the
BCD Store (and associated files) will remain in use by the OS (preventing them from being copied)!
B) Create a copy of the BCD file
in C:\Boot by using this command (as Administrator): bcdedit /export C:\Boot\BCD
C) Change the
MBR Sector, so the main OS partition is the ‘Active’ partition.
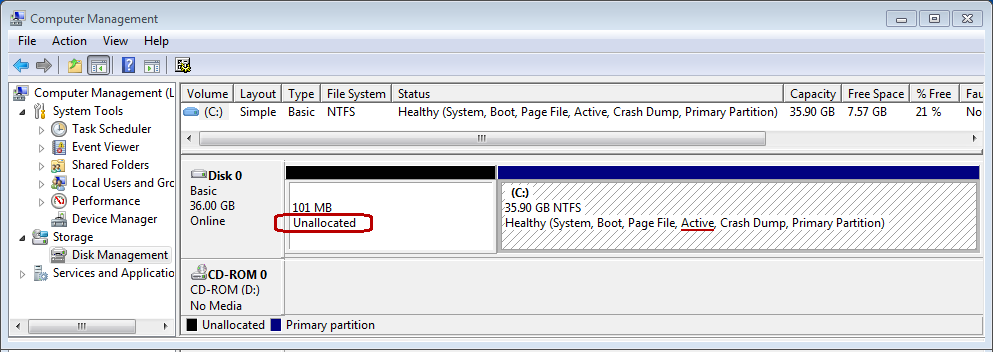
After that we were able to boot-up the OS from only the C: drive. In order to prove
this is true, we used HxD to zero-out the entry in the Partition Table for the System Reserved partition. (Note: The reason we did not
use Windows to ‘delete’ the partition, is because that could have ruined being able to access it again in the future. By saving those hex bytes elsewhere
and zero-filling the entry, we can simply enter those bytes in the table again, in order to restore and access the partition!) Upon rebooting and opening
the Disk Management utility, one can graphically see this is true:
D) We shrank the size of this Volume (C:) to only 8 GB in order to run the next test below.
What about BOOTSTAT.DAT and BOOTSECT.BAK files?
E) shift the beginning of the C: drive to where the System Reserved partition had been, by correcting the data in both the
Boot Sector (VBR) and the Partition Table; not to mention, actually moving the Boot Sector and its following Volume Boot Record sectors as well
This guide explains how to use the BCDEdit (bcdedit.exe) utility for the following Windows versions: Vista, 7, 8, 8.1or10
BCDEdit is the command-line utility that you can use to manage BCD stores on your computer. BCDEdit works similarly to Bootcfg.exe available on Windows XP systems, but with more options available and various improvements.
BCDEdit on Windows
You must be logged-in as an Administrator in order to use BCDEdit.
Always create a backup of your current BCD file before using the utility with the help of the /export parameter:
bcdedit /export C:\exportBCDfile
To open bcdedit, you need to:
- Open Command Prompt
- Type:
bcdedit
- Press Enter
When you type bcdedit in Command Prompt, the output is your computer’s current BCD configuration:
Microsoft Windows [Version 6.0]
 Copyright (c) 2006 Microsoft Corporation. All rights reserved.

 C:\Windows\system32>bcdedit

 Windows Boot Manager
 --------------------
 identifier {bootmgr}
 device partition=C:
 description Windows Boot Manager
 locale en-US
 inherit {globalsettings}
 default {current}
 resumeobject {0}
 displayorder {current}
 toolsdisplayorder {memdiag}
 timeout 30

 Windows Boot Loader
 -------------------
 identifier {current}
 device partition=C:
 path \Windows\system32\winload.exe
 description Microsoft Windows Vista
 locale en-US
 inherit {bootloadersettings}
 recoverysequence {0}
 recoveryenabled Yes
 osdevice partition=C:
 systemroot \Windows
 resumeobject {0}
 nx OptIn
BCDEdit on Windows XP
Windows XP doesn’t have a bcdedit.exe utility available, but the bootcfg.exe utility instead. Bootcfg.exe is part of the Windows XP’s Recovery Console.
To read about bootcfg, follow our guide: Bootcfg – Guide for Windows XP.
BCDEdit on Windows Vista
To run bcdedit.exe on a Windows Vista system, you have these options available:
- Use the original Windows Vista installation media to access Command Prompt
- If Repair Your Computer option is available on Advanced Boot Options menu, boot into this mode to access Command Prompt
- Use Easy Recovery Essentials
If you have the Windows Vista installation DVD, follow these steps:
- Insert the installation media and boot from it
- Select a language, time and keyboard and click Next
- Click Repair your computer
Windows Vista Repair Your Computer Menu
- Select the operating system
- Click Next
- At the System Recovery Options screen, click Command Prompt
Windows Vista System Recovery Options
- Type:
bcdedit.exe
- Press Enter
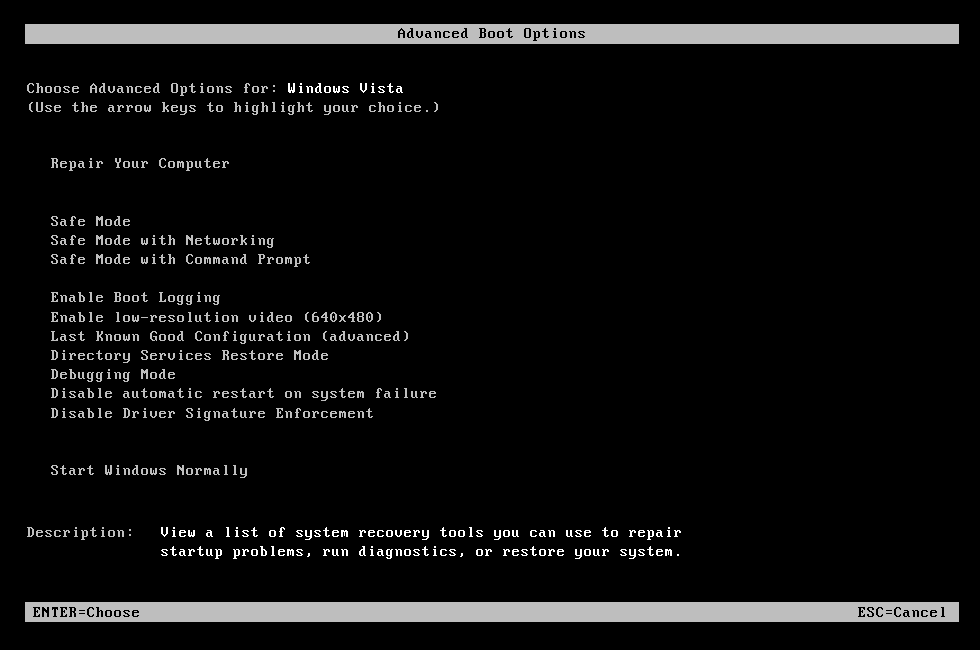
If you have the “Repair Your Computer” option available, you can access Command Prompt from there:
- Restart the computer
- Press the F8 key to open the Advanced Boot Options menu
- Select Repair Your Computer and press Enter

- If Repair Your Computer isn’t available, the recovery tools aren’t installed on your computer.
- At the System Recovery Options screen, click Command Prompt
- Type:
bcdedit.exe
- Press Enter
If you use Easy Recovery Essentials Command-line:
- Download Easy Recovery Essentials
- Burn the ISO Image. Follow our instructions on how to burn a bootable ISO image. If you’d like to have a recovery USB instead, follow our instructions on how to make a recovery USB.
- Boot Easy Recovery Essentials from the CD, DVD or USB
- Select Launch Command Line


To download Easy Recovery Essentials, click here.
BCDEdit on Windows 7
The options to run bcdedit.exe on Windows 7 systems are similar to those of Windows Vista.
If you have the Windows 7 installation DVD available, follow these steps:
- Insert the DVD in the optical drive
- Boot from it by restarting the computer and pressing any key when prompted
- Select a language, time and keyboard
- Click Next
- Click Repair your computer

Install Now (Windows 7)
- Select the operating system from the list and click Next
- At System Recovery Options, click Command Prompt
- Type:
bcdedit.exe
- Press Enter

If you have the “Repair Your Computer” available at “Advanced Boot Options” (most Windows 7 systems have these recovery tools installed), follow these steps:
- Restart the computer
- Press the F8 key to open Advanced Boot Options
- Select Repair your computer

Advanced Boot Options on Windows 7
- Press Enter
- At the System Recovery Options, click Command Prompt
- Type:
bcdedit.exe
- Press Enter

If you use Easy Recovery Essentials Command-line:
- Download Easy Recovery Essentials
- Burn the ISO Image. Follow our instructions on how to burn a bootable ISO image. If you’d like to have a recovery USB instead, follow our instructions on how to make a recovery USB.
- Boot Easy Recovery Essentials from the CD, DVD or USB
- Select Launch Command Line
To download Easy Recovery Essentials, click here.
BCDEdit on Windows 8
On Windows 8 or Windows 8.1 systems, you need to have the original installation media (DVD or USB drive) in order to access Command Prompt.
If you have the installation media, follow these steps:
- Insert the Windows 8 DVD or Windows 8.1 USB drive
- Restart the computer and boot from the DVD/USB
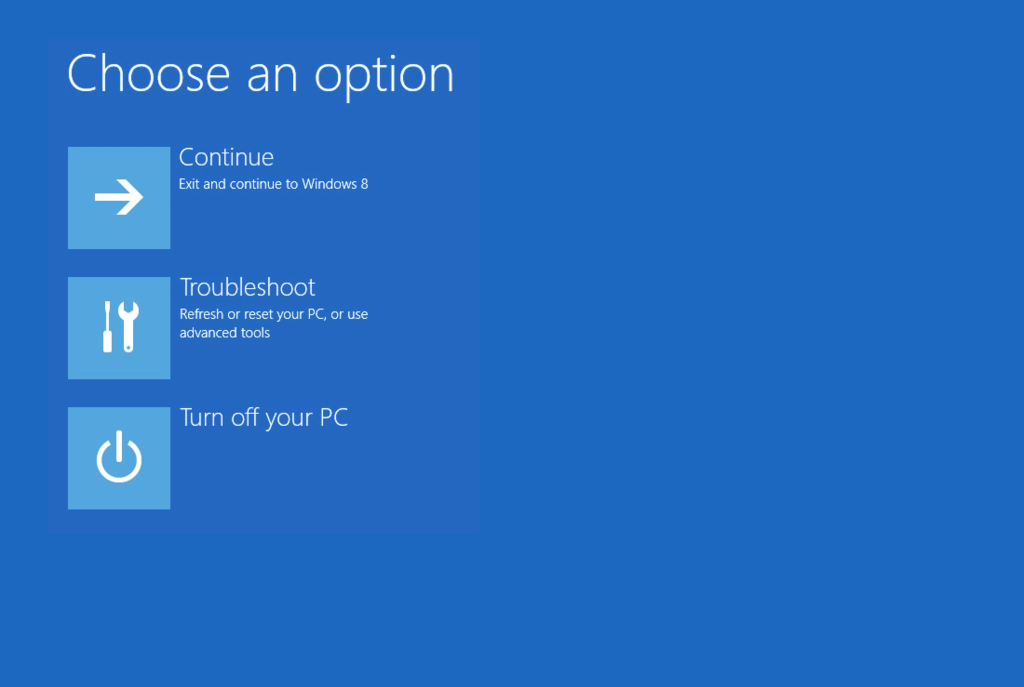
- Click Repair your computer

Windows 8 Repair Your Computer Menu
- Click Troubleshoot

Troubleshoot in Windows 8 recovery options screen
- Click Command Prompt
- Type:
bcdedit.exe
- Press Enter

If you use Easy Recovery Essentials Command-line:
- Download Easy Recovery Essentials
- Burn the ISO Image. Follow our instructions on how to burn a bootable ISO image. If you’d like to have a recovery USB instead, follow our instructions on how to make a recovery USB.
- Boot Easy Recovery Essentials from the CD, DVD or USB
- Select Launch Command Line
To download Easy Recovery Essentials, click here.
BCDEdit on Windows 10
On Windows 10 systems, you need to have the original installation media (DVD or USB drive) in order to access Command Prompt.
If you have the installation media, follow these steps:
- Insert the Windows 10 media
- Restart the computer and boot from the DVD/USB
- Click Repair your computer

- Click Troubleshoot

- Click Command Prompt
- Type:
bcdedit.exe
- Press Enter


If you use Easy Recovery Essentials Command-line:
- Download Easy Recovery Essentials
- Burn the ISO Image. Follow our instructions on how to burn a bootable ISO image. If you’d like to have a recovery USB instead, follow our instructions on how to make a recovery USB.
- Boot Easy Recovery Essentials from the CD, DVD or USB
- Select Launch Command Line
To download Easy Recovery Essentials, click here.
Commands and parameters
For the complete list of commands and parameters you can use with BCDEdit, type:
bcdedit /?
Whenever you are using this utility to modify a BCD store, make use use of these parameters:
/createstoreto create a new empty boot configuration data (BCD) store./exportto export the current configuration of the BCD store./importto import a previously exported configuration file./createto create a new entry in the BCD store./deleteto delete an entry from the BCD store./deletevalueto delete a specified value./setto set a new value./defaultto specify the default entry./timeoutto specify the timeout at startup value.
For example, to create a new entry in the BCD file to load Windows XP, run these commands:
-
bcdedit /create {ntldr} /d "Windows XP" -
bcdedit /set {ntldr} device partition=C: -
bcdedit /set {ntldr} path \ntldr -
bcdedit /displayorder {ntldr} /addlast
More Information
Linked Entries
- bootcfg
Support Links
- Easy Recovery Essentials for Windows – our repair and recovery disk.
It’s an easy-to-use and automated diagnostics disk. It’s available for Windows 8, Windows 7 and Windows Vista. It’s also available for Windows XP and Windows Server.
Read more at Windows Recovery Disks.
- The NeoSmart Support Forums, member-to-member technical support and troubleshooting.
- Get a discounted price on replacement setup and installation discs: Windows XP, Windows Vista, Windows 7, Windows 8, Windows 10.
Applicable Systems
This Windows-related knowledgebase article applies to the following operating systems:
- Windows XP (all editions)
- Windows Vista (all editions)
- Windows 7 (all editions)
- Windows 8 (all editions)
- Windows 8.1 (all editions)
- Windows 10 (all editions)
Propose an edit
При запуске Bootmgr необходимы рабочие инструкции, получаемые из двоичного файла, называемого файлом данных конфигурации загрузки (BCD). Обычно этот файл находится в папке\boot активного раздела. Для настройки файла BCD используется команда Bcdedit. Давайте посмотрим, как с ее помощью построить загрузочный файл BCD с нуля
В статье «Восстанавливаем систему с помощью Bootsect», опубликованной в предыдущем номере, речь шла о том, как восстановить систему Windows 7/R2, которая перестала загружаться. В частности, были даны пояснения, касающиеся загрузочной записи Windows 7/R2 и приложения Bootmgr. .
Рабочий файл BCD обычно включает как минимум два объекта. Во-первых, это диспетчер загрузки, содержащий всю загрузочную информацию, в частности указание на то, какой элемент списка загрузки операционных систем следует использовать по умолчанию, и время ожидания выбора пользователя, если существует несколько элементов списка загрузки операционных систем. Во-вторых, файл содержит хотя бы один элемент загрузки операционных систем. Порядок создания этих объектов описан ниже.
Начнем с удаления всех существующих файлов BCD и создания нового пустого файла. По странному свойству Bcdedit, сперва надлежит создать новый файл BCD в каком-либо месте, а затем «импортировать» его, то есть скопировать все его содержимое в «официальный» файл BCD в папке \boot активного тома. Это можно сделать с помощью двух команд, вводимых в окне командной строки с повышенными привилегиями:
bcdedit/createstore bcd
bcdedit/import bcd
Эти команды работают независимо от того, существует папка \boot\bcd в нужном месте либо в загрузочном томе вообще нет файлов BCD. После выполнения описанных выше действий вновь созданный файл BCD больше не нужен, и его можно удалить.
Теперь создадим диспетчер загрузки для файла BCD с помощью следующей команды:
bcdedit/create {bootmgr}
Отметим параметр/create в этом варианте команды вместо применявшегося ранее /create store. Этот параметр позволяет создавать различные виды объектов BCD. С использованием данного параметра в комбинации с идентификатором {bootmgr} создается диспетчер загрузки. Я опускаю описание использования команды с параметром /d, которое содержится в любом примере, который я смог найти в Интернете. При создании диспетчера загрузки эта информация не нужна.
Диспетчер загрузки не требует сложной настройки. Необходимо лишь указать загрузочный том и время ожидания выбора пользователем элемента списка загрузки операционных систем:
bcdedit/set {bootmgr} device boot
bcdedit/timeout 30
Перейдем к созданию элемента списка загрузки операционных систем, который укажет диспетчеру загрузки выполнить загрузку Windows из файлов в папке \Windows одного из томов системы. Обычно таким томом является диск C, однако в случае загрузки из среды предустановки Windows (WinPE) необходимо проверить, на каком диске находится папка \Windows, поскольку в WinPE он может называться D или E.
Создадим элемент списка загрузки операционных систем:
bcdedit/create/d "Windows 7"/application osloader
Параметры /create (без идентификатора) и /application osloader указывают на то, что элемент списка загрузки операционных систем создается для Vista и более поздней версии Windows. Параметр /d содержит метку, которую диспетчер загрузки указывает, предлагая варианты элементов списка загрузки операционных систем. После выполнения команды система возвращает новый глобально уникальный идентификатор (GUID), который нужно вставить в следующую команду:
bcdedit/default {}
На данном этапе мы имеем «голый» объект, для которого нужно установить некоторые значения с помощью команды Bcdedit/set, рассматривавшейся в предыдущих выпусках, посвященных Bcdedit. Какие значения следует устанавливать? Ответ прост. Берем выходные данные Bcdedit, полученные для исправной копии Windows, и используем их как модель. В моем случае папка \Windows находится на диске D, поэтому я ввожу следующее:
bcdedit/set {default} device partition=d:
bcdedit/set {default} path\windows\system32\boot\winload.exe
bcdedit/set {default} osdevice partition=d:
bcdedit/set {default} systemroot\Windows
bcdedit/set {default} detecthal yes
Наконец, вводим следующую команду, чтобы система Windows «увидела» элемент списка загрузки операционных систем должным образом:
bcdedit/displayorder {default}/addlast
Попробуйте это проделать на тестовой системе, и вы очень быстро решите проблемы с загрузкой.
Марк Минаси (www.minasi.com/gethelp) — старший редактор журнала Windows IT Pro, сертифицированный системный инженер по продуктам Microsoft
В Windows XP загрузочная информация хранилась в файле boot.ini, и для внесения изменений в меню загрузки достаточно было просто отредактировать этот файл в текстовом редакторе. Начиная с Windows Vista все поменялось, и теперь меню загрузки операционной системы находится в хранилище загрузки (Boot Configuration Data, BCD). Некоторые параметры меню загрузки можно изменить привычным способом, используя графический интерфейс, но полный доступ к BCD возможен только из командной строки.
Мы рассмотрим несколько способов внесения изменений в загрузочное меню. Итак, способ первый.
Апплет панели управления Свойства системы.
Для того чтобы добраться до параметров, отвечающих за загрузку системы, идем в меню Пуск — Панель управления — Система. Откроется окно свойств системы, в котором нужно выбрать пункт «Дополнительные параметры системы».

Затем, из дополнительных свойств системы выбираем раздел «Загрузка и восстановление» и нажимаем кнопку Параметры.
В открывшемся окне мы можем:
- посмотреть список установленных операционных систем и изменить систему, загружаемую по умолчанию.
- установить время ожидания до загрузки выбранной системы (таймаут).
- убрать отображение списка ОС при загрузке.
И все, не добавить новую запись, не изменить или удалить существующую отсюда не получится (в XP была еще кнопка «Правка», при нажатии на которую можно было вручную отредактировать загрузочное меню в Блокноте).
Настроек явно маловато, попробуем другой способ.
Оснастка Конфигурация системы.
Чтобы открыть окно Конфигурация системы, набираем сочетание клавиш Win+R , в строке Выполнить вводим команду msconfig и нажимаем ОК.
В открывшемся окне конфигурации системы переходим на вкладку Загрузка. Здесь мы можем проделать следующие действия:
- посмотреть информацию о том, какая система загружена сейчас и какая загружается по умолчанию.
- изменить систему, загружаемую по умолчанию.
- отредактировать таймаут, по истечении которого будет загружена операционная система по умолчанию.
- удалить запись из меню загрузки.
Добавить или изменить запись мы по прежнему не можем.

А что же делать, если нужно, например изменить положение записи в меню загрузки или переименовать ее? В этом нам поможет третий способ:
Утилита командной строки bcdedit
Утилита bcdedit.exe находится в системной папке Windows\System32. Для работы ей необходим административный доступ к компьютеру, поэтому оболочку командной строки запускаем от имени администратора (иначе при попытке запустить программу будет выдана ошибка).
Если просто ввести команду bcdedit без параметров, то на экран будет выведена информация, хранящаяся в BCD. Информация представлена в виде двух столбцов: слевав расположены названия параметров, справа – их значения.

Вот основные параметры, отвечающие за загрузку:
- идентификатор — идентификационный номер, указывающий на запись в меню загрузки. Представляет из себя 32-значный буквенно-цифровой код, заключенный в фигурные скобки. Для стандартных идентификаторов используются названия, например {current} — текущая система, {default} — система по умолчанию;
- device — указывает раздел, на котором расположен загрузчик операционной системы;
- osdevice — указывает раздел, на котором находится сама операционная система. Как правило, значения device и osdevice идентичны;
- path — остальной путь к загрузчику операционной системы;
- description — описание операционной системы, отображающееся в меню при загрузке;
- default — операционная система, загружаемая по умолчанию;
- timeout — время ожидания перед загрузкой ОС по умолчанию;
- displayorder — порядок, в котором системы отображаются при загрузке.
А теперь рассмотрим варианты применения bcdedit:
bcdedit /default {ID} — задаем систему, загружаемую по умолчанию.
bcdedit /displayorder — управляем порядком размещения записей в меню загрузки:
- bcdedit /displayorder {ID} /addlast — добавляем систему в конец списка;
- bcdedit /displayorder {ID} /addfirst — добавляем систему в начало списка;
- bcdedit /displayorder {ID2} {ID1} — указываем порядок отображения систем в списке;
- bcdedit /displayorder {ID} /remove — удаляем запись из меню загрузки.
Имейте ввиду, что при удалении записи из меню загрузки информация о параметрах выбранной системы не удаляется из BCD и при необходимости может быть восстановлена.
bcdedit /timeout XX — задаем таймаут в секундах.
bcdedit /set {ID} description ″Название системы″ — изменяем название системы, отображаемое в меню загрузки.
bcdedit /create /d ″Windows Vista″ /application osloader — создаем новую загрузочную запись.
bcdedit /create {ntldr} /d ″Windows XP″ — создаем загрузочную запись для ОС предыдущих версий (XP и старше).
bcdedit /copy {ID} /d ″Новая система″ — копируем загрузочную запись. Таким образом тоже можно добавить новую запись в меню загрузки.
bcdedit /delete {ID} /cleanup — удаляем загрузочную запись. При этом удаляется вся информация об установленной операционной системе из BCD и меню загрузки. У этой команды есть одна особенность — если в качестве ID указывается название, например {default}, то команда должна выполняться с ключом /f, если же ID записывается в буквенно-цифровом коде, ключ /f не нужен.
bcdedit /export ″C:\Backup\bcd″ — экспортируем содержимое хранилища в указанный файл.
bcdedit /import ″C:\Backup\bcd″ — восстанавливаем состояние системного хранилища из резервной копии, созданной с помощью команды /export.
Ну и несколько наиболее «жизненных» примеров
Добавление новой загрузочной записи, для мультизагрузки:
bcdedit /copy {current} /d ″New Windows 7 ″ — копируем текущую запись и называем ее по новому;
bcdedit /set {ID} device partition=D: — указываем местоположение загрузчика системы;
bcdedit /set {ID} osdevice partition=D: — указываем местоположение операционной системы;
bcdedit /displayorder {ID} /addlast — добавляем запись о системе в меню загрузки, в конец списка.
Добавление загрузочной записи для загрузки системы с виртуального диска (VHD):
bcdedit /copy {current} /d ″Загрузка с VHD″ — копируем текущую запись;
bcdedit /set {ID} device vhd=[X:]\DIR\filename.vhd — указываем местоположение загрузчика системы;
bcdedit /set {ID} osdevice vhd= [X:]\DIR\filename.vhd — указываем местоположение операционной системы;
bcdedit /set {ID} detecthal on — включаем принудительное обнаружение аппаратно-зависимого уровня (Hardware Abstraction Layer, HAL);
bcdedit /displayorder {ID} /addlast — добавляем запись о системе в меню загрузки, в конец списка.
Примечание. [X:]\DIR\filename.vhd – это полный путь к VHD-файлу и указание имени файла.
Добавление загрузочной записи для загрузки Windows XP:
bcdedit /create {ntldr} /d ″Microsoft Windows XP″ — создаем новую загрузочную запись;
bcdedit /set {ntldr} device partition=\Device\HarddiskVolume1 — указываем расположение файлов загрузки системы;
bcdedit /set {ntldr} path \ntldr — указываем путь к загрузчику системы;
bcdedit /displayorder {ntldr} /addlast — добавляем запись о системе в меню загрузки.
Key Points
What is BCDEdit?
- A command-line tool for managing Windows Boot Configuration Data (BCD).
- Helps modify boot settings, control boot sequences, and troubleshoot boot issues.
How to Use BCDEdit: Essential BCDEdit Commands
📌 Display Boot Entries & Configurations
bcdedit /enum→ Lists all boot entries.bcdedit /v→ Displays verbose boot entry details.
📌 Create, Export, and Restore BCD Stores
bcdedit /createstore C:\newstore.bcd→ Creates a new BCD store.bcdedit /export C:\bcdexport.bcd→ Exports the current BCD store.bcdedit /import C:\bcdexport.bcd→ Restores the BCD store from backup.
📌 Modify Boot Entries
bcdedit /copy {current} /d "Copied Entry"→ Duplicates a boot entry.bcdedit /create /d "New Entry" /application osloader→ Adds a new boot entry.bcdedit /delete {identifier}→ Removes a boot entry.
📌 Customize Boot Manager Options
bcdedit /default {identifier}→ Sets the default boot entry.bcdedit /timeout 30→ Sets the boot menu timeout (seconds).bcdedit /displayorder {identifier1} {identifier2}→ Reorders boot menu entries.
📌 Debugging & Recovery
bcdedit /bootdebug {identifier} ON→ Enables boot debugging.bcdedit /set {current} bootstatuspolicy ignoreallfailures→ Fixes boot loops.bcdedit /set {default} device partition=C:→ Assigns boot partition.bcdedit /ems {identifier} ON→ Enables Emergency Management Services (EMS).
📌 Multi-Boot Configurations
bcdedit /set {bootmgr} path \EFI\Microsoft\Boot\bootmgfw.efi→ Specifies a custom boot manager path.bcdedit /set {current} device partition=G:→ Assigns a custom boot device (e.g., VHD, external disk).
BCDEdit for Boot Repair & Recovery
- Run
bcdboot C:\Windowsto restore Windows Boot Loader. - Use
bcdedit /rebuildbcdto scan and repair missing boot entries. - Delete corrupted boot entries with
bcdedit /delete {identifier}.
Every interaction with a Windows operating system begins with a successful boot process, paving the way for a stable user environment. Central to this process is the Boot Configuration Data (BCD) store, which houses the essential boot information that guides the system during the boot process. Managing this crucial data is the command-line utility BCDEdit, or “Boot Configuration Data Editor”.
Ensure consistency across all endpoints. Automate your boot configuration tasks with custom BCDEdit scripts using NinjaOne.
Learn more about NinjaOne automation feature now!
What is BCDEdit?
BCDEdit is a command-line tool crucial for managing the BCD store, a firmware-independent database located on the system partition, typically at BootBCD. BCDEdit’s fundamental role is to ensure system stability and recoverability through precise boot configuration management. BCDEdit allows users and administrators to manage boot entries, modify boot settings, and control the system boot process, catering to normal, safe, or various debugging boot modes.
What is the purpose of BCDEdit?
BCDEdit commands modify settings in the BCD store, dictating the behavior of the operating system loader during boot, including which driver and system files should be loaded and in what sequence. BCDEdit is pivotal for troubleshooting, enabling Safe Mode in system failure scenarios, and managing boot entries in multi-boot environments, aiding in smooth system recovery and maintenance.
The shift from boot.ini to the BCD store and BCDEdit, starting with Windows Vista, ushered in a more structured, secure, and flexible framework for managing boot configurations, enhancing security and control over the boot process.
Key functions and commands of BCDEdit
Understanding BCDEdit commands and their interactions is crucial for effective boot management. For instance, /enum, the default runtime option, is pivotal for listing all entries, aiding in easily accessing system identifier codes. The {current} parameter in BCDEdit syntax is a powerful tool, allowing operations on the currently running system’s boot entry, streamlining many tasks.
Get basic help
Display list of BCDEdit commands or detailed help for a particular command:
- bcdedit /? [command] – eg.:
- bcdedit /? createstore to see detailed usage info on the bcdedit createstore command.
Operating on a store
Create a new empty boot configuration data store
- bcdedit /createstore C:newstore.bcd
Export the system store contents into a file
- bcdedit /export C:bcdexport.bcd
Restore the system store using a backup data file
- bcdedit /import C:bcdexport.bcd
Specify the store to be used with most BCDEdit commands
- bcdedit /store C:externalstore.bcd
Set the system store device (only affects EFI-based systems)
- bcdedit /sysstore {fwbootmgr}
Operating on entries in a store
Make a copy of a specified boot entry
- bcdedit /copy {current} /d “Copied Entry”
Create a new entry in the boot configuration data store
- bcdedit /create /d “New Entry” /application osloader
Delete an element from a specified entry
- bcdedit /delete {identifier}
Create mirror of entries in the store
- bcdedit /mirror {identifier}
Changing entry options
Delete a specified element from a boot entry
- bcdedit /deletevalue {identifier} element
Set an entry option value
- bcdedit /set {bootmgr} flightsigning on
Controlling output
Enum is also the default runtime option. That is, running bcdedit /enum is equivalent to running bcdedit without parameters. Often combined with the /v (verbose) switch, to access all identifiers.
List entries in a store
- bcdedit /enum
Verbose mode, displays all identifiers in full
- bcdedit /v
Controlling the boot manager
Specify a one-time display order for the next boot
- bcdedit /bootsequence {identifier}
Specify the default entry for boot manager selection
- bcdedit /default {identifier}
Specify the boot manager’s display order
Optionally, the /addfirst or /addlast options respectively add an entry to the beginning or end of the display order:
- bcdedit /displayorder [/addfirst|/addlast] {identifier1} {identifier2} [{identifier3} …]
Specify time to wait before the boot manager selects the default entry
- bcdedit /timeout 30
Specify the display order for the Tools menu
- bcdedit /toolsdisplayorder {identifier}
Emergency Management Services (EMS) options
Enable/disable EMS for the boot manager itself
- bcdedit /bootems {identifier} ON
Enables/disables EMS for the specified OS boot entry
- bcdedit /ems {identifier} ON
Sets global EMS settings for the computer
The baudrate parameter in the /emssettings command specifies the baud rate for a serial console connection when using Emergency Management Services (EMS). A higher baud rate allows faster data transmission, but both ends of the connection must agree on the baud rate to communicate effectively. This setting is crucial for proper setup and functionality when utilizing a serial console for remote management or troubleshooting.
- bcdedit /emssettings baudrate:115200
Debugging
Enable/disable the boot debugger
- bcdedit /bootdebug {identifier} ON
Enable/disable the kernel debugger
- bcdedit /debug {identifier} ON
Sets the hypervisor parameters
- bcdedit /hypervisorsettings hypervisordebug ON
This list provides a broad overview of the BCDEdit command-line options available for managing boot configurations and troubleshooting on Windows systems.
Using BCDEdit for boot repair and recovery
BCDEdit is instrumental in resolving boot issues and recovering from errors that prevent Windows from starting correctly. It provides a command-line interface for managing boot configuration data (BCD) stores, enabling precise control over boot options and settings.
Step-by-step guide to using BCDEdit to repair common boot issues
Often, boot problems arise from incorrect or missing boot configuration settings. For instance, if the boot manager’s entry is corrupted or deleted, BCDEdit can help recreate it:
- Launch Command Prompt as an administrator.
- View current boot entries with bcdedit /enum.
- Identify any missing or incorrect entries.
- Use bcdedit /create to create missing entries or bcdedit /set to correct erroneous settings.
- Restart the system to apply changes.
Recovering from boot errors and failures using BCDEdit commands
BCDEdit commands are versatile in recovering from various boot errors:
- Repair boot records using bcdboot C:Windows to restore the Windows bootloader.
- Set the correct boot partition with bcdedit /set {default} device partition=C:
- Reset boot manager settings to default using bcdedit /deletevalue to remove incorrect settings.
Utilizing BCDEdit for rebuilding the boot configuration from scratch
Rebuilding the boot configuration may be necessary when facing severe boot issues:
- Backup existing BCD store with bcdedit /export C:BCD_Backup.bcd.
- Delete current BCD store using bcdedit /store C:WindowsSystem32ConfigBCD-Template /createstore.
- Create new entries and set appropriate values using bcdedit /create and bcdedit /set.
- Import backup if needed with bcdedit /import C:BCD_Backup.bcd.
Examples of boot repair with BCDEdit
Fixing boot loops
Disabling automatic restart on system failure is a common boot loop troubleshooting step:
- bcdedit /set {current} bootstatuspolicy ignoreallfailures
Assigning a boot device in a VM or server
In virtualized environments, specifying the boot device is crucial. Set the boot device for the VM with:
- bcdedit /set {current} device boot
Enabling debugging in VM or server
- bcdedit /set {current} bootdebug on
Specifying boot manager path
In cases where servers or VMs boot from a network or shared drive, specifying the boot manager’s path with bcdedit /set {bootmgr} path sharedbootmgr can be crucial.
Through these methods, BCDEdit proves to be an invaluable tool for diagnosing and fixing boot-related issues, ensuring systems remain accessible and operational amidst configurations gone awry.
Customizing boot options with BCDEdit
These examples provide a glimpse into the advanced customization capabilities of BCDEdit, offering granular control over boot and UEFI settings to cater to specific operational requirements.
Modify default boot entry
- bcdedit /default {identifier}
Changing boot timeout and managing boot menu
Adjusting the boot timeout can help in troubleshooting scenarios. Value parameter in seconds.
- bcdedit /timeout 30
Adding and removing boot entries
Create a new entry
- bcdedit /create
Delete an entry
- bcdedit /delete {identifier}
Advanced customization: Secure boot, UEFI settings
- Enable secure boot: bcdedit /set {current} secureboot on.
- Adjust UEFI settings: bcdedit /set {fwbootmgr} displayorder {bootmgr} {identifier}.
- Disabling secure boot: bcdedit /set {current} secureboot off
- Setting a custom boot logo: bcdedit /set {bootmgr} custom:16000002 “C:pathtologo.bmp”
- Access UEFI settings on next boot: bcdedit /set {fwbootmgr} displayorder {bootmgr} {identifier}
- Specifying a Custom Boot Device: bcdedit /set {current} device partition=G:
BCDEdit in multi-boot environments
Overview of multi-boot setups
Multi-boot setups allow for the co-existence of different, selectable at boot time. Multi-boot setups enable a computer to host multiple OSes like Windows and Linux on separate partitions or drives on the same machine, allowing the user to choose which OS to boot during startup. This setup is valuable for those who need to access different OS environments, whether for software compatibility, development, testing, or personal preference.
BCDEdit can co-exist with Linux boot loaders like GRUB and LILO in a multi-boot setup. Typically, one boot manager/loader is set as the primary, which then chain-loads the other. For instance, you can configure GRUB to load the Windows Boot Manager, which is controlled by BCDEdit.
Challenges and solutions
Challenges arise from differing boot configurations, like BIOS vs UEFI. Solutions often involve third-party tools like EasyBCD or configuring one loader to chain-load the other.
Best practices
- Installation order: Install Windows first, as Linux installers generally recognize existing Windows installations, while the reverse is not true.
- Boot manager tools: Utilize a third-party tool like EasyBCD to manage multi-boot setups, allowing for a graphical interface to configure boot entries across different OS boot managers.
- Backups: Keep a backup of boot configuration data to restore in case of misconfiguration.
- Documentation: Keep thorough documentation of your boot configuration, including any custom boot entries or settings.
- Regular reviews: Periodically review and update your boot configuration to ensure it aligns with current system requirements.
- Testing: Test new configurations thoroughly in a controlled environment before applying them to a live system.
- Recovery tools: Have boot recovery tools readily available, and familiarize yourself with recovery procedures.
- Learning: Stay updated with the latest best practices and tools in multi-boot management through forums, communities, and reputable tech publications.
BCDEdit and virtualization platforms
Virtualization platforms like VMWare, Hyper-V, KVM, Xen, and VirtualBox allow multiple operating systems to run on a single physical machine, each within its own virtual machine (VM). In virtual environments, BCDEdit operates within the Windows VMs exactly as it would on a physical machine, managing boot configuration data.
Special considerations, limitations, and tips:
- When using BCDEdit with virtual machines, ensure the VM’s boot firmware matches the intended configuration (BIOS/UEFI).
- Ensure VM settings align with boot configurations.
- Keep VM boot configurations simple to avoid conflicts.
- Use snapshots to revert to known good configurations when experimenting.
Advanced topics in BCDEdit
- Debugging and performance tuning: Utilize BCDEdit for boot-time debugging, configuring boot parameters for performance tuning.
- Scripting for automation: Automate boot configuration tasks by scripting BCDEdit commands in batch files or PowerShell scripts.
- Interactions with security features: BCDEdit commands might impact security features like BitLocker by altering boot configurations.
- Windows deployment: Customize boot configurations in deployment scenarios, facilitating various boot options and troubleshooting tools for newly deployed Windows installations.
Security considerations
It’s imperative to understand the security implications and ensure adequate protective measures are in place when using BCDEdit.
- Permission levels: It requires administrative privileges, ensuring only authorized users can alter boot configurations.
- Error prone: Incorrect use can render systems unbootable, posing a risk if used maliciously.
- Secure boot: Modifying boot settings could potentially disable Secure Boot, weakening protection against bootkit/rootkit infections.
- Access control: Limiting access to BCDEdit and ensuring strong user account control is crucial to prevent unauthorized alterations.
These advanced uses of BCDEdit illustrate its versatility and crucial role in various aspects of system configuration and troubleshooting.
BCDEdit troubleshooting FAQ
Q: I made a mistake with BCDEdit. How do I revert changes?
A: Use bcdedit /import to restore a backup of the BCD store.
Q: How can I view my current boot configuration?
A: Run bcdedit /enum to list all entries in the store.
Q: I’m getting a The boot configuration data store could not be opened error. What do I do?
A: Ensure you’re running the command prompt as an administrator.
Q: How can I add a new boot entry?
A: Use bcdedit /copy to copy an existing entry, then modify the new entry with bcdedit /set.
Q: How do I change the boot order?
A: Use bcdedit /displayorder followed by the identifiers of the entries in the desired order.
Q: How do I set up booting to a VHD (Virtual Hard Disk)?
A: Create a new entry with bcdedit /copy {current} /d “Description”, then set the device and osdevice to the VHD path using bcdedit /set.
Q: How to enable or disable Hyper-V at boot?
A: Use bcdedit /set hypervisorlaunchtype auto to enable or bcdedit /set hypervisorlaunchtype off to disable.
Q: How do I debug boot issues with BCDEdit?
A: Enable boot debugging via bcdedit /bootdebug on, and configure debug settings with bcdedit /dbgsettings.
Q: How to enable EMS on a boot entry?
A: Use bcdedit /ems {identifier} on to enable EMS for troubleshooting. Use bcdedit /bootems {identifier} on to enable EMS on the boot manager itself.
Get the full breakdown! Watch our video about what BCDEdit does and how to use it.
Further reading & resources
For open-source alternatives or supplements to BCDEdit, you might want to consider looking into bootloader projects like GRUB. The BCDEdit Command-Line Options on Microsoft Learn serves as a good starting resource for further learning. More advanced topics and use cases are discussed in BCDBoot Command-Line Options as well as BCD System Store Settings for UEFI for Secure Boot usage (recommended).
BCDEdit: Harnessing boot mastery
BCDEdit stands as a cornerstone in the Windows boot management realm, ensuring smooth system startup and providing a conduit for troubleshooting and recovery. Mastery of this utility enhances control over boot settings, serving as a critical lifeline for IT teams during system malfunctions.