
Windows 11, the newest version of the Microsoft operating system, comes with many exciting features, making it a big improvement from Windows 10. But, some users are dealing with a problem of high RAM or memory usage. This issue happens because of different reasons, making Windows 11 not work as well as it could on laptops and PCs.
If you’re one of those facing this problem and want to boost your computer’s performance or increase your laptop’s RAM, you’re in the right spot. You can go through these effective solutions to reduce memory usage in Windows 11. You can also look at what is Memory Usage on Windows and how to check Memory Usage on Windows 11. Just follow the whole article to make your PC work better without hassle.
What Is Memory Usage on Windows?
Memory usage on Windows is the amount of random access memory (RAM) that is currently being used by the operating system, applications, and other processes. RAM is a type of volatile memory that is used to store data that is being actively used by the computer. When the computer is turned off, all of the data in the RAM is lost.
However, upon restarting or booting up the system, background services, operating system functions, and actively running applications begin to utilize the available RAM.
If the memory usage percentage is excessively high, it can lead to performance issues such as slow responsiveness, lags, or even system freezes.
Therefore, balancing and managing memory usage in Windows is fundamental for ensuring an efficient and smooth computing experience. Regularly monitoring memory usage can help you prevent performance degradation.
How to Check Memory Usage on Windows 11
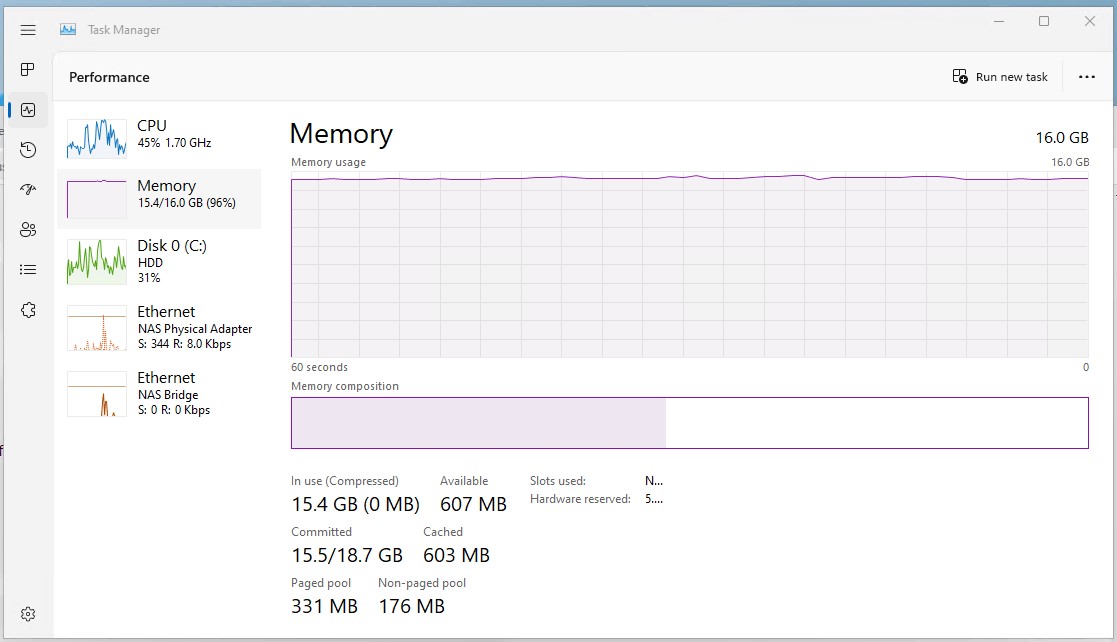
There are a few different ways to check memory usage on Windows. One way is to use Task Manager. To open Task Manager, press Ctrl + Shift + Esc. In Task Manager, click the Performance tab. Under Memory, you can see how much RAM is currently being used and how much RAM is free.
Another way to check memory usage is to use Resource Monitor. To open Resource Monitor, press Windows + R to open the Run dialog box. Type resmon and press Enter. In Resource Monitor, click the Memory tab. You can see a more detailed view of memory usage on this tab, including which processes are using the most RAM.
High RAM usage can be a common problem in Windows 11, especially if you have a lot of programs running at the same time. If you’re experiencing high RAM usage, it can cause your computer to slow down and become unresponsive.
There are a few things you can do to fix high RAM usage in Windows 11, and we’ll discuss some of the most common solutions in this article.
1. Restart PC
One of the easiest and most effective ways to resolve excessive RAM usage in Windows 11 is to simply restart the computer. It can address various issues and reduce excessive RAM consumption. When you restart your computer, it shuts down all currently active programs and background processes. This effectively refreshes your system, stopping any tasks that use a lot of memory and are causing the computer to use too much RAM.
As your PC restarts, it releases the memory that was previously allocated to various applications. This action can help free up valuable RAM and ensure a more seamless experience. Follow the below steps to do so.
1. Click the Start Menu.
2. Click on the Power icon, and then select Restart.

2. Update Windows 11
Restarting your computer might have helped you, but if you still notice that your PC is using high RAM, making sure your operating system is up to date can make a big difference. Regular system updates not only make your computer run better but also can solve problems related to RAM. Windows 11 updates include bug fixes and optimizations for better resource management. These updates can resolve software issues that contribute to high RAM usage.
Keeping your operating system updated is also essential for security reasons. This helps keep your system safe from potential problems that can slow it down. Follow the steps below to check for Windows 11 updates.
1. Press the Windows + I button simultaneously to open Settings.
2. In the Settings window, select Windows Update.

3. Click Check for updates and follow the on-screen instructions to download and install any available updates.

3. Uninstall Unused Apps
You might be facing a shortage of RAM in your Windows 11 for various reasons, and one of the primary reasons is the accumulation of numerous unnecessary apps over time. Even if you rarely use these applications or don’t use them at all, they continue to occupy a significant portion of your computer’s RAM.
Many of these apps are configured to automatically launch every time, which is unnecessary if you rarely use them. This continuous auto-start contributes to the excessive consumption of RAM. That’s why uninstalling these unused apps is crucial to free up storage space and improve your PC’s RAM situation.
Here’s how you can uninstall apps on Windows 11:
1. Open Settings.
2. Navigate to the Apps section on the left-hand panel.
3. Select Installed Apps from the options available on the right-hand panel.

4. Upon clicking Installed Apps, all the applications on your PC will appear in the window. Here, locate the applications that you wanna uninstall.
5. Then, click the three-dot icon and select Uninstall from the menu popup.

6. A confirmation dialog will appear. Click Uninstall again to proceed with the uninstallation.

4. Close Unnecessary Apps and Services
If you’ve tried the previously mentioned methods to fix high RAM usage in Windows 11 and still face the same issues, it may be because of unnecessary apps and services running in the background.
When you open numerous apps and services that you don’t frequently use, they continue running in the background, consuming your PC’s storage and, importantly, RAM. This can be a significant drain on your system’s resources. However, you can regain control and free up precious RAM by ending these unnecessary apps and services using the built-in Windows Task Manager.
Here’s how you can close unnecessary apps and services using the Task Manager:
1. Press Ctrl + Shift + Esc on your keyboard simultaneously to open Task Manager.
2. In the Task Manager window, click on the Processes tab, and then click on the Memory column to sort the processes by memory usage, with the highest consumers listed first.
3. Now, look for apps and services you don’t need at the moment or are using excessive RAM. Common examples might include background applications related to software updates, unnecessary browser tabs, or applications you’ve opened but aren’t actively using.
4. Right-click on the unnecessary apps and services.
5. Then, click the End Task option from the pop-up menu.

5. Run Windows Memory Diagnostic
Is your Windows 11 computer experiencing issues like slow performance, freezing issues, hanging, blue screen errors, or unexpected reboots? These problems can sometimes be attributed to memory issues, particularly with your computer’s Random Access Memory (RAM).
To identify and diagnose such problems, Windows 11 provides a built-in tool called the Windows Memory Diagnostic Tool. It is a valuable tool that can help you identify and address potential memory problems on your PC.
Here are the steps to run the Windows Memory Diagnostic Tool:
1. Press the Windows key + R to open the Run dialog box.
2. Type mdsched in the search field, and hit OK.

3. A window pop-up will appear with two distinct options.
4. Here, click on Restart now and check for problems option to run the memory diagnostic.

Your computer will restart, and the Windows Memory Diagnostic Tool will begin running. The test will take several minutes to complete as it performs two different tests, so please be patient.
Once the test is complete, your computer will restart, and you will see a notification with the test results. You can also view the results in Event Viewer. To learn more, you can check out our guide on how to use the Windows Memory Diagnostic Tool.
If the test detects any errors, you will need to contact your computer manufacturer or a qualified technician to replace the faulty RAM module.
6. Disable Startup Apps
You can boost your Windows 11 computer’s performance and free up RAM by taking control of unnecessary startup apps. These are the applications that automatically launch when you restart your computer. While some apps are essential for your workflow, many of them are superfluous and can be easily disabled.
You can even customize your list of startup apps to include the ones you frequently use. This way, you can have your preferred apps ready to go as soon as your computer boots up.
Let’s explore how to manage these startup apps and ensure your system runs efficiently.
1. Open the Windows Settings app.
2. Click on Apps in the left sidebar and click on Startup in the right pane.

3. Toggle off the switch next to the apps you don’t want to start at startup.

Using the above steps, you can control the Startup apps and reduce RAM usage on your Windows 11 system.
7. Disable SysMain Service
The SysMain service, known as Superfetch, is a Windows service that monitors how you use your computer and preloads frequently used applications and data into memory. This can improve the startup and load times of your applications.
However, the SysMain service can also use a significant amount of CPU and disk resources, especially when it is first running. If you are experiencing performance problems with your computer, you may want to consider disabling the SysMain service.
Here’s how you can disable the SysMain service:
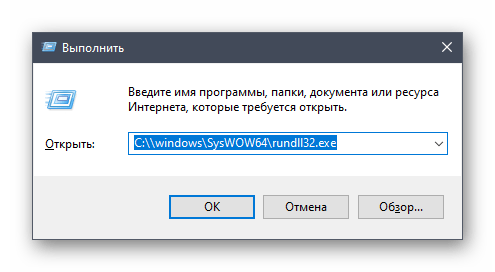
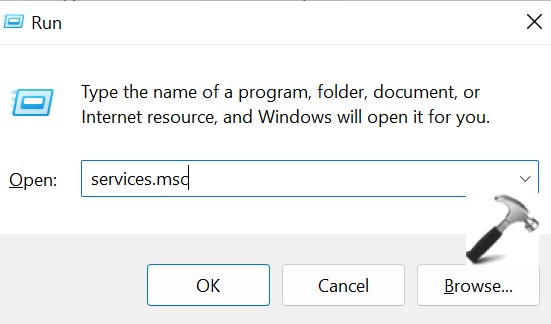
1. Press the Windows key + R to open Run.
2. Here, type services.msc and press Enter.

3. Scroll down and double-click on the SysMain from the lists of services.
4. Then, click the Stop button to stop the service.

8. Adjust for Best Performance
Adjusting the best performance will disable some of the visual effects in Windows 11 and it may help to smoothly run the PC. For example, you may notice that windows no longer fade in and out when you open and close them. You may also notice that fonts are not as smooth as they were before. But it will also help to improve performance on older or less powerful computers.
Follow the steps below to adjust for the best performance in Windows 11
1. Open the Start menu and search for Performance.
2. Click on Adjust the appearance and performance of Windows option.

3. Click on the Visual Effects tab and select Adjust for best performance.
4. Now, to apply and save the changes, click on the Apply and OK button.
5. After that, Restart your PC.

9. Change Registry Key
The Windows Registry is a powerful tool that can be used to optimize your system’s performance. Changing the registry key is also an important method to fix high RAM usage in Windows 11. It is important to note that changing registry keys can be dangerous, follow the steps very precisely and only change keys that you are familiar with. Do not change what a key does if you are unsure.
1. Press Windows key + R to open Run.
2. Here, type regedit and press Enter to open the Registry Editor.

3. A confirmation pop-up will appear saying Do you want to allow this app to make changes to your device. Press Yes if you want.
4. Navigate the HKEY_LOCAL_MACHINE registry key and expand SYSTEM > CurrentControlSet > Control.

5. Furthermore, expand Session Manager > Memory Management.
6. In the right-hand pane, double-click the ClearPageFileAtShutdown registry key.

7. Click on Modify from the menu that appears.

8. Change the value data to 1 and select base as Hexadecimal.
9. Then, click OK to save the change.
10. After that, close the Registry Editor and restart your computer.

10. Check for Virus
If you continue to experience the same issue, there’s a significant possibility that your PC has viruses, which can result in high usage of memory or RAM. To address this, you should promptly scan and remove any viruses from your computer.
Here are some steps you can follow to eliminate these threats from your system. To check for viruses in Windows 11, you can use Windows Security, which is Microsoft’s built-in antivirus software.
Let me show you how you can check for viruses using Windows Security:
1. Click on the Start button.
2. It will open the Start menu, type Windows Security, and open it.

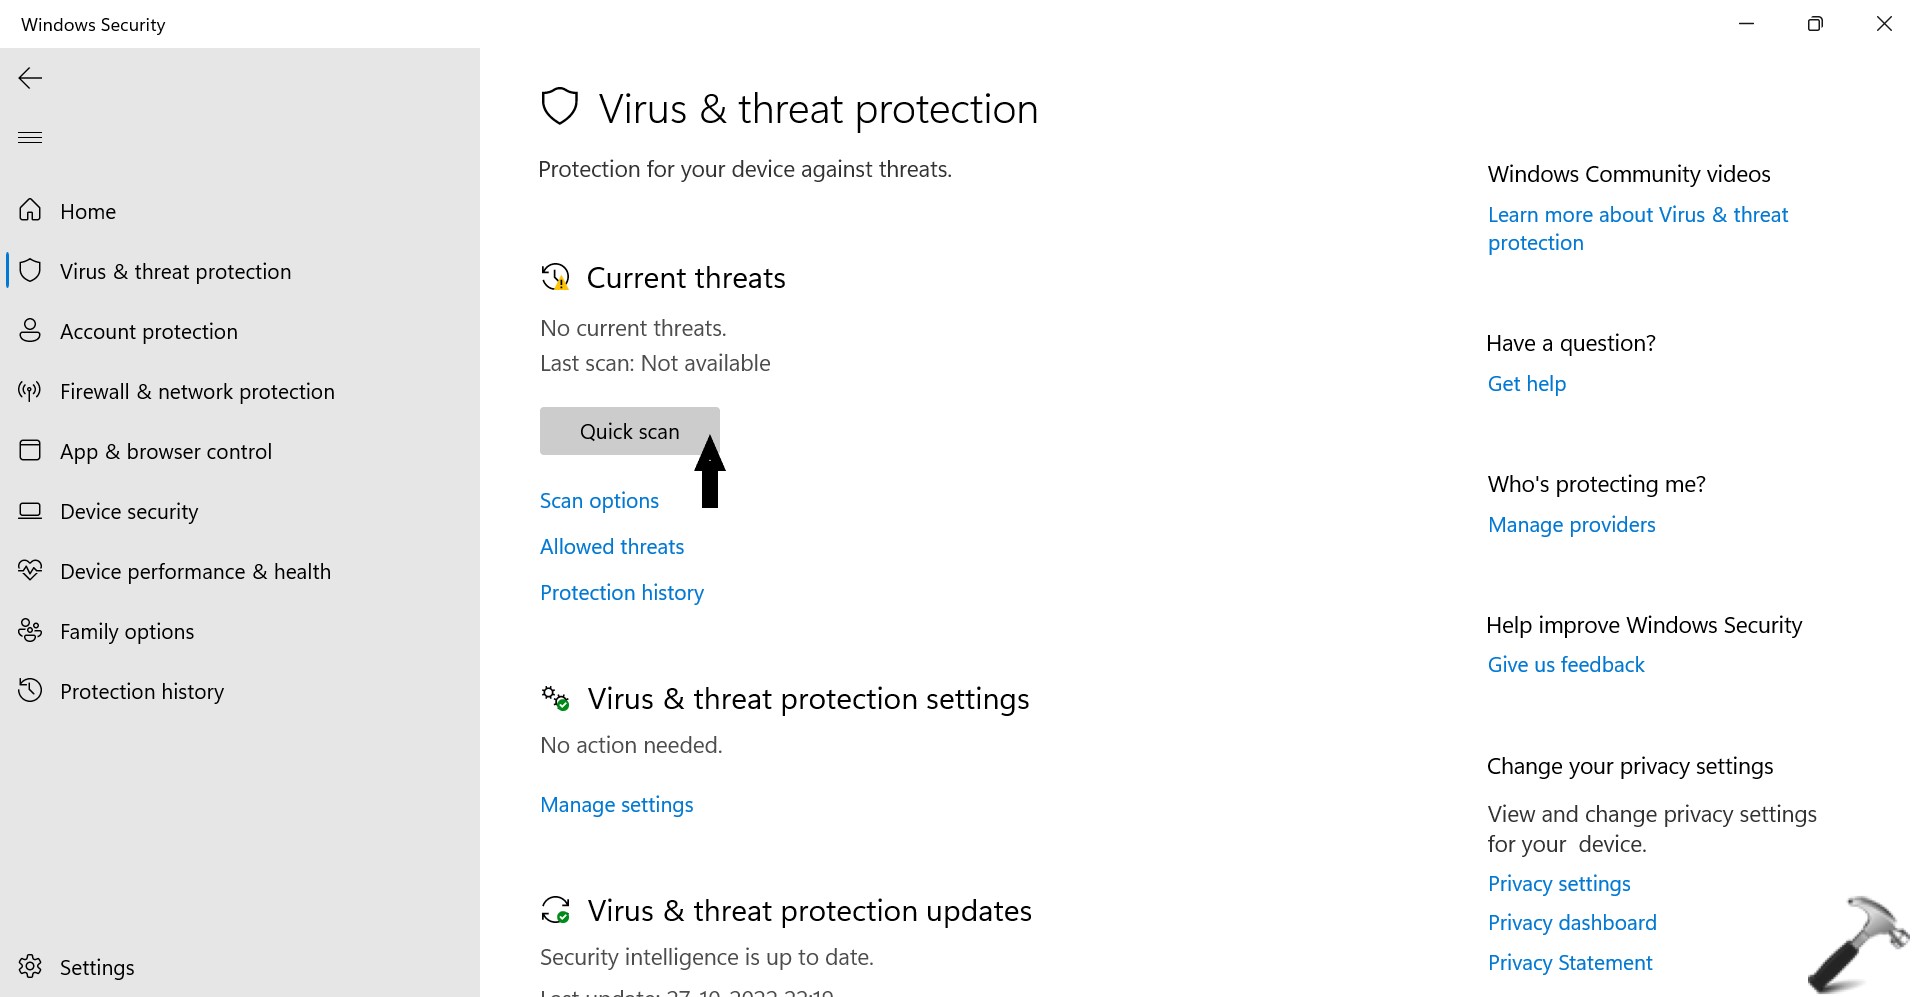
3. Click on the Virus & threat protection tab and then click on the Quick Scan button. However, if you want to perform a full scan, click on Scan options.

4. Here, select Full Scan and click on the Scan Now button.

Windows Security will scan your computer for viruses and other malware. If any threats are found, Windows Security will prompt you to remove them.
11. Upgrade or Install Additional RAM
After following all the above methods, if you are still facing high RAM usage on Windows 11, you might need to upgrade or install additional RAM modules on your system. As the installed RAM modules may not be sufficient enough to handle processes on your system.
However, adding physical RAM requires purchasing compatible modules and installing them on your laptop or PC. After upgrading or installing RAM modules, you should see an effective boost and improvement in performance to a certain extent fixing high RAM usage.
Conclusion
The suggested methods for fixing RAM usage in Windows 11 should have helped you resolve the issue. After that, check the memory usage to identify the status of your RAM and the reasons behind its high usage.
If any of the fixes did not work, you might also consider upgrading or installing additional RAM in your Windows 11 system.
Винда не предназначена работать без перезагрузки. на серверных версиях такая же проблема бывает.
Надо перезагружать
Если не пользоваться сном и гибернацией, не выключаться ПК — возможно станет чуть получше
Выделенная память — это то пространство памяти, с которой ОС успела поработать и как-то проиндексировать ее в течении сеанса работы.
Не обязательно, что ее нельзя использовать повторно.
открытые приложения начинают падать, закрываться, перезапускаться, закрываются проводники
Если вы поставите серверную ОС и забудете про режим гибернации, то приложения будут меньше падать. Потому что перевод в гибернацию никак не может гарантировать работу процессов, которые могли в этот момент использовать ресурсы — диск, сеть, исполнять транзакционные процессы в какую-нибудь СУБД.
Это кэшированная память скорее всего, со сном у меня такой проблемы нет, с гибернацией были и так-же с диском происходило (полностью забивался и пришлось удалять hyberfill файл).
Открой монитор ресурсов и проверь кэш это или используемая память.
Так-же возможно какое-то приложение утечку вызывает — такое и со сном происходит, фиксится перезагрузкой или остановкой приложения.
У меня кэшировано 39гб, а используется 23гб:

Запускаете полноценный менеджер процессов Process explorer и смотрите все детали.
скачай и установи вот это приложение (или какое-нибудь аналогичное). Он опредназначено как раз для борьбы с непрошенным кэшированием. Если свободной памяти станвоится меньше заданного объёма, то вызывается очистка кэша. Разумеется это замедлит работу в том случае, если данные из кэша стали бы нужны, а их там нет и опять с диска считывать надо. Ещё можно индексацию диска отключить и прочую ненужную самодеятельность.
https://www.wagnardsoft.com/ISLCw
в диспетчере задач объём «используемой» памяти всегда в норме и намного меньше «выделенной» памяти. Как же так?
Скачайте вот эту программу, вероятнее всего вот отсюда (прямая ссылка с сайта может не пустить из России).
Только в ней я нашёл колонку Shared commit. По-моему, что-то подобное раньше было в одной из утилит SysInternals, но в настоящее время мне её найти не удалось.
У меня стабильно наблюдается схожая ситуация при использовании Google Chrome, создающего «невидимый своп», который не виден ни из одного другого приложения. Встроенные в ОС утилиты объём свопа для Хром отображают неверно.
Также я видел аналогичный баг для эксплорера и стандартной смотрелки картинок (но в меньшей степени).
Но убрать этот шаред коммит можно только перезапуском процесса.
Отсортируйте свои процессы по этой колонке и посмотрите, что будет у вас.
Все способы:
- Способ 1: Отключение фоновых приложений
- Способ 2: Удаление мини-приложений
- Способ 3: Отключение виджетов
- Способ 4: Очистка автозагрузки
- Вариант 1: Раздел «Автозагрузка» в «Параметрах»
- Вариант 2: «Диспетчер задач»
- Способ 5: Очистка кеша оперативной памяти
- Способ 6: Отключение открытия приложений после перезапуска
- Способ 7: Использование режима максимальной производительности
- Способ 8: Установка драйверов и обновлений для них
- Способ 9: Проверка системных обновлений
- Способ 10: Проверка компьютера на наличие вирусов
- Способ 11: Очистка и дефрагментация жесткого диска
- Способ 12: Отключение индексирования поиска
- Способ 13: Апгрейд ОЗУ
- Вопросы и ответы: 0
Способ 1: Отключение фоновых приложений
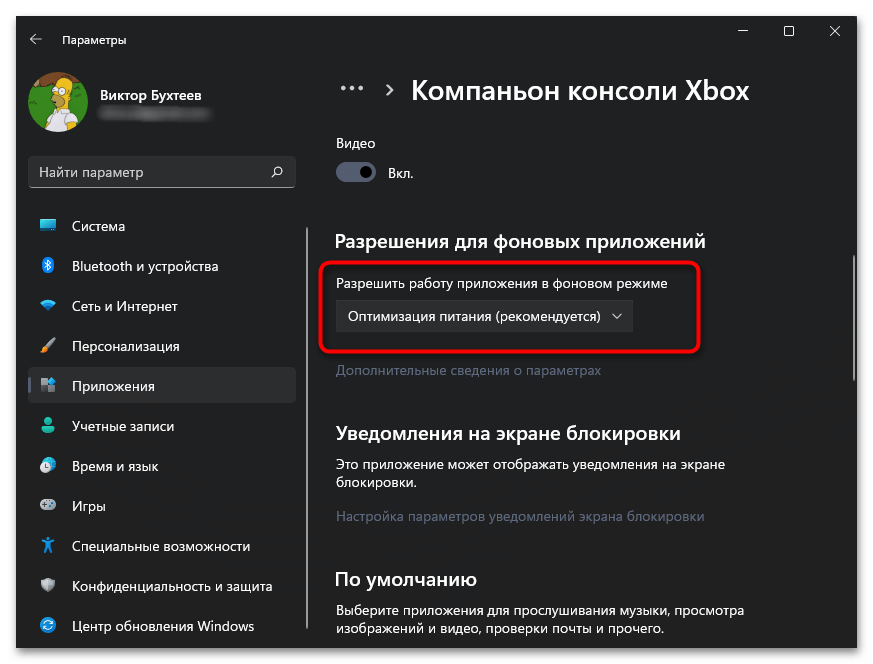
Фоновым приложением в Windows 11 может стать практически любое установленное, если для него настроен автозапуск и соответствующие разрешения поведения, добавляемые по умолчанию. Каждая программа, которая находится в фоновом режиме, всегда потребляет какое-то количество оперативной памяти, пускай даже и незначительное. Для оптимизации ОЗУ рекомендуется проверить, есть ли на вашем ПК работающие фоном программы. Если покажется, что какие-то из них можно отключить, непременно стоит сделать это, ведь данная операция исключительно положительно повлияет на количество освобожденной оперативной памяти и ее быстродействие в операционной системе.
Подробнее: Как отключить фоновые приложения в Windows 11
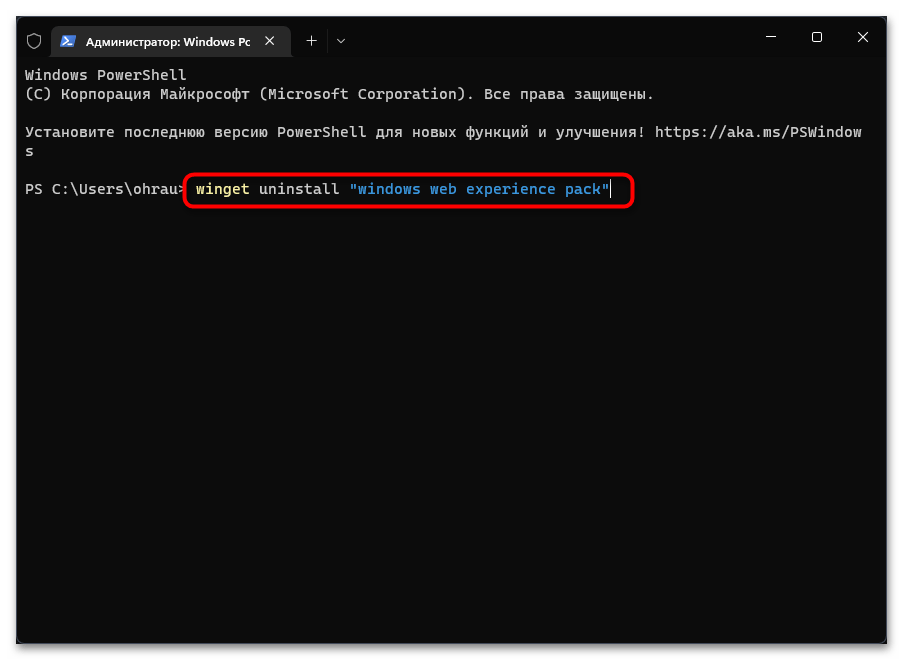
Способ 2: Удаление мини-приложений
Разберем еще один метод, который тоже может помочь, если вы обнаружили, что оперативную память занимают стандартные приложения Windows 11. К ним зачастую относятся различные мини-приложения, установленные по умолчанию и недоступные для удаления стандартным методом. Отключить их вряд ли получится, поэтому можно только удалить выборочно или пакетно, что зависит от вашей ситуации. Рекомендуем удалять только те мини-приложения, которые действительно всегда открыты и использовать их вы не собираетесь. Более детально об этом читайте в отдельном материале на нашем сайте по следующей ссылке.
Подробнее: Удаление мини-приложений в Windows 11
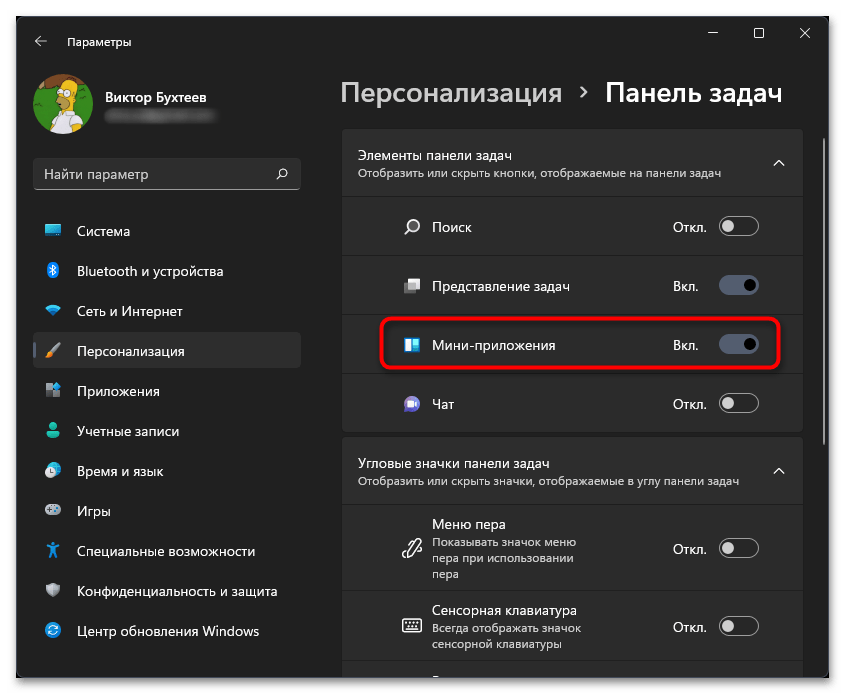
Способ 3: Отключение виджетов
К виджетам в Windows 11 отчасти относятся как мини-приложения, так и дополнительные плитки на самой панели, отображающие самую разную информацию из интернета. Конечно, для ее загрузки и показа используются определенные ресурсы компьютера даже в тот момент, когда сами плитки свернуты. Вы можете отключить работу мини-приложений или разобраться с каждым виджетом, оставляя только необходимые. Это не сильно скажется на нагрузке оперативной памяти, но может помочь немного разгрузить ее, особенно когда речь идет об ее постоянной нехватке.
Подробнее: Как отключить виджеты в Windows 11
Способ 4: Очистка автозагрузки
Автозагрузка — специальная функция в операционной системе, позволяющая некоторым программам стартовать и работать в активном режиме сразу при запуске операционной системы. Разные сторонние программы особенно активно функционируют и потребляют довольно много оперативной памяти, даже если вы ими не пользуетесь или не видите окно на рабочем столе. Для оптимизации ОЗУ мы бы настоятельно рекомендовали проверить, какой софт включается автоматически и какой можно отключить. Рассмотрим два самых популярных варианта выполнения настройки.
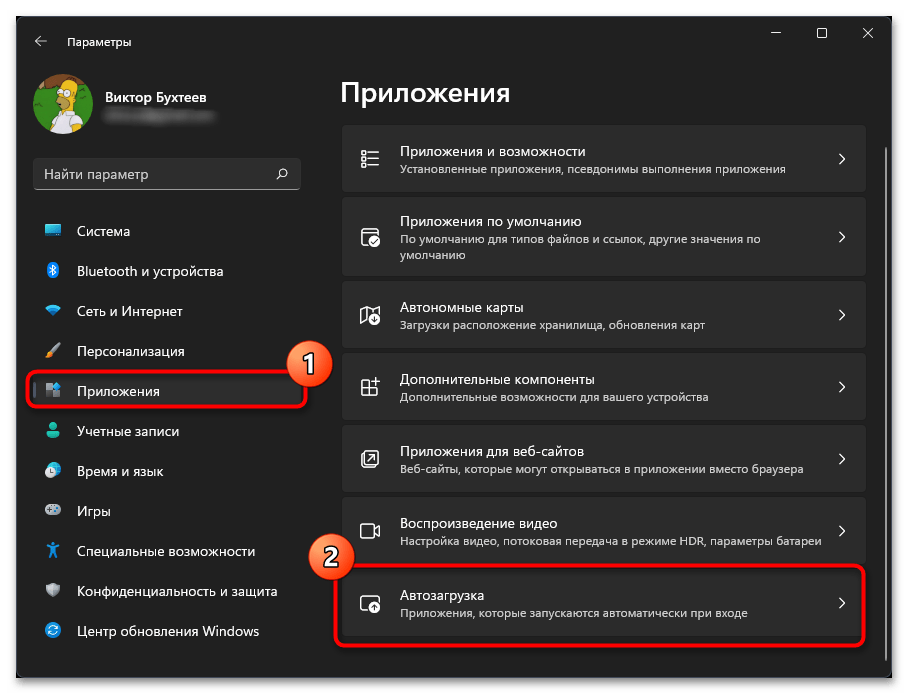
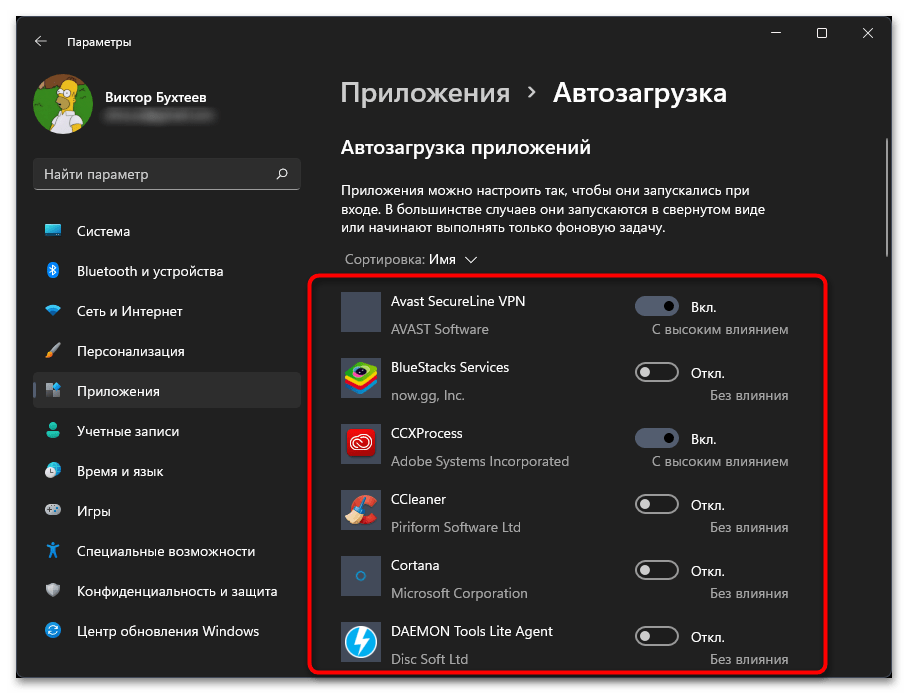
Вариант 1: Раздел «Автозагрузка» в «Параметрах»
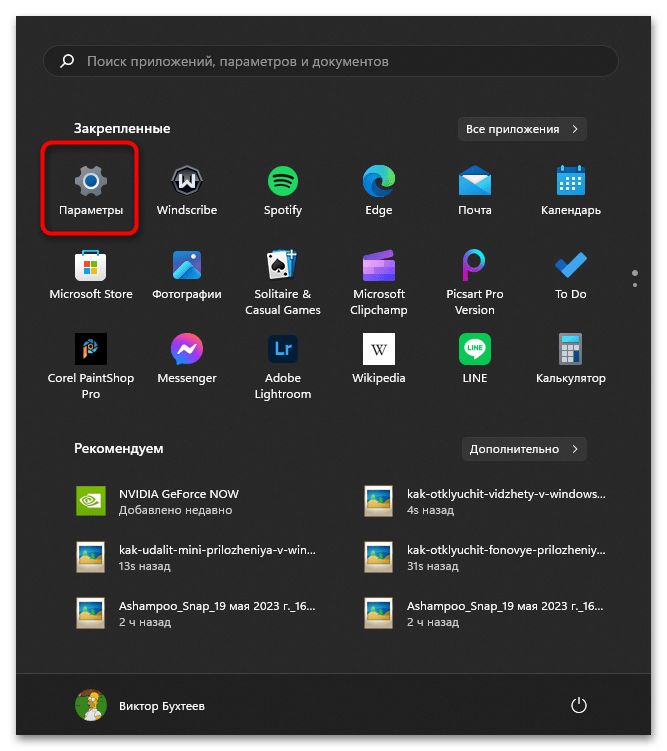
Приложение «Параметры» в Windows 11 отлично подходит практически для любых настроек. В нем есть и специальный раздел для управления программами, в котором можно найти список автозагрузки, быстро ознакомиться с ним и решить, что можно отключить. Для этого следуйте простой инструкции.
- Откройте меню «Пуск» и найдите в списке закрепленных значков «Параметры».
- В новом окне на левой панели выберите «Приложения» и перейдите к разделу «Автозагрузка».
- Ознакомьтесь со списком отображаемых приложений и решите, что из этого вам не нужно. Для отключения автозагрузки конкретной программы перетащите ее переключатель в состояние «Откл.». Повторите то же самое с остальными, после чего перезагрузите ПК и проверьте, уменьшится ли нагрузка на ОЗУ.
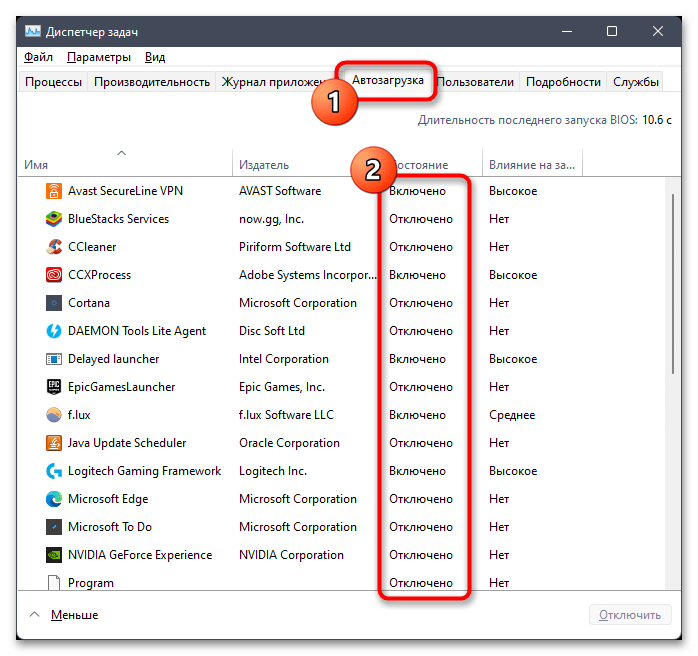
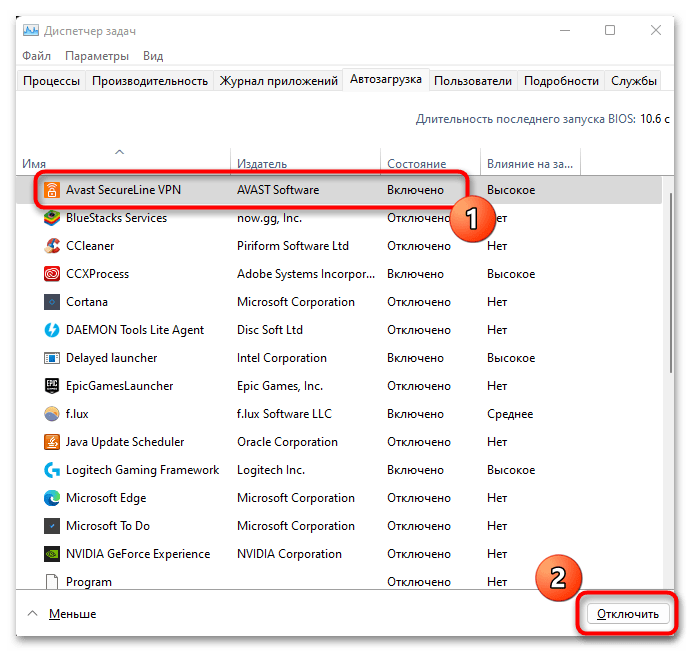
Вариант 2: «Диспетчер задач»
Через «Диспетчер задач» можно не только отследить нагрузку на комплектующие и управлять различными процессами, но и узнать программы автозагрузки, а также убрать их из нее, если это понадобится. Все действия происходят в рамках одного окна, поэтому вам не придется тратить на это много времени.
- Щелкните правой кнопкой мыши по «Пуску» и из появившегося контекстного меню выберите пункт «Диспетчер задач».
- Перейдите на вкладку «Автозагрузка» и ознакомьтесь с состоянием отображаемых там программ.
- Если какую-то захотите отключить, выделите ее левой кнопкой мыши и используйте кнопку с соответствующим названием справа внизу.
Способ 5: Очистка кеша оперативной памяти
Кеш оперативной памяти необходим для быстрого повторного запуска ранее открытых программ и различных процессов, если те были завершены. Обычно кеш очищается автоматически при перезагрузке ПК или через некоторое время, однако из-за ошибок и различных системных сбоев это может не произойти. В результате пользователь получает не только забитое пространство, но и заполненность самого кеша, что приводит к замедлению быстродействия ПК. Для очистки можно использовать как стандартное средство Windows, так и дополнительные программы, о чем более детально читайте в статье ниже.
Подробнее: Очистка кеша оперативной памяти в Windows
Отметим, что в представленном материале рассказано было не обо всех программах, к тому же есть и такие, которые обладают другим подходом к очистке оперативной памяти, затрагивая различные системные службы и временные файлы. Обзоры на них вы можете найти в тематическом материале далее, а после ознакомления решить, подойдет ли что-то из предложенного для оптимизации ОЗУ на вашем компьютере.
Читайте также: Программы для очистки оперативной памяти
Способ 6: Отключение открытия приложений после перезапуска
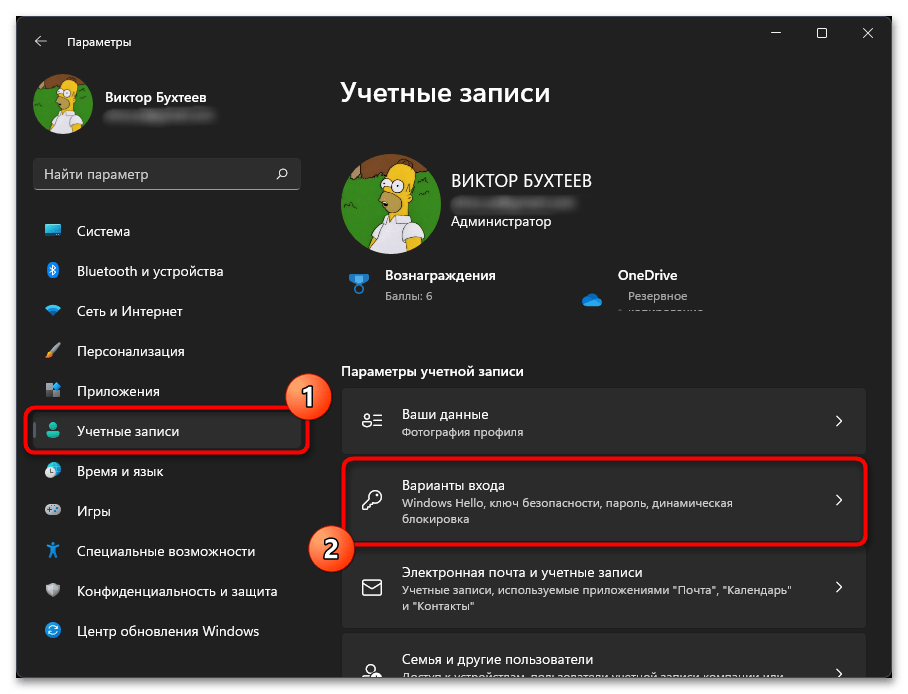
В Windows 11 есть функция, связанная со входом в аккаунт, что чаще всего происходит в разных сеансах операционной системы. Она предполагает сохранение состояния приложений при выходе и возвращении их изначального состояния при перезапуске. То есть вы можете не выключать программы, а просто завершить работу за компьютером, а при следующем старте все приложения откроются в том же месте и будут доступны для работы. Такая функция потребляет значительное количество оперативной памяти в активном режиме, поэтому для оптимизации ее можно отключить, если вам не нужно сохранять состояние приложений.
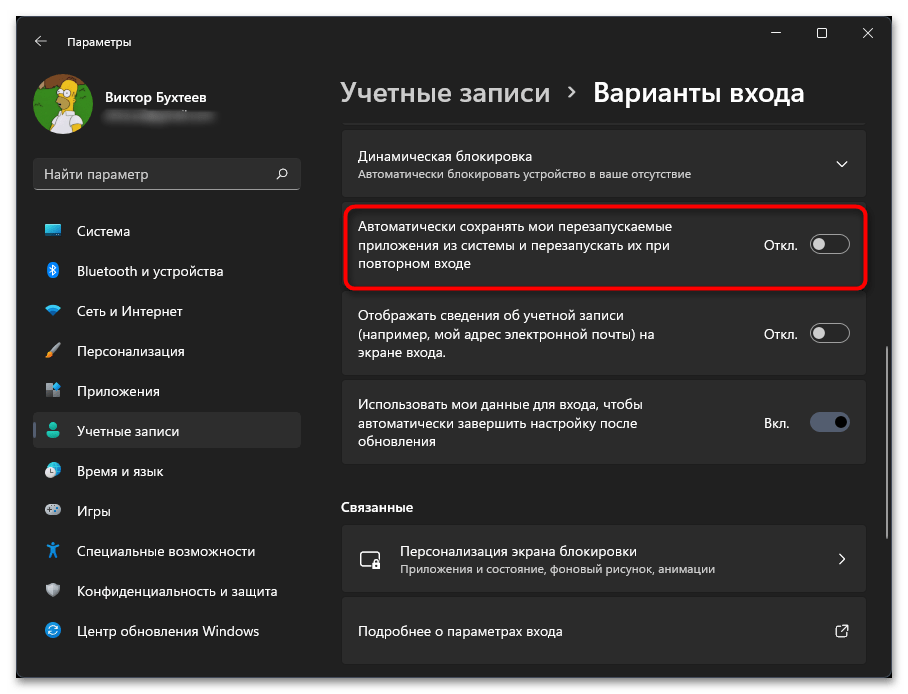
- Через «Параметры» перейдите к разделу «Учетные записи», где выберите «Варианты входа».
- Перетащите переключатель у пункта «Автоматически сохранять мои перезапускаемые приложения из системы и перезапускать их при повторном входе» в состояние «Откл.». Теперь вы можете отправить компьютер на перезагрузку и проверить, поможет ли данное действие немного оптимизировать работу ОЗУ.
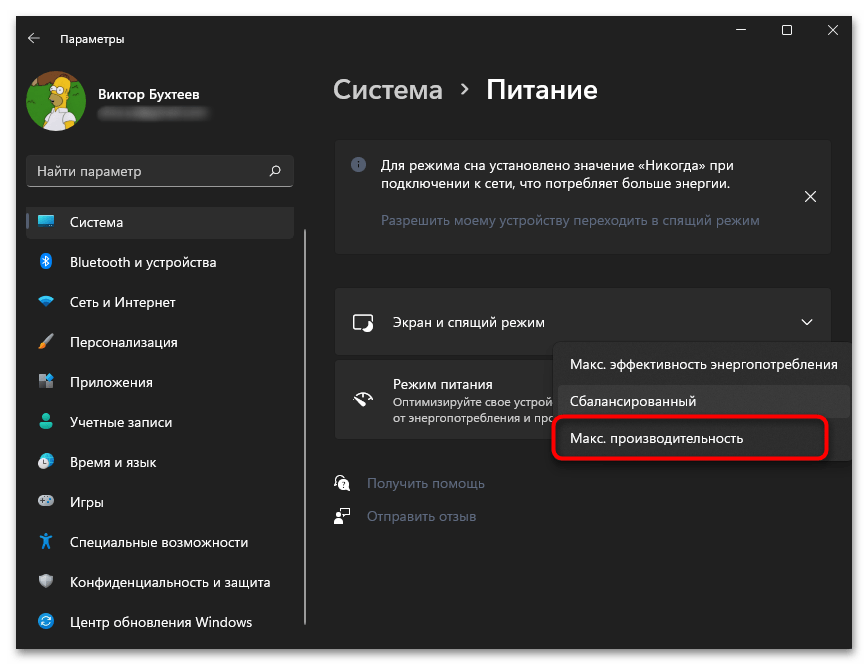
Способ 7: Использование режима максимальной производительности
Режим максимальной производительности — один из стандартных планов электропитания для компьютеров или ноутбуков под управлением Windows. Он подразумевает отсутствие любых ограничений для работы комплектующих в плане снижения нагрузки с целью уменьшения электропотребления. Как раз он и позволяет использовать, в том числе, и оперативную память на полную мощность. Благодаря этому режиму убирается любое ограничение на частоты, а также повышается скорость отклика процессора, что тоже важно при работе с программами. О том, как включить данный режим максимальной производительности, читайте в другой статье, кликнув по следующему заголовку.
Подробнее: Использование режима максимальной производительности в Windows 11
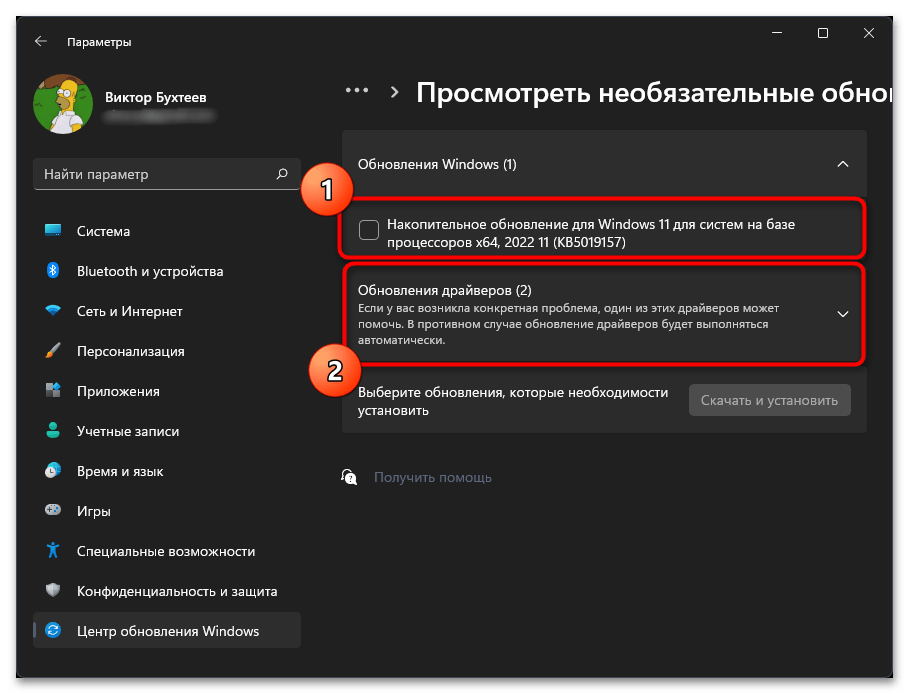
Способ 8: Установка драйверов и обновлений для них
Конкретно драйверов для оперативной памяти как таковых не существует, однако есть вспомогательные, предназначенные для чипсета материнской платы и других связанных компонентов. Наличие всех необходимых драйверов и обновлений для них комплексно оптимизирует работу операционной системы, повышая и быстродействие оперативной памяти. Поэтому мы настоятельно рекомендуем проверить все это вручную или при помощи специальных программ.
Подробнее: Установка драйверов в Windows 11
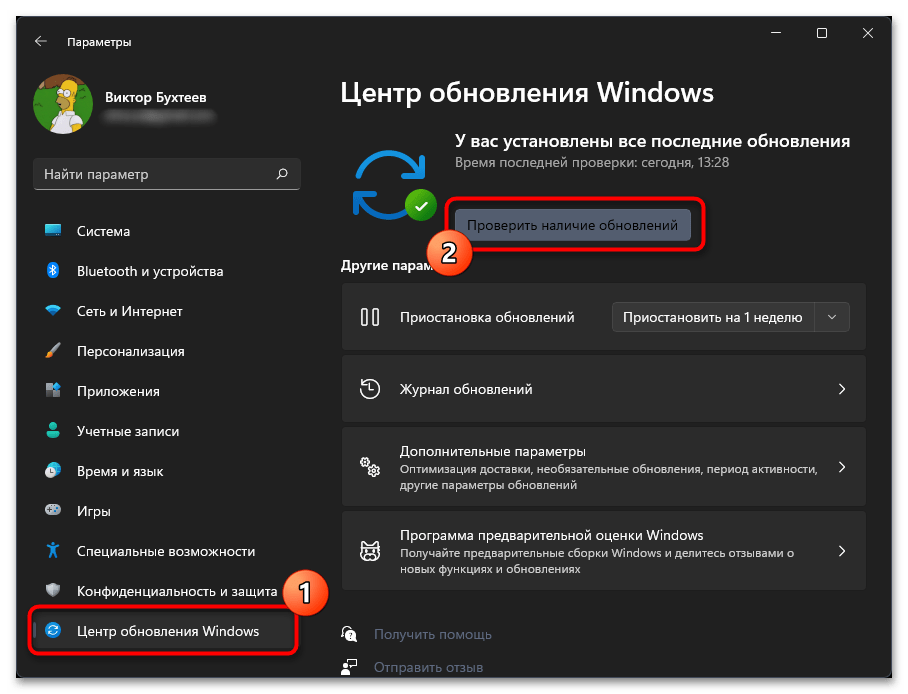
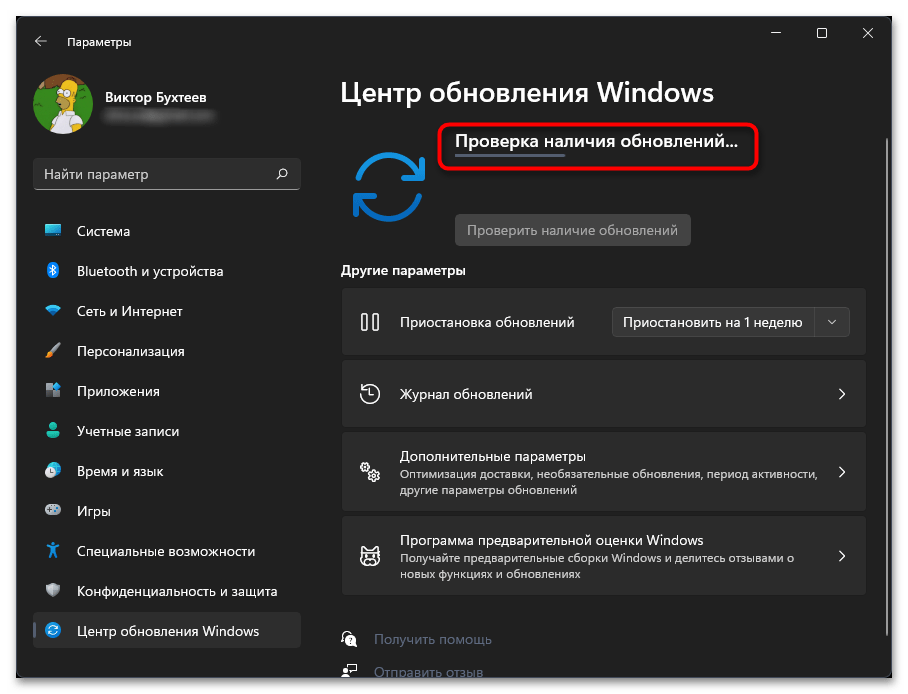
Способ 9: Проверка системных обновлений
Наличие всех актуальных обновлений для Windows 11 косвенно влияет на оперативную память, поскольку может помочь оптимизировать общую производительность и отклик программ с процессами. Однако при комплексном подходе к решению задачи проверка апдейтов является практически обязательным пунктом, к тому же это не отнимет у вас много времени и сил.
- В «Пуске» нажмите по значку с шестеренкой, чтобы перейти в «Параметры».
- На панели слева выберите раздел «Центр обновления Windows» и нажмите кнопку «Проверить наличие обновлений».
- Ожидайте окончания сканирования и ознакомьтесь с результатами. Если апдейты были найдены, запустите их скачивание и установку, после чего перезагрузите компьютер для применения изменений.
Способ 10: Проверка компьютера на наличие вирусов
Все действия по оптимизации оперативной памяти в Windows 11 могут быть бессмысленны, если компьютер заражен вирусами. Вредоносное ПО может потреблять значительное количество ОЗУ и замедлять выполнение различных процессов. Именно поэтому одна из рекомендаций заключается в регулярной проверке ПК на наличие вирусов. Вы можете настроить автоматическое сканирование в определенное время через сторонние антивирусы или стандартную защиту. Это остается исключительно на ваш выбор, как и подбор подходящего софта.
Подробнее: Борьба с компьютерными вирусами

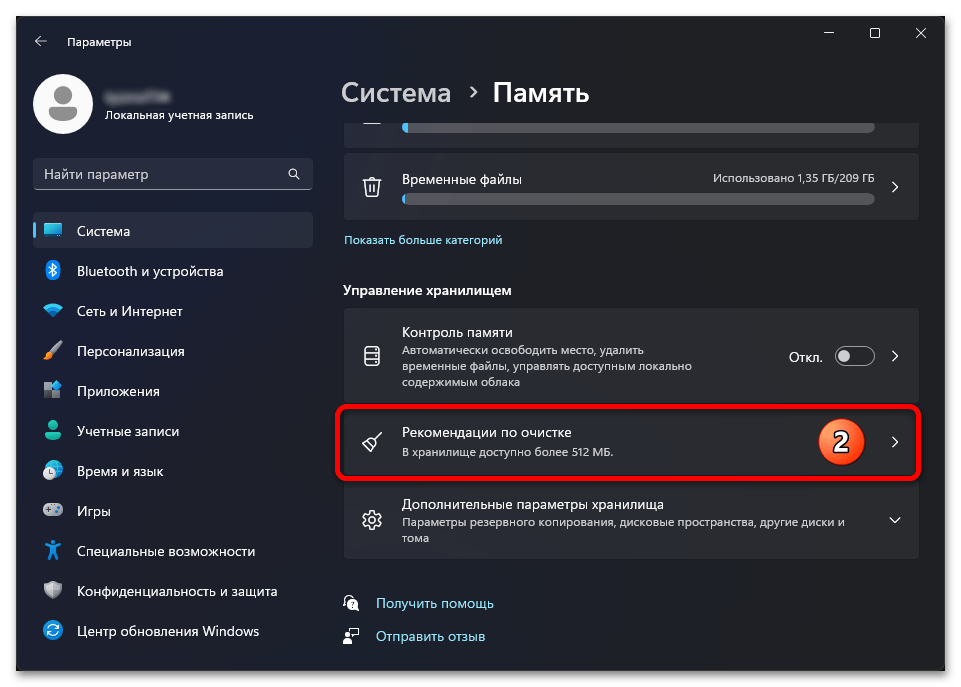
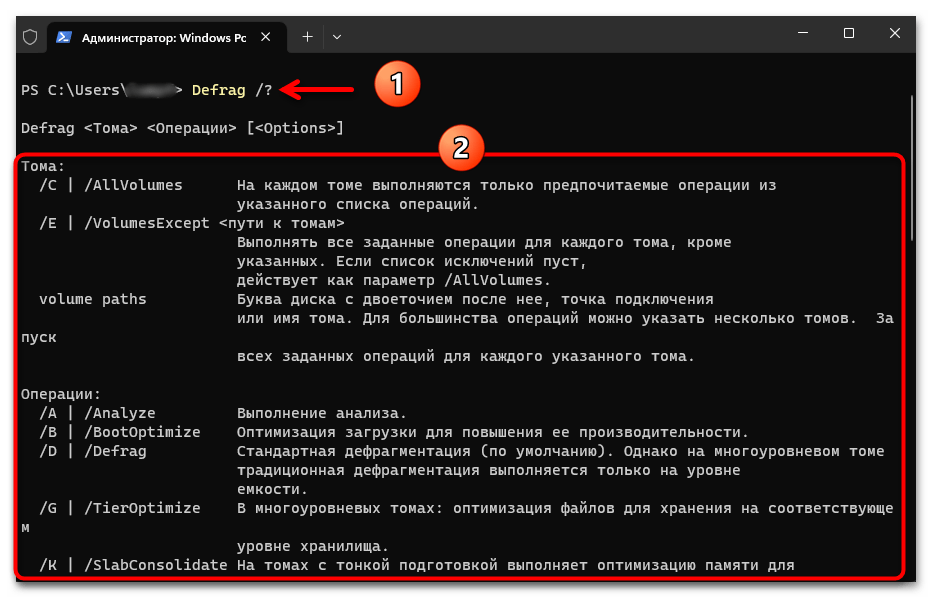
Способ 11: Очистка и дефрагментация жесткого диска
Следующий совет лишь косвенно связан с оперативной памятью и ее оптимизацией, поскольку подразумевает прямую работу с жестким диском. Нужно освободить память и удалить временные файлы, что позволит немного или даже значительно повысить быстродействие. Это поможет и оперативной памяти обрабатывать запросы быстрее, поскольку не придется ждать долгого отклика от жесткого диска.
Подробнее: Очистка системного (C:) диска в Windows 11
Дефрагментация нужна в тех случаях, когда вы уже давно пользуетесь диском и не запускали эту процедуру ранее. Она подразумевает перераспределение пространства, чтобы при считывании файлов диску не нужно было обращаться к секторам в разных местах, что значительно замедляет процесс чтения. Дефрагментация скажется и на ОЗУ, поскольку вы будете быстрее получать отклик от процессов и файлов.
Подробнее: Дефрагментация дисков в Windows 11
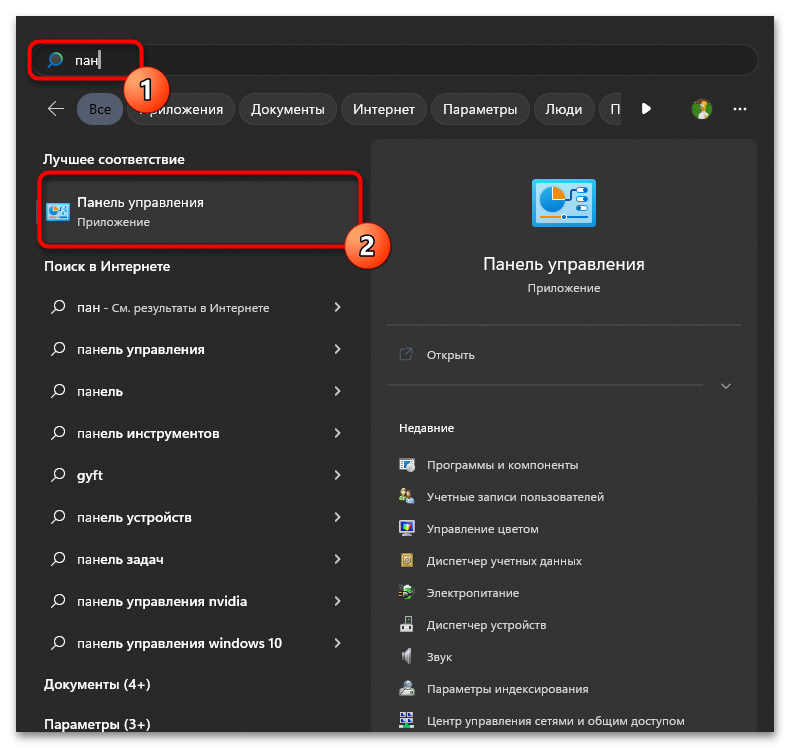
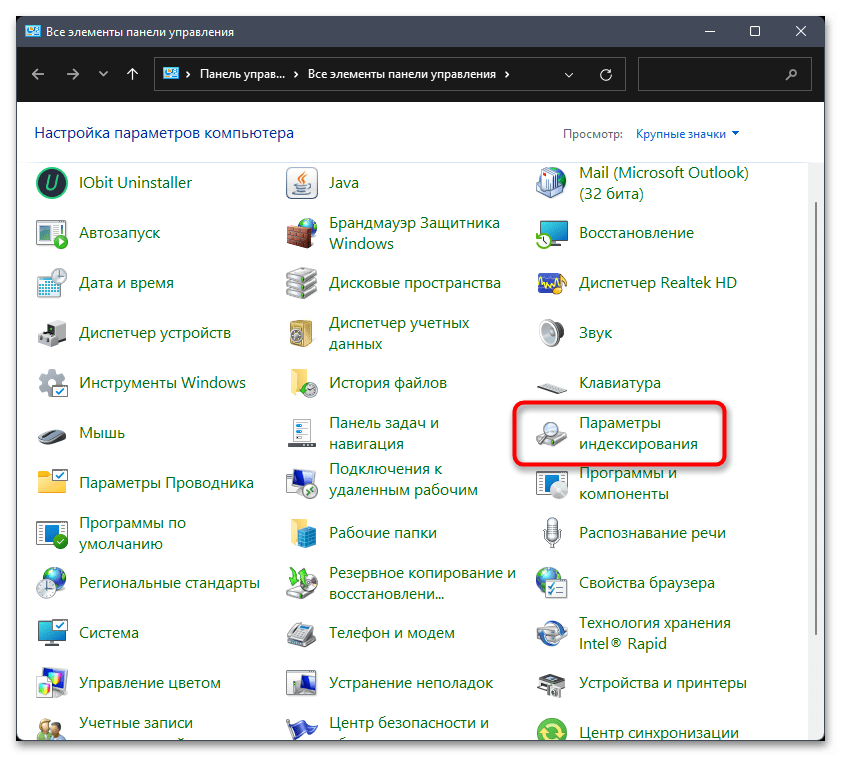
Способ 12: Отключение индексирования поиска
Есть и радикальный метод, позволяющий на несколько процентов улучшить работу оперативной памяти, оптимизируя ее в плане работы с самой системой. Заключается способ в отключении индексирования поиска. Это приведет к тому, что поиск будет работать медленнее, а также поиск по названиям файлов станет недоступен. Однако в целом нагрузка на ОЗУ снизится, и в других аспектах быстродействие повысится.
- Если вы решили отключить индексирование, через поиск в «Пуске» отыщите «Панель управления» и запустите данное классическое приложение.
- В нем выберите раздел «Параметры индексирования».
- В новом окне воспользуйтесь кнопкой «Изменить».
- Снимите галочки со всех существующих расположений, после чего подтвердите изменения и отправьте компьютер на перезагрузку.

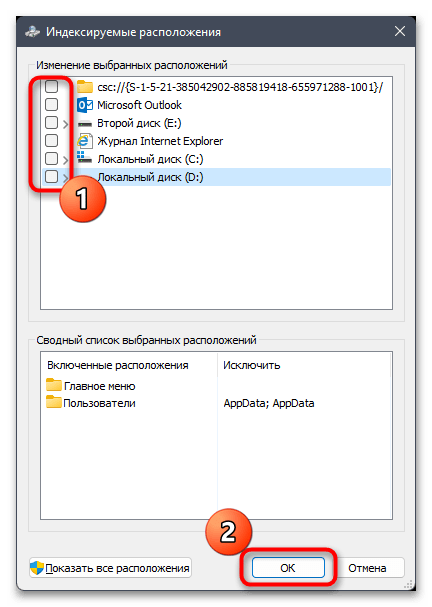
Если при дальнейшем использовании компьютера окажется, что поиск вам все-таки нужен или не удается отыскать нужные файлы без их названий, вы можете точно так же включить индексирование обратно, поставив те же самые галочки. Никаких критических изменений в систему при этой настройке не вносится, поэтому ОС будет работать точно так же, как и раньше.
Способ 13: Апгрейд ОЗУ
Если ничего из перечисленного выше вам так и не помогло оптимизировать работу оперативной памяти, не хватает ее объема или скорость обработки информации слишком маленькая, остается только один выход — апгрейд комплектующего. Вы можете приобрести новые модули или проверить, работают ли текущие в многоканальном режиме. Второй пункт обязателен для соблюдения, если в вашей системе установлено более одной планки с ОЗУ, поскольку это значительно увеличивает производительность.
Наша группа в TelegramПолезные советы и помощь
After upgrading to the new Windows version, Windows 11, you may find that Windows 11 high memory usage issue bothers you. Do you know why Windows 11 is using a lot of RAM? If high memory usage influences your computer’s performance, do you know how to free up RAM on Windows 11? MiniTool Software will show you the answers you want to know in this article.
Here, we will talk about the causes of Windows high memory usage, the methods to solve this issue, and MiniTool’s secure data recovery services to help you recover lost and deleted files on Windows 11.
Tips:
Experience peak PC performance with MiniTool System Booster — Free up RAM for a smoother computing journey.
MiniTool System Booster TrialClick to Download100%Clean & Safe
What Is Memory Usage on Windows?
Memory, which should be exactly RAM (Random-access memory), is an important component of a computer. A RAM device allows data to be read and written at any time, regardless of the physical location of the data within the memory, and the read and write speed is very fast normally.
The data stored on the RAM device is temporary. After you shut up your computer, the memory usage will be 0 (zero). However, as long as you open your PC, the background services and running apps will begin to use the memory. The percentage of memory usage will influence the performance of your computer. If the percentage is too high, your computer performance will be reduced. So, Windows memory usage is a matter of concern.
Windows 11 Is Using a Lot of RAM
Windows 11 is the new version of Windows, which was released to the public on October 5th, 2021. After the release, many users choose to upgrade to Windows 11 to experience the new features and new UI (user interface). Microsoft is also advocating an upgrade to Windows 11 to provide your PC with more reliable security.
Now, Windows 11 has been released for months. Windows 11 users are more and more. After upgrading to Windows 11, some users post that Windows 11 is using a lot of RAM. This problem largely reduces the users’ goodwill towards Windows 11.
How to Check Memory Usage on Windows 11?
How to know if your Windows 11 is using a lot of RAM or how to check your Windows 11 RAM usage? It is easy to check it. Here is a guide:
Step 1: Press Win+X to call out the WinX menu, then select Task Manager from the WinX menu open it.
Step 2: Click More details to continue.
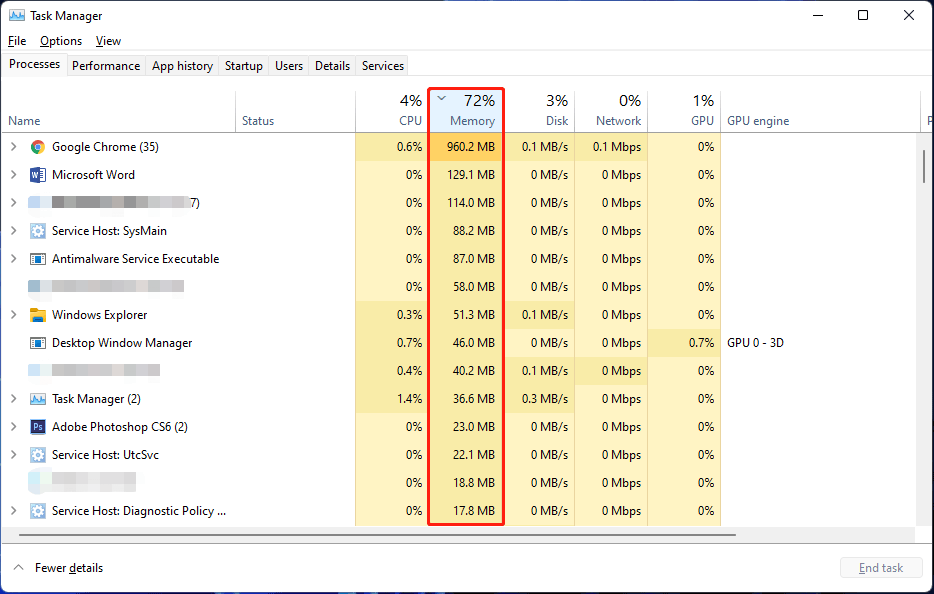
Step 3: By default, you see the Processes section. You just need to stay at this section, then check the column of Memory. You can find the memory usage percentage of your Windows 11 computer. Looking further down, you will see how much memory each application or service is using. If the sorting is messed up, you can click Memory to sort in ascending or descending order.
Well then, what is the reason for high memory usage on Windows 11? Here are some main causes.
Top Causes of Windows 11 High Memory Usage
- Too many unnecessary apps and programs are running on your Windows 11 computer.
- There are too many startup programs on your device.
- The virtual memory is not enough.
- Your computer is infected by viruses or malware.
- And more….
Now, you know the reasons for this issue. Then, you can take some relative measures to free up RAM or clear RAM on Windows 11. We show some things you can try in the next part.
How to free up RAM on Windows 11 if the memory usage is too high?
You can close the unnecessary apps and services, disable the unnecessary startup apps, remove viruses or malware, and take some other measures to reduce Windows 11 memory usage. Here are some methods you can try:
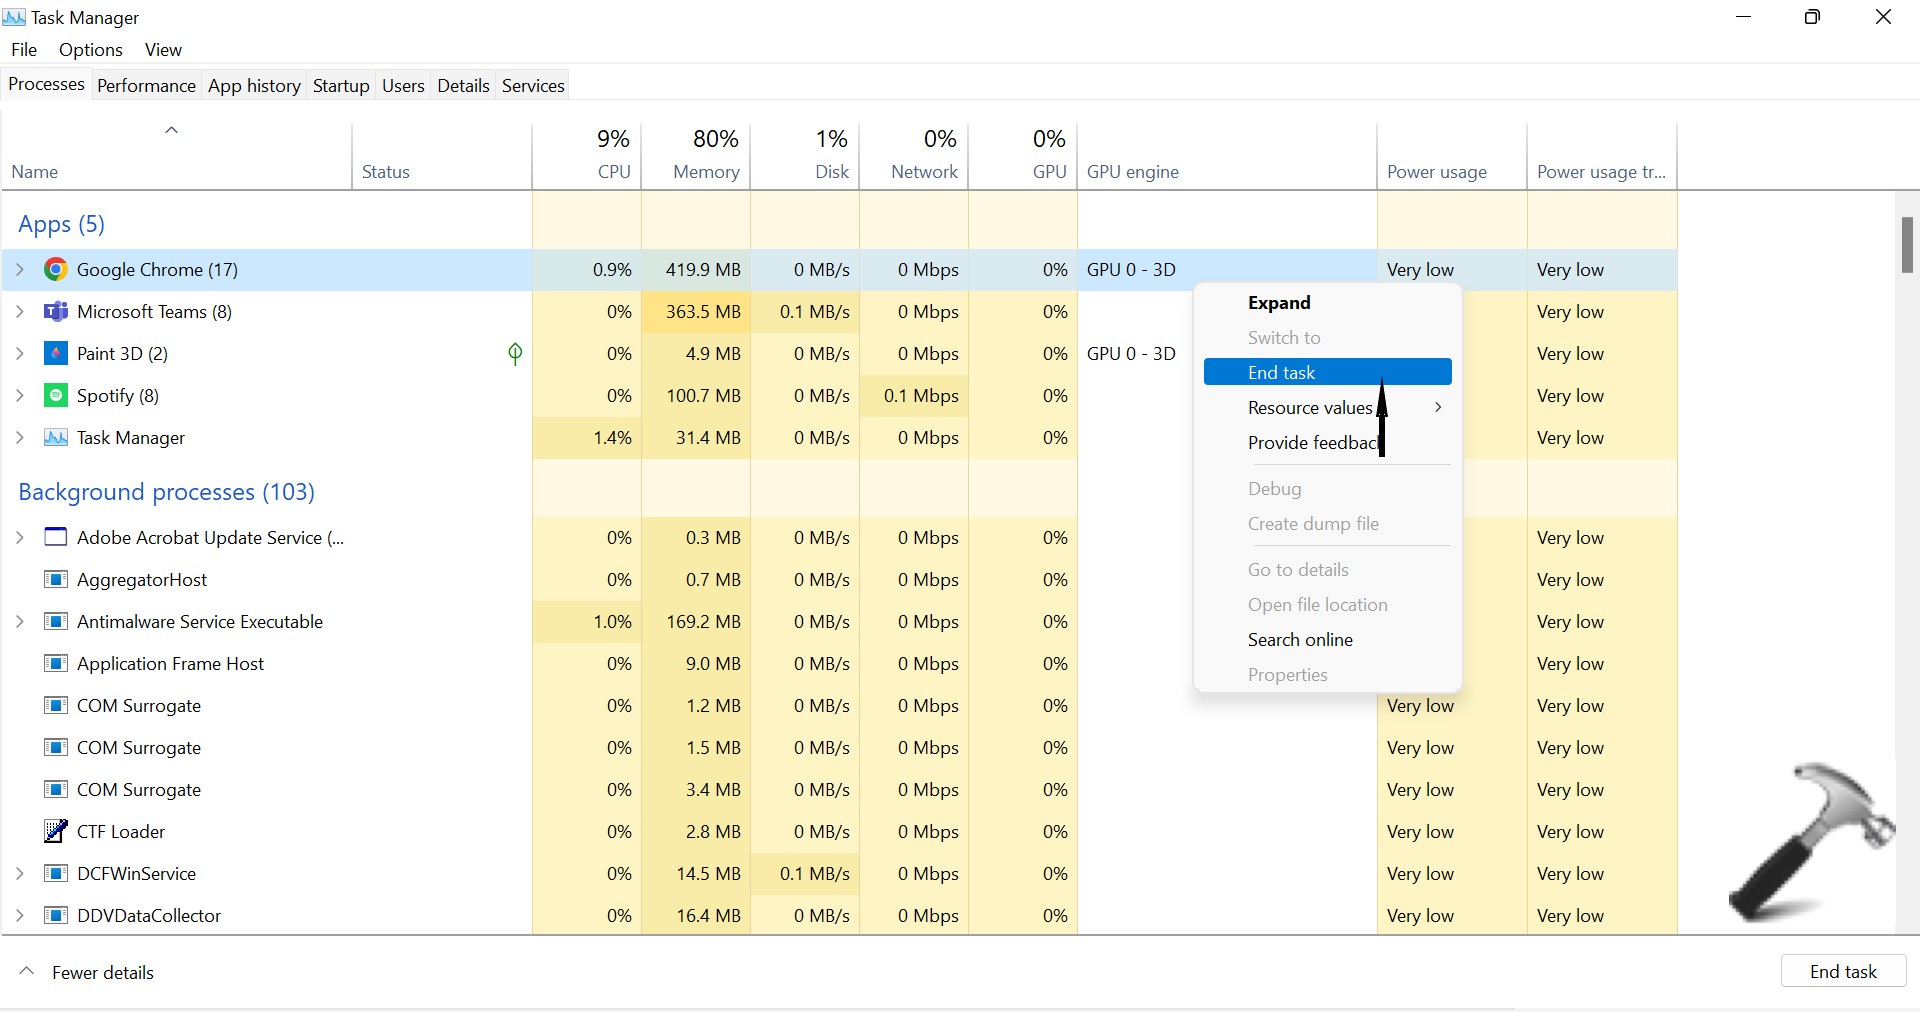
Method 1: End the Unnecessary Apps and Services
One of the main reasons for Windows 11 high memory usage is you are opening too many apps or services. If you don’t need to use them for a while, you can just close them. You can use Task Manager to end the unnecessary apps and services.
Step 1: Right-click Start and select Task Manager to open it.
Step 2: Click More details if necessary.
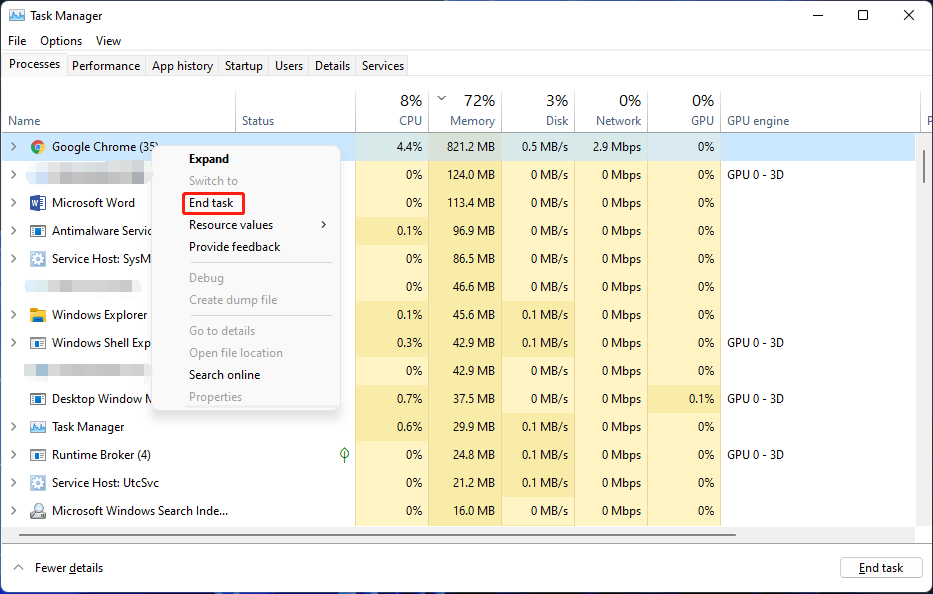
Step 3: Find the unnecessary apps or services that are using too much memory. Then, right-click one and select End task. You can also select the app or service and click the End task button on the bottom-right corner to close it. Repeat this step to close all unnecessary apps and services to low down the memory usage on your Windows 11 device.
This method should largely reduce the memory usage on your Windows 11 computer. However, you can continue using the following ways to free up more memory.
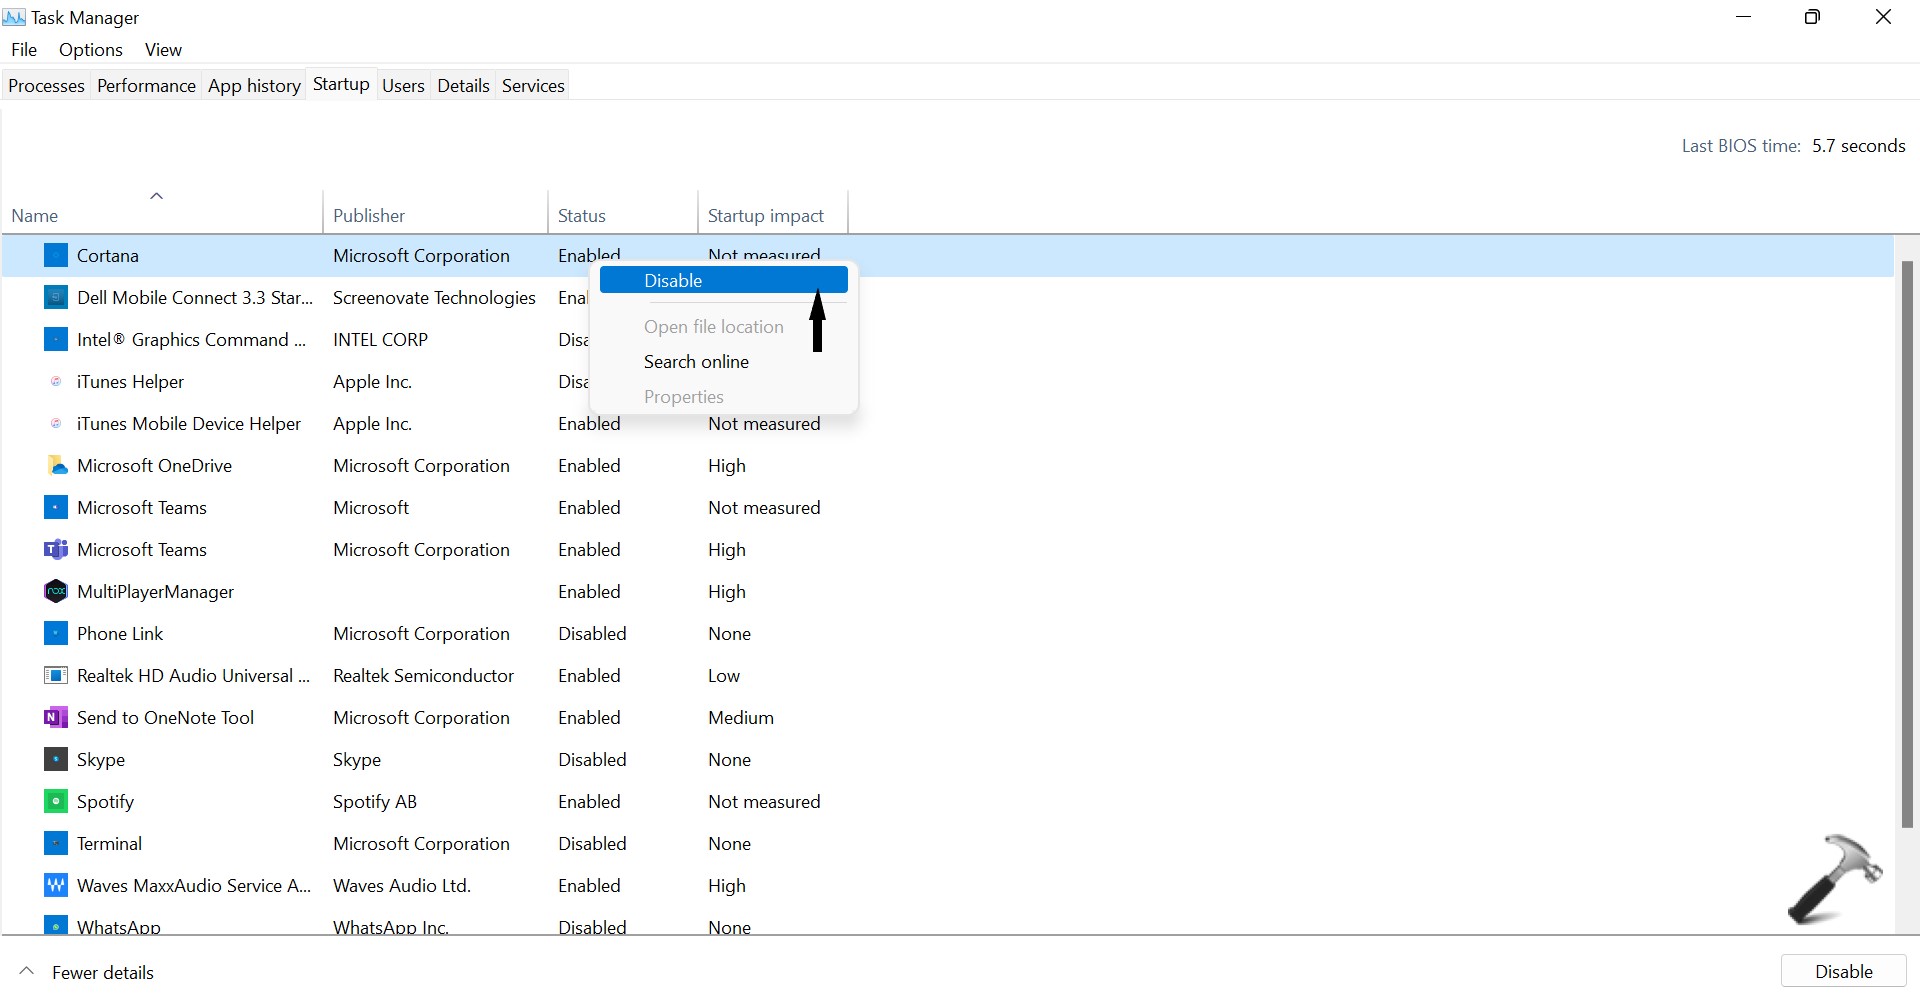
Method 2: Disable the Unnecessary Startup Apps
How to clear RAM on Windows 11? You can also consider disabling the unnecessary startup apps.
What are startup apps? They are the apps that can automatically launch when you boot your computer. You can set the programs you need to use after booting up as startup items.
Setting too many applications as startup items not only prolongs the startup time of your computer but also causes high memory usage. To optimize RAM on Windows 11, you can disable the unnecessary startup apps.
Step 1: Right-click Start and select Task Manager to open it.
Step 2: Click More details to continue.
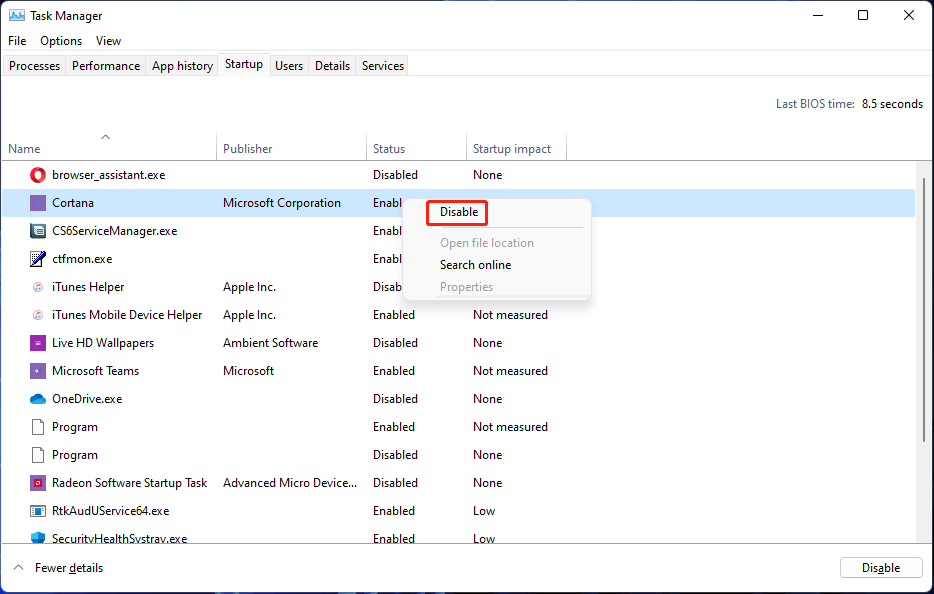
Step 3: Switch to the Startup section. Here you can see the apps and services which are set as startup items or not. For example, the status for Cortana is Enabled. This means that it is a startup app.
Step 4: Select the app or service you want to disable the startup feature and select Disable. Repeat this step to disable all the unnecessary apps.
After that, you can go to check if the memory usage is reduced.
Method 3: Defragment Your Hard Drive
You can also let your Windows 11 reduce RAM usage by defragmenting your hard drive. You can follow this guide to do it.
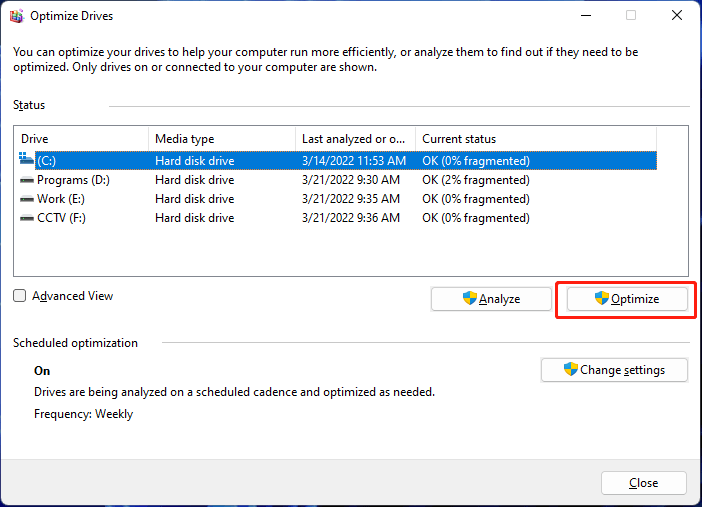
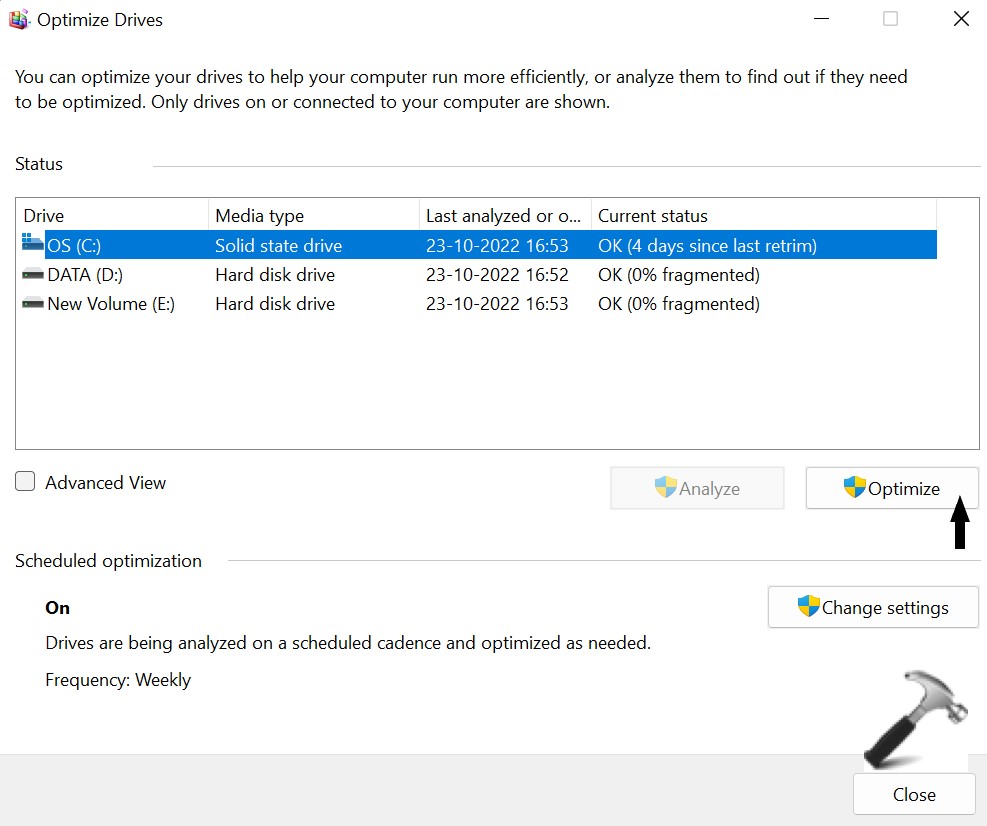
Step 1: Click the search icon from the taskbar and search for Defragment and Optimize Drives.
Step 2: Select Defragment and Optimize Drives from the search result to open it.
Step 3: Select the drive you want to defragment and click the Optimize button to defragment it.
Step 4: When the process ends, you need to restart your computer and see if more memory is released.
Method 4: Disable SysMain Service
If your Windows 11 performance is largely reduced due to high memory usage, you can disable SysMain Service to fix the issue. SysMain is known as SuperFetch on Windows 10. It is used to identify your frequently used apps and help you start these apps faster.
Step 1: Press Win+R to open Run.
Step 2: Type services.msc into Run and press Enter to open Services.
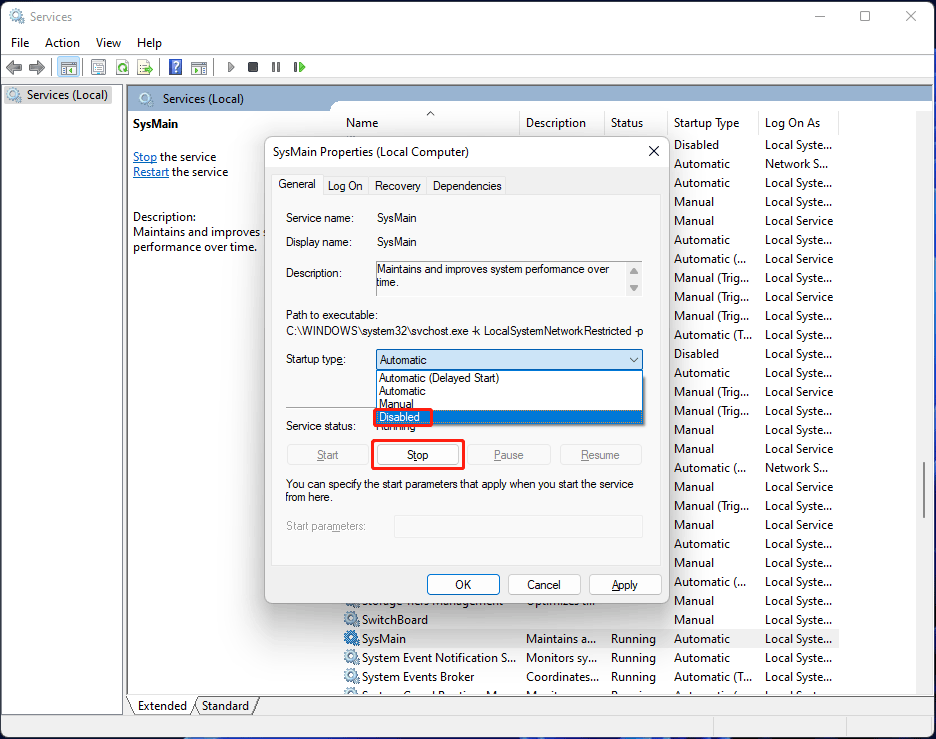
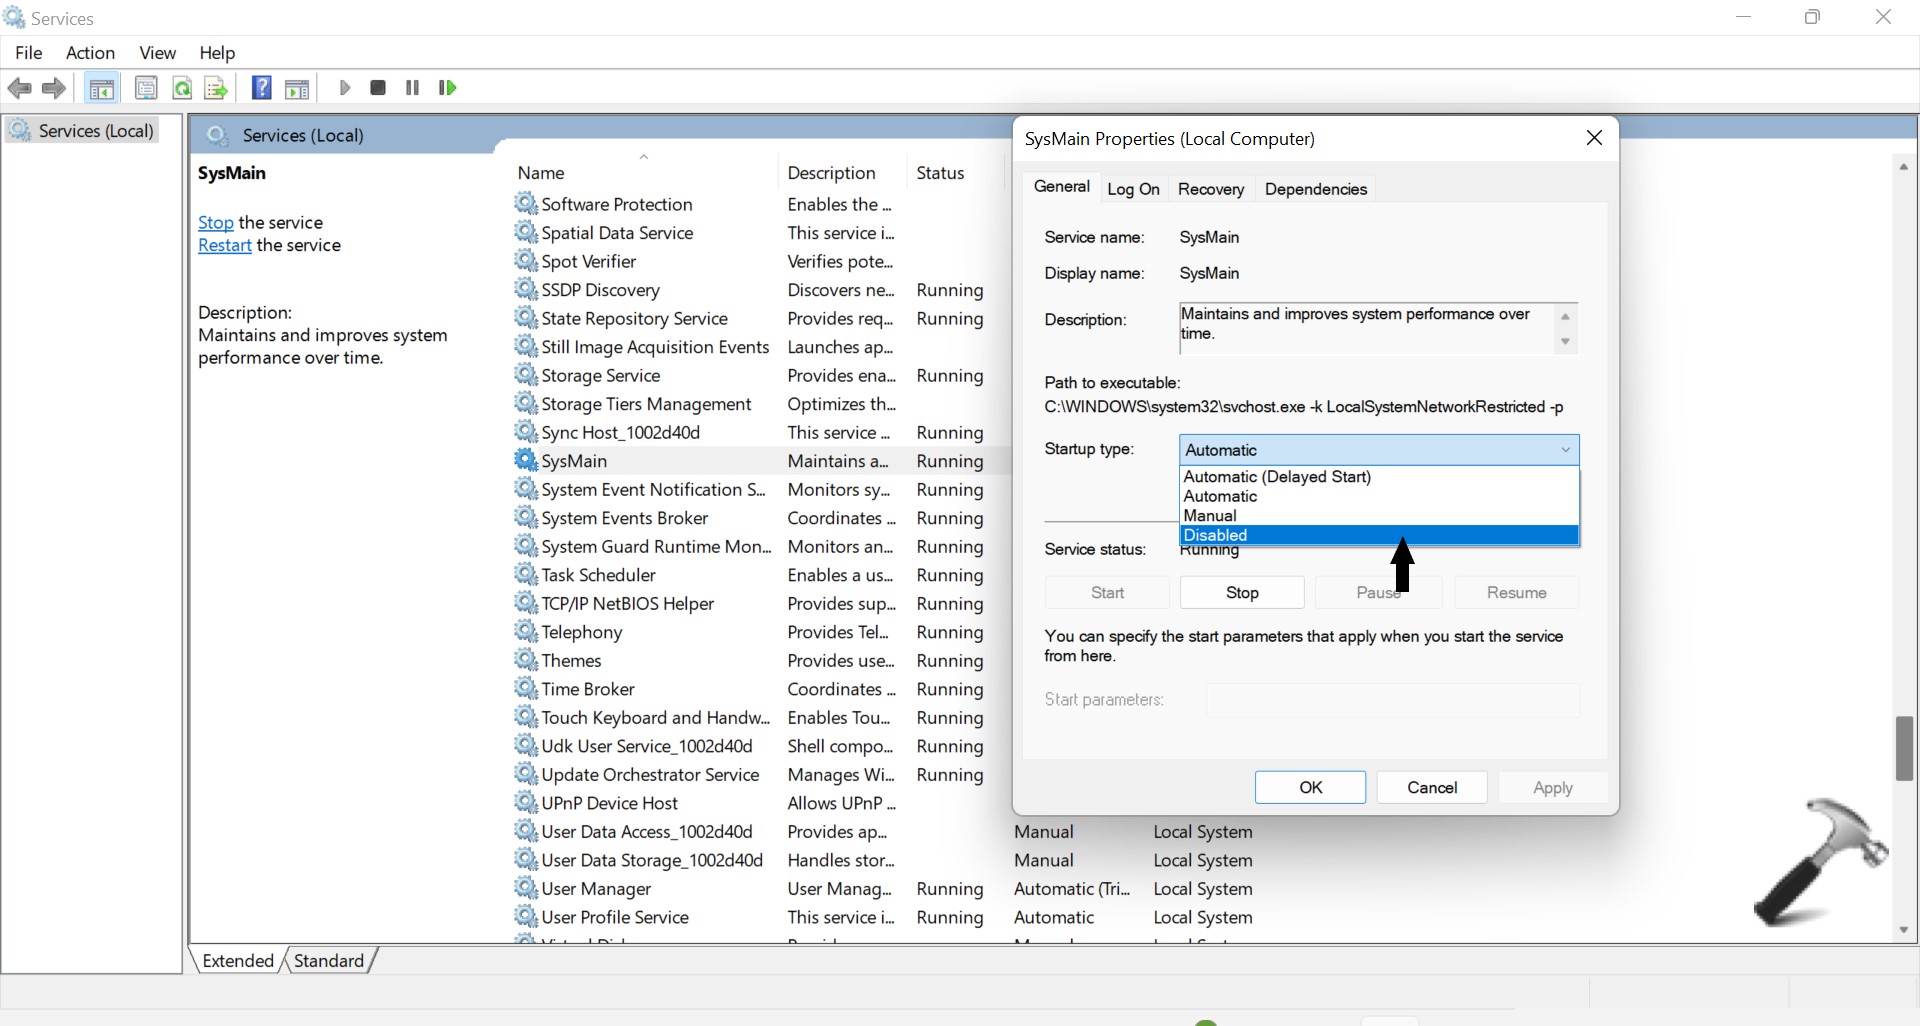
Step 3: Scroll down to find the SysMain service from the right panel. Then, double-click it to open its Properties interface.
Step 4: Select Disabled for Startup type.
Step 5: Click the Stop button and wait until the process ends.
Step 6: Click Apply.
Step 7: Click OK.
Method 5: Adjust for Best Performance
You can also adjust for best performance to optimize RAM on Windows 11:
Step 1: Click the search icon from the taskbar and search for sysdm.cpl.
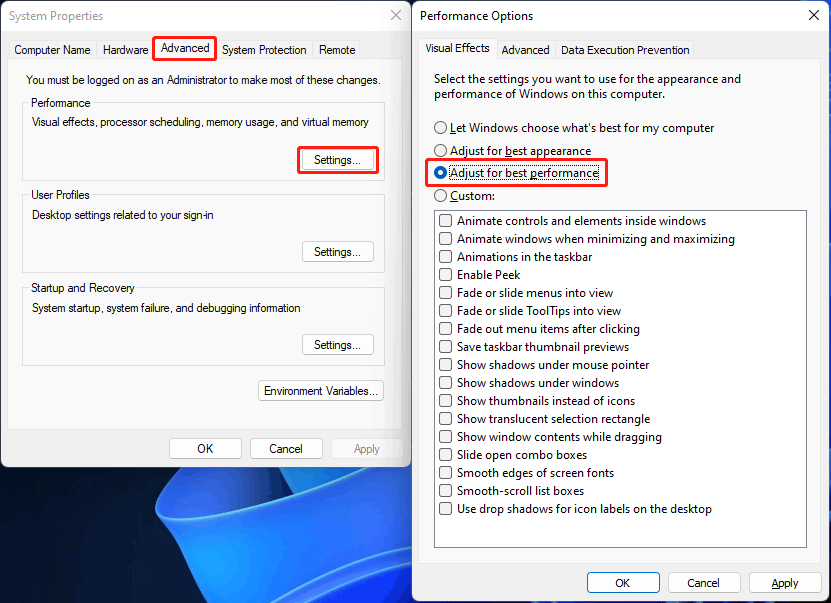
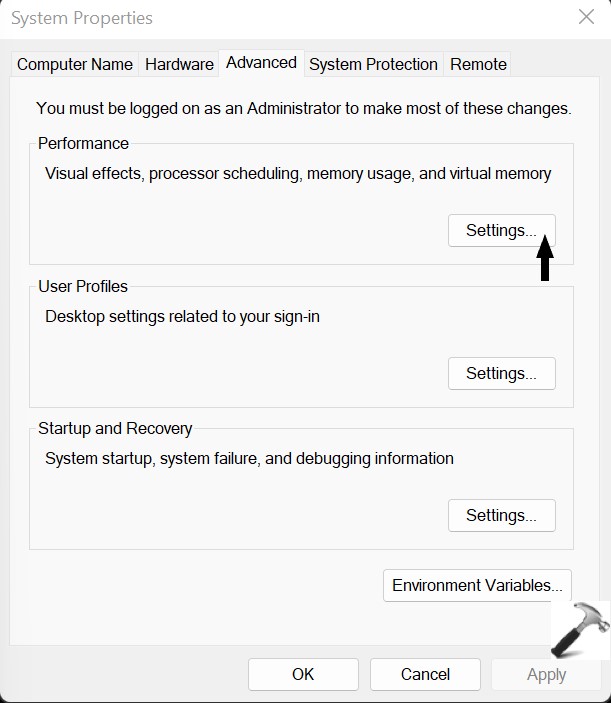
Step 2: Select sysdm.cpl from the search result to open System Properties.
Step 3: Switch to the Advanced tab.
Step 4: Click the Settings button under Performance.
Step 5: Under Visual Effects, check Adjust for best performance.
Step 6: Click Apply.
Step 7: Click OK.
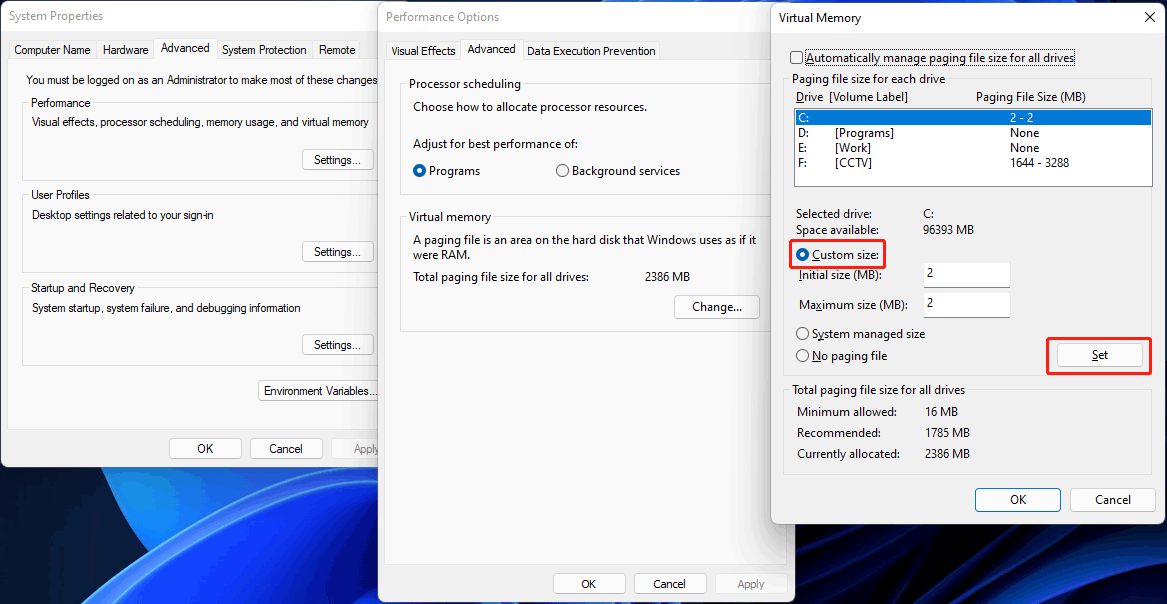
Method 6: Increase Virtual Memory
Some users solve the high memory usage on Windows 11 by increasing virtual memory. You can also do this to have a shot.
Step 1: Use the method mentioned above to open System Properties.
Step 2: Switch to Advanced, then click the Settings button under Performance.
Step 3: Click the Change button under Virtual Memory.
Step 4: Make Automatically manage paging file size for all drives is not selected.
Step 5: Select Custom size.
Step 6: Specify the initial and maximum size for the paging file in megabytes according to your requirements.
Step 7: Click the Set button.
Step 8: Click OK.
Step 9: Click OK again.
Step 10: Restart your computer.
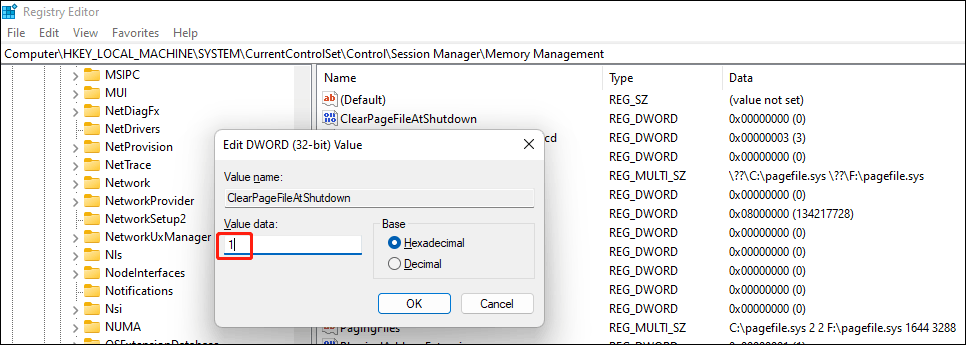
Method 7: Modify the Registry Key
You can also modify the registry key to reduce Windows 11 memory usage. Before doing this, you’d better back up the registry key to protect your system.
Step 1: Press Win+R to open Run.
Step 2: Type regedit and press Enter to open Registry Editor.
Step 3: Go to:
Computer\HKEY_LOCAL_MACHINE\SYSTEM\CurrentControlSet\Control\Session Manager\Memory Management
Step 4: Find ClearPageFileAtShutDown from the right panel and double-click it to open it.
Step 5: Enter 1 for its value data.
Step 6: Click OK to save the change.
Step 7: Restart your computer.
Method 8: Scan & Remove Viruses and Malware from Your PC
If your computer is attacked by viruses or malware, high memory usage can easily happen. This situation is a risk. You need to scan and remove viruses and malware as soon as possible. You can use the Windows built-in Windows Security to scan your computer for viruses and malware.
Step 1: Use Windows search to search for Windows Security and select the first result to open it.
Step 2: Click Virus & threat protection to continue.
Step 3: Click the Quick scan button on the right panel to scan your device for viruses and malware.

Step 4: If nothing is found, you can click Scan options, select Full scan, and click Scan now to perform a full scan on your device.
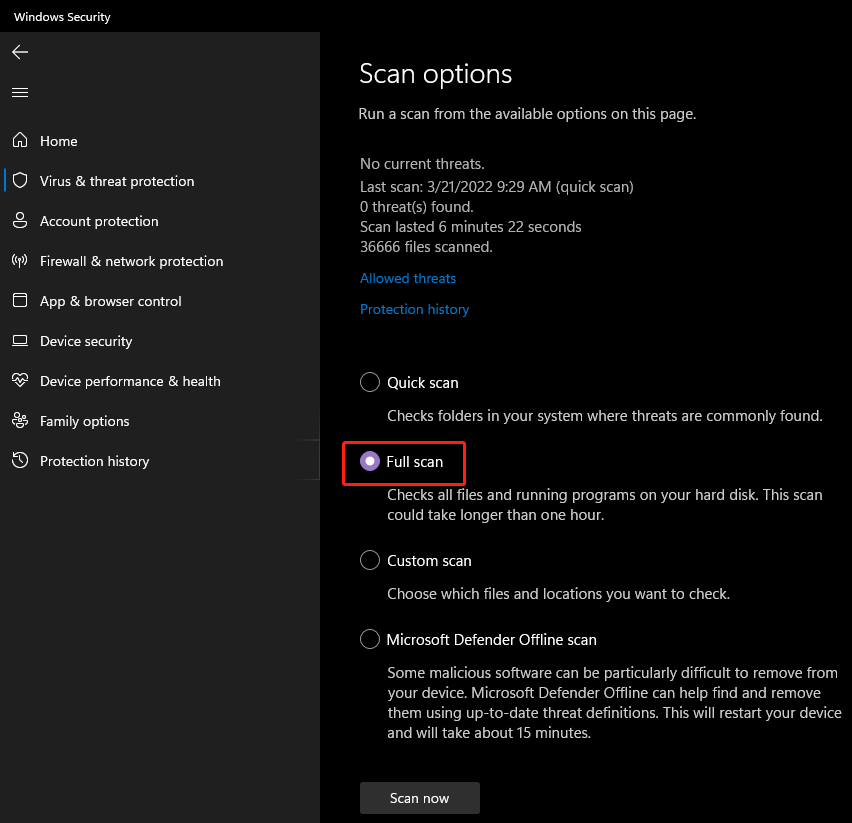
Of course, you can also use third-party anti-virus software like Norton, McAfee, and Bitdefender to do the same job.
Bonus Tips: Back up your PC and recover your data
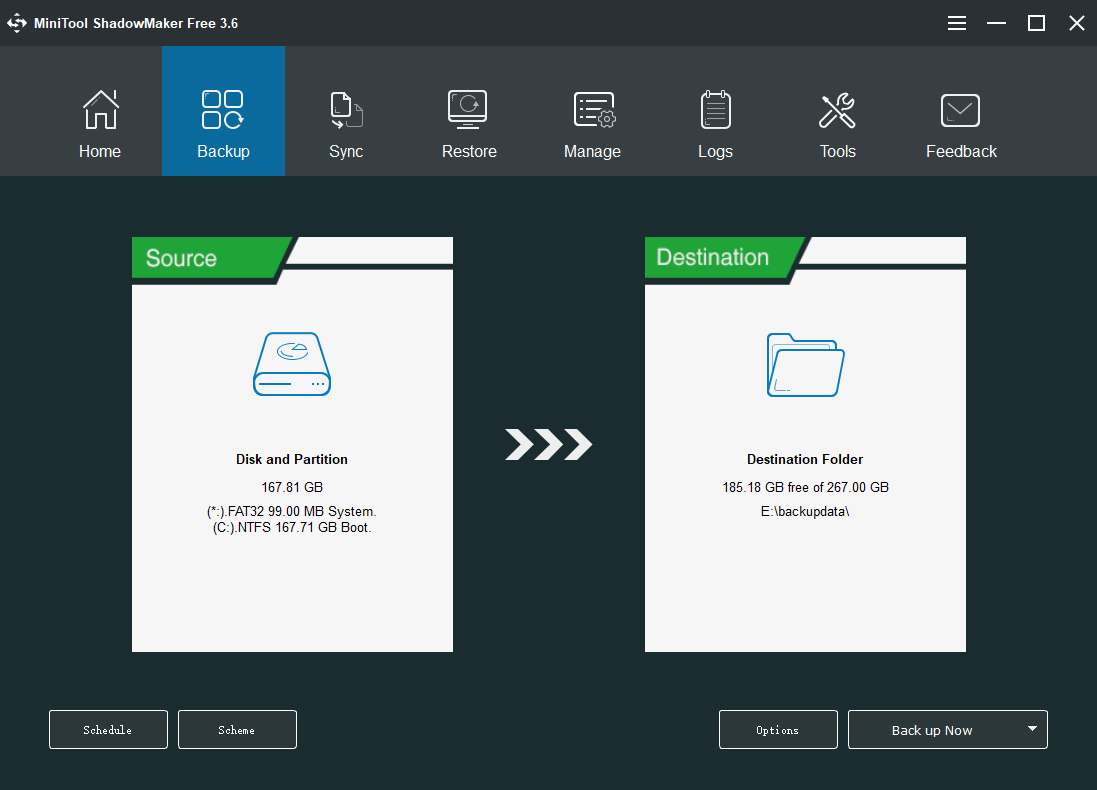
Tip 1: Back up Your Files to Keep Them Safe
We believe that there are many important files on your computer. Improper computer operation may cause data loss issues or system crashing problems. But you can use professional Windows backup software to back up your files and system to keep them safe. MiniTool ShadowMaker is your best bet.
You can use this tool to back up files, folders, partitions, disks, and systems at any time you want. It supports automatic backup, and differential & incremental backup. You can learn more information from the user tutorial.
This software has a trial edition, which allows you to use it for free within 30 days.
MiniTool ShadowMaker TrialClick to Download100%Clean & Safe
Tip 2: Rescue Your Lost and Deleted Files on PC
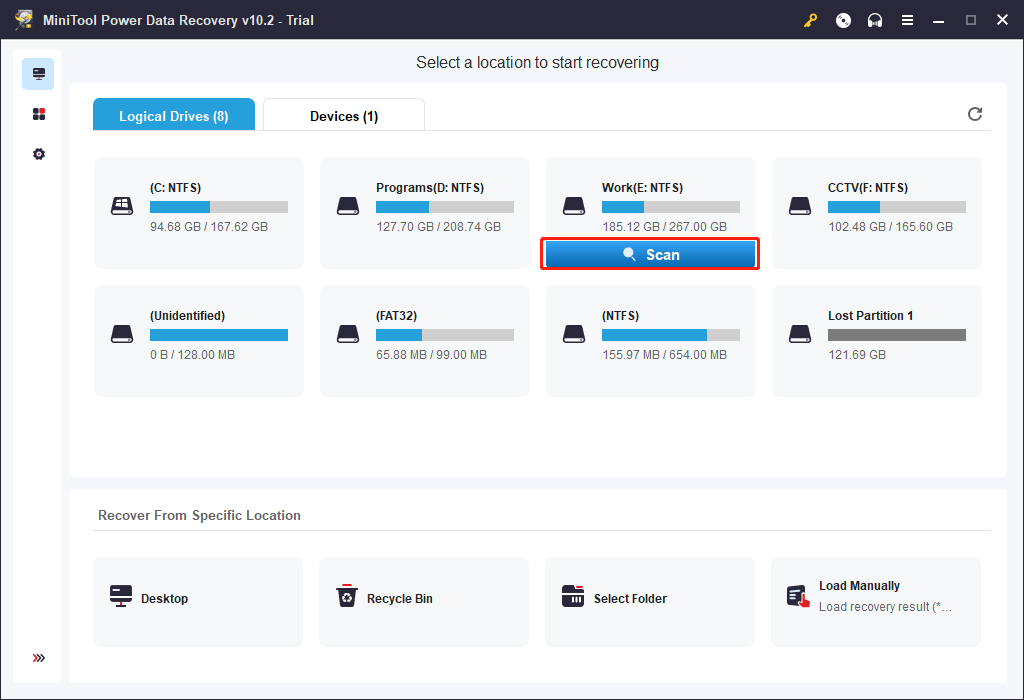
If your files get lost or deleted by mistake and there is no available backup, you can use MiniTool Power Data Recovery to get them back as long as they are not overwritten.
This is the best free data recovery software can be used to retrieve files and folders from all kinds of data storage devices including hard drives, SSDs, USB flash drives, memory cards, SD cards, pen drives, and more.
It also has a trial edition. You can first use it to scan the drive you want to recover data from and see if it can find your needed files. If yes, you can use a full edition to recover files without limits.
MiniTool Power Data Recovery TrialClick to Download100%Clean & Safe
This software works on all versions of Windows. You can feel free to use it to rescue your Windows files.
Bottom Line
If you discover that your Windows 11 is using too much memory usage, you can just use the methods mentioned in this article to reduce RAM usage or optimize RAM on your device. In addition, if you lose your files by mistake, you can use MiniTool Power Data Recovery to get your files back. You can use this software to recover files from SSD, Samsung drive, Seagate drive, and SD card.
If you have other good suggestions, you can let us know in the comments. You can also contact us via [email protected].
Have you been facing high memory issue after upgrading to the latest Windows 11 version? If yes, then you can resolve this issue by freeing up the RAM on your Windows 11 device. Any of the below mentioned methods can be use to fix high memory usage in Windows 11 22H2 of your device.
Page Contents
Method 1: By disabling the unnecessary Startup Apps
1. Start by opening Task Manager.
2. Select the Startup section. Here you can see the apps and services that are set as startup items or not.
3. Now, you can select the apps where you want to disable the startup feature. Copy this set to disable all the unnecessary startups.
Method 2: End unnecessary Apps and Services to Fix High memory usage
1. Start by opening Task Manager.
2. Now, find the unnecessary apps and services that are using too much memory. Then, right click on the app or service and select End task. Copy this set to close all the unnecessary apps.
Method 3: By Disabling SysMain Service
1. Start by opening Run directly or by pressing Windows + R keys together.
2. Type services.msc and press OK.
3. Now, scroll down to find SysMain service. Double click on SysMain to open its Properties interface.
4. Click on Disabled for Startup type.
5. Press the Stop button and wait until the process ends.
6. Click on Apply.
7. Click on OK.
Method 4: Adjust for Best Performance
1. Search sysdm.cpl to open System Properties.
2. Select Advanced tab.
3. Now, select Settings button under Performance.
4. Select Adjust for best performance under Visual Effects.
5. Click on OK.
Method 5: By Defragmenting your drive
1. Start by opening Defragment and Optimize Drives.
2. Now, select the drive you want to defragment and click the Optimize button to defragment it.
3. Restart your device once the process ends and see if more memory is released.
Method 6: Modify the Registry Key
1. Start by opening Run directly or by pressing Windows + R keys together.
2. Type regedit and press OK.
3. Copy and paste,
Computer\HKEY_LOCAL_MACHINE\SYSTEM\CurrentControlSet\Control\Session Manager\Memory Management

4. Double click on ClearPageFileAtShutDown.
5. Enter 1 as the value data.
6. Press on OK to save the changes.
7. Lastly, Restart your computer.
Method 7: Scan & Remove Viruses and Malware
1. Start by opening Windows Security.
2. Select Virus & threat protection.
3. Click on Quick scan button to scan your device for viruses and malware.
4. If nothing is detected, then you can Scan options, select Full scan, and click on Scan now to perform a full scan of your device.