
The official OpenVPN client for Windows offers per-IP split tunneling. Some proprietary clients also offer per-app split tunneling.
To look up IP addresses, open a Windows terminal (Command Prompt or Windows PowerShell) and issue the command:
1 |
nslookup whatismyipaddress.com |
Sample response:
1 |
Non-authoritative answer: |
To send only two IP addresses through the VPN tunnel:
- Disconnect the client from the server
- Edit the client configuration file
- Add these lines at the end before reconnecting
1 |
route 104.16.154.36 255.255.255.255 vpn_gateway |
To send everything except two IP addresses through the VPN tunnel:
1 |
route 104.16.154.36 255.255.255.255 net_gateway |
Code: Select all
Wed May 03 01:00:16 2017 OpenVPN 2.4.1 x86_64-w64-mingw32 [SSL (OpenSSL)] [LZO] [LZ4] [PKCS11] [AEAD] built on Mar 22 2017
Wed May 03 01:00:16 2017 Windows version 6.2 (Windows 8 or greater) 64bit
Wed May 03 01:00:16 2017 library versions: OpenSSL 1.0.2k  26 Jan 2017, LZO 2.09
Enter Management Password:
Wed May 03 01:00:16 2017 MANAGEMENT: TCP Socket listening on [AF_INET]127.0.0.1:25340
Wed May 03 01:00:16 2017 Need hold release from management interface, waiting...
Wed May 03 01:00:16 2017 MANAGEMENT: Client connected from [AF_INET]127.0.0.1:25340
Wed May 03 01:00:16 2017 MANAGEMENT: CMD 'state on'
Wed May 03 01:00:16 2017 MANAGEMENT: CMD 'log all on'
Wed May 03 01:00:16 2017 MANAGEMENT: CMD 'echo all on'
Wed May 03 01:00:16 2017 MANAGEMENT: CMD 'hold off'
Wed May 03 01:00:16 2017 MANAGEMENT: CMD 'hold release'
Wed May 03 01:00:17 2017 Outgoing Control Channel Authentication: Using 160 bit message hash 'SHA1' for HMAC authentication
Wed May 03 01:00:17 2017 Incoming Control Channel Authentication: Using 160 bit message hash 'SHA1' for HMAC authentication
Wed May 03 01:00:17 2017 TCP/UDP: Preserving recently used remote address: [AF_INET]5.xx.xx.184:1133
Wed May 03 01:00:17 2017 Socket Buffers: R=[65536->65536] S=[65536->65536]
Wed May 03 01:00:17 2017 UDP link local: (not bound)
Wed May 03 01:00:17 2017 UDP link remote: [AF_INET]5.xx.xx.184:1133
Wed May 03 01:00:17 2017 MANAGEMENT: >STATE:1493769617,WAIT,,,,,,
Wed May 03 01:00:17 2017 MANAGEMENT: >STATE:1493769617,AUTH,,,,,,
Wed May 03 01:00:17 2017 TLS: Initial packet from [AF_INET]5.xx.xx.184:1133, sid=ed49bab2 2286540c
Wed May 03 01:00:17 2017 VERIFY OK: depth=1, CN=ChangeMe
Wed May 03 01:00:17 2017 VERIFY KU OK
Wed May 03 01:00:17 2017 Validating certificate extended key usage
Wed May 03 01:00:17 2017 ++ Certificate has EKU (str) TLS Web Server Authentication, expects TLS Web Server Authentication
Wed May 03 01:00:17 2017 VERIFY EKU OK
Wed May 03 01:00:17 2017 VERIFY OK: depth=0, CN=server
Wed May 03 01:00:17 2017 Control Channel: TLSv1, cipher TLSv1/SSLv3 DHE-RSA-AES256-SHA, 2048 bit RSA
Wed May 03 01:00:17 2017 [server] Peer Connection Initiated with [AF_INET]5.xx.xx.184:1133
Wed May 03 01:00:18 2017 MANAGEMENT: >STATE:1493769618,GET_CONFIG,,,,,,
Wed May 03 01:00:18 2017 SENT CONTROL [server]: 'PUSH_REQUEST' (status=1)
Wed May 03 01:00:18 2017 PUSH: Received control message: 'PUSH_REPLY,redirect-gateway def1 bypass-dhcp,dhcp-option DNS 8.8.8.8,dhcp-option DNS 8.8.4.4,route 10.8.0.1 255.255.255.0,route-gateway 10.8.0.1,topology subnet,ping 10,ping-restart 120,ifconfig 10.8.0.2 255.255.255.0'
Wed May 03 01:00:18 2017 OPTIONS IMPORT: timers and/or timeouts modified
Wed May 03 01:00:18 2017 OPTIONS IMPORT: --ifconfig/up options modified
Wed May 03 01:00:18 2017 OPTIONS IMPORT: route options modified
Wed May 03 01:00:18 2017 OPTIONS IMPORT: route-related options modified
Wed May 03 01:00:18 2017 OPTIONS IMPORT: --ip-win32 and/or --dhcp-option options modified
Wed May 03 01:00:18 2017 Data Channel Encrypt: Cipher 'AES-256-CBC' initialized with 256 bit key
Wed May 03 01:00:18 2017 Data Channel Encrypt: Using 160 bit message hash 'SHA1' for HMAC authentication
Wed May 03 01:00:18 2017 Data Channel Decrypt: Cipher 'AES-256-CBC' initialized with 256 bit key
Wed May 03 01:00:18 2017 Data Channel Decrypt: Using 160 bit message hash 'SHA1' for HMAC authentication
Wed May 03 01:00:18 2017 interactive service msg_channel=652
Wed May 03 01:00:18 2017 ROUTE_GATEWAY 192.168.1.1/255.255.255.0 I=5 HWADDR=00:19:xx:5b:eb:b9
Wed May 03 01:00:18 2017 open_tun
Wed May 03 01:00:18 2017 TAP-WIN32 device [Ethernet 2] opened: \\.\Global\{D508BAEC-180D-xxx-xx48-0A4F13DC21D1}.tap
Wed May 03 01:00:18 2017 TAP-Windows Driver Version 9.21
Wed May 03 01:00:18 2017 Set TAP-Windows TUN subnet mode network/local/netmask = 10.8.0.0/10.8.0.2/255.255.255.0 [SUCCEEDED]
Wed May 03 01:00:18 2017 Notified TAP-Windows driver to set a DHCP IP/netmask of 10.8.0.2/255.255.255.0 on interface {D508BAEC-180D-408E-B348-0A4F13DC21D1} [DHCP-serv: 10.8.0.254, lease-time: 31536000]
Wed May 03 01:00:18 2017 Successful ARP Flush on interface [6] {D508BAEC-180D-xxx-B348-0A4F13DC21D1}
Wed May 03 01:00:18 2017 do_ifconfig, tt->did_ifconfig_ipv6_setup=0
Wed May 03 01:00:18 2017 MANAGEMENT: >STATE:1493769618,ASSIGN_IP,,10.8.0.2,,,,
Wed May 03 01:00:18 2017 Blocking outside dns using service succeeded.
Wed May 03 01:00:23 2017 TEST ROUTES: 2/2 succeeded len=1 ret=1 a=0 u/d=up
Wed May 03 01:00:23 2017 C:\Windows\system32\route.exe ADD 5.xx.xx.184 MASK 255.255.255.255 192.168.1.1
Wed May 03 01:00:23 2017 Route addition via service succeeded
Wed May 03 01:00:23 2017 C:\Windows\system32\route.exe ADD 0.0.0.0 MASK 128.0.0.0 10.8.0.1
Wed May 03 01:00:23 2017 Route addition via service succeeded
Wed May 03 01:00:23 2017 C:\Windows\system32\route.exe ADD 128.0.0.0 MASK 128.0.0.0 10.8.0.1
Wed May 03 01:00:23 2017 Route addition via service succeeded
Wed May 03 01:00:23 2017 MANAGEMENT: >STATE:1493769623,ADD_ROUTES,,,,,,
Wed May 03 01:00:23 2017 C:\Windows\system32\route.exe ADD 10.8.0.1 MASK 255.255.255.0 10.8.0.1
Wed May 03 01:00:23 2017 ROUTE: route addition failed using service: The parameter is incorrect.   [status=87 if_index=6]
Wed May 03 01:00:23 2017 Route addition via service failed
Wed May 03 01:00:23 2017 Initialization Sequence Completed
Wed May 03 01:00:23 2017 MANAGEMENT: >STATE:1493769623,CONNECTED,SUCCESS,10.8.0.2,5.39.79.184,1133,,
Want to use some apps with a VPN’s protection and some without? Perhaps you want to mix up VPN connections between devices? You need split tunneling! Here’s everything you need to know.
Tech Writer, Privacy Advocate and VPN Expert
Updated: December 19, 2024
Streaming, Kodi and VPN Expert
Updated: December 19, 2024
Split tunneling allows VPN users to route traffic from specified apps or devices through the VPN while traffic from other apps and devices travels over the default, non-VPN network.
Wondering how to split tunnel VPN traffic? Read on for our complete guide to Split tunneling.
Why use Split tunneling?
Split tunneling can be used for several different purposes, including:
- Allowing normal use of the internet while simultaneously accessing resources only available to VPN users, such as a business server
- Setting up specific devices, such as game consoles or streaming media boxes, to use (or not use) the VPN without affecting other devices on the network
- Sending all of a device’s traffic through the VPN except when accessing content or services that don’t allow VPN connections, such as MLB.tv or Netflix
- Sending all traffic through the VPN except for content and services that require low latency, such as VoIP applications and online games
- Only routing torrent traffic through the VPN, while all other internet traffic goes to the default network
- Access the VPN without affecting your connection to other devices on the local network, such as printers or a Plex Media Server
Types of split tunneling
For typical VPN users, there are four main types of split tunneling.
The first type is the most simple and is useful if you need to access remote resources through a VPN while also maintaining a normal, non-VPN connection to the internet. We’ll explain how to do this in the tutorials below.
The second is by device. For example, if you want your game console to connect to the internet without a VPN, but your PC and smartphone to connect with a VPN. This type of split tunneling is typically done on your wi-fi router. In the popular DD-WRT router firmware, this is called “policy-based routing.”
The third type of split tunneling is by application. You can set up a blacklist or whitelist of apps and services that you want to connect to the VPN or don’t want to connect to the VPN, respectively. The latter is sometimes called “inverse” split tunneling. For example, if you only want torrent traffic to go through the VPN but all your other applications, such as games and web browsers, to connect to the internet without a VPN, this is the method you want to use. Split tunneling by application only works on some VPNs, operating systems, and router firmware. It’s important to make sure your chosen VPN offers split tunneling.
The final type of split tunneling allows you to route traffic based on its destination rather than its source. For example, if you wanted to route all traffic through the VPN except for that traveling to Netflix or Hulu. This is called IP-based routing, and it’s the most difficult type of split tunneling to accomplish. It requires a stateful router or firewall, and even if you have that, sites like Netflix have so many IP addresses that it’s hard to get it working reliably. As such, we won’t be covering IP routing in this article.
Not all operating systems support all types of split tunneling. In fact, Windows users will find that their options are severely limited. Macs aren’t bad, but routers with DD-WRT or Tomato firmware offer the most versatility. Unfortunately, they are also the most complicated to configure.
How to split tunnel VPN traffic
Your imagination is the limit to the number of applications for split tunneling. Well, that and your hardware. Different types of split tunneling have different technical requirements. What you can achieve depends heavily on your device, wi-fi router, and VPN service.
Before you get started, it’s important to realize that split tunneling requires some advanced technical knowledge and haphazard implementation can lead to security risks. If you don’t properly configure your split-tunneling settings, your ISP or a third party could access some of your sensitive data. If in doubt, use a VPN with a split tunneling feature. These require little more than mastery of toggle switches.
Here are a few of our top recommended VPNs with split tunneling. If you want the complete list and detailed reviews, check out the full article.
- NordVPN Our first choice VPN for split tunneling. Allows you to only tunnel web traffic. It also comes with strong security and privacy features, a large server network, great speeds, and a 30-day money-back guarantee.
TIP In our testing we found that the cheapest NordVPN plan (Standard) works perfectly. - Surfshark Our top budget VPN with split tunneling. Privacy-conscious provider with no connection limits, great speeds, and advanced features. Lets you tunnel your apps or specific websites.
- IPVanish Offers split tunneling on its Android and Fire OS apps. Allows unlimited simultaneous connections. Popular provider for Kodi users and torrenters.
- ExpressVPN Range of split tunneling options in its apps and its custom router firmware. Prioritizes privacy and security, fast speeds, servers in 100+ countries, and a strict no-logs policy.
- CyberGhost Beginner-friendly VPN with split tunneling. Easy-to-use. Vast server network. Includes “smart rules” that divert different apps through different servers.
TRY THE TOP-RATED VPN RISK FREE
NordVPN is offering a fully-featured, risk-free 30-day trial if you sign up on this page. You can use the VPN rated #1 for split tunneling with no restrictions for a month – great if you want to test out the service before making a commitment.
There are no hidden terms – just contact support within 30 days if you decide NordVPN isn’t right for you, and you’ll get a full refund. Start your NordVPN trial here.
How to split tunnel on MacOS
First, check with your VPN provider to see if their app includes built-in split tunneling functionality. While not too common, some providers like IPVanish offer application-based split tunneling.
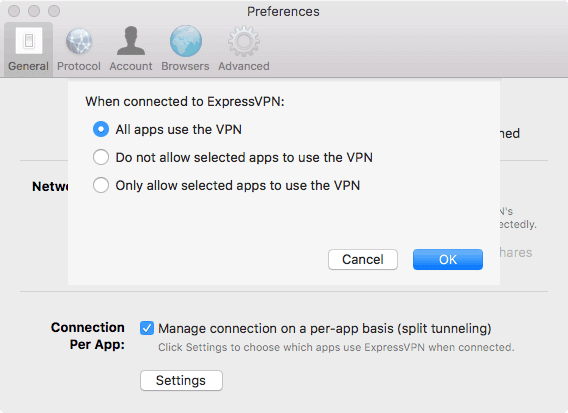
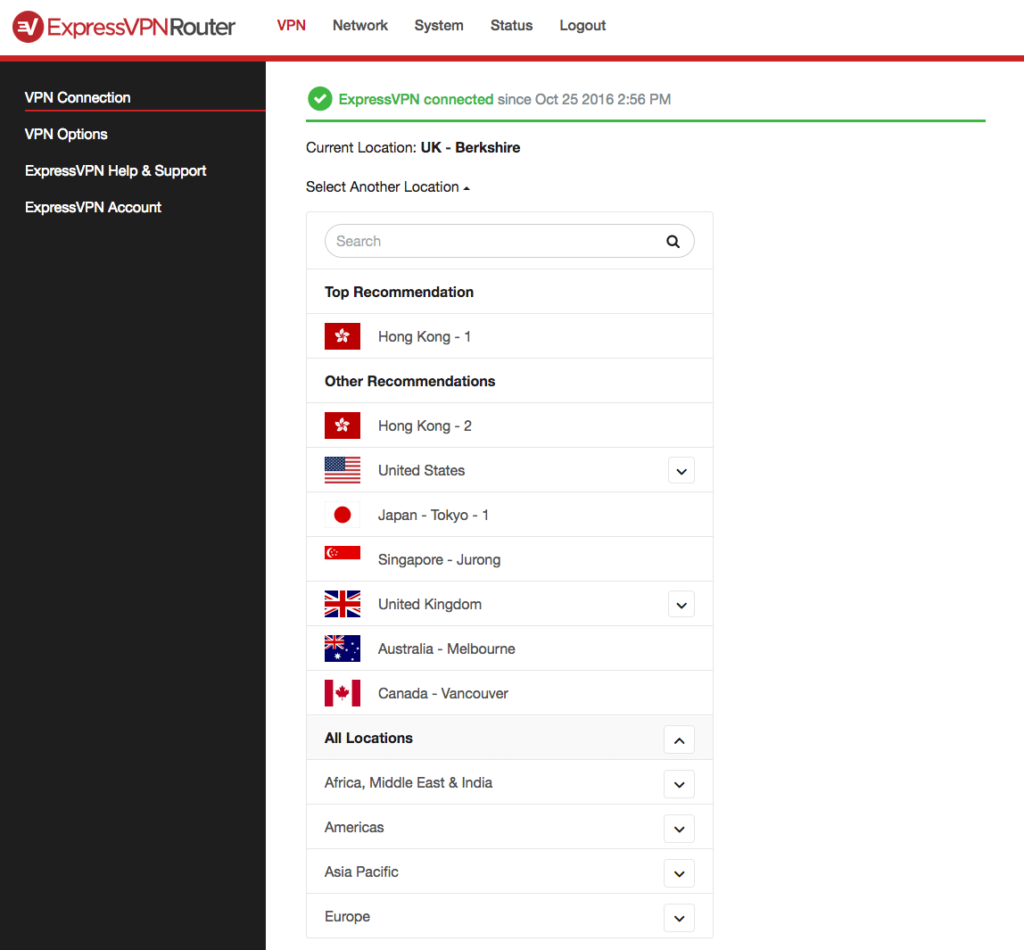
ExpressVPN’s Mac app provides a Connection per App feature that lets you create a blacklist or whitelist of apps to route through the VPN. Note that split tunneling isn’t available on macOS 11 and above.
If your VPN app doesn’t have built-in support for split tunneling, we’ll have to get our hands dirty and do things the manual way.
You’ll need superuser administrative privileges and an existing L2TP or PPTP connection, as well as the destination subnet for the VPN private space.
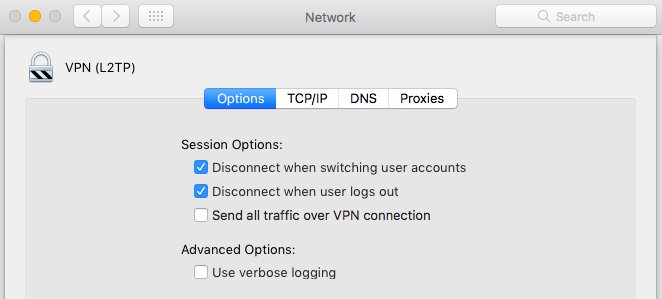
- Go to System Preferences > Network
- In the left sidebar, click your VPN connection and go to Advanced settings > Options
- Uncheck the box for Send all traffic over VPN connection

- Save your changes and connect to the VPN
- Once connected, go to Application > Utilities > Terminal
- Type ifconfig into the terminal and hit Enter. Make a note of the interface used by the VPN. Using L2TP, this will probably be ppp0

- Log in as root. An easy way to do this is to type sudo su into the terminal and authenticate with your Mac password.

- Enter the following command, replacing >DESTINATION SUBNET< with the subnet you want routed through the VPN, and >VPN INTERFACE< with the interface listed in the previous step.route add -net >DESTINATION SUBNET< -interface >VPN INTERFACE<

See also: Our list of recommended Mac VPN providers.
How to split tunnel on Windows
Some VPN providers offer split tunneling in their Windows apps, with varying degrees of functionality.
The NordVPN app allows users to choose which apps they want to use the VPN tunnel and which they trust to connect outside of it.

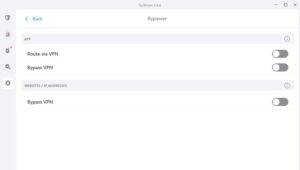
The Surfshark app for Windows has a Bypasser feature. This provides split tunneling for both websites and apps. Users can choose which apps use the VPN tunnel or, if it’s easier, specify which apps don’t use the VPN tunnel. Alternatively, they can choose which websites or IP addresses they want to bypass the VPN tunnel and connect to the internet normally.
If your VPN app doesn’t have built-in support for split tunneling, we’ll have to get our hands dirty and do things the manual way.
Windows is fairly limited when it comes to split tunneling. There’s no way that we’re aware of to split tunnel by app or destination. Instead, the split tunneling option in Windows is much broader. You can choose not to tunnel IPv4 and IPv6 traffic so that only local traffic goes through the VPN. That’s useful if you only need to use the VPN to access remote resources not available from your normal internet connection, but not much else.
Furthermore, Windows only split tunnels VPN protocols for which it has built-in support. That means you’ll need to configure an L2TP, SSTP, or PPTP connection first. OpenVPN won’t work here.
This example will use your local connection to access the internet, while the VPN will be used to access remote resources, such as a private business server that can only be accessed via VPN. The VPN will only be used when a host isn’t available on the local network.
In this tutorial, will use Windows 10. We’ll assume you’ve already set up your VPN connection, and you only need to enable split tunneling. You’ll need admin privileges and the destination subnet for your VPN private space.
- In your Windows search bar, type Powershell and right-click it to Run as administrator
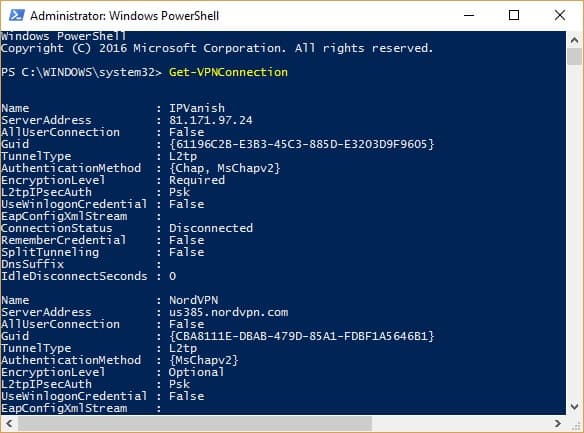
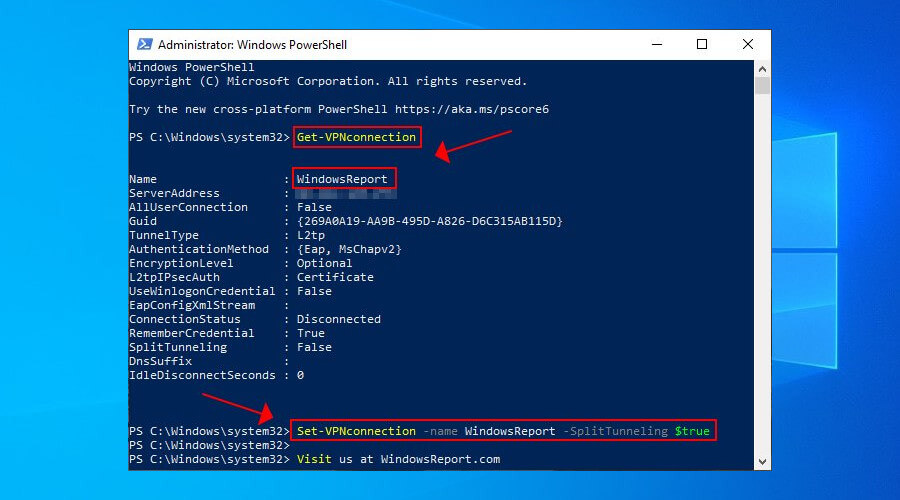
- Type Get-VPNConnection and press Enter to bring up a list of all your available VPN connections. (I test a lot of VPNs, so there are several in my screenshot, but you’ll likely only have one.) Make a note of the Name of the VPN you want to split tunnel.

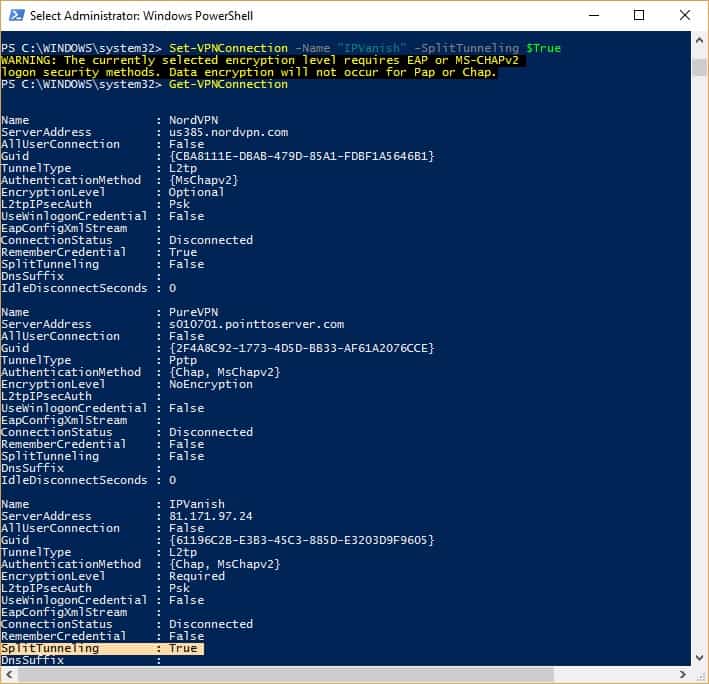
- Type the following command and hit Enter, replacing >VPN NAME< with the name you noted in the previous step: Set-VPNConnection -Name “>VPN NAME<” -SplitTunneling $True
You can check that split tunneling is enabled by entering the Get-VPNConnection command again. The split tunneling field should now be set to True.
Next, enter this command and make a note of the Description field:
ipconfig /all
If necessary, add the route. Replace >DESTINATION SUBNET< with the subnet you want to route through the VPN, and >INTERFACE< with the name of the Description field we mentioned in the last step:
netsh interface ipv4 add route >DESTINATION SUBNET< ">INTERFACE NAME<"
If you want to disable split tunneling, enter this command:
Set-VPNConnection -Name ">VPN NAME<" -SplitTunneling $False
Split tunneling with your own OpenVPN server on Windows
If you’ve created your own OpenVPN server similar to the one in our tutorial that uses Amazon EC2, you can enable split tunneling on Windows by editing your config files.
Remove redirect-gateway def1 in your OpenVPN server config file (probably called server.conf). In the client config (client.ovpn or client.conf), add the following line:
route 12.12.12.0 255.255.255.0 vpn_gateway
This routes the 12.12.12.0 subnet through the VPN connection and everything else out of the non-VPN connection.
See also: The best VPN for Windows 10 users.
How to split tunnel on DD-WRT routers
Setting up OpenVPN and split tunneling on DD-WRT routers is tedious and tricky business, so if you want to go the router route, then we recommend purchasing a subscription to ExpressVPN. With that, you can install the ExpressVPN custom router firmware, or buy a router with the firmware pre-installed. It’s far easier than setting up everything manually.
BEST VPN to split tunnel on DD-WRT routers:ExpressVPN is our to choice. This VPN leads the way with its easy to use no-fuss apps and router software. It has a vast server network that is optimized for high-speed connections. Hard to beat on privacy and security. Works with all major streaming services. There is a 30-day no-quibbles money-back guarantee so you can try it risk-free.
If you’re in the market for a new router, the AirCove router comes with ExpressVPN pre-installed. Users can connect to a maximum of five VPN locations at the same time by setting up groups — itself a form of split tunneling.
Alternatively, the InvizBox2 router comes with Proton VPN pre-installed. Users can perform device-level split tunneling by setting, for example, their Smart TV to connect to a UK server, but their games consoles to connect outside the VPN tunnel.
If you want to save a few bucks and do things the hard way, we’ll assume you’ve already set up your VPN connection in DD-WRT and have it working properly. DD-WRT allows you to split tunnel VPN traffic in a few different ways:
- by device, called “policy-based routing”
- by destination IP address, called “IP routing”
- by application or port
Policy based routing
In the DD-WRT dashboard, go to Service > VPN. Find the Policy based routing box and enter IP addresses for each of the devices you want to go through the VPN. Simple as that!
If you’re not sure of the IP addresses of your devices, you can find them by going to the Router status page of the DD-WRT dashboard. Under the Network section, find Active IP Connections. Click the number next to that to launch the Active IP Connections Table. Here, you can view the IP addresses for all incoming and outgoing connections on the router, as well as protocols and port numbers.
Port based routing
If you want to specify which programs or apps use the VPN, one way to do this is by split tunneling by port. Each application likely uses a different port, for example web browsers use TCP ports 80 and 443, Spotify uses TCP port 4070, and Steam uses UDP ports 27000 thru 27030. So by specifying which specific ports to route VPN traffic through, we can split tunnel by application.
Unfortunately, this is more difficult than it sounds on DD-WRT. You’ll need to familiarize yourself with IPTables, which governs Linux firewall rules in the firmware. You might find this tutorial useful as an example.
Go to Administration > Commands. Under Firewall click Edit and enter the necessary commands. Then go to your OpenVPN client configuration in DD-WRT and find the Additional config box to modify your OpenVPN config.
Destination IP routing
If you want to tunnel traffic by its destination, i.e. by website or some other sort of server, then IP routing might do the trick.
Go to your OpenVPN client configuration in DD-WRT and find the Additional config box. Enter the following:
route-nopull
route XXX.XXX.XXX.XXX 255.255.255.255 net_gateway
route YYY.YYY.YYY.YYY 255.ZZZ.ZZZ.0 vpn_gateway
Replace the Xs with the same address you entered under Server IP field of your OpenVPN configuration. Replace the Ys with the IP address of the server you want to route VPN traffic to, and the Zs with the appropriate subnet (the latter will often be 255.255.255.0).
Note that if you want to route all VPN traffic going to a specific website, then you’ll need to add the IP addresses and subnets for all of the servers that website uses. Netflix, for instance, uses several dozen IPs and they can change at any time, so you will need to find an up-to-date list of Netflix IPs and update this configuration regularly.
How to split tunnel on Tomato routers
Tomato doesn’t have policy-based routing baked in like DD-WRT, so you’re pretty much stuck with using IPTables to get the job done. On the Tomato dashboard, with your OpenVPN connection already set up and working, this is an example of how to enable selective routing.
Go to Administration > Scripts > Firewall and add these commands:
iptables -I FORWARD -i br0 -o tun11 -j ACCEPT
iptables -I FORWARD -i tun11 -o br0 -j ACCEPT
iptables -I INPUT -i tun11 -j REJECT
iptables -t nat -A POSTROUTING -o tun11 -j MASQUERADE
Click the “WAN Up” tab and add these commands, replacing >SOURCE IP ADDRESS< with the local IP of the device you want to route through the VPN:
sleep 30
ip route flush table 200
ip route flush cache
ip rule add from >SOURCE IP ADDRESS< lookup 200
VPN_GW=`ifconfig tun11 | awk '/inet addr/ {split ($2,A,":"); print A[2]}'`
ip route add table 200 default via $VPN_GW dev tun11
In the left sidebar, go to VPN Tunneling > OpenVPN Client. On your OpenVPN client config, go to Advanced. Under Custom configuration, add this command:
route-nopull
Readers help support Windows Report. We may get a commission if you buy through our links.
Read our disclosure page to find out how can you help Windows Report sustain the editorial team. Read more
Today, we’ll show you how to set up VPN split tunneling on Windows 10.
This feature lets you secure important data with your VPN while keeping your internet fast for gaming and streaming on Netflix or other international platforms.
It’s great for managing bandwidth and ensuring smooth gameplay without slowdowns. Let’s get started.
How do I set up split tunneling in Windows 10?
1. Edit the VPN connection properties
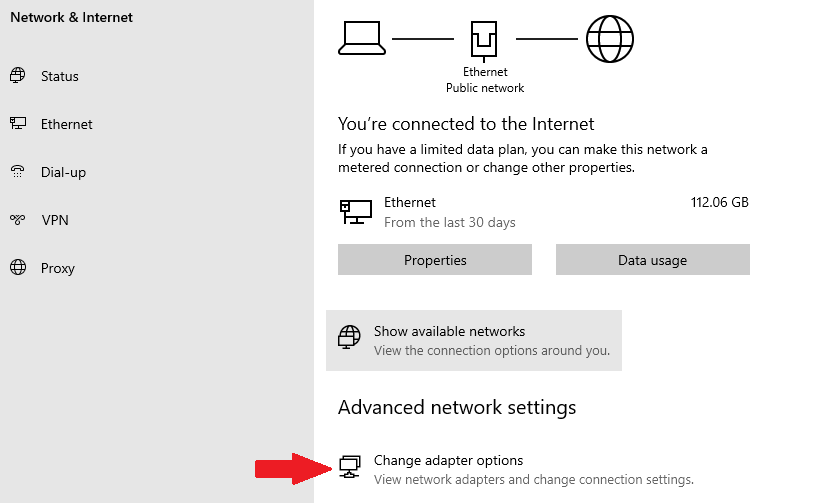
- Right-click the Windows 10 Start button and go to Network Connections.
- Click Change adapter options.
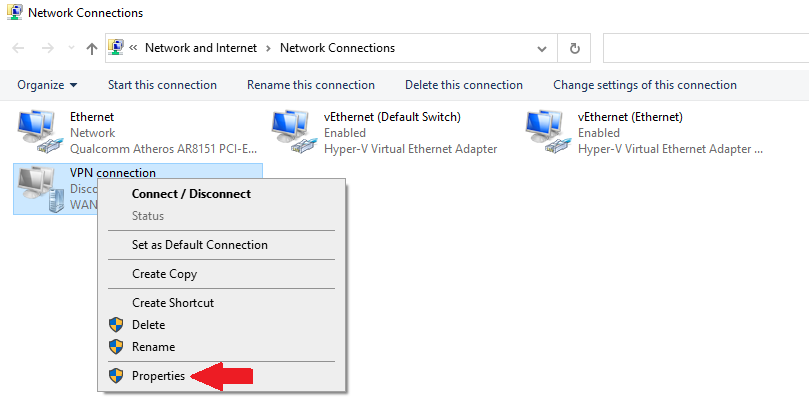
- Right-click your VPN connection and open Properties.
- In the Networking tab, select Internet Protocol Version 4 (TCP/IPv4).
- Click Advanced.
- In the General tab, click Advanced.
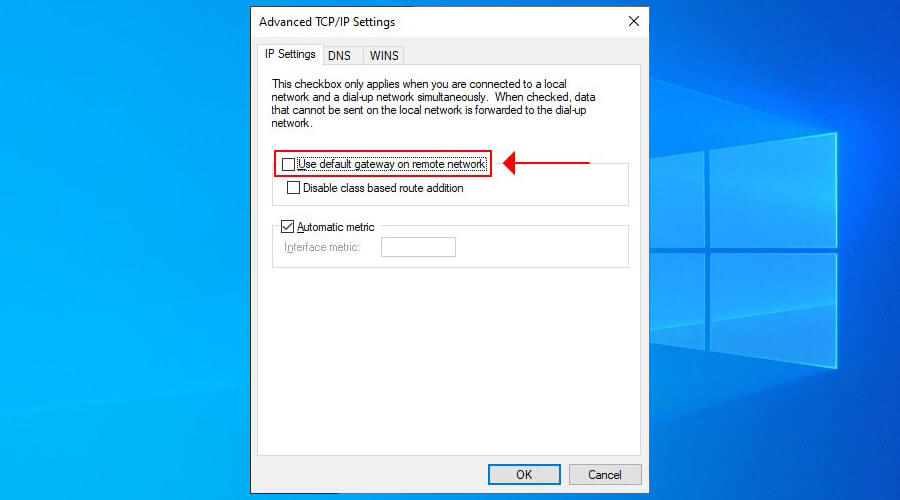
- Disable Use default gateway on remote network.
- Restart your VPN connection.
To disable split tunneling, go to the same place and enable Use default gateway on remote network.
This method can be used to remotely connect to another PC, in order to access files through VPN and use the remote LAN resources while also staying connected to your home network.
2. Use PowerShell
- Right-click Start and select Windows PowerShell (Admin).
- If you don’t know the VPN connection’s name, use Get-VPNconnection.
- To enable VPN split tunneling in Windows 10, paste:
Set-VPNconnection -name YourVPNconnection -SplitTunneling $true - Replace YourVPNconnection with the actual name and press Enter.
- To disable VPN split tunneling, paste:
Set-VPNconnection -name YourVPNconnection -SplitTunneling $false
This method uses the L2tp split tunnel and is identical to the first one but faster for Windows 10 users familiar with PowerShell.
Furthermore, it’s possible to create and run PowerShell scripts that automatically execute commands like enabling or disabling split tunneling.
Join our PowerShell Troubleshooting Hub if you’re experiencing any issues with this utility.
3. Get a VPN client with split tunneling

- Sign up for a VPN subscription plan (we recommend ExpressVPN).
- Download and install the VPN.
- Launch the app and click its icon in the systray.
- Click on the Menu icon (three horizontal lines) in the top-left corner of the app and select Options
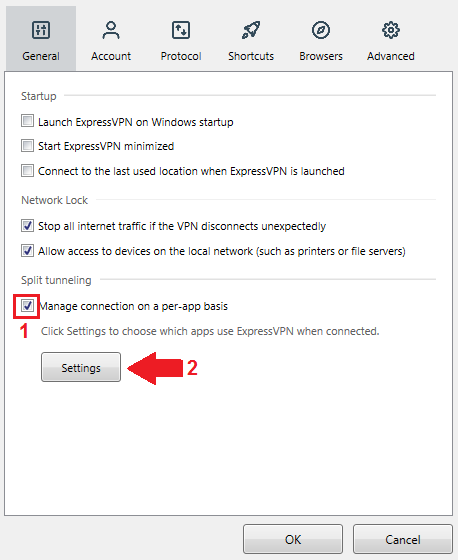
- In the Settings window, go to the General tab.
- Check the box next to Manage Connection on a Per-App Basis.
- Select either All apps use the VPN (default), Do not allow selected apps to use the VPN, or Only allow selected apps to use the VPN.
- Add apps to your list by clicking Add an app and selecting the apps you want.
ExpressVPN
Make the most of split tunneling with ExpressVPN for faster, smarter browsing!
4. Change router firmware settings
Is split tunneling safe?
Split tunneling is perfectly safe to set up and use. You don’t have to worry about any security vulnerabilities when setting up a VPN between two networks.
Does OpenVPN support split tunneling?
Yes, OpenVPN supports split tunneling. You can exclude IP addresses using route IPaddress netmask net_gateway. For example, route 192.168.1.0 255.255.255.0 net_gateway
Conclusion
To sum up, you can set up split tunneling by editing the Windows 10 VPN connection properties or by using PowerShell. You can also use a VPN that has split tunneling features.
A fourth alternative is to set up split tunneling mode at the router level if your router firmware supports this feature. It will divert network traffic for all devices connected to your home Wi-Fi.
Did you manage to set up a split tunnel through VPN? Let us know how you did it in the comment section below.
Elena Constantinescu
Windows Software Expert
Elena started writing professionally in 2010 and hasn’t stopped exploring the tech world since. With a firm grasp of software reviewing and content editing, she is always trying new things to improve her skill set.
Once in a blue moon, she steps aside from the desk to play with her bunny and to water her probably dead plants.
When you purchase through links on our site, we may earn an affiliate commission. Here’s how it works.
Need a quick boost of speed in a multiplayer game or video call, but still want to keep the VPN on for torrenting or Netflix on a side screen? Well, split tunneling lets you «whitelist» which apps use or don’t use the VPN connection, leaving your ISP’s servers to do the grunt work. Today, we’ll be looking at how to enable VPN split tunneling in Windows 10.
Here are four different methods to do so, although the easiest one remains to get a commercial split-tunneling VPN. We’ll cover that option later in the article as well.
Before we move on, make sure you know how to set up a VPN on Windows. This is because the first two methods involve a manually created VPN connection.
Using Windows 10’s built-in VPN
While Windows 10 has a built-in VPN option, it doesn’t support newer VPN protocols such as OpenVPN or WireGuard. If you’re new to VPNs, we recommend using a fast and secure provider (like ExpressVPN) and enabling their built-in split tunneling option.
Method #1: Using Network Settings
One way to enable VPN split tunneling in Windows 10 is to disable the «Use default gateway on remote network» option on your manually created VPN connection. Here’s how to do so.
Step 1: Right-click the Start button then click on Network Connections.
Step 2: Under Advanced network settings, click the Change adapter options button.
Step 3: Locate your VPN connection (in our case, the cleverly named «VPN connection»). Right-click on it and click Properties.
Step 4: Click on the Networking tab, then select Internet Protocol Version 4 (TCP/IPv4), and click on Properties.
Step 5: In the Internet Protocol Version 4 (TCP/IPv4) Properties menu, click on «Advanced…«.
Step 6: In the IP Settings tab, untick the box that says «Use default gateway on remote network«.
And that’s how to enable VPN split tunneling in Windows 10 using the settings on your virtual network adapter. Now all you need to do is restart your VPN connection.
How to disable VPN split tunneling
If you ever want to disable split tunneling, navigate to the same menu and tick the «Use default gateway on remote network» checkbox.
Method #2: Using PowerShell
This next method basically does the same thing, but you don’t need to navigate through so many menus.
Step 1: Once again, right-click on the Start button and click on Windows PowerShell (Admin).
Step 2: Copy and paste this line of code into PowerShell. Change «VPNConnectionName» to whatever you named your connection (ours is literally just called «VPN connection»).
Set-VPNconnection -name VPNConnectionName -SplitTunneling $true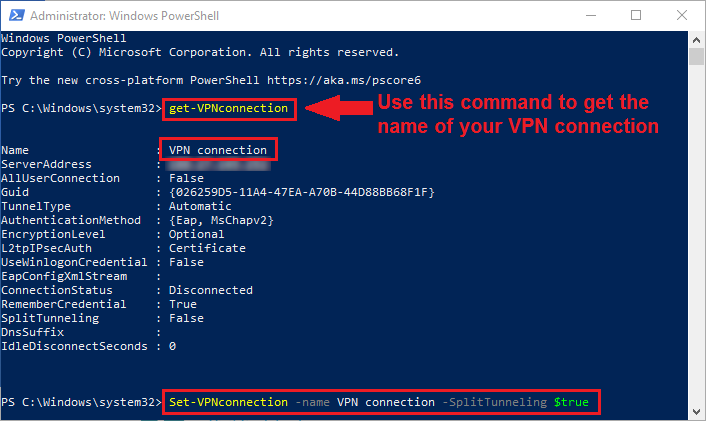
Note that you can use the command Get-VPNconnection to get the name of the connection, as well as some additional info. Saves you time instead of navigating all the way to the network adapter settings.
Disabling VPN split tunneling with PowerShell
To disable the option, simply change the value at the end of the code line from «$true» to «$false» (without the quote marks).
Method #3: Get a VPN with Split Tunneling
If you’re wondering how to enable VPN split tunneling in Windows 10 without any sort of complications or manual VPN settings, this is the way to go. We’ll be using ExpressVPN to showcase the quick process, though it should be fairly similar to other providers.
|
Servers N/A Countries 105 |
|
| Visit Site |
Parallel Connections 8 Live Chat Yes |
Step 1: First, launch ExpressVPN (log in if necessary). Click on the Menu button in the top left corner of the app (three vertical lines).
Step 2: In the General tab, tick the checkbox that says «Manage connections on a per-app basis«. Then click on Settings.
Now, there are two ways you can use split tunneling in ExpressVPN. We’ll separate the two under Step 3A and 3B.
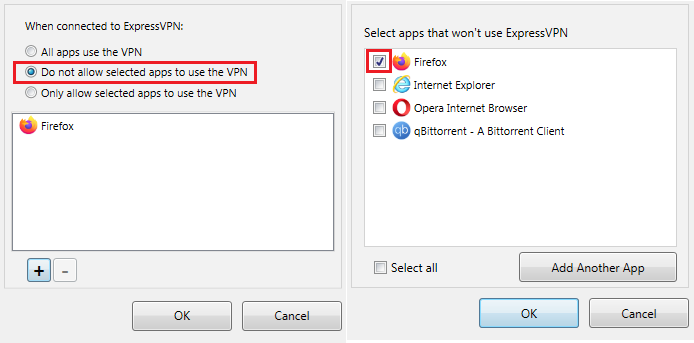
Step 3A: First, you can disallow apps from using the VPN.
This is useful in case you want to use a different browser to watch Netflix locally, or make a video call that requires faster network speeds than with an active VPN connection. Just a couple of examples, but you get the idea.
Anyway, click on «Do not allow selected apps to use the VPN«. Then click on the plus sign (+) to add apps that won’t use ExpressVPN. Use the «Add another app» option if your choice is not on the list, and head to the folder where it’s installed.
Step 3B: Use the «Only allow selected apps to use the VPN» option if you want to use your ISP’s servers for the rest of your traffic. Useful in case you have stuff running in the background, and want to use VPN to stream content from abroad in a separate browser.
Step 4: Click OK to apply your settings, no matter which option you picked. Restart your VPN and the apps you’ve selected to ensure everything works properly.
How to disable split tunneling in ExpressVPN
If you want to disable split tunneling in ExpressVPN (or any other provider), simply select the «All apps use the VPN» option from the same menu as above.
Method #4: Through Router Firmware Settings
Want to share a VPN connection with devices that don’t natively support it (such as a smart TV or game console)? Then take a look at our guide on how to set up VPN on your router, provided you have a compatible router to work with.
Enabling VPN split tunneling on a router will allow you to:
- Route traffic from specific devices through the VPN tunnel (policy-based routing)
- Tunnel traffic to specific destination IP addresses (IP routing)
- Tunnel traffic from individual apps or port numbers (say, port numbers for multiplayer games)
Note that the process of installing and setting up VPN split tunneling on your router can be tricky. We only recommend this process to advanced users.
Final Thoughts
As you can see, there are several ways to split your traffic and use VPN tunneling only where necessary. If you have a manual VPN setup on Windows 10, PowerShell and your network adapter settings are your friends. Alternatively, you can use a compatible VPN router and use interfaces like DD-WRT to change tunneling policies by device, IP, app, or port.
Of course, the easiest way is to just skip all the complicated setup and enable split tunneling on a third-party VPN. You can easily exclude individual apps from the VPN tunnel, or select specific apps you want to use the VPN.