
OpenVPN is an excellent open-source VPN that lets us browse the internet anonymously. But, like other VPN apps, it also sometimes faces issues in working. For instance, some users in the online forums mentioned that the OpenVPN isn’t working properly on their Windows 11 PC.
If that’s the same with the OpenVPN app on your Windows 11 PC, then read this in-depth fixes guide until the end. Here in this guide, we’ll share some working fixes to fix OpenVPN not working in Windows 11. Let’s get into and fix this issue with ease.
Why Is OpenVPN Not Working in Windows 11?
Various reasons could make the OpenVPN program inoperable on your Windows 11 computer. Below, we’ll mention the most prevalent reasons for OpenVPN not working in Windows 11. So, check all the possible reasons for the ill-functioning OpenVPN app below:
- Interruption by Windows Defender Firewall
- Bugs and Glitches in the PC
- Lack of Administrative Rights
- Misconfigured OpenVPN Config File
- Azure VM Isn’t Correctly Configured
- DHCP Client Service Isn’t Working
- Third-Party Antivirus Programs
- Corrupted DNS Cache
- Corrupted Temporary Files
Fix OpenVPN Not Working in Windows 11
In this section, we’ll share the most working workarounds to fix OpenVPN not working in Windows 11. So try all of them one by one and check what works for you and what doesn’t:
1. Restart Your PC
One of the most effective yet easy-to-apply workarounds in this troubleshooting guide is to restart the affected PC. Doing so will fix all the problems that may be causing this issue with it. To know if it fixes the issue for you, follow the below steps to restart your Windows 11 PC:
1. Use the Alt + F4 keyboard shortcut to open the Shut Down Windows prompt on your PC.

2. In the Shut Down Windows prompt, pick the Restart option from the menu and hit Enter.

3. Once done, your PC or laptop will restart, and once it’s started, check if the OpenVPN is working.
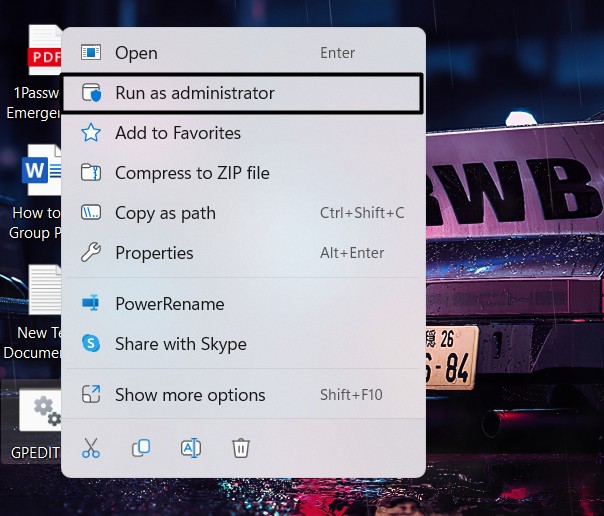
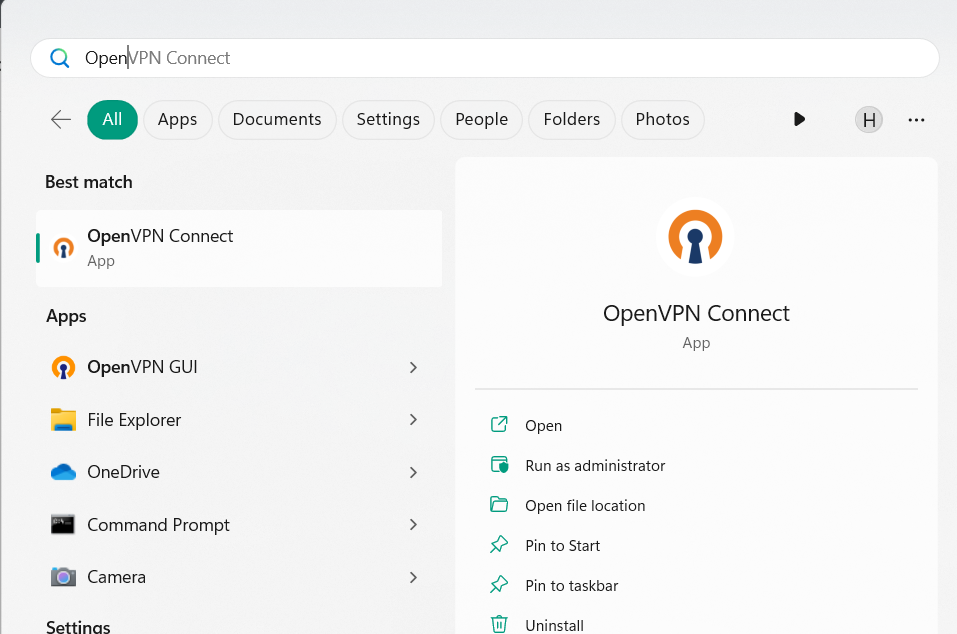
2. Run OpenVPN as an Administrator
It may be possible that the OpenVPN isn’t opening or launching on your Windows 11 PC due to a lack of administrative rights. We suggest you run the OpenVPN program with admin privileges to check the same. We’ve mentioned the steps to do so, so follow them:
1. Open the Windows Search Box on your Windows 11 PC by pressing the Windows key.

2. In the Windows Search Box, type OpenVPN and choose Run as administrator from it.
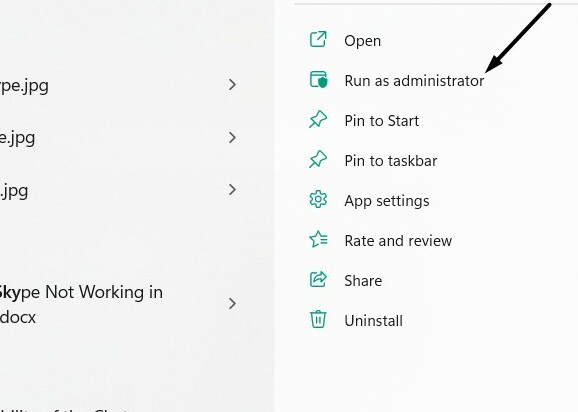
3. In the User Action Control window, click the Yes button to open it with administrative rights.
Another way to launch OpenVPN with admin rights is from the context menu. To open it from the contextual menu, right-click the app’s shortcut and select Run as administrator from it. Then, click the Yes button in the UAC window to launch it with admin rights on your PC.
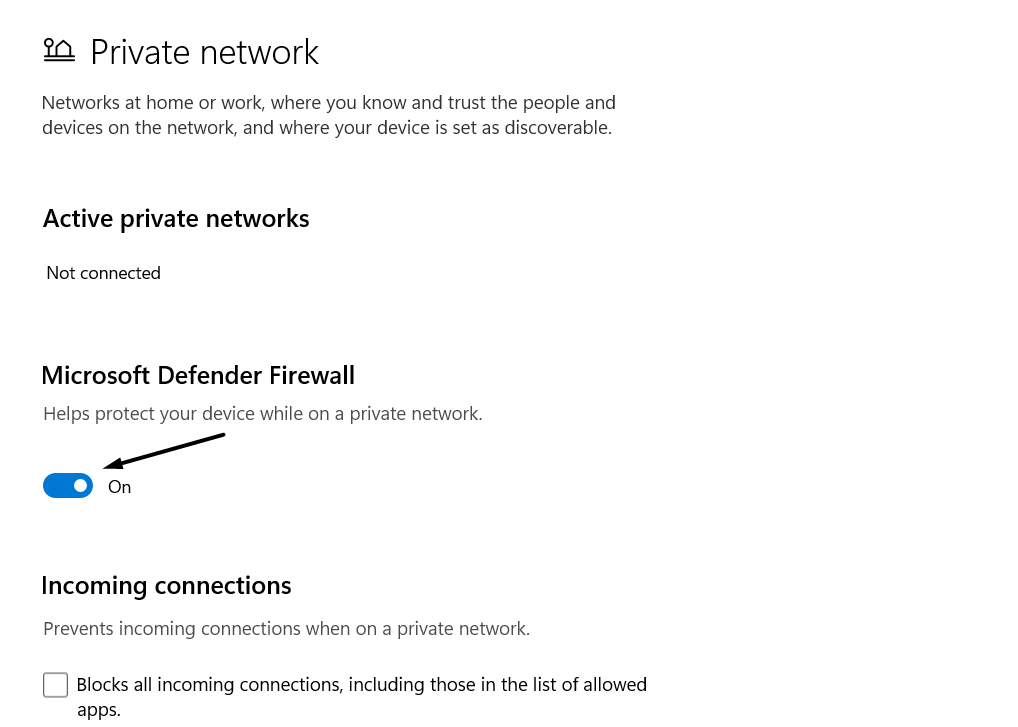
3. Disable Windows Defender Firewall
A set of users in the online forums mentioned that the Windows 11 PC’s built-in Windows firewall could also be the one stopping the OpenVPN program from launching or working on it. Thus, to check whether it’s true, consider turning off the integrated firewall on your Windows 11 computer. You can check the below-mentioned prompts to know how to do so:
1. Press the Windows key to open Windows Search Box, and type Firewall & network protection in it.

2. Choose the Firewall & network protection option from the search to open the firewall settings.
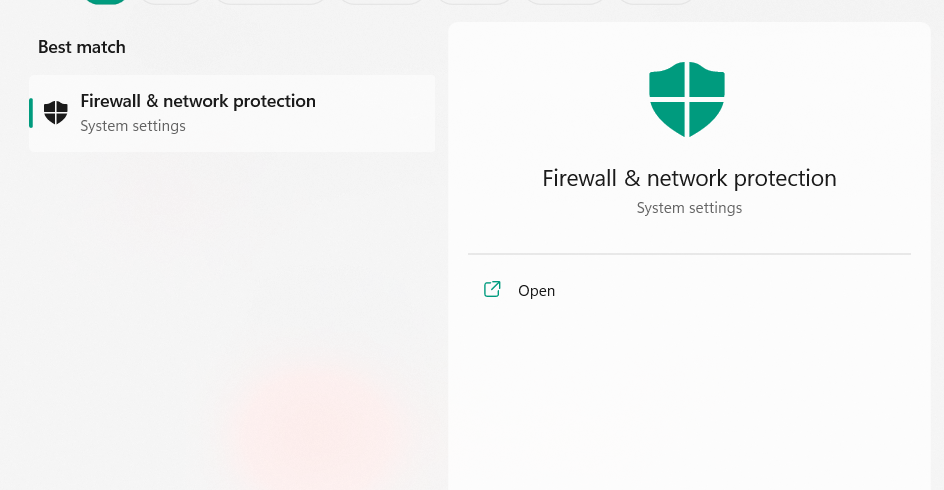
3. In the Firewall & network protection window, select Private network and disable the toggle on the next screen.
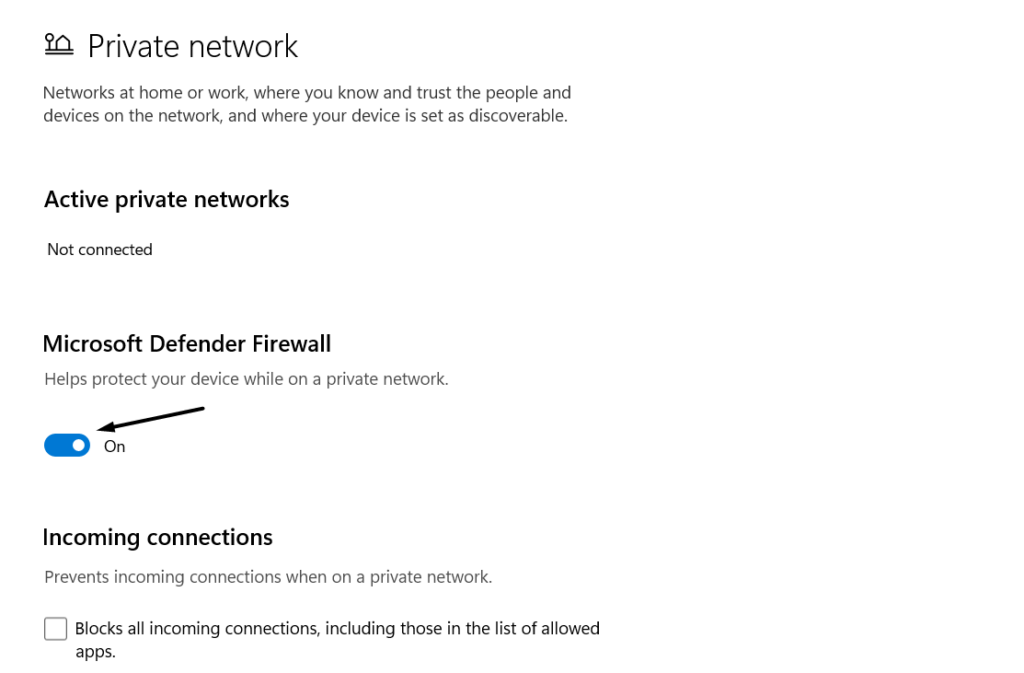
4. Once done, go back to the previous window, and this time, select the Public network option.

5. In the Public network window, turn off the toggle and exit the window to see the change.
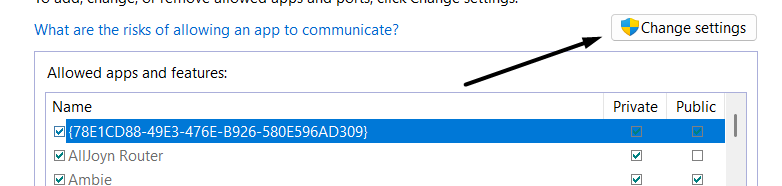
4. Whitelist OpenVPN and OpenVPN GUI
If you don’t want to disable your PC’s integrated firewall due to security reasons, we suggest you whitelist OpenVPN Connect and OpenVPN GUI through it. It’ll allow them to work properly without any issues. So, learn to do the same by following the below-listed steps:
1. Open the Firewall & network protection app on your Windows 11 PC and click the below option:
Allow an app through firewall
2. On the next screen, click the Change settings button and then Allow another app… button.
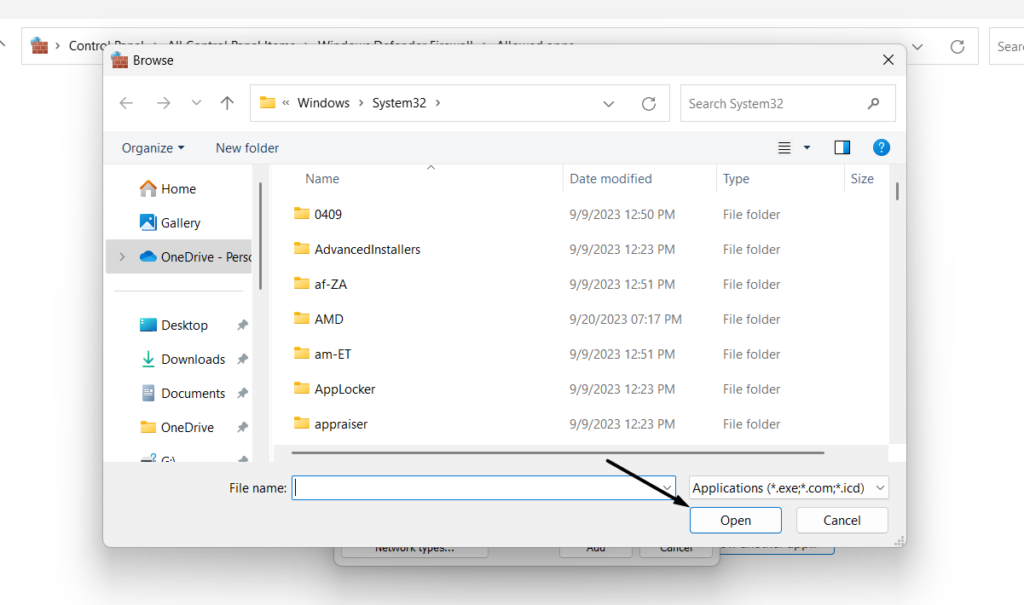
3. In the Add an app window, click Browse… and move to the location where the VPN is saved.
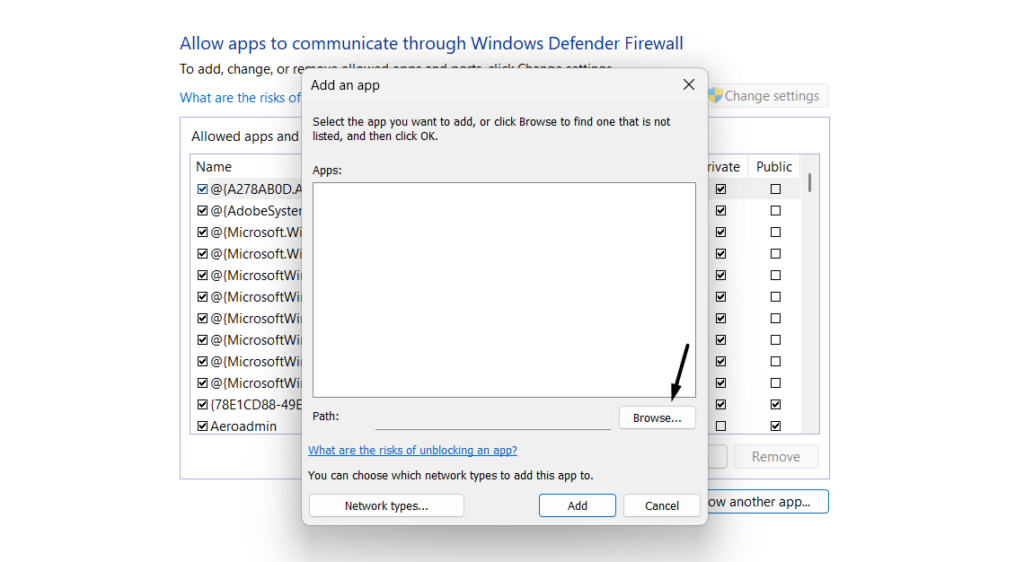
4. Choose the app, click the Open button, and then select the Add button to import the location.
5. Tick both checkboxes next to it in the box and click OK at the bottom to save the change.
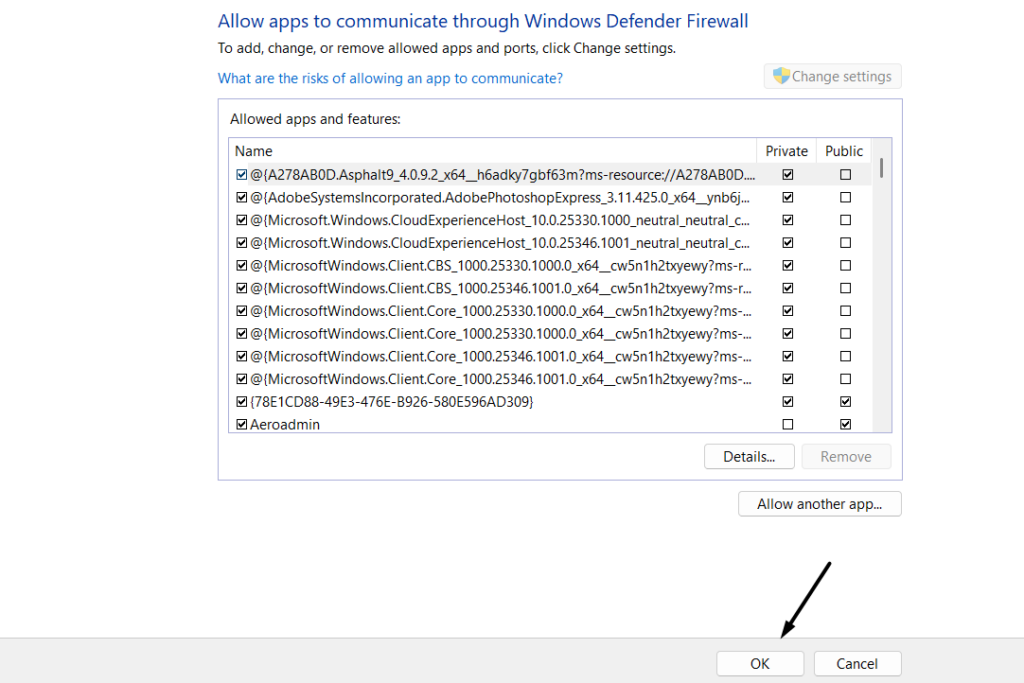
6. After doing so, restart your Windows PC and check whether the OpenVPN is working now.
5. Edit the OpenVPN Config File
Some users in the online forums said that making some necessary changes to the OpenVPN configuration file fixed the issue for them. Thus, we suggest you do the same and check if it works for you. You can need to enter the below lines in your config file:
push "redirect-gateway def1 bypass-dhcp"push "dhcp-option DNS 208.67.222.222"push "dhcp-option DNS 208.67.220.220"6. Force Close & Restart OpenVPN
It may be possible that your OpenVPN app is facing some issues in working, which is why the OpenVPN not working issue is appearing on your Windows 11 PC. In that case, force close and restart OpenVPN on your PC. You can follow the below steps to try out the same:
1. Press Ctrl + Shift + Esc to open the Task Manager program on your Windows 11 PC or laptop.

2. In the Task Manager window, search for the OpenVPN Connect app and right-click on it.
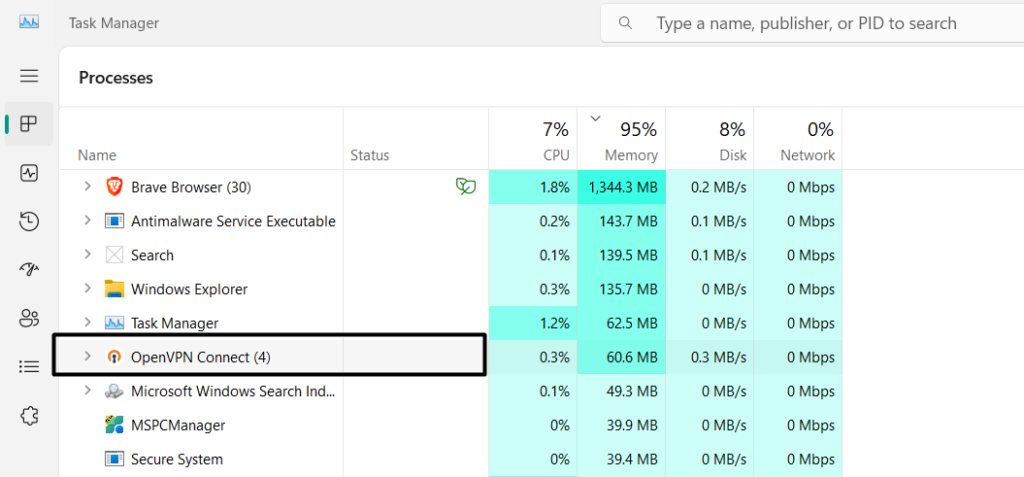
3. Right-click the OpenVPN Connect process and choose the End task option from the menu.

4. In the end, reopen the OpenVPN Connect and check whether it opens or works well now.
7. Make Sure Your Azure VM Is Correctly Configured
Some users in the online forums said that they’re only facing issues with Azure VM. If that’s the same with you, you need to make sure that your Azure VM is properly working now. We hope you find and fix the OpenVPN not working issue on your Windows 11 PC or laptop.
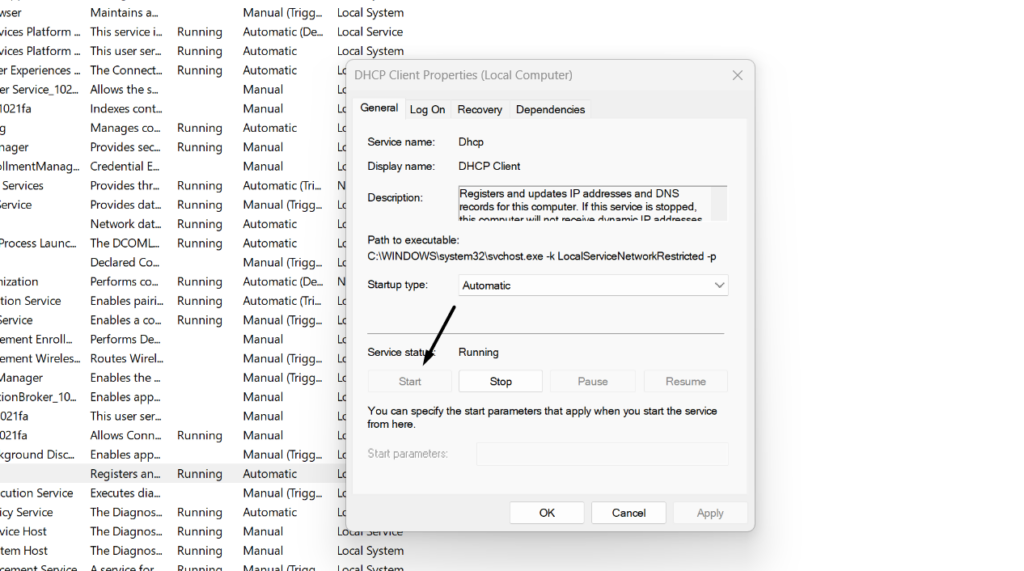
8. Ensure the DHCP Client Service Is Running
The DHCP Client service is an integral Windows service that registers and updates IP addresses and DNS records for the PC. If this service is stopped, this computer will not receive dynamic IP addresses and DNS updates.
Also, components that depend on it will fail to work. So, this could be the same in your case. So, make sure that the DHCP Client service is working properly. You can check the same by following the below process:
1. Press Windows + R to open the Run program and type Services.msc in its search box.

2. In the Services window, look for the DHCP Client service, choose it, and right-click on it.
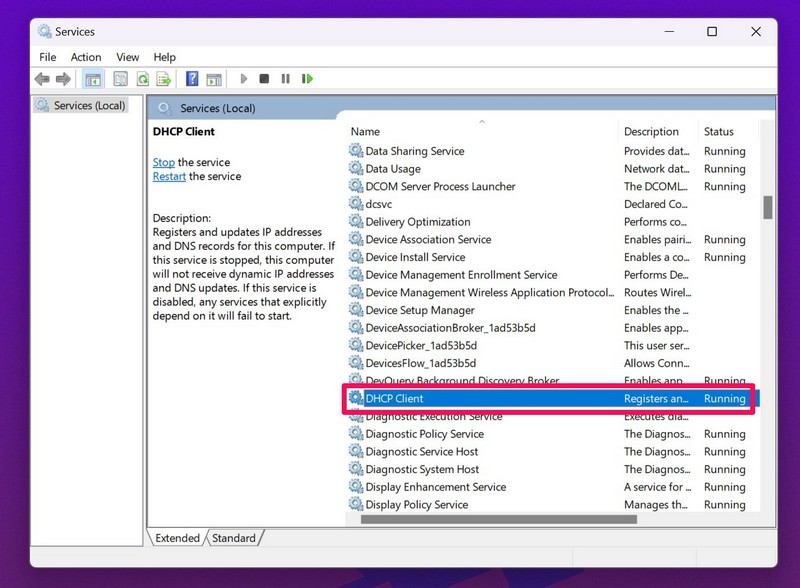
3. From the right-click menu, choose the Properties option and ensure Stopped is written next to Service status:. If there’s nothing mentioned like that, click the Start button to restart it. In case it was already enabled, choose the Stop button and then Start to restart it.
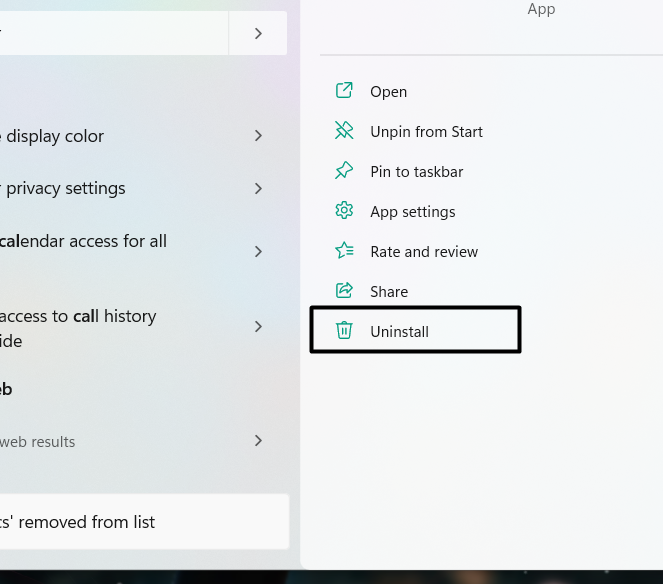
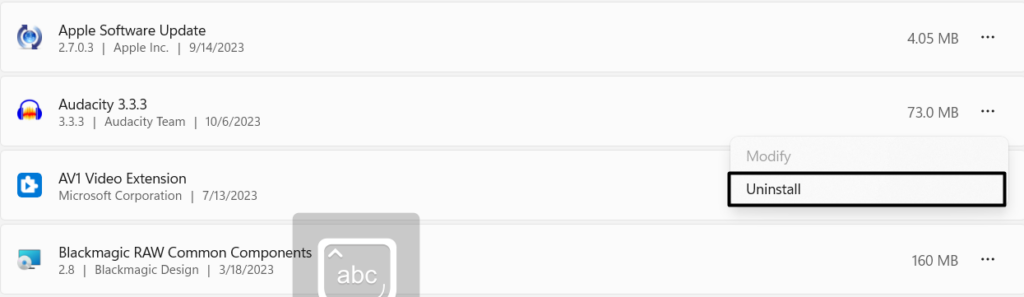
9. Uninstall Third-party Antivirus
If you’re using a third-party antivirus app on your Windows 11 PC, it could be possible that it’s causing this issue, as sometimes, they prevent the VPNs from working due to security concerns.
So, we suggest you uninstall the third-party antivirus program from your PC. You can check the below-mentioned steps to know how to uninstall apps in Windows 11:
1. Open the Windows Search Box by pressing the Windows key and enter the name in it.
2. Select the Uninstall option from the Windows search results to open the Installed apps window.
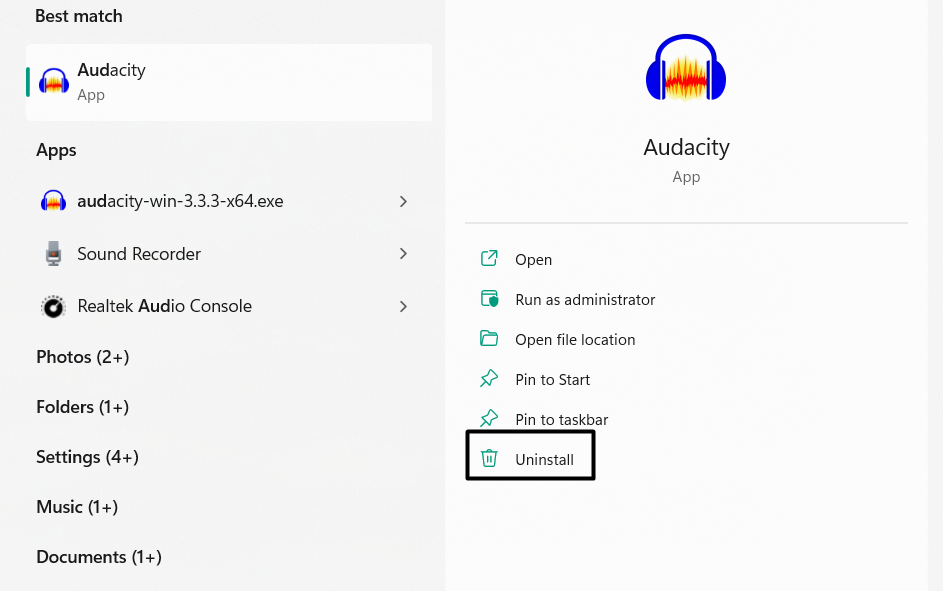
3. On the next screen, search the antivirus app you want to delete from your Windows 11 PC.

4. Click the three dots (…) next to it, and from the dropdown menu, choose the Uninstall option.

5. In the new prompt, choose the Uninstall button and let the app uninstall from your device.
After removing the antivirus app from your device, check if the OpenVPN app is working now.
10. Clean the Temp Folder
Some users in the OpenVPN forum mentioned that cleaning the Temp folder of the user in which the OpenVPN Connect App is not starting/opening can also fix the OpenVPN not working issue. Considering this, we suggest you also do the same and check whether it works. We’ve mentioned the instructions to delete the Temp folder from your computer below:
1. Press the Windows + R hotkey to open the Run utility and type %temp% in the search field.
2. In the Temp folder, use the Ctrl + A keyboard shortcut to select all the files and folders in it.

3. Select the Bin icon in the top navigation menu to delete the selected folders from the folder.
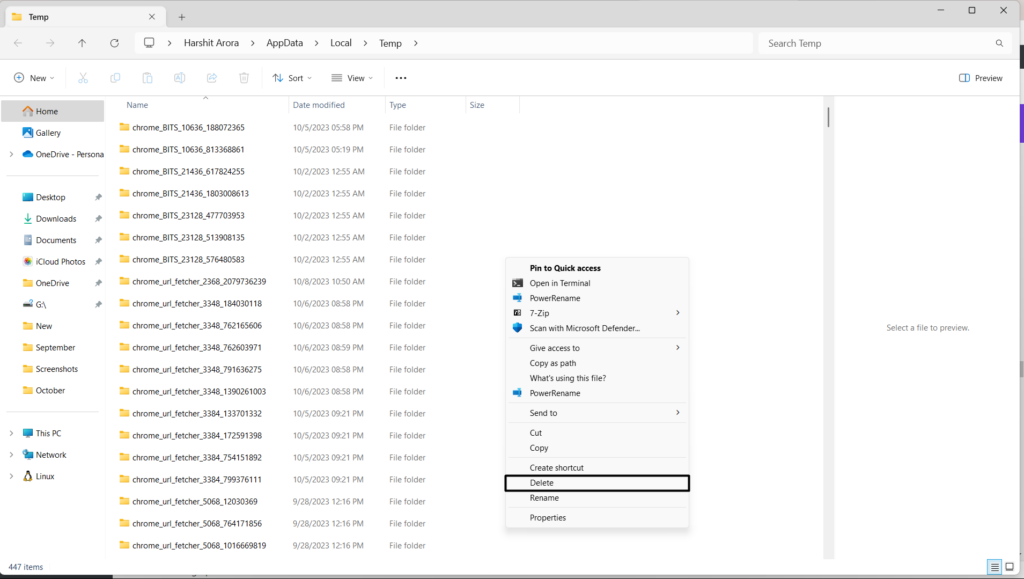
4. Once done, exit the File Explorer window on your PC and restart your Windows 11 PC.
11. Flush Your DNS Cache
One way to resolve OpenVPN-related issues is to clear the system’s DNS cache, as it could be possible that it has been corrupted. Thus, to check this, we suggest flushing your PC’s DNS cache. To know how to clear the DNS cache in Windows 11, check the below steps:
1. In the search, type Command Prompt, and then select it from the search results with admin rights.
2. In the Command Prompt utility, run the below-mentioned commands and press the Enter key:
netsh winsock resetnetsh int ip resetipconfig /releaseipconfig /renewipconfig /flushdns3. After running the above command, confirm if OpenVPN is working on your Windows PC.
12. Update Windows
It may be possible that the OpenVPN not working is appearing because of some bugs and glitches in the PC. In that case, we suggest you update your Windows 11 PC and see if the new updates fix these problems. Below are the right steps to update Windows 11:
1. Launch the Settings app on your Windows computer and choose Windows Update at the top.
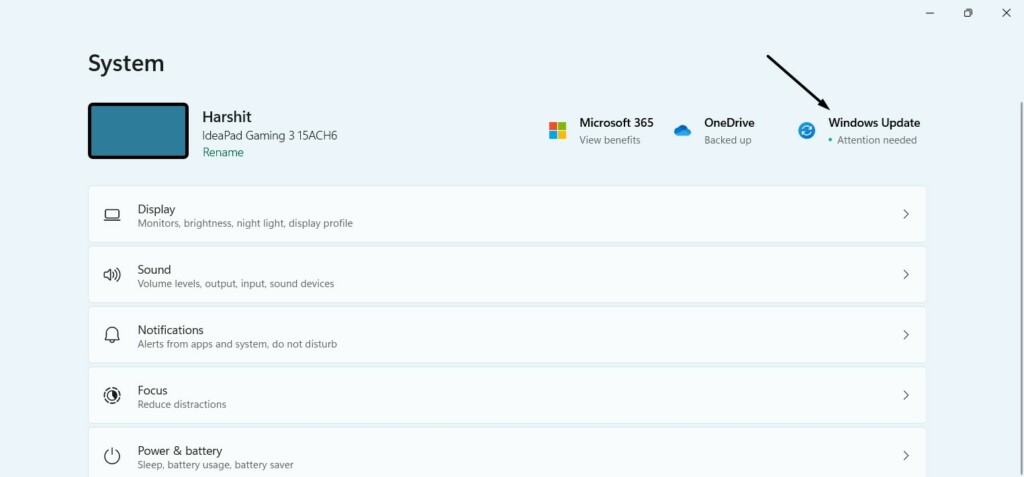
2. In the Windows Update window, choose the Check for updates button to search for updates.

3. If you find new updates to install after clicking Check for updates, click Download & install next to them to do so. Otherwise, click Download & install all to install all at once.

13. Reinstall OpenVPN
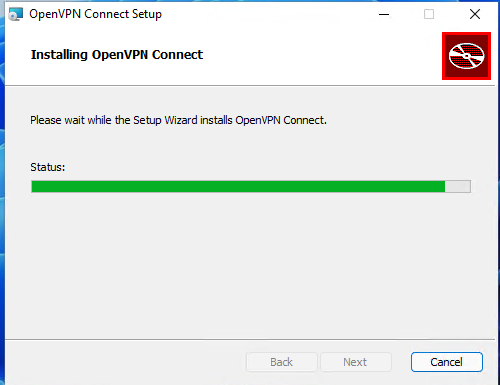
If none of the above-mentioned workarounds help you get rid of the OpenVPN not working issue in Windows 11 until now, consider reinstalling the OpenVPN app on your PC. Doing so will eliminate all the issues and, hopefully, also resolve the issues with it. You can follow the below-mentioned prompts to reinstall the OpenVPN app on your PC:
1. Get the Windows Search Box on your Windows 11 PC and type OpenVPN Connect in it.
2. From the search results, choose the Uninstall button and search the OpenVPN Connect app.
3. Click the three dots (…) next to it, and choose the Uninstall button from the dropdown menu.
4. Click the Uninstall button in the new prompt to delete the program from your Windows PC.
5. Once you’ve uninstalled it, click here to get the OpenVPN Connect installer on your PC.
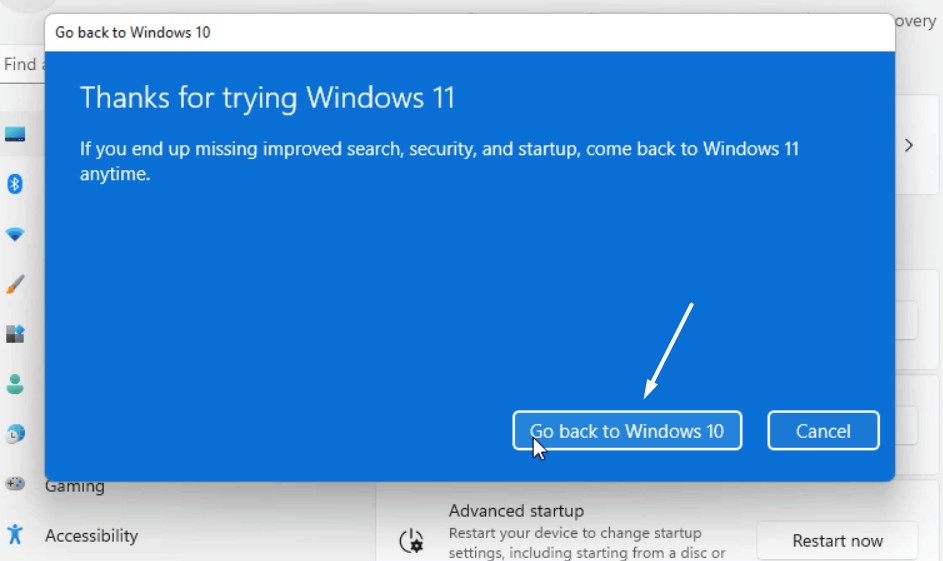
14. Roll Back to Windows 10
For some users, the issue with OpenVPN started appearing after upgrading the Windows 10 PC to Windows 11. If that’s the same with you, consider rolling it back to Windows 10, as doing so will fix all the issues that are causing OpenVPN not working in Windows 11. So, follow the below-mentioned steps to easily revert your Windows 11 PC to Windows 10:
1. Launch the Settings app on your Windows 11 PC and head to the Recovery section of it.

2. In the Recovery window, click the Go back button next to Go Back under Recovery options.
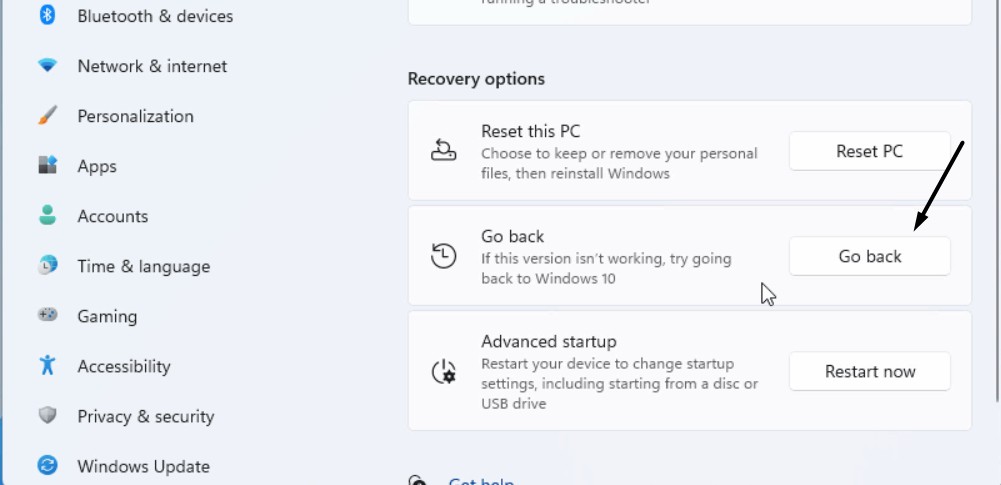
3. After clicking the respective button, follow the on-screen prompts to revert to Windows 10.
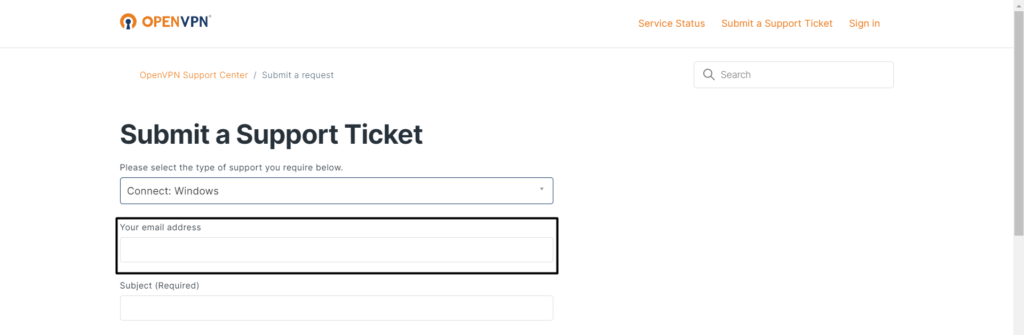
15. Submit a Support Ticket to OpenVPN Support
If you still can’t use the OpenVPN Connect program on your Windows 11 PC, you should submit a support ticket to its support. Hopefully, they’ll provide you with some working workarounds to eliminate all the issues with the OpenVPN Connect app on your Windows 11 PC. Check the below-mentioned steps to know how to contact the OpenVPN support:
1. Click here to visit the OpenVPN official site in your browser and click Support at the top.

2. Click the Submit A Support Ticket button and choose the appropriate option from the menu.

3. Enter your email address in the Your email address text box and then enter the subject.
4. Choose the right option from the OpenVPN Product (Required) and Server Instance Type menu.
5. Enter the OpenVPN Connect client version and then choose the OS you’re using the VPN on.

6. Write a detailed description in the Detailed Description (Required) box and fill in other fields.
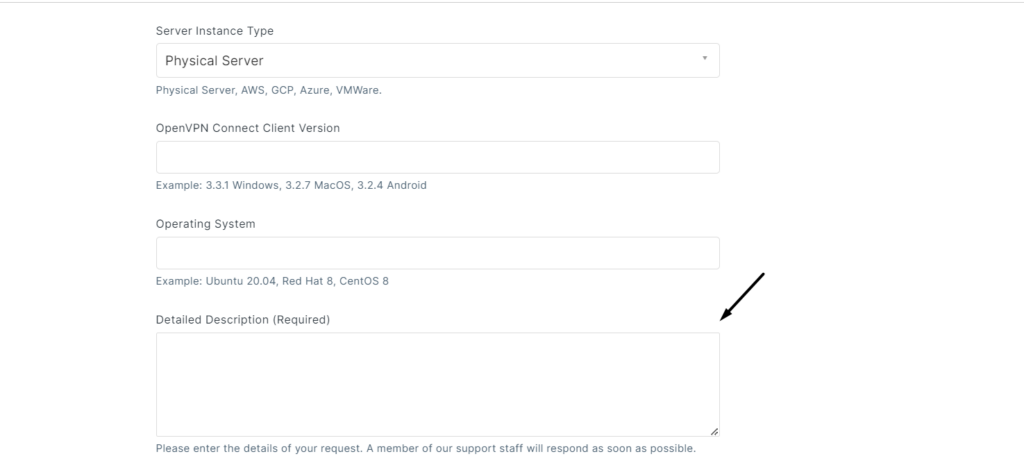
7. Once done, click the Submit button and then wait for the support to revert back with a fix.

FAQs
Does OpenVPN Work With Windows 11?
The OpenVPN app works on Windows 11. You can download it on your PC by clicking here.
Why Is VPN Not Working on Windows 11?
It could be possible that the computer has some bugs and glitches, which is why the VPN isn’t working properly. Other new reasons could be the computer’s Firewall, third-party apps, etc.
Why Is OpenVPN Not Working?
It could be possible that OpenVPN has some bugs and glitches, which is why it isn’t working. Otherwise, it could be possible that the Windows Defender Firewall is stopping it from working.
Does Windows 11 Support VPN?
Yes, the new Windows 11 also supports the VPN. You can access it by going to the below path:
Settings App on your PC > VPN > Add VPN > Follow the On-Screen Instruction
How Do I Enable VPN in Windows 11?
You can follow the below-mentioned steps to turn on the VPN function on your Windows 11 PC:
1. Launch the Settings app on your computer and choose Network & internet from the left.
2. In the Network & internet window, choose the VPN option and enable the toggle next to VPN.
Hopefully, OpenVPN Not Working in Windows 11 Is Fixed Now
OpenVPN is a great Windows VPN program with many useful features to let us browse the internet while being anonymous. However, at times, it faces issues in working properly.
If your OpenVPN app was also not behaving properly on your Windows 11 PC, we hope this troubleshooting guide helped you resolve the issue. If yes, then do let us know which mentioned workaround assisted you in fixing OpenVPN not working in Windows 11.
Readers help support Windows Report. We may get a commission if you buy through our links.
Read our disclosure page to find out how can you help Windows Report sustain the editorial team. Read more
The popularity of VPNs has soared in recent years, owing to cyber threats and regional restrictions on accessing websites. Many users who went with the OpenVPN client reported that it’s not working in Windows 11.
This particularly happens when an installed third-party antivirus is blocking the VPN connection, or it could be the Windows Defender Firewall. Other than that, there are some critical services to be run in order to have a stable connection, so make sure these are running.
Now that you have a basic understanding of the underlying causes, let’s walk you through the most effective fixes for OpenVPN not working issue in Windows 11.
What do I do if OpenVPN is not working in Windows 11?
1. Add an exception to the firewall
- Press Windows + S to launch the Search menu, enter Allow an app through Windows Firewall in the text field, and then click on the relevant search result that appears.

- Click on the Change settings button near the top-right corner in the Allowed apps window.

- Next, click on Allow another app at the bottom.
- Click Browse.

- Go to the folder where OpenVPN is stored, select it, and then click on Open.

- Now, click on Add at the bottom.
- Once OpenVPN is added to the list of allowed apps, make sure the checkboxes for both Private and Public networks are checked, and then click on OK at the bottom.


After making the changes, restart the computer and check if OpenVPN now starts working in Windows 11.
- Recent Windows 11 update lets you disable profanity filter in voice typing
- Microsoft wants Windows 10 users to upgrade to Windows 11 or Copilot + PCs
- Windows 11 KB5055627 update makes File Explorer more fluid
- A few keyboard settings are moving from Control Panel to Settings app in Windows 11
2. Make sure the DHCP Client service is running
- Press Windows + R to launch the Run command dialog box, enter services.msc in the text field, and click on OK to launch the Services app.

- Now, locate the DHCP Client service, right-click on it, and select Properties from the context menu.

- Click on the Startup type dropdown menu, and select Automatic from the list of options.

- Next, if the service is not running, click the Start button under Service status, and click on OK at the bottom to save the changes.


3. Use a reliable VPN client
If the methods listed above have not worked, you may consider switching to another VPN client. And, if you do, we recommend going with PIA (Private Internet Access). It’s a fast and secure VPN with over 3000 servers in 78 countries.
Also, you can access up to 10 devices with the same account. The best part, PIA does not store any browsing history and offers the feature to block ads and trackers for a safe browsing experience.
⇒ Get Private Internet Access
4. Uninstall third-party antivirus
- Press Windows + I to launch Settings, and then select Apps from the tabs listed in the navigation pane on the left.

- Click on Apps & features on the right.
- Locate the third-party antivirus, click on the ellipsis next to it, and then select Uninstall from the menu.
- Again, click Uninstall in the prompt that pops up.


Once done, you can restart the computer, and OpenVPN should now be working in Windows 11. Also, the built-in Windows Security is more than capable of keeping your PC secure, so you should worry about that aspect.
If you have another system running the previous iteration, learn what to do if OpenVPN is not working in Windows 10. Also, if you plan to go with another one, check out the 5 best VPNs as per experts after 3 months of usage.
Tell us which fix worked, and your experience with the OpenVPN client, in the comments section below.
Kazim Ali Alvi
Windows Hardware Expert
Kazim has always been fond of technology, be it scrolling through the settings on his iPhone, Android device, or Windows PC. He’s specialized in hardware devices, always ready to remove a screw or two to find out the real cause of a problem.
Long-time Windows user, Kazim is ready to provide a solution for your every software & hardware error on Windows 11, Windows 10 and any previous iteration. He’s also one of our experts in Networking & Security.
-
Ronv
- OpenVpn Newbie
- Posts: 2
- Joined: Wed Jun 28, 2023 1:12 pm
Windows 11 OpenVPN Connect 3.3.7 GUI showing blank (white GUI)
Windows 11 OpenVPN Connect GUI showing blank (white GUI)
openvpn-connect-3.3.7.2979_signed.msi

how can i fix it?
i tried removing the Temp folder , no luck
can’t find older versions , is there any ftp?
-
mitec.visual
- OpenVpn Newbie
- Posts: 1
- Joined: Fri Jun 30, 2023 1:50 pm
Re: Windows 11 OpenVPN Connect 3.3.7 GUI showing blank (white GUI)
Post
by mitec.visual » Fri Jun 30, 2023 1:51 pm
The same here for me on serveral PCs of my company. I started experiencing this problem since about March.
Empty temp doesn’t work also for me
Skip to content
Navigation Menu
Provide feedback
Saved searches
Use saved searches to filter your results more quickly
Sign up
Description
Drops randomly. Didn’t notice the patterns. The tray icon disappears and the OpenVPN GUI for Windows process disappears.
Network connectivity remains good. But now there is no way to break the connection. Just restart the computer. I don’t see gui logs anywhere, only the network itself.
OS: Windows 11 Pro 21H2 (22000.1219), also crashed on earlier versions
OpenVpn: (v2.5.8), also crashed on earlier versions
OpenVpn GUI: (v11.31.0.0), also crashed on earlier versions
Please help, it’s incredibly annoying
OpenVPN – это набор open source программ, который заслуженно является одним из самых популярных и легких решений для реализации защищенной VPN сети. OpenVPN позволяет объединить в единую сеть сервер и клиентов (даже находящиеся за NAT или файерволами), или объединить сети удаленных офисов. Серверную часть OpenVPN можно развернуть практически на всех доступных операционных системах (пример настройки OpenVPN на Linux). Вы можете установить OpenVPN сервер даже на обычный компьютер с десктопной редакцией Windows 10.
В этой статье, мы покажем, как установить OpenVPN сервер на компьютер с Windows 10, настроить OpenVPN клиент на другом Windows хосте и установить защищенное VPN подключение.
Содержание:
- Установка службы OpenVPN сервера в Windows
- Создаем ключи шифрования и сертификаты для OpenVPN
- Конфигурационный файл OpenVPN сервера в Windows
- Настройка OpenVPN клиента в Windows
Установка службы OpenVPN сервера в Windows
Скачайте MSI установщик OpenVPN для вашей версии Windows с официального сайта (https://openvpn.net/community-downloads/). В нашем случае это OpenVPN-2.5.5-I602-amd64.msi (https://swupdate.openvpn.org/community/releases/OpenVPN-2.5.5-I602-amd64.msi).
Запустите установку.
Если вы планируете, OpenVPN сервер работал в автоматическом режиме, можно не устанавливать OpenVPN GUI. Обязательно установите OpenVPN Services.
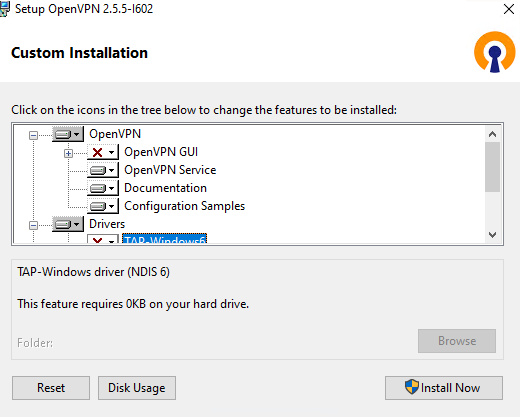
Начиная с версии OpenVPN 2.5, поддерживается драйвер WinTun от разработчиков WireGuard. Считается, что этот драйвер работает быстрее чем классический OpenVPN драйвер TAP. Установите драйвер Wintun, откажитесь от установки TAP-Windows6.
Установите OpenSSL утилиту EasyRSA Certificate Management Scripts.

Запустите установку.
По умолчанию OpenVPN устаналивается в каталог C:\Program Files\OpenVPN.
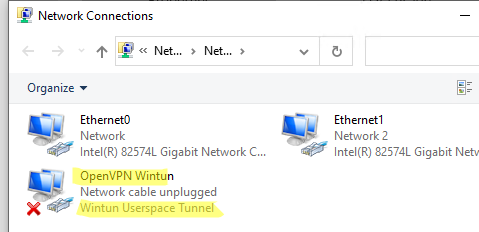
После окончания установки появится новый сетевой адаптер типа Wintun Userspace Tunnel. Этот адаптер отключен, если служба OpenVPN не запущена.
Создаем ключи шифрования и сертификаты для OpenVPN
OpenVPN основан на шифровании OpenSSL. Это означает, что для обмена трафиком между клиентом и серверов VPN нужно сгенерировать ключи и сертификаты с использованием RSA3.
Откройте командную строку и перейдите в каталог easy-rsa:
cd C:\Program Files\OpenVPN\easy-rsa
Создайте копию файла:
copy vars.example vars
Откройте файл vars с помощью любого текстового редактора. Проверьте пути к рабочим директориям.
Обязательно поправьте переменную EASYRSA_TEMP_DIR следующим образом:
set_var EASYRSA_TEMP_DIR "$EASYRSA_PKI/temp"

Можете заполнить поля для сертификатов (опционально)
set_var EASYRSA_REQ_COUNTRY "RU"
set_var EASYRSA_REQ_PROVINCE "MSK"
set_var EASYRSA_REQ_CITY "MSK"
set_var EASYRSA_REQ_ORG "IT-Company"
set_var EASYRSA_REQ_EMAIL " [email protected] "
set_var EASYRSA_REQ_OU " IT department "

Срок действия сертификатов задается с помощью:
#set_var EASYRSA_CA_EXPIRE 3650
#set_var EASYRSA_CERT_EXPIRE 825
Сохраните файл и выполните команду:
EasyRSA-Start.bat
Следующие команды выполняются в среде EasyRSA Shell:
Инициализация PKI:
./easyrsa init-pki
Должна появится надпись:
init-pki complete; you may now create a CA or requests.
Your newly created PKI dir is: C:/Program Files/OpenVPN/easy-rsa/pki
Теперь нужно сгенерировать корневой CA:
./easyrsa build-ca
Задайте дважды пароль для CA:
CA creation complete and you may now import and sign cert requests.
Данная команда сформировала:
- Корневой сертификат центра сертификации: «C:\Program Files\OpenVPN\easy-rsa\pki\ca.crt»
- Ключ центра сертификации «C:\Program Files\OpenVPN\easy-rsa\pki\private\ca.key»
Теперь нужно сгенерировать запрос сертификата и ключ для вашего сервера OpenVPN:
./easyrsa gen-req server nopass
Утилита сгенерирует два файла:
req: C:/Program Files/OpenVPN/easy-rsa/pki/reqs/server.req
key: C:/Program Files/OpenVPN/easy-rsa/pki/private/server.key
Подпишем запрос на выпуск сертификата сервера с помощью нашего CA:
./easyrsa sign-req server server
Подтвердите правильность данных, набрав yes.
Затем введите пароль CA от корневого CA.
В каталоге issued появится сертификат сервера («C:\Program Files\OpenVPN\easy-rsa\pki\issued\server.crt»)

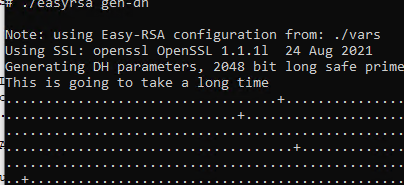
Теперь можно создать ключи Диффи-Хеллмана (займет длительное время):
./easyrsa gen-dh
Для дополнительной защиты VPN сервера желательно включить tls-auth. Данная технология позволяет использовать подписи HMAC к handshake-пакетам SSL/TLS, инициируя дополнительную проверку целостности. Пакеты без такой подписи будут отбрасываться VPN сервером. Это защитит вас от сканирования порта VPN сервера, DoS атак, переполнения буфера SSL/TLS.
Сгенерируйте ключ tls-auth:
cd C:\Program Files\OpenVPN\bin
openvpn --genkey secret ta.key
Должен появиться файл «C:\Program Files\OpenVPN\bin\ta.key». Переместите его в каталог C:\Program Files\OpenVPN\easy-rsa\pki
Теперь можно сформировать ключи для клиентов OpenVPN. Для каждого клиента, который будет подключаться к вашему серверу нужно создать собственные ключи.
Есть несколько способов генерации ключей и передачи их клиентам. В следующем примере, мы создадим на сервере ключ клиента и защитим его паролем:
./easyrsa gen-req kbuldogov
./easyrsa sign-req client kbuldogov
Данный ключ («C:\Program Files\OpenVPN\easy-rsa\pki\private\kbuldogov.key») нужно передать клиенту и сообщить пароль. Клиент может снять защиту паролем для ключа:
openssl rsa -in "C:\Program Files\OpenVPN\easy-rsa\pki\private\kbuldogov.key"-out "C:\Program Files\OpenVPN\easy-rsa\pki\private\kbuldogov_use.key"

Если вы хотите сгенерировать ключ, не защищенный паролем, нужно выполнить команду:
./easyrsa gen-req имяклиента nopass
На сервере с OpenVPN вы можете создать неограниченное количество ключей и сертификатов для пользователей. Аналогичным образом сформируйте ключи и сертфикаты для других клиентов.
Вы можете отохвать скомпрометированные сертификаты клиентов:
cd C:\Program Files\OpenVPN\easy-rsa
EasyRSA-Start.bat
./easyrsa revoke kbuldogov
Итак, мы сгенерировали набор ключей и сертификатов для OpenVPN сервера. Теперь можно настроить и запустить службу OpenVPN.
Конфигурационный файл OpenVPN сервера в Windows
Скопируйте типовой конфигурационный файл OpenVPN сервера:
copy "C:\Program Files\OpenVPN\sample-config\server.ovpn" "C:\Program Files\OpenVPN\config-auto\server.ovpn"
Откройте файл server.ovpn в любом текстовом редакторе и внесите свои настройки. Я использую следующий конфиг для OpenVPN:
# Указываем порт, протокол и устройство
port 1194
proto udp
dev tun
# Указываем пути к сертификатам сервера
ca "C:\\Program Files\\OpenVPN\\easy-rsa\\pki\\ca.crt"
cert "C:\\Program Files\\OpenVPN\\easy-rsa\\pki\\issued\\server.crt"
key "C:\\Program Files\\OpenVPN\\easy-rsa\\pki\\private\\server.key"
dh "C:\\Program Files\\OpenVPN\\easy-rsa\\pki\\dh.pem"
# Указываем настройки IP сети, адреса из которой будет будут получать VPN клиенты
server 10.24.1.0 255.255.255.0
#если нужно разрешить клиентам подключаться под одним ключом, нужвно включить опцию duplicate-cn (не рекомендуется)
#duplicate-cn
# TLS защита
tls-auth "C:\\Program Files\\OpenVPN\\easy-rsa\\pki\\ta.key" 0
cipher AES-256-GCM
# Другая параметры
keepalive 20 60
persist-key
persist-tun
status "C:\\Program Files\\OpenVPN\\log\\status.log"
log "C:\\Program Files\\OpenVPN\\log\\openvpn.log"
verb 3
mute 20
windows-driver wintun
Сохраните файл.
OpenVPN позволяет использовать как TCP, так и UDP для подключения. В этом примере я запустил OpenVPN на 1194 UDP. Рекомендуется использовать протокол UDP, это оптимально как с точки зрения производительности, так и безопасности.
Не забудьте открыть на файерволе порты для указанного вами порта OpenVPN на клиенте и на сервере. Можно открыть порты в Windows Defender с помощью PowerShell.
Правило для сервера:
New-NetFirewallRule -DisplayName "AllowOpenVPN-In" -Direction Inbound -Protocol UDP –LocalPort 1194 -Action Allow
Правило для клиента:
New-NetFirewallRule -DisplayName "AllowOpenVPN-Out" -Direction Outbound -Protocol UDP –LocalPort 1194 -Action Allow
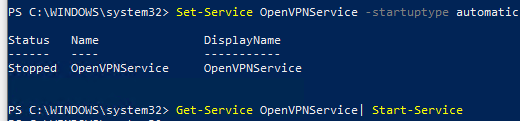
Теперь нужно запустить службу OpenVPN и изменить тип ее запуска на автоматический. Воспользуйтесь таким командами PowerShell, чтобы включить службу:
Set-Service OpenVPNService –startuptype automatic –passthru
Get-Service OpenVPNService| Start-Service
Откройте панель управления, и убедитесь, что виртуальный сетевой адаптер OpenVPN Wintun теперь активен. Если нет, смотрите лог «C:\Program Files\OpenVPN\log\server.log»
Если при запуске OpenVPN вы видите в логе ошибку:
Options error: In C:\Program Files\OpenVPN\config-auto\server.ovpn:1: Maximum option line length (256) exceeded, line starts with..
Смените в файле server.ovpn символы переноса строки на Windows CRLF (в notepad++ нужно выбрать Edit -> EOL Conversion -> Windows CR LF). Сохраните файл, перезапустите службу OpevVPNService.
Данный конфиг позволит удаленным клиентам получить доступ только к серверу, но другие компьютеры и сервисы в локальной сети сервера для них недоступны. Чтобы разрешить клиентам OpenVPN получить доступ к внутренней сети нужно:
Включить опцию IPEnableRouter в реестре (включает IP маршрутизацию в Windows, в том числе включает маршрутизацию меду сетями Hyper-V): reg add «HKLM\SYSTEM\CurrentControlSet\Services\Tcpip\Parameters» /v IPEnableRouter /t REG_DWORD /d 1 /f
Добавьте в конфгурационный файл сервера OpenVPN маршруты до внутренней IP сети:
push "route 10.24.1.0 255.255.255.0"
push "route 192.168.100.0 255.255.255.0"
Если нужно, назначьте клиенту адреса DNS серверов:
push "dhcp-option DNS 192.168.100.11"
push "dhcp-option DNS 192.168.100.12"
Если нужно завернуть все запросы клиента (в том числе Интернет трафик) на ваш OpenVPN сервер, добавьте опцию:
push "redirect-gateway def1"
Настройка OpenVPN клиента в Windows
Создайте на сервере шаблонный конфигурационный файла для клиента VPN (на базе iшаблона client.ovpn) со следующими параметрами (имя файла kbuldovov.ovpn)
client
dev tun
proto udp
remote your_vpn_server_address 1194
resolv-retry infinite
nobind
persist-key
persist-tun
ca ca.crt
cert kbuldogov.crt
key kbuldogov.key
remote-cert-tls server
tls-auth ta.key 1
cipher AES-256-GCM
connect-retry-max 25
verb 3
В директиве remote указывается публичный IP адрес или DNS имя вашего сервера OpenVPN.
Скачайте и установите клиент OpenVPN Connect для Windows (https://openvpn.net/downloads/openvpn-connect-v3-windows.msi).
Теперь на компьютер с клиентом OpenVPN нужно с сервера скопировать файлы:
- ca.crt
- kbuldogov.crt
- kbuldogov.key
- dh.pem
- ta.key
- kbuldogov.ovpn
Теперь импортируйте файл с профилем *.ovpn и попробуйте подключиться к вашему VPN серверу.
Если все настроено правильно, появится такая картинка.
Проверьте теперь лог OpenVPN на клиенте «C:\Program Files\OpenVPN Connect\agent.log»
Mon Dec 27 08:09:30 2021 proxy_auto_config_url
Mon Dec 27 08:09:31 2021 TUN SETUP
TAP ADAPTERS:
guid='{25EE4A55-BE90-45A0-88A1-8FA8FEF24C42}' index=22 name='Local Area Connection'
Open TAP device "Local Area Connection" PATH="\\.\Global\{25EE4A55-BE90-45A0-88A1-8FA8FEF24C42}.tap" SUCCEEDED
TAP-Windows Driver Version 9.24
ActionDeleteAllRoutesOnInterface iface_index=22
netsh interface ip set interface 22 metric=1
Ok.
netsh interface ip set address 22 static 10.24.1.6 255.255.255.252 gateway=10.24.1.5 store=active
IPHelper: add route 10.24.1.1/32 22 10.24.1.5 metric=-1
Клиент успешно подключится к OpenVPN серверу и получил IP адрес 10.24.1.6.
Проверьте теперь лог на сервере («C:\Program Files\OpenVPN\log\openvpn.log»). Здесь также видно, что клиент с сертификатом kbuldogov успешно подключится к вашему серверу.
2021-12-27 08:09:35 192.168.13.202:55648 [kbuldogov] Peer Connection Initiated with [AF_INET6]::ffff:192.168.13.202:55648
2021-12-27 08:09:35 kbuldogov/192.168.13.202:55648 MULTI_sva: pool returned IPv4=10.24.1.6, IPv6=(Not enabled)
2021-12-27 08:09:35 kbuldogov/192.168.13.202:55648 MULTI: Learn: 10.24.1.6 -> kbuldogov/192.168.13.202:55648
2021-12-27 08:09:35 kbuldogov/192.168.13.202:55648 MULTI: primary virtual IP for kbuldogov/192.168.13.202:55648: 10.24.1.6