
Описание
Установка OpenVPN сервера на Windows включает несколько шагов. Вот пошаговое руководство для этого процесса:
1. Скачивание необходимого программного обеспечения
- – Сначала скачайте установщик OpenVPN Access Server с официального сайта: <https://openvpn.net/access-server/downloads/>
- – Также потребуется OpenSSL, который часто входит в состав OpenVPN Access Server.
2. Установка OpenVPN Access Server
- – Запустите скачанный установщик и следуйте инструкциям для установки.
- – В процессе установки вы сможете выбрать язык интерфейса и другие параметры, такие как адрес сервера и порт.
- – Убедитесь, что у вас есть права администратора на компьютере, чтобы успешно установить программу.
3. Настройка OpenVPN Access Server
- – После установки вам нужно будет зайти в административный интерфейс OpenVPN Access Server через браузер.
- – Административная панель обычно доступна по адресу `https://localhost:943/admin` или по IP-адресу вашего сервера на порту 943.
- – Войдите с помощью учетных данных, установленных во время установки.
4. Настройка сети
- – Убедитесь, что ваш Windows сервер имеет статический IP адрес и правильную настройку сетевых подключений для работы OpenVPN.
- – Если вы используете NAT (Network Address Translation), убедитесь, что порты для OpenVPN открыты.
5. Настройка безопасности
- – Установите и активируйте брандмауэр Windows или другой программный фаерволл.
- – Откройте требуемые TCP/UDP порты через фаерволл для соединений с вашим OpenVPN сервером.
6. Настройка клиентской конфигурации
- – Создайте профили для подключений и скачайте их на устройства, которые будут использовать OpenVPN.
- – Загрузите соответствующее приложение OpenVPN для клиентского использования с сайта openvpn.net или используйте встроенный Windows OpenVPN клиент.
7. Тестирование
- – Подключитесь к серверу через клиентское приложение OpenVPN и убедитесь, что все работает как надо.
- – Проверьте соединение и настройки сети между вашим сервером и устройствами клиента.
Помните, что установка OpenVPN требует знаний в области безопасности и сетевых технологий. Важно также регулярно обновлять программное обеспечение для поддержания высокого уровня безопасности. Если вы новичок в этой сфере, рекомендуется обратиться за помощью к опытному системному администратору или найти подробные руководства по настройке OpenVPN для конкретных требований вашего проекта.
OpenVPN
If you want to protect your online privacy or encrypt your information on the web so that it does not fall into the hands of hackers; you should use a VPN. The main element of any VPN is the VPN protocol used by it. In this article, we will teach you how to install OpenVpn on Windows Server 2019. Most VPNs support several protocols such as IKEv2, L2TP, and SSTP, but the OpenVPN protocol is known as the most popular and best VPN protocol in the world. In this article, we will teach you How to Setup OpenVPN On Windows Server 2019. If you want to purchase your own RDP, you can check out the packages offered on the Eldernode website.
Table of Contents
What is OpenVPN?
Openvpn is currently the most popular and widely used protocol as a VPN. Unlike other IPSec-based tunneling protocols (such as L2tp), Openvpn relies on SSL / TLS for authentication and data encryption. This standard security technology is for making secure, remote connections from one place to another or from one point to another. The use of SSL to protect financial transactions, data transfers, emails, and other things is very popular.
OpenVPN is compatible with all major operating systems such as Windows, Android, iOS, Mac, and Linux. It is open source and supports up to 256-bit encryption.
Available OpenVPNs is as follows:
–> OpenVPN Community Edition: It is an open-source and free version and doesn’t have user limitations.
–> OpenVPN Access Server: It is based on the Community Edition but provides additional paid and proprietary features such as Easy Management Admin Portal, LDAP integration and etc.
–> OpenVPN-as-a-Service: It is a solution that eliminates the need for VPN server installation. You can connect to your hosted service with regions around the world simply by purchasing OpenVPN Cloud.
In this step from the Windows training tag, you will learn how to install OpenVPN on Windows Server 2019.
Prerequisites
– Access to port 1194 to connect to the same network
– Windows Server 2019
You can do this by allowing UDP traffic on port 1194 by adding a rule to your Firewall.
How to Install OpenVPN on Windows Server 2019
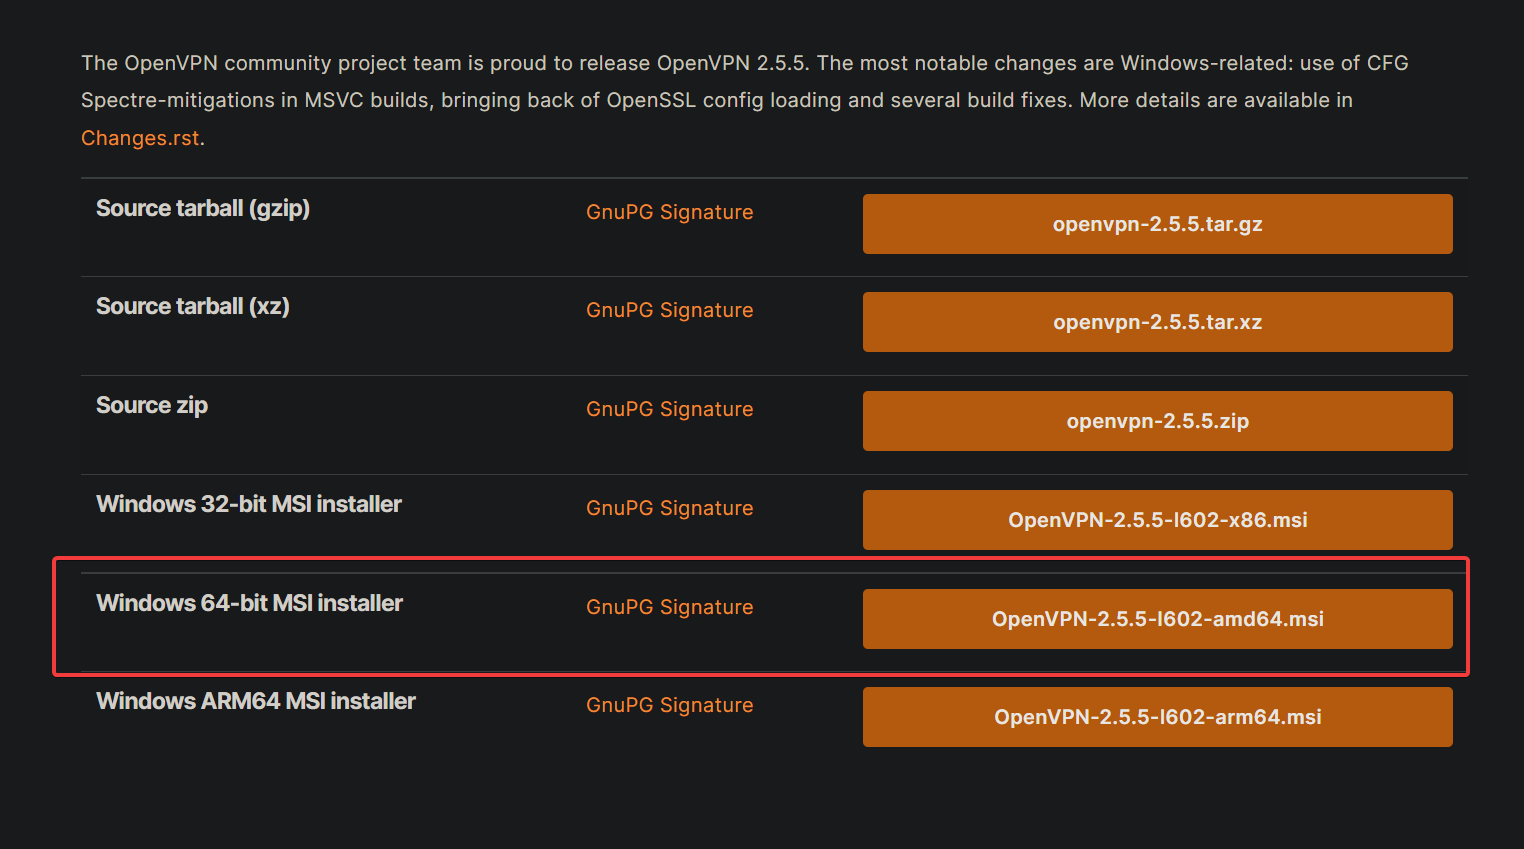
Go to the official OpenVPN Website to download the latest Windows 64-bit MSI installer for the OpenVPN Community edition:
After the download is completed, go to the downloaded file and double-click on it. Click on the icon next to desired features to choose them. Check the ”EasyRSA 2 Certificate Management Scripts” and click on Next:
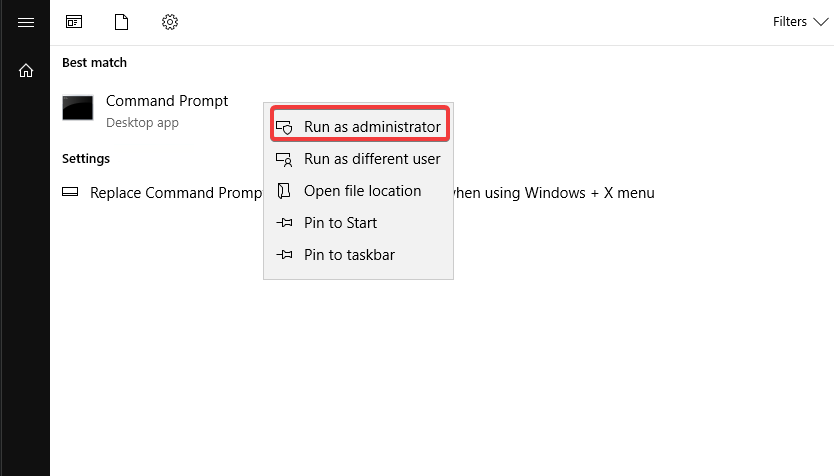
Once the installation is completed, you should generate the certificates and keys to access the VPN. To do this, open the terminal by typing cmd on the Start menu and right-click on the Command Prompt icon. Choose ”Run as Administrator”:
Go to the following path:
C:\Program Files\OpenVPN\easy-rsaNow you can start configuring OpenVPN:
init-configIn this step, you need to open the vars.bat file in the text editor:
notepad vars.batEdit the subsequent lines by switching The ”US”, ”CA” etc with your business’s data:
set KEY_COUNTRY=US set KEY_PROVINCE=CA set KEY_CITY=SanFrancisco set KEY_ORG=OpenVPN set [email protected]–> KEY_CN and KEY_NAME: They will be unique for each build request and refer to the common name field and the name of the certificate.
–> KEY_OU: They refer to an ”Organizational Unit” and can be set to whatever if there isn’t a requirement for it.
–> PKCS11_values: They refer to settings used for Hardware Security Modules and Smart Cards if you use them.
Save the text editor file and exit it.
To apply the changes, enter the following command:
varsclean allBuilding Certificates and Keys
In order to create the Certificate Authority (CA) certificate and key, we need to run the following command:
build-caThis will prompt you to enter your country, state, and city. These options will also have default values, which appear within brackets:
Certificate Authority "OpenVPN-CA": Country Name (2 letter code) [US]: State or Province Name (full name) [CA]: Locality Name (eg, city) [SanFrancisco]: Organization Name (eg, company) [OpenVPN]: Organizational Unit Name (eg, section) []: Common Name (eg, your name or your server's hostname) []:OpenVPN-CA Email Address [[email protected]]:Using the following command, we initiate the server’s certificate and key:
build-key-server serverWhen prompted to sign the certificate and commit, enter ”y” and enter the ”Common Name” as a server.
Server Certificates and Keys
C:\Program Files\OpenVPN\easy-rsa>build-key-server.bat Generating a RSA private key ..............................................................................................................................................................................................................................................++++ ................................++++ writing new private key to 'keys\.key' ----- You are about to be asked to enter information that will be incorporated into your certificate request. What you are about to enter is what is called a Distinguished Name or a DN. There are quite a few fields but you can leave some blank For some fields there will be a default value, If you enter '.', the field will be left blank. ----- Country Name (2 letter code) [US]:US State or Province Name (full name) [MI]: Locality Name (eg, city) [Lansing]: Organization Name (eg, company) [OpenVPN]: Organizational Unit Name (eg, section) [changeme]: Common Name (eg, your name or your server's hostname) [changeme]:Server Name [changeme]: Email Address [[email protected]]: Please enter the following 'extra' attributes to be sent with your certificate request A challenge password []:XXXXXXXXXXXXXXXX An optional company name []: Using configuration from openssl-1.0.0.cnf Can't open keys/index.txt.attr for reading, No such file or directory 1832:error:02001002:system library:fopen:No such file or directory:crypto/bio/bss_file.c:74:fopen('keys/index.txt.attr','r') 1832:error:2006D080:BIO routines:BIO_new_file:no such file:crypto/bio/bss_file.c:81: Check that the request matches the signature Signature ok The Subject's Distinguished Name is as follows countryName :PRINTABLE:'US' stateOrProvinceName :PRINTABLE:'MI' localityName :PRINTABLE:'Lansing' organizationName :PRINTABLE:'OpenVPN' organizationalUnitName:PRINTABLE:'changeme' commonName :PRINTABLE:'Server' name :PRINTABLE:'changeme' emailAddress :IA5STRING:'[email protected]' Certificate is to be certified until Dec 24 19:01:08 2029 GMT (3650 days) Sign the certificate? [y/n]:y 1 out of 1 certificate requests certified, commit? [y/n]y Write out database with 1 new entries Data Base Updated C:\Program Files\OpenVPN\easy-rsa>Client Certificates and Keys
For each client that will be connecting to the server, you should choose a unique name to identify that user’s computer, such as ”Michael-PC” in the following example.
When prompted, enter the Common Name as the name you have chosen for the client’s cert/key. You will repeat this step for every client computer that is going to connect to the VPN.
C:\Program Files\OpenVPN\easy-rsa>build-key Michael-PC Generating a RSA private key .............................................................................................................................................................................++++ ..............................................................................++++ writing new private key to 'keys\Michael-PC.key' ----- You are about to be asked to enter information that will be incorporated into your certificate request. What you are about to enter is what is called a Distinguished Name or a DN. There are quite a few fields but you can leave some blank For some fields there will be a default value, If you enter '.', the field will be left blank. ----- Country Name (2 letter code) [US]: State or Province Name (full name) [MI]: Locality Name (eg, city) [Lansing]: Organization Name (eg, company) [OpenVPN]: Organizational Unit Name (eg, section) [changeme]: Common Name (eg, your name or your server's hostname) [changeme]:Michael-PC Name [changeme]: Michael Jordan Email Address [[email protected]]: Please enter the following 'extra' attributes to be sent with your certificate request A challenge password []:XXXXXXXXXXXXXXXX An optional company name []: Using configuration from openssl-1.0.0.cnf Check that the request matches the signature Signature ok The Subject's Distinguished Name is as follows countryName :PRINTABLE:'US' stateOrProvinceName :PRINTABLE:'MI' localityName :PRINTABLE:'Lansing' organizationName :PRINTABLE:'OpenVPN' organizationalUnitName:PRINTABLE:'changeme' commonName :PRINTABLE:'Michael-PC' name :PRINTABLE:'Michael Jordan' emailAddress :IA5STRING:'[email protected]' Certificate is to be certified until Dec 24 19:06:10 2029 GMT (3650 days) Sign the certificate? [y/n]:y 1 out of 1 certificate requests certified, commit? [y/n]y Write out database with 1 new entries Data Base Updated C:\Program Files\OpenVPN\easy-rsa>In this part, you need to generate the ”Diffie Hellman” parameters using thebuild-dh command. This step is necessary in order to set up the encryption model.
C:\Program Files\OpenVPN\easy-rsa>build-dh.bat Generating DH parameters, 2048 bit long safe prime, generator 2 This is going to take a long time .................................+......................................................................................................+.............................................................................................+..................................................................................+......................................................... .............................................................................+............................+..........+........+............................................+..............................................+....++*++*++*++* C:\Program Files\OpenVPN\easy-rsa>Generate a shared secret key (which is required when using tls-auth):
"C:\Program Files\OpenVPN\bin\openvpn.exe" --genkey --secret "C:\Program Files\OpenVPN\easy-rsa\keys\ta.key"Configuration Files
OpenVPN provides sample configuration data which can easily be found using the start menu.
Open the Start menu, and click on All Programs. Then select OpenVPN Sample Configuration Files from the OpenVPN options.
Server Config File
Copy the sample ”server configuration” file over to the easy-rsa folder. This command and its output are as follows:
copy "C:\Program Files\OpenVPN\sample-config\server.ovpn" "C:\Program Files\OpenVPN\easy-rsa\keys\server.ovpn" C:\Program Files\OpenVPN\easy-rsa>"C:\Program Files\OpenVPN\bin\openvpn.exe" --genkey --secret "C:\Program Files\OpenVPN\easy-rsa\keys\ta.key" C:\Program Files\OpenVPN\easy-rsa>copy "C:\Program Files\OpenVPN\sample-config\server.ovpn" "C:\Program Files\OpenVPN\easy-rsa\keys\server.ovpn" 1 file(s) copied. C:\Program Files\OpenVPN\easy-rsa>Now edit the server.ovpn file:
notepad "C:\Program Files\OpenVPN\easy-rsa\keys\server.ovpn"Locate the following lines within the file:
ca ca.crt cert server.crt key server.key dh dh2048.pemThen edit them as follows:
ca "C:\\Program Files\\OpenVPN\\config\\ca.crt" cert "C:\\Program Files\\OpenVPN\\config\\server.crt" key "C:\\Program Files\\OpenVPN\\config\\server.key" dh "C:\\Program Files\\OpenVPN\\config\\dh2048.pem"Finally, save and close the file.
Client Config Files
The client file modification is very similar to the server configuration changes.
Copy the sample server configuration file to the easy-rsa folder with the client’s Common Name as the file name.
Remember: Each client will need to have a unique filename.
copy "C:\Program Files\OpenVPN\sample-config\client.ovpn" "C:\Program Files\OpenVPN\easy-rsa\keys\Michael-PC.ovpn" C:\Program Files\OpenVPN\easy-rsa>copy "C:\Program Files\OpenVPN\sample-config\client.ovpn" "C:\Program Files\OpenVPN\easy-rsa\keys\Michael-PC.ovpn" 1 file(s) copied. C:\Program Files\OpenVPN\easy-rsa> Edit the client’s config file.
notepad "C:\Program Files\OpenVPN\easy-rsa\keys\Michael-PC.ovpn" Locate the following settings in the file and edit them as follows:
ca ca.crt cert client.crt key client.key to ca "C:\\Program Files\\OpenVPN\\config\\ca.crt" cert "C:\\Program Files\\OpenVPN\\config\\Michael-PC.crt" key "C:\\Program Files\\OpenVPN\\config\\Michael-PC.key" Next, we will edit the line “my-server-1“, replacing it with the server’s public IP Address or Domain Name.
remote my-server-1 1194 # The hostname/IP and port of the server. # You can have multiple remote entries # to load balance between the servers. remote my-server-1 69.16.236.167 ;remote my-server-2 1194 Save and close the file.
Copying the Client and Server Files to Their Pertinent Directories
Now you can copy these files from C:\Program Files\OpenVPN\easy-rsa\keys\ to C:\Program Files\OpenVPN\config\ on the server using the robocopy command:
- ca.crt
- ta.key
- dh2048.pem
- server.crt
- server.key
- server.ovpn
robocopy "C:\Program Files\OpenVPN\easy-rsa\keys\ " "C:\Program Files\OpenVPN\config\ " ca.crt ta.key dh2048.pem server.crt server.key server.ovpn C:\Program Files\OpenVPN\easy-rsa>robocopy "C:\Program Files\OpenVPN\easy-rsa\keys\ " "C:\Program Files\OpenVPN\config\ " ca.crt ta.key dh2048.pem server.crt server.key server.ovpn ------------------------------------------------------------------------------- ROBOCOPY :: Robust File Copy for Windows ------------------------------------------------------------------------------- Started : Friday, December 27, 2019 12:16:02 PM Source : C:\Program Files\OpenVPN\easy-rsa\keys\ Dest : C:\Program Files\OpenVPN\config\ Files : ca.crt ta.key dh2048.pem server.crt server.key server.ovpn Options : /DCOPY:DA /COPY:DAT /R:1000000 /W:30 ------------------------------------------------------------------------------ 4 C:\Program Files\OpenVPN\easy-rsa\keys\ 100% New File 2482 ca.crt 100% New File 432 dh2048.pem 100% New File 10901 server.ovpn 100% New File 657 ta.key ------------------------------------------------------------------------------ Total Copied Skipped Mismatch FAILED Extras Dirs : 1 0 1 0 0 0 Files : 4 4 0 0 0 0 Bytes : 14.1 k 14.1 k 0 0 0 0 Times : 0:00:00 0:00:00 0:00:00 0:00:00 Speed : 452250 Bytes/sec. Speed : 25.877 MegaBytes/min. Ended : Thursday, July 16, 2020 12:16:02 PM C:\Program Files\OpenVPN\easy-rsa> You can copy the following files from C:\Program Files\OpenVPN\easy-rsa\keys\ on the server to C:\Program Files\OpenVPN\config\ for each client that will be using the VPN (e.g., Michael-PC, in this example)
- ca.crt
- ta.key
- Michael-PC.crt
- Michael-PC.key
- Michael-PC.ovpn
Firewall Settings
If you have any connection difficulties, ensure you set up a rule on the server’s firewall allowing incoming UDP traffic on port 1194. (Win+R “wf.msc”)
Conclusion
We hope you would enjoy this tutorial, you can ask questions about this training in the comments section, or to solve other problems in the field of Eldernode training, refer to the Ask page section and raise your problem in it as soon as possible. In this article, we taught you how to install OpenVPN on Windows Server 2019.
OpenVPN serves as a secure communication protocol and software application for creating encrypted virtual private networks (VPNs). OpenVPN access server is an enterprise-grade VPN solution built on top of the OpenVPN software. In this article, we will discuss the key features of OpenVPN Access Server, and the procedures for its creation, connection, and installation.
OpenVPN Access Server is a powerful, versatile solution for creating secure VPNs. It acts as a centralized platform for creating, managing, and maintaining VPNs, enabling users to establish encrypted connections to their networks remotely. OpenVPN Access Server leverages the open-source OpenVPN software. It also adds an intuitive web-based interface, making it accessible to both beginners and experienced network administrators.
OpenVPN Access Server’s Major Features
OpenVPN access server’s essential features include:
- Scalability – Designed to accommodate a growing user base, OpenVPN Access Server is scalable and can adapt to the changing needs of your network. It supports many simultaneous connections, making it suitable for small businesses and large enterprises.
- Robust security – OpenVPN Access Server uses robust encryption protocols, including SSL (Secure Sockets Layer) and TLS (Transport Layer Security) to ensure data confidentiality and integrity. This security measure makes it a reliable choice for sensitive data transmission because it shields communication channels from potential threats.
- Cross-platform compatibility – Whether you’re using Windows, Linux, macOS, or even mobile devices, OpenVPN Access Server ensures compatibility across various platforms. This flexibility allows users to connect to the VPN from different devices, enhancing accessibility.
- Authentication options – With support for multiple authentication methods, including username/password, two-factor authentication, and certificate-based authentication, OpenVPN Access Server provides a customizable and secure user authentication process.

How to Create an OpenVPN Server
Do the following steps:
- Choose a hosting provider – Select a reliable hosting provider that offers a virtual private server or dedicated server that will host your OpenVPN server.
- Install the OpenVPN access server – Depending on your chosen hosting provider, follow the relevant instructions for installing the OpenVPN Access Server. Below is an example installation command for Ubuntu: ‘wget https://swupdate.openvpn.net/as/openvpn-as–Ubuntu20.amd_64.deb’ to download the page, and ‘dpkg -i openvpn-as–Ubuntu20.amd_64.deb’ to install the software
- Access the admin web interface – After the OpenVPN Access Server is installed, access the web-based administration interface by navigating to https://your-server-ip:943/admin. Log in with the default credentials provided during the installation.
- Configure network settings – Customize network settings, such as the IP address range for VPN clients and DNS (Domain Name System) settings to align with your network requirements.
- Create user accounts – Generate user accounts with secure credentials to control access to your OpenVPN server. Assign different levels of permissions based on the roles of your users.
How to Connect to an OpenVPN Server
Do the following steps:
- Download OpenVPN client – Go to the OpenVPN Community Downloads website and download the OpenVPN client that is suitable for your operating system.
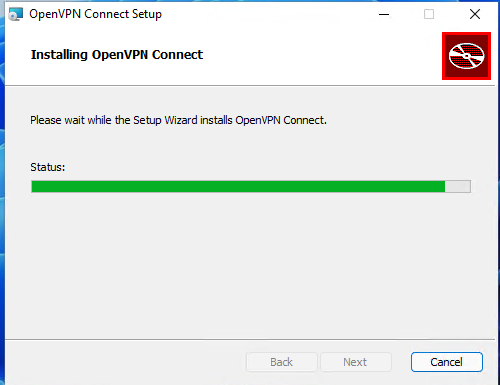
- Install OpenVPN client – Follow the installation instructions to set up the OpenVPN client on your computer or device.
- Download the user profile – Access the OpenVPN Access Server’s web interface and download the user profile for the account you created earlier. This profile contains the necessary configuration details.
- Import the user profile – Import the downloaded user profile into the OpenVPN client. This step typically involves selecting the “Import” within the client and choosing the downloaded profile.
- Connect to the server – Open the OpenVPN client, select the imported profile, and click “Connect.” Enter the credentials for the user account. Then the client will establish a secure connection to the OpenVPN server.
How to Install OpenVPN Access Server in Windows
Do the following steps:
- The OpenVPN protocol is not built into Windows. You must install a client application to handle communication with OpenVPN Access Server. A client application is required to capture the traffic you want to send through the OpenVPN tunnel, encrypt it, pass it on to the server, and decrypt the return traffic.
- OpenVPN recommends using OpenVPN Connect, which is a pre-configured client app that will connect with your OpenVPN Access Server.
- Go to the OpenVPN Connect for Windows site to download the latest OpenVPN Connect client app version.
- Visit the Connecting to Access Server with Windows site for instructions on how to install the OpenVPN Connect application on a Windows computer.
How to Install OpenVPN Access Server in Ubuntu
Do the following steps:
- Download the package – You can use the ‘wget’ command to download the OpenVPN Access Server package. The following is an example of the command: ‘wget https://swupdate.openvpn.net/as/openvpn-as–Ubuntu20.amd_64.deb’
- Install the package – Use the ‘dpkg’ command to install the downloaded package. The following is an example of the command: ‘dpkg -i openvpn-as–Ubuntu20.amd_64.deb’
- Access the web interface – Open a web browser and navigate to https://your-server-ip:943/admin. Log in using the default credentials provided to you during the installation process.
- Configure the settings – Adjust the network settings and other configurations according to your preferences.
- Create the user accounts – Generate the user accounts that have varying permissions to gain entry to the OpenVPN access server.
Note: For additional information on how to install OpenVPN Access Server in other Linux distributions, go to the Access Server installation options website, and follow the instructions on the site.
OpenVPN Access Server as an Ideal VPN Solution
To conclude, OpenVPN Access Server is a powerful tool for creating secure network connections. It offers advanced security features, a user-friendly interface, and support for multiple operating systems. By following the steps outlined in this article, you can easily set up, connect, and install OpenVPN access server, and effectively use it for your remote connection needs.
ServerHub’s Server Hosting Solutions
ServerHub’s dedicated servers are powered by the latest Intel Xeon processors, ensuring exceptional performance and reliability. We take pride in our rapid server deployments, with most servers provisioned in under 60 minutes. Experience blazing-fast speeds with up to 40 Gbps network uplinks, making us the ideal choice for demanding applications and workloads. Contact us now to start your journey to a seamless and powerful dedicated server hosting experience.
References:
- Access Server
- Connecting to Access Server with Windows
- OpenVPN Access Server Admin Manual
- OpenVPN Connect for Windows
- Access Server Installation Options
OpenVPN – это набор open source программ, который заслуженно является одним из самых популярных и легких решений для реализации защищенной VPN сети. OpenVPN позволяет объединить в единую сеть сервер и клиентов (даже находящиеся за NAT или файерволами), или объединить сети удаленных офисов. Серверную часть OpenVPN можно развернуть практически на всех доступных операционных системах (пример настройки OpenVPN на Linux). Вы можете установить OpenVPN сервер даже на обычный компьютер с десктопной редакцией Windows 10.
В этой статье, мы покажем, как установить OpenVPN сервер на компьютер с Windows 10, настроить OpenVPN клиент на другом Windows хосте и установить защищенное VPN подключение.
Содержание:
- Установка службы OpenVPN сервера в Windows
- Создаем ключи шифрования и сертификаты для OpenVPN
- Конфигурационный файл OpenVPN сервера в Windows
- Настройка OpenVPN клиента в Windows
Установка службы OpenVPN сервера в Windows
Скачайте MSI установщик OpenVPN для вашей версии Windows с официального сайта (https://openvpn.net/community-downloads/). В нашем случае это OpenVPN-2.5.5-I602-amd64.msi (https://swupdate.openvpn.org/community/releases/OpenVPN-2.5.5-I602-amd64.msi).
Запустите установку.
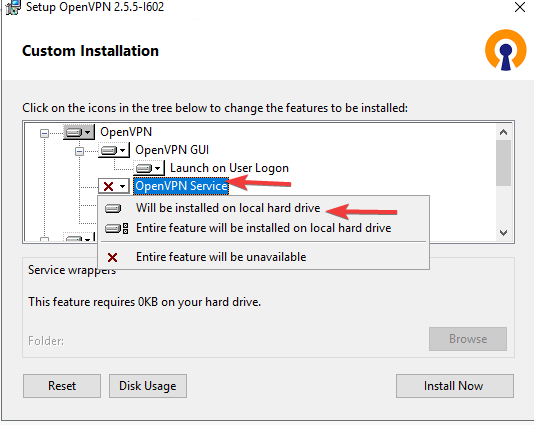
Если вы планируете, OpenVPN сервер работал в автоматическом режиме, можно не устанавливать OpenVPN GUI. Обязательно установите OpenVPN Services.
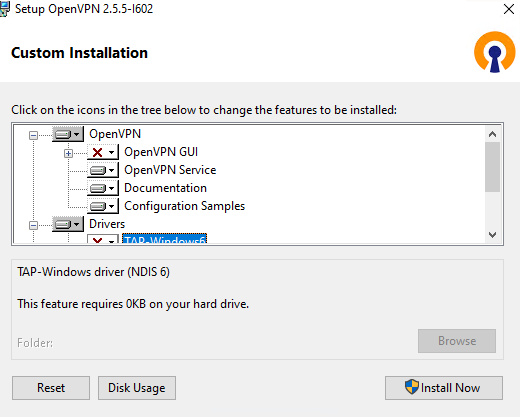
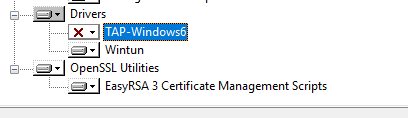
Начиная с версии OpenVPN 2.5, поддерживается драйвер WinTun от разработчиков WireGuard. Считается, что этот драйвер работает быстрее чем классический OpenVPN драйвер TAP. Установите драйвер Wintun, откажитесь от установки TAP-Windows6.
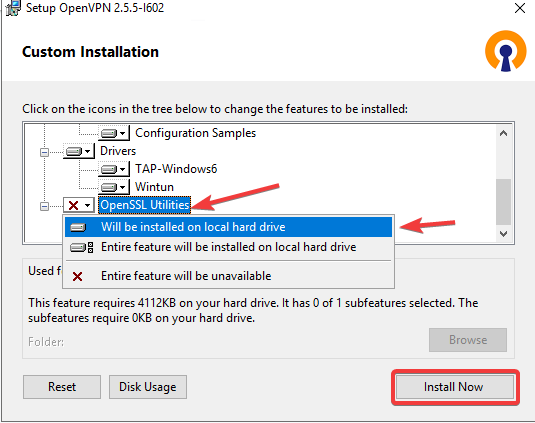
Установите OpenSSL утилиту EasyRSA Certificate Management Scripts.
Запустите установку.
По умолчанию OpenVPN устаналивается в каталог C:\Program Files\OpenVPN.
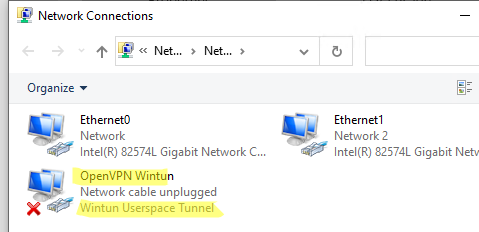
После окончания установки появится новый сетевой адаптер типа Wintun Userspace Tunnel. Этот адаптер отключен, если служба OpenVPN не запущена.
Создаем ключи шифрования и сертификаты для OpenVPN
OpenVPN основан на шифровании OpenSSL. Это означает, что для обмена трафиком между клиентом и серверов VPN нужно сгенерировать ключи и сертификаты с использованием RSA3.
Откройте командную строку и перейдите в каталог easy-rsa:
cd C:\Program Files\OpenVPN\easy-rsa
Создайте копию файла:
copy vars.example vars
Откройте файл vars с помощью любого текстового редактора. Проверьте пути к рабочим директориям.
Обязательно поправьте переменную EASYRSA_TEMP_DIR следующим образом:
set_var EASYRSA_TEMP_DIR "$EASYRSA_PKI/temp"

Можете заполнить поля для сертификатов (опционально)
set_var EASYRSA_REQ_COUNTRY "RU"
set_var EASYRSA_REQ_PROVINCE "MSK"
set_var EASYRSA_REQ_CITY "MSK"
set_var EASYRSA_REQ_ORG "IT-Company"
set_var EASYRSA_REQ_EMAIL " [email protected] "
set_var EASYRSA_REQ_OU " IT department "

Срок действия сертификатов задается с помощью:
#set_var EASYRSA_CA_EXPIRE 3650
#set_var EASYRSA_CERT_EXPIRE 825
Сохраните файл и выполните команду:
EasyRSA-Start.bat
Следующие команды выполняются в среде EasyRSA Shell:
Инициализация PKI:
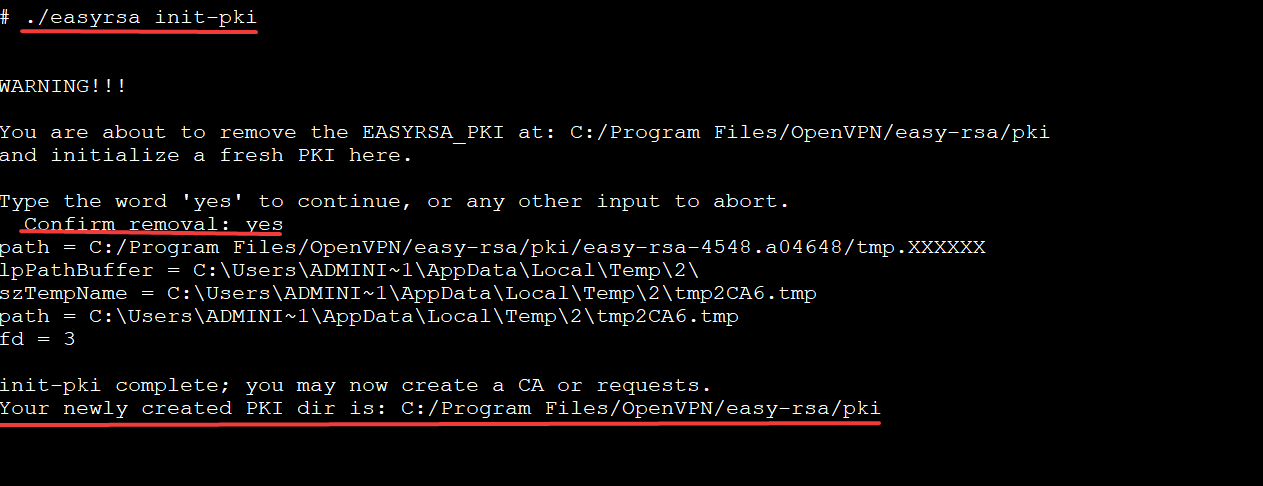
./easyrsa init-pki
Должна появится надпись:
init-pki complete; you may now create a CA or requests.
Your newly created PKI dir is: C:/Program Files/OpenVPN/easy-rsa/pki
Теперь нужно сгенерировать корневой CA:
./easyrsa build-ca
Задайте дважды пароль для CA:
CA creation complete and you may now import and sign cert requests.
Данная команда сформировала:
- Корневой сертификат центра сертификации: «C:\Program Files\OpenVPN\easy-rsa\pki\ca.crt»
- Ключ центра сертификации «C:\Program Files\OpenVPN\easy-rsa\pki\private\ca.key»
Теперь нужно сгенерировать запрос сертификата и ключ для вашего сервера OpenVPN:
./easyrsa gen-req server nopass
Утилита сгенерирует два файла:
req: C:/Program Files/OpenVPN/easy-rsa/pki/reqs/server.req
key: C:/Program Files/OpenVPN/easy-rsa/pki/private/server.key
Подпишем запрос на выпуск сертификата сервера с помощью нашего CA:
./easyrsa sign-req server server
Подтвердите правильность данных, набрав yes.
Затем введите пароль CA от корневого CA.
В каталоге issued появится сертификат сервера («C:\Program Files\OpenVPN\easy-rsa\pki\issued\server.crt»)

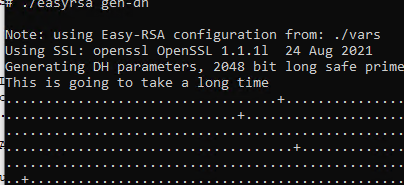
Теперь можно создать ключи Диффи-Хеллмана (займет длительное время):
./easyrsa gen-dh
Для дополнительной защиты VPN сервера желательно включить tls-auth. Данная технология позволяет использовать подписи HMAC к handshake-пакетам SSL/TLS, инициируя дополнительную проверку целостности. Пакеты без такой подписи будут отбрасываться VPN сервером. Это защитит вас от сканирования порта VPN сервера, DoS атак, переполнения буфера SSL/TLS.
Сгенерируйте ключ tls-auth:
cd C:\Program Files\OpenVPN\bin
openvpn --genkey secret ta.key
Должен появиться файл «C:\Program Files\OpenVPN\bin\ta.key». Переместите его в каталог C:\Program Files\OpenVPN\easy-rsa\pki
Теперь можно сформировать ключи для клиентов OpenVPN. Для каждого клиента, который будет подключаться к вашему серверу нужно создать собственные ключи.
Есть несколько способов генерации ключей и передачи их клиентам. В следующем примере, мы создадим на сервере ключ клиента и защитим его паролем:
./easyrsa gen-req kbuldogov
./easyrsa sign-req client kbuldogov
Данный ключ («C:\Program Files\OpenVPN\easy-rsa\pki\private\kbuldogov.key») нужно передать клиенту и сообщить пароль. Клиент может снять защиту паролем для ключа:
openssl rsa -in "C:\Program Files\OpenVPN\easy-rsa\pki\private\kbuldogov.key"-out "C:\Program Files\OpenVPN\easy-rsa\pki\private\kbuldogov_use.key"

Если вы хотите сгенерировать ключ, не защищенный паролем, нужно выполнить команду:
./easyrsa gen-req имяклиента nopass
На сервере с OpenVPN вы можете создать неограниченное количество ключей и сертификатов для пользователей. Аналогичным образом сформируйте ключи и сертфикаты для других клиентов.
Вы можете отохвать скомпрометированные сертификаты клиентов:
cd C:\Program Files\OpenVPN\easy-rsa
EasyRSA-Start.bat
./easyrsa revoke kbuldogov
Итак, мы сгенерировали набор ключей и сертификатов для OpenVPN сервера. Теперь можно настроить и запустить службу OpenVPN.
Конфигурационный файл OpenVPN сервера в Windows
Скопируйте типовой конфигурационный файл OpenVPN сервера:
copy "C:\Program Files\OpenVPN\sample-config\server.ovpn" "C:\Program Files\OpenVPN\config-auto\server.ovpn"
Откройте файл server.ovpn в любом текстовом редакторе и внесите свои настройки. Я использую следующий конфиг для OpenVPN:
# Указываем порт, протокол и устройство
port 1194
proto udp
dev tun
# Указываем пути к сертификатам сервера
ca "C:\\Program Files\\OpenVPN\\easy-rsa\\pki\\ca.crt"
cert "C:\\Program Files\\OpenVPN\\easy-rsa\\pki\\issued\\server.crt"
key "C:\\Program Files\\OpenVPN\\easy-rsa\\pki\\private\\server.key"
dh "C:\\Program Files\\OpenVPN\\easy-rsa\\pki\\dh.pem"
# Указываем настройки IP сети, адреса из которой будет будут получать VPN клиенты
server 10.24.1.0 255.255.255.0
#если нужно разрешить клиентам подключаться под одним ключом, нужвно включить опцию duplicate-cn (не рекомендуется)
#duplicate-cn
# TLS защита
tls-auth "C:\\Program Files\\OpenVPN\\easy-rsa\\pki\\ta.key" 0
cipher AES-256-GCM
# Другая параметры
keepalive 20 60
persist-key
persist-tun
status "C:\\Program Files\\OpenVPN\\log\\status.log"
log "C:\\Program Files\\OpenVPN\\log\\openvpn.log"
verb 3
mute 20
windows-driver wintun
Сохраните файл.
OpenVPN позволяет использовать как TCP, так и UDP для подключения. В этом примере я запустил OpenVPN на 1194 UDP. Рекомендуется использовать протокол UDP, это оптимально как с точки зрения производительности, так и безопасности.
Не забудьте открыть на файерволе порты для указанного вами порта OpenVPN на клиенте и на сервере. Можно открыть порты в Windows Defender с помощью PowerShell.
Правило для сервера:
New-NetFirewallRule -DisplayName "AllowOpenVPN-In" -Direction Inbound -Protocol UDP –LocalPort 1194 -Action Allow
Правило для клиента:
New-NetFirewallRule -DisplayName "AllowOpenVPN-Out" -Direction Outbound -Protocol UDP –LocalPort 1194 -Action Allow
Теперь нужно запустить службу OpenVPN и изменить тип ее запуска на автоматический. Воспользуйтесь таким командами PowerShell, чтобы включить службу:
Set-Service OpenVPNService –startuptype automatic –passthru
Get-Service OpenVPNService| Start-Service
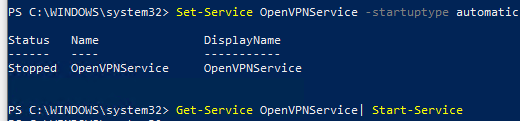
Откройте панель управления, и убедитесь, что виртуальный сетевой адаптер OpenVPN Wintun теперь активен. Если нет, смотрите лог «C:\Program Files\OpenVPN\log\server.log»
Если при запуске OpenVPN вы видите в логе ошибку:
Options error: In C:\Program Files\OpenVPN\config-auto\server.ovpn:1: Maximum option line length (256) exceeded, line starts with..
Смените в файле server.ovpn символы переноса строки на Windows CRLF (в notepad++ нужно выбрать Edit -> EOL Conversion -> Windows CR LF). Сохраните файл, перезапустите службу OpevVPNService.
Данный конфиг позволит удаленным клиентам получить доступ только к серверу, но другие компьютеры и сервисы в локальной сети сервера для них недоступны. Чтобы разрешить клиентам OpenVPN получить доступ к внутренней сети нужно:
Включить опцию IPEnableRouter в реестре (включает IP маршрутизацию в Windows, в том числе включает маршрутизацию меду сетями Hyper-V): reg add «HKLM\SYSTEM\CurrentControlSet\Services\Tcpip\Parameters» /v IPEnableRouter /t REG_DWORD /d 1 /f
Добавьте в конфгурационный файл сервера OpenVPN маршруты до внутренней IP сети:
push "route 10.24.1.0 255.255.255.0"
push "route 192.168.100.0 255.255.255.0"
Если нужно, назначьте клиенту адреса DNS серверов:
push "dhcp-option DNS 192.168.100.11"
push "dhcp-option DNS 192.168.100.12"
Если нужно завернуть все запросы клиента (в том числе Интернет трафик) на ваш OpenVPN сервер, добавьте опцию:
push "redirect-gateway def1"
Настройка OpenVPN клиента в Windows
Создайте на сервере шаблонный конфигурационный файла для клиента VPN (на базе iшаблона client.ovpn) со следующими параметрами (имя файла kbuldovov.ovpn)
client
dev tun
proto udp
remote your_vpn_server_address 1194
resolv-retry infinite
nobind
persist-key
persist-tun
ca ca.crt
cert kbuldogov.crt
key kbuldogov.key
remote-cert-tls server
tls-auth ta.key 1
cipher AES-256-GCM
connect-retry-max 25
verb 3
В директиве remote указывается публичный IP адрес или DNS имя вашего сервера OpenVPN.
Скачайте и установите клиент OpenVPN Connect для Windows (https://openvpn.net/downloads/openvpn-connect-v3-windows.msi).
Теперь на компьютер с клиентом OpenVPN нужно с сервера скопировать файлы:
- ca.crt
- kbuldogov.crt
- kbuldogov.key
- dh.pem
- ta.key
- kbuldogov.ovpn
Теперь импортируйте файл с профилем *.ovpn и попробуйте подключиться к вашему VPN серверу.
Если все настроено правильно, появится такая картинка.
Проверьте теперь лог OpenVPN на клиенте «C:\Program Files\OpenVPN Connect\agent.log»
Mon Dec 27 08:09:30 2021 proxy_auto_config_url
Mon Dec 27 08:09:31 2021 TUN SETUP
TAP ADAPTERS:
guid='{25EE4A55-BE90-45A0-88A1-8FA8FEF24C42}' index=22 name='Local Area Connection'
Open TAP device "Local Area Connection" PATH="\\.\Global\{25EE4A55-BE90-45A0-88A1-8FA8FEF24C42}.tap" SUCCEEDED
TAP-Windows Driver Version 9.24
ActionDeleteAllRoutesOnInterface iface_index=22
netsh interface ip set interface 22 metric=1
Ok.
netsh interface ip set address 22 static 10.24.1.6 255.255.255.252 gateway=10.24.1.5 store=active
IPHelper: add route 10.24.1.1/32 22 10.24.1.5 metric=-1
Клиент успешно подключится к OpenVPN серверу и получил IP адрес 10.24.1.6.
Проверьте теперь лог на сервере («C:\Program Files\OpenVPN\log\openvpn.log»). Здесь также видно, что клиент с сертификатом kbuldogov успешно подключится к вашему серверу.
2021-12-27 08:09:35 192.168.13.202:55648 [kbuldogov] Peer Connection Initiated with [AF_INET6]::ffff:192.168.13.202:55648
2021-12-27 08:09:35 kbuldogov/192.168.13.202:55648 MULTI_sva: pool returned IPv4=10.24.1.6, IPv6=(Not enabled)
2021-12-27 08:09:35 kbuldogov/192.168.13.202:55648 MULTI: Learn: 10.24.1.6 -> kbuldogov/192.168.13.202:55648
2021-12-27 08:09:35 kbuldogov/192.168.13.202:55648 MULTI: primary virtual IP for kbuldogov/192.168.13.202:55648: 10.24.1.6
Need a secure, encrypted way to access your internet? Why not turn to OpenVPN on Window Server? Setting up your first VPN could be a pain, but you’ve come to the right place!
In this tutorial, you’ll learn how to set up a free VPN and keep malicious entities out of your Windows Server.
Ready to secure your network? Well, dive right in!
Prerequisites
This tutorial will be a hands-on demonstration. If you’d like to follow along, be sure you have the following:
- A Windows Server – This tutorial uses Window Server 2019 R2.
- A client machine to test the VPN server – This demo uses Windows 10 64 bit.
- Connect to the desktop on a Windows Server using Remote Desktop (RDP) or your preferred desktop manager client – This demo uses the default RDP window client.
Installing OpenVPN on Window Server
OpenVPN works on different operating systems, but it doesn’t come with your OS installation. Kick off this tutorial by installing OpenVPN on your server.
1. Open your favorite browser and navigate to the OpenVPN download page. Download the Windows 64-bit MSI installer package to your server and run the installer.
2. Next, click Customize on the installer wizard’s initial page, as shown below. The Customize option lets you install extra items for your VPN server.
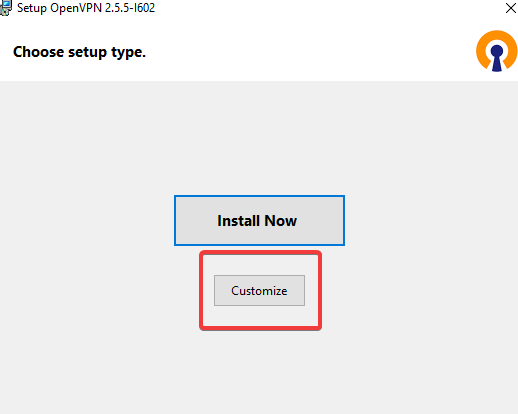
3. On the Custom Installation page, click on the OpenVPN Service drop-down menu —> Will be installed on local hard drive to install the OpenVPN Service to your system. This option also enables the OpenVPN Service at your system boot.
4. Now, scroll down, and click on the OpenSSL Utilities drop-down menu —> Will be installed on local hard drive option. This option makes OpenSSL Libraries and development headers available for the OpenVPN Service and required by the OpenVPN Service for certain cryptographic functions.
Click on Install Now to install OpenVPN on your server.
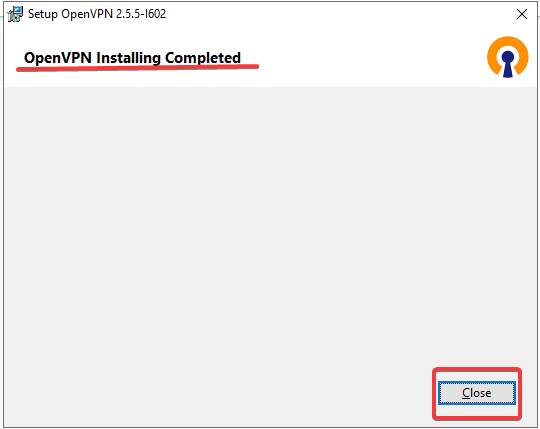
5. Finally, click on Close when the installation completes.
Generating Certificates and Keys for the Server and Clients
You now have OpenVPN installed on your server, but how will you secure your server’s connection to the client(s)? You’ll generate certificates and keys for your server and client(s).
Certificates and keys are used to provide an encrypted connection between your server and client(s). You get a unique public and private key upon generating a certificate.
1. Open your command prompt as an administrator. Some OpenVPN commands require elevated privileges to run.
2. Next, run the commands below to start the easy-rsa shell. The easy-rsa shell is used to manage certificates, keys, and configurations.
EasyRSA will be your main command-line interface for the rest of the tutorial.
cd C:\Program Files\OpenVPN\easy-rsa
EasyRSA-Start.bat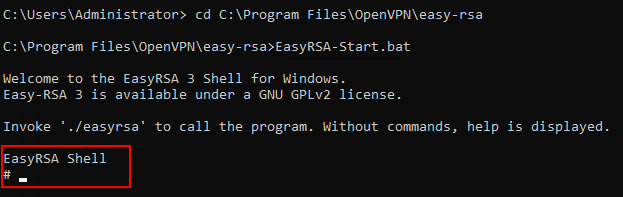
3. Run the ./easyrsa clean-all command below to clear any existing keys and configurations. This command ensures that you start with a clean configuration.
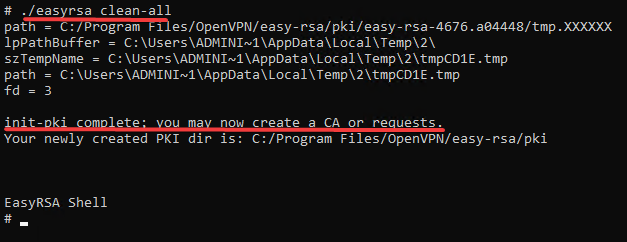
4. Now, run the ./easyrsa init-pki command to initialize the Public Key Infrastructure (PKI) and create a new directory structure for your certificates and keys.
Public Key Infrastructure (PKI) is a framework that allows you to create and manage public and private keys for your server and client(s) to use.
Type yes and press Enter to confirm that you want to destroy any existing keys and create a new PKI, as shown below.
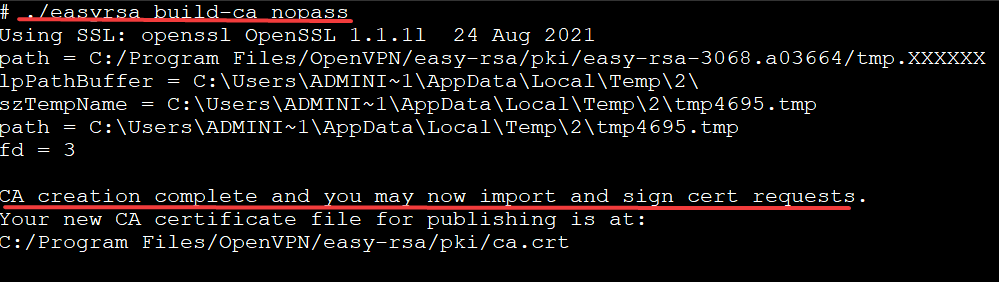
5. Run the command below to create the Certificate Authority (CA) (build-ca). The CA is responsible for issuing certificates to servers and clients, signing those certificates, revoking certificates, and so on.
The nopass option is used, so you don’t have to enter a password every time you copy the certificates and keys to your clients. ./easyrsa build-ca nopass
./easyrsa build-ca nopassWhen configuring your VPN, you will need to generate a certificate for your server and client(s) signed by the Certificate Authority (CA).
6. Run the below command to build the server certificate and key (build-server-full). This command creates the OpenVPN server certificate and key, signs it with your CA, and places the files in the keys subdirectory.
./easyrsa build-server-full server nopass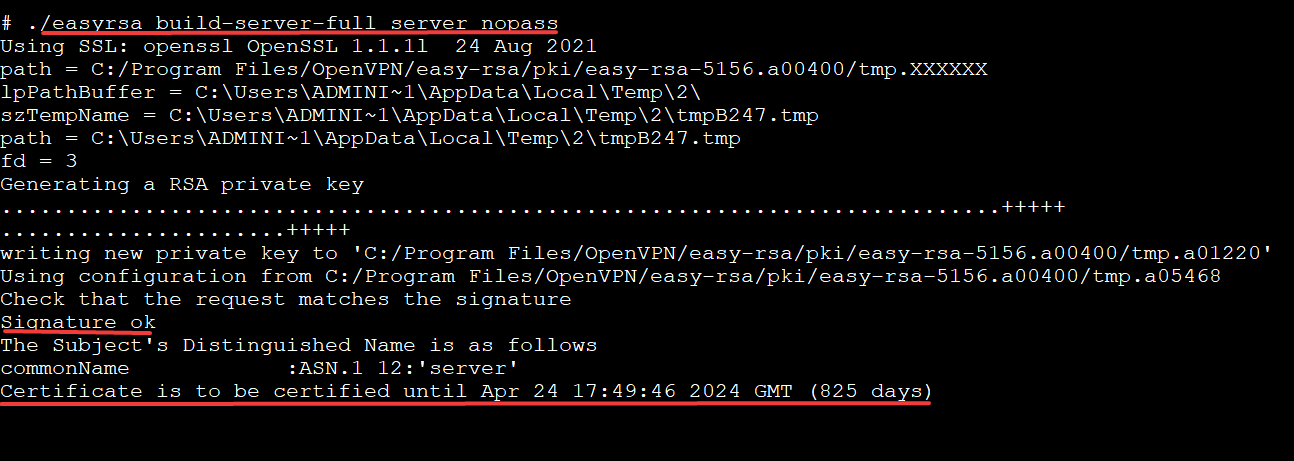
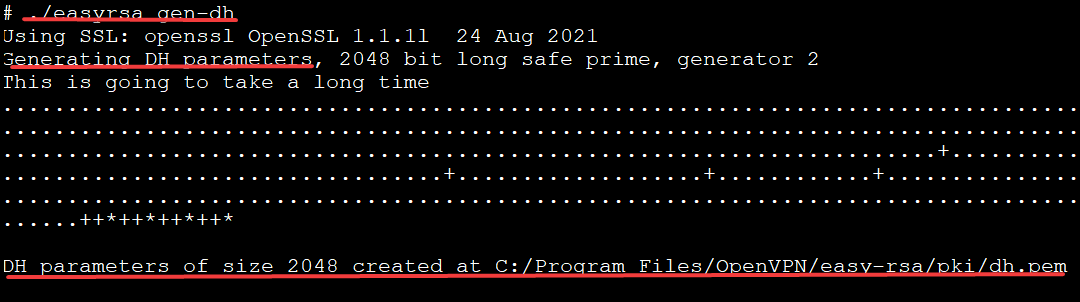
7. Next, run the following command to generate the Diffie-Hellman parameters (gen-dh), then close your easyrsa shell.
Diffie-Hellman is a protocol that allows two users to exchange cryptographic keys over an unsecured connection. Diffie-Hellman will be required to ensure that your VPN stays secure even if your encryption keys are stolen.
By now, you have all the necessary SSL/TLS key files required for your OpenVPN service listed in the table below.
| Folder Path | Content |
| C:\Program Files\OpenVPN\easy-rsa\pki | CA file, DH file, and other OpenSSL-related files like a config file. |
| C:\Program Files\OpenVPN\easy-rsa\pki\private | Include the private key files of CA, Server, and Client certificates. |
| C:\Program Files\OpenVPN\easy-rsa\pki\issued | Contains issued server and client certificates. |
8. Finally, open your File Explorer, and copy the files listed below to the C:\Program Files\OpenVPN\config-auto and C:\Program Files\OpenVPN\easy-rsa\pki\private folders.
| C:\Program Files\OpenVPN\easy-rsa\pki\ca.cert |
| C:\Program Files\OpenVPN\easy-rsa\pki\dh.pem |
| C:\Program Files\OpenVPN\easy-rsa\pki\issued\server.cert |
| C:\Program Files\OpenVPN\easy-rsa\pki\private\server.key |
Configuring your Windows Firewall Rules
Now that you have configured your OpenVPN server, your next step is to ensure that you can access the service. You will need to configure the Windows Firewall to allow OpenVPN traffic.
1. Run the netsh command below to allow traffic through your Windows firewall with the following:
- Configures (
advfirewall) Windows Firewall (firewall) by adding a rule namedOpenVPN(add rule name="OpenVPN") to the Windows Firewall. - Allows (
action=allow) all local IP addresses (localip=any) and external devices (remoteip=any) to communicate over this rule. - Tells the server which port to open (
localport=1194 remoteport=0-65535) and what type of protocol to use (protocol=UDP).
netsh advfirewall firewall add rule name="OpenVPN" dir=in localport=1194 remoteport=0-65535 protocol=UDP action=allow remoteip=any localip=any
2. Open your C:\Program Files\OpenVPN\config-auto\server.ovpn file in your preferred text editor to preview its content, as shown below.
An .ovpn file is an OpenVPN configuration file. It contains all the information that OpenVPN needs to connect to a VPN, like encryption and authentication keys. For this tutorial, you will need a .ovpn file in order to configure your connection with your VPN server.

Finally, run the following commands to restart your OpenVPN service to apply your changes.
net stop openvpnservice
net start openvpnservice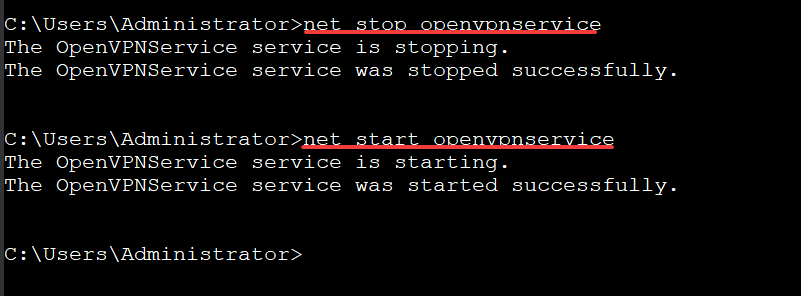
Configuring your Client
Apart from configuring your server to allow OpenVPN traffic, you’ll also need to configure your client. In OpenVPN, a client is any machine that connects to the VPN. This demo uses Windows 10 to connect to the server.
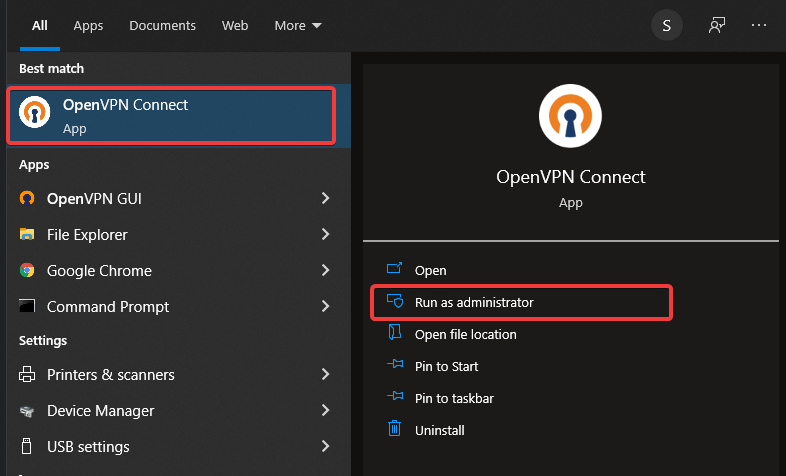
1. Install OpenVPN on your client as you did in the “Installing OpenVPN on your Server” ****section.
2. Copy the files listed below from your server to your client’s C:\Program Files\OpenVPN\config folder.
| C:\Program Files\OpenVPN\easy-rsa\pki\ca.cert |
| C:\Program Files\OpenVPN\easy-rsa\pki\issued\client.crt |
| C:\Program Files\OpenVPN\easy-rsa\pki\issued\client.key |
3. Finally, open the C:\Program Files\OpenVPN\config\client.ovpn file and populate the file with the content below. Replace YOUR_OPENVPN_IP with your actual Windows Server IP address.
# client is your account name, but you can choose your preferred name
client
# dev tun is the kind of VPN connection you need, using an ethernet connection.
dev tun
# Protocol (UDP) used this VPN connection
proto udp
# Set the IP address of your OpenVPN server.
# 1194 is the port of your OpenVPN server.
remote YOUR_OPENVPN_IP 1194
# Resolve your domain names when they are not found,
# so you don't see "domain not found" errors.
resolv-retry infinite
# Change the value from "nobind" to "sea " to disconnect your internet
# when the VPN ID is disconnected.
nobind
# Your encryption key will be saved for the next time
# you connect to the OpenVPN server.
persist-key
# your VPN connection will be saved for the next time you use it.
persist-tun
# The certificate your VPN server uses to identify itself to you (the client).
# You can download it from your VPN server.
ca ca.crt
# the name of your certificate.
cert client01.crt
# the name of your encryption key.
key client01.key
# LZO data compression will compress your blocks of data
# before sending so that the data should be smaller and faster.
comp-lzo
# The level of verbosity of your output will be set to the maximum.
# So that you will get the most amount of information from your connection.
# This feature is handy when trying to debug your connection.
verb 3
Testing your Client’s VPN Connection
Now that you have installed and configured both server and client, it is time to test whether the connection between them works properly.
On your Windows 10 client, run the OpenVPN GUI.
Right click on the OpenVPN status icon (monitor with a padlock icon) in the notification area, and choose Connect to connect the client to your VPN.
Once the client is connected, the OpenVPN status icon turns green, and you’ll get a vpn is now connected notification, as shown below.

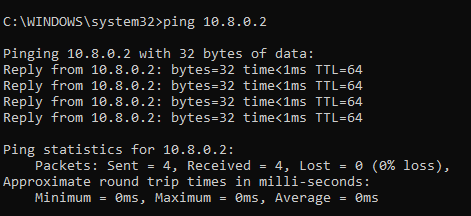
For double-checking, you can ping your VPN server using the assigned IP address (10.8.0.2).
ping [10.8.0.2](<http://10.8.0.2/>)
The output below confirms that your VPN works as intended.
Conclusion
In this tutorial, you have learned the proper steps to install OpenVPN on Windows Server. You also learned to configure the OpenVPN server and client via an OpenVPN configuration file (.ovpn). At this point, you now have a fully-functional VPN service that you can use to secure your internet connection to browse the web safely.
Now, why not extend your VPN Connectivity to Amazon AWS VPC using AWS VPC VPN Gateway service with this newfound knowledge?