
TABLE OF CONTENTS
- About OpenSSL
- Download OpenSSL
- Installing OpenSSL
- Windows Installer
- Winget Package Manager
- ZIP File
- OpenSSL Screenshot
- OpenSSL Documentation
- Checking SSL / TLS Certificate Validity with Certify One
- Compiling OpenSSL From Source
- Release Policy
- Source
- Build Script
- Compilation
- Integrating OpenSSL with Your Visual Studio Project
- Sample Project
- Additional Include Directories
- Additional Library Directories
- Additional Dependencies
- Basic Troubleshooting
- FireDaemon Software Development Services
- Privilege Escalation Mitigation
- Compatibility and Support Matrix
- License, Warranty, and Support
- Useful Links
- Acknowledgments
- Buy SSL / TLS Certificates
About OpenSSL
OpenSSL is a popular open-source, publicly available software library that provides a robust, full-featured set of cryptographic functions and tools to secure communications over computer networks. When we build and ship FireDaemon Certify One, FireDaemon Fusion, and FireDaemon Lozenge we try to ensure they contain the most recent version of OpenSSL. We thought it would be useful to make our OpenSSL Binary Distribution available to you to download and use free of charge. The key advantages of using our OpenSSL Binary Distribution for Microsoft Windows over others that are available are:
- No need to deploy various software tools to attempt to compile the source from scratch. Our build script is available if you do want to compile OpenSSL yourself
- No external dependencies. Installing or distributing the Visual C++ Redistributable Runtime (MSVC) is unnecessary. There is an implicit dependency on the Windows Universal C Runtime (UCRT), which is included by default in all modern versions of Microsoft Windows
- Packaged for simple deployment and use case scenarios, including standalone, embeddable, deployable, or portable
- Digitally signed with our Extended Validation (EV) code signing certificate to avoid Windows SmartScreen warnings and increase trust by Sectigo’s authentication and verification procedures on us: FireDaemon Technologies Limited and validatable binary integrity to meet your compliance requirements.
Download OpenSSL
Below, you will find pre-compiled OpenSSL executables (EXE) and libraries (DLL) for Microsoft Windows Operating Systems in the form of installer and ZIP files. OpenSSL can be used standalone or integrated into any Windows application. The installers, EXEs and DLLs are digitally signed with our Extended Validation (EV) code signing certificate. We do not have an EAR CCL ECCN for our Binary Distributions. This is intentional. You must seek independent legal advice before using/integrating/exporting our Binary Distributions in your products if you believe you are subject to export controls.
|
Download OpenSSL Binary Distributions for Microsoft Windows |
|
|
OpenSSL 3.5.0 LTS Windows Installer x64 April 2025 SHA2-256 99F778ADA6DDE8499C62299323CB868D7B35C571CF82F1165C36009A2FD456DB Git commit openssl-3.5.0-0-g636dfadc70 |
OpenSSL 3.5.0 LTS ZIP x86+x64+ARM64 April 2025 SHA2-256 9AC6B98D947E558E6ADBBC9CC9EAF504B3540BAB90767CF71E3582A14F75AFBD Git commit openssl-3.5.0-0-g636dfadc70 |
|
OpenSSL 3.0.16 LTS ZIP x86+x64 February 2025 SHA2-256 EAEE11E6ED1DE4E5B6A95E5837AC66ABE842B5E9F6477C8CECBE417FE4704508 Git commit openssl-3.0.16-0-gfa1e5dfb14 |
OpenSSL 1.1.1w LTS ZIP x86+x64 September 2023 SHA2-256 1870B15BF6749E65FFBBADF52CDFF3EE0E9F02943550BF4395574BB432AF3EB8 Git commit OpenSSL_1_1_1w-0-ge04bd3433f |
|
To calculate/verify the SHA2-256 checksums above, please use FireDaemon Lozenge! OpenSSL maintains a list of 3rd-party maintained binary distributions of OpenSSL. Please review our Release Policy before downloading and using this distribution. OpenSSL 1.1.1y or later is only available to OpenSSL customers who have a Premium Support Contract. |
Installing OpenSSL
Windows Installer
You can download the Windows installers in the «Download OpenSSL» section above. Installation is straightforward. OpenSSL is installed into the following file system locations, which is specified during the build and follow OpenSSL’s conventions.
%PROGRAMFILES%\FireDaemon OpenSSL 3
%PROGRAMFILES%\Common Files\FireDaemon SSL 3
You can silently install OpenSSL with the following command in an elevated command prompt (noting APPDIR and ADJUSTSYSTEMPATHENV are optional):
FireDaemon-OpenSSL-x64-3.5.0.exe /exenoui /exelog fdopenssl3.log /qn /norestart REBOOT=ReallySuppress APPDIR="C:\Program Files\FireDaemon OpenSSL 3" ADJUSTSYSTEMPATHENV=yes
You can silently uninstall OpenSSL with the following commands:
:: To uninstall at an elevated command prompt, first verify the product GUID
wmic product where name="FireDaemon OpenSSL 3" get IdentifyingNumber

:: Then uninstall silently using msiexec
msiexec /x {34DB0C5E-1E16-46D4-8125-F12F723FD49C} /quiet /noreboot

:: You can also use the original FireDaemon OpenSSL installer
FireDaemon-OpenSSL-x64-3.5.0.exe /x // /quiet

:: Or uninstall using PowerShell
$app = Get-WmiObject Win32_Product | where { $_.name -eq "FireDaemon OpenSSL 3" }
$app.Uninstall()
Winget Package Manager
Instead of downloading and installing the Windows Installer, you can use the Microsoft package manager called winget. Winget is built into Windows 10, 11, and Server 2025 or can be installed manually. To install FireDaemon OpenSSL, open a command prompt on your computer, then:
:: Search for FireDaemon OpenSSL
winget search FireDaemon.OpenSSL

:: Show the FireDaemon OpenSSL package contents
winget show FireDaemon.OpenSSL

:: Install FireDaemon OpenSSL interactively
winget install FireDaemon.OpenSSL --interactive

:: Install FireDaemon OpenSSL silently (default)
winget install FireDaemon.OpenSSL --silent

:: Show installed packages
winget list FireDaemon

:: Uninstall FireDaemon OpenSSL
winget uninstall FireDaemon.OpenSSL
ZIP File
Instead of using the installer or package manager, you can download one of the ZIP files in the «Download OpenSSL» section above.
- Follow the instructions below if you have downloaded one of the ZIP files above and want to deploy OpenSSL manually (e.g. on the local hard disk or a USB drive for a portable installation)
- Download the appropriate FireDaemon OpenSSL Binary Distribution ZIP file via the links above.
- Unpack the contents of the folder found in the ZIP file to a temporary directory (e.g. C:\Temp)
- Copy the contents (i.e. the files and directories contained within) of the x64 folder or x86 folder to your target directory (e.g. C:\OpenSSL)
- Copy the ssl folder and contents to the target directory (e.g. C:\OpenSSL).
The commands to copy the files correctly from the location where you unpacked the ZIP file (assuming C:\Temp) are as follows:
: For OpenSSL 1.1.1 LTS
cd C:\Temp\openssl-1.1

: For OpenSSL 3.0 LTS
cd C:\Temp\openssl-3.0

: For OpenSSL 3.5
cd C:\Temp\openssl-3

: Copy the binaries specific to your platform
: Copy 64-bit binaries
robocopy x64 C:\OpenSSL /E

: Or, copy 32-bit binaries. Don't copy both!
robocopy x86 C:\OpenSSL /E

: Copy the ssl folder
robocopy ssl C:\OpenSSL\ssl /E
Your directory structure should look as follows:
C:\OpenSSL>dir /b
bin
include
lib
ssl
To use OpenSSL, open an elevated Command Prompt (adjusting the path in OPENSSL_HOME to suit your manual installation):
: You can set OPENSSL_HOME=%~dp0 in a batch script for portable installs
set OPENSSL_HOME=C:\OpenSSL
set OPENSSL_CONF=%OPENSSL_HOME%\ssl\openssl.cnf
set PATH=%OPENSSL_HOME%\bin;%PATH%
cd /d %OPENSSL_HOME%
openssl version -a
To create a certificate signing request and private key using the same environment variables as above:
openssl genrsa -out server.key 4096
openssl req -new -key server.key -out server.csr -sha256
openssl x509 -req -days 365 -in server.csr -signkey server.key -out server.crt
OpenSSL Screenshot
Below is a screenshot showing the certificate signing request in an elevated PowerShell:

OpenSSL Documentation
Please refer to OpenSSL’s documentation.
Checking SSL / TLS Certificate Validity with Certify One
FireDaemon Certify One allows you to audit, check, inspect, and validate SSL / TLS certificates and certificate chains. Fortify also has a browser-based TLS Encryption Check Tool available.
Compiling OpenSSL From Source
Release Policy
Whenever we release an updated version of FireDaemon Fusion, FireDaemon Certify One, or OpenSSL gets updated with security fixes, we will provide the latest tagged version of the OpenSSL stable branch. The currently deployed OpenSSL library commit versions are listed underneath the download links above. Commit is described viz:
git describe --always --tag --long --first-parent --dirty
Source
We directly pull from OpenSSL’s official GitHub repository.
Build Script
You can use our build script to create the binary distributions. The build script has the following dependencies:
- Visual Studio Community Edition
- Git for Windows
- Strawberry Perl.
Compilation
The actual command line to build OpenSSL is as follows (where %toolset% is VC-WIN32-HYBRIDCRT and VC-WIN64A-HYBRIDCRT, respectively):
perl ..\Configure %toolset% no-ssl3 no-zlib no-comp no-autoload-config no-makedepend --prefix="%installdir%" --openssldir="%commoninstalldir%"
Integrating OpenSSL with Your Visual Studio Project
You must configure your project’s properties to use the headers and libraries in FireDaemon OpenSSL in your Visual Studio project.
Sample Project
We have included a sample Visual Studio Project in the OpenSSL 3 ZIP file. The sample project can be found in the «projects» folder.
Additional Include Directories
Prepend «C:\Program Files\FireDaemon Open SSL 3\include»; to Property Pages -> C/C++ -> General -> Additional Include Directories in your project per the screenshot below adjusting the prepended path to suit your installation. In our case, we use a pre-defined User Macro called OpenSslIncludeDir. You can also specify this path on the command line:
/I"C:\Program Files\FireDaemon OpenSSL 3\include"

Additional Library Directories
Prepend «C:\Program Files\FireDaemon Open SSL 3\lib»; to Property Pages -> Linker -> General -> Additional Library Directories in your project per the screenshot below adjusting the prepended path to suit your installation. In our case, we use a pre-defined User Macro called OpenSslLibraryDir. You can also specify this path on the command line:
/LIBPATH:"C:\Program Files\FireDaemon OpenSSL 3\lib"

Additional Dependencies
Prepend libcrypto.lib;libssl.lib; to Property Pages -> Linker -> Input -> Additional Dependencies in your project per the screenshot below. You can also specify this on the command line:
/DYNAMICBASE "libcrypto.lib" "libssl.lib"

Basic Troubleshooting
If you run into issues compiling or linking FireDaemon OpenSSL, please review the tips below to help you debug your project:
- Ensure you have set up your Visual Studio project correctly per the previous section
- When compiling OpenSSL yourself, ensure you choose the correct target platform. For example, ./configure <toolset> where <toolset> can be triplets including VC-WIN64A and Cygwin-x86_64. The complete list of toolsets can be found by typing perl ..\configure LIST
- Verify that the versions of libssl.lib and libcrypto.lib are correct by using dumpbin.exe which is available in the Windows SDK. dumpbin /ALL libssl.lib should refer to libssl-3.dll. dumpbin /ALL libcrypto.lib should refer to libcrypto-3.dll
- Use /VERBOSE when linking to verify the libraries found and used by the linker
- Use Dependencies to verify the dependencies of your built executable
- Ensure you build, rebuild, or clean your project to avoid stale dependencies, outdated object files, and other artifacts and detritus that may have accumulated in your project
- Double-check, then triple-check your compiler and linker command line to ensure your project is not referring to folders or directories that may contain other versions of OpenSSL libs and DLLs
- Use pre-defined User Macros in your project to ensure you explicitly reference the correct OpenSSL include, lib, and bin directories (e.g. OpenSslIncludeDir, OpenSslLibDir, OpenSslBinDir).
FireDaemon Software Development Services
We offer paid commercial software development services to assist you in building and integrating OpenSSL into your project or product. Please contact us for rates and availability.
Privilege Escalation Mitigation
When building OpenSSL, the build scripts bake the default location of the library (i.e. the installation directory) and the SSL configuration into the final product. By default, OpenSSL automatically loads the SSL configuration file from the default file system location. This leads to an easily exploitable privilege escalation scenario documented in CVE-2019-12572. Our build of OpenSSL mitigates this flaw using the following preventative measures:
- The target directories we have chosen are Windows’ default system program files directories, assuming a 64-bit architecture with a shared configuration file directory common to both x64 and x86:
- x64: C:\Program Files\FireDaemon OpenSSL 3, C:\Program Files\Common Files\FireDaemon SSL 3
- x86: C:\Program Files (x86)\FireDaemon OpenSSL 3, C:\Program Files\Common Files\FireDaemon SSL 3
- To mitigate security issues even on non-default installations, we built the library so that it doesn’t automatically load the SSL configuration. Hence, when using the OpenSSL tools or the DLLs in your products, you have to explicitly load the SSL configuration.
- All FireDaemon software products that utilise OpenSSL initialise the OpenSSL library at runtime using a flag that prevents the loading of the default configuration.
Compatibility and Support Matrix
The table below provides a compatibility and support matrix, mapping compatible Microsoft Windows operating system versions to specific FireDaemon OpenSSL software versions.
| OpenSSL Versions |
OpenSSL 3.5, 3.0 LTS, & 1.1.1 LTS |
|
| Windows Operating System Version | 32-bit (x86) | 64-bit (x64) |
| Windows XP (1) | ||
| Windows Vista (1) | ||
| Windows 7 (1) | ||
| Windows 8 (1) | ||
| Windows 8.1 (1) | ||
| Windows 10 | ||
| Windows 11 | ||
| Server 2008 (2) | ||
| Server 2008 R2 (2) | ||
| Server 2012 | ||
| Server 2012 R2 | ||
| Server 2016 | ||
| Server 2019 | ||
| Server 2022 | ||
| Server 2025 |
(1) Windows Desktop Operating System is End of Support
(2) Windows Server Operating System is End of Support
| Compatible / Supported | The software is designed to be installed on the Microsoft Windows operating system. We actively support the operating system version plus software version combination, provided that the 32-bit (x86) version is deployed on a 32-bit (x86) operating system and the 64-bit (x64) version is deployed on a 64-bit (x64) operating system. Please see the License, Warranty, and Support section below. |
| Compatible / Unsupported | The software product can be installed on the Microsoft Windows operating system version. We do not support the operating system version plus software version combination. This is typically due to the operating system version reaching End of Support. |
| Incompatible / Unsupported | The software product should not or does not install on the Microsoft Windows operating system version or work. We do not support the operating system version plus software version combination. |
License, Warranty, and Support
Our OpenSSL Binary Distribution is free to use and redistribute. Product use, redistribution, and warranty are governed by the OpenSSL License. If you have questions regarding OpenSSL, wish to report bugs, or require implementation guidance, please consider joining the OpenSSL Community.
Useful Links
- OpenSSL History
- OpenSSL Events
- OpenSSL Corporation Mission
- OpenSSL Corporation 2024 Annual Report
- OpenSSL Library Release Lifecycle and Roadmap
- OpenSSL Sponsorship
- OpenSSL Webinars
Acknowledgments
This product includes:
- Software developed by the OpenSSL Project for use in the OpenSSL Library
- Cryptographic software written by Eric Young
- Software written by Tim Hudson.
Buy SSL / TLS Certificates
- Home
- Blog
-
Step-By-Step Procedure to Install OpenSSL on a Windows Machine
/
/

OpenSSL is an open-source cryptographic library that provides a robust toolkit for securing communications and creating, managing, and verifying digital certificates. It is widely used for implementing Secure Sockets Layer (SSL) and Transport Layer Security (TLS) protocols to encrypt connections between clients and servers.
Some of the common uses of OpenSSL include setting up private certificate authorities, generating public/private key pairs, creating certificate signing requests, exporting private key from certificates, converting between certificate formats like PEM and PFX, validating SSL connections, and more.
In this comprehensive guide, we will cover how to download, install, and configure OpenSSL on Windows machines. While Linux distributions come with OpenSSL pre-installed, Windows users need to manually install OpenSSL by getting the binaries from trusted third-party sources.
We will go over the prerequisites, walk through the installation steps, explain how to set up environment variables, and verify the installation to ensure OpenSSL is ready to use on your Windows PC or server. Whether you are a developer, IT admin, or security professional, this step-by-step procedure will help you get OpenSSL running smoothly on your Windows systems.
What is OpenSSL and Why Should We Install OpenSSL on a Windows PC?
OpenSSL is an open-source cryptographic library that provides a robust toolkit for securing communications and applications. Though primarily used on Linux, installing OpenSSL on Windows unlocks powerful capabilities. OpenSSL is mostly for system administrators, developers, and Windows users who wants to implement SSL/TLS connections in their apps and scripts. It enables generating X.509 certificates and certificate signing requests (CSRs) for securing websites and internal infrastructure. Developers can call OpenSSL crypto functions to encrypt data and implement PKI authentication in their apps.
System administrators can manage certificates, test secure connections, and integrate OpenSSL into automation scripts. OpenSSL also helps troubleshoot connection issues by analyzing network traffic and certificates.
There are a lot of things you can do using OpenSSL. Only a few of them are listed here:
-
You can create your own Certificate Authority and issue certificates on your network.
-
Convert digital certificates from one to another format.
-
Export or Import private keys from the certificates.
-
Validate the HTTPS connections to the destination website.
-
Verify the certificate of the destination website.
-
Run benchmark tests of your server and remote website.
-
Extract information like issuer, subject, issued and expiring dates, and fingerprint from certificates.
-
Create CSR.
-
Decode CSR and Certificates to verify contents.
You can enjoy the features of OpenSSL if you have installed it on your Windows machine. Before we begin the procedure to install OpenSSL on the Windows platform, let’s see the prerequisites.
Download OpenSSL Installer for Windows
Before we jump into the installation of OpenSSL on a Windows PC, let’s cover a few things about the Linux package. As we said in the introduction, OpenSSL will come as part of default installation packages in all the popular Linux distributions, even if you need a specific version of OpenSSL for your Linux machine, you can download the source code of OpenSSL on from its official website alternatively from here and compel it on Linux.
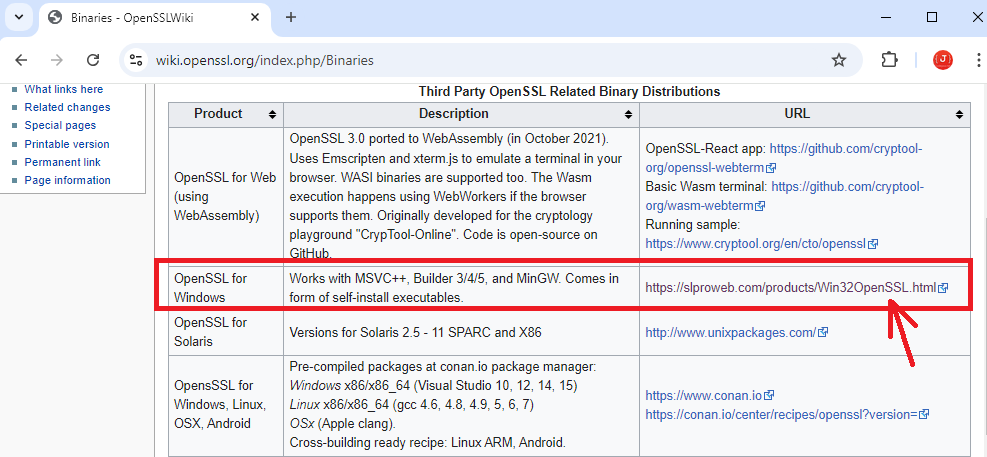
Well, If you are looking to download the OpenSSL package for your Windows machine from its official website, you can’t. It’s because OpenSSL doesn’t release official OpenSSL installers for Windows. You should depend on a few third-party distributors who distribute OpenSSL installer files for Windows platforms. OpenSSL has published the list of all trusted third-party distributors on its Wiki page. Please download and install only from these listed third-party sites.
Disclaimer Message from OpenSSL: The listing of these third-party products does not imply any endorsement by the OpenSSL project, and these organizations are not affiliated in any way with OpenSSL other than by reference to their independent websites here. In particular, any donations or payments to any of these organizations will not be known to, seen by, or in any way benefit the OpenSSL project.
– OpenSSL
Note: OpenSSL says none of these vendors are partnered with OpenSSL, so issues with these installers should be directly communicated with the distributors. OpenSSL doesn’t hold any responsibilities for these installers. Use these OpenSSL-derived products at your own risk; these products have not been evaluated or tested by the OpenSSL project.
List of Third-Party OpenSSL Distributions:
| Product | Description | URL |
|---|---|---|
| OpenSSL for Web (using WebAssembly) | OpenSSL 3.0 ported to WebAssembly (in October 2021). Uses Emscripten and xterm.js to emulate a terminal in your browser. WASI binaries are supported too. The Wasm execution happens using WebWorkers if the browser supports them. Originally developed for the cryptology playground “CrypTool-Online”. Code is open-source on GitHub. | OpenSSL-React app: https://github.com/cryptool-org/openssl-webtermBasic Wasm terminal: https://github.com/cryptool-org/wasm-webtermRunning sample: https://www.cryptool.org/en/cto/openssl |
| OpenSSL for Windows | Works with MSVC++, Builder 3/4/5, and MinGW. Comes in form of self-install executables. | https://slproweb.com/products/Win32OpenSSL.html |
| OpenSSL for Windows | Pre-compiled Win32/64 libraries without external dependencies to the Microsoft Visual Studio Runtime DLLs, except for the system provided msvcrt.dll. | https://indy.fulgan.com/SSL/ |
| OpenSSL for Windows | Reproducible builds with latest MinGW-w64, 64/32-bit, static/dynamic libs and executable. | https://github.com/curl/curl-for-win |
| OpenSSL for Solaris | Versions for Solaris 2.5 – 11 SPARC and X86 | http://www.unixpackages.com/ |
| OpensSSL for Windows, Linux, OSX, Android | Pre-compiled packages at conan.io package manager:Windows x86/x86_64 (Visual Studio 10, 12, 14, 15)Linux x86/x86_64 (gcc 4.6, 4.8, 4.9, 5, 6, 7)OSx (Apple clang).Cross-building ready recipe: Linux ARM, Android. | https://www.conan.io https://conan.io/center/openssl |
| OpenSSL for Windows | Pre-compiled Win32/64 1.0.2, 1.1.0, 1.1.1 and 3.0 libraries without external dependencies, primarily built for François Piette’s Internet Component Suite (ICS) for Embarcadero (Borland) Delphi and C++ development tools, but may be used for any Windows applications. The OpenSSL DLLs and EXE files are digitally code signed ‘Open Source Developer, François PIETTE’, so applications can self verify them for corruption. | http://wiki.overbyte.eu/wiki/index.php/ICS_Download |
| OpenSSL for Windows | OpenSSL 3.1, 3.0, and 1.1.1 pre-compiled for Microsoft Windows with no external dependencies. The binary distributions can be used standalone or integrated into any Windows application. Installer, EXEs and DLLs are digitally signed with ‘FireDaemon Technologies Limited’ Extended Validation (EV) code signing certificate. | https://www.firedaemon.com/get-openssl |
| OpenSSL for NonStop | Pre-compiled NonStop ia64/x86 1.0.2, 1.1.1 executables and libraries for the HPE NonStop Operating Systems. Threaded versions are included. The SPT version depends on FLOSS, otherwise there are no other dependencies. 32-bit versions are available. The builds are done by the ITUGLIB Technical Committee as part of Connect. | https://ituglib.connect-community.org/apps/Ituglib/SrchOpenSrcLib.xhtml |
How To Install OpenSSL On The Windows Platform?
The installation procedure is very simple and straightforward. Since OpenSSL does not provide official Windows installers, you need to download OpenSSL from trusted third-party sources listed on the OpenSSL Wiki.
We used Windows 11 64-bit and OpenSSL v 3.1.3 in this tutorial post.
Step 1. Download OpenSSL Installer
Visit any of the above sites and download the appropriate OpenSSL installer for your Windows version (32-bit or 64-bit). Make sure to pick the correct installer package for your machine.
Step 2. Run the OpenSSL Installer
Once downloaded, run the OpenSSL installer (.exe file) by double-clicking on it.
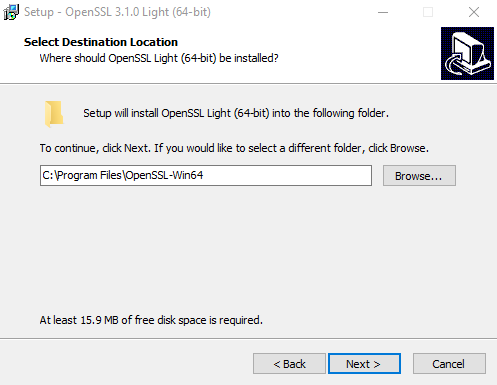
Accept the license agreement and choose the installation directory. The default is C:\Program Files\OpenSSL-Win64 but you can customize it.
The installer will copy all the required DLLs, and libraries, including files and executables. The installation typically finishes within a minute.
Step 3. Installation in progress…….
Step 4. Finish OpenSSL Installation
Once the installation completes, the setup wizard will prompt you to finish the installation. Click Finish to complete the OpenSSL installation process.
Step 5. Set Environment Variable
If you just want to set the environment varibles only for a login session, then run these commands.

>set OPENSSL_CONF=C:\Program Files\OpenSSL-Win64\bin\openssl.cfg
>set Path= C:\Program Files\OpenSSL-Win64\bin
If you want to set the env variable for permanently, then add OPENSSL_CONF and Path environment variable on System Properties.
Open Run using ‘Windows’ + ‘r’ then type ‘sysdm.cpl‘. Go to Advanced > Environment Variable.
Set OPENSSL_CONF and Path variables.
Step 6. Verify the Installation
To verify that OpenSSL is installed correctly and added to PATH, open a new command prompt and run:
openssl versionThis will print the installed OpenSSL version and confirm the installation was successful.
You can also check all available commands by running:
openssl helpThis completes the installation of OpenSSL on Windows. You will see openssl.ext file in C:\Program Files\OpenSSL-Win64\bin directory.
Troubleshooting OpenSSL Issues
The real problem is not in installing OpenSSL on your Windows computer. The real problem encountered after the installation is when you start using OpenSSL. Many people reported that they were unable to run OpenSSL commands on their computers. This could be due to one of these reasons:
-
Incorrect environment variables – OpenSSL requires certain env vars like OPENSSL_CONF to be set properly. Not configuring these variables correctly can prevent things from working.
-
OpenSSL path not added – The OpenSSL install location needs to be added to the PATH env variable. Failing to do so will make the openssl command unrecognized.
-
Configuration issues – OpenSSL depends on its config file openssl.cnf. If this file is missing or corrupted, strange errors can occur.
-
Old OpenSSL version – OpenSSL releases new versions periodically with security fixes and improvements. Using an outdated OpenSSL can expose vulnerabilities. Upgrade to a newer version when possible.
-
Wrong architecture – Getting 32-bit and 64-bit versions mixed up can lead to errors. Make sure to install the version that matches your Windows architecture.
-
Missing DLL files – OpenSSL relies on certain DLL files like libeay32.dll and ssleay32.dll. If these files are missing or not in the system path, OpenSSL commands will fail.
The first thing you should do is to download the correct installer file and reinstall the OpenSSL. This solves problems like missing DLL and wrong architecture. Generally, version-related issues were seen least oftentimes. You can try fixing version-related issues by reinstalling a different version.
If your problem still persists, then the reason could either be with environment variables or OpenSSL configuration files. Let’s try to troubleshoot.
You should start troubleshooting by running openssl version command. If you get any error, ensure you configured OPENSSL_CONF and Path environment variable as per step 5. We should tell you about the two prominent configuration files openssl.cfg and openssl.cnf. People often get confused with these files. Just pay attention to the extensions .cfg and .cnf. You should set the environment variable OPENSSL_CONF to openssl.cfg file.
Let’s understand openssl.cfg and openssl.cnf configuration files in OpenSSL.
-
openssl.cfg – This is the default configuration file that comes with OpenSSL. It contains default settings for OpenSSL when no other config file is specified. The openssl.cfg file is located in the apps subfolder of the OpenSSL install directory.
-
openssl.cnf – This is the recommended main configuration file for OpenSSL. It contains sections for settings like certificate authority locations, certificate policies, default algorithms and protocols etc. The openssl.cnf file allows extensive customization of OpenSSL behavior.
It may sound similar. Let’s see the difference between to know more about these two files.
The main differences between openssl.cfg and openssl.cnf are:
-
openssl.cfg contains minimal default settings just to get OpenSSL working out of the box. openssl.cnf has extensive options to control OpenSSL behavior.
-
openssl.cfg is automatically loaded if no other config is specified. openssl.cnf must be explicitly specified using the -config option.
-
openssl.cfg is limited and intended for initial testing. openssl.cnf is meant for production use and customization.
-
openssl.cfg sets insecure default settings like using MD5 hashes. openssl.cnf has more conservative secure defaults.
-
Anything set in openssl.cnf will override the defaults in openssl.cfg. openssl.cnf is treated as the main config.
In Windows, openssl.cfg file is located at C:\Program Files\OpenSSL-Win64\bin directory. The openssl.cnf file is located at two locations: C:\Program Files\Common Files\SSL and C:\Program Files\OpenSSL-Win64\bin\cnf.
If you get an error messages “Can’t open /usr/lib/ssl/openssl.cnf for reading, No such file or directory” and “cannot access ‘/etc/ssl/openssl.cnf’: No such file or directory“. Make sure you have both files in their path and that environment variables are set.
If in case your openssl.cnf file is missing or unable to see, you can download openssl.cnf file from MIT (Massachusetts Institute of Technology). MIT provides a generic configuration file that you can use. You can download the file to these directories to fix the errors.
-
C:\Program Files\Common Files\SSL\
-
C:\Program Files\OpenSSL-Win64\bin\cnf\
If you set all these things, you are not going to see any issues in OpenSSL.
Bottom Line
Installing OpenSSL on Windows provides access to a robust cryptographic toolkit for secure communication and certificate management. This step-by-step guide covered downloading OpenSSL installers from the trusted third-party distributors, installing it on a Windows machine, setting up environment variables, and verifying the installation.
With OpenSSL added to your Windows desktop or server, you can now generate public/private key pairs, create and manage X.509 certificates, test SSL/TLS connections, implement encryption in your apps, and much more.
We hope this step-by-step procedure helps understand everything about the instillation of OpenSSL on a Windows machine. Thanks for reading this post. Please share this post and help secure the digital world. Visit our website, thesecmaster.com, and our social media page on Facebook, LinkedIn, Twitter, Telegram, Tumblr, Medium, and Instagram and subscribe to receive updates like this.
You may also like these articles:
Arun KL
Arun KL is a cybersecurity professional with 15+ years of experience in IT infrastructure, cloud security, vulnerability management, Penetration Testing, security operations, and incident response. He is adept at designing and implementing robust security solutions to safeguard systems and data. Arun holds multiple industry certifications including CCNA, CCNA Security, RHCE, CEH, and AWS Security.
- Details
- Written by
- Last Updated on 21 October 2024 | Print Email
Are you stuck in setting up the OpenSSL library on a Windows operating system? What is the right and official way to install OpenSSL? Are you wondering why it is so difficult? You’ve come to the right place! In this article, I will show you an easy way to install OpenSSL on Windows.
OpenSSL is an open-source cryptographic toolkit widely used to implement secure communication and encryption based on Transport Layer Security (TLS) and Secure Sockets Layer (SSL). You can use it to generate and install SSL certificates for web servers, create private keys, verify certificates, and perform more cryptographic operations.
Follow the steps below to install OpenSSL on your Windows OS.
1. Download Windows Installer for OpenSSL
If you visit the official OpenSSL website and OpenSSL library, you’ll notice that it seemingly provides only the source code and you would need to build the binaries from the source! Of course, you just want to use the tool right away and might be hesitant of going through the complexities of building the code, right? There should be an easier way.
No worries. I’ll save you time by pointing out this OpenSSL binaries download page from third-party distributions:
As you can see, there are several binary distribution (installers) of OpenSSL, but I recommend downloading the second one on the list (OpenSSL for Windows). So click this link to go to the download page, as shown below:
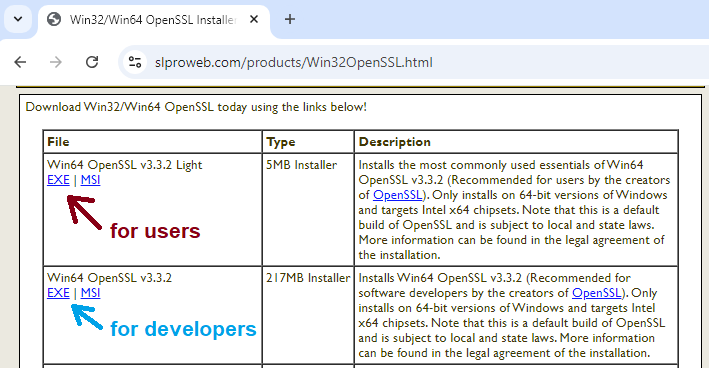
This is an OpenSSL distribution provided by Shining Light Productions. And there are 2 types of installers for the 64-bit Windows operating system:
- Win64 OpenSSL v3.3.2 Light: this installer is recommended for users.
- Win64 OpenSSL v3.3.2: this installer is recommended for software developers.
If you only need the essential features of the OpenSSL library, download the Light version (5MB). However, if you want to use advanced features, download the full installer (217MB). Since I am just an end user of OpenSSL, I clicked on the EXE link to download the Win64 OpenSSL Light installer.
2. Set up OpenSSL on Windows
Double-click the downloaded EXE file to launch the installer. Click Install anyway if you see the warning message ‘The app you’re trying to install isn’t a Microsoft-verified app’. The setup program for OpenSSL 3.3.2 Light (64-bit) will appear as follows:
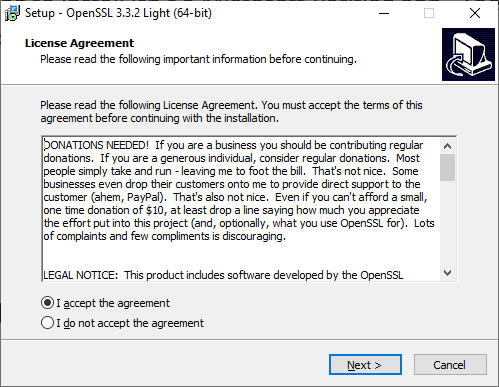
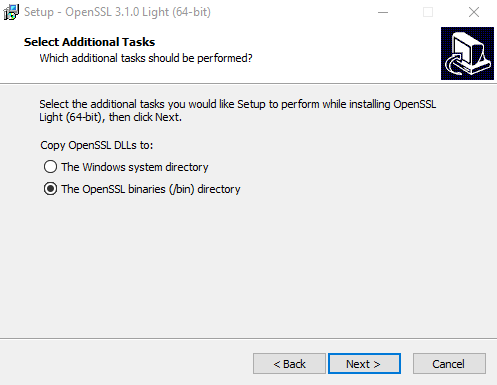
Check “I accept the agreement” and click Next 3 times to proceed with the installation using the default settings, which will install OpenSSL binaries into the C:\Program Files\OpenSSL-Win64 directory and copy the OpenSSL DLLs to the Windows system directory. Then, click the Finish button to close the setup wizard. It’s quick and easy, isn’t it?
3. Verify the OpenSSL Installation
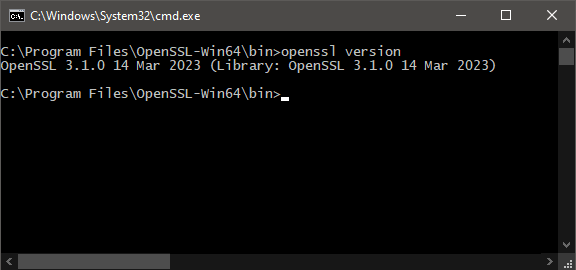
Press the Windows Start button, and type openssl. Click the result that shows “Win64 OpenSSL Command Prompt”:
It will open up a new command prompt window that is customized for using the OpenSSL library. When you see the following screen, it means you have successfully installed OpenSSL on your Windows operating system:
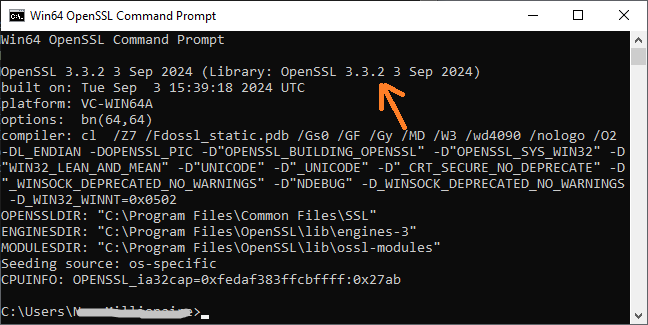
You can also type openssl -version to verify, and it will print the full version of the library in the command prompt. This means that openssl is the command-line tool used to perform cryptographic operations.
NOTES: If you want to use the openssl command-line tool anywhere in the Windows Command prompt, watch the following video to learn how:
About the Author:
Nam Ha Minh is certified Java programmer (SCJP and SCWCD). He began programming with Java back in the days of Java 1.4 and has been passionate about it ever since. You can connect with him on Facebook and watch his Java videos on YouTube.
Add comment
Tutorial: OpenSSL provision on Windows 10 and Windows 11
OpenSSL was previously reserved for Linux operating systems or had to be compiled from the source code itself under Mac and Windows. With Win32/Win64 OpenSSL, the open source software library can also be run on 32-bit and 64-bit Windows OS (x86/i386) and can be integrated on Windows machines via installer.
OpenSSL is widely used and found by encryption in numerous application and secure connections, as well as for SSL/TLS connections HTTPS, including cryptography in SSH, OpenVPN and DNSSEC.
The Win32/Win64 OpenSSL installation project from Shining Light Productions (slproweb.com) carrying the ease of deployment of OpenSSL for Microsoft Windows. The installation consists of downloading and unpacking the binaries, which eliminates the need to compile source code.
Installation
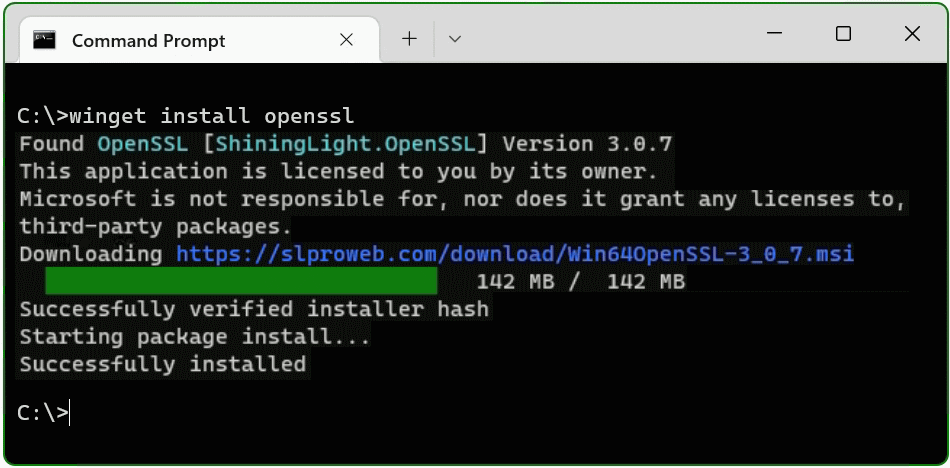
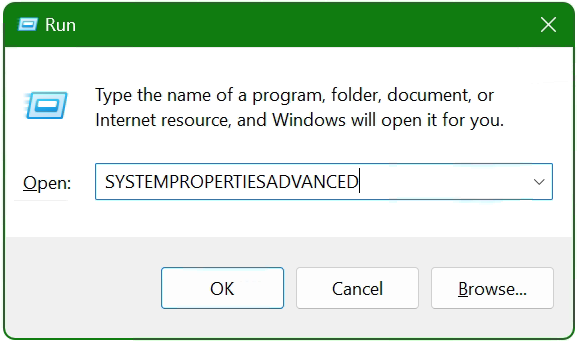
This tutorial shows two methods to deploy OpenSSL on Windows 10 and Windows 11. The simple method right at the beginning, by running Windows Package Manager with hit the Windows-logo+R keys and enter cmd in the Run box then click OK, or press and hit cmd then click the command prompt icon.
Click Start
and hit cmd

In the now opened command prompt ran the following command, if you are not authorized as administrator with the logged in user, you can select “Run as administrator”.
C:\> winget install opensslThe Windows package manager “winget” allows you to install applications and other packages by using the command line. If winget is started for the first time, you will be prompted to confirm the source agreement terms, by hit the Y key.
The OpenSSL package is now installed. The second method is to download and install the package.
Install Win64 OpenSSL package manually
The table (screenshot) on the slproweb.com website contains the versions for Win32 and Win64 OpenSSL as EXE and MSI installers.
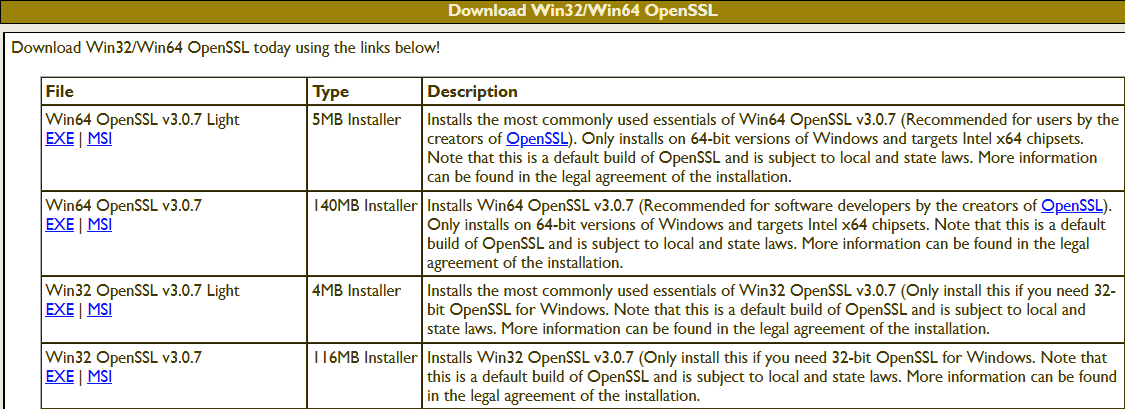
Recommended here is the latest version with the most commonly used essentials of Win64 OpenSSL v3.0.7, at the time of writing this article, it is Win64 OpenSSL v3.0.7 EXE Light, at the top of the first line.
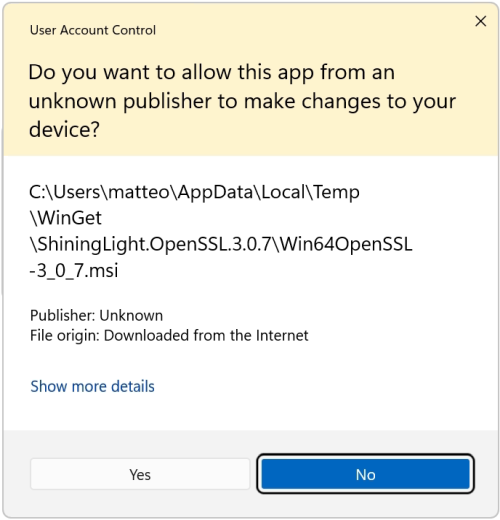
Double-click to execute the file Win64OpenSSL_Light-3_0_7.exe will the setup wizard appears. Confirm the Windows Account Control (UAC) with Yes to continue the installation.
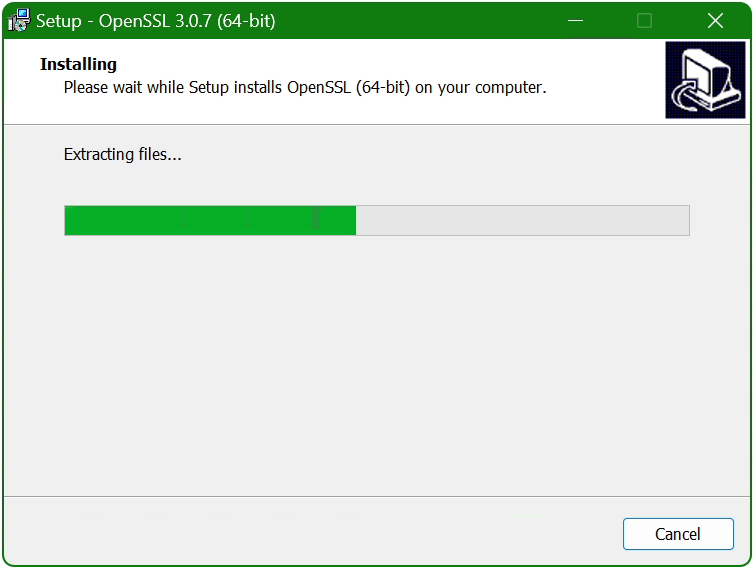
The setup wizard unpacks and copies the OpenSSL files.
Set up the OpenSSL environment
After the OpenSSL files are copied and installed, the search path and environment variable are now added to the operating system, with + R and paste SYSTEMPROPERTIESADVANCED and click OK.
The System Properties window opens.
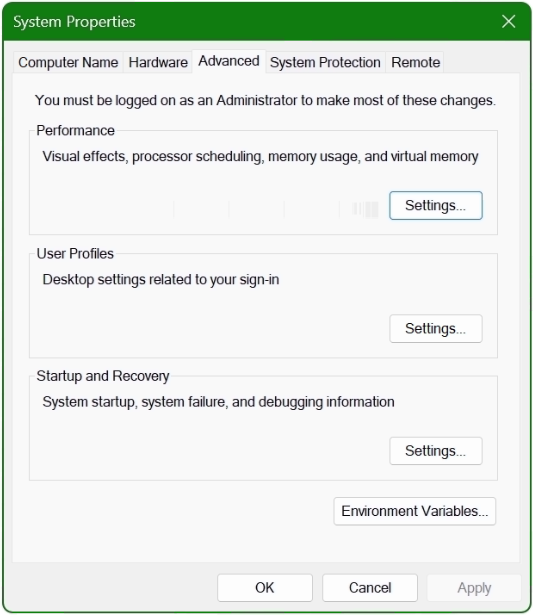
Click the Environment Variables button at the bottom.
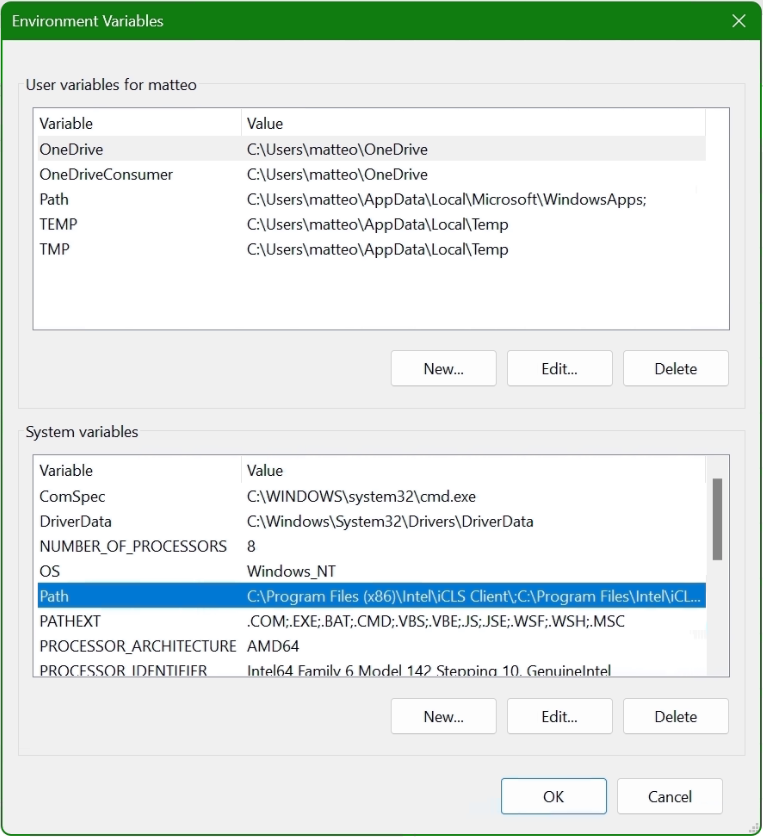
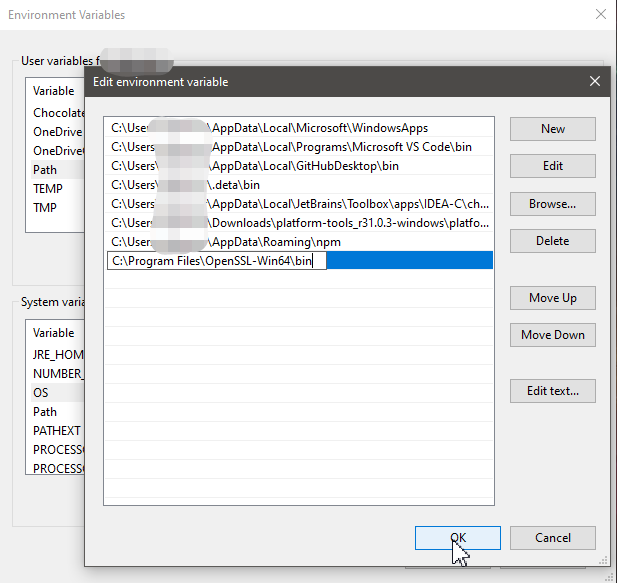
In the lower area System Variables, select the Path line with the mouse and click on the Edit button.
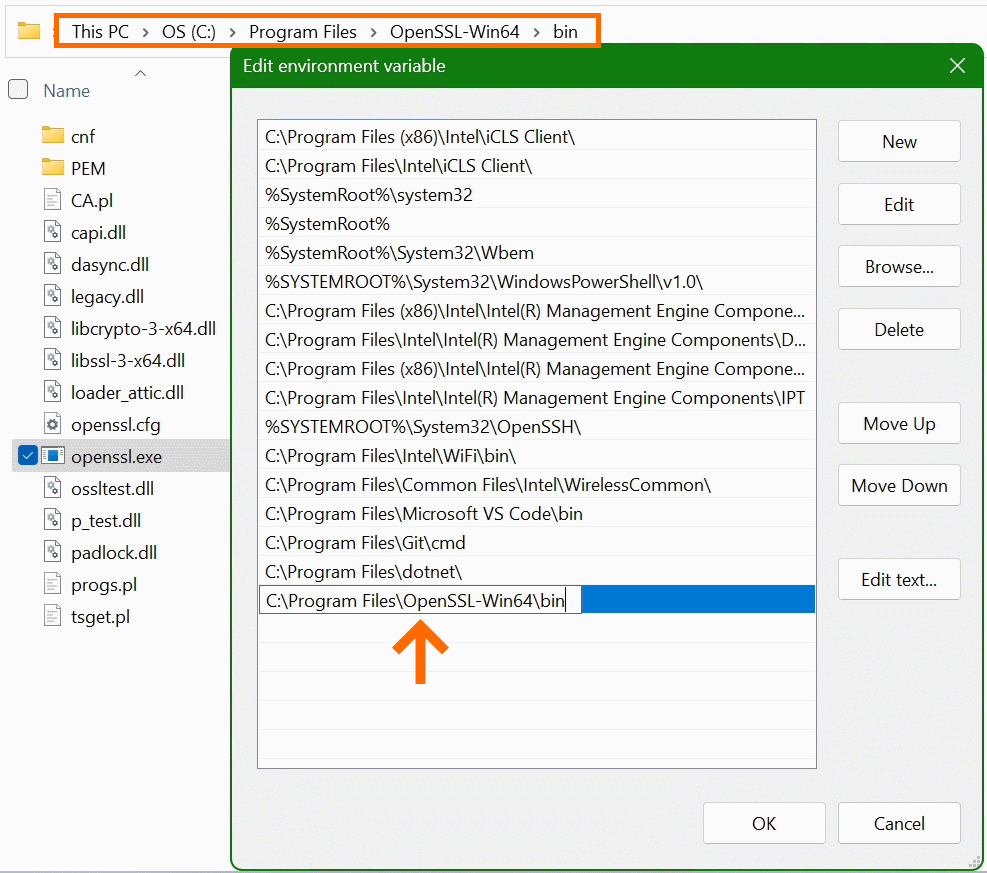
In the “Edit Environment Variables” window, click New to add the path to the OpenSSL-Win64\bin folder under Program files. The path in which the file openssl.exe is located can be found with Windows Explorer and copied to the clipboard, there is also the possibility to choose the path to the bin folder with the Browse button. Confirm the action with OK.
Now add another system variable with click New.
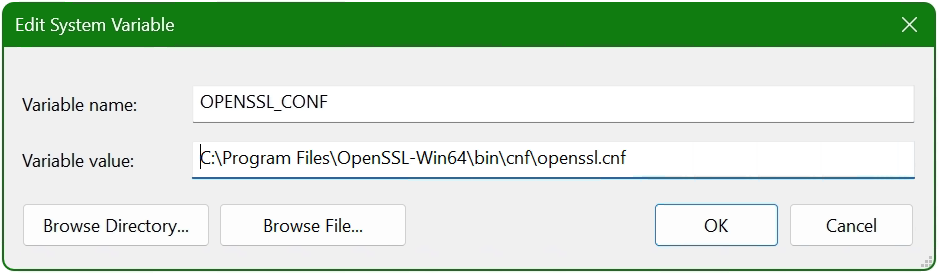
Enter OPENSSL_CONF in the Variable name field. In the next field insert the path to which the file openssl.cnf is located, here it is C:\Program Files\OpenSSL-Win64\bin\cnf\openssl.cnf
The installation is now complete and OpenSSL can be used. First of all, there is the opportunity to check the OpenSSL provisioned release.
C:\> openssl version -a
OpenSSL 3.0.7 1 Nov 2022 (Library: OpenSSL 3.0.7 1 Nov 2022)
built on: Tue Nov  1 16:04:12 2022 UTC
...
C:\> openssl version -d
OPENSSLDIR: "C:\Program Files\Common Files\SSL"
The OpenSSL Toolkit is a versatile utility with many options, but under Windows there is not the possibility of using the man page, as is known on Linux. However, the openssl help command provides context-sensitive help, such asopenssl help s_clientor useopenssl help x509oropenssl help reqto show just a few examples. Help is also offered on the documentation pages on the web, where manpages can also be found.
Useful OpenSSL Examples
A few of the most commonly used openssl command examples in the console are shown below, note that this is not a comprehensive collection of all possible applicable commands of this powerful open source toolkit.
openssl x509 -noout -text -in ca-cert.pemDisplaying and print the ca-cert.pem certificate file in plain text.
openssl req -text -noout -verify -in x509-check.csrView and verify the contents of CSR x509-check.csr in plain text.
openssl rsa -check -in rootCA.keyVerify key consistency of the rootCA.key file.
openssl x509 -noout -modulus -in ca-cert.pem | openssl md5Check md5 checksum of certificate ca-cert.pem file.
openssl crl2pkcs7 -nocrl -certfile servercert.pem -out c:\temp\servercert.p7bConvert certificate from pem to p7b format and write to temp folder.
openssl pkcs12 -export -in rootCA.pem -inkey rootCA.key -out c:\temp\rootCA.p12 -name "PKCS12 certificate"Convert certificate rootCA.pem to PKCS12 format as rootCA.p12 file.
openssl req -new -newkey rsa:2048 -sha256 -days 365 -nodes -x509 -keyout server.key -out server.crtGenerate SSL certificate and key on a single line, using SHA256 with RSA 2048 encryption, the certificate will be valid for 1 year.
openssl s_client -connect imap.gmail.com:993Check connection to imap.gmail.com service 993 to get more useful results like than as in telnet.
openssl s_client -crlf -connect smtp.gmail.com:587 -starttls smtpTry to connect service 587 on smtp.gmail.com using the starttls protocol, possibly to check a firewall policy for its effect.
openssl s_client -verify_quiet -brief www.ietf.org:443Check protocol version and ciphersuite, peer certificate and hash used.
openssl rand -base64 20Generate a random password in base64 using OpenSSL, can be used as a passphrase to hide private keys from spying eyes.
These were just a few examples, because openssl is a versatile toolkit that offers numerous application options.
Conclusion
The OpenSSL open-source library for cryptography is more important than ever and indispensable. Connections are encrypted and protected, so why shouldn’t the OpenSSL Toolkit be used on Windows? Creating and managing Digital X. 509 certificates, check algorithms for data encryption such as Chiper Suite, digital fingerprint, MD5 and SHA hash values can be checked, which was previously reserved only for Linux.
Sources Links:
slproweb.com Win32/Win64 OpenSSL Installation Project for Windows
openssl.org Cryptography and SSL/TLS Toolkit
OpenSSL is a command-line tool for cryptographic operations such as generating private keys, creating digital certificates, and encrypting/decrypting data.
To install OpenSSL on Windows, you can follow these steps:
Download the latest OpenSSL binary installer from the official website.
Win32/Win64 OpenSSL Installer for Windows — Shining Light Productions
Shining Light Productions
Click on the above link to download OpenSSL for Windows
Choose a directory where OpenSSL will be installed (e.g., C:\OpenSSL).
Select Additional Task to copy OpenSSL DLLs
After installation, add the OpenSSL bin directory to your system’s PATH environment variable.
Check the OpenSSL Version
💡
Alternatively, if you have Git for Windows installed on your system, you can use the openssl.exe that comes with it.