
Skip to content
Navigation Menu
Provide feedback
Saved searches
Use saved searches to filter your results more quickly
Sign up
Appearance settings
OpenSSL Library Portable Redistributable
OpenSSL is a versatile tool that can be used for many purposes:
- A command line application to perform a wide variety of cryptography tasks,
- A command line application for creating and handling certificates and related files.
- A comprehensive and extensive cryptographic library libcrypto.
- A library for enabling SSL/TLS communications libssl to provide SSL and TLS Protocols support within clients or servers applications.
Download
Download OpenSSL 3.2.3 3 Sep 2024
Command Line Utilities
This article is an overview of the available tools provided by OpenSSL
TABLE OF CONTENTS
- About OpenSSL
- Download OpenSSL
- Installing OpenSSL
- Windows Installer
- Winget Package Manager
- ZIP File
- OpenSSL Screenshot
- OpenSSL Documentation
- Checking SSL / TLS Certificate Validity with Certify One
- Compiling OpenSSL From Source
- Release Policy
- Source
- Build Script
- Compilation
- Integrating OpenSSL with Your Visual Studio Project
- Sample Project
- Additional Include Directories
- Additional Library Directories
- Additional Dependencies
- Basic Troubleshooting
- FireDaemon Software Development Services
- Privilege Escalation Mitigation
- Compatibility and Support Matrix
- License, Warranty, and Support
- Useful Links
- Acknowledgments
- Buy SSL / TLS Certificates
About OpenSSL
OpenSSL is a popular open-source, publicly available software library that provides a robust, full-featured set of cryptographic functions and tools to secure communications over computer networks. When we build and ship FireDaemon Certify One, FireDaemon Fusion, and FireDaemon Lozenge we try to ensure they contain the most recent version of OpenSSL. We thought it would be useful to make our OpenSSL Binary Distribution available to you to download and use free of charge. The key advantages of using our OpenSSL Binary Distribution for Microsoft Windows over others that are available are:
- No need to deploy various software tools to attempt to compile the source from scratch. Our build script is available if you do want to compile OpenSSL yourself
- No external dependencies. Installing or distributing the Visual C++ Redistributable Runtime (MSVC) is unnecessary. There is an implicit dependency on the Windows Universal C Runtime (UCRT), which is included by default in all modern versions of Microsoft Windows
- Packaged for simple deployment and use case scenarios, including standalone, embeddable, deployable, or portable
- Digitally signed with our Extended Validation (EV) code signing certificate to avoid Windows SmartScreen warnings and increase trust by Sectigo’s authentication and verification procedures on us: FireDaemon Technologies Limited and validatable binary integrity to meet your compliance requirements.
Download OpenSSL
Below, you will find pre-compiled OpenSSL executables (EXE) and libraries (DLL) for Microsoft Windows Operating Systems in the form of installer and ZIP files. OpenSSL can be used standalone or integrated into any Windows application. The installers, EXEs and DLLs are digitally signed with our Extended Validation (EV) code signing certificate. We do not have an EAR CCL ECCN for our Binary Distributions. This is intentional. You must seek independent legal advice before using/integrating/exporting our Binary Distributions in your products if you believe you are subject to export controls.
|
Download OpenSSL Binary Distributions for Microsoft Windows |
|
|
OpenSSL 3.5.0 LTS Windows Installer x64 April 2025 SHA2-256 99F778ADA6DDE8499C62299323CB868D7B35C571CF82F1165C36009A2FD456DB Git commit openssl-3.5.0-0-g636dfadc70 |
OpenSSL 3.5.0 LTS ZIP x86+x64+ARM64 April 2025 SHA2-256 9AC6B98D947E558E6ADBBC9CC9EAF504B3540BAB90767CF71E3582A14F75AFBD Git commit openssl-3.5.0-0-g636dfadc70 |
|
OpenSSL 3.0.16 LTS ZIP x86+x64 February 2025 SHA2-256 EAEE11E6ED1DE4E5B6A95E5837AC66ABE842B5E9F6477C8CECBE417FE4704508 Git commit openssl-3.0.16-0-gfa1e5dfb14 |
OpenSSL 1.1.1w LTS ZIP x86+x64 September 2023 SHA2-256 1870B15BF6749E65FFBBADF52CDFF3EE0E9F02943550BF4395574BB432AF3EB8 Git commit OpenSSL_1_1_1w-0-ge04bd3433f |
|
To calculate/verify the SHA2-256 checksums above, please use FireDaemon Lozenge! OpenSSL maintains a list of 3rd-party maintained binary distributions of OpenSSL. Please review our Release Policy before downloading and using this distribution. OpenSSL 1.1.1y or later is only available to OpenSSL customers who have a Premium Support Contract. |
Installing OpenSSL
Windows Installer
You can download the Windows installers in the «Download OpenSSL» section above. Installation is straightforward. OpenSSL is installed into the following file system locations, which is specified during the build and follow OpenSSL’s conventions.
%PROGRAMFILES%\FireDaemon OpenSSL 3
%PROGRAMFILES%\Common Files\FireDaemon SSL 3
You can silently install OpenSSL with the following command in an elevated command prompt (noting APPDIR and ADJUSTSYSTEMPATHENV are optional):
FireDaemon-OpenSSL-x64-3.5.0.exe /exenoui /exelog fdopenssl3.log /qn /norestart REBOOT=ReallySuppress APPDIR="C:\Program Files\FireDaemon OpenSSL 3" ADJUSTSYSTEMPATHENV=yes
You can silently uninstall OpenSSL with the following commands:
:: To uninstall at an elevated command prompt, first verify the product GUID
wmic product where name="FireDaemon OpenSSL 3" get IdentifyingNumber

:: Then uninstall silently using msiexec
msiexec /x {34DB0C5E-1E16-46D4-8125-F12F723FD49C} /quiet /noreboot

:: You can also use the original FireDaemon OpenSSL installer
FireDaemon-OpenSSL-x64-3.5.0.exe /x // /quiet

:: Or uninstall using PowerShell
$app = Get-WmiObject Win32_Product | where { $_.name -eq "FireDaemon OpenSSL 3" }
$app.Uninstall()
Winget Package Manager
Instead of downloading and installing the Windows Installer, you can use the Microsoft package manager called winget. Winget is built into Windows 10, 11, and Server 2025 or can be installed manually. To install FireDaemon OpenSSL, open a command prompt on your computer, then:
:: Search for FireDaemon OpenSSL
winget search FireDaemon.OpenSSL

:: Show the FireDaemon OpenSSL package contents
winget show FireDaemon.OpenSSL

:: Install FireDaemon OpenSSL interactively
winget install FireDaemon.OpenSSL --interactive

:: Install FireDaemon OpenSSL silently (default)
winget install FireDaemon.OpenSSL --silent

:: Show installed packages
winget list FireDaemon

:: Uninstall FireDaemon OpenSSL
winget uninstall FireDaemon.OpenSSL
ZIP File
Instead of using the installer or package manager, you can download one of the ZIP files in the «Download OpenSSL» section above.
- Follow the instructions below if you have downloaded one of the ZIP files above and want to deploy OpenSSL manually (e.g. on the local hard disk or a USB drive for a portable installation)
- Download the appropriate FireDaemon OpenSSL Binary Distribution ZIP file via the links above.
- Unpack the contents of the folder found in the ZIP file to a temporary directory (e.g. C:\Temp)
- Copy the contents (i.e. the files and directories contained within) of the x64 folder or x86 folder to your target directory (e.g. C:\OpenSSL)
- Copy the ssl folder and contents to the target directory (e.g. C:\OpenSSL).
The commands to copy the files correctly from the location where you unpacked the ZIP file (assuming C:\Temp) are as follows:
: For OpenSSL 1.1.1 LTS
cd C:\Temp\openssl-1.1

: For OpenSSL 3.0 LTS
cd C:\Temp\openssl-3.0

: For OpenSSL 3.5
cd C:\Temp\openssl-3

: Copy the binaries specific to your platform
: Copy 64-bit binaries
robocopy x64 C:\OpenSSL /E

: Or, copy 32-bit binaries. Don't copy both!
robocopy x86 C:\OpenSSL /E

: Copy the ssl folder
robocopy ssl C:\OpenSSL\ssl /E
Your directory structure should look as follows:
C:\OpenSSL>dir /b
bin
include
lib
ssl
To use OpenSSL, open an elevated Command Prompt (adjusting the path in OPENSSL_HOME to suit your manual installation):
: You can set OPENSSL_HOME=%~dp0 in a batch script for portable installs
set OPENSSL_HOME=C:\OpenSSL
set OPENSSL_CONF=%OPENSSL_HOME%\ssl\openssl.cnf
set PATH=%OPENSSL_HOME%\bin;%PATH%
cd /d %OPENSSL_HOME%
openssl version -a
To create a certificate signing request and private key using the same environment variables as above:
openssl genrsa -out server.key 4096
openssl req -new -key server.key -out server.csr -sha256
openssl x509 -req -days 365 -in server.csr -signkey server.key -out server.crt
OpenSSL Screenshot
Below is a screenshot showing the certificate signing request in an elevated PowerShell:

OpenSSL Documentation
Please refer to OpenSSL’s documentation.
Checking SSL / TLS Certificate Validity with Certify One
FireDaemon Certify One allows you to audit, check, inspect, and validate SSL / TLS certificates and certificate chains. Fortify also has a browser-based TLS Encryption Check Tool available.
Compiling OpenSSL From Source
Release Policy
Whenever we release an updated version of FireDaemon Fusion, FireDaemon Certify One, or OpenSSL gets updated with security fixes, we will provide the latest tagged version of the OpenSSL stable branch. The currently deployed OpenSSL library commit versions are listed underneath the download links above. Commit is described viz:
git describe --always --tag --long --first-parent --dirty
Source
We directly pull from OpenSSL’s official GitHub repository.
Build Script
You can use our build script to create the binary distributions. The build script has the following dependencies:
- Visual Studio Community Edition
- Git for Windows
- Strawberry Perl.
Compilation
The actual command line to build OpenSSL is as follows (where %toolset% is VC-WIN32-HYBRIDCRT and VC-WIN64A-HYBRIDCRT, respectively):
perl ..\Configure %toolset% no-ssl3 no-zlib no-comp no-autoload-config no-makedepend --prefix="%installdir%" --openssldir="%commoninstalldir%"
Integrating OpenSSL with Your Visual Studio Project
You must configure your project’s properties to use the headers and libraries in FireDaemon OpenSSL in your Visual Studio project.
Sample Project
We have included a sample Visual Studio Project in the OpenSSL 3 ZIP file. The sample project can be found in the «projects» folder.
Additional Include Directories
Prepend «C:\Program Files\FireDaemon Open SSL 3\include»; to Property Pages -> C/C++ -> General -> Additional Include Directories in your project per the screenshot below adjusting the prepended path to suit your installation. In our case, we use a pre-defined User Macro called OpenSslIncludeDir. You can also specify this path on the command line:
/I"C:\Program Files\FireDaemon OpenSSL 3\include"

Additional Library Directories
Prepend «C:\Program Files\FireDaemon Open SSL 3\lib»; to Property Pages -> Linker -> General -> Additional Library Directories in your project per the screenshot below adjusting the prepended path to suit your installation. In our case, we use a pre-defined User Macro called OpenSslLibraryDir. You can also specify this path on the command line:
/LIBPATH:"C:\Program Files\FireDaemon OpenSSL 3\lib"

Additional Dependencies
Prepend libcrypto.lib;libssl.lib; to Property Pages -> Linker -> Input -> Additional Dependencies in your project per the screenshot below. You can also specify this on the command line:
/DYNAMICBASE "libcrypto.lib" "libssl.lib"

Basic Troubleshooting
If you run into issues compiling or linking FireDaemon OpenSSL, please review the tips below to help you debug your project:
- Ensure you have set up your Visual Studio project correctly per the previous section
- When compiling OpenSSL yourself, ensure you choose the correct target platform. For example, ./configure <toolset> where <toolset> can be triplets including VC-WIN64A and Cygwin-x86_64. The complete list of toolsets can be found by typing perl ..\configure LIST
- Verify that the versions of libssl.lib and libcrypto.lib are correct by using dumpbin.exe which is available in the Windows SDK. dumpbin /ALL libssl.lib should refer to libssl-3.dll. dumpbin /ALL libcrypto.lib should refer to libcrypto-3.dll
- Use /VERBOSE when linking to verify the libraries found and used by the linker
- Use Dependencies to verify the dependencies of your built executable
- Ensure you build, rebuild, or clean your project to avoid stale dependencies, outdated object files, and other artifacts and detritus that may have accumulated in your project
- Double-check, then triple-check your compiler and linker command line to ensure your project is not referring to folders or directories that may contain other versions of OpenSSL libs and DLLs
- Use pre-defined User Macros in your project to ensure you explicitly reference the correct OpenSSL include, lib, and bin directories (e.g. OpenSslIncludeDir, OpenSslLibDir, OpenSslBinDir).
FireDaemon Software Development Services
We offer paid commercial software development services to assist you in building and integrating OpenSSL into your project or product. Please contact us for rates and availability.
Privilege Escalation Mitigation
When building OpenSSL, the build scripts bake the default location of the library (i.e. the installation directory) and the SSL configuration into the final product. By default, OpenSSL automatically loads the SSL configuration file from the default file system location. This leads to an easily exploitable privilege escalation scenario documented in CVE-2019-12572. Our build of OpenSSL mitigates this flaw using the following preventative measures:
- The target directories we have chosen are Windows’ default system program files directories, assuming a 64-bit architecture with a shared configuration file directory common to both x64 and x86:
- x64: C:\Program Files\FireDaemon OpenSSL 3, C:\Program Files\Common Files\FireDaemon SSL 3
- x86: C:\Program Files (x86)\FireDaemon OpenSSL 3, C:\Program Files\Common Files\FireDaemon SSL 3
- To mitigate security issues even on non-default installations, we built the library so that it doesn’t automatically load the SSL configuration. Hence, when using the OpenSSL tools or the DLLs in your products, you have to explicitly load the SSL configuration.
- All FireDaemon software products that utilise OpenSSL initialise the OpenSSL library at runtime using a flag that prevents the loading of the default configuration.
Compatibility and Support Matrix
The table below provides a compatibility and support matrix, mapping compatible Microsoft Windows operating system versions to specific FireDaemon OpenSSL software versions.
| OpenSSL Versions |
OpenSSL 3.5, 3.0 LTS, & 1.1.1 LTS |
|
| Windows Operating System Version | 32-bit (x86) | 64-bit (x64) |
| Windows XP (1) | ||
| Windows Vista (1) | ||
| Windows 7 (1) | ||
| Windows 8 (1) | ||
| Windows 8.1 (1) | ||
| Windows 10 | ||
| Windows 11 | ||
| Server 2008 (2) | ||
| Server 2008 R2 (2) | ||
| Server 2012 | ||
| Server 2012 R2 | ||
| Server 2016 | ||
| Server 2019 | ||
| Server 2022 | ||
| Server 2025 |
(1) Windows Desktop Operating System is End of Support
(2) Windows Server Operating System is End of Support
| Compatible / Supported | The software is designed to be installed on the Microsoft Windows operating system. We actively support the operating system version plus software version combination, provided that the 32-bit (x86) version is deployed on a 32-bit (x86) operating system and the 64-bit (x64) version is deployed on a 64-bit (x64) operating system. Please see the License, Warranty, and Support section below. |
| Compatible / Unsupported | The software product can be installed on the Microsoft Windows operating system version. We do not support the operating system version plus software version combination. This is typically due to the operating system version reaching End of Support. |
| Incompatible / Unsupported | The software product should not or does not install on the Microsoft Windows operating system version or work. We do not support the operating system version plus software version combination. |
License, Warranty, and Support
Our OpenSSL Binary Distribution is free to use and redistribute. Product use, redistribution, and warranty are governed by the OpenSSL License. If you have questions regarding OpenSSL, wish to report bugs, or require implementation guidance, please consider joining the OpenSSL Community.
Useful Links
- OpenSSL History
- OpenSSL Events
- OpenSSL Corporation Mission
- OpenSSL Corporation 2024 Annual Report
- OpenSSL Library Release Lifecycle and Roadmap
- OpenSSL Sponsorship
- OpenSSL Webinars
Acknowledgments
This product includes:
- Software developed by the OpenSSL Project for use in the OpenSSL Library
- Cryptographic software written by Eric Young
- Software written by Tim Hudson.
Buy SSL / TLS Certificates
Table of Contents
On Windows, the operating system does not come with a built-in OpenSSL executable, unlike Ubuntu or other Linux distributions. This means that in order to generate .key, .pem, and .crt files, you will need to install OpenSSL manually.
In this post, we will show you several ways to download and install OpenSSL on Windows 11.
Method 1: Install OpenSSL using Windows Package Manager
This easiest way is using Windows Package Manager. Windows Package Manager is a comprehensive package manager solution that consists of a command line tool and set of services for installing applications on Windows 10 and Windows 11.
Note
Note: The winget command line tool is only supported on Windows 10 1709 (build 16299) or later and Windows 11 at this time.
1. Right-click on the Windows Start icon then select Windows Terminal (Admin).
2. Run the following command to search the OpenSSL package:
3. Copy the app’s id for the next step. In this case, the id of this app is FireDaemon.OpenSSL.
Name                 Id                 Version Match        Source
-------------------------------------------------------------------
FireDaemon OpenSSL 3 FireDaemon.OpenSSL 3.1.4   Tag: openssl winget
4. Now, run the following command to install OpenSSL on Windows 11:
winget install --id=FireDaemon.OpenSSL -e# Output
Found FireDaemon OpenSSL 3 [FireDaemon.OpenSSL] Version 3.1.4
This application is licensed to you by its owner.
Microsoft is not responsible for, nor does it grant any licenses to, third-party packages.
Downloading https://download.firedaemon.com/FireDaemon-OpenSSL/FireDaemon-OpenSSL-x64-3.1.4.exe
██████████████████████████████ 11.3 MB / 11.3 MB
Successfully verified installer hash
Starting package install...
Successfully installed5. By default, after installed you must navigate to the installation location to run openssl. To run it from anywhere, run the below PowerShell command to add a new path to the environment variable.
$Env:PATH += ";C:\Program Files\FireDaemon OpenSSL 3\bin"6. Finally, open PowerShell, type opensll then hit to verify it works.
PS C:\> openssl
help:

Standard commands
asn1parse         ca                ciphers           cmp
cms               crl               crl2pkcs7         dgst
dhparam           dsa               dsaparam          ec
ecparam           enc               engine            errstr
fipsinstall       gendsa            genpkey           genrsa
help              info              kdf               list
mac               nseq              ocsp              passwd
pkcs12            pkcs7             pkcs8             pkey
pkeyparam         pkeyutl           prime             rand
rehash            req               rsa               rsautl
s_client          s_server          s_time            sess_id
smime             speed             spkac             srp
storeutl          ts                verify            version
x509
Alternatively, some Windows package managers can be used to install OpenSSL.
- Install OpenSSL using Chocolatey package manager:
# Install Chocolatey
irm bonguides.com/choco | iex

# Install OpenSSL
choco install OpenSSL.Light- Install OpenSSL using Scoop package manager:
# Install Scoop package manager
Set-ExecutionPolicy -ExecutionPolicy RemoteSigned -Scope CurrentUser
irm get.scoop.sh | iex

# Install OpenSSL
scoop install openssl
Method 2: Install OpenSSL from Shining Light Productions
2. Install OpenSSL following the installation wizard. Once done, you can find the program at C:\Program Files\OpenSSL-Win64\bin.
Method 3: Download OpenSSL from Git For Windows
1. Download Git for Windows from https://git-scm.com/download/win. You don’t need download the installer, just download the portable version to get OpenSSL tool.
2. Open the downloaded file to extract it to a folder, then you would get OpenSSL tool in /usr/bin folder.
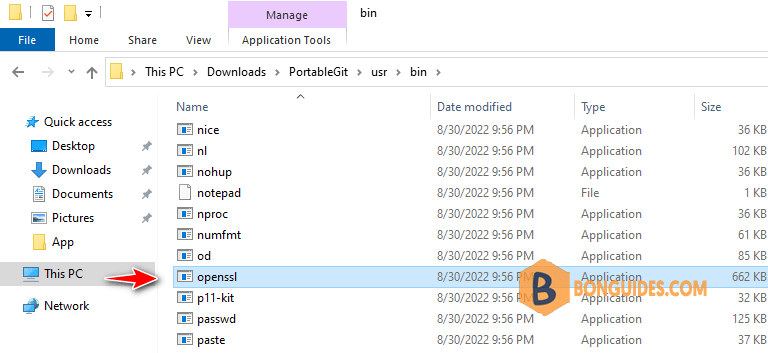
Open PowerShell or CMD then navigate to the extracted folder and run openssl to verify it works. You can also add the path to the environment variables to run it from anywhere.
Running OpenSSL in Windows 10, 11
To run the OpenSSL tool, let’s open Windows command prompt (CMD) or Windows PowerShell then navigate to the tool’s location.
cd "C:\Users\mpnadmin\Downloads\PortableGit\usr\bin"Each time when run openssl, you need to navigate to its folder manually.
C:\Users\mpnadmin\Downloads\PortableGit\usr\bin>openssl.exe
OpenSSL> help
Standard commands
asn1parse         ca                ciphers           cms
crl               crl2pkcs7         dgst              dhparam
dsa               dsaparam          ec                ecparam
enc               engine            errstr            gendsa
genpkey           genrsa            help              list
To run OpenSSL from anywhere, you need to add the bin folder into Windows environment.
C:\Users\mpnadmin>openssl
help:

Standard commands
asn1parse         ca                ciphers           cmp
cms               crl               crl2pkcs7         dgst
dhparam           dsa               dsaparam          ec
ecparam           enc               engine            errstr
fipsinstall       gendsa            genpkey           genrsa
You can use the PowerShell to set the environment variables path or you can do it manually as follows:
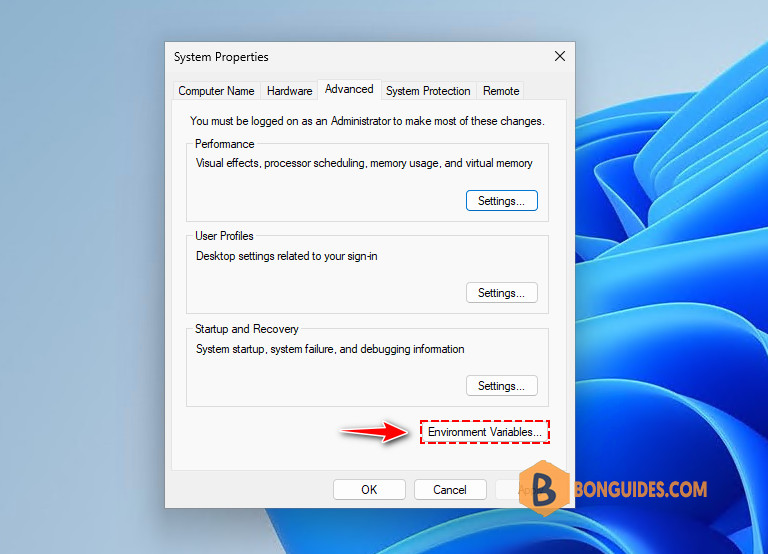
1. Type env into the Windows search box then select the result under the best match.

2. In the System Properties window, select the Environment Variables… button.
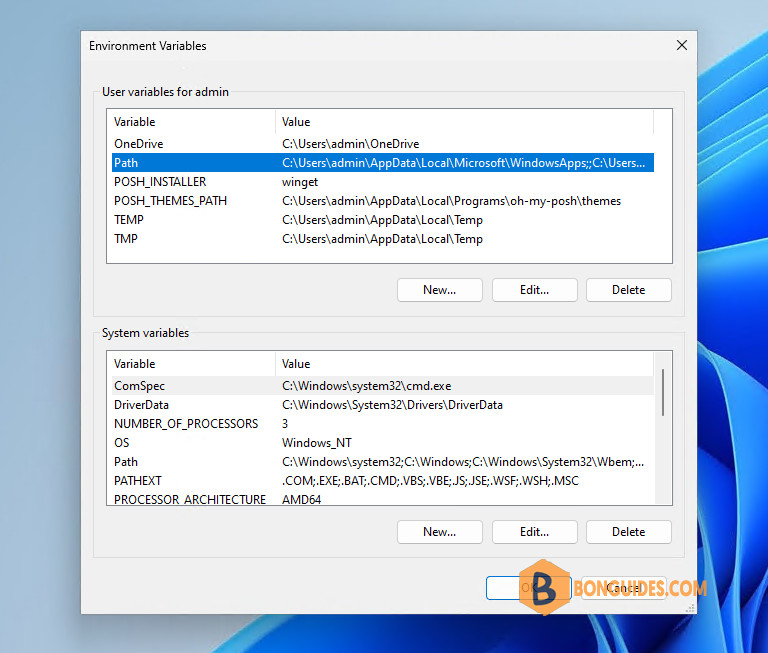
3. Double-click on the Path variable in either User variables or System variables to edit it.
4. Click on the button to add a new Path. The path depends on the way you have to install OpenSSL. So, let’s change it to fit with yours.
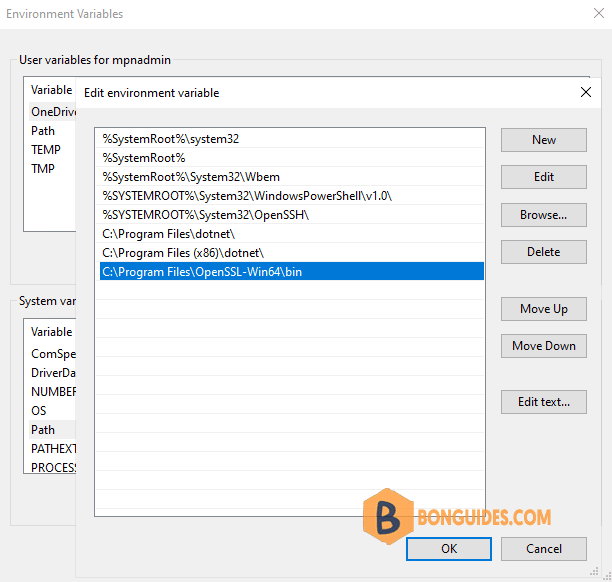
Finally, click OK to save the changes then open PowerShell or CMD, type openssl then hit Enter to verify it works.
Creator:
Jim Shoe
Status:
Research Complete
Born On:
01:19, 17 February 2008 (CDT)
Last Updated:
10:22, 23 January 2012 (CDT)
Overview
This is a guide to using OpenSSL in a portable fashion on Windows.
Talk
I did a talk in June ’08 about a portable life.
Details
The other day I picked up a new 2gb USB Drive. I like to keep storage with me, as well as programs like Portable Putty, Firefox, Filezilla, VLC, 7Zip and KeePass. All of which can be downloaded free at PortableApps.com Keeping all these programs only takes up around 150MB, which isn’t bad when you have 1.9GB to play with. Now lets talk about encryption. Using a Mac or Linux a lot like I do, you find OpenSSL is awesome. You can easily encrypt and decrypt files quickly. I recently got to looking around and found an .exe of OpenSSL. So I started playing. When I was done I had OpenSSL working off a USB Drive, and a batch file that either encrypts or decrypts based on the file extension. Oh and the batch file is run by dropping a file onto it. Here is what I did.
  1. Download the latest OpenSSL Light from OpenSSL.org.
  2. Install OpenSSL
     a. Ignore the error about MS Visual C++
     b. Select Copy OpenSSL DLL to /bin directory
  3. Copy C:\OpenSSL\bin to your USB Drive.
  4. Rename the bin directory to openssl..
  5. Double click on openssl.exe in your openssl directory. If it works you should get a command prompt showing OpenSSL>
  6. Download this file to the root of your USB Drive. encrypt-and-decrypt.bat
  7. Now you have drag and drop encryption and decryption using aes-256.
The batch file will encrypt any file but will not encrypt a directory. If you want to encrypt a directory you can use 7zip to zip up the directory, then encrypt the .zip Also the batch file will only decrypt files ending in .enc Test it out and you will see what I mean. If you have any questions just leave a comment.
Thanks
Nathan
ps. If you want separated encrypt and decrypt files you can download these. encrypt.bat decrypt.bat
encrypt-and-decrypt.bat
@echo off

SET EX=%~x1

rem Changes program to the dir .bat is in
cd /d %~dp0

if %EX%==.enc (GOTO :DECRYPT)
  IF EXIST %1.enc (
    echo Please rename/remove file.
    echo %~f1.enc
    pause)
  IF EXIST %1.enc (GOTO :END)
  "%CD%\openssl\openssl.exe"  enc -aes-256-cbc -salt < %1 > %1.enc
  GOTO :END

:DECRYPT
  IF EXIST "%~dp1%~n1" (
    echo Please rename/remove file.
    echo %~dp1%~n1
    pause)
  IF EXIST "%~dp1%~n1" (GOTO :END)
  "%CD%\openssl\openssl.exe"  enc -d -aes-256-cbc -salt < %1 > "%~dp1%~n1"
  GOTO :END

:END
encrypt.bat
@echo off

rem Changes program to the dir .bat is in
cd /d %~dp0

rem First part is the path to openssl.exe, then the encryptions stuff.
rem rem Then %1 is the item you dropped on the .bat file.
rem Then the second %1 adds a .enc to the end of the file name, and saves it.
"%CD%\openssl\openssl.exe"  enc -aes-256-cbc -salt < %1 > %1.enc
decrypt.bat
@echo off

rem Changes program to the dir .bat is in
cd /d %~dp0

rem First part is the path to openssl.exe, then the encryptions stuff.
rem Then %1 is the item you dropped on the .bat file.
rem Then %~dp1%~n1 removes the .enc and places the file into original dir.
"%CD%\openssl\openssl.exe"  enc -d -aes-256-cbc -salt < %1 > "%~dp1%~n1"
OpenSSL v3.3.2 — криптографическая библиотека с кодом открытого типа «Open source». Она предназначена для работы с протоколами SSL и TLS, а также доступна для платформ Windows и Unix.
Основные возможности OpenSSL
-
Поддержка практически всех алгоритмов хеширования, шифрования и электронной подписи.
-
Реализация большинства криптографических стандартов.
Работа с ключами (RSA, DH, DSA) и сертификатами.
-
Поддержка сертификатов X.509.
Формирование приватных ключей CRT и CSR.
-
Тестирование соединений: SSL и TLS.
Удобство использования
Библиотеку используют все разработчики WEB-приложений, поскольку она отвечает за безопасность.
-
При создании сайта обязательно необходимо создавать SSL-ключ (файл, позволяющий связать криптографический ключ с доменным именем или сервером).
-
Библиотеку можно использовать для тестирования соединений SSL и TTL.
Специальных приложений для работы с библиотекой в графическом интерфейсе не существует. В этом случае приходится довольствоваться только консольным режимом, в котором требуется вводить команды.
Для новичка, на первый взгляд, покажется все очень сложным, но на самом деле это не так. Для работы с библиотекой в Интернете можно найти множество инструкций и видеоуроков, в которых детально объясняются основные аспекты ее использования.
«Изюминка» библиотеки заключается в открытом коде, в который можно вносить изменения, переписывать и удалять ненужные функции, т. е. создавать свой собственный модуль.
Разработчики рекомендуют скачивать ее с официального сайта.
Однако не стоит забывать и о «GitHub» (хранилище, которое IT-специалисты используют для обмена программным кодом).
Достоинства
Поддержка алгоритмов шифрования, хеширования.
Работа с сертификатами и электронной подписью.
Тестирование SSL/TTL-соединений.
Гибкая настройка параметров создаваемых сертификатов.
Поддержка CRT и CSR, а также сертификата X.509.
Работа с ключами RSA, DH и DSA.
Бесплатная версия.
Открытый код (можно вносить свои коррективы в исходный программный код библиотеки).
Высокая степень надежности.
Реализация всех типов криптографических стандартов.
Недостатки
Отсутствие графического интерфейса.
Сложный синтаксис команд для новичков.
Библиотека является неотъемлемой частью каждого WEB-приложения и напрямую связана с его безопасностью. Благодаря открытому коду, ее можно изменить и доработать под свои предпочтения.