
TABLE OF CONTENTS
- About OpenSSL
- Download OpenSSL
- Installing OpenSSL
- Windows Installer
- Winget Package Manager
- ZIP File
- OpenSSL Screenshot
- OpenSSL Documentation
- Checking SSL / TLS Certificate Validity with Certify One
- Compiling OpenSSL From Source
- Release Policy
- Source
- Build Script
- Compilation
- Integrating OpenSSL with Your Visual Studio Project
- Sample Project
- Additional Include Directories
- Additional Library Directories
- Additional Dependencies
- Basic Troubleshooting
- FireDaemon Software Development Services
- Privilege Escalation Mitigation
- Compatibility and Support Matrix
- License, Warranty, and Support
- Useful Links
- Acknowledgments
- Buy SSL / TLS Certificates
About OpenSSL
OpenSSL is a popular open-source, publicly available software library that provides a robust, full-featured set of cryptographic functions and tools to secure communications over computer networks. When we build and ship FireDaemon Certify One, FireDaemon Fusion, and FireDaemon Lozenge we try to ensure they contain the most recent version of OpenSSL. We thought it would be useful to make our OpenSSL Binary Distribution available to you to download and use free of charge. The key advantages of using our OpenSSL Binary Distribution for Microsoft Windows over others that are available are:
- No need to deploy various software tools to attempt to compile the source from scratch. Our build script is available if you do want to compile OpenSSL yourself
- No external dependencies. Installing or distributing the Visual C++ Redistributable Runtime (MSVC) is unnecessary. There is an implicit dependency on the Windows Universal C Runtime (UCRT), which is included by default in all modern versions of Microsoft Windows
- Packaged for simple deployment and use case scenarios, including standalone, embeddable, deployable, or portable
- Digitally signed with our Extended Validation (EV) code signing certificate to avoid Windows SmartScreen warnings and increase trust by Sectigo’s authentication and verification procedures on us: FireDaemon Technologies Limited and validatable binary integrity to meet your compliance requirements.
Download OpenSSL
Below, you will find pre-compiled OpenSSL executables (EXE) and libraries (DLL) for Microsoft Windows Operating Systems in the form of installer and ZIP files. OpenSSL can be used standalone or integrated into any Windows application. The installers, EXEs and DLLs are digitally signed with our Extended Validation (EV) code signing certificate. We do not have an EAR CCL ECCN for our Binary Distributions. This is intentional. You must seek independent legal advice before using/integrating/exporting our Binary Distributions in your products if you believe you are subject to export controls.
|
Download OpenSSL Binary Distributions for Microsoft Windows |
|
|
OpenSSL 3.5.0 LTS Windows Installer x64 April 2025 SHA2-256 99F778ADA6DDE8499C62299323CB868D7B35C571CF82F1165C36009A2FD456DB Git commit openssl-3.5.0-0-g636dfadc70 |
OpenSSL 3.5.0 LTS ZIP x86+x64+ARM64 April 2025 SHA2-256 9AC6B98D947E558E6ADBBC9CC9EAF504B3540BAB90767CF71E3582A14F75AFBD Git commit openssl-3.5.0-0-g636dfadc70 |
|
OpenSSL 3.0.16 LTS ZIP x86+x64 February 2025 SHA2-256 EAEE11E6ED1DE4E5B6A95E5837AC66ABE842B5E9F6477C8CECBE417FE4704508 Git commit openssl-3.0.16-0-gfa1e5dfb14 |
OpenSSL 1.1.1w LTS ZIP x86+x64 September 2023 SHA2-256 1870B15BF6749E65FFBBADF52CDFF3EE0E9F02943550BF4395574BB432AF3EB8 Git commit OpenSSL_1_1_1w-0-ge04bd3433f |
|
To calculate/verify the SHA2-256 checksums above, please use FireDaemon Lozenge! OpenSSL maintains a list of 3rd-party maintained binary distributions of OpenSSL. Please review our Release Policy before downloading and using this distribution. OpenSSL 1.1.1y or later is only available to OpenSSL customers who have a Premium Support Contract. |
Installing OpenSSL
Windows Installer
You can download the Windows installers in the «Download OpenSSL» section above. Installation is straightforward. OpenSSL is installed into the following file system locations, which is specified during the build and follow OpenSSL’s conventions.
%PROGRAMFILES%\FireDaemon OpenSSL 3
%PROGRAMFILES%\Common Files\FireDaemon SSL 3
You can silently install OpenSSL with the following command in an elevated command prompt (noting APPDIR and ADJUSTSYSTEMPATHENV are optional):
FireDaemon-OpenSSL-x64-3.5.0.exe /exenoui /exelog fdopenssl3.log /qn /norestart REBOOT=ReallySuppress APPDIR="C:\Program Files\FireDaemon OpenSSL 3" ADJUSTSYSTEMPATHENV=yes
You can silently uninstall OpenSSL with the following commands:
:: To uninstall at an elevated command prompt, first verify the product GUID
wmic product where name="FireDaemon OpenSSL 3" get IdentifyingNumber

:: Then uninstall silently using msiexec
msiexec /x {34DB0C5E-1E16-46D4-8125-F12F723FD49C} /quiet /noreboot

:: You can also use the original FireDaemon OpenSSL installer
FireDaemon-OpenSSL-x64-3.5.0.exe /x // /quiet

:: Or uninstall using PowerShell
$app = Get-WmiObject Win32_Product | where { $_.name -eq "FireDaemon OpenSSL 3" }
$app.Uninstall()
Winget Package Manager
Instead of downloading and installing the Windows Installer, you can use the Microsoft package manager called winget. Winget is built into Windows 10, 11, and Server 2025 or can be installed manually. To install FireDaemon OpenSSL, open a command prompt on your computer, then:
:: Search for FireDaemon OpenSSL
winget search FireDaemon.OpenSSL

:: Show the FireDaemon OpenSSL package contents
winget show FireDaemon.OpenSSL

:: Install FireDaemon OpenSSL interactively
winget install FireDaemon.OpenSSL --interactive

:: Install FireDaemon OpenSSL silently (default)
winget install FireDaemon.OpenSSL --silent

:: Show installed packages
winget list FireDaemon

:: Uninstall FireDaemon OpenSSL
winget uninstall FireDaemon.OpenSSL
ZIP File
Instead of using the installer or package manager, you can download one of the ZIP files in the «Download OpenSSL» section above.
- Follow the instructions below if you have downloaded one of the ZIP files above and want to deploy OpenSSL manually (e.g. on the local hard disk or a USB drive for a portable installation)
- Download the appropriate FireDaemon OpenSSL Binary Distribution ZIP file via the links above.
- Unpack the contents of the folder found in the ZIP file to a temporary directory (e.g. C:\Temp)
- Copy the contents (i.e. the files and directories contained within) of the x64 folder or x86 folder to your target directory (e.g. C:\OpenSSL)
- Copy the ssl folder and contents to the target directory (e.g. C:\OpenSSL).
The commands to copy the files correctly from the location where you unpacked the ZIP file (assuming C:\Temp) are as follows:
: For OpenSSL 1.1.1 LTS
cd C:\Temp\openssl-1.1

: For OpenSSL 3.0 LTS
cd C:\Temp\openssl-3.0

: For OpenSSL 3.5
cd C:\Temp\openssl-3

: Copy the binaries specific to your platform
: Copy 64-bit binaries
robocopy x64 C:\OpenSSL /E

: Or, copy 32-bit binaries. Don't copy both!
robocopy x86 C:\OpenSSL /E

: Copy the ssl folder
robocopy ssl C:\OpenSSL\ssl /E
Your directory structure should look as follows:
C:\OpenSSL>dir /b
bin
include
lib
ssl
To use OpenSSL, open an elevated Command Prompt (adjusting the path in OPENSSL_HOME to suit your manual installation):
: You can set OPENSSL_HOME=%~dp0 in a batch script for portable installs
set OPENSSL_HOME=C:\OpenSSL
set OPENSSL_CONF=%OPENSSL_HOME%\ssl\openssl.cnf
set PATH=%OPENSSL_HOME%\bin;%PATH%
cd /d %OPENSSL_HOME%
openssl version -a
To create a certificate signing request and private key using the same environment variables as above:
openssl genrsa -out server.key 4096
openssl req -new -key server.key -out server.csr -sha256
openssl x509 -req -days 365 -in server.csr -signkey server.key -out server.crt
OpenSSL Screenshot
Below is a screenshot showing the certificate signing request in an elevated PowerShell:

OpenSSL Documentation
Please refer to OpenSSL’s documentation.
Checking SSL / TLS Certificate Validity with Certify One
FireDaemon Certify One allows you to audit, check, inspect, and validate SSL / TLS certificates and certificate chains. Fortify also has a browser-based TLS Encryption Check Tool available.
Compiling OpenSSL From Source
Release Policy
Whenever we release an updated version of FireDaemon Fusion, FireDaemon Certify One, or OpenSSL gets updated with security fixes, we will provide the latest tagged version of the OpenSSL stable branch. The currently deployed OpenSSL library commit versions are listed underneath the download links above. Commit is described viz:
git describe --always --tag --long --first-parent --dirty
Source
We directly pull from OpenSSL’s official GitHub repository.
Build Script
You can use our build script to create the binary distributions. The build script has the following dependencies:
- Visual Studio Community Edition
- Git for Windows
- Strawberry Perl.
Compilation
The actual command line to build OpenSSL is as follows (where %toolset% is VC-WIN32 and VC-WIN64A, respectively):
perl ..\Configure %toolset% no-ssl3 no-zlib no-comp no-autoload-config no-makedepend --prefix="%installdir%" --openssldir="%commoninstalldir%"
Integrating OpenSSL with Your Visual Studio Project
You must configure your project’s properties to use the headers and libraries in FireDaemon OpenSSL in your Visual Studio project.
Sample Project
We have included a sample Visual Studio Project in the OpenSSL 3 ZIP file. The sample project can be found in the «projects» folder.
Additional Include Directories
Prepend «C:\Program Files\FireDaemon Open SSL 3\include»; to Property Pages -> C/C++ -> General -> Additional Include Directories in your project per the screenshot below adjusting the prepended path to suit your installation. In our case, we use a pre-defined User Macro called OpenSslIncludeDir. You can also specify this path on the command line:
/I"C:\Program Files\FireDaemon OpenSSL 3\include"

Additional Library Directories
Prepend «C:\Program Files\FireDaemon Open SSL 3\lib»; to Property Pages -> Linker -> General -> Additional Library Directories in your project per the screenshot below adjusting the prepended path to suit your installation. In our case, we use a pre-defined User Macro called OpenSslLibraryDir. You can also specify this path on the command line:
/LIBPATH:"C:\Program Files\FireDaemon OpenSSL 3\lib"

Additional Dependencies
Prepend libcrypto.lib;libssl.lib; to Property Pages -> Linker -> Input -> Additional Dependencies in your project per the screenshot below. You can also specify this on the command line:
/DYNAMICBASE "libcrypto.lib" "libssl.lib"

Basic Troubleshooting
If you run into issues compiling or linking FireDaemon OpenSSL, please review the tips below to help you debug your project:
- Ensure you have set up your Visual Studio project correctly per the previous section
- When compiling OpenSSL yourself, ensure you choose the correct target platform. For example, ./configure <toolset> where <toolset> can be triplets including VC-WIN64A and Cygwin-x86_64. The complete list of toolsets can be found by typing perl ..\configure LIST
- Verify that the versions of libssl.lib and libcrypto.lib are correct by using dumpbin.exe which is available in the Windows SDK. dumpbin /ALL libssl.lib should refer to libssl-3.dll. dumpbin /ALL libcrypto.lib should refer to libcrypto-3.dll
- Use /VERBOSE when linking to verify the libraries found and used by the linker
- Use Dependencies to verify the dependencies of your built executable
- Ensure you build, rebuild, or clean your project to avoid stale dependencies, outdated object files, and other artifacts and detritus that may have accumulated in your project
- Double-check, then triple-check your compiler and linker command line to ensure your project is not referring to folders or directories that may contain other versions of OpenSSL libs and DLLs
- Use pre-defined User Macros in your project to ensure you explicitly reference the correct OpenSSL include, lib, and bin directories (e.g. OpenSslIncludeDir, OpenSslLibDir, OpenSslBinDir).
FireDaemon Software Development Services
We offer paid commercial software development services to assist you in building and integrating OpenSSL into your project or product. Please contact us for rates and availability.
Privilege Escalation Mitigation
When building OpenSSL, the build scripts bake the default location of the library (i.e. the installation directory) and the SSL configuration into the final product. By default, OpenSSL automatically loads the SSL configuration file from the default file system location. This leads to an easily exploitable privilege escalation scenario documented in CVE-2019-12572. Our build of OpenSSL mitigates this flaw using the following preventative measures:
- The target directories we have chosen are Windows’ default system program files directories, assuming a 64-bit architecture with a shared configuration file directory common to both x64 and x86:
- x64: C:\Program Files\FireDaemon OpenSSL 3, C:\Program Files\Common Files\FireDaemon SSL 3
- x86: C:\Program Files (x86)\FireDaemon OpenSSL 3, C:\Program Files\Common Files\FireDaemon SSL 3
- To mitigate security issues even on non-default installations, we built the library so that it doesn’t automatically load the SSL configuration. Hence, when using the OpenSSL tools or the DLLs in your products, you have to explicitly load the SSL configuration.
- All FireDaemon software products that utilise OpenSSL initialise the OpenSSL library at runtime using a flag that prevents the loading of the default configuration.
Compatibility and Support Matrix
The table below provides a compatibility and support matrix, mapping compatible Microsoft Windows operating system versions to specific FireDaemon OpenSSL software versions.
| OpenSSL Versions |
OpenSSL 3.5, 3.0 LTS, & 1.1.1 LTS |
|
| Windows Operating System Version | 32-bit (x86) | 64-bit (x64) |
| Windows XP (1) | ||
| Windows Vista (1) | ||
| Windows 7 (1) | ||
| Windows 8 (1) | ||
| Windows 8.1 (1) | ||
| Windows 10 | ||
| Windows 11 | ||
| Server 2008 (2) | ||
| Server 2008 R2 (2) | ||
| Server 2012 | ||
| Server 2012 R2 | ||
| Server 2016 | ||
| Server 2019 | ||
| Server 2022 | ||
| Server 2025 |
(1) Windows Desktop Operating System is End of Support
(2) Windows Server Operating System is End of Support
| Compatible / Supported | The software is designed to be installed on the Microsoft Windows operating system. We actively support the operating system version plus software version combination, provided that the 32-bit (x86) version is deployed on a 32-bit (x86) operating system and the 64-bit (x64) version is deployed on a 64-bit (x64) operating system. Please see the License, Warranty, and Support section below. |
| Compatible / Unsupported | The software product can be installed on the Microsoft Windows operating system version. We do not support the operating system version plus software version combination. This is typically due to the operating system version reaching End of Support. |
| Incompatible / Unsupported | The software product should not or does not install on the Microsoft Windows operating system version or work. We do not support the operating system version plus software version combination. |
License, Warranty, and Support
Our OpenSSL Binary Distribution is free to use and redistribute. Product use, redistribution, and warranty are governed by the OpenSSL License. If you have questions regarding OpenSSL, wish to report bugs, or require implementation guidance, please consider joining the OpenSSL Community.
Useful Links
- OpenSSL History
- OpenSSL Events
- OpenSSL Corporation Mission
- OpenSSL Corporation 2024 Annual Report
- OpenSSL Library Release Lifecycle and Roadmap
- OpenSSL Sponsorship
- OpenSSL Webinars
Acknowledgments
This product includes:
- Software developed by the OpenSSL Project for use in the OpenSSL Library
- Cryptographic software written by Eric Young
- Software written by Tim Hudson.
Buy SSL / TLS Certificates
- Details
- Written by
- Last Updated on 21 October 2024 | Print Email
Are you stuck in setting up the OpenSSL library on a Windows operating system? What is the right and official way to install OpenSSL? Are you wondering why it is so difficult? You’ve come to the right place! In this article, I will show you an easy way to install OpenSSL on Windows.
OpenSSL is an open-source cryptographic toolkit widely used to implement secure communication and encryption based on Transport Layer Security (TLS) and Secure Sockets Layer (SSL). You can use it to generate and install SSL certificates for web servers, create private keys, verify certificates, and perform more cryptographic operations.
Follow the steps below to install OpenSSL on your Windows OS.
1. Download Windows Installer for OpenSSL
If you visit the official OpenSSL website and OpenSSL library, you’ll notice that it seemingly provides only the source code and you would need to build the binaries from the source! Of course, you just want to use the tool right away and might be hesitant of going through the complexities of building the code, right? There should be an easier way.
No worries. I’ll save you time by pointing out this OpenSSL binaries download page from third-party distributions:
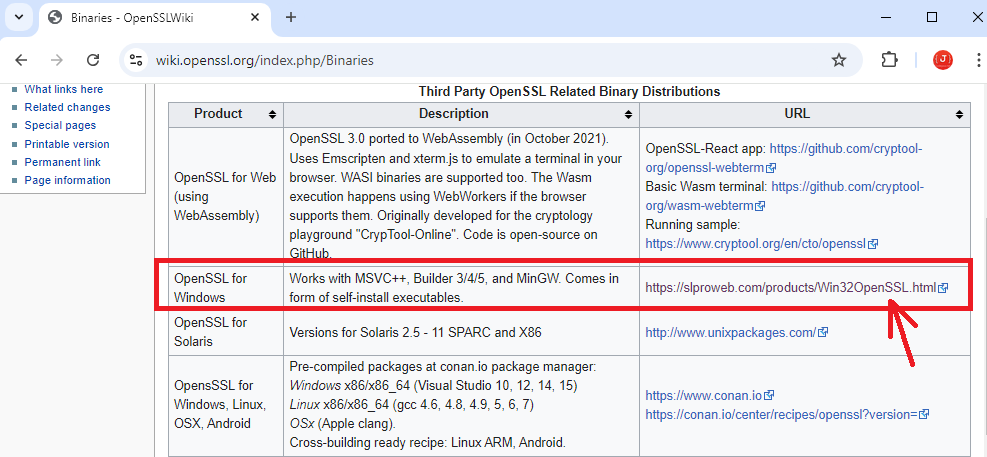
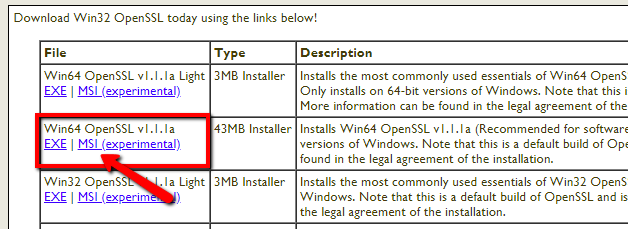
As you can see, there are several binary distribution (installers) of OpenSSL, but I recommend downloading the second one on the list (OpenSSL for Windows). So click this link to go to the download page, as shown below:
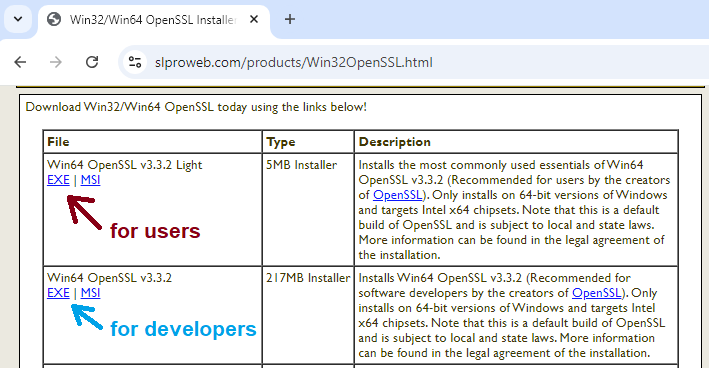
This is an OpenSSL distribution provided by Shining Light Productions. And there are 2 types of installers for the 64-bit Windows operating system:
- Win64 OpenSSL v3.3.2 Light: this installer is recommended for users.
- Win64 OpenSSL v3.3.2: this installer is recommended for software developers.
If you only need the essential features of the OpenSSL library, download the Light version (5MB). However, if you want to use advanced features, download the full installer (217MB). Since I am just an end user of OpenSSL, I clicked on the EXE link to download the Win64 OpenSSL Light installer.
2. Set up OpenSSL on Windows
Double-click the downloaded EXE file to launch the installer. Click Install anyway if you see the warning message ‘The app you’re trying to install isn’t a Microsoft-verified app’. The setup program for OpenSSL 3.3.2 Light (64-bit) will appear as follows:
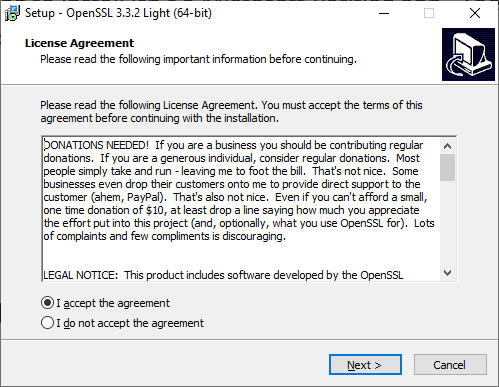
Check “I accept the agreement” and click Next 3 times to proceed with the installation using the default settings, which will install OpenSSL binaries into the C:\Program Files\OpenSSL-Win64 directory and copy the OpenSSL DLLs to the Windows system directory. Then, click the Finish button to close the setup wizard. It’s quick and easy, isn’t it?
3. Verify the OpenSSL Installation
Press the Windows Start button, and type openssl. Click the result that shows “Win64 OpenSSL Command Prompt”:
It will open up a new command prompt window that is customized for using the OpenSSL library. When you see the following screen, it means you have successfully installed OpenSSL on your Windows operating system:
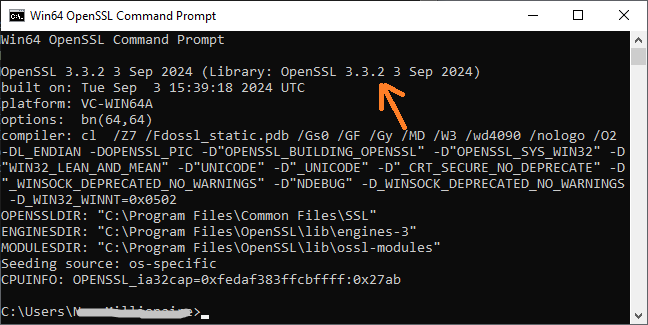
You can also type openssl -version to verify, and it will print the full version of the library in the command prompt. This means that openssl is the command-line tool used to perform cryptographic operations.
NOTES: If you want to use the openssl command-line tool anywhere in the Windows Command prompt, watch the following video to learn how:
About the Author:
Nam Ha Minh is certified Java programmer (SCJP and SCWCD). He began programming with Java back in the days of Java 1.4 and has been passionate about it ever since. You can connect with him on Facebook and watch his Java videos on YouTube.
Add comment
Provide feedback
Saved searches
Use saved searches to filter your results more quickly
Sign up
OpenSSL is a command-line tool for cryptographic operations such as generating private keys, creating digital certificates, and encrypting/decrypting data.
To install OpenSSL on Windows, you can follow these steps:
Download the latest OpenSSL binary installer from the official website.
Win32/Win64 OpenSSL Installer for Windows — Shining Light Productions
Shining Light Productions
Click on the above link to download OpenSSL for Windows
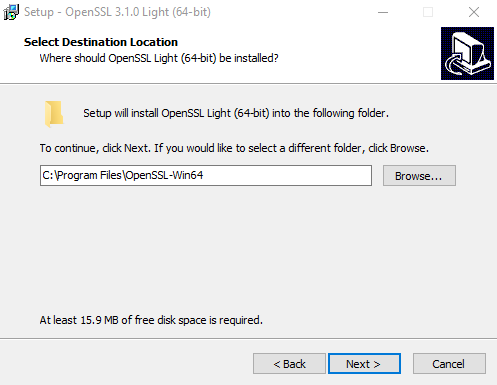
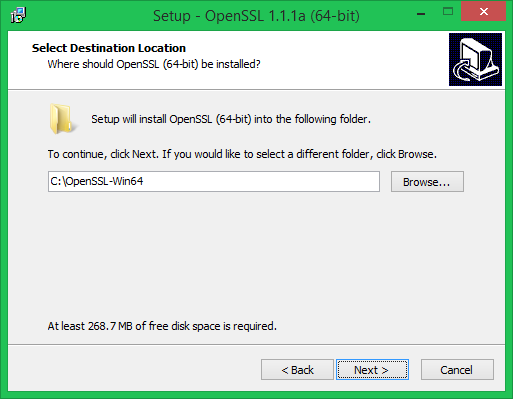
Choose a directory where OpenSSL will be installed (e.g., C:\OpenSSL).
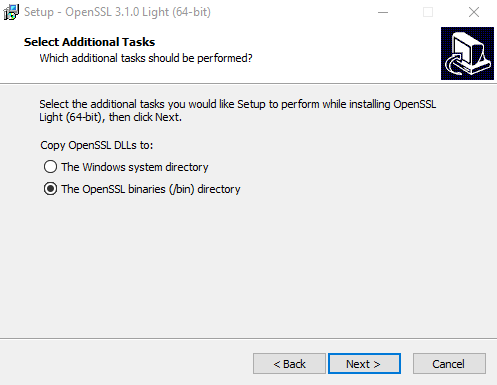
Select Additional Task to copy OpenSSL DLLs
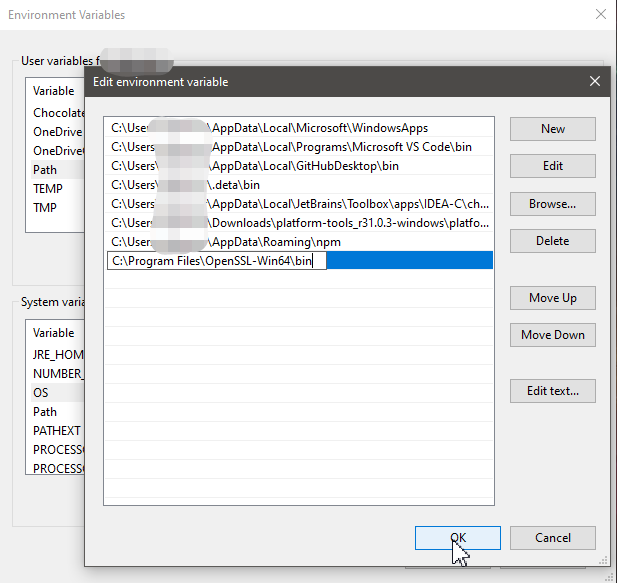
After installation, add the OpenSSL bin directory to your system’s PATH environment variable.
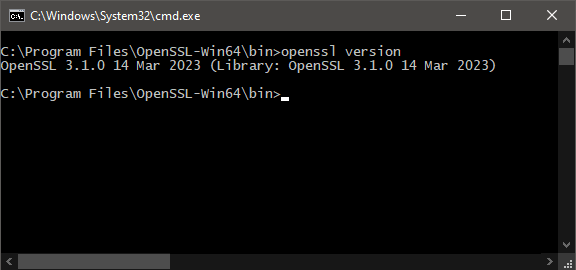
Check the OpenSSL Version
💡
Alternatively, if you have Git for Windows installed on your system, you can use the openssl.exe that comes with it.
Keeping your computer secure is a balancing act. On one hand, you need to keep your computer safe from viruses and hackers so that confidential information doesn’t get leaked. On the other hand, it’s also important that programs and apps are able to access information from users as needed so they can complete tasks efficiently. Keeping these two factors in mind is essential when installing software on your Windows OS.
Luckily for you, this article will explore how you can install OpenSSL on Windows. You see, OpenSSL helps developers and programmers create applications or software that have encrypted communication over the internet. In this article, you will learn what OpenSSL is and why it’s essential when creating a new app or program with security in mind. Additionally, we explore how to install OpenSSL on Windows using simple steps that even beginners can understand. Let’s get started!
This tutorial will help you to install OpenSSL on Windows operating systems.
Step 1 – Download OpenSSL Binary
You need to download the latest OpenSSL windows installer file. Click the below link to visit the OpenSSL download page:
http://slproweb.com/products/Win32OpenSSL.html
The above screenshot may be outdated but we recommend downloading the most recent version of OpenSSL.
Step 2 – Run OpenSSL Installer
Now run the OpenSSL installer on your system. The OpenSSL required Microsoft Visual C++ to be installed on your system. If your system doesn’t have Microsoft Visual C++ installed, the installer will show your message like:
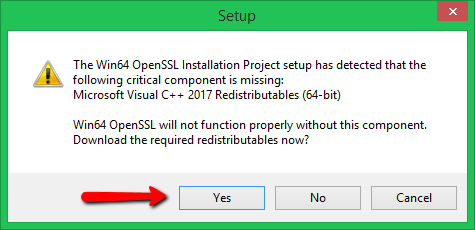
Click Yes to download and install required Microsoft Visual C++ package on your system.
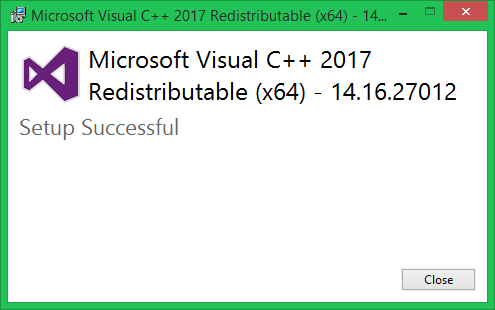
Then again run the OpenSSL installer and follow the wizard.
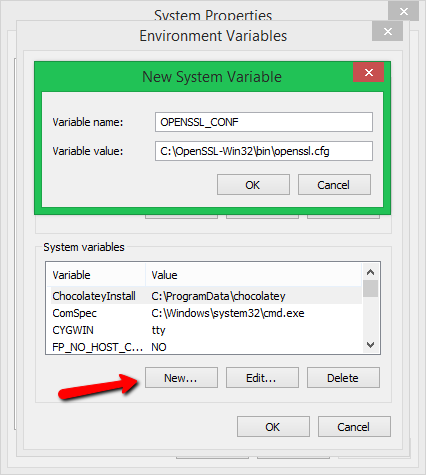
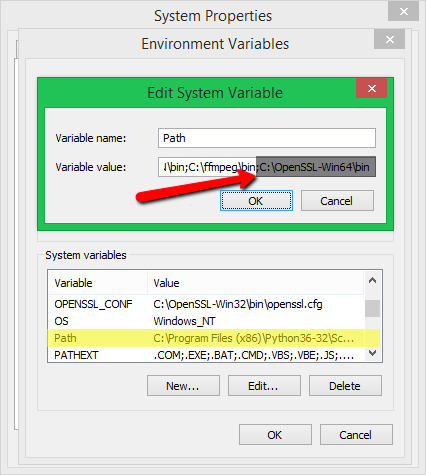
Step 3 – Setup Environment Variables
Now set the environment variables to function OpenSSL properly on your system. You are required to set OPENSSL_CONF and Path environment variables.
Use the following commands to set the environment for the current session only:
set OPENSSL_CONF=C:\OpenSSL-Win64\bin\openssl.cfgset Path=%Path%;C:\OpenSSL-Win64\bin
Set Variables Permanently – You can also set the OPENSSL_CONF and Path environment variables in the system permanently. To set the environment variable follow:
Press Windows + R keys together to open run window, Then type “sysdm.cpl” in the Run dialog box and hit Enter. Alternatively, you can open Command Prompt and type the same command to open System Properties
Go to “Advanced” tab and click on “Environment variables“.
Set OPENSSL_CONF Variable:
Set Path Variable:
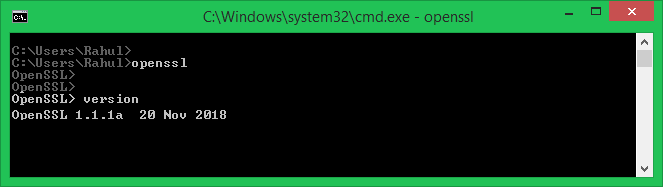
Step 4 – Run OpenSSL Binary
Open a command prompt on your system and type openssl to open OpenSSL prompt. After that type version to get the installed OpenSSL version on your system.
Conclusion
This tutorial helped you for installing OpenSSL on the Windows system. As a best security practice, it is recommended to use the latest OpenSSL version on your system. You can find the latest version details from the www.openssl.org