
Introduction
Managing who can access your server is important. Windows Server 2019 Datacenter, user group permissions help control access and keep everything secure. OpenSSH Windows makes it easy to connect to your server remotely, but setting up the right permissions is critical.
In this article, we will explain how permissions work. Windows Server You’ll also learn why they matter and how to set them up. Whether you are new or need a quick guide, this post will walk you through it step-by-step!
What is OpenSSH on Windows Server 2019 Datacenter?
OpenSSH Windows Server is a utility for remotely accessing servers to manage them even if a person is not sitting in front of them. It locks the data so no one sees it, and everything from the user to the server is kept safe. This is very useful in managing remote servers in other locations.
Let’s break this down to its essential parts to understand how it works.
OpenSSH, or Open Secure Shell, enables users to log into remote computers and give commands from afar. In other words, you’re using a computer that happens to be far away, but you are in front of it.
The primary function of OpenSSH is to protect any information shared by locking information, which is encryption. It saves hackers or other unwanted people from accessing or altering it.
Key Features of OpenSSH on Windows Server 2019
OpenSSH Windows Server’s basic feature is using a key to log in. It enables a connection without needing to write the password each time, which is very useful and secure.
The other feature is data protection. Everything shared between your computer and the server will remain confidential. OpenSSH can be used on various operating systems, such as Linux, and easily connects multiple systems. It’s fast, reliable, and doesn’t slow down the server.
Role of OpenSSH in Server Management
OpenSSH Windows Server can execute and manage servers; thus, an administrator may reboot services or upgrade installed applications remotely without physically being there. Files can also be transferred from anywhere.
OpenSSH also supports automated jobs: jobs like producing regular backups may run automatically without manual intervention. Using OpenSSH makes administering this server relatively easier because more time is saved with fewer changes for error.
Understanding User Groups and Permissions
User groups and permissions control access to resources on a server. Instead of assigning specific access to every user, users are put into groups, and the group is assigned permissions. This approach makes it much more manageable, especially when several users have the same rights.
Let’s dive into more detail on how user groups and permissions work.

What Are User Groups?
A user group is an aggregation of people who can access files or programs the same way. For example, “Admins” contains a list of individuals responsible for managing the server, whereas setup group permissions on Windows server “Developers” contains a group of employees working on their software project.
Groups help by reducing the time needed to assign permissions to each user individually. When you update the group’s permissions, all users in the group get the new access.
How Permissions Work for User Groups
Permissions tell the system what actions a group or user is allowed to perform. These actions could include reading files, changing them, or running certain commands.
For example, one can be allowed to read data but not delete it. Permissions ensure that only the right people can do specific things, thus eliminating errors or unauthorized changes.
Importance of Permission Management for Security
Manual handling of permissions is an important task to keep the system secure. If one user gains more access than he requires, it could result in accidental or intentional damage.
Proper permission management also protects sensitive information. Only those needing access will see or change the essential data, thus minimizing security risks and keeping it safe.
Setting Up OpenSSH on Windows Server 2019 Datacenter
This lesson will teach you how to set up OpenSSH Windows Server 2019 Datacenter. This includes installing OpenSSH, making access for the users, and testing everything that should work just right.
Installing OpenSSH on Windows Server 2019
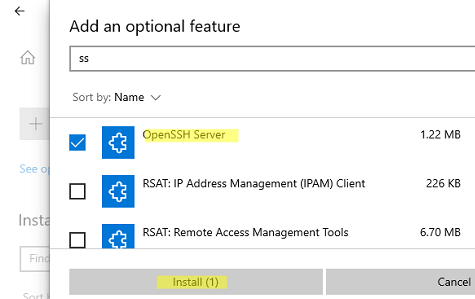
First, you’ll need to add OpenSSH. OpenSSH is a feature of Windows, so adding it is pretty simple. Go to your server settings and look for “Optional Features.” There, you’ll find OpenSSH. The installation process is straightforward; follow the prompts, and your server will be ready for secure connections.
Setting Up Basic SSH Access for Users
Once OpenSSH is installed, the job is to configure user access. You will be expected to open accounts for users connecting remotely to your server. You will need a username and password for each user account. Be sure to allow appropriate access rights on each account. This will then ensure that the users can connect with the server without any hindrance.
Testing OpenSSH Before Setting Permissions
Set permissions before moving on, but test whether OpenSSH is working first. You can do this by trying to SSH into your server. Use a terminal or command prompt to do so. If it connects, all is well and good! If it doesn’t, you’ll need to review some of your settings and make the appropriate alterations to get everything working as expected.
How to Configure User Group Permissions for OpenSSH
This section will discuss how to configure user group permissions for OpenSSH. This allows you to control who accesses your server and what they can do.
Creating User Groups on Windows Server 2019
The first thing you have to do is create user groups, which help manage many users. To make a group:
- Open the Computer Management tool and locate Local Users and Groups.
- Right-click Groups and click New Group.
- Assign your group a sensible name, such as “SSH Users.”
- Assign the users to this group so that they share permissions.
Assigning Permissions to User Groups
Once you have your groups, you need to set permissions. Permissions explain what users can and cannot do. You can also enable permissions for each group. For example, you could let the “SSH Users” group access the server but deny it any significant configuration rights. To add permissions to your group, right-click on the group and choose Properties. Select Members from the Properties menu, where you can add members and configure their rights.
Configure OpenSSH to Require Group Permissions
Now that you have configured the user groups and permissions, you will need to enforce these rules for OpenSSH. Open the OpenSSH configuration file. Its installation folder should tell you where it is located. You will be looking for a file named sshd_config. That is where you set the rules for your user groups. Save your changes and then restart OpenSSH so it can apply the new permissions.
Managing and Changing Permissions
In this chapter, we’ll discuss how to manage and change user group permissions. It’s very important to keep your permissions current so your server stays safe.
How to View Current User Group Permissions
You can see what the user groups have in them. This is as easy as loading the Computer Management tool again and finding Local Users and Groups > Groups. Click on the name of the group you’d like to review. When you right-click on a group and select Properties, you can see who is in it and what their permissions are. Reviewing this periodically is good practice to ensure everything looks correct.
Change Group Permission by using PowerShell
If you want to change permissions, PowerShell is the quickest way. You open up PowerShell as an admin. You can use commands to add or remove permissions. If you want to give a group more access, you can use the command Add-LocalGroupMember. Remove-LocalGroupMember would be used to remove access. Double-check your commands before running them. You will not accidentally change something you didn’t mean to do.
Be very careful when granting or taking away permissions. Give them only the access they need. This will ensure that your server is as safe as possible. When a person leaves your team, don’t forget to remove him from any user groups he might have belonged to. Periodically, check the permissions so you can update them accordingly to prevent unauthorized access to your server.
Common OpenSSH Permission Errors
Sometimes, errors appear when the user tries to access the server. Common ones include “Access Denied.” This often occurs due to insufficient permissions. You may have problems connecting if the OpenSSH service is not running. Be very careful when analyzing error messages because sometimes they can explain the cause of the problem.
Overcoming Access Denied Errors
If you get an “Access Denied” message, the first thing to do is check a user’s permissions. Scroll back to the Computer Management tool and check what group they belong to. Make sure that the group has permissions set up correctly. If so, check if the user is added correctly to a group. Sometimes, just re-adding the user is enough.
If these don’t help, read on. Restart the OpenSSH service. Sometimes, the easiest solution is just a reboot. To do that, open PowerShell and type the command Restart-Service sshd. Examine your log files as well. These can sometimes be an enormous source of detail to identify what happened wrong. Reading through the logs might reveal clues that, at the same time, give away quick solutions to problems.
Here, we are going to learn how scripts could make working with groups of users and permissions much easier. Automated routine tasks will save you hours and avoid mistakes.
Advantages of Automation of Permission Management
Automating permission management will mean you can set things to happen independently. That’s fantastic because it saves time and ensures everything’s done correctly. You won’t have to check and update permissions manually. Instead, let the script do it for you, and you can focus on other important matters.
Sounds hard to do? Not really. With PowerShell, you can author straightforward scripts that simply add a user to a group or change permissions on files and folders. It could automatically add users who meet specific criteria to a particular group. The primary point here is to get trim, test them to be sure they are doing what they’re supposed to, and iterate.
Scheduling Scripts to Update Permissions
Now, by scheduling your scripts to execute on a scheduled basis, you would have them automatically operate during certain times of the month, for example. All of this can be found using Task Scheduler on Windows, so do not forget to update your permissions!
Good Practice for OpenSSH Permission Administration
This chapter discusses some good practices or habits for permission administration through OpenSSH. Concerning these best practices, your system will remain secure and operate smoothly.
Accuracy in access control
Access control is the process of allowing only those who need to access the system in certain places. Only give permissions to users when they need them. This is the only way to prevent unauthorized access and keep your server safe. Check the access levels from time to time and eliminate anyone who no longer needs access to their system.
Maintaining Access Controls with Server Policies
As your organization grows, so does your server policy. Permissions must be updated along with the changing policies. They must also be checked periodically and changed when required. This ensures everyone receives access at the right level for their role.
Permission for Regular Auditing for Security
Auditing checks how the permissions are set up. Regularly review the user permissions to make sure everything is just fine. Check for any strange or out-of-place permissions, as far as this goes. This can help you spot problems before they grow into significant security issues. If you’re on your toes, your server cannot fall off.
Conclusion:
This conclusion will summarize what we know about setting up user group permissions for OpenSSH on Windows Server 2019.
We discussed how to handle user and group permissions in OpenSSH. The right permissions must be set to help keep your server safe and ensure that the user can do his or her job without problems. In this tutorial, we learned how to create user groups, assign permissions, and see whether everything works well.
FAQs
Is it possible to give different permissions to every user in the same group?
If you remove a user from a group, the group’s access is now removed from that user, meaning they can’t perform any actions allowed only by the group.
How do I deny unauthorized access to OpenSSH?
Deter unauthorized access by creating strong passwords and keeping your permissions updated. Be vigilant and check often who can gain access to your server.
Is PowerShell needed to administer group permissions?
You don’t need PowerShell for group permission management, but it makes things easier. If you prefer, you can also use the graphical user interface(GUI).
What are the best practices for automating permission updates?
Best practices include writing clear scripts and scheduling them to run regularly. You should also always test your scripts to make sure they work as expected.
How do I troubleshoot permission conflicts between users and groups?
It would then be advisable to troubleshoot possible conflicts and examine user and group permissions for possible overlapping or lack of permission that could contribute to the problem.
Latest post:
- How to convert the putty key to openssh windows?
- How to openssh via terminal windows?
- How to change default sftp location in openssh windows?
- What is the difference between OpenSSH and PuTTY?
- How to Install OpenSSH on Windows?
В современных версиях Windows уже есть встроенный SSH сервер на базе пакета OpenSSH. В этой статье мы покажем, как установить и настроить OpenSSH сервер в Windows 10/11 и Windows Server 2022/2019 и подключиться к нему удаленно по защищенному SSH протоколу (как к Linux).
Содержание:
- Установка сервера OpenSSH в Windows
- Настройка SSH сервера в Windows
- Sshd_config: Конфигурационный файл сервера OpenSSH
- Подключение по SSH к Windows компьютеру
- Логи SSH подключений в Windows
Установка сервера OpenSSH в Windows
Пакет OpenSSH Server включен в современные версии Windows 10 (начиная с 1803), Windows 11 и Windows Server 2022/2019 в виде Feature on Demand (FoD). Для установки сервера OpenSSH достаточно выполнить PowerShell команду:
Get-WindowsCapability -Online | Where-Object Name -like ‘OpenSSH.Server*’ | Add-WindowsCapability –Online
Или при помощи команды DISM:
dism /Online /Add-Capability /CapabilityName:OpenSSH.Server~~~~0.0.1.0
Если ваш компьютер подключен к интернету, пакет OpenSSH.Server будет скачан и установлен в Windows.
Также вы можете установить сервер OpenSSH в Windows через современную панель Параметры (Settings -> Apps and features -> Optional features -> Add a feature, Приложения -> Управление дополнительными компонентами -> Добавить компонент. Найдите в списке OpenSSH Server и нажмите кнопку Install).
На изолированных от интернета компьютерах вы можете установить компонент с ISO образа Features On Demand (доступен в личном кабинете на сайте Microsoft: MSDN или my.visualstudio.com). Скачайте диск, извлеките его содержимое в папку c:\FOD (достаточно распаковать извлечь файл
OpenSSH-Server-Package~31bf3856ad364e35~amd64~~.cab
), выполните установку из локального репозитория:
Add-WindowsCapability -Name OpenSSH.Server~~~~0.0.1.0 -Online -Source c:\FOD
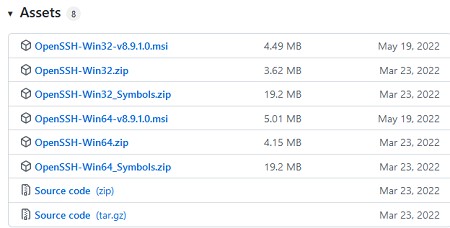
Также доступен MSI установщик OpenSSH для Windows в официальном репозитории Microsoft на GitHub (https://github.com/PowerShell/Win32-OpenSSH/releases/). Например, для Windows 10 x64 нужно скачать и установить пакет OpenSSH-Win64-v8.9.1.0.msi. Следующая PowerShell команда скачает MSI файл и установит клиент и сервер OpenSSH:
Invoke-WebRequest https://github.com/PowerShell/Win32-OpenSSH/releases/download/v8.9.1.0p1-Beta/OpenSSH-Win64-v8.9.1.0.msi -OutFile $HOME\Downloads\OpenSSH-Win64-v8.9.1.0.msi -UseBasicParsing
msiexec /i c:\users\root\downloads\OpenSSH-Win64-v8.9.1.0.msi
Также вы можете вручную установить OpenSSH сервер в предыдущих версиях Windows (Windows 8.1, Windows Server 2016/2012R2). Пример установки Win32-OpenSSH есть в статье “Настройка SFTP сервера (SSH FTP) в Windows”.
Чтобы проверить, что OpenSSH сервер установлен, выполните:
Get-WindowsCapability -Online | ? Name -like 'OpenSSH.Ser*'
State : Installed

Настройка SSH сервера в Windows
После установки сервера OpenSSH в Windows добавляются две службы:
- ssh-agent (OpenSSH Authentication Agent) – можно использовать для управления закрытыми ключами если вы настроили SSH аутентификацию по ключам;
- sshd (OpenSSH SSH Server) – собственно сам SSH сервер.
Вам нужно изменить тип запуска службы sshd на автоматический и запустить службу с помощью PowerShell:
Set-Service -Name sshd -StartupType 'Automatic'
Start-Service sshd

С помощью nestat убедитесь, что теперь в системе запущен SSH сервер и ждет подключений на порту TCP:22 :
netstat -na| find ":22"

Проверьте, что включено правило брандмауэра (Windows Defender Firewall), разрешающее входящие подключения к Windows по порту TCP/22.
Get-NetFirewallRule -Name *OpenSSH-Server* |select Name, DisplayName, Description, Enabled
Name DisplayName Description Enabled
---- ----------- ----------- -------
OpenSSH-Server-In-TCP OpenSSH SSH Server (sshd) Inbound rule for OpenSSH SSH Server (sshd) True

Если правило отключено (состоянии Enabled=False) или отсутствует, вы можете создать новое входящее правило командой New-NetFirewallRule:
New-NetFirewallRule -Name sshd -DisplayName 'OpenSSH Server (sshd)' -Enabled True -Direction Inbound -Protocol TCP -Action Allow -LocalPort 22
Рассмотрим, где храниться основные компоненты OpenSSH:
- Исполняемые файлы OpenSSH Server находятся в каталоге
C:\Windows\System32\OpenSSH\
(sshd.exe, ssh.exe, ssh-keygen.exe, sftp.exe и т.д.) - Конфигурационный файл sshd_config (создается после первого запуска службы):
C:\ProgramData\ssh - Файлы authorized_keys и ssh ключи можно хранить в профиле пользователей:
%USERPROFILE%\.ssh\
Sshd_config: Конфигурационный файл сервера OpenSSH
Настройки сервере OpenSSH хранятся в конфигурационном файле %programdata%\ssh\sshd_config. Это обычный текстовый файл с набором директив. Для редактирования можно использовать любой текстовый редактор (я предпочитаю notepad++). Можно открыть с помощью обычного блокнота:
start-process notepad C:\Programdata\ssh\sshd_config
Например, чтобы запретить SSH подключение для определенного доменного пользователя (и всех пользователей указанного домена), добавьте в конце файле директивы:
DenyUsers winitpro\[email protected]
DenyUsers corp\*
Чтобы разрешить подключение только для определенной доменной группы:
AllowGroups winitpro\sshadmins
Либо можете разрешить доступ для локальной группы:
AllowGroups sshadmins
По умолчанию могут к openssh могут подключаться все пользователи Windows. Директивы обрабатываются в следующем порядке: DenyUsers, AllowUsers, DenyGroups,AllowGroups.
Можно запретить вход под учетными записями с правами администратора, в этом случае для выполнения привилегированных действий в SSH сессии нужно делать runas.
DenyGroups Administrators
Следующие директивы разрешают SSH доступ по ключам (SSH аутентификации в Windows с помощью ключей описана в отдельной статье) и по паролю:
PubkeyAuthentication yes
PasswordAuthentication yes
Вы можете изменить стандартный SSH порт TCP/22, на котором принимает подключения OpenSSH в конфигурационном файле sshd_config в директиве Port.
После любых изменений в конфигурационном файле sshd_config нужно перезапускать службу sshd:
restart-service sshd
Подключение по SSH к Windows компьютеру
Теперь вы можете попробовать подключиться к своей Windows 10 через SSH клиент (в этом примере я использую putty).
Вы можете использовать встроенный SSH клиентом Windows для подключения к удаленному хосту. Для этого нужно в командной строке выполнить команду:
ssh [email protected]
В этом примере
alexbel
– имя пользователя на удаленном Windows компьютере, и 192.168.31.102 – IP адрес или DNS имя компьютера.
Обратите внимание что можно использовать следующие форматы имен пользователей Windows при подключении через SSH:
-
alex@server1
– локальный пользователь Windows -
[email protected]@server1
–пользователь Active Directory (в виде UPN) или аккаунт Microsoft/ Azure(Microsoft 365) -
winitpro\alex@server1
– NetBIOS формат имени
В домене Active Directory можно использовать Kerberos аутентификацию в SSH. Для этого в sshd_config нужно включить параметр:
GSSAPIAuthentication yes
После этого можно прозрачно подключать к SSH сервер с Windows компьютера в домене из сессии доменного подключается. В этом случае пароль пользователя не указывается и выполняется SSO аутентификация через Kerberos:
ssh -K server1
При первом подключении появится стандартный запрос на добавление узла в список известных SSH хостов.
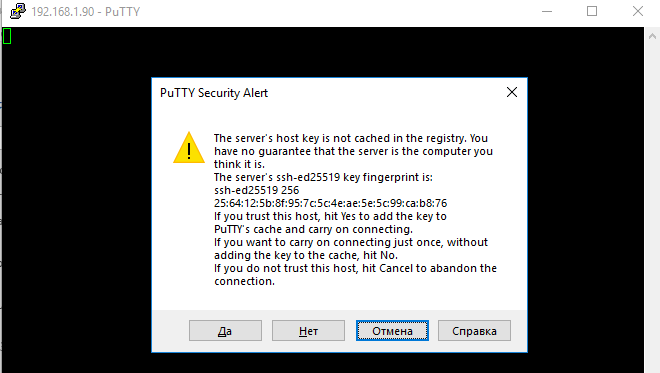
Нажимаем Да, и в открывшееся окне авторизуемся под пользователем Windows.
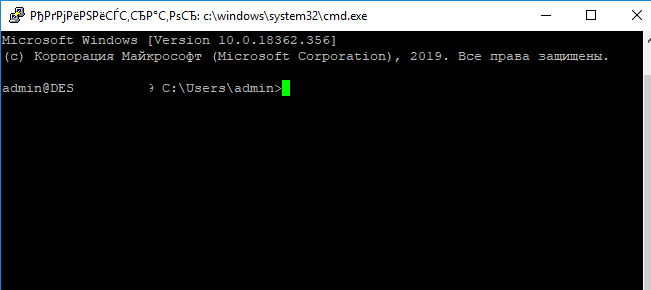
При успешном подключении запускается командная оболочка cmd.exe со строкой-приглашением.
admin@win10tst C:\Users\admin>
В командной строке вы можете выполнять различные команды, запускать скрипты и программы.
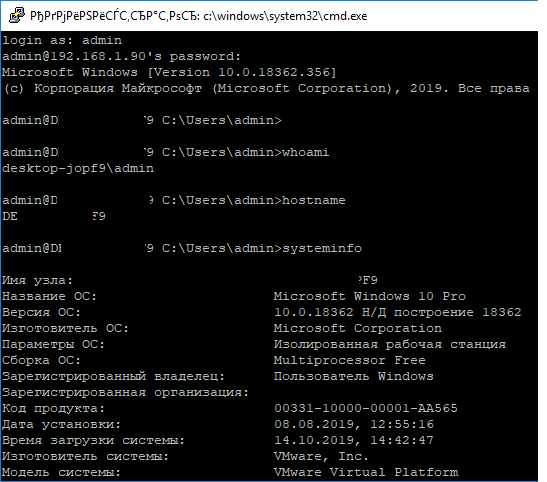
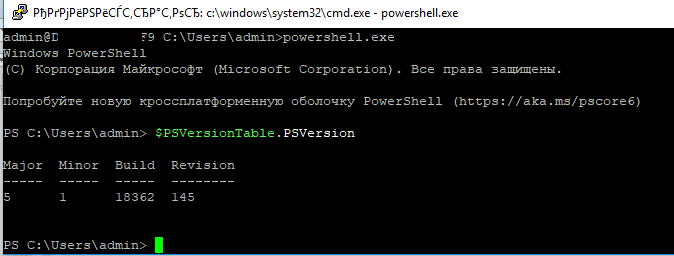
Я предпочитаю работать в командной строке PowerShell. Чтобы запустить интерпретатор PowerShell, выполните:
powershell.exe
Чтобы изменить командную оболочку (Shell) по умолчанию в OpenSSH с cmd.exe на PowerShell, внесите изменение в реестр такой командой:
New-ItemProperty -Path "HKLM:\SOFTWARE\OpenSSH" -Name DefaultShell -Value "C:\Windows\System32\WindowsPowerShell\v1.0\powershell.exe" -PropertyType String –Force
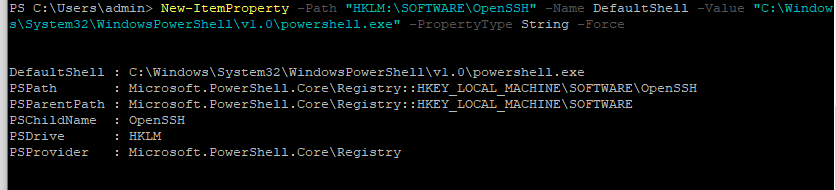
Осталось перезапустить SSH подключение и убедиться, что при подключении используется командный интерпретатор PowerShell (об этом свидетельствует приглашение
PS C:\Users\admin>
).
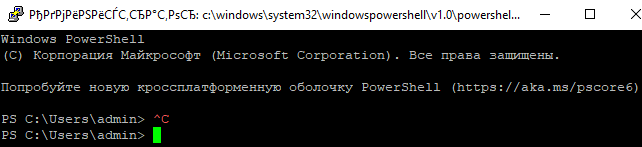
В SSH сессии запустилась командная строка PowerShell, в которой работают привычные функции: авто дополнение, раскраска модулем PSReadLine, история команд и т.д. Если текущий пользователь входит в группу локальных администраторов, то все команды в его сессии выполняются с повышенными правами даже при включенном UAC.
Логи SSH подключений в Windows
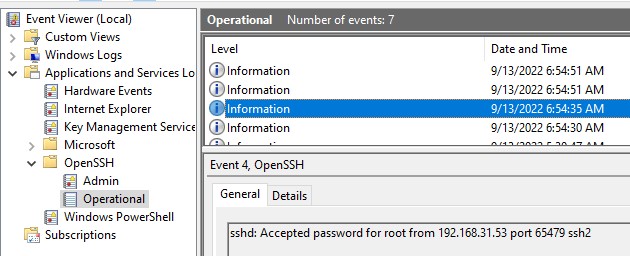
В Windows логи подключений к SSH серверу по-умолчанию пишутся не в текстовые файлы, а в отдельный журнал событий через Event Tracing for Windows (ETW). Откройте консоль Event Viewer (
eventvwr.msc
>) и перейдите в раздел Application and services logs -> OpenSSH -> Operational.
При успешном подключении с помощью к SSH серверу с помощью пароля в журнале появится событие:
EventID: 4
sshd: Accepted password for root from 192.168.31.53 port 65479 ssh2
Если была выполнена аутентификация с помощью SSH ключа, событие будет выглядеть так:
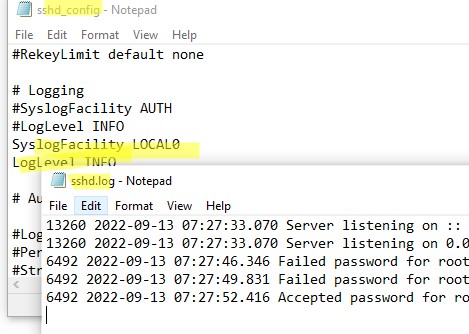
sshd: Accepted publickey for locadm from 192.168.31.53 port 55772 ssh2: ED25519 SHA256:FEHDEC/J72Fb2zC2oJNb45678967kghH43h3bBl31ldPs
Если вы хотите, чтобы логи писались в локальный текстовый файл, нужно в файле sshd_config включить параметры:
SyslogFacility LOCAL0
LogLevel INFO
Перезапустите службу sshd и провеьте, что теперь логи SSH сервера пишутся в файл C:\ProgramData\ssh\logs\sshd.log
Lately, I have been working a lot with SSH and Windows 10, for one transitioning away from WMI for certain things, hopefully, a blog post coming on that front soon. Setting up SSH on Windows 10 is fairly simple to do, but it is one of those processes that can be wrought with missteps and misinformation from various places. As a case in point, you may receive permissions issues on a private key connecting to Windows 10. Why is this? Let’s take a look at bad owner or permissions on SSH config Windows 10 and see what this relates to.
Public key authentication with Windows 10
First of all, if you see this error mentioned in the title of the blog post, it means you are most likely attempting to configure public key authentication to access your OpenSSH installed and configured in Windows 10. Why do you want to configure public key authentication?
First of all, if you want to know how to configure Windows 10 SSH, take a look at my blog post here:
- OpenSSH Server Windows 10 Install with Public Key authentication
Also, learn about OpenSSH in general here:
- OpenSSH
Public key authentication is noted as a more secure way to authenticate to an OpenSSH server. Why is this? With public-key authentication, you have two parts of a cryptographic key that grants access. It includes both a private key and a public key. The SSH server possesses the public key of the key pair, while you as the user possess the private key. In addition to passing the physical private key file, you can also secure the private key with a password.
So, it is easy to understand how this type of authentication is much more secure. As far as the cryptographic key is concerned, an attacker can’t simply brute force the server to guess a weak, guessable, or cracked password to gain access. They have to have possession of the key and know the password if the private key is secured with one.
SSH clients have also come a long way in recognizing when there may be bad ideas in play when it comes to private key files. If the permissions contain other security permissions on the private key file other than the user that should possess those permissions, the key can be more easily compromised.
Many SSH clients check for the permissions configured on the SSH private key and if these are too permissive, it will not be allowed for use to make the SSH connection. Note the following error seen when trying to SSH into a remote Windows 10 machine with wide-open permissions on the private key file:
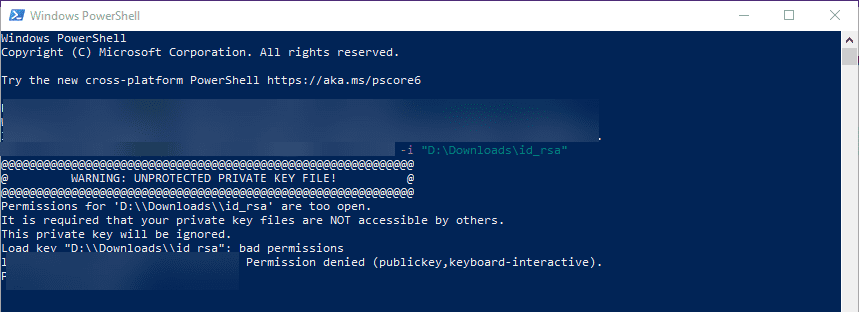
The error above states the issue: Permissions for the key file are too open. It is required that your private key files are NOT accessible by others. This private key will be ignored.
To get past the Bad Owner or Permissions on SSH Config Windows 10 error, you need to configure three things:
- Permissions on the authorized_keys file
- Permissions on your private key file
- sshd_config file changes
Part of the process to properly configure your Windows 10 SSH session for public-key authentication is ensuring the permissions are set correctly, both on the authorized_keys file (holds public key) and the private key file that holds the private key side of your key pair. Let’s take a look at both.
When you enable OpenSSH on your Windows 10 machine, you need to create the .ssh directory in the user profile of the user you will be logging in with. This is the location OpenSSH looks to find the authorized public keys, and by extension, the paired private keys that are allowed to access the machine.
By default, when you create the directory and the authorized_keys file, it will have too many permissions assigned. As you can see, it will have the local Administrators group added to the file. Click Advanced.
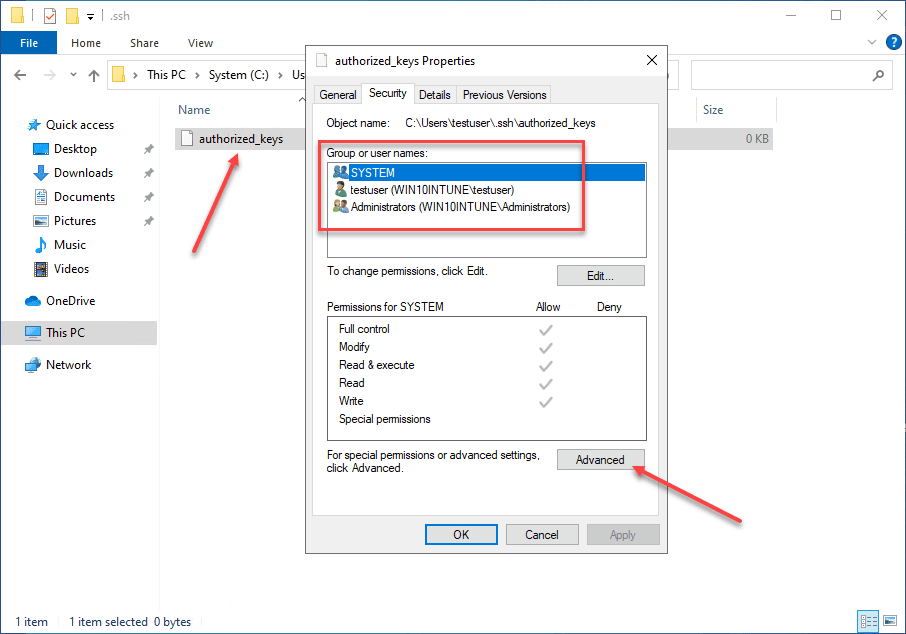
Here, we need to disable inheritance. This breaks inheritance on the folder and allows you to set explicit permissions.
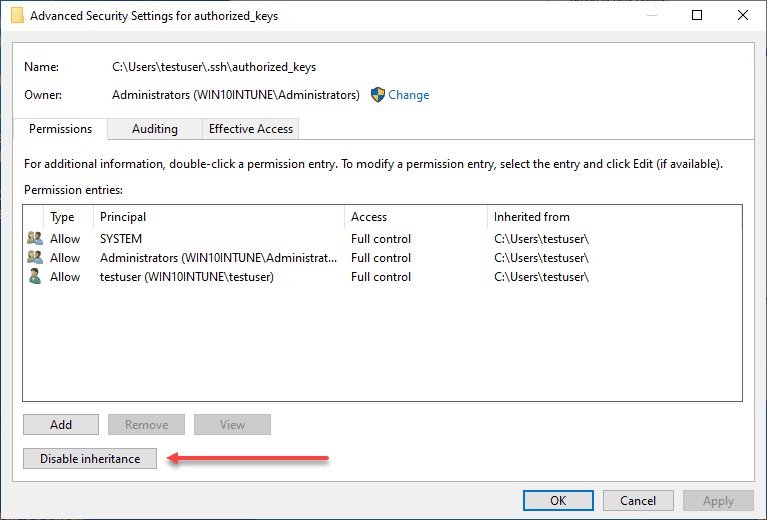
Choose the option Convert inherited permissions into explicit permissions on this object.

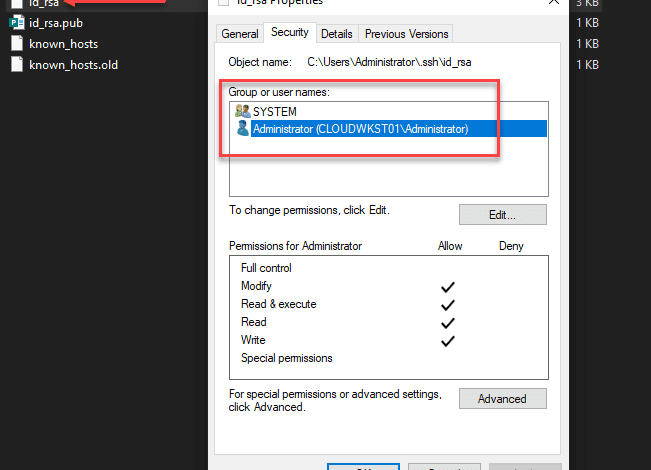
Adjust your permissions so that you only have SYSTEM and your username displayed as having permissions on the authorized_keys file.
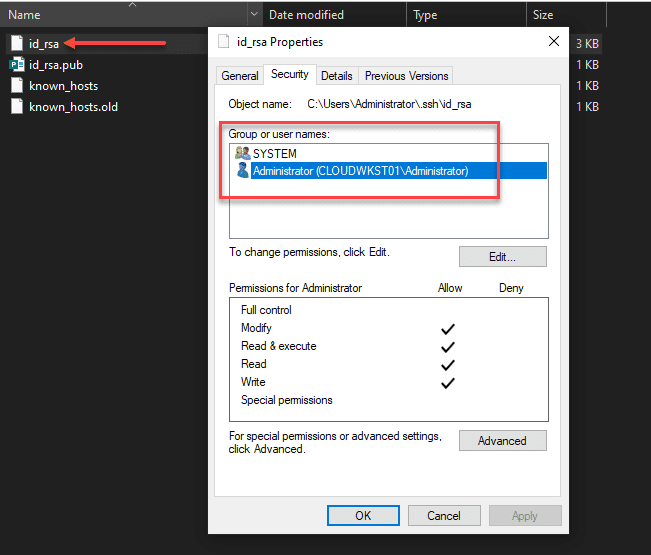
Permissions on your private key file
Now, on your private key, you need to ensure the same thing is set. The user that you are logged in with and SYSTEM are the only permissions that need to be enumerated on the private key file.
sshd_config file changes
Now that we have the permissions set correctly on the authorized_keys file and the private key, we need to make sure the sshd_config file is configured correctly. We need to make three changes for this to work correctly:
Below, I have uncommented the PubeyAuthentication yes stanza. Then, we have commented out the PasswordAuthentication yes and Match Group administrators configuration.
PubkeyAuthentication yes
#PasswordAuthentication yes
#Match Group administrators
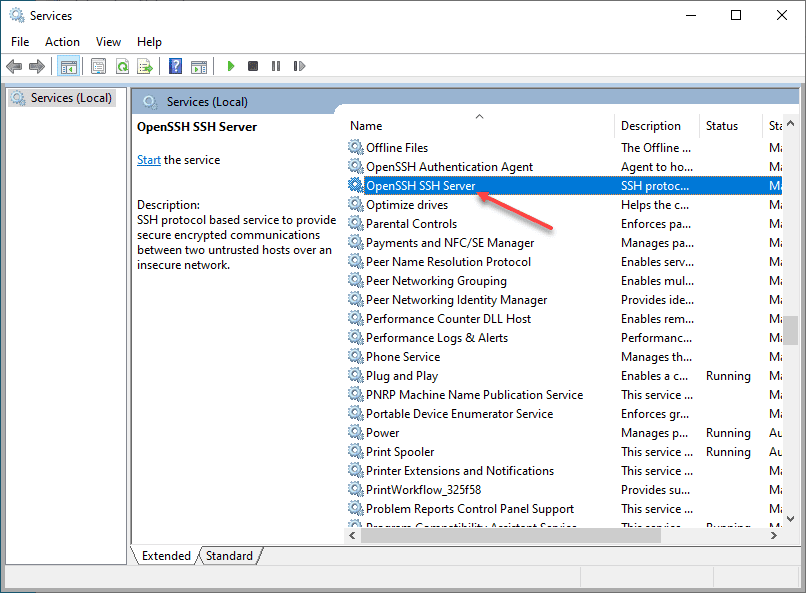
# AuthorizedKeysFile __PROGRAMDATA__/ssh/administrators_authorized_keysBe sure to restart your OpenSSH SSH Server service on your Windows 10 machine after making these changes to the sshd_config file. Once the changes are in place, you should be able to connect to the machine via SSH.
Wrapping Up
Connecting to Windows 10 via SSH is a great way to make secure connections to Windows 10 when public-key authentication is used. It can also be a great way to use solutions like Ansible to connect to your Windows 10 boxes remotely.
Brandon Lee
Brandon Lee is the Senior Writer, Engineer and owner at Virtualizationhowto.com, and a 7-time VMware vExpert, with over two decades of experience in Information Technology. Having worked for numerous Fortune 500 companies as well as in various industries, He has extensive experience in various IT segments and is a strong advocate for open source technologies. Brandon holds many industry certifications, loves the outdoors and spending time with family. Also, he goes through the effort of testing and troubleshooting issues, so you don’t have to.
SSH • Windows • Конфигурирование • OpenSSH • Компьютерные истории • Истории
Введение
Начиная с верcии 1803, в Windows 10 доступны SSH клиент и SSH сервер, причём, SSH клиент установлен и готов к использованию, как говорится, прямо из коробки, а SSH сервер надо устанавливать, но делается это буквально в пару-тройку кликов мышкой[1]. Что это означает? С точки зрения клиента можно говорить о том, что сторонние программы, такие как PuTTY, вроде как больше не нужны. С точки зрения сервера — не надо устанавливать никакие сторонние серверы, если есть решение интегрированное.
В работе что клиент, что сервер, практически не отличаются от того ПО, к которому я привык в Debian. Но, как ни крути, есть некоторые отличия, и вот об одном из них попробую сейчас рассказать. Речь пойдет о подключении к SSH серверу, работающему на Windows, с клиента, в моем случае, работающего на Debian Jessie, причем, без использования пароля, то есть, задействуя ключи.
На самом деле, начало процесса не отличается от стандартного: если у вас нет набора ключей, вам его надо сгенерировать, если есть — используйте существующий. Речь сейчас идёт о той машине, которая будет клиентом. И я уже как-то писал об этом, но на некоторых моментах всё-таки остановлюсь ещё раз: повторенье — мать ученья 😉.
Про генерацию ключей
Итак, если ключей нет и вы работаете на системе под управлением Linux, то вот эта команда поможет вам их сгенерировать:
ssh-keygen -t rsa
Если же вы работаете под Windows, то у вас есть несколько возможностей сгенерировать ключи:
- Если вы работаете под
Windows 10и включили возможность использовать встроенныйSSHклиент, то смело используйте командуssh-keygen— должно сработать… 🙄😉 - Если вы работаете под
Windows 10и включили возможность использовать WSL, то можете воспользоваться возможностями этой подсистемы, то есть, использовать в ней… всё ту же командуssh-keygen. - Если вы работаете под
Windows 10и у вас не установлен встроенныйSSHклиент и не включена возможность использованияWSL, или же у вас более ранняя версияWindows, то придется использовать стороннее ПО, тот же PuTTY с его генераторомPuTTYgen— для этого случая есть достаточно подробная документация.
Если пара ключей успешно сгенерирована, или уже была у вас, то необходимо «доставить» публичный ключ на сервер и там сделать его доступным для использования SSH сервером. И вот тут то и начинаются отличия от обычного — для мира Linux — процесса.
Доставка публичного ключа на сервер Linux
Что я делал, когда мне надо было «доставить» ключ на SSH сервер, работающий на Linux? Всё очень просто — запуск следующей команды на клиентской машине решал все вопросы:
ssh-copy-id user_name@server_name_or_ip
где user_name — имя пользователя, ключ которого передаётся на сервер, а server_name_or_ip — имя или адрес хоста с сервером SSH, к которому есть желание подключаться без ввода пароля (от имени пользователя с ключом). Иногда команда не работала и приходилось явно указывать файл (при помощи параметра командной строки -i), в котором хранился публичный ключ, но это, в большей степени, зависело от устройства, на котором выполнялась эта команда, вернее, от версии ОС, ну и от реализации и версии криптографического ПО, конечно.
Но, в случае, когда в качестве сервера выступает машина с Windows, этот приём не прокатывает — ключ не передаётся на нужный хост и всё. Не знаю, эксперименты эти я проводил довольно давно, может, в новых версиях Windows эту «особенность» исправили, а может и нет. В любом случае, тогда мне пришлось искать обходной путь.
Собственно, сам этот путь очевиден — раз не получается сделать передачу ключа автоматом, надо всё выполнить вручную. А для этого необходимо знать, где и как Windows хранит публичные ключи, используемые SSH сервером для аутентификации клиентов. К счастью, в документации Microsoft есть необходимая информация и её надо просто использовать. Давайте её детально разберём, при том держа в уме, что документация предполагает работу с клиентской машины под управлением Windows с заранее настроенным доступом по SSH к необходимому серверу.
Создание каталога для хранения ключей
Итак, из документации становится очевидно, что Windows хранит пользовательские ключи, используя тот же принцип, что и Linux: на сервере в файле authorized_keys в подкаталоге .ssh домашнего каталога пользователя (а это, как правило, c:\Users\user_name, где user_name — имя пользователя), от имени которого вы хотите работать в установившемся SSH сеансе. Если этого каталога нет, его надо создать, для чего предлагается использовать команду:
ssh user_name@domain_name@host_name "mkdir C:\\users\\user_name\\.ssh\\"
где user_name — имя пользователя, domain_name — имя домена, в который входит пользователь (его можно опустить для локальных пользователей на удалённом сервере), host_name — имя или адрес хоста, к которому подключаемся. Приведённая мною команда несколько отличается от той, которая дана в документации, но следует помнить, что я работаю с клиентской машины под управлением Linux.
Копирование публичного ключа
Далее, предлагается скопировать во вновь созданный каталог файл с публичным ключом пользователя, от имени которого вы работаете на клиентской машине при подключении к серверу по SSH (команда слегка отличается от той, которая приведена в документации, так как я работаю с машины под управлением Debian):
scp ~/.ssh/public_key_file_name.pub user_name@domain_name@host_name:C:\Users\user_name\.ssh\authorized_keys
где public_key_file_name.pub — имя файла публичного ключа, например, id_ed25519.pub или id_rsa.pub (далее в примерах я буду использовать для простоты id_rsa.pub).
На этом моменте хотелось бы остановиться подробнее. Обычно вы работаете на своём компьютере (или виртуалке) под своим собственным пользователем. Когда вы подключаетесь к удалённой машине по SSH, вы можете подключаться под именем своего текущего пользователя локальной машины, или использовать имя какого-либо пользователя удалённого компьютера, или же — доменное имя. Конечно, в любом случае на удалённом хосте должен существовать соответствующий пользователь (или разрешено использовать доменное имя), даже если его имя будет совпадать с именем пользователя, под которым вы работаете на своём локальном хосте. Так вот, совсем не обязательно, что вы единственный подключаетесь к удалённому хосту под определенным пользователем, вполне возможно, что с других хостов другие люди (или вы сами?) также подключаются по SSH, используя ту же самую учётную запись.
Возможно то, что я написал выше, это «ужас-ужас» с точки зрения безопасности, но такая ситуация весьма вероятна в домашних и небольших офисных сетях (да и не только 🙁), в которых не сильно заморачиваются с администрированием. И вот в таких случаях, копировать файл со своим публичным ключом — плохая идея: вы просто затрёте существующий файл authorized_keys с публичными ключами других пользователей (или ваших собственных ключей на других компьютерах — вряд ли вы переносите свою единственную пару ключей с хоста на хост 😉). Поэтому следует рассмотреть возможность добавлять свой ключ к соответствующему файлу на удалённом хосте.
Добавление публичного ключа
Естественно, возникает вопрос, как это можно сделать. И на этот вопрос существует множество ответов. Например, если у вас есть доступ к удалённому хосту по RDP, то можно отредактировать на нём файл authorized_keys с помощью того же notepad-а, добавив содержимое своего файла с публичным ключом. Или же, можно скопировать свой файл с публичным ключом на нужный сервер и объединить его с существующим файлом, а затем — удалить (конечно, при этом у вас, вернее, у вашего пользователя на удалённом компьютере, должны быть права на редактирование файла authorized_keys):
scp ~/.ssh/id_rsa.pub user_name@domain_name@host_name:C:/Users/user_name/.ssh/my_public_key_file_name.pub
ssh user_name@domain_name@host_name "type C:\\Users\\user_name\\.ssh\\my_public_key_file_name.pub >> C:\\Users\\user_name\\.ssh\\authorized_keys"
ssh user_name@domain_name@host_name "del /Q C:\\Users\\user_name\\.ssh\\my_public_key_file_name.pub"
Обратите внимание на использование символов ‘/’ в команде scp и ‘\’ в командах ssh — так как мы работаем на Debian, то в команду scp можно передать путь на хосте с Windows с использованием нестандартного для Windows разделителя ‘/’, а вот в команды, выполняемые при помощи ssh на том же удалённом компьютере, следует передавать символы ‘\’,то есть, стандартный для Windows разделитель ‘\’ с предшествующим символом ‘\’, так называемый «escaped backslash», иначе Windows не найдёт нужные файлы.
Назначение прав доступа к файлу с публичными ключами
Вот мы и подошли к последнему шагу — предоставлению прав доступа к файлу authorized_keys. Именно этим занимается команда:
ssh --% user_name@domain_name@host_name powershell -c $ConfirmPreference = 'None'; Repair-AuthorizedKeyPermission C:\Users\user_name\.ssh\authorized_keys
Основную смысловую нагрузку в этой составной команде несёт функция Repair-AuthorizedKeyPermission из модуля OpenSSHUtils для PowerShell (да, именно PowerShell используется в качестве командной оболочки в этот раз). Этот модуль надо устанавливать отдельно, например, так (выполнять эту команду надо, естественно, из PowerShell):
Install-Module -Force OpenSSHUtils -Scope AllUsers
Так вот, когда я запустил эту команду, ответом мне стало сообщение об ошибке:
Совпадения для указанных условий поиска и имени пакета "OpenSSHUtils" не найдены.
Естествено, я начал разбираться в сложившейся ситуации, после чего, если честно, желание использовать этот модуль у меня стало исчезающе малым.
Суть в том, что Windows 10 предъявляет определённые требования к безопасности файла authorized_keys (на самом деле, к безопасности публичных ключей). Причины, по которым это происходит, наверное, не надо объяснять. Так вот, в документации Microsoft указывается, что при использовании Windows 10 доступ может быть предоставлен только администаторам и специальному пользователю SYSTEM. Там же советуется использовать модуль OpenSSHUtils, который должен оказать помощь при установке нужных прав. Собственно, при использовании предложенного в документации подхода я и наткнулся на ошибку. Но кроме документации от Microsoft я нашёл довольно много информации о проблемах, вызванных использованием этого модуля. Если попробовать кратко изложить содержимое ответов на возникающие у пользователей вопросы и проблемы, то получится что-то типа:
«Не используйте этот модуль, он дополнительно предоставит права пользователю
sshd, после чего у вас перестанут соблюдаться требования к безопасности публичных ключей.»
Вот честно, не знаю, так это, или нет, но проверять расхотелось, тем более, что совсем не трудно задать нужные права самостоятельно. После некоторого изучения вопроса — я не большой специалист в PowerShell — получился вот такой вот набор команд[2] (я приведу их полностью, потом разберу для чего нужна каждая из них):
$acl = Get-Acl C:\Users\user_name\.ssh\authorized_keys
$acl.SetAccessRuleProtection($true, $false)
$adminsRule = New-Object system.security.accesscontrol.filesystemaccessrule("Администраторы","FullControl","Allow")
$sysRule = New-Object system.security.accesscontrol.filesystemaccessrule("SYSTEM","FullControl","Allow")
$acl.SetAccessRule($adminsRule)
$acl.SetAccessRule($sysRule)
Set-Acl -Path C:\Users\user_name\.ssh\authorized_keys -AclObject $acl
Теперь, как и обещал, небольшие пояснения по командам. Итак, для начала, при помощи cmdlet-а Get-Acl получаем дескриптор безопасности, содержащий ACL (Access Control List) нужного нам объекта файловой системы (параметр командной строки Path можно опустить) и сохраняем результат в переменной $acl. Далее, используя метод SetAccessRuleProtection полученного объекта, запрещаем наследование прав (true в первом параметре) и отказываемся от сохранения унаследованных ранее прав (false во втором параметре). Затем создаём два объекта, описывающих правила доступа к объектам файловой системы: один (сохраняется в переменной $adminsRule) — для Администраторов, второй (сохраняется в переменной $sysRule) — для специального пользователя SYSTEM. Теперь, при помощи метода SetAccessRule, добавляем только что соданные ACL к дескриптору безопасности нашего файла, хранящегося в переменной $acl. После чего, всё, что нам остаётся сделать — применить полученный дескриптор, для чего используем cmdlet Set-Acl.
Ну вот, теперь, когда мы выполнили все шаги, всё должно заработать. Но, в моём случае, не заработало. Очередная неудача заставила меня вновь полезть в документацию, что обогатило меня новыми знаниями. Рассказываю…
Публичные ключи для работы от имени пользователей администраторов
Причиной того, что при соединении с SSH сервером мне, несмотря на все предыдущие мытарства, продолжало выводиться требование ввести пароль, было то, что я пытался подключиться под пользователем, который входил в группу локальных Администраторов. У Windows 10 в этом случае есть требование — публичные ключи должны храниться в файле %programdata%/ssh/administrators_authorized_keys, то есть, обычно, в C:\ProgramData\ssh\administrators_authorized_keys.
Что ж, для того, чтобы решить проблему, можно воспользоваться двумя путями. Первый путь — воспользоваться процедурой добавления публичного ключа, рассмотренной нами выше. Да-да, все эти шаги: копирование, добавление, предоставление прав, только применяем их не к authorized_keys, а к administrators_authorized_keys. Я напишу, на всякий случай, полную последовательность команд, чтобы удобно было воспользоваться, но не забудьте подставить свои значения для пользователя, домена и хоста.
scp ~/.ssh/id_rsa.pub user_name@domain_name@host_name:C:/Users/user_name/.ssh/my_public_key_file_name.pub
ssh user_name@domain_name@host_name "type C:\\Users\\user_name\\.ssh\\my_public_key_file_name.pub >> C:\\ProgramData\\ssh\\administrators_authorized_keys"
ssh user_name@domain_name@host_name "del /Q C:\\Users\\user_name\\.ssh\\my_public_key_file_name.pub"
$acl = Get-Acl C:\ProgramData\ssh\administrators_authorized_keys
$acl.SetAccessRuleProtection($true, $false)
$adminsRule = New-Object system.security.accesscontrol.filesystemaccessrule("Администраторы","FullControl","Allow")
$sysRule = New-Object system.security.accesscontrol.filesystemaccessrule("SYSTEM","FullControl","Allow")
$acl.SetAccessRule($adminsRule)
$acl.SetAccessRule($sysRule)
Set-Acl -Path C:\ProgramData\ssh\administrators_authorized_keys -AclObject $acl
Второй путь чуть более радикальный — изменить настройки SSH сервиса. Настройки эти хранятся в файле %programdata%/ssh/sshd_config. Как оказалось, именно там определяется, где должны храниться публичные ключи тех пользователей, которые подключаются к SSH серверу от имени пользователей, входящих в группу администраторов. Вот, собственно, эти строки:
...
Match Group administrators
       AuthorizedKeysFile __PROGRAMDATA__/ssh/administrators_authorized_keys
...
Так вот, эти строки надо закомментировать или удалить, после чего SSH сервер надо перезапустить.
Какой путь использовать — решать вам. Я же, пожалуй, закончу — пост получился и так слишком длинным…
-
На самом деле, в виде beta версий эти компоненты были доступны и раньше, но и установка и стабильность работы, были, что называется, не на высоте. ↩︎
-
Честно признаюсь, очень многое я подсмотрел в документации, например, как отключить наследование прав, или предоставить Администраторам полный контроль над файлом, и лишь немного адаптировал эти примеры к собственным нуждам. ↩︎
Subscribe to Записки на полях
Get the latest posts delivered right to your inbox
Great! Check your inbox and click the link to confirm your subscription.
Please enter a valid email address!