
Agent to hold private keys used for public key authentication.
This service also exists in Windows 11.
Startup Type
| Windows 10 version | Home | Pro | Education | Enterprise |
|---|---|---|---|---|
| 1507 | not exists | not exists | not exists | not exists |
| 1511 | not exists | not exists | not exists | not exists |
| 1607 | not exists | not exists | not exists | not exists |
| 1703 | not exists | not exists | not exists | not exists |
| 1709 | not exists | not exists | not exists | not exists |
| 1803 | Manual | Manual | Manual | Manual |
| 1809 | Disabled | Disabled | Disabled | Disabled |
| 1903 | Disabled | Disabled | Disabled | Disabled |
| 1909 | Disabled | Disabled | Disabled | Disabled |
| 2004 | Disabled | Disabled | Disabled | Disabled |
| 20H2 | Disabled | Disabled | Disabled | Disabled |
| 21H1 | Disabled | Disabled | Disabled | Disabled |
| 21H2 | Disabled | Disabled | Disabled | Disabled |
| 22H2 | Disabled | Disabled | Disabled | Disabled |
Default Properties
| Display name: | OpenSSH Authentication Agent |
| Service name: | ssh-agent |
| Type: | own |
| Path: | %WinDir%\System32\OpenSSH\ssh-agent.exe |
| Error control: | normal |
| Object: | LocalSystem |
| Privileges: |
|
Default Behavior
The OpenSSH Authentication Agent service is running as LocalSystem in its own process of ssh-agent.exe. It doesn’t share its process with other services. If OpenSSH Authentication Agent fails to start, the error is logged. Windows 10 startup proceeds, but a message box is displayed informing you that the ssh-agent service has failed to start.
Restore Default Startup Type of OpenSSH Authentication Agent
Automated Restore
1. Select your Windows 10 edition and release, and then click on the Download button below.
2. Save the RestoreOpenSSHAuthenticationAgentWindows10.bat file to any folder on your hard drive.
3. Right-click the downloaded batch file and select Run as administrator.
4. Restart the computer to save changes.
Note. Make sure that the ssh-agent.exe file exists in the %WinDir%\System32\OpenSSH folder. If this file is missing you can try to restore it from your Windows 10 installation media.
Yea, though I walk through the valley of the shadow of death, I will fear no evil: for thou art with me; thy rod and thy staff they comfort me.
В современных версиях Windows уже есть встроенный SSH сервер на базе пакета OpenSSH. В этой статье мы покажем, как установить и настроить OpenSSH сервер в Windows 10/11 и Windows Server 2022/2019 и подключиться к нему удаленно по защищенному SSH протоколу (как к Linux).
Содержание:
- Установка сервера OpenSSH в Windows
- Настройка SSH сервера в Windows
- Sshd_config: Конфигурационный файл сервера OpenSSH
- Подключение по SSH к Windows компьютеру
- Логи SSH подключений в Windows
Установка сервера OpenSSH в Windows
Пакет OpenSSH Server включен в современные версии Windows 10 (начиная с 1803), Windows 11 и Windows Server 2022/2019 в виде Feature on Demand (FoD). Для установки сервера OpenSSH достаточно выполнить PowerShell команду:
Get-WindowsCapability -Online | Where-Object Name -like ‘OpenSSH.Server*’ | Add-WindowsCapability –Online
Или при помощи команды DISM:
dism /Online /Add-Capability /CapabilityName:OpenSSH.Server~~~~0.0.1.0
Если ваш компьютер подключен к интернету, пакет OpenSSH.Server будет скачан и установлен в Windows.
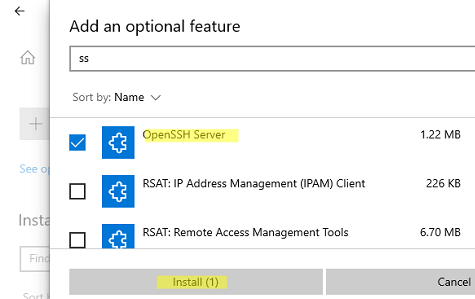
Также вы можете установить сервер OpenSSH в Windows через современную панель Параметры (Settings -> Apps and features -> Optional features -> Add a feature, Приложения -> Управление дополнительными компонентами -> Добавить компонент. Найдите в списке OpenSSH Server и нажмите кнопку Install).
На изолированных от интернета компьютерах вы можете установить компонент с ISO образа Features On Demand (доступен в личном кабинете на сайте Microsoft: MSDN или my.visualstudio.com). Скачайте диск, извлеките его содержимое в папку c:\FOD (достаточно распаковать извлечь файл
OpenSSH-Server-Package~31bf3856ad364e35~amd64~~.cab
), выполните установку из локального репозитория:
Add-WindowsCapability -Name OpenSSH.Server~~~~0.0.1.0 -Online -Source c:\FOD
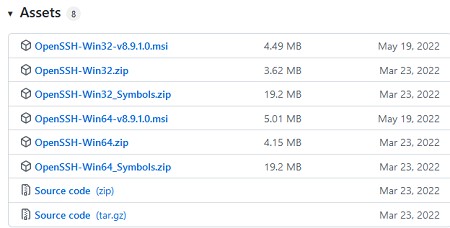
Также доступен MSI установщик OpenSSH для Windows в официальном репозитории Microsoft на GitHub (https://github.com/PowerShell/Win32-OpenSSH/releases/). Например, для Windows 10 x64 нужно скачать и установить пакет OpenSSH-Win64-v8.9.1.0.msi. Следующая PowerShell команда скачает MSI файл и установит клиент и сервер OpenSSH:
Invoke-WebRequest https://github.com/PowerShell/Win32-OpenSSH/releases/download/v8.9.1.0p1-Beta/OpenSSH-Win64-v8.9.1.0.msi -OutFile $HOME\Downloads\OpenSSH-Win64-v8.9.1.0.msi -UseBasicParsing
msiexec /i c:\users\root\downloads\OpenSSH-Win64-v8.9.1.0.msi
Также вы можете вручную установить OpenSSH сервер в предыдущих версиях Windows (Windows 8.1, Windows Server 2016/2012R2). Пример установки Win32-OpenSSH есть в статье “Настройка SFTP сервера (SSH FTP) в Windows”.
Чтобы проверить, что OpenSSH сервер установлен, выполните:
Get-WindowsCapability -Online | ? Name -like 'OpenSSH.Ser*'
State : Installed

Настройка SSH сервера в Windows
После установки сервера OpenSSH в Windows добавляются две службы:
- ssh-agent (OpenSSH Authentication Agent) – можно использовать для управления закрытыми ключами если вы настроили SSH аутентификацию по ключам;
- sshd (OpenSSH SSH Server) – собственно сам SSH сервер.
Вам нужно изменить тип запуска службы sshd на автоматический и запустить службу с помощью PowerShell:
Set-Service -Name sshd -StartupType 'Automatic'
Start-Service sshd

С помощью nestat убедитесь, что теперь в системе запущен SSH сервер и ждет подключений на порту TCP:22 :
netstat -na| find ":22"

Проверьте, что включено правило брандмауэра (Windows Defender Firewall), разрешающее входящие подключения к Windows по порту TCP/22.
Get-NetFirewallRule -Name *OpenSSH-Server* |select Name, DisplayName, Description, Enabled
Name DisplayName Description Enabled
---- ----------- ----------- -------
OpenSSH-Server-In-TCP OpenSSH SSH Server (sshd) Inbound rule for OpenSSH SSH Server (sshd) True

Если правило отключено (состоянии Enabled=False) или отсутствует, вы можете создать новое входящее правило командой New-NetFirewallRule:
New-NetFirewallRule -Name sshd -DisplayName 'OpenSSH Server (sshd)' -Enabled True -Direction Inbound -Protocol TCP -Action Allow -LocalPort 22
Рассмотрим, где храниться основные компоненты OpenSSH:
- Исполняемые файлы OpenSSH Server находятся в каталоге
C:\Windows\System32\OpenSSH\
(sshd.exe, ssh.exe, ssh-keygen.exe, sftp.exe и т.д.) - Конфигурационный файл sshd_config (создается после первого запуска службы):
C:\ProgramData\ssh - Файлы authorized_keys и ssh ключи можно хранить в профиле пользователей:
%USERPROFILE%\.ssh\
Sshd_config: Конфигурационный файл сервера OpenSSH
Настройки сервере OpenSSH хранятся в конфигурационном файле %programdata%\ssh\sshd_config. Это обычный текстовый файл с набором директив. Для редактирования можно использовать любой текстовый редактор (я предпочитаю notepad++). Можно открыть с помощью обычного блокнота:
start-process notepad C:\Programdata\ssh\sshd_config
Например, чтобы запретить SSH подключение для определенного доменного пользователя (и всех пользователей указанного домена), добавьте в конце файле директивы:
DenyUsers winitpro\[email protected]
DenyUsers corp\*
Чтобы разрешить подключение только для определенной доменной группы:
AllowGroups winitpro\sshadmins
Либо можете разрешить доступ для локальной группы:
AllowGroups sshadmins
По умолчанию могут к openssh могут подключаться все пользователи Windows. Директивы обрабатываются в следующем порядке: DenyUsers, AllowUsers, DenyGroups,AllowGroups.
Можно запретить вход под учетными записями с правами администратора, в этом случае для выполнения привилегированных действий в SSH сессии нужно делать runas.
DenyGroups Administrators
Следующие директивы разрешают SSH доступ по ключам (SSH аутентификации в Windows с помощью ключей описана в отдельной статье) и по паролю:
PubkeyAuthentication yes
PasswordAuthentication yes
Вы можете изменить стандартный SSH порт TCP/22, на котором принимает подключения OpenSSH в конфигурационном файле sshd_config в директиве Port.
После любых изменений в конфигурационном файле sshd_config нужно перезапускать службу sshd:
restart-service sshd
Подключение по SSH к Windows компьютеру
Теперь вы можете попробовать подключиться к своей Windows 10 через SSH клиент (в этом примере я использую putty).
Вы можете использовать встроенный SSH клиентом Windows для подключения к удаленному хосту. Для этого нужно в командной строке выполнить команду:
ssh [email protected]
В этом примере
alexbel
– имя пользователя на удаленном Windows компьютере, и 192.168.31.102 – IP адрес или DNS имя компьютера.
Обратите внимание что можно использовать следующие форматы имен пользователей Windows при подключении через SSH:
-
alex@server1
– локальный пользователь Windows -
[email protected]@server1
–пользователь Active Directory (в виде UPN) или аккаунт Microsoft/ Azure(Microsoft 365) -
winitpro\alex@server1
– NetBIOS формат имени
В домене Active Directory можно использовать Kerberos аутентификацию в SSH. Для этого в sshd_config нужно включить параметр:
GSSAPIAuthentication yes
После этого можно прозрачно подключать к SSH сервер с Windows компьютера в домене из сессии доменного подключается. В этом случае пароль пользователя не указывается и выполняется SSO аутентификация через Kerberos:
ssh -K server1
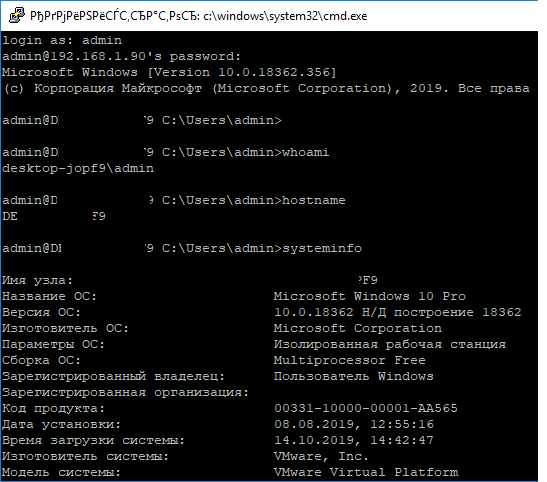
При первом подключении появится стандартный запрос на добавление узла в список известных SSH хостов.
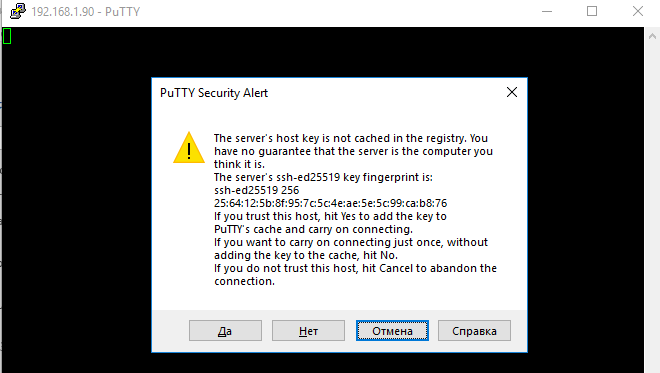
Нажимаем Да, и в открывшееся окне авторизуемся под пользователем Windows.
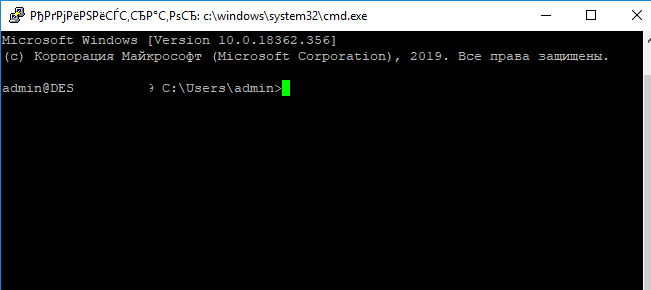
При успешном подключении запускается командная оболочка cmd.exe со строкой-приглашением.
admin@win10tst C:\Users\admin>
В командной строке вы можете выполнять различные команды, запускать скрипты и программы.
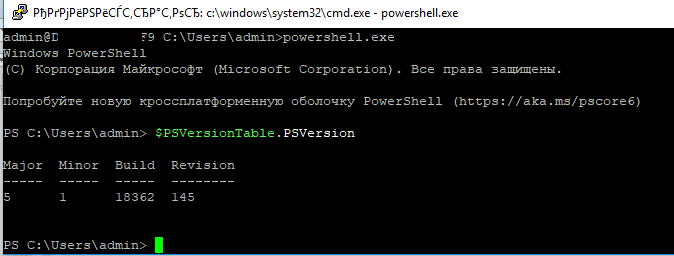
Я предпочитаю работать в командной строке PowerShell. Чтобы запустить интерпретатор PowerShell, выполните:
powershell.exe
Чтобы изменить командную оболочку (Shell) по умолчанию в OpenSSH с cmd.exe на PowerShell, внесите изменение в реестр такой командой:
New-ItemProperty -Path "HKLM:\SOFTWARE\OpenSSH" -Name DefaultShell -Value "C:\Windows\System32\WindowsPowerShell\v1.0\powershell.exe" -PropertyType String –Force
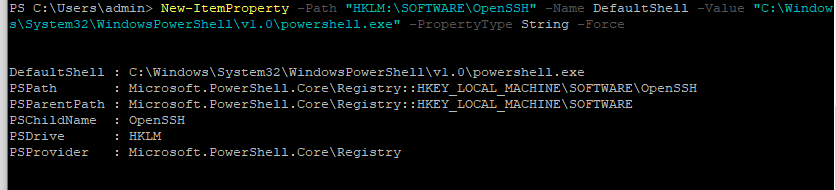
Осталось перезапустить SSH подключение и убедиться, что при подключении используется командный интерпретатор PowerShell (об этом свидетельствует приглашение
PS C:\Users\admin>
).
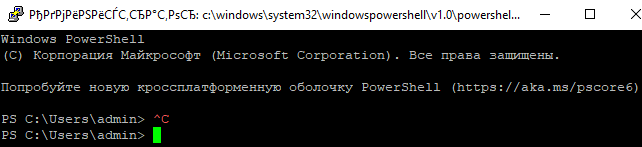
В SSH сессии запустилась командная строка PowerShell, в которой работают привычные функции: авто дополнение, раскраска модулем PSReadLine, история команд и т.д. Если текущий пользователь входит в группу локальных администраторов, то все команды в его сессии выполняются с повышенными правами даже при включенном UAC.
Логи SSH подключений в Windows
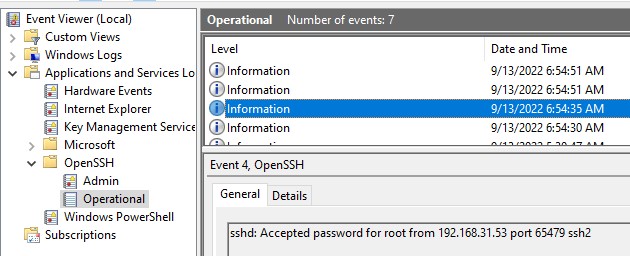
В Windows логи подключений к SSH серверу по-умолчанию пишутся не в текстовые файлы, а в отдельный журнал событий через Event Tracing for Windows (ETW). Откройте консоль Event Viewer (
eventvwr.msc
>) и перейдите в раздел Application and services logs -> OpenSSH -> Operational.
При успешном подключении с помощью к SSH серверу с помощью пароля в журнале появится событие:
EventID: 4
sshd: Accepted password for root from 192.168.31.53 port 65479 ssh2
Если была выполнена аутентификация с помощью SSH ключа, событие будет выглядеть так:
sshd: Accepted publickey for locadm from 192.168.31.53 port 55772 ssh2: ED25519 SHA256:FEHDEC/J72Fb2zC2oJNb45678967kghH43h3bBl31ldPs
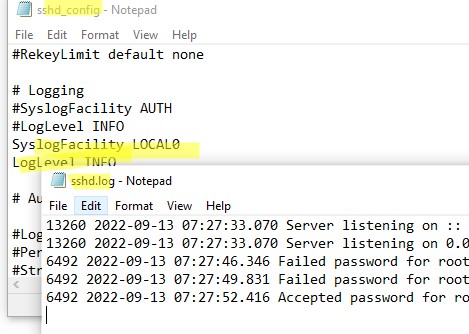
Если вы хотите, чтобы логи писались в локальный текстовый файл, нужно в файле sshd_config включить параметры:
SyslogFacility LOCAL0
LogLevel INFO
Перезапустите службу sshd и провеьте, что теперь логи SSH сервера пишутся в файл C:\ProgramData\ssh\logs\sshd.log
Introduction
Technology never stays static, so there’s an ever-present need to secure and ensure that communications are fast for all Windows 11 users. OpenSSH Windows Here is when the openssh authentication agent necessary plays a vital role by providing secure connectivity without risking sensitive data; does it make sense?
What is the Purpose of OpenSSH Authentication Agent?
The OpenSSH Authentication Agent, often referred to as ssh-agent, is a tool designed to manage private keys securely for SSH (Secure Shell) connections. Its primary purpose is to facilitate secure, password-free access to remote systems by storing and managing cryptographic keys. This agent holds the private keys in memory, allowing users to establish secure SSH sessions without repeatedly entering passwords or manually handling key files.
Key-Based Authentication vs. Password-Based Authentication
In Windows 11, the OpenSSH Authentication Agent provides a seamless experience for users and administrators who frequently connect to remote servers or perform DevOps tasks, as it offers an efficient and secure way to handle SSH authentication.
Password-Based Authentication:
- Traditional authentication method where users enter a password to access a system.
- Passwords are simple to use but can be weak, easy to guess, or vulnerable to brute-force attacks.
- Repeated logins are required, which can disrupt workflow and increase risk if passwords are reused across systems.
Key-Based Authentication:
- Uses cryptographic key pairs (a public and a private key) for authentication, offering a more secure alternative to passwords.
- The private key remains with the user, while the public key is stored on the remote server. When connecting, the keys are matched to grant access.
- Key-based authentication is highly secure, as it relies on complex cryptography that is difficult to compromise.
- It provides a seamless experience: once a key is added to the OpenSSH Authentication Agent, users can connect to multiple servers without re-entering credentials.
By using key-based authentication, the OpenSSH Authentication Agent minimizes risks associated with password use and enhances the security of remote connections.
Advantages of Using OpenSSH Authentication Agent in Windows 11
- Enhanced Security: With the agent, private keys are securely stored in memory, preventing unauthorized access. By removing the need for passwords, it reduces exposure to phishing attacks or brute-force attempts.
- Convenience: Once keys are loaded into the agent, users can connect to multiple servers without re-entering credentials, streamlining workflows for IT admins, developers, and DevOps teams.
- Improved Efficiency: Reduces the friction of secure logins, which is particularly helpful for tasks involving multiple or frequent SSH connections, such as automated deployments and server maintenance.
- Centralized Key Management: The OpenSSH Authentication Agent allows users to manage and control SSH keys centrally within the system, improving organization and accessibility.
Using the OpenSSH Authentication Agent in Windows 11 is highly beneficial for anyone relying on SSH for secure, efficient, and frequent access to remote systems, making it an essential tool for modern server and DevOps management.

Do You Need OpenSSH Authentication Agent on Windows 11?
The OpenSSH Authentication Agent is an optional feature in Windows 11 that can make managing secure shell (SSH) connections easier, especially for users who frequently access remote servers. However, whether you truly need this agent depends on your specific use cases and security requirements.
Scenarios Where OpenSSH Authentication Agent is Beneficial
Frequent SSH Connections: If you regularly connect to remote servers, the OpenSSH Authentication Agent can simplify your workflow by allowing you to authenticate without re-entering your passphrase each time. The agent stores your SSH keys in memory, making it faster and easier to access servers securely.
Key-Based Authentication for Security: Key-based authentication is often more secure than password-based methods. The OpenSSH agent allows you to use SSH keys securely, ensuring that they are encrypted and loaded only once, reducing the risk of password leaks.
Automated Scripts or Scheduled Tasks: If you run automated tasks or scripts that require SSH connections, the agent can provide seamless authentication, which is especially helpful for scheduled tasks that need consistent access without manual intervention.
DevOps and IT Administration: For those managing multiple servers or working in DevOps, using the OpenSSH Authentication Agent can greatly enhance productivity. It lets you manage multiple SSH sessions securely and efficiently without repeated logins.
When You Can Skip the OpenSSH Agent
Using Other Authentication Methods: If you’re already using another authentication method like multi-factor authentication (MFA) or secure VPNs, the OpenSSH Authentication Agent may be redundant.
Infrequent or One-Time SSH Connections: If you rarely connect to remote servers or only use SSH occasionally, setting up and managing the OpenSSH Authentication Agent may not be necessary. You can authenticate using a password or load SSH keys manually when needed.
For Personal, Non-Enterprise Use: Users who don’t require strict security for their remote connections may not need the agent. For personal projects or low-security environments, password-based SSH authentication might suffice, eliminating the need for an authentication agent.
Simple Network Environments: In cases where SSH is used on a local network or for limited, straightforward connections, the added complexity of managing an authentication agent may not be worthwhile. Password-based access may be easier to manage for basic needs.
Step-by-Step Guide to Installing OpenSSH on Windows 11
Open Settings
Go to Settings > Apps > Optional features. Here, you can add additional features to your Windows installation.
Find and Install OpenSSH Client and Server
- Scroll down and select Add a feature.
- In the search bar, type “OpenSSH” to locate OpenSSH Client and OpenSSH Server.
- Select both options and click Install.
Verify the Installation
Open Command Prompt or PowerShell and type ssh to check if OpenSSH is recognized as a command. You should see usage options appear, confirming successful installation.
Configuring OpenSSH Agent for First-Time Use
Enable the OpenSSH Authentication Agent Service
- Press Windows + R to open the Run dialog, type
services.msc, and hit Enter. - In the Services window, find OpenSSH Authentication Agent. Right-click it, select Properties, and change the Startup type to Automatic.
- Click Start to activate the service, then Apply and OK.
Load Your SSH Key into the Agent
- Open PowerShell and type
ssh-addfollowed by the path to your private key file (usually~/.ssh/id_rsa). - If prompted, enter the passphrase for your private key. The agent will now remember your key for seamless SSH connections.
Verifying OpenSSH Agent Functionality
Test Your SSH Connection
- Open PowerShell or Command Prompt and run a test SSH connection to a known server, e.g.,
ssh username@hostname. - If the OpenSSH Authentication Agent is working correctly, it should prompt for a passphrase (if required) or connect without asking if the key is passphrase-free.
Check Agent-Loaded Keys
In PowerShell, type ssh-add -l. You should see a list of loaded SSH keys if the agent is running and has keys loaded correctly.
Exploring Alternative Authentication Tools
While OpenSSH Authentication Agent is widely used for secure key-based authentication, Windows 11 users have several other options to consider, depending on their needs. Here are some popular alternatives:
Pageant (Putty Agent):
A component of the PuTTY suite, Pageant enables users to securely store SSH keys in memory. It’s lightweight and popular among Windows users for its ease of integration with other PuTTY tools. Pageant supports key management for both PuTTY and OpenSSH, offering flexibility for users who work across platforms.
WinSCP:
Primarily a secure file transfer application, WinSCP includes support for key-based authentication and can store SSH keys, offering an alternative to OpenSSH for those who need file management alongside secure SSH connections. It also integrates with Pageant, making it a versatile choice for remote file operations.
Bitvise SSH Client:
Known for its user-friendly interface, Bitvise offers a full-featured SSH client for Windows, with support for both key-based and password-based authentication. It includes a dedicated SSH agent, making it a direct alternative to OpenSSH with additional GUI-based management tools.
Windows Terminal with WSL (Windows Subsystem for Linux):
For users who prefer a Linux-like environment within Windows, WSL offers native support for OpenSSH and key management, allowing users to operate as if on a Linux machine. This can be particularly beneficial for developers familiar with Linux but working in a Windows environment.
MobaXterm:
An all-in-one solution that combines terminal support, file transfer, and an SSH agent, MobaXterm supports key-based authentication and integrates well with remote servers. It’s ideal for users who need multi-session management and extra tools like file browsing and SFTP in one application.
Comparison of OpenSSH Agent with Other Authentication Solutions
Here’s how OpenSSH Authentication Agent compares with some popular alternatives:
| Feature | OpenSSH Authentication Agent | Pageant | Bitvise SSH Client | WinSCP | MobaXterm |
|---|---|---|---|---|---|
| Platform Integration | Native to Windows 11 | Works with PuTTY | Windows-only | Windows-only | Multi-platform |
| GUI Availability | Command-line only | GUI-based | GUI-based | Limited GUI | Full GUI |
| Key Management | Yes | Yes | Yes | Basic | Yes |
| File Transfer Support | No | No | Yes (SFTP) | Yes (SFTP) | Yes (SFTP) |
| Session Management | Limited | No | Yes | No | Yes |
| Ease of Use | Moderate | Easy | Easy | Easy | Very easy |
Conclusion:
All this knowledge about OpenSSH and its components, specifically SSH-Agent, helps users navigate through Windows 10 and 11. Using these tools will boost your ability to set up a secure remote connection while smoothing out your workflow and productivity in the long run. A developer, system administrator, or just a casual user- OpenSSH’s integration with Windows makes connecting to a remote server straightforward while ensuring data is kept safe.
Features such as the SSH Client make it a part of Windows’ basic build and symbolize efforts toward enriching user experience and safety. Take advantage of these tools and take charge of the control of your digital life and the efficient management of your applications. Open your world of OpenSSH and SSH-Agent to elevate your Windows journey.
FAQs:
What is OpenSSH?
A suite of secure networking utilities that lets users log into remote servers, transfer files, and perform system management via the SSH protocol. In short, OpenSSH is a package of secure networking utilities allowing users to access remote servers, file transfer, and manage systems securely via the SSH protocol.
OpenSSH comes installed in Windows 10 and 11?
Yes, the OpenSSH Client is available by default on Windows 10 and 11.
How do I turn on SSH-Agent on Windows? To turn on the SSH Agent, go to the Settings app, then Apps, ensuring the OpenSSH Authentication Agent is installed. You can then start it from Windows Services or PowerShell command Start-Service ssh-agent.
Can I use OpenSSH for file transfer?
Absolutely! OpenSSH comes with SCP and SFTP tools, which you can use for secure file transfer between your local machine and remote servers.
Is the SSH-Agent secure?
The SSH-Agent is designed to store SSH keys securely in memory so that you do not need to enter your passphrase over and over again. It must be used in secured environments to avoid unauthorized use of your keys.
Latest post:
- How to convert the putty key to openssh windows?
- How to openssh via terminal windows?
- How to change default sftp location in openssh windows?
- What is the difference between OpenSSH and PuTTY?
- How to Install OpenSSH on Windows?
На чтение5 мин
Опубликовано
Обновлено
OpenSSH authentication agent — это агент аутентификации, предоставляемый OpenSSH, который обеспечивает безопасное и удобное управление приватными ключами для аутентификации при подключении к удаленным серверам. Этот инструмент позволяет пользователям избежать необходимости вводить пароль каждый раз при подключении к серверу, а также упрощает использование нескольких ключей.
Одной из особенностей OpenSSH authentication agent является его способность кэшировать приватные ключи после их разблокировки с помощью пароля пользователя. После разблокировки ключи остаются доступными в памяти до тех пор, пока агент работает, что позволяет автоматически использовать их при подключении к любому удаленному серверу, который принимает данные ключи.
Для использования OpenSSH authentication agent необходимо выполнить несколько простых шагов. Во-первых, требуется запустить агент на локальной машине. Затем нужно добавить приватные ключи в агент с помощью команды ssh-add. После этого агент будет управлять доступом к данным ключам и автоматически аутентифицировать пользователя при подключении к удаленным серверам.
Использование OpenSSH authentication agent значительно упрощает процесс аутентификации и повышает безопасность подключения к удаленным серверам. Он позволяет пользователям удобно работать с приватными ключами и автоматически использовать их при подключении без необходимости вводить пароль каждый раз. Это делает OpenSSH authentication agent незаменимым инструментом для всех, кто часто работает с удаленными серверами.
Как работает Openssh authentication agent
Когда пользователь запускает Openssh authentication agent на своем компьютере, он может добавлять свои приватные ключи в агент. При подключении к удаленному серверу, агент может предоставить соответствующий приватный ключ для аутентификации, тем самым упрощая процесс и избегая необходимости вводить пароли каждый раз.
Работа с Openssh authentication agent осуществляется через командную строку. Пользователь может использовать команды для добавления, удаления и просмотра ключей, а также для подключения к удаленному серверу.
Преимущество использования OpenSSH authentication agent заключается в том, что приватные ключи хранятся в безопасной среде и автоматически доступны для использования при аутентификации на удаленных серверах. Это упрощает и ускоряет процесс подключения и повышает безопасность системы.
Определение и роль
Его основная роль заключается в том, чтобы предоставить централизованный хранилище для приватных ключей, что позволяет пользователям аутентифицироваться на нескольких серверах без необходимости каждый раз вводить пароль или приватный ключ.
Authentication agent работает как служба в фоновом режиме и может быть запущена при загрузке операционной системы. Он загружает и хранит приватные ключи пользователя в защищенном цифровом контейнере, который может быть разблокирован при помощи пароля пользователя. Когда пользователь запрашивает доступ к удаленному серверу, аутентификация происходит автоматически с использованием приватного ключа, хранящегося в аутентификационном агенте.
Authentication agent также позволяет пользователю добавлять и удалять ключи, а также управлять списком доступных агентов аутентификации.
Общая роль аутентификационного агента в системе OpenSSH заключается в обеспечении удобства и безопасности при аутентификации пользователей, устранении необходимости повторного ввода пароля или приватного ключа при подключении к удаленным серверам и предотвращении несанкционированного доступа к приватным ключам.
Преимущества использования
Openssh authentication agent предоставляет ряд значительных преимуществ, которые делают его полезным инструментом для работы с удаленными серверами:
1. Удобство использования: Использование агента аутентификации позволяет избежать необходимости вводить пароли или ключи при каждом подключении к удаленному серверу. Вместо этого, агент хранит в памяти ваш ключ и автоматически предоставляет его при необходимости, что значительно упрощает процесс работы.
2. Безопасность: Отсутствие необходимости вводить пароли или ключи при каждом подключении снижает риск ошибки или утечки ваших учетных данных. Агент аутентификации также предоставляет возможность использования ключей с паролем, что позволяет дополнительно защитить доступ к вашим удаленным серверам.
3. Масштабируемость: Агент аутентификации позволяет работать с несколькими ключами одновременно, что особенно полезно в случае работы с большим количеством удаленных серверов или использования разных ключей для различных сервисов.
4. Поддержка аутентификации на разных уровнях: Openssh authentication agent поддерживает различные методы аутентификации, включая использование пароля, публичного ключа и публичного ключа с паролем. Это позволяет настроить аутентификацию в соответствии с потребностями вашей конкретной среды.
5. Гибкость настройки: Агент аутентификации предлагает ряд настроек и опций для более гибкой работы. Вы можете настроить время жизни ключей, указать конкретные ключи для использования и многое другое, чтобы адаптировать его под ваши потребности.
Как пользоваться Openssh authentication agent
eval `ssh-agent`
После запуска агента, можно добавить файл с приватным ключом с помощью команды ssh-add. Например, чтобы добавить ключ из файла «id_rsa», можно использовать команду:
ssh-add ~/.ssh/id_rsa
После этого, агент будет использовать этот приватный ключ для аутентификации при подключении к удаленным серверам. Нет необходимости вводить пароль каждый раз при подключении.
Если в системе используется парольная фраза для приватного ключа, то при запуске агента и добавлении ключа, потребуется ввести эту парольную фразу. После этого, аутентификационный агент будет хранить эту парольную фразу в памяти и использовать ее для аутентификации при подключениях.
Чтобы прекратить работу с аутентификационным агентом, можно воспользоваться командой:
ssh-agent -k
Эта команда завершит работу агента и удалит все загруженные приватные ключи из памяти.
Использование Openssh authentication agent позволяет значительно упростить процесс аутентификации при подключении к удаленным серверам с помощью SSH и обеспечить безопасную передачу данных.
Установка и настройка
Установка и настройка OpenSSH Authentication Agent довольно простые и не требуют особых навыков. Вот шаги, которые необходимо выполнить для установки и настройки:
- Установите пакет openssh-agent, если он еще не установлен на вашей системе. Для большинства дистрибутивов Linux это можно сделать с помощью менеджера пакетов, например, командой
sudo apt-get install openssh-agentдля Ubuntu. - Запустите агент авторизации SSH командой
eval $(ssh-agent). Это создаст новый экземпляр агента и выведет переменные среды, которые нужно экспортировать. - Экспортируйте переменные среды, чтобы указать клиентским приложениям, где находится агент авторизации. Например, для bash можно использовать команду
export SSH_AUTH_SOCK=$(tempfile). - Добавьте ключи авторизации SSH в агент с помощью команды
ssh-add. Например,ssh-add ~/.ssh/id_rsaдобавит ключ, указанный в файлеid_rsa. - Теперь вы можете использовать агента авторизации SSH для автоматической аутентификации при подключении к удаленным серверам. Как только ключи авторизации будут добавлены в агент, клиентские приложения смогут автоматически использовать эти ключи для аутентификации.
Теперь вы готовы использовать OpenSSH Authentication Agent для удобного и безопасного подключения к удаленным серверам по протоколу SSH.
Добавление и удаление ключей
Для использования OpenSSH Authentication Agent вам необходимо добавить в него ваши ключи для аутентификации. В этом разделе мы расскажем, как добавить и удалить ключи.
Для добавления ключа используйте команду ssh-add с указанием пути к вашему ключу:
ssh-add /путь/к/вашему/ключу
После этого вам будет предложено ввести пароль, связанный с вашим ключом, если такой пароль установлен.
Для удаления ключа из OpenSSH Authentication Agent можно использовать команду ssh-add -d с указанием пути к ключу:
ssh-add -d /путь/к/вашему/ключу
Таким образом, вы можете легко добавлять и удалять ключи в OpenSSH Authentication Agent, что позволяет вам управлять вашими ключами для аутентификации безопасным и эффективным способом.
WINDOWS
Introduction
With the advent of OpenSSH being natively integrated into Windows 10 and beyond, managing SSH keys has become more streamlined and efficient for Windows users. Coupled with Windows Subsystem for Linux (WSL), users can enjoy a seamless experience when working with SSH in a cross-platform environment. In this article, we will cover everything you need to know about setting up ssh-agent on both Windows and WSL, ensuring your SSH environment is consistent, predictable, safe, and easy to use.
What is ssh-agent?
ssh-agent is a key management program that holds your private keys used for SSH authentication. When you add your keys to ssh-agent, it will handle authentication requests for you, so you won’t need to enter your passphrase every time you connect to a remote server. This is particularly useful in a development environment where multiple SSH connections are often required.
Benefits of Using ssh-agent
-
Convenience: Avoids the need to manually enter passphrases.
-
Security: Keeps your private keys secure while allowing easy access for authentication.
-
Integration: Works smoothly across various systems, including Windows and WSL.
Setting Up ssh-agent on Windows
Step 1: Install OpenSSH
-
Check for OpenSSH Installation:
Open PowerShell or Command Prompt and run:
If OpenSSH is already installed, you will see the version number. If not, continue with the steps below.
-
Install OpenSSH via Settings:
-
Go to Settings > Apps > Optional Features.
-
Scroll down and click on Add a feature.
-
Search for OpenSSH Client and click Install.
-
Step 2: Initialize ssh-agent
-
Start the ssh-agent service:
Open PowerShell and run the following command to start the ssh-agent service:
-
Configure ssh-agent to start automatically (optional):
Get-Service ssh-agent | Set-Service -StartupType Automatic
Step 3: Load Your SSH Keys
-
Generate SSH Keys (if you don’t have them):
ssh-keygen -t rsa -b 4096 -C "your_email@example.com"By default, the keys will be saved in
C:\Users\<YourUserName>\.ssh\. -
Add your SSH private key to the ssh-agent:
Once those steps are complete, your SSH keys are ready to be used with minimal passphrase interruption.
Setting Up ssh-agent on WSL
Step 1: Install OpenSSH
Unlike Windows, most recent distributions of WSL come with OpenSSH pre-installed. You can check by running:
If it’s not installed, you can install it using your package manager. For Ubuntu, run:
sudo apt update
sudo apt install openssh-client
Step 2: Start ssh-agent
-
Start the ssh-agent:
In your WSL terminal, run the following command: -
Add Your SSH Key:
If you have already generated an SSH key, use:
Step 3: Configure Your SSH Environment
To ensure that ssh-agent starts automatically with your WSL sessions, add the following lines to your .bashrc or .zshrc file:
# Start ssh-agent
eval "$(ssh-agent -s)"
ssh-add ~/.ssh/id_rsa
Synchronizing SSH Keys Between Windows and WSL
Using SSH keys seamlessly between your native Windows environment and WSL requires setup for consistent key access:
-
Use a Shared .ssh Directory:
Point both environments to the same SSH key directory. You can either copy your keys over to WSL or create a symbolic link.
For instance, to create a symbolic link:
ln -s /mnt/c/Users/<YourUserName>/.ssh ~/.ssh
-
Accessing SSH Keys in Windows with WSL: Ensure your Windows
.sshkey permissions are correctly set. You can do this via:chmod 600 /mnt/c/Users/<YourUserName>/.ssh/id_rsa
Troubleshooting Common Issues
Issue 1: Permission Denied Errors
This could arise from incorrect permissions on your key files. Ensure your private key has the correct permissions:
Issue 2: ssh-agent Not Starting
Ensure that your ssh-agent service is running. You can check on Windows by running:
If it’s not running, start the service as described above.
Issue 3: Key Does Not Appear to Be Added
Verify that your key is loaded by running:
If it isn’t, ensure that you are using the correct path when adding your key.
Conclusion
Setting up ssh-agent on Windows and WSL enhances your development workflow by simplifying and securing SSH key management. With the comprehensive guide provided in this article, you can ensure a consistent and safe SSH environment across your systems. Don’t forget to maintain best practices in key management to safeguard your credentials. Whether you are a developer, system administrator, or a hobbyist, harnessing the power of ssh-agent will undoubtedly enrich your experience in cross-platform development.
Further Reading
-
OpenSSH Official Documentation
-
Windows OpenSSH Features
Keywords: ssh-agent, Windows, WSL, OpenSSH, SSH keys, key management, Windows Subsystem for Linux, secure SSH authentication.
Suggested Articles
WINDOWS
WINDOWS
WINDOWS
WINDOWS
WINDOWS
WINDOWS