
Description
With this guide you are able to join a Windows domain (Either a Windows domain controller, either a Samba 4 domain controller) with your OpenMediaVault server.
This is a new method to join a domain with sssd instead of Winbind. It is much more easy to setup, and is more reliable than winbind.
However there is a drawback: if SSSD chooses himself UID and GID, the numbers seems to high to be available in OMV’s UI. If the Directory provides UID and GID set by the administrator, and low enough (10000 for example), OMV is able to show them.
This is currently a BETA, I successfully configured a fresh install of OMV 3 with these steps.
Requirements
- OpenMediaVault 3.0.83 or higher
- A Samba 4 domain controller with uid and gid properties set for users and groups
OMV Configuration
Network settings
- Check IP configuration
Use the web UI to setup a fixed IP address, and a hostname with a domain name matching your domain.
Open a terminal (locally ot with SSH) and check the hostname configuration of your OpenMediaVault.
root@my-server:~# hostname -s
my-server
root@my-server:~# hostmane -d
domain.com


root@my-server:~# cat /etc/hostname
my-server


root@my-server:~# cat /etc/hosts
127.0.0.1	localhost
127.0.1.1	my-server.domain.com	my-server


# The following lines are desirable for IPv6 capable hosts
::1     localhost ip6-localhost ip6-loopback
ff02::1 ip6-allnodes
ff02::2 ip6-allrouters
Alles anzeigen
The first command allows you to check the server has the expected name. It may be whatever you want.
The second command checks the suffix of your hostname. It must match the domain name of your domain controller.
The third command checks that /etc/hostname matches your hostname. If it does not matches hostname -s, then update it.
Packages installation
Now install the requred packages to install and use SSSD.
root@my-server:~# apt-get install sssd realmd policykit-1 packagekit adcli
root@my-server:~# realm discover -v domain.com
root@my-server:~# realm -v join domain.com -U administrator --membership-software=adcli
apt-get install sssd and required packages
realm discover checks you can find your domain controller
realm join .. well .. joins your domain. You need a specify the login of a administrator account, and the process will ask you its password. Some additional packages will be automatically installed.
SSSD is running, you need to stop and reset its cache to tweak it.
Configure SSSD
service sssd stop
sss_cache -E
rm /var/lib/sss/db/*
Check /etc/sssd/sssd.conf and switch use_fully_qualified_names to False. This allows you to authenticate without specifying your domain.
Read the Mapping algorithm paragraph of SSSD to determine if you want ldap_id_mapping or not. Either reading this page: https://linux.die.net/man/5/sssd-ad or either by reading it from OMV terminal.
If you want to disable ID mapping and use POSIX attributes in your AD, change also ldap_id_mapping to False. Doing this requires you set up uid and gid for all your users and groups in your directory.
If you want to show your users in the OpenMediaVault web interface, you need to add at the bottonm of section [domain/domain.com] the parameter enumerate = True. However this is NOT recommended because it will slow down the server and generate network traffic with your domain controller. If you got a lot of users, you should consider keep its default value (False) and configure permissions with setfacl. The same issue occurs with Winbind, so it is useless to prefer Winbind to workaround this problem.
Customize override_homedir to set the path containing your users home directories. You will bind a subtree of a filesystem here in next steps. This means this subtree will be available in 2 paths in OMV’s filesystem.
Here is an example of /etc/sssd/sssd.conf
Code: /etc/sssd/sssd.conf
[sssd]
domains = domain.com
config_file_version = 2
services = nss, pam


[domain/domain.com]
ad_domain = domain.com
krb5_realm = DOMAIN.COM
realmd_tags = manages-system joined-with-samba
cache_credentials = True
id_provider = ad
krb5_store_password_if_offline = True
default_shell = /bin/bash
# Enable the following line to manage UID and GID
#ldap_id_mapping = False
use_fully_qualified_names = False
override_homedir = /home/domain.com/users/%u
# fallback_homedir is actually useless, but I prefer keep it,
# if I need to do something with override_homedir
fallback_homedir = /home/domain.com/users/%u
access_provider = ad
#enumerate = True
Alles anzeigen
Restart SSSD.
The command realm also updates /etc/nsswitch to use sssd as a source. You do not need to update it yourself, but here is an example of what you should read in this file. Notice the word sss is added in some lines.
# /etc/nsswitch.conf
#
# Example configuration of GNU Name Service Switch functionality.
# If you have the `glibc-doc-reference' and `info' packages installed, try:
# `info libc "Name Service Switch"' for information about this file.


passwd:         compat sss
group:          compat sss
shadow:         compat sss


hosts:          files mdns4_minimal [NOTFOUND=return] dns mdns4
networks:       files


protocols:      db files
services:       db files sss
ethers:         db files
rpc:            db files


netgroup:       nis sss
Alles anzeigen
Now sssd is up to date and running, try to find an existing user
getent passwd johndoe
johndoe:*:10000:10000:johndoe:/home/DOMAIN/johndoe:/bin/bash
Enable mkhomedir
create the file /usr/share/pam-configs/my_mkhomedir with the following content:
Name: Activate mkhomedir
Default: yes
Priority: 900
Session-Type: Additional
Session:
	required	pam_mkhomedir.so umask=0077 skel=/etc/skel
Umask argument for mkhomedir didn’t worked for me. pam_umask.so seems be a better option. Create the file /usr/share/pam-configs/umask with the following:
Name: Activate umask
Default: yes
Priority: 800
Session-Type: Additional
Session:
	optional	pam_umask.so umask=0077
Run the command pam-auth-update, enable Activate mkhomedir and Activate umask.
Configure Home directories
In the OMV UI, open the users administration panel. Assuming you got at least one shared folder defined, choose the tab Settings and enable user home directories. Choose a device and set the path /users to store them. This path is important for the next step.
Find the mounted data volume you want to use for your home directories. In this example, this is the last line. The path after «on» will be re-used to bind mount the volume in /home/domain.com.
mount
( ... snip ... )
tmpfs on /etc/machine-id type tmpfs (ro,relatime,size=100844k,mode=755)
systemd-1 on /proc/sys/fs/binfmt_misc type autofs (rw,relatime,fd=23,pgrp=1,timeout=300,minproto=5,maxproto=5,direct,pipe_ino=9415)
debugfs on /sys/kernel/debug type debugfs (rw,relatime)
mqueue on /dev/mqueue type mqueue (rw,relatime)
hugetlbfs on /dev/hugepages type hugetlbfs (rw,relatime)
fusectl on /sys/fs/fuse/connections type fusectl (rw,relatime)
tmpfs on /tmp type tmpfs (rw,relatime)
rpc_pipefs on /run/rpc_pipefs type rpc_pipefs (rw,relatime)
binfmt_misc on /proc/sys/fs/binfmt_misc type binfmt_misc (rw,relatime)
/dev/sdb1 on /srv/dev-disk-by-id-scsi-0QEMU_QEMU_HARDDISK_drive-scsi1-part1 type ext4 (rw,noexec,relatime,data=ordered,jqfmt=vfsv0,usrjquota=aquota.user,grpjquota=aquota.group)
Alles anzeigen
Edit /etc/fstab and bind mount your share to /home/domain.com. The line must be added after # <<< [openmediavault]. This is ensures it will not be overwritten when you edit OpenMediaVault’s configuration.
/srv/dev-disk-by-id-scsi-0QEMU_QEMU_HARDDISK_drive-scsi1-part1 /home/domain.com none bind 0 2Go in SMB/CIFS configuration, and enable SMB/CIFS.
Set the Workgroup field to DOMAIN (uppercase, and match the word before the first dot of your domain name). Enable user home directories, and add the following on your extra options:
password server = *
realm = DOMAIN.COM
dedicated keytab file = FILE:/etc/krb5.keytab
kerberos method = dedicated keytab
security = ads
allow trusted domains = yes


template shell = /bin/bash
template homedir = /home/domain.com/users/%U


# Performance improvements
socket options = TCP_NODELAY SO_RCVBUF=8192 SO_SNDBUF=8192


client ntlmv2 auth = yes
client use spnego = yes
obey pam restrictions = yes
Alles anzeigen
If you’re using OMV 4.X change the line
dedicated keytab file = FILE:/etc/krb5.keytab
into
dedicated keytab file = /etc/krb5.keytab
Save and apply changes.
Read this post if you’re under windows 8 to try a performance enhancement : http://forums.openmediavault.o…f=3&t=1493&p=24413#p24366
This step is not required
If you wish to view your AD users and groups in OMV webinterface include UIDs and GIDs into non-system users and groups in /etc/login.defs. Find UID_MAX and change UID_MAX and GID_MAX. You need to choose a value higher than the highest UID and GID you can find in your directory. Here are the default values.
UID_MAX                 60000
GID_MAX                 60000
Editing AD users and groups using the OMV webinterface will fail because they are not stored in /etc/passwd and /etc/group .
You should now be able to browse your home dir and shares if any with a user managed by your Directory server, from a workstation enrolled with SSSD. To setup SSSD on a workstation, do the same as this guide, and don’t setup Samba (because it will probably not share files itself, thanks to OMV).
0
1
Всем привет. Возникла тут проблема с вводом FS на OpenMediaVault 5 в домен Active-directory. Я настраивал по этому руководству. К сожалению для 5-го не нашел. Но после сохранения настроек я не вижу списка доменных пользователей в OMV, и не могу распределять права на общие папки. Что самое интересное, машина в домене и комманда id "username" нормально отвечает:
# id vasya
uid=635601109(vasya) gid=635600513(пользователи домена) groups=635600513(пользователи домена),635600512(администраторы домена),635600572(группа с запрещением репликации паролей rodc)
и getent тоже всё видит.
getent passwd mahsa
mahsa:*:635601108:635600513:Mahsa:/home/mahsa@test.ts:/bin/bash
все настройки точно выполнил кроме создания домашних папок, мне это не нужно, только авторизация для CIFS..
Подскажите в чем проблема кто знает. Раньше года 3-4 назад настраивал правда через winbind, но тогда и версии были другие, Debian 7, ф сейчас уже 10.7.
Ниже приведены листинги файлов конфигурации.
sss
cat /etc/sssd/sssd.conf

[sssd]
domains = test.ts
config_file_version = 2
services = nss, pam


[domain/test.ts]
ad_domain = test.ts
ad_server = 1ctest.test.ts.
chpass_provider = ad
access_provider = simple

krb5_realm = TEST.TS
realmd_tags = manages-system joined-with-adcli
cache_credentials = True
id_provider = ad
krb5_store_password_if_offline = True
default_shell = /bin/bash
ldap_id_mapping = True
use_fully_qualified_names = False
fallback_homedir = /home/%u@%d
access_provider = ad
SAMBA 4.9.5-Debian Конфиг папки не стал вставлять.
testparm -v
rlimit_max: increasing rlimit_max (1024) to minimum Windows limit (16384)
Registered MSG_REQ_POOL_USAGE
Registered MSG_REQ_DMALLOC_MARK and LOG_CHANGED
Load smb config files from /etc/samba/smb.conf
rlimit_max: increasing rlimit_max (1024) to minimum Windows limit (16384)
Processing section "[test]"
Loaded services file OK.
WARNING: socket options = TCP_NODELAY SO_RCVBUF=8192 SO_SNDBUF=8192
This warning is printed because you set one of the
following options: SO_SNDBUF, SO_RCVBUF, SO_SNDLOWAT,
SO_RCVLOWAT
Modern server operating systems are tuned for
high network performance in the majority of situations;
when you set 'socket options' you are overriding those
settings.
Linux in particular has an auto-tuning mechanism for
buffer sizes (SO_SNDBUF, SO_RCVBUF) that will be
disabled if you specify a socket buffer size. This can
potentially cripple your TCP/IP stack.

Getting the 'socket options' correct can make a big
difference to your performance, but getting them wrong
can degrade it by just as much. As with any other low
level setting, if you must make changes to it, make
 small changes and test the effect before making any
large changes.

Server role: ROLE_STANDALONE

Press enter to see a dump of your service definitions

# Global parameters
[global]
        abort shutdown script =
        add group script =
        add machine script =
        addport command =
        addprinter command =
        add share command =
        add user script =
        add user to group script =
        afs token lifetime = 604800
        afs username map =
        aio max threads = 100
        algorithmic rid base = 1000
        allow dcerpc auth level connect = No
        allow dns updates = secure only
        allow insecure wide links = No
        allow nt4 crypto = No
        allow trusted domains = Yes
        allow unsafe cluster upgrade = No
        apply group policies = No
        async smb echo handler = No
        auth event notification = No
        auto services =
        binddns dir = /var/lib/samba/bind-dns
        bind interfaces only = No
        browse list = Yes
        cache directory = /var/cache/samba
        change notify = Yes
        change share command =
        check password script =
        cldap port = 389
        client ipc max protocol = default
        client ipc min protocol = default
        client ipc signing = default
        client lanman auth = No
        client ldap sasl wrapping = sign
        client max protocol = default
        client min protocol = CORE
        client NTLMv2 auth = Yes
        client plaintext auth = No
        client schannel = Yes
        client signing = default
        client use spnego principal = No
        client use spnego = Yes
        cluster addresses =
        clustering = No
        config backend = file
        config file =
        create krb5 conf = Yes
        ctdbd socket =
        ctdb locktime warn threshold = 0
        ctdb timeout = 0
        cups connection timeout = 30
        cups encrypt = No
        cups server =
        dcerpc endpoint servers = epmapper, wkssvc, rpcecho, samr, netlogon, lsarpc, drsuapi, dssetup, unixinfo, browser, eventlog6, backupkey, dnsserver
        deadtime = 0
        debug class = No
        debug hires timestamp = Yes
        debug pid = No
        debug prefix timestamp = No
        debug uid = No
        dedicated keytab file =
        default service =
        defer sharing violations = Yes
        delete group script =
        deleteprinter command =
        delete share command =
        delete user from group script =
        delete user script =
        dgram port = 138
        disable netbios = No
        disable spoolss = Yes
        dns forwarder =
        dns proxy = No
        dns update command = /usr/sbin/samba_dnsupdate
        dns zone scavenging = No
        domain logons = No
        domain master = Auto
        dos charset = CP850
        dsdb event notification = No
        dsdb group change notification = No
        dsdb password event notification = No
        enable asu support = No
        enable core files = Yes
        enable privileges = Yes
        encrypt passwords = Yes
        enhanced browsing = Yes
        enumports command =
        eventlog list =
        get quota command =
        getwd cache = Yes
        gpo update command = /usr/sbin/samba-gpupdate
        guest account = nobody
        homedir map = auto.home
        host msdfs = Yes
        hostname lookups = No
        idmap backend = tdb
        idmap cache time = 604800
        idmap gid =
        idmap negative cache time = 120
        idmap uid =
        include system krb5 conf = Yes
        init logon delay = 100
        init logon delayed hosts =
        interfaces =
        iprint server =
        keepalive = 300
        kerberos encryption types = all
        kerberos method = default
        kernel change notify = Yes
        kpasswd port = 464
        krb5 port = 88
        lanman auth = No
        large readwrite = Yes
        ldap admin dn =
        ldap connection timeout = 2
        ldap debug level = 0
        ldap debug threshold = 10
        ldap delete dn = No
        ldap deref = auto
        ldap follow referral = Auto
        ldap group suffix =
        ldap idmap suffix =
        ldap machine suffix =
        ldap page size = 1000
        ldap passwd sync = no
        ldap replication sleep = 1000
        ldap server require strong auth = Yes
        ldap ssl = start tls
        ldap ssl ads = No
        ldap suffix =
        ldap timeout = 15
        ldap user suffix =
        lm announce = Auto
        lm interval = 60
        load printers = No
        local master = Yes
        lock directory = /var/run/samba
        lock spin time = 200
        log file = /var/log/samba/log.%m
        logging = syslog
        log level = 2
        log nt token command =
        logon drive =
        logon home = \\%N\%U
        logon path = \\%N\%U\profile
        logon script =
        log writeable files on exit = No
        lpq cache time = 30
        lsa over netlogon = No
        machine password timeout = 604800
        mangle prefix = 1
        mangling method = hash2
        map to guest = Bad User
        max disk size = 0
        max log size = 1000
        max mux = 50
        max open files = 16384
        max smbd processes = 0
        max stat cache size = 256
        max ttl = 259200
        max wins ttl = 518400
        max xmit = 16644
        mdns name = netbios
        message command =
        min receivefile size = 0
        min wins ttl = 21600
        mit kdc command =
        multicast dns register = No
        name cache timeout = 660
        name resolve order = lmhosts wins host bcast
        nbt client socket address = 0.0.0.0
        nbt port = 137
        ncalrpc dir = /var/run/samba/ncalrpc
        netbios aliases =
        netbios name = OMV
        netbios scope =
        neutralize nt4 emulation = No
        NIS homedir = No
        nmbd bind explicit broadcast = Yes
        nsupdate command = /usr/bin/nsupdate -g
        ntlm auth = ntlmv2-only
        nt pipe support = Yes
        ntp signd socket directory = /var/lib/samba/ntp_signd
        nt status support = Yes
        null passwords = No
        obey pam restrictions = Yes
        old password allowed period = 60
        oplock break wait time = 0
        os2 driver map =
        os level = 20
        pam password change = Yes
        panic action = /usr/share/samba/panic-action %d
        passdb backend = tdbsam
        passdb expand explicit = No
        passwd chat = *Enter\snew\s*\spassword:* %n\n *Retype\snew\s*\spassword:* %n\n *password\supdated\ssuccessfully* .
        passwd chat debug = No
        passwd chat timeout = 2
        passwd program = /usr/bin/passwd %u
        password hash gpg key ids =
        password hash userPassword schemes =
        password server = *
        perfcount module =
        pid directory = /var/run/samba
        preferred master = Auto
        prefork children = 1
        preload modules =
        printcap cache time = 750
        printcap name = /dev/null
        private dir = /var/lib/samba/private
        raw NTLMv2 auth = No
        read raw = Yes
        realm =
        registry shares = No
        reject md5 clients = No
        reject md5 servers = No
        remote announce =
        remote browse sync =
        rename user script =
        require strong key = Yes
        reset on zero vc = No
        restrict anonymous = 0
        rndc command = /usr/sbin/rndc
        root directory =
        rpc big endian = No
        rpc server dynamic port range = 49152-65535
        rpc server port = 0
        samba kcc command = /usr/sbin/samba_kcc
        security = AUTO
        server max protocol = SMB3
        server min protocol = LANMAN1
        server multi channel support = No
        server role = auto
        server schannel = Yes
        server services = s3fs, rpc, nbt, wrepl, ldap, cldap, kdc, drepl, winbindd, ntp_signd, kcc, dnsupdate, dns
        server signing = default
        server string = %h server
        set primary group script =
        set quota command =
        share backend = classic
        show add printer wizard = Yes
        shutdown script =
        smb2 leases = Yes
        smb2 max credits = 8192
        smb2 max read = 8388608
        smb2 max trans = 8388608
        smb2 max write = 8388608
        smbd profiling level = off
        smb passwd file = /etc/samba/smbpasswd
        smb ports = 445 139
        socket options = TCP_NODELAY SO_RCVBUF=8192 SO_SNDBUF=8192
        spn update command = /usr/sbin/samba_spnupdate
        stat cache = Yes
        state directory = /var/lib/samba
        svcctl list =
        syslog = 1
        syslog only = No
        template homedir = /home/domain.com/users/%U
        template shell = /bin/bash
        time server = No
        timestamp logs = Yes
        tls cafile = tls/ca.pem
        tls certfile = tls/cert.pem
        tls crlfile =
        tls dh params file =
        tls enabled = Yes
        tls keyfile = tls/key.pem
        tls priority = NORMAL:-VERS-SSL3.0
        tls verify peer = as_strict_as_possible
        unicode = Yes
        unix charset = UTF-8
        unix extensions = Yes
        unix password sync = No
        use mmap = Yes
        username level = 0
        username map =
        username map cache time = 0
        username map script =
        usershare allow guests = No
        usershare max shares = 100
        usershare owner only = Yes
        usershare path = /var/lib/samba/usershares
        usershare prefix allow list =
        usershare prefix deny list =
        usershare template share =
        utmp = No
        utmp directory =
        web port = 901
        winbind cache time = 300
        winbindd socket directory = /var/run/samba/winbindd
        winbind enum groups = No
        winbind enum users = No
        winbind expand groups = 0
        winbind max clients = 200
        winbind max domain connections = 1
        winbind nested groups = Yes
        winbind normalize names = No
        winbind nss info = template
        winbind offline logon = No
        winbind reconnect delay = 30
        winbind refresh tickets = No
        winbind request timeout = 60
        winbind rpc only = No
        winbind scan trusted domains = Yes
        winbind sealed pipes = Yes
        winbind separator = \
        winbind use default domain = No
        wins hook =
        wins proxy = No
        wins server =
        wins support = No
        workgroup = TEST
        write raw = Yes
        wtmp directory =
        fruit:aapl = yes
        idmap config * : backend = tdb
        access based share enum = No
        acl allow execute always = No
        acl check permissions = Yes
        acl group control = No
        acl map full control = Yes
        administrative share = No
        admin users =
        afs share = No
        aio read size = 16384
        aio write behind =
        aio write size = 16384
        allocation roundup size = 1048576
        available = Yes
        blocking locks = Yes
        block size = 1024
        browseable = Yes
        case sensitive = Auto
        check parent directory delete on close = No
        comment =
        copy =
        create mask = 0777
        csc policy = manual
        cups options =
        default case = lower
        default devmode = Yes
        delete readonly = No
        delete veto files = No
        dfree cache time = 0
        dfree command =
        directory mask = 0777
        directory name cache size = 100
        dmapi support = No
        dont descend =
        dos filemode = No
        dos filetime resolution = No
        dos filetimes = Yes
        durable handles = Yes
        ea support = Yes
        fake directory create times = No
        fake oplocks = No
        follow symlinks = Yes
        force create mode = 0000
        force directory mode = 0000
        force group =
        force printername = No
        force unknown acl user = No
        force user =
        fstype = NTFS
        guest ok = No
        guest only = No
        hide dot files = Yes
        hide files =
        hide special files = No
        hide unreadable = No
        hide unwriteable files = No
        hosts allow =
        hosts deny =
        include =
        inherit acls = No
        inherit owner = no
        inherit permissions = No
        invalid users =
        kernel oplocks = No
        kernel share modes = Yes
        level2 oplocks = Yes
        locking = Yes
        lppause command =
        lpq command = %p
        lpresume command =
        lprm command =
        magic output =
        magic script =
        mangled names = yes
        mangling char = ~
        map acl inherit = No
        map archive = Yes
        map hidden = No
        map readonly = no
        map system = No
        max connections = 0
        max print jobs = 1000
        max reported print jobs = 0
        min print space = 0
        msdfs proxy =
        msdfs root = No
        msdfs shuffle referrals = No
        nt acl support = Yes
        ntvfs handler = unixuid, default
        oplocks = Yes
        path =
        posix locking = Yes
        postexec =
        preexec =
        preexec close = No
        preserve case = Yes
        printable = No
        print command =
        printer name =
        printing = bsd
        printjob username = %U
        print notify backchannel = No
        queuepause command =
        queueresume command =
        read list =
        read only = Yes
        root postexec =
        root preexec =
        root preexec close = No
        short preserve case = Yes
        smb encrypt = default
        spotlight = No
        store dos attributes = Yes
        strict allocate = No
        strict locking = Auto
        strict rename = No
        strict sync = Yes
        sync always = No
        use client driver = No
        use sendfile = Yes
        valid users =
        veto files =
        veto oplock files =
        vfs objects =
        volume =
        wide links = No
        write cache size = 0
        write list =
nsswitch
cat /etc/nsswitch.conf
# /etc/nsswitch.conf
#
# Example configuration of GNU Name Service Switch functionality.
# If you have the `glibc-doc-reference' and `info' packages installed, try:
# `info libc "Name Service Switch"' for information about this file.

passwd:         files systemd sss
group:          files systemd sss
shadow:         files sss
gshadow:        files

hosts:          files mdns4_minimal [NOTFOUND=return] dns myhostname
networks:       files

protocols:      db files
services:       db files sss
ethers:         db files
rpc:            db files

netgroup:       nis sss
Microsoft NT Domain / Active Directory provides for single sign-on, time sync, roaming user profiles and other features.
From home use of NAS appliances single sign on is the immediately seen problem. Creating new user or changing password should be repeated on every single device. Fragile and boring.
Microsoft desktop operating systems are prohibited from becoming «domain controllers».
However SAMBA has domain controller functionality. It is limited (for example Russian AstraLinux FAQ says once domain was created in Samba it can not be renamed, only deleted and created anew) and might be obsolete, but it would be enough at least for having centralized users database for all the family.
https://wiki.samba.org/index.php/Setting_up_Samba_as_an_Active_Directory_Domain_Controller
Протокол Server Message Block (SMB — Samba) позволяет объединять в сети и обмениваться файлами между компьютерами с несовместимыми операционными системами Windows и UNIX/Linux. С помощью Samba можно адаптировать для ОС Windows распространенные сетевые решения. Например, создать на удаленном сервере сетевое хранилище (SAMBA-диск) для Windows на основе решения OpenMediaVault.
Мы расскажем, как это сделать на сервере с предустановленным решением OpenMediaVault (OMV).
- После заказа сервера OMV вам на почту придет активационное письмо с данными доступа: IP, логин и пароль
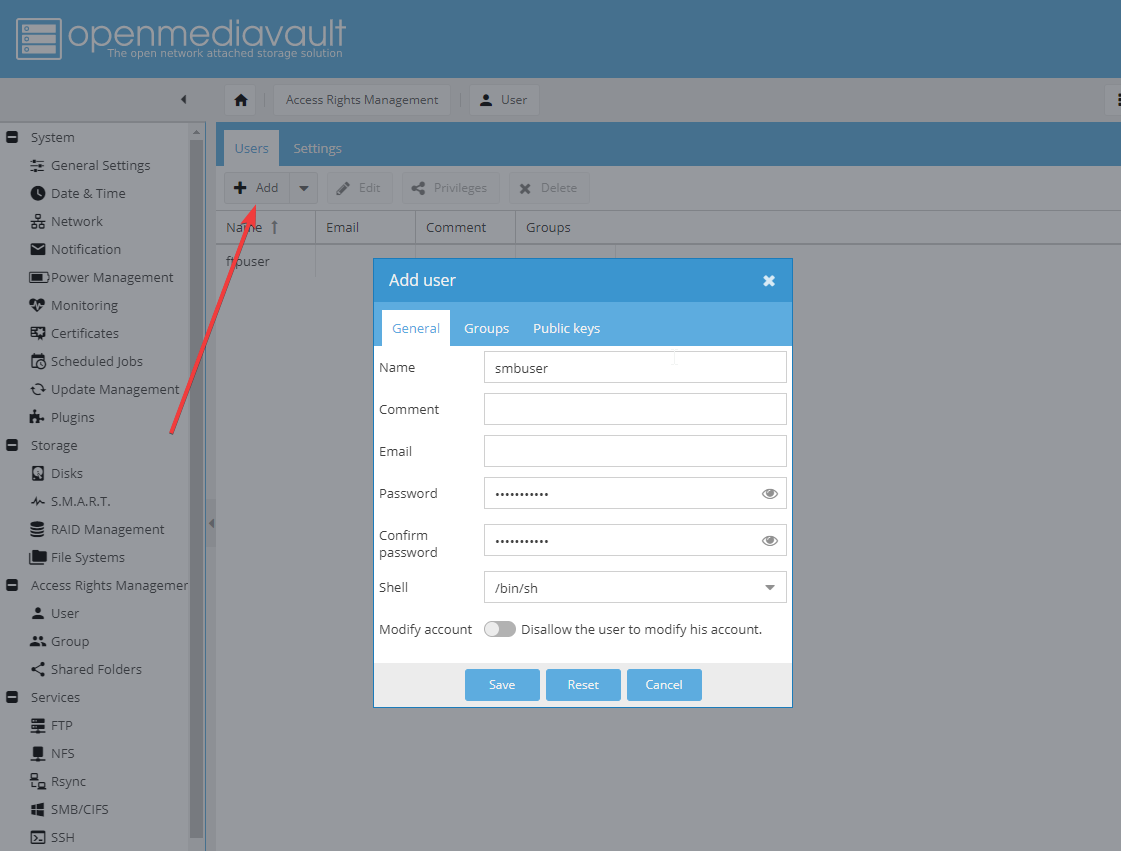
Подключитесь к веб-панели по указанному в письме адресу http://<ip> и авторизуйтесь, указав логин и пароль - Создадим нового пользователя c именем smbuser

Нажмите на кнопку Add (добавить нового пользователя) и заполните открывшуюся форму (логин, пароль и подтверждение пароля). После этого подтвердите изменения.
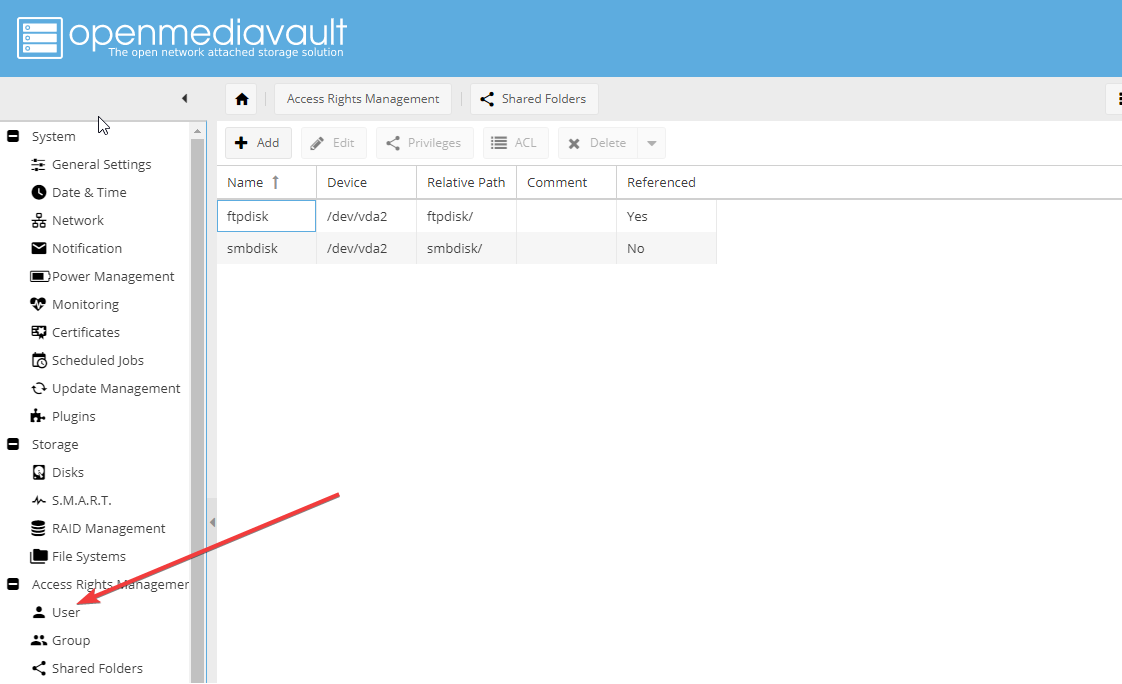
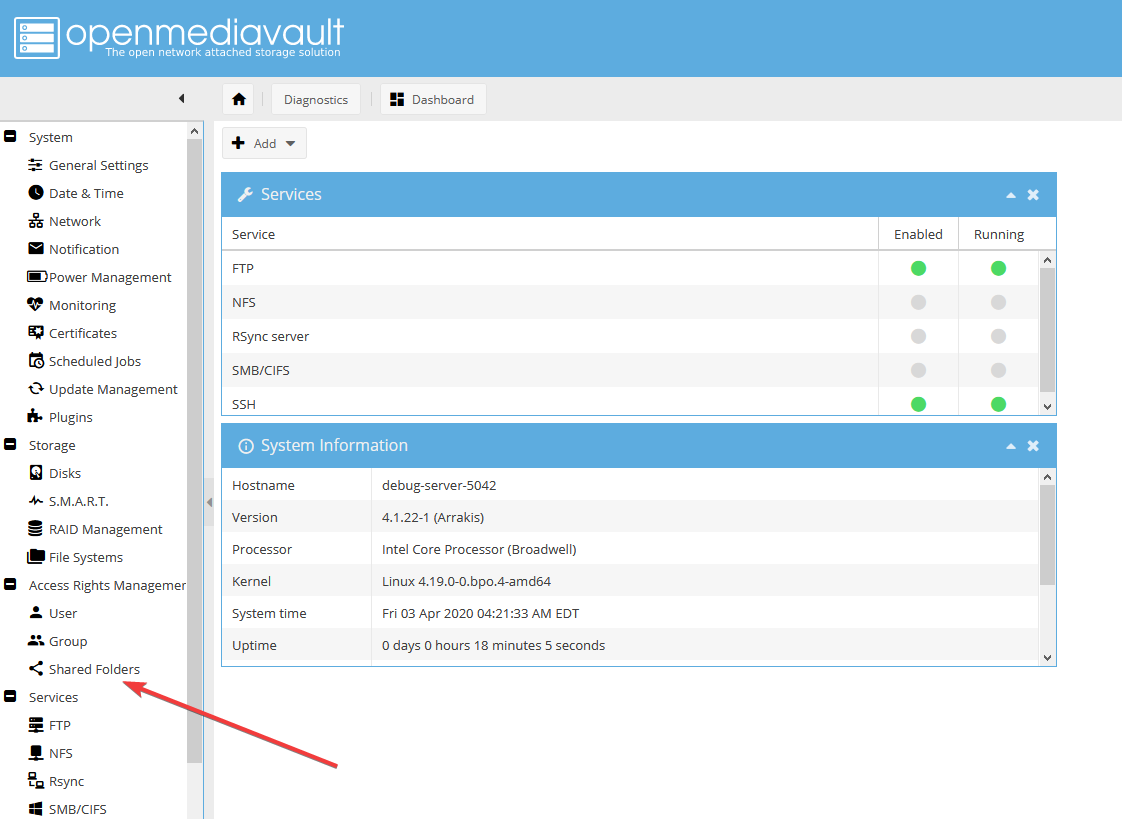
- В панели откройте вкладку shared folders:
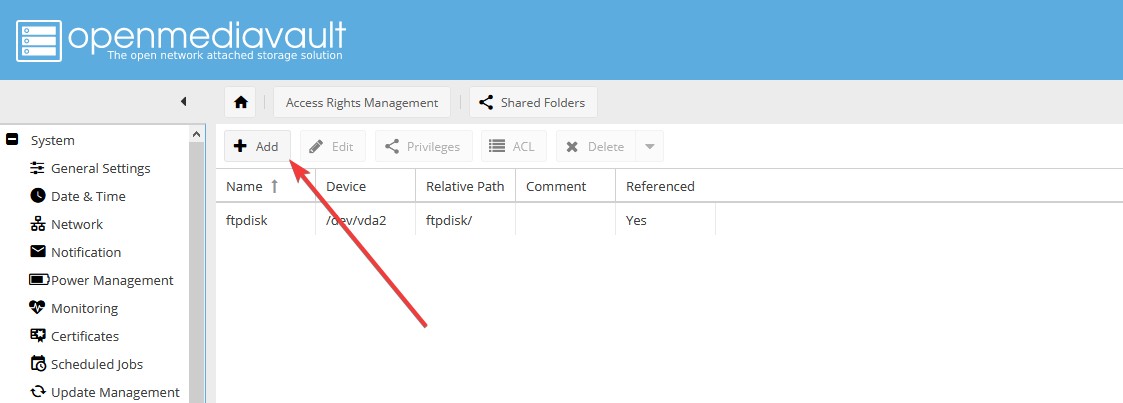
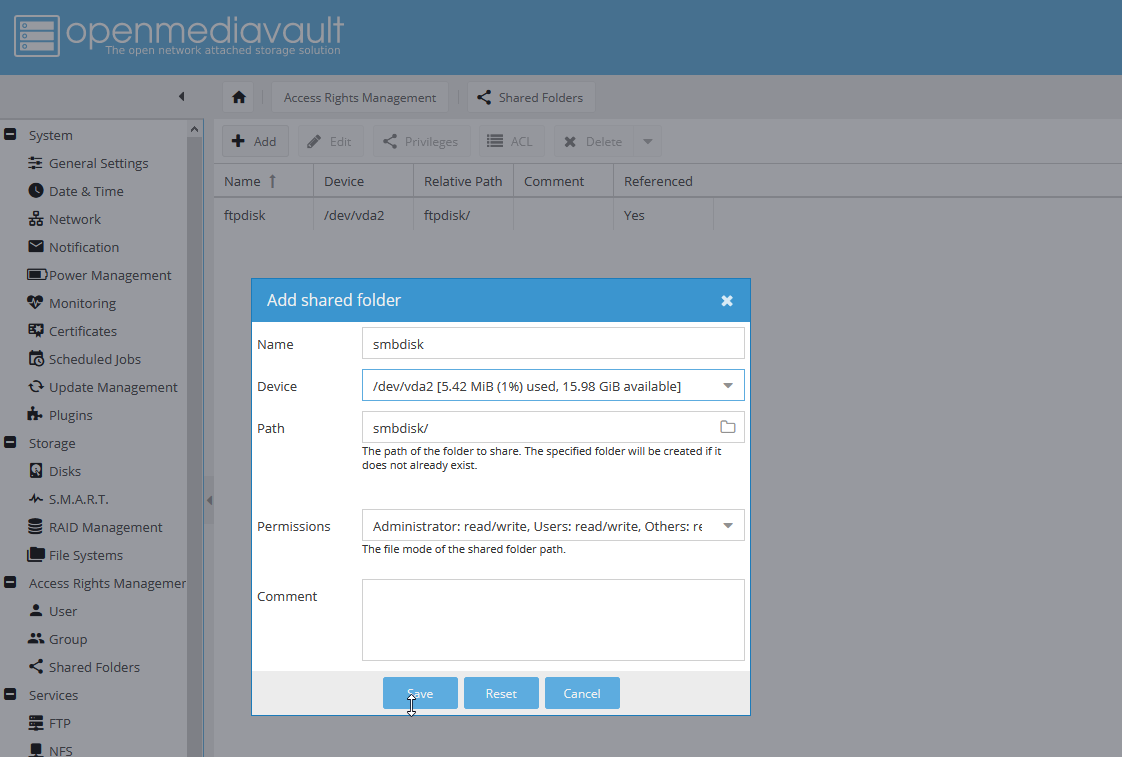
- Создайте новую shared folders:
- Заполните форму по созданию shared folder, указав название, выбрав диск. Остальные опции оставьте по умолчанию и нажмите Save.
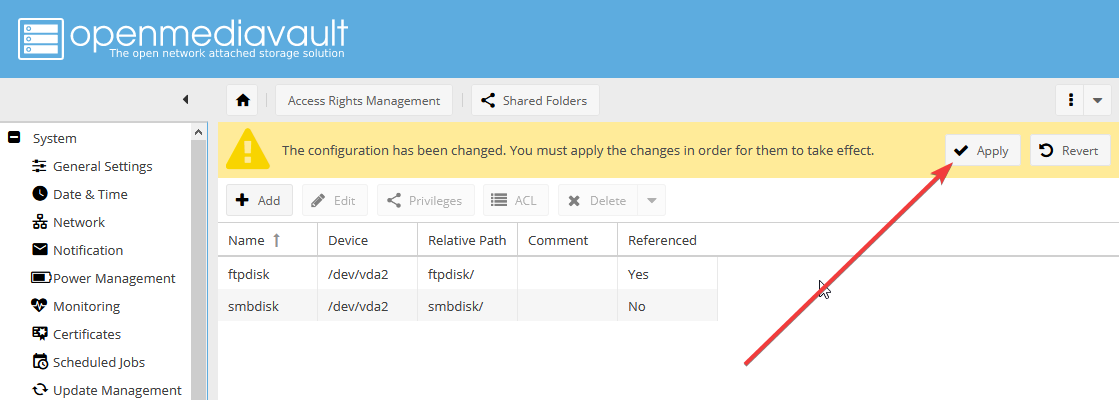
Подтвердите изменения:
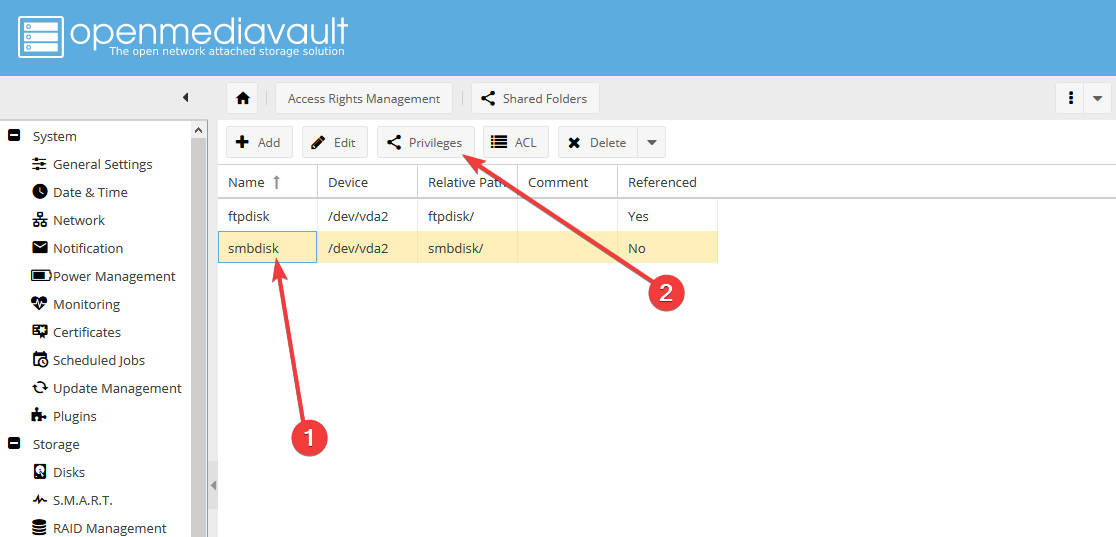
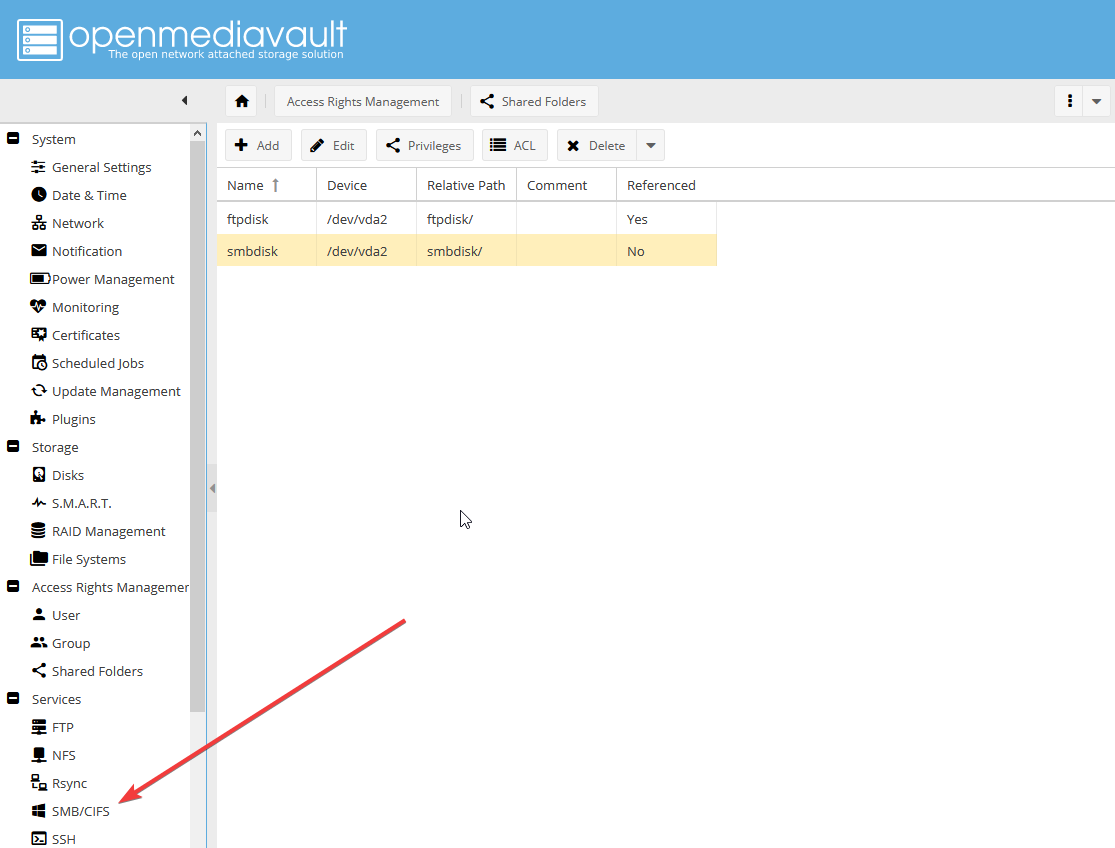
- Далее нужно настроить доступ для чтения и записи для пользователя smbuser: выделите shared folder smbdisk (1) и нажмите Privileges (2):
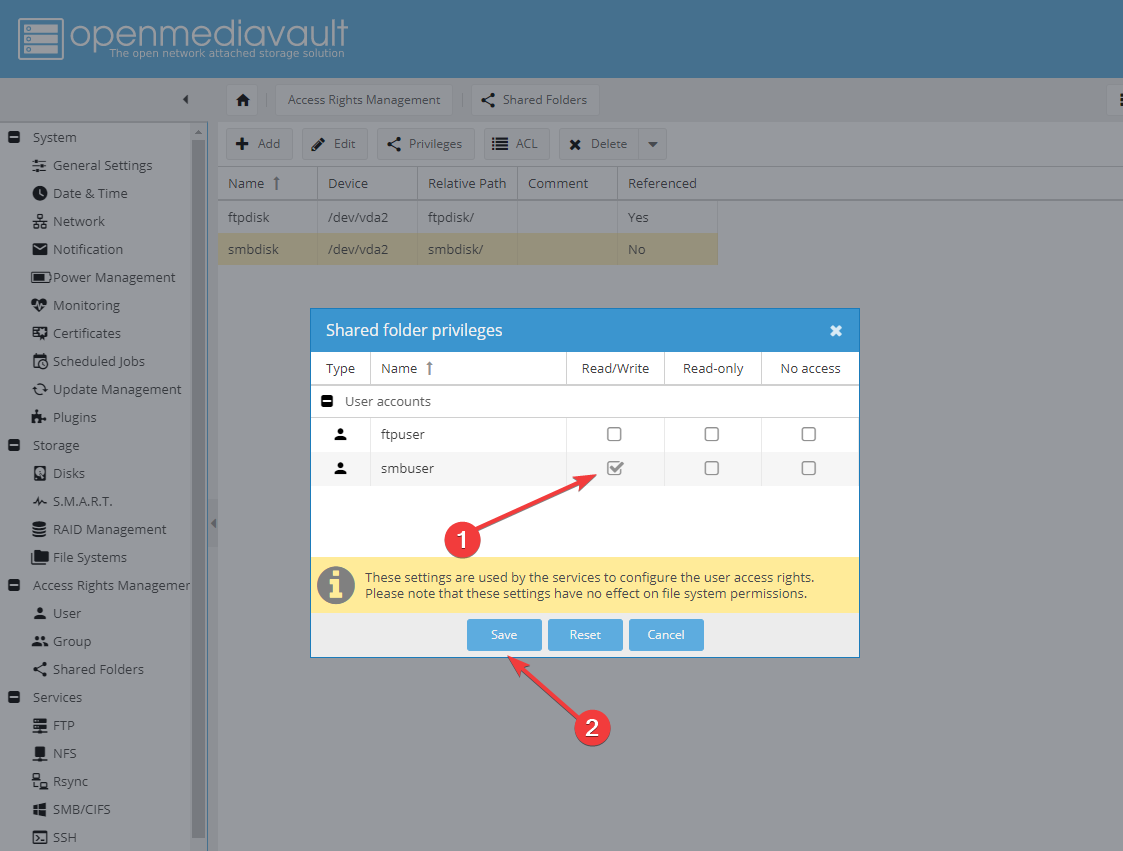
В открывшемся окне поставьте галочку напротив Read/Write для пользователя smbuser (1) и нажмите Save (2):
Окно закроется и останется подтвердить изменения.
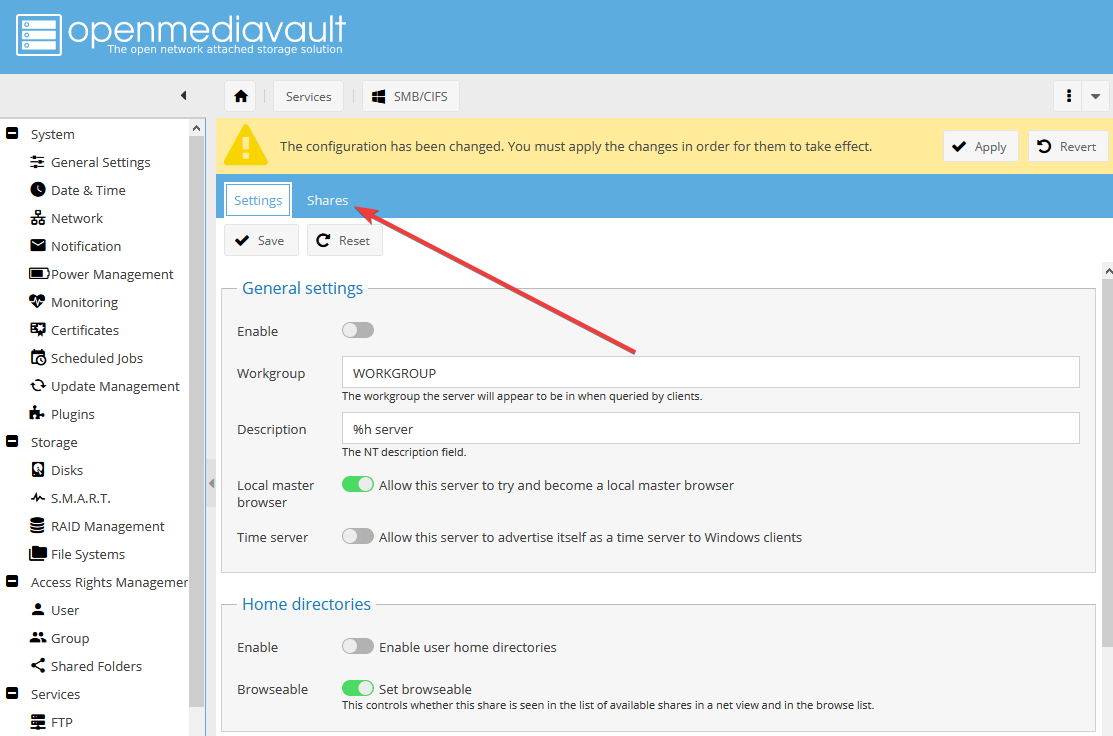
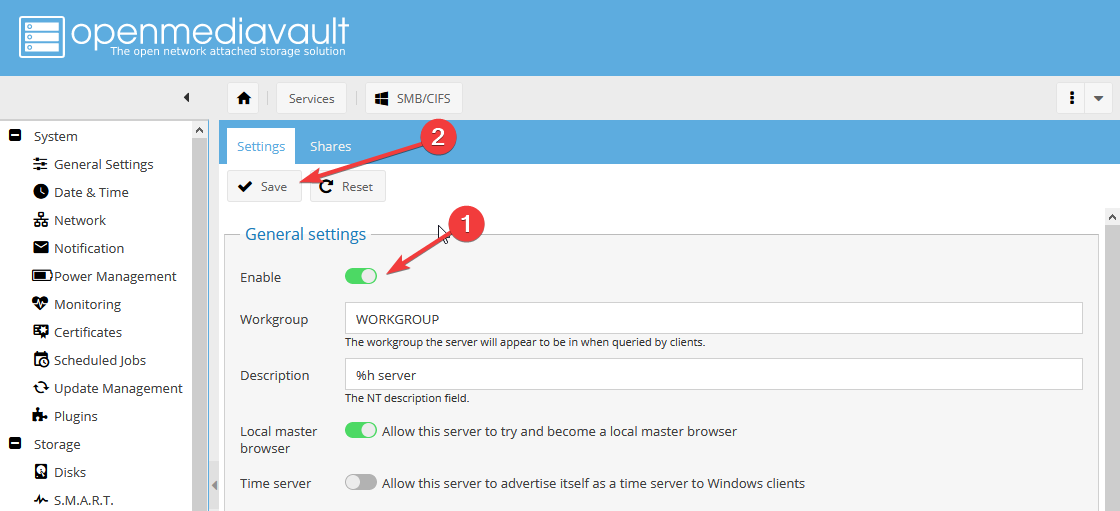
- В боковом меню выберите Services > SMB/CIFS:
Откройте вкладку Shares:
Нажмите кнопку Add, чтоб «привязать» новую shared folder к службе SMB:
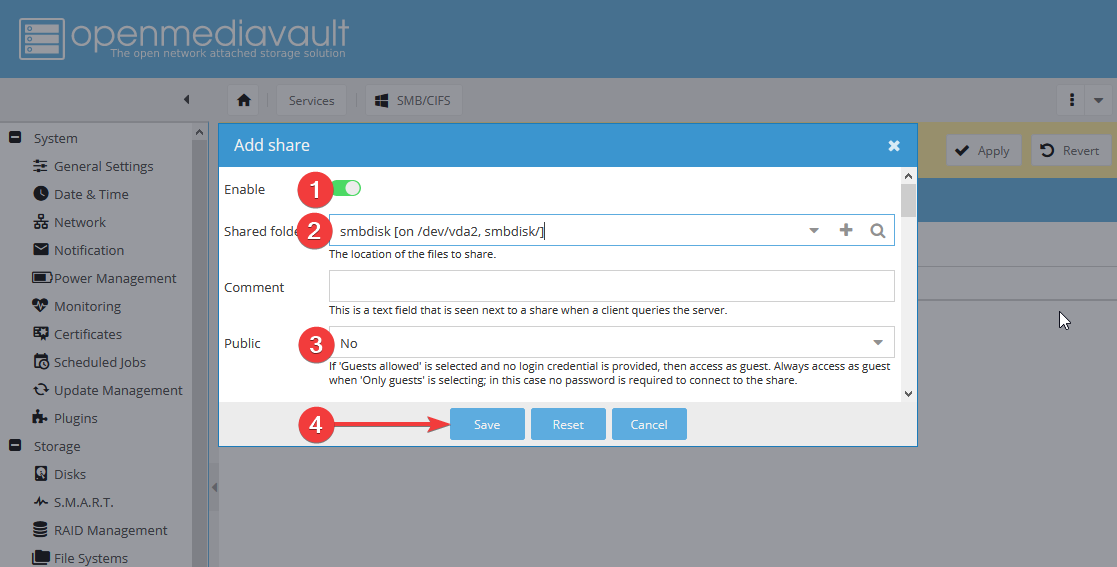
Заполните форму следующим образом: включите Share (1), выберите в поле Shared Folder созданную папку smbdisk (2), укажите в поле Public значение None (3)и нажмите Save (4):
Подтвердите изменения.
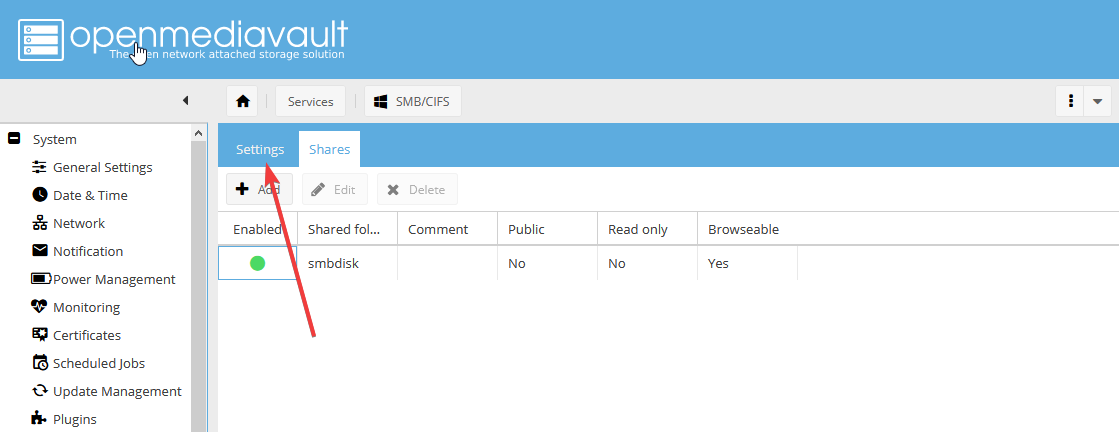
- Вернитесь во вкладку Settings:
Включите службу SMB (1) и нажмите Save (2):
Подтвердите изменения.
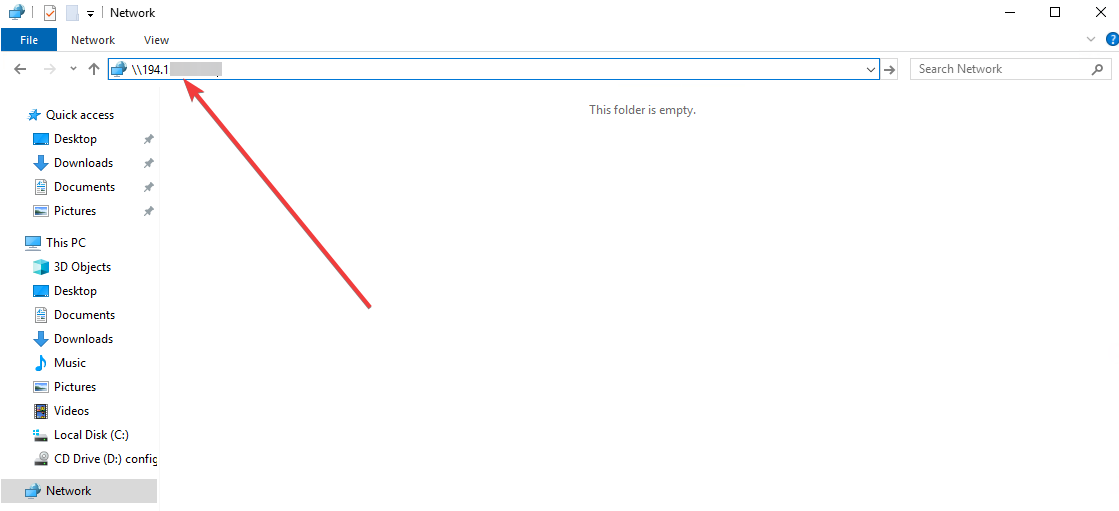
- После этого откройте на компьютере Windows папку Сеть (Network) и в адресной строке введите \\ip-address (ip-адрес Вашего сервера).
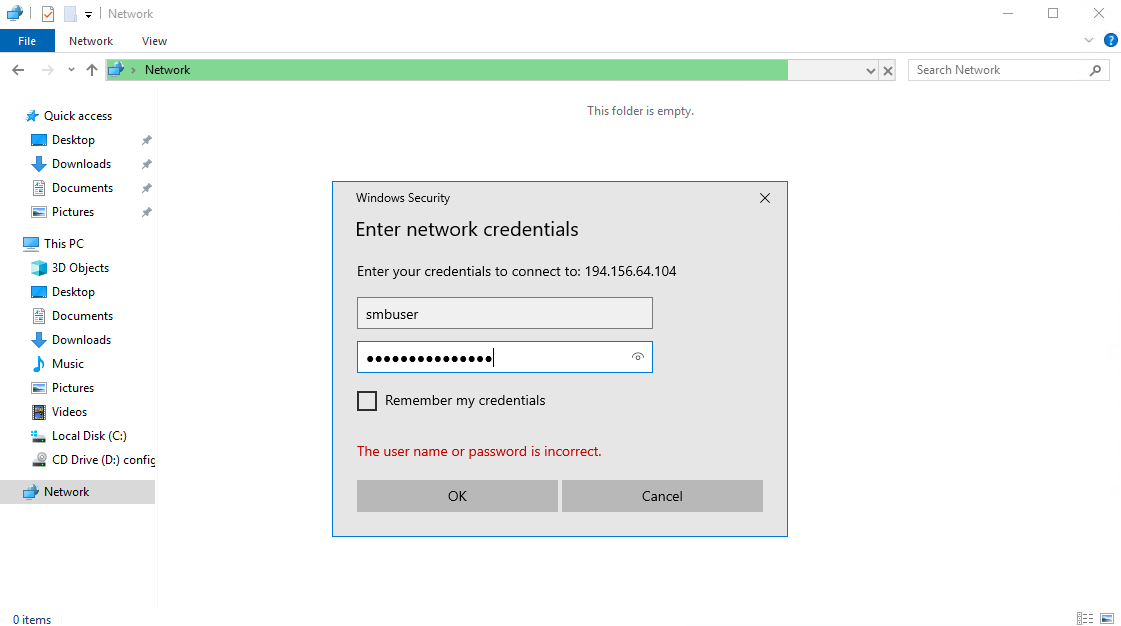
- После этого откроется диалоговое окно для подключения к диску:
Введите логин smbuser и пароль, который вы указали в п.2 и нажмите ок.
После этого Вы получите доступ к SAMBA-диску:

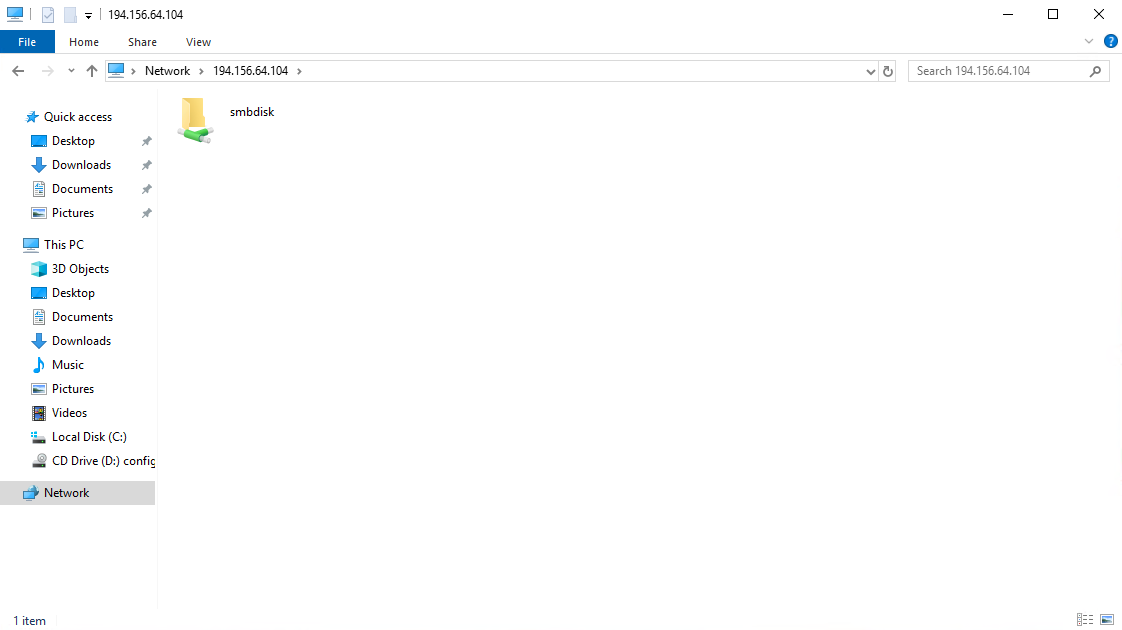
Теперь вы можете пользоваться вашим новым сетевым диском.
Купите Openmediavault VPS прямо сейчас
Минимальная конфигурация включает:
1 ядро, 2Gb RAM, 60Gb Жесткий диск
В каждый тариф входят 5 Тб ежемесячного трафика и выделенный IP адрес.
Вы можете изменять параметры тарифов и подобрать индивидуальную конфигурацию.
google translate français italiano español 中国 한국의 Azərbaycan Deutsch Polskie 日本人 O’zbekiston Қазақстан
_____________________________________________________________________
Здравствуйте наконец дошли руки написать как я добавил сетевое хранилище к домену.
ТЗ: В организованной доменной сети добавить сетевую папку с соответствующими правами для группы пользователей.
ТО: Настроена доменная сеть. Машина на плате со встроенным процессором 1.2 ггц, 8 гб оперативной памяти, 1 ssd диск 32 гб, 2 hdd диска 2 тб каждый.
_____________________________________________________________________
Решение:
1. Скачиваю установочный образ будущей NAS с сайта:
http://sourceforge.net/projects/openmediavault/files/2.1/
openmediavault_2.1_amd64.iso
2. Устанавливаю Openmediavault 2.1 и настраиваю через веб интерфейс сеть, время, оповещения на почту, создаю папку «share_1», включаю SMB сервис добавляю папку, включаю ssh сервис для удаленного доступа (если вы не созавали пользователя, то стоит разрешить на время root пользователя в SSH).
3. Для доступа по SSH пользуюсь программой PUTTY с сайта:
http://www.chiark.greenend.org.uk/~sgtatham/putty/download.html
A Windows installer for everything except PuTTYtel
Installer: putty-0.65-installer.exe
4. Подключившись к консоли Openmediavault 2.1 устанавливаю PBIS для подключения к домену. Можно скачать по адресу : http://download1.beyondtrust.com/Technical-Support/Downloads/PowerBroker-Identity-Services-Open-Edition/?Pass=True
wget http://download.beyondtrust.com/PBISO/8.3/pbis-open-8.3.0.3287.linux.x86_64.deb.sh
chmod 777 pbis-open-8.3.0.3287.linux.x86_64.deb.sh
./pbis-open-8.3.0.3287.linux.x86_64.deb.sh
/opt/pbis/bin/domainjoin-cli join domainName ADjoinAccount
DOMAIN\\username
…
Настраивал по статье: http://habrahabr.ru/post/174407/
На контроллере домена Zentyal 4.1 проверим и если нет то допишем соответствующую запись DNS с адресом и именем. Если требуется доступ по впн то установим OpenVPN клиент и скопирем файлы конфигурации.
5. Ещё я добавил вот это:
/opt/pbis/bin/samba-interop-install --install --loglevel debug
nano /etc/samba/smb.conf
тут строчки новые:
[global]
  security = ADS
  workgroup = MYDOMEN
  realm = MYDOMEN.RU
  machine password timeout = 0
сохраняем ctrl+x
/etc/init.d/samba restart script
Делал по статье: http://habrahabr.ru/post/174497/
6. Всё в принципе готово, можно порпробовать подключится пользователями из разных групп, чтобы проверить права доступа. Если все хорошо то запрос логин/пароль должен отсутствовать, а со сторонних машин должен присутствовать.
7. Дальнейшие настройки и назначение прав ACL осуществляется СТАНДАРТНО в веб интерфейсе OpenMediaVault 2.1
Спасибо за внимание.
_______________________________________
P.S. Пункт (8.) иногда после перезагрузки фаил /etc/samba/smb.conf возвращается в исходное состояние, если вы потеряли доступ из домена проверьте ещё раз наличие строк:
security = ADS
realm = MYDOMEN.RU
machine password timeout = 0
_______________________________________
Репозитарий:
Открытая версия:
wget -O - http://repo.pbis.beyondtrust.com/yum/RPM-GPG-KEY-pbis|sudo apt-key add -
sudo wget -O /etc/apt/sources.list.d/pbiso.list http://repo.pbis.beyondtrust.com/apt/pbiso.list
sudo apt-get update
sudo apt-get install pbis-open
Коммерческая версия:
wget -O - http://repo.pbis.beyondtrust.com/yum/RPM-GPG-KEY-pbis|sudo apt-key add -
sudo wget -O /etc/apt/sources.list.d/pbiso.list http://repo.pbis.beyondtrust.com/apt/pbise.list
sudo apt-get update
sudo apt-get install pbis-enterprise
Тоже самое для yum:
sudo wget -O /etc/yum.repos.d/pbiso.repo http://repo.pbis.beyondtrust.com/yum/pbiso.repo
sudo yum clean all
sudo yum install pbis-open
Коммерческая версия:
sudo wget -O /etc/yum.repos.d/pbise.repo http://repo.pbis.beyondtrust.com/yum/pbise.repo
sudo yum clean all
sudo yum install pbis-enterprise
Форум по этой теме: http://forum.beyondtrust.com/
ввод:
sudo domainjoin-cli join --disable ssh domain username
вывод:
sudo domainjoin-cli leave --disable ssh domain username
________________________________________________________________________________
Решение возможной ошибки ДНС для убунту http://askubuntu.com/questions/100661/adding-ubuntu-to-active-directory-with-likewise-open
или так:
создадим запись в днс на домене через виндовс и создадм запись на клиенте
sudo nano /etc/resolv.conf
добавляем
search domainmy.ru 192.168.1.2
пробуем
sudo domainjoin-cli join domainmy.ru Administrator
________________________________________________________________________________