
- Details
- Written by
- Last Updated on 09 October 2021 | Print Email
In this article, I will show you how to setup OpenJDK 17 on Windows operating system. You know, OpenJDK is a production-ready, open-source distribution of Java Development Kit (JDK). And JDK 17 is the latest Long Term Support (LTS) release of Java SE platform, as of October 2021.
1. Download binary distribution of OpenJDK 17
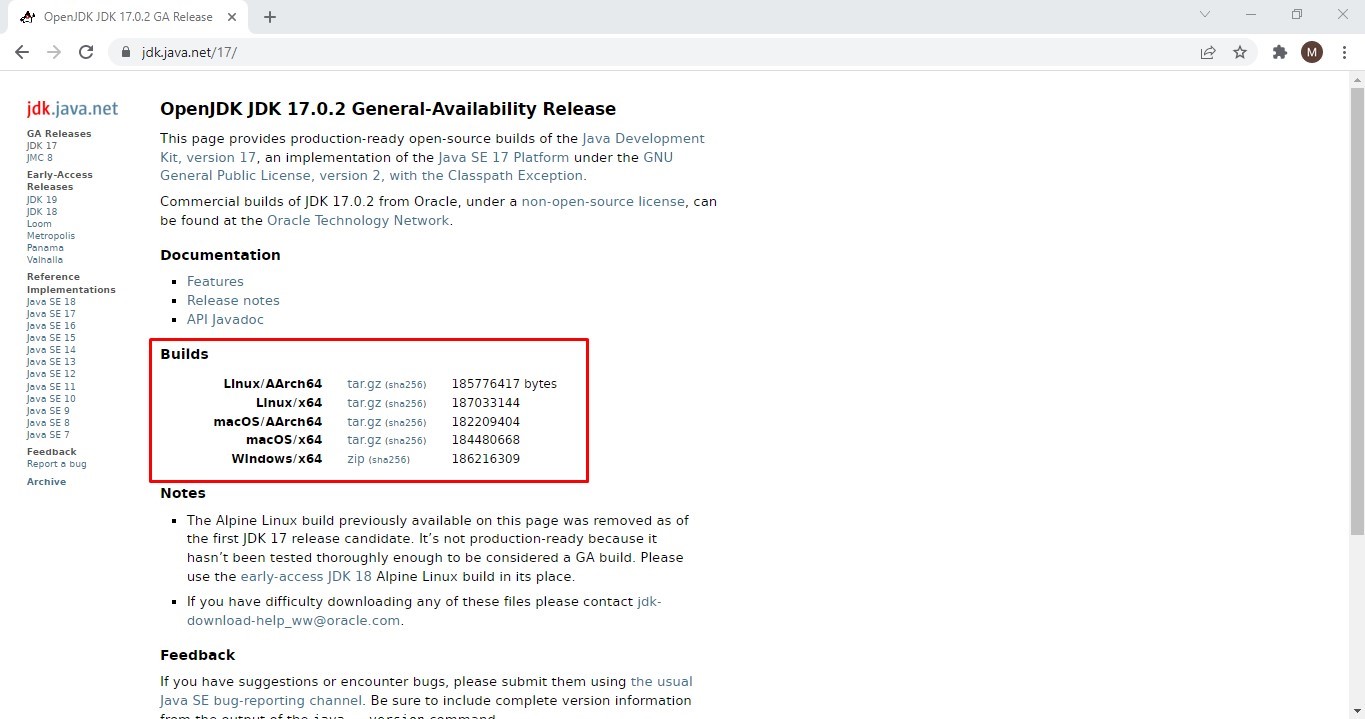
Head over to the official download page of OpenJDK at https://jdk.java.net/17, and click on the link for Windows/x64:

It will download the binary distribution of OpenJDK 17 as a ZIP archive file. Then you should type the following command to verify the SHA256 checksum of the downloaded file:
certutil –hash openjdk-17_windows-x64_bin.zip SHA256
Compare the SHA256 value produced by this command against the value posted on the website, in the corresponding sha256 link. If they are identical, it’s safe to use the downloaded zip file.
2. Install OpenJDK 17 on Windows
Extract the zip file into a directory on your computer, e.g. D:\OpenJDK17. Then you need to update the JAVA_HOME environment variable, pointing to the installation directory of OpenJDK 17, e.g. D:\OpenJDK17\jdk-17. Also make sure that the PATH variable does include an entry to JAVA_HOME’s bin folder:
setx –m JAVA_HOME “D:\OpenJDK17\jdk-17”
setx –m PATH “%JAVA_HOME%\bin;%PATH%”
Note that you must execute these commands with administrator right. Follow this article to learn more.
Then open a new command prompt and type java –version to verify:

If you see this screen, it means that OpenJDK 17 has been successfully installed.
To see the steps in action, watch the following video:
Learn more:
- How to check Java version
- Java SE versions history
- How to set environment variables for Java using command line
- How to write, compile and run a hello world Java program for beginners
- What are JVM, JRE and JDK
About the Author:
Nam Ha Minh is certified Java programmer (SCJP and SCWCD). He began programming with Java back in the days of Java 1.4 and has been passionate about it ever since. You can connect with him on Facebook and watch his Java videos on YouTube.
Add comment
This tutorial provides all the steps required to install OpenJDK 17 on Windows 10. The steps to install OpenJDK 17 on other versions of Windows should be similar to the steps explained in this tutorial.
You may also install the popular IDEs to develop Java applications by following — How To Install Eclipse For Java On Windows, How To Install IntelliJ IDEA for Java on Windows, and How To Install VSCode For Java On Windows. You may also follow the How To Install OpenJDK 17 On Ubuntu to install the latest OpenJDK on Ubuntu and How To Install Java 17 On Ubuntu to install Oracle JDK.
Notes: New version of this tutorial is available at How To Install OpenJDK 18 On Windows.
Step 1: Download OpenJDK
Open the JDK 17 GA Release site and download the distribution for Windows as highlighted in Fig 1.

Fig 1
Click the zip download link as highlighted in Fig 1 to download OpenJDK for Windows. Also, verify your download using the given sha256 checksum.
Step 2: Install OpenJDK
Extract the downloaded zip to the desired location. In my case, I have extracted the downloaded zip to C:\java\openjdk. The final path should be C:\java\openjdk\jdk-17.
This is the only step required to install OpenJDK on windows.
Step 3: Set Environment Variables
In this step, we will configure the environment variables to use the OpenJDK from Command Prompt. Open Command Prompt and check the installed version of Java using the command java -version as shown in Fig 2.

Fig 2
It shows the version of Java 17 since my current version of Java is 17. In your case it might show another version of Java if it’s already installed, else it will show the message — Java is not recognized as internal or external command, operable program or batch file.
Right Click -> My Computer(This PC) -> Properties -> Advanced System Settings
The above steps will open the Windows Settings Panel as shown in Fig 3.

Fig 3
Now click the Environment Variables Button, select Path under the System Variables section, and click the Edit Button. We need to add the path of the installed JDK to the system Path.
Click on the New/Edit Button and add/update the path to the installed JDK bin which is C:\java\openjdk\jdk-17\bin in our case. You might be required to update the path if it already exists. It should look like Fig 4.

Fig 4
Press the OK Button 3 times to close all the windows. This sets the JDK 17 on system environment variables to access the same from the console.
Notes: Remove existing PATH values specific to previously installed Java. Also update JAVA_HOME, in case it was already set. Also, you might be required to remove the previously installed JDK from the Global Path as shown in Fig 5.

Fig 5
Now again open the console and test the Java version as shown in Fig 6. Make sure to use a new console to test the version of the newly installed OpenJDK 17.

Fig 6
It must show the OpenJDK version as shown in Fig 6. You might need to restart the system in case it does not reflect the JDK version installed by us.
Getting started with Java — Hello World
In this step, we will write, compile, and execute our first program in Java using the standard Hello World example.
Now write the first Java program as shown below, save the program as HelloWorld.java and exit the editor. Make sure that the class name and file name are the same.
class HelloWorld {
	public static void main( String[] args ) {
		System.out.println( "Hello World !!\n" );
	}
}
Now open the command prompt and navigate to the path where you have saved your Java program. Use the below-mentioned commands to compile and execute the program.
# Compile - Specify file name and extension
javac HelloWorld.java

# Execute - Spicy file name
java HelloWorld

# Output
Hello World !!
These are the easy-to-install steps required to install OpenJDK on Windows and write and execute the Java program.
Summary
This tutorial provided the steps required to download and install the most recent versions of OpenJDK i.e. JDK 17 and also provided the steps to write, compile, and execute the first Java program.
Installing and using Red Hat build of OpenJDK 17 for Windows
Red Hat build of OpenJDK 17
Abstract
Red Hat build of OpenJDK 17 for Windows is a Red Hat offering on the Microsoft Windows platform. The Installing and using Red Hat build of OpenJDK 17 for Windows guide provides an overview of this product and explains how to install the software and start using it.
Providing feedback on Red Hat build of OpenJDK documentation
To report an error or to improve our documentation, log in to your Red Hat Jira account and submit an issue. If you do not have a Red Hat Jira account, then you will be prompted to create an account.
Procedure
- Click the following link to create a ticket.
- Enter a brief description of the issue in the Summary.
- Provide a detailed description of the issue or enhancement in the Description. Include a URL to where the issue occurs in the documentation.
- Clicking Submit creates and routes the issue to the appropriate documentation team.
Making open source more inclusive
Red Hat is committed to replacing problematic language in our code, documentation, and web properties. We are beginning with these four terms: master, slave, blacklist, and whitelist. Because of the enormity of this endeavor, these changes will be implemented gradually over several upcoming releases. For more details, see our CTO Chris Wright’s message.
Chapter 1. Red Hat build of OpenJDK 17 for Microsoft Windows installation options
Red Hat build of OpenJDK 17 for Microsoft Windows can be installed using an archive or through a graphical user interface using an MSI-based installer.
Depending on your circumstance, use one of the following installation methods:
- Installing Red Hat build of OpenJDK with the archive
- Installing Red Hat build of OpenJDK with the MSI installer
Chapter 2. Installing Red Hat build of OpenJDK 17 for Microsoft Windows with the archive
This procedure describes how to manually install Red Hat build of OpenJDK 17 for Microsoft Windows using the archive.
Procedure
- Download the archive of Red Hat build of OpenJDK 17 for Microsoft Windows.
-
Extract the contents of an archive to a directory of your choice.
Extracting the contents of an archive to a directory path that does not contain spaces is recommended.
-
Update the
PATHas below:-
Add the
bindirectory contained in your Red Hat build of OpenJDK 17 for Microsoft Windows installation path to the%PATH%environment variable:C:\> setx /m PATH "%PATH%;C:\Progra~1\RedHat\java-17-openjdk-17.0.0.0.35-1\bin"
If the path contains spaces, use the shortened path name.
- Restart Command Prompt to reload the environment variables.
-
-
Verify the Red Hat build of OpenJDK 17 for Microsoft Windows is successfully installed, run
java -versioncommand in a command prompt and you must get the following output:openjdk version "17" 2021-09-14 LTS OpenJDK Runtime Environment 21.9 (build 17+35-LTS) OpenJDK 64-Bit Server VM 21.9 (build 17+35-LTS, mixed mode, sharing)
-
The
%JAVA_HOME%environment variable must also be set to use some developer tools. Set the%JAVA_HOME%environment variable as follows:- Open Command Prompt as an administrator.
-
Set the value of the environment variable to your Red Hat build of OpenJDK 17 for Microsoft Windows installation path:
C:\> setx /m JAVA_HOME "C:\Progra~1\RedHat\java-17-openjdk-17.0.0.0.35-1"
If the path contains spaces, use the shortened path name.
- Restart Command Prompt to reload the environment variables.
Chapter 3. Updating Red Hat build of OpenJDK 17 for Microsoft Windows using the archive
Red Hat build of OpenJDK 17 for Microsoft Windows can be manually update using the archive.
Procedure
- Download the archive of Red Hat build of OpenJDK 17.
-
Extract the contents of an archive to a directory of your choice.
Extracting the contents of an archive to a directory path that does not contain spaces is recommended.
-
On Command Prompt, update
JAVA_HOMEenvironment variable as follows:- Open Command Prompt as an administrator.
-
Set the value of the environment variable to your Red Hat build of OpenJDK 17 for Microsoft Windows installation path:
C:\> setx /m JAVA_HOME "C:\Progra~1\RedHat\java-17-openjdk-17.0.0.0.35-1"
If the path contains spaces, use the shortened path name.
- Restart Command Prompt to reload the environment variables.
-
Set the value of
PATHvariable if it is not set already:C:\> setx -m PATH "%PATH%;%JAVA_HOME%\bin";
- Restart Command Prompt to reload the environment variables.
-
Verify that
java -versionworks without supplying the full path.C:\> java -version openjdk version "17" 2021-09-14 LTS OpenJDK Runtime Environment 21.9 (build 17+35-LTS) OpenJDK 64-Bit Server VM 21.9 (build 17+35-LTS, mixed mode, sharing)
Chapter 4. Installing Red Hat build of OpenJDK with the MSI installer
This procedure describes how to install Red Hat build of OpenJDK 17 for Microsoft Windows using the MSI-based installer.
Procedure
- Download the MSI-based installer of Red Hat build of OpenJDK 17 for Microsoft Windows.
- Run the installer for Red Hat build of OpenJDK 17 for Microsoft Windows.
-
Click
Nexton the welcome screen. -
Check
I accept the terms in license agreement, then clickNext. -
Click
Next. - Accept the defaults or review the optional properties.
-
Click
Install. -
Click
Yeson theDo you want to allow this app to make changes on your device?. -
Verify the Red Hat build of OpenJDK 17 for Microsoft Windows is successfully installed, run
java -versioncommand in the command prompt and you must get the following output:openjdk version "17" 2021-09-14 LTS OpenJDK Runtime Environment 21.9 (build 17+35-LTS) OpenJDK 64-Bit Server VM 21.9 (build 17+35-LTS, mixed mode, sharing)
Chapter 5. Red Hat build of OpenJDK MSI installer components
You can set the following Red Hat build of OpenJDK 17 for Microsoft Windows MSI-based installer components. Setting these components is optional. If these components are not set, the default settings will be used.
- jdk
-
Java Development Kit (JDK) files. Defaults to
true, meaning that thejdkcomponent is enabled. - jdk_registry_runtime
-
A set of Windows registry keys that other software can use to locate JDK installation files. Defaults to
true, meaning that thejdk_registry_runtimecomponent is enabled. This component includes the following registry keys:HKLM\Software\JavaSoft\JDK\<version>, entries: JavaHome: <INSTALLDIR> RuntimeLib: <INSTALLDIR>\bin\server\jvm.dll HKLM\Software\JavaSoft\JDK, entries: CurrentVersion: <version> - jdk_env_path
-
Appends
<INSTALLDIR>\binto the system%PATH%environment variable. - jdk_env_java_home
-
Sets
<INSTALLDIR>to the system%JAVA_HOME%environment variable. - jdk_env_vendor_java_home
-
Sets
<INSTALLDIR>to the system%REDHAT_JAVA_HOME%environment variable. - jdk_registry_jar
- Association for JAR files. Launch JAR files with the Red Hat build of OpenJDK context menu.
- jmc
-
JDK Mission Control files, installed into
<INSTALLDIR>\missioncontrol. - jmc_env
-
Appends
<INSTALLDIR>\missioncontrolto the system%PATH%environment variable.
Appendix A. MSI-based installer properties
The Red Hat build of OpenJDK for Windows MSI-based installer includes the JDK Files component and the following optional properties:
Table A.1. Red Hat build of OpenJDK for Windows MSI-based installer properties
| Property | Description | Default value |
|---|---|---|
|
OpenJDK Runtime — Windows Registry |
Sets registry keys that other software can use to locate JDK installation files. |
Yes |
|
OpenJDK Runtime — Path Variable |
Adds the Runtime to the Path variable so it is available from the command line. |
Yes |
|
OpenJDK Runtime — JAVA_HOME System Variable |
JAVA_HOME is used by some programs to find the Java runtime. |
No |
|
OpenJDK Runtime — REDHAT_JAVA_HOME System Variable |
REDHAT_JAVA_HOME can be used by some programs to find the Red Hat build of OpenJDK runtime. |
No |
|
OpenJDK Runtime — Jar Files Association |
This enables Jar files to be run from within Windows Explorer. |
No |
|
Mission Control — Files |
Contains files that are installed in the <installdir>\missioncontrol directory. |
No |
|
Mission Control — Path Variable |
Appends <installdir>\missioncontrol to the system PATH environment variable. |
No |
Revised on 2024-05-03 15:37:58 UTC
Legal Notice
Copyright © 2024 Red Hat, Inc.
The text of and illustrations in this document are licensed by Red Hat under a Creative Commons Attribution–Share Alike 3.0 Unported license («CC-BY-SA»). An explanation of CC-BY-SA is available at http://creativecommons.org/licenses/by-sa/3.0/. In accordance with CC-BY-SA, if you distribute this document or an adaptation of it, you must provide the URL for the original version.
Red Hat, as the licensor of this document, waives the right to enforce, and agrees not to assert, Section 4d of CC-BY-SA to the fullest extent permitted by applicable law.
Red Hat, Red Hat Enterprise Linux, the Shadowman logo, the Red Hat logo, JBoss, OpenShift, Fedora, the Infinity logo, and RHCE are trademarks of Red Hat, Inc., registered in the United States and other countries.
Linux® is the registered trademark of Linus Torvalds in the United States and other countries.
Java® is a registered trademark of Oracle and/or its affiliates.
XFS® is a trademark of Silicon Graphics International Corp. or its subsidiaries in the United States and/or other countries.
MySQL® is a registered trademark of MySQL AB in the United States, the European Union and other countries.
Node.js® is an official trademark of Joyent. Red Hat is not formally related to or endorsed by the official Joyent Node.js open source or commercial project.
The OpenStack® Word Mark and OpenStack logo are either registered trademarks/service marks or trademarks/service marks of the OpenStack Foundation, in the United States and other countries and are used with the OpenStack Foundation’s permission. We are not affiliated with, endorsed or sponsored by the OpenStack Foundation, or the OpenStack community.
All other trademarks are the property of their respective owners.
Install and Configure OpenJDK in Windows
Table of Contents
The Oracle JDK license has been changed since the release of Java Standard Edition (JDK 8 and above) on April 16, 2019. While this license change does not impact people using Oracle JDK for personal, development, and training purpose, there are a lot of people who started looking for an alternative option. The use of Oracle JDK in production environment now needs a commercial license to be purchased. However, No-Fee Terms and Conditions (NFTC) still allows the users to use Oracle JDK free of cost (even in production environment) as long as the end product is not distributed for a fee.
I am neither a lawyer nor a licensing expert so I will not discuss the licensing and technical details here. In this article, I will discuss how you can install and configure OpenJDK – a completely free and open-source implementation of the Java SE – in Windows. The main problem with OpenJDK is that it does not provide the installer packages like Oracle JDK. The executable installer packages of Oracle JDK made it incredibly easy for users to install and setup JDK without hassle – particularly in Windows. OpenJDK is available as compressed archives which require manual configuration in Windows. So lets discuss how to install and configure OpenJDK in Windows.
Downloading OpenJDK
The OpenJDK is available for download at https://openjdk.java.net. You can download the compressed archive of a particular build for your operating system as shown in the following screenshot:
Installing OpenJDK
Once you download the compressed archive, the installation is fairly simple. You just need to extract the archive into a folder of your choice. I will extract mine into “C:\Program Files\Java” using the following PowerShell command:
Expand-Archive -Path "$env:USERPROFILE\downloads\openjdk-17.0.2_windows-x64_bin.zip" -DestinationPath "C:\Program Files\Java" -Force

Assuming the OpenJDK archive is located in your downloads folder, this command extracts it to the “C:\Program Files\Java” folder. The destination folder will be automatically created if it doesn’t exist. Next step is to setup the environment variables in Windows so that OpenJDK can be accessed by users and programs the same way as that of Oracle JDK.
Configuring Environment Variables for OpenJDK
To setup the environment variables for OpenJDK, follow these steps:
If you see this error, watch this video to learn how to setup environment variables in Windows. You could also try to setup environment variables using PowerShell commands as shown in the next section.
Configuring Environment Variables for OpenJDK using PowerShell
If the environment variable you created using GUI does not work, you could use the commands mentioned in this section to setup the environment variables using PowerShell commands. The benefit of using this method is that there are less chances of errors.
- Launch an elevated session of Windows PowerShell console. To do this, right click on Windows PowerShell and select “Run as Administrator” option.
- Now type the following command and press Enter:
[Environment]::SetEnvironmentVariable("JAVA_HOME", "C:\Program Files\Java\jdk-17.0.2", "Machine")

If you do not see any error, it means the system variable is created successfully. Please modify the folder path as per your system.
- Next step is to create user variable referencing to the Java binaries. To do that, use the following commands:
$path = [System.Environment]::GetEnvironmentVariable("Path","Machine")

[System.Environment]::SetEnvironmentVariable("Path", $path + ";%JAVA_HOME%\bin", "Machine")
- After running these commands, the Path user variable is updated to include java binaries. To view the Path user variable, you could use the following command:
[System.Environment]::GetEnvironmentVariable("Path","Machine") -Split ";"

These commands will set the environment variables that are required for Java to work on your Windows system. To verify the setup, launch a new command prompt and type java --version command and press Enter. This time you should see the Java version configured on your system.
Troubleshooting
If you follow this guide properly but still get the following error:
Error opening registry key 'Software\JavaSoft\Java Runtime Environment'
Error: could not find Java.dll
Error: could not find Java 2 Runtime Environment
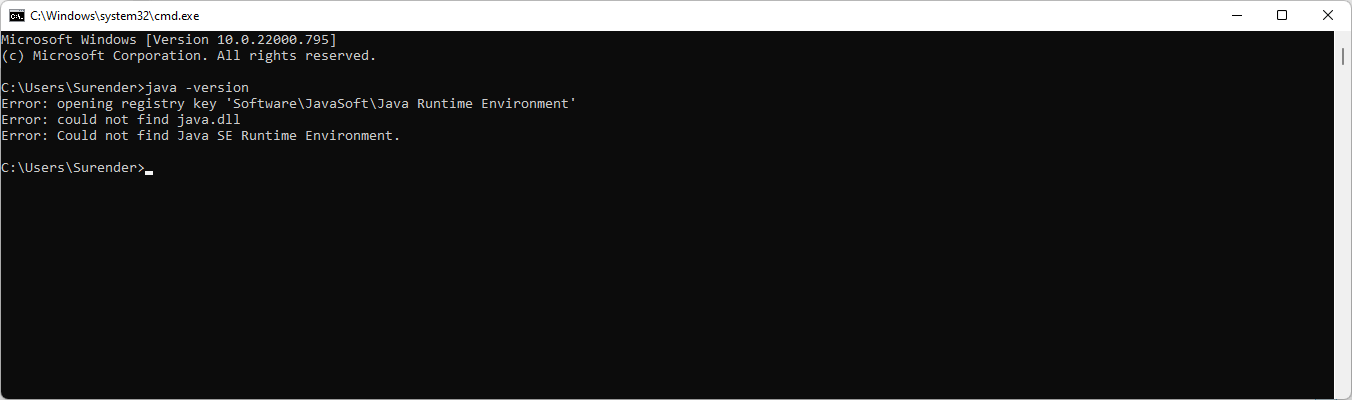
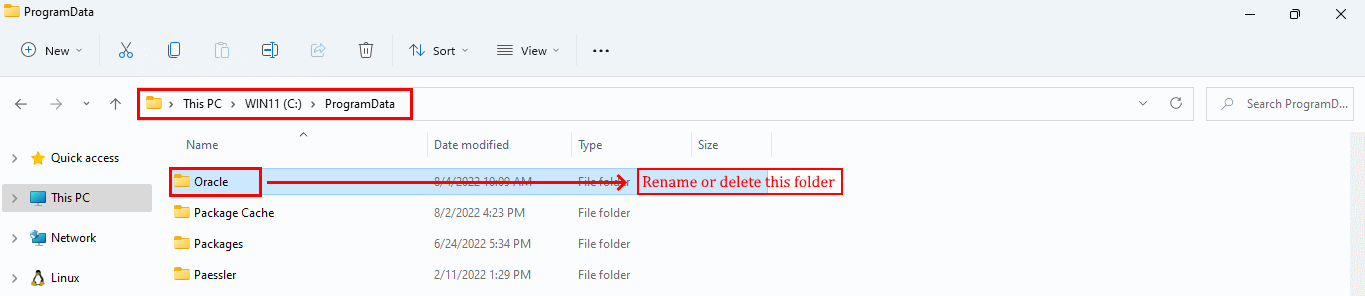
This error occurs when the previously installed Java SE isn’t properly removed from your system. To fix this error, go to C:\ProgramData directory, locate the directory named Oracle, then rename or delete it. See the screenshot for a reference:
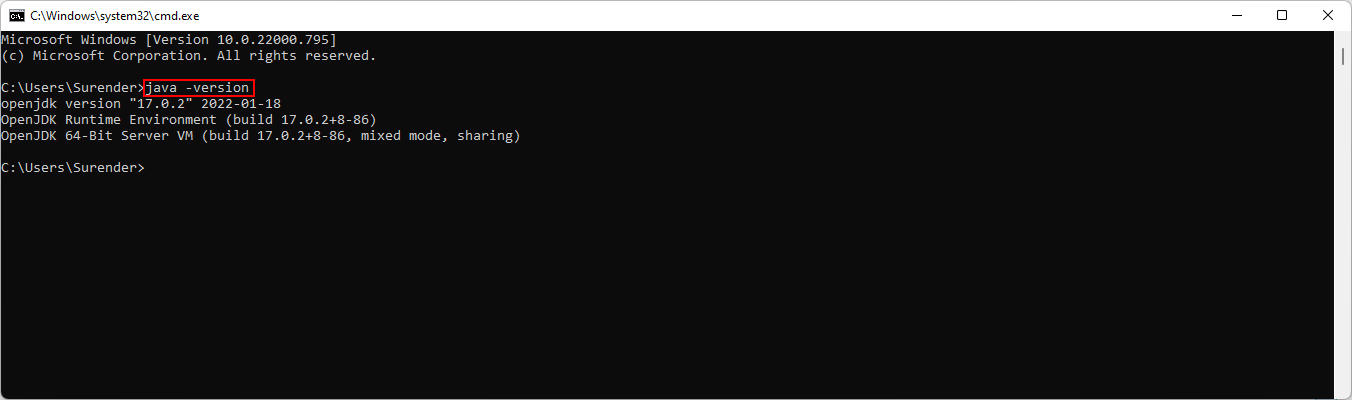
After removing the said directory, run the java -version command again and the error will go away.
To install OpenJDK 17 on Windows 11, follow these steps:
Step 1: Download OpenJDK 17
Visit the Official Website: Go to the OpenJDK download page.
Download the ZIP File: Download the OpenJDK 17 ZIP file for Windows.
Step 2: Extract the ZIP File
Locate the Downloaded File: Find the ZIP file in your downloads folder.
Extract the Contents: Right-click the ZIP file and select Extract Here to extract the contents to a folder of your choice (e.g., C:\Program Files\OpenJDK\jdk-17).
Step 3: Set JAVA_HOME Environment Variable
Open Environment Variables: Press Win + S, type Environment Variables, and select Edit the system environment variables.
System Variables: In the System variables section, click New.
Create JAVA_HOME: Enter JAVA_HOME as the variable name and the path to the extracted JDK folder as the variable value (e.g., C:\Program Files\OpenJDK\jdk-17).
Update PATH: In the System variables section, find the Path variable, select it, and click Edit. Add %JAVA_HOME%\bin to the list of paths.
Step 4: Verify Installation
Open Command Prompt: Press Win + R, type cmd, and press Enter.
Check Java Version: Type java -version and press Enter. You should see the version information for OpenJDK 173.
Check javac Version: Type javac -version and press Enter. You should see the version information for the Java compiler3.
That’s it! You should now have OpenJDK 17 installed and configured on your Windows 11 system. If you encounter any issues or need further assistance, feel free to ask!