
Skip to content
Navigation Menu
Provide feedback
Saved searches
Use saved searches to filter your results more quickly
Sign up
VulkanGL
Vulkan wrapper for OpenGL, allowing you to use the Vulkan API on platforms that only support OpenGL.
About
Vulkan wrapper for OpenGL, allowing you to use the Vulkan API on platforms that only support OpenGL.
Resources
Readme
License
MIT license
Activity
Stars
9
stars
Watchers
3
watching
Forks
1
fork
A Step-by-Step Guide to Migrating OpenGL to Vulkan: Understanding the Benefits #
As software engineers, we’re constantly seeking ways to improve the performance, security, and overall quality of our applications. When it comes to graphics rendering, one of the most critical decisions we can make is choosing the right API. In this post, we’ll explore the benefits of migrating from OpenGL to Vulkan, a more modern and powerful API designed for high-performance graphics rendering.
Understanding the Benefits of Vulkan #
Before diving into the migration process, let’s discuss the advantages of using Vulkan over OpenGL. Vulkan is a low-level, explicit, and multi-threaded API that provides a more direct and efficient way of communicating with the graphics processing unit (GPU). This results in several benefits:
- Improved Performance: Vulkan’s low-level API and explicit resource management allow for better performance and reduced overhead compared to OpenGL.
- Enhanced Security: Vulkan’s multi-threaded and asynchronous nature makes it more resistant to security threats and better equipped to handle concurrent access to shared resources.
- Better Support for Multi-Threaded Applications: Vulkan’s design allows for seamless integration with multi-threaded applications, making it an ideal choice for games and other high-performance graphics applications.
- Increased Portability: Vulkan’s platform-agnostic design makes it easier to deploy graphics applications across different platforms, including Windows, macOS, and Linux.
Setting Up a Vulkan Project #
To begin the migration process, you’ll need to set up a Vulkan project. Here’s a step-by-step guide to help you get started:
- Install the Vulkan SDK: Download and install the Vulkan SDK for your platform. The SDK includes the necessary libraries, headers, and tools for developing Vulkan applications.
- Choose a Development Environment: Select a suitable development environment, such as Visual Studio or Xcode, to create and build your Vulkan project.
- Create a New Vulkan Project: Create a new project in your development environment, specifying the Vulkan SDK and necessary dependencies.
- Initialize Vulkan: Initialize the Vulkan API by creating a
VkInstanceobject and setting up the required instance extensions. - Create a VkDevice: Create a
VkDeviceobject to manage the Vulkan device and allocate resources.
Migrating OpenGL Code to Vulkan #
Migrating OpenGL code to Vulkan requires a deep understanding of both APIs and their respective architectures. Here are some key considerations to keep in mind:
- Resource Management: Vulkan’s explicit resource management requires a different approach to resource allocation and deallocation compared to OpenGL.
- Buffer and Image Management: Vulkan’s buffer and image management differ significantly from OpenGL, requiring careful attention to memory allocation and synchronization.
- Shader and Pipeline Management: Vulkan’s shader and pipeline management are more complex and flexible than OpenGL, requiring a deeper understanding of graphics programming.
- Event and Fence Management: Vulkan’s event and fence management are designed to handle concurrent access to shared resources, making them essential for multi-threaded applications.
Practical Example: Migrating a Simple OpenGL Application to Vulkan #
To illustrate the migration process, let’s consider a simple OpenGL application that renders a triangle using a vertex shader. We’ll migrate this application to Vulkan, highlighting key differences and considerations:
// OpenGL Application

// Create an OpenGL context
glCreateContext();

// Create a vertex buffer object
GLuint vbo;
glGenBuffers(1, &vbo);
glBindBuffer(GL_ARRAY_BUFFER, vbo);

// Allocate vertex data
GLfloat vertices[] = {
    -0.5, -0.5,
     0.5, -0.5,
     0.0,  0.5
};

// Copy vertex data to the buffer
glBufferData(GL_ARRAY_BUFFER, sizeof(vertices), vertices, GL_STATIC_DRAW);

// Create a vertex array object
GLuint vao;
glGenVertexArrays(1, &vao);
glBindVertexArray(vao);

// Specify vertex attribute locations
glVertexAttribPointer(0, 2, GL_FLOAT, GL_FALSE, sizeof(GLfloat) * 2, (GLvoid*)0);
glEnableVertexAttribArray(0);

// Render the triangle
glDrawArrays(GL_TRIANGLES, 0, 3);
// Vulkan Application
// Create a Vulkan instance
VkInstance instance;
VkApplicationInfo appInfo;
appInfo.sType = VK_STRUCTURE_TYPE_APPLICATION_INFO;
appInfo.pApplicationName = "Vulkan Application";
appInfo.applicationVersion = VK_MAKE_VERSION(1, 0, 0);
appInfo.pEngineName = "Custom Engine";
appInfo.engineVersion = VK_MAKE_VERSION(1, 0, 0);
appInfo.apiVersion = VK_API_VERSION_1_0;
// Create a device and allocate resources
VkDevice device;
VkPhysicalDevice physicalDevice;
VkQueue graphicsQueue;
VkCommandPool commandPool;
// Create a vertex buffer
VkBuffer vertexBuffer;
VkDeviceMemory vertexMemory;
VkBufferCreateInfo bufferCreateInfo;
bufferCreateInfo.sType = VK_STRUCTURE_TYPE_BUFFER_CREATE_INFO;
bufferCreateInfo.size = sizeof(vertices);
bufferCreateInfo.usage = VK_BUFFER_USAGE_VERTEX_BUFFER_BIT;
bufferCreateInfo.sharingMode = VK_SHARING_MODE_EXCLUSIVE;
vkCreateBuffer(device, &bufferCreateInfo, nullptr, &vertexBuffer);
// Allocate vertex memory
VkMemoryRequirements memoryRequirements;
vkGetBufferMemoryRequirements(device, vertexBuffer, &memoryRequirements);
VkMemoryAllocateInfo allocateInfo;
allocateInfo.sType = VK_STRUCTURE_TYPE_MEMORY_ALLOCATE_INFO;
allocateInfo.allocationSize = memoryRequirements.size;
vkAllocateMemory(device, &allocateInfo, nullptr, &vertexMemory);
// Map vertex memory
void* vertexData;
vkMapMemory(device, vertexMemory, 0, bufferCreateInfo.size, 0, &vertexData);
memcpy(vertexData, vertices, bufferCreateInfo.size);
vkUnmapMemory(device, vertexMemory);
// Create a vertex array object
VkVertexArrayCreateInfo vertexArrayCreateInfo;
vertexArrayCreateInfo.sType = VK_STRUCTURE_TYPE_VERTEX_ARRAY_CREATE_INFO;
vertexArrayCreateInfo.vertexBindingDescriptionCount = 1;
vertexArrayCreateInfo.pVertexBindingDescriptions = &vertexBindingDescription;
vertexArrayCreateInfo.vertexAttributeDescriptionCount = 1;
vertexArrayCreateInfo.pVertexAttributeDescriptions = &vertexAttributeDescription;
vkCreateVertexArrays(device, &vertexArrayCreateInfo, nullptr, &vertexArray);
// Specify vertex attribute locations
VkVertexInputBindingDescription vertexBindingDescription;
vertexBindingDescription.binding = 0;
vertexBindingDescription.stride = sizeof(vertices[0]);
vertexBindingDescription.inputRate = VK_VERTEX_INPUT_RATE_VERTEX;
vertexBindingDescription.format = VK_FORMAT_R32G32_SFLOAT;
VkVertexInputAttributeDescription vertexAttributeDescription;
vertexAttributeDescription.binding = 0;
vertexAttributeDescription.location = 0;
vertexAttributeDescription.format = VK_FORMAT_R32G32_SFLOAT;
vertexAttributeDescription.offset = 0;
// Draw the triangle
VkCommandBuffer commandBuffer;
vkBeginCommandBuffer(commandBuffer);
vkCmdDrawArrays(commandBuffer, VK_PRIMITIVE_TOPOLOGY_TRIANGLE_LIST, 3, 0);
vkEndCommandBuffer(commandBuffer);Conclusion #
Migrating from OpenGL to Vulkan requires a deep understanding of both APIs and their respective architectures. By following the steps outlined in this post, you can successfully migrate your OpenGL application to Vulkan and take advantage of the improved performance, enhanced security, and better support for multi-threaded applications that Vulkan offers.
As you embark on this migration journey, remember to carefully consider the key differences between OpenGL and Vulkan, including resource management, buffer and image management, shader and pipeline management, and event and fence management. With patience and persistence, you’ll be able to create high-performance graphics applications that take full advantage of the capabilities offered by Vulkan.
- Previous: A Step-by-Step Guide to Conducting a Heuristic Evaluation for User Interface Redesign
- Next: A Step-by-Step Guide to Normalizing a Database for Improved Data Integrity
Porting NAP Framework
- Motivation
- The NAP Render Engine
- Porting
- SDL & Vulkan
- Complexity
- Debug Layers
- Mental Map
- Implementation
- Frames and Synchronization
- Inter-Frame Considerations
- Important Vulkan Objects
- Role of the Pipeline
- A Simple Frame
- The Pipeline Cache
- Expected Amount of Pipelines
- Pipeline Creation
- The DescriptorSet Cache
- Design Considerations
- The Cache
- A Two Tier Cache
- Final DescriptorSet Flow
- Dirty Checking
- Textures
- Material & Texture Interaction
- Meshes
- Render Windows & Headless Rendering
- Command Buffer Ordering
- Command Buffer Organization
- Keeping the OpenGL Coordinate Space
- How Textures Are Really Sampled
- The Problem With Render Targets
- Cross Compilation
- Windows
- Linux
- macOS
- Performance
- Closing Notes
Motivation
When Apple deprecated OpenGL about 2 years ago we knew we had to find an alternative. I remember being upset, I just spent more than 3 years working on a new OpenGL render back-end for our creative coding engine. Yes, OpenGL is a ‘tad’ bloated, contains too many ‘deprecated’ extensions but is well known, relatively easy to use and (still) an industry standard. It ‘was’ also the only viable cross platform graphics API for a long time. The deprecation notice did not come as a surprise though, Apple has a tendency to break backwards compatibility in favor of new standards, often their own.
What frustrated me most was that there was no immediate alternative. Apple decided to not support Vulkan, only Metal. This infuriated me! It felt like a ‘death sentence’ from Apple to independent developers that work on cross platform (low-level graphics) solutions. Our clients use applications built with our engine on both macOS and Windows. We often deploy the final version on Linux for stability and maintenance reasons. Small teams (such as ours) don’t have the manpower to implement and support multiple low level graphics APIs for different operating systems. What was Apple thinking? Why only push your own standard? Why can’t Apple work together with the industry, are they not part of the Khronos group?
So next to not being able to use OpenGL on macOS and iOS there was no viable cross-platform alternative. The new generation graphics APIs (including DirectX12, Metal and Vulkan) are also notorious for being more difficult to implement, moving a lot of the logic previously managed by the driver to the developer. I understand the reasoning behind this decision and am willing to take the plunge, but not at the expense of implementing and maintaining 2 or 3 different low-level graphics APIs at the same time. Doing so would financially ruin my company and therefore wasn’t an option from the start. I know from first hand experience, working at a large AAA games company, how difficult this is.
Imagine my relief when Khronos announced the Vulkan Portability Initiative to encourage and enable layered implementations of Vulkan functionality including MoltenVK: a runtime for macOS and iOS that offers an (almost) complete subset of the Vulkan API implemented using Metal. A true hallelujah moment! I should be able to use the same code base to run high performance graphics applications on macOS, Windows and Linux. The world started to make sense again, not thanks to Apple, but Khronos.
Only question left to be answered: is MoltenVK any good? Yes, the demos will work, but what about applications developed with our engine? An engine that is not (primarily) made for games, but to visualize and solve ‘creative’ problems in the physical space. The only way to find out was to port it to Vulkan.
The NAP Render Engine
NAP applications do not dictate any sort of pipeline, including the graphics pipeline. Many games can be optimized because they render a single frame in a (very) specific way, for example: using x amount of frame buffers, in a certain order, with a known quantity of pipelines, shaders and buffers. I am aware this over-simplifies a typical render scenario for a game, but it helps illustrate my point. Because the game knows ‘how’ it is going to render ‘what’ you can be very explicit about your intentions up front. And Vulkan loves you being explicit about your intentions: perfect for a typical game-engine scenario, where there’s often only 1 window and a known quantity of shaders, frame-buffers, geometry and therefore pipelines.
Every NAP application, on the other hand, makes use of a completely different render pipeline. We don’t know in advance if and how many render targets (including windows) are spawned and how they are being rendered to. We don’t know which shader is going to render what type of geometry, and which attributes are updated at what point at runtime. That’s all up to the developer that writes the application. This freedom allows you to be ‘creative’, hence the phrase: ‘creative coding’ (which I hate, because it implies something else).
The end result is (often) a very straightforward, minimal pipeline, that draws exactly what you want and nothing more. This is ideal in situations where performance is crucial: NAP applications are (often) deployed on low spec devices with integrated graphics cards in industrial environments. Not on powerful gaming rigs with dedicated video cards and ‘infinite’ amounts of ram. Every compute-cycle and byte of memory counts.
The good: Vulkan allows you to be explicit. The bad: Vulkan wants you to be explicit up front. With OpenGL you can issue commands at any stage and have the driver figure it out, which is great but far from optimal in terms of performance. When using Vulkan those days are over. We had to completely rethink our graphics back-end to take full advantage of Vulkan without compromising the existing level of freedom we already provide in creating a custom render pipeline. On top of that: The render interface (used by clients) shouldn’t change (unless necessary) and performance should be equally good, preferably better, than OpenGL.
Now, where to start?
Porting
It took us (a team of 3 relatively experienced ‘graphics’ programmers) approximately 7 months to port our entire render back-end from OpenGL to Vulkan. We didn’t work on the port full-time, often other work got in the way. I estimate that a single, well experienced graphics programmer, could complete this specific task in 3 months, working on it full-time.
Our goal was to reach feature parity asap, optimize where possible and make sure all NAP demos run equally well on Windows, Linux and macOS. If the Vulkan implementation was just as fast and stable as OpenGL, we would deprecate OpenGL in favor of Vulkan, completely removing OpenGL from our code base.
SDL & Vulkan
NAP uses SDL (simple direct media layer) to get cross-platform access to audio, keyboard, mouse, joystick, and graphics hardware. SDL already has built-in support for Vulkan, although information on how to set it up was (and remains) limited. I had to combine multiple sources of information to spawn a Vulkan compatible surface using SDL and a Vulkan instance. I decided to share my steps on Github. All things considered this was relatively straight-forward: Create a Vulkan window and Vulkan Instance using the required extensions and layers, select a GPU, create a surface to render to (based on window specifications) and make sure the GPU can present to it, create a swap chain and select a Queue. Your standard Vulkan initialization fare right? It just takes over 1000 lines of code.
At this point I realized how explicit Vulkan is. Nothing is left to chance and I absolutely love that after years of active OpenGL development. Finally a transparent way to inspect and select a GPU. No more implicit context creation. Proper support for sharing resources between multiple windows (without feeling disgusted), transparent handling of extensions and very good debug options (called layers, which you absolutely need if you’re serious about getting into Vulkan programming). The explicitness felt good.
Complexity
We all know how the programmable pipeline works by now, otherwise you wouldn’t be reading this post, but that’s not enough. The moment you want to draw anything with Vulkan you are slapped in the face with synchronization primitives. And there are many, most notably primitives to synchronize GPU / CPU operations (fences) and primitives to synchronize operations on the GPU (Semaphores and Barriers).
I am not going to cover the ins and outs of Vulkan synchronization here. This post is about our porting experience, not the technical intricacies of the porting process itself. But if you’re interested in Vulkan Synchronization I highly recommend reading this article, it helped us a lot. Alternatively you can take a look at the NAP source code. Also: we’re not perfect, If you have any suggestions feel free to contribute!
Suffice to say that synchronization threw us (and I believe many with us) for a loop. What do I synchronize? Where? Using what? How does this example translate to our problem? Is the example correct? Especially that last question turned out to be relevant. Since Vulkan is relatively new and information is relatively sparse, you can’t be certain that what is shared is correct and when correct: the best solution for your problem.
One example we encountered early on had to do with the ‘Rendering and Presentation’ part of the Vulkan Tutorial. Initially ‘vkQueueWaitIdle’ is used, after that a semaphore is introduced to synchronize the operation on the GPU, based on a comment from a developer in the comment section. Later in the article a fence is introduced to ensure all commands associated with the previous frame are processed, but according to us in the wrong spot, causing the CPU to stall too early. It took us many hours, back and forth, to figure out the right approach, based on our specific needs, using various sources of information and the official Vulkan spec.
And that’s not an isolated case. We ran into similar issues trying to decide how to push changes to a shader (uniforms and samplers), how to properly allocate memory, when to use staging buffers and how many, how to destroy resources after hot loading content changes, how to organize our command buffers etc. The list goes on and on.
The main complaint coming from our developers was that existing information on Vulkan was either too low level (spec) or high level, with barely anything in between. Later I realized Vulkan is too hard to capture and generalize into solutions for common problems, due to the nature of the API. There are many ways to tackle a problem and the most optimal solution is most likely unique (at least to some extent) to your case, making it hard to generalize the ‘correct’ approach.
That Vulkan offers you this kind of control is great, it also means you could end up searching for the ‘right’ solution for some time, constantly questioning yourself, is this the right way? What are the implications of my decision? Luckily there are some options available to ease the development process.
Debug Layers
This is hands down the best and most helpful feature to not only spot issues but also ease the Vulkan development process. We made extensive use of the ‘VK_LAYER_KHRONOS_validation’ layer, helping us to understand and resolve every reported warning and or error. Often our chosen direction turned out to be right, but the implementation not necessarily correct. The debug layers, almost always, pointed out the flaw in our thinking. An impressive and essential feature. Use them!
Mental Map
More than with OpenGL, having a good mental map of the GPU (physical device) and graphics pipeline, aided the implementation of certain features. For example: how to handle the double buffering of resources (such as dynamic meshes and textures), updating uniforms and samplers, when to delete resources etc.
Turns out: it’s not important to have a complete understanding of the ‘Vulkan API’. It’s better to map your decisions onto the hardware and apply those to the API. Because the driver does less, you do more, remember? This implies that you, at least partially, are the person writing the ‘driver’ (that’s how it feels). And drivers tell some piece of hardware, in this case the GPU, how to talk to the computer. It’s therefore important to have a good understanding of the physical layout of a GPU and how to address it. This, in turn, maps perfectly well to the Vulkan API and all the calls available to you. Once we reached this point of understanding, things such as synchronization (using barriers and semaphores) and memory management started to make more sense.
Implementation
The following section contains high level information about the NAP Framework Vulkan implementation. It also explains which parts of Vulkan we misinterpreted when we started development and the design decisions we made.
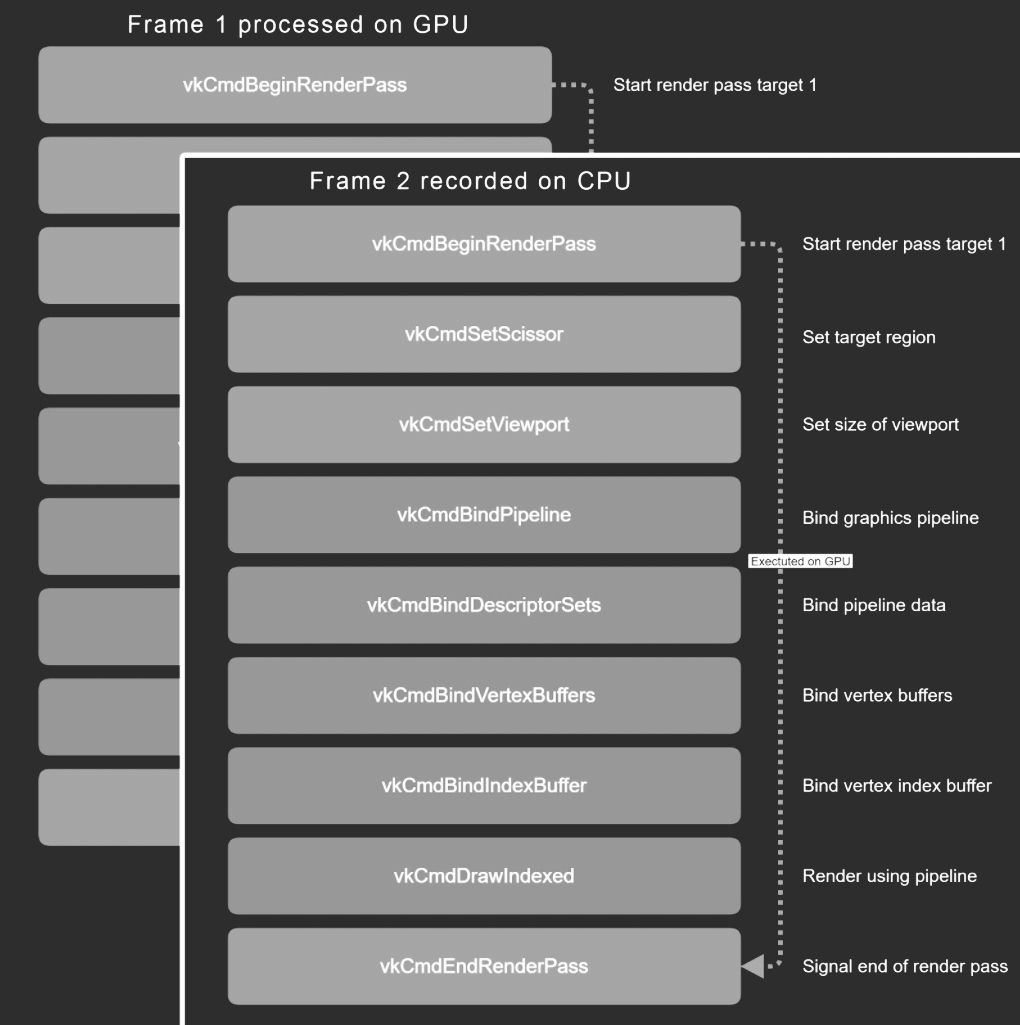
Frames and Synchronization
Render commands are put in command buffers, these are processed by the GPU. Some commands contain data that is put into the command buffer as well. But most of the time, commands reference resources like textures, meshes and uniforms. You could say that this is similar to commands using data by value or by reference. When you submit a command buffer to the GPU, the GPU will start processing those commands. If you would wait for the command buffer to be finished, you would stall until the GPU is ready processing all of those commands. Instead, we submit our commands to the GPU and continue building a new command buffer for the next frame. So, the rendering of a frame on the CPU runs while the previous frame is rendered on the GPU. We need two command buffers: one that is being read by the GPU and one that is being written to by the CPU. This is double buffering, and we might also consider triple buffering. It just depends on how many frames you would like to have in flight at once. With triple buffering, the CPU won’t stall if the GPU is running an additional frame behind. The more buffers you have in flight, the higher the latency can be between a processed frame and the visual result on the screen, but there is less chance of the CPU being blocked by the GPU.
A frame processed on the GPU might reference a resource that is being processed by the CPU, running in parallel. A simple example is a texture on a mesh that you render in both frames. As long as the texture does not change, all is good. But what happens if we alter the texture while the GPU was processing a command buffer that refers to that texture?
Vulkan provides synchronization mechanisms to wait until the texture is not being used anymore on the GPU – the memory and execution barriers that we mentioned earlier. But in practice that would mean that we would need to wait for (a part of) the previous frame to finish before we can alter our resource. To make sure we can run frames fully in parallel, we decided to refer to a completely different texture with new contents in the new frame.
This applies to all mutable data. If you want to change a mesh or a texture, you need to provide a new mesh or texture with the new contents. But it doesn’t stop there. Uniforms are stored in Uniform Buffer Objects (UBOs) – another external resource. If you want to render your object at a new position, you need to provide a different UBO, set your matrix and refer to that UBO in your command buffer.
Command buffering
Inter-Frame Considerations
While you might think that this only applies to frames, it can also apply within frames. If you change the contents of a resource multiple times before submitting the command queue, all commands that refer to that resource will simply refer to the latest state. You are basically just overwriting the state of that resource for that frame. If you want to be able to use a resource multiple times within a frame with changing contents, you need to have multiple resources available as well, with unique contents. A good example is rendering an object on different positions within a frame: you would need multiple unique UBOs to accomplish this.
Note: Vulkan does provide ‘push constants’ for this particular case, where the matrices can be pushed onto the command buffer itself: a ‘by value’ operation. However, the amount of memory that is available for push constant is so small, that you can only reliably put two matrices in there. This does not solve the case for changing arbitrary uniform values within a frame, so we found this to be quite limiting and we therefore decided to solve this using UBOs instead.
In OpenGL, you never have to deal with any of these issues. If you update a texture, the driver will take care of managing those resources for you. In Vulkan, for each mutable resource you need to think about your multi-frame and inter-frame strategy. In NAP Framework, we introduced a concept of frames, and we use this concept to perform buffering of resources. We will show for each resource how this is performed.
Important Vulkan Objects
Vulkan exposes quite a few concepts and at first, it’s hard to see what piece goes where because they don’t map to OpenGL as easily. Here are a couple of key objects and what they do:
- RenderPass Describes where you are rendering to. RenderPasses are bound to render targets. The ‘clear’ behaviour is also set here. RenderPasses can contain multiple subpasses, but we don’t use those, as they are primarily important for optimizing certain renderers in mobile hardware
- Pipeline Describes how you are going to render
- Descriptor Set Interface to a shader. Allows for binding uniforms (using a Uniform Buffer Object) and textures
- Command Buffer Used to record commands which can be subsequently submitted the the GPU for execution
Role of the Pipeline
When you get started with Vulkan, the data structures sometimes appear so rigid that it can be hard to understand how you should use Vulkan in scenarios where things are quite dynamic. An example is the Vulkan Pipeline object. A pipeline contains all of the GPU state like shaders, blend state, clip and view rect and it even refers to a Vulkan Render Pass. A Render Pass is bound to a render target. Because the pipeline’s clip and view rects have to be set and because you’d set them to the render target size by default, it appears as if the pipeline does not only tell you exactly how to render something, but also where you render it to. Creating pipelines is expensive, so you want to do this in advance as much as possible. But you don’t know in advance where you’d like to render something to. This can be very dynamic. Do you need to create pipelines for each render target you could possibly render to? Is that even feasible? And what if you want to change a blend property? It appears as if Vulkan wants to pin down as much state as possible, which may be confusing and hard to fit into your engine. But, things are not quite as they appear, or at least appeared to us.
Initially, we got the impression that a Vulkan Pipeline dictates the how, where and even what you are going to render. But that isn’t the case, it only describes the how, and only partially. Let’s look at a couple of things:
- RenderPass Compatibility
A render pass describes where you render to, how a render target is cleared, and some synchronization properties. A Vulkan Pipeline does refer to a Render Pass, but it only needs to be compatible with a render pass. You can still use the same pipeline to render to multiple different render targets using multiple render targets, as long as the render targets are compatible.
- Clip and View Rects
The pipeline still refers to clip and view rect, and they have to be set. By default you’d set these to the render target’s size. So there still appears to be a tight link to render targets. However, the clip and view rect can be changed to be set dynamically as part of the command buffer. We can set the clip and view rect globally and only override it where we need to. This is exactly what we need.
- Mesh Relationship
The only relationship between a mesh and a pipeline is the draw mode: POINTS, LINES, TRIANGLES, and so on. This property is not a strong coupling between mesh and pipeline. The only thing that we need to make sure of, is that when we render a mesh using a pipeline, that the mesh is actually compatible with the shader in the pipeline. We verify this when creating a RenderableMesh, quite similar to how we did this in OpenGL.
- Shader Input
Uniforms and samplers are all set through Descriptor Sets. For each draw call, a Descriptor Set needs to be bound. So, what textures are being used and what uniform values are used is all determined dynamically.
A Simple Frame
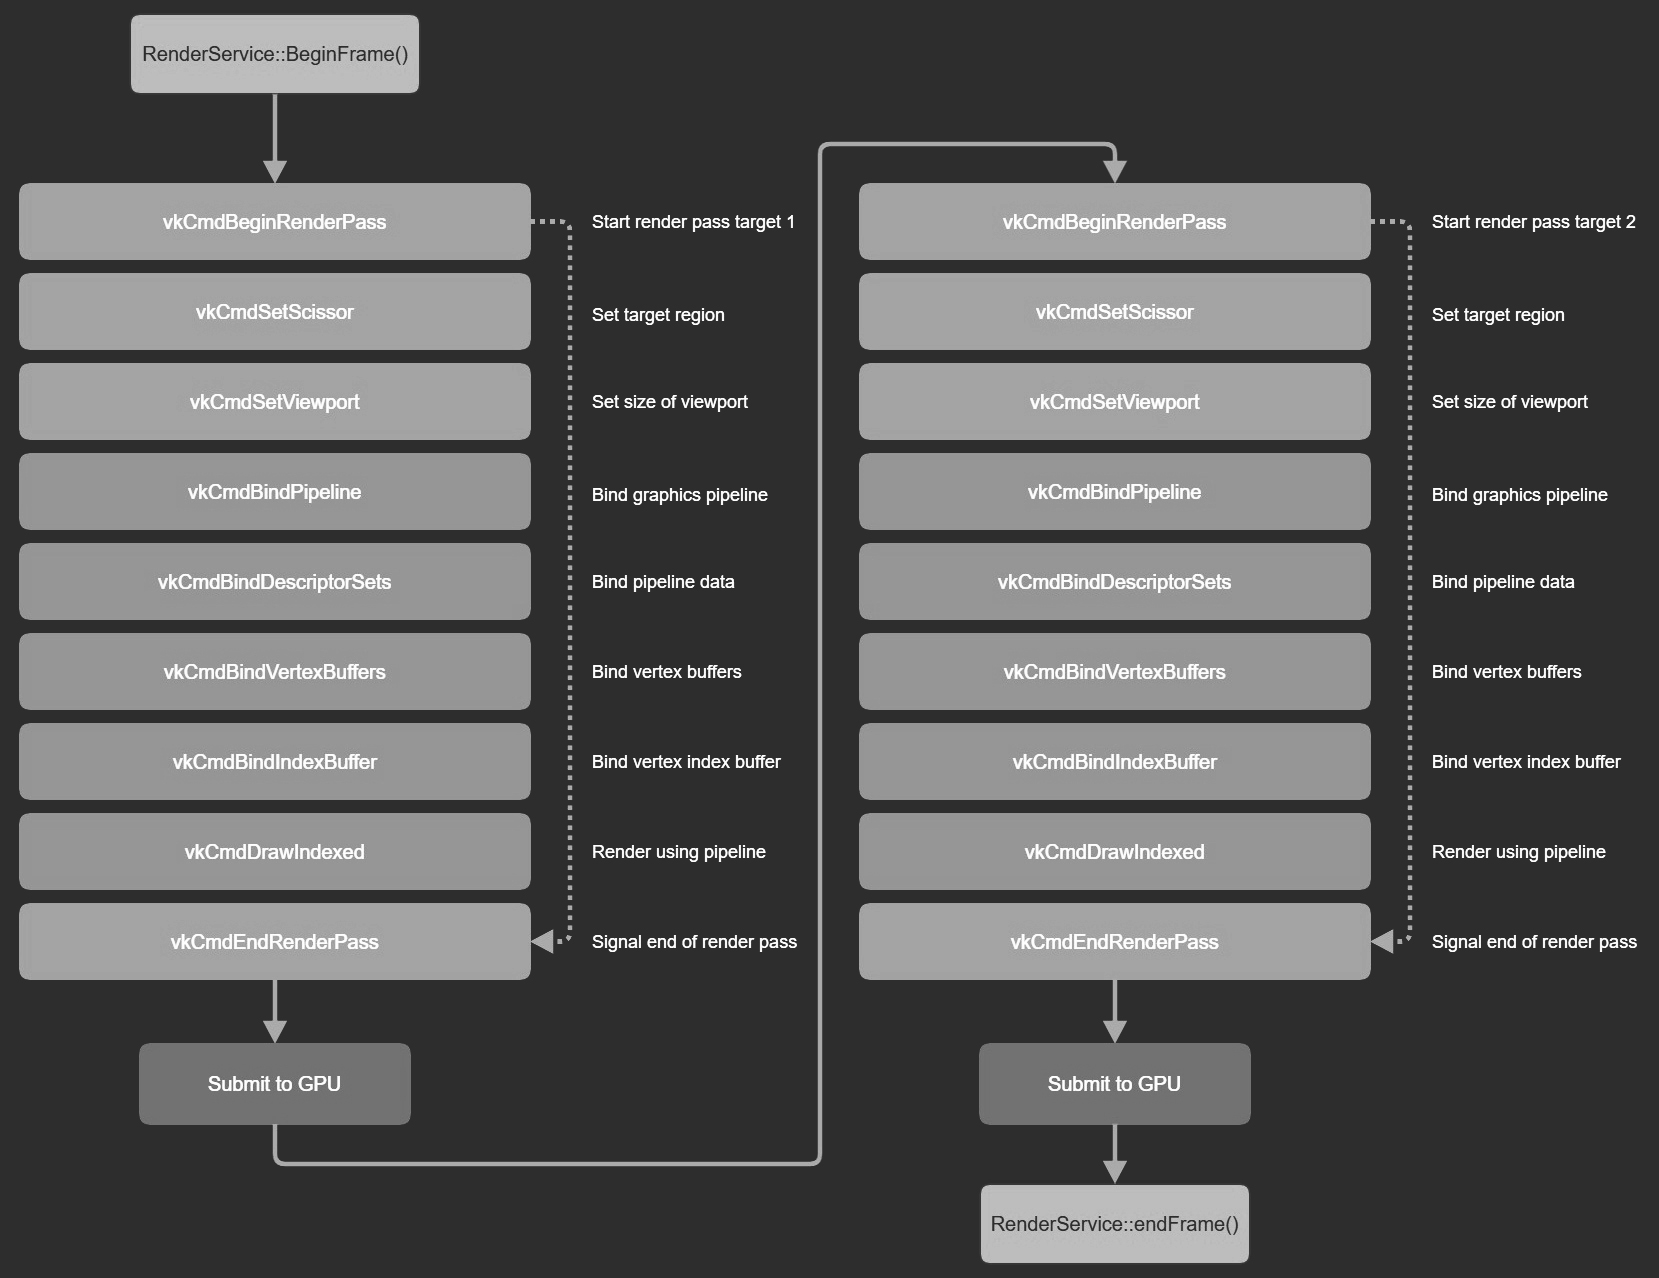
If we simplify the Vulkan calls for a typical frame, in this case rendering 2 objects each to a different window, the call stack looks like this:
Frame example
From this loop, you can probably spot opportunities for optimization. If a pipeline is shared for multiple objects, you only need to set it once. We could also record the command buffer, each associated with a different window, on a different thread. However: the potential gain in performance currently doesn’t justify the added level of complexity to add synchronization. Especially for your typical NAP application, it would just clobber the render interface. More advanced users can however write custom NAP render components to minimize pipeline swithches. In OpenGL, drivers tend to perform a lot of work to cache render state and to minimize state changes. Once everything is in place using the Vulkan pipeline object, this process becomes a lot easier.
The Pipeline Cache
Expected amount of pipelines
Now that we understand the role of the Vulkan Pipeline better, we also better understand how we should treat it. it’s good to think about how many pipelines you expect to have in your engine or application. Again, our initial thought was that we’d have many because we overestimated the responsibility of the pipeline object, but once we understood the pipeline better, we realized there aren’t that many pipeline objects at all. It is currently parameterized by the following properties in NAP Framework:
- Shader
- Draw mode
- Depth mode
- Blend mode
- Winding order
- Color format
- Depth format
- Sample Count (MSAA)
- Sample Shading
- Cull Mode
How many combinations of these properties do you expect to have in your application? We expect them to be fairly limited. We also heard about a AAA game that only has about a hundred pipeline objects that they create in advance.
Pipeline Creation
Creating a pipeline is expensive. Vulkan recommends to create as many of them in advance. So our initial thought was to move the pipeline creation to initialization. We struggled with this approach and moved from design to design a couple of times. For instance, in the NAP Framework Material design, there are multiple places where one of the aforementioned properties can change: in the Material or MaterialInstance. We had to implement a serious amount of callbacks and other logic to be able to create new pipelines on the fly when properties changed. It felt like we were fighting with Vulkan more than we’d like.
Once we realized how few pipelines were actually required and how much freedom it would give if we allocated pipelines lazily, we started building a pipeline cache. For each object that you draw, you simply acquire a compatible pipeline from the RenderService:
{C++}
RenderService::Pipeline pipeline = renderer.getOrCreatePipeline(render_target, renderable_mesh, error);
The pipeline cache will only contain a limited amount of objects and a lot of objects share the same pipeline, so the warmup of the cache won’t be as much of a problem. If it does happen to be a problem, it’s good to look at ways to ‘hint’ or ‘warmup’ the cache in advance for certain objects.
The DescriptorSet Cache
Design Considerations
A DescriptorSet binds runtime data to a shader. This sounds pretty trivial but it turned out to be one of the most complex areas of our Vulkan integration. When you draw an object, you call vkCmdBindDescriptorSets to bind textures and uniform values for that draw call. Uniform values are passed to the shader in memory blocks called Uniform Buffer Objects (UBOs). As described earlier, the command buffer will then contain a reference to the UBO via the DescriptorSet.
These UBOs contain every type of uniform data, including model / view & projection matrices. Our basic assumption was that we’d like to keep the OpenGL freedom of being able to set uniforms before each draw call, even if there are multiple draws per frame. The reasoning behind this was that NAP is very versatile in its drawing. We may want to draw a single object multiple times, but we may also want to draw it multiple times to multiple windows. And we would like to keep the flexibility to change uniform parameters on the fly within those draw calls.
That means we need to deal with changing state within a single frame. Normally you would like to create DescriptorSets in advance, and buffer them for each frame that you have in flight. But this becomes problematic because we cannot predict anymore how many of these DescriptorSets (and UBOs) we want to have in advance.
A secondary complication is that we can’t make any assumption on how previous frames left the state of a Descriptor Set or UBO. In other words: ‘dirty’ mechanisms and other ways to avoid updating a UBO become harder. We’ll see the effects of this in a moment and how we can potentially fix that later.
The Cache
Instead of having a double buffered DescriptorSet in MaterialInstance, we decided to create a DescriptorSetCache and acquire a DescriptorSet on each draw, similar to how we acquire a pipeline object for each draw. The cache internally maintains a free-list of DescriptorSets. When an object is not in the free-list, we allocate a new one. When we advance in frames, any used DescriptorSets are pushed back onto the free-list. An upside to this approach is that this works regardless of the amount of frames you have in flight: a frame just pulls items off the freelist, regardless of the frame it was previously used in. As mentioned, we cannot make any assumption anymore about the state of the DescriptorSet and its content, because the content could have been updated in any of the draw calls of the previous frames. This means we push all the content when a descriptor set is requested. However, the amount of work we do to update the DescriptorSet is very minimal.
A Two Tier Cache
A DescriptorSet binds a certain amount of samplers and textures, and those samplers and textures need to have the same shader bindings. So a single DescriptorSet is created for a specific shader and cannot be reused for another shader. Well, in theory they could be shared if the shader’s interfaces match each other exactly, but in any other case, this is not possible.
Vulkan has support for allocating DescriptorSets from a pool, but the allocation mechanism is rather strange and it has the effect that a pool can only reliably hold a fixed number of DescriptorSets of the same type. We’ve modeled our DescriptorSetCache around these pools. A single DescriptorSetCache manages a growing number of pools of a fixed size, all bound to the same type of descriptor. This means that we first need to acquire a DescriptorSetCache from a global group of DescriptorSetCaches, given a certain shader layout. In practice you will have as many DescriptorSetCaches as you will have shaders. But other than that, the caches are shared across material instances.
Final DescriptorSet Flow
To summarize how DescriptorSets are acquired:
- On init() we acquire a DescriptorSetCache from a global cache of DescriptorSetCaches, given a certain shader layout. We store this cache in
MaterialInstance. - On update() we acquire a DescriptorSet from the cache we stored earlier. Internally, the DescriptorSetCache pulls a DescriptorSet from the freelist. If the list is empty, a new DescriptorSet is allocated from the pool. If the current pool is full, we add another DescriptorSet pool and allocate from that pool.
- We don’t know what the contents of the item is, all we know is that the descriptor is compatible with what we need. Therefore we push all content.
Dirty Checking
We would like to be able to perform some form of dirty checking, to avoid updating any data when it is needed. The only way we see that this could be possible is by maintaining a content hash that describes the content of what textures were bound and what uniform data is bound. That hash could then be stored for each item in the DescriptorSetCache as well, and it could be passed as an argument to the acquire method. The cache would then prefer to return an item from the free-list with the same hash. If such an item is returned, no updating would be required.
Textures
Textures can be used in a variety of ways:
- Static Texture does not change, uploaded to once
- DynamicRead Texture is frequently read from GPU to CPU
- DynamicWrite Texture is frequently updated from CPU to GPU
In OpenGL, all of this is rather easy. However, in Vulkan, we have to deal with all of the synchronization that is involved. And we want to make sure that we’re not allocating too many buffers for cases where it is not needed. For instance, static textures do not need any form of double buffering at all. Important to note is that contrary to uniform values, we decided not to support changing textures within a frame. There are two reasons for that:
- Updating a texture has to occur outside of a RenderPass, this is a Vulkan limitation.
- Given this limitation, we could update textures on each render pass within a frame. The limited amount of value that this has compared against the additional complexity we had to add, did not seem worth the effort.
We use a staging buffer to upload the content of a texture from the CPU to GPU. We perform this copy by putting a copy command on the command buffer through vkCmdCopyBufferToImage. The number of required staging buffers varies per type:
- Static We only need one staging buffer for the initial upload.
- DynamicWrite Content can change every frame. We need a staging buffer for each frame in flight + 1.
- DynamicRead Content is read, potentially each frame. We need a staging buffer for each frame in flight
Textures can only be updated outside of a RenderPass. We added dedicated logic to the RenderService to upload textures at the beginning of each frame, before a RenderPass is activated. The Texture requests an update when the content of a staging buffer changes. If the amount of staging buffers would be equal to the amount of frames in flight, we would not be able to update the staging buffer outside of a frame. There is a very simple fix for this: if we allocate one additional staging buffer, there will always be one staging buffer available outside of the render frame.
Material Texture Interaction
How does the material know what texture to use? This is best explained by looking at the flow of commands: Texture2D::update is called somewhere in the application with new texture contents. We write the content to a staging buffer that is guaranteed to be free. We signal RenderService that at the beginning of the next frame, it needs to start a transfer.
RenderService::beginFrame calls Texture2D::upload, which puts a transfer command on the command buffer. The current image index points to the new texture and the notifyChanged signal is called. The Material responds to the signal and updates the internal DescriptorImageInfo to point to the new texture. The nice thing about this approach is that there is a single code path for static and dynamic textures.
Meshes
Meshes in NAP are either static or dynamic and contain at least 1, but often more, attributes. The number of attributes and their intended use is competely open and customizable. Every attribute is a vertex buffer that has a CPU and GPU representation.
Static meshes use a Vulkan staging buffer to copy the vertex buffers from the CPU to the GPU. As with static textures, the content of the staging buffer is copied to the GPU buffer at the beginning of a new frame. Because the staging buffer is no longer needed (the mesh won’t be updated) it is scheduled for destruction.
Dynamic meshes (contrary to Textures) are not copied to dedicated GPU buffers but, depending on the hardware, a slower set of shared CPU / GPU buffers. This is because dynamic meshes are updated every frame, contrary to a texture, which is updated less frequently. The therefore required number of CPU / GPU copies would have a negative effect on performance, removing the benefit of being able to read from a dedicated GPU buffer when rendering. For this reason the NAP default is ‘static’. As with textures, the number of staging buffers equals the number of frames in flight + 1, for the same reason textures do. We might add another mode for meshes that are updated (after the initial upload) but less frequent.
Render Windows & Headless Rendering
We have chosen a specific way to organize our command buffers for NAP Framework. This goes quite deep into Vulkan and is related to how Vulkan handles command buffers and synchronization. We will highlight the most important aspects and explain the choices we made.
Command Buffer Ordering
An important part about command buffers is understanding how ordering works in Vulkan. I find it easiest to think about command buffers as one giant stream of commands, spread across multiple command buffers that are submitted over time. If you let go of the ‘frame’ idea for a second then the idea of a large stream of commands becomes easier. When you think about ordering commands in this giant stream, there is a natural hierarchy. First, commands within a command buffer have a specific order. Then, between command buffers, the ordering depends on the submission time of the command buffer as a whole. The hierarchy goes even further in Vulkan, but this is where it ends for our purposes.
All of this ordering is about ‘submission time’ ordering: it tells you when commands were submitted to the GPU, but not at all when they are finished. Synchronization through memory and execution barriers work entirely on this submission order. You can create barriers for ‘everything that happened before me’ or ‘everything that happens after me’. An example of this is our texture usage. We put a command on the command buffer to transfer a staging buffer to a target texture. A later command then uses that texture. But there is no guarantee that the transfer has finished before we want to use it. All of the dependencies between commands in the command buffer need to be explicitly synchronized using the Vulkan synchronization mechanics. So we insert a barrier that tells the GPU: when a subsequent command in the command stream wants to read from this resource, wait until transfer is completed.
In all of this it is important to realize that there is no implicit synchronization between command buffers. If you perform a submit of a command buffer, and then another command buffer, there’s zero guarantee that commands in the first command buffer will be finished before commands in the second command buffer. It’s still one giant stream without guarantees when commands are finished. For example, we could submit our texture transfers in a single command buffer and then use the texture in a later command buffer. We still need to put explicit synchronization commands in one of the command buffers for this to be safe.
Command Buffer Organization
We decided that each render window manages its own double buffered command buffer. When beginRecording() is called, the current command buffer for that target is set and all commands will be recorded in that command buffer until endRecording() is called. On completion the command buffer is immediately submitted to the GPU, ready to be processed. But we still need to do two things, we want to:
- Transfer texture data
- Support headless rendering
Because of the Vulkan requirement to transfer data outside of RenderPasses, we maintain a separate command buffer just for data transfer. As explained, we need to take care to put barriers in place in this command buffer to make sure that a subsequent read from the texture will be blocked until the transfer is ready.
To support headless rendering, we use another command buffer. This command buffer is used during the RenderService::beginHeadlessRecording and RenderService::endHeadlessRendering calls.
We perform a little trick to synchronize all these separate command buffers into ‘frames’. On RenderService::endFrame(), we submit an empty command buffer together with a fence. When we wait for that fence to be signalled we know all commands, up to that point in the frame, have been processed on the GPU
Keeping the OpenGL Coordinate Space
It was a wish for us to maintain the OpenGL coordinate space in Vulkan. OpenGL consistently uses the bottom-left corner as its origin (0,0), Vulkan consistently uses the top-left corner as its origin. If we want to keep using the OpenGL coordinate space, it appears as if a simple y flip in the projection matrix would suffice. That goes a long way until you start to use texture render targets. We dug into this issue and found a wealth of misinformation on the internet, so here’s an explanation on what happens.
How Textures Are Really Sampled
When you think about sampling textures, the notion of a bottom-left or top-left corner is vague. What does it mean exactly? It becomes easier when you let go of that idea and start thinking about data in its raw form. Any API (OpenGL, Vulkan, DirectX) all have their origin set to the first byte in memory of a texture. So, if you upload the texture the same way in all APIs and sample (0,0) in any API, you will get the same value back. If your paint program stored the top-left corner as its first byte on disk, and you load this into OpenGL using glTexImage2D, contrary to what you perhaps would think, the top-left corner is returned. The reason it works this way is because glTexImage2D expects the first byte to be the lower-left corner of the texture:
The first element corresponds to the lower left corner of the texture image. Subsequent elements progress left-to-right through the remaining texels in the lowest row of the texture image, and then in successively higher rows of the texture image. The final element corresponds to the upper right corner of the texture image.
But we didn’t upload it this way. We uploaded the logical top-left corner of the image as the bottom-left. And when we sample at (0,0), it will sample what OpenGL considers to be the bottom-left corner. The ‘correct’ way to do this in OpenGL is to actually flip the contents of the image before uploading, and inverse the vertical texture space compared to other APIs. But that is all rather senseless because the result is the same.
The Problem With Render Targets
If you start thinking less about top-left and bottom-left and start thinking more about the raw data, it becomes a lot easier to reason about. However, the part where top-left and bottom-left become relevant is when you start using render targets. When you render to a texture using a render target, there is an absolute top-left defined in image space. In other words: the render target will store its first byte differently in OpenGL than in Vulkan. As long as those spaces are consistent, everything will be fine. But if you mix them, things are not, which is what we have here: we have an OpenGL texture space, but a Vulkan way of writing to a render target. After you render to a texture using a render target, and subsequently use that texture, the texture will be vertically flipped.
What you could do is invert the entire scene vertically, when rendering to a render target. This could be done using the projection matrix, but Vulkan has a special little hack for this, and that is to invert the viewport. On beginRendering() we actually use a viewport with a negative height to accomplish this, just for render targets. But we’re not done. The inversion causes the winding order of our triangles to be reversed. So, when rendering to a render target, we also flip the winding order in our pipeline.
Cross Compilation
At the time of porting, MoltenVK only supported Vulkan version 1.0. This meant we were bound to version 1.0 for our engine. However, because we invert the viewport (to minimize content changes) the VK_KHR_maintenance1 is required. This extension was at the time already supported on all platforms.
Windows
After having ported the render-backend (together with all demos and additional content) on Windows, we moved to Linux and macOS.
Linux
We only support the latest LTS version of Ubuntu, in this case 20.04. Compiling (GCC) and getting it to run turned out to be a walk in the park. Everything was up and running within a day, we only had to resolve some minor swap chain issues when resizing a window and add Vulkan to our build system. Other than that most things worked as expected. Both integrated and dedicated GPUs worked. Next!
MacOS
Getting the port to run on macOS (Catalina) took approximately a week and wasn’t as smooth of a process as with Linux, but then again, I did not expect it to be, considering we’re dealing with Apple and MoltenVK. The main issue we faced, after deciding to use the Vulkan Loader (instead of linking directly to MoltenVK), was that everything rendered fine on integrated cards but failed to render on dedicated cards, except for the GUI. It was immediately clear this had to do with memory allocation, because NAP uses the vma_allocator, where imGUI uses default vulkan allocation objects. But why were we not seeing the same issue on Windows and Linux? Isn’t the entire point: One API to rule them all?
Turns out we forgot to set the VK_MEMORY_PROPERTY_HOST_COHERENT_BIT when creating a staging buffer. After that everything worked as expected. An impressive feat considering macOS doesn’t have native Vulkan support. Chapeau to the people at MoltenVK!
Performance
I will dedicate a different article to the performance gains, including benchmarks. But overall most demos and applications run approximately 5-25% faster on Windows and Linux, depending on the complexity of the scene and final optimization of the render pipeline. As always: this is just the beginning, there’s room for improvement. But the initial results are very promising.
On macOS the gains are more substantial. Because Apple deprecated OpenGL and stopped supporting it a long time ago, performance has been particularly bad. Often the same NAP application would run at ~half the speed (on similar hardware) on macOS in comparison to windows. That’s no longer the case.
I was initially skeptical about the use of MoltenVK, being a translation layer to Metal, but as it turns out, all apps run just as well on macOS as they do on Linux / Windows, with the use of MoltenVK. This is something I’d like to highlight more, and stress the importance of. Without Vulkan we would have to implement a special Metal render back-end just for macOS users, something not doable for a relatively small company such as ours. Having switched to Vulkan dramatically improved render-times for our mac users.
Closing Notes
I can’t say this was easy (far from it) but in retrospect absolutely worth it. Vulkan does feel like the future of graphics. The growing level of complexity developers are confronted with on a daily basis justifies (in my opinion) the existence of low-level specialized APIs such as Vulkan, there’s no way around it. I am looking forward to learning more and improving our engine, even if that means smashing my head against the wall from time to time.
NAP Framework is open source software. Suggestions and contributions are welcome.
NAP 0.4 is now available for download and ships with Vulkan instead of OpenGL
Coen Klosters
Lead Developer NAP Framework
Technical Director Naivi
Special Thanks: Jelle van der Beek & Ritesh Oedayrajsingh Varma
A wrapper is a reimplementation of a library, where the goal is to substitute the original API with a better-supported interface. It works as a drop-in replacement for the original library, since a lot of software usually bundled it as-is without any fine-tuning. Wrappers are most common for proprietary interfaces that are either abandoned or otherwise platform-specific.
See Emulation Accuracy page for more information about terms like «hypervisors», «simulators», «compatibility layers», «wrappers», «FPGA-based hardware cloning» and «software emulators».
Contents
- 1 ’90s APIs
- 1.1 Comparisons
- 2 2000s and later APIs
- 2.1 Comparisons
- 3 See also
- 4 References
- 5 External links
’90s APIs[edit]
(Glide, DirectDraw 1-7, Direct3D 2-7[N 1], OpenGL 1.x)
During the 90s, many IBM-Compatible PC game developers used 3dfx’s Glide API for hardware accelerated 3D games, which is compatible only with 3dfx Voodoo cards. Neither NVIDIA nor ATI supported Glide, hence a wrapper is needed to play Glide games on non-Voodoo hardware.
Games using older versions of DirectDraw or Direct3D can also benefit from wrappers, since their interfaces may not work properly on newer systems. Wrappers can also enable various overrides and enhancements, such as ReShade.
| Type | Name | Platform(s) | Latest version | Translates | Into | Compatibility | License | Active | Recommended |
|---|---|---|---|---|---|---|---|---|---|
| Graphics | dgVoodoo2 | 2.86 | Glide 2.11-3.10 DirectDraw 1-7 Direct3D 2-7 |
Direct3D 11, 12 | ? | Proprietary | ✓ | ✓ | |
| WineD3D | 10.0 (Linux, macOS) 10.6 (Windows)[N 2] |
DirectDraw 1-7 Direct3D 2-7 |
Vulkan OpenGL |
? | LGPLv2.1 (Copyleft) | ✓ | ✓ | ||
| DxWnd | 2.06.08 [N 2] | DirectDraw 1-7 Direct3D 2-7 |
no API conversion | GPLv2 (Copyleft) | ✓ | ✓ | |||
| nGlide | 2.10 | Glide | Vulkan Direct3D 9 |
Proprietary | ✗ | ✓ | |||
| DxWrapper | v1.1.6900.22 | DirectDraw 1-7 Direct3D 2-7 |
Direct3D 9[N 3] Direct3D 7 (for Direct3D 2-6) DirectDraw 7 (for DirectDraw 1-6) |
? | zlib License (Permissive) | ✓ | ~ | ||
| DDrawCompat | 0.6.0 | DirectDraw 1-7 Direct3D 2-7 GDI (Partially) |
no API conversion | BSD-0-Clause (Permissive) | ✓ | ~ | |||
| cnc-ddraw | [N 4] | 6.6 | DirectDraw 1-7 | GDI OpenGL Direct3D 9 |
MIT (Permissive) | ✓ | ~ | ||
| DXGL | 0.5.23 | DirectDraw 1-7 | OpenGL | LGPLv2.1 (Copyleft) | ✓ | ~ | |||
| Glidos | 1.59 | Glide (DOS) | ? | ? | ✓ | ✗ | |||
| dgVoodoo | v1.50b2 | Glide 2.11-2.45 | Direct3D 7, 9 | Proprietary | ✗ | ✗ | |||
| OpenGlide | 0.09 Alpha | Glide | OpenGL | Apache 2.0 (Permissive) | ✗ | ✗ | |||
| psVoodoo | 0.17 | Glide | Direct3D 9 | LGPL (Copyleft) | ✗ | ✗ | |||
| glrage | r10 | ATI3DCIF DirectDraw 2 |
OpenGL 3.3 | LGPLv3 (Copyleft) | ✗ | ✓ | |||
| RReady (Rendition Verite wrapper) | RReady Rendition Verité | RRedline Speedy3D |
OpenGL | Proprietary | ✓ | ✓ | |||
| S3d wrappers | S3d wrappers | S3D MSI95 |
Software | Proprietary | ✓ | ✓ | |||
| Input | XOutput | 3.32 | DirectInput | XInput | MIT (Permissive) | ✓ | ✓ | ||
| DxWrapper | v1.1.6900.22 | DirectInput 1-7 | DirectInput 8 | zlib License (Permissive) | ✓ | ~ | |||
| Sound | DSOAL | git | DirectSound | OpenAL | LGPLv2.1 (Copyleft) | ✓ | TBD |
- ↑ Direct3D 1 is not listed, since DirectX 1 did not have a Direct3D component. The first release was Direct3D 2. The internal numbers of Direct3D pre-7 actually differ from the corresponding DirectX, but they were not referred to as such, outside of low-level dev material, possibly to avoid confusion.
- ↑ 2.0 2.1 DxWnd 2.05.70, WineD3D 1.7.52 or 1.9.7-staging(partially) versions are the latest compatible versions with Windows XP (if OneCoreAPI is not installed to OS), for getting these old «WineD3D for Windows» builds use this link. Also you can use JHRobotics port for using WineD3D on Windows 9x or Windows XP.
- ↑ Through dd7to9.
- ↑ Linux and macOS are supported through wine.
Comparisons[edit]
- nGlide
- Currently the best Glide wrapper, supporting all three public versions (2.11, 2.60 and 3.10) but it’s closed-source. It originally only used Direct3D 9 until Vulkan output was added in 2.0, allowing it to work under Linux using Wine 2.10.0 and newer.[1] nGlide also supports high resolution modes. See the compatibility list.
- dgVoodoo2
- Supports Glide 2.11, 2.45, 3.10, 3.1 Napalm, all versions of DirectDraw, and Direct3D up to version 7. Outputs Direct3D 11 and Direct3D 12 with different device types as wrapping output, such as hardware or software rendering.
- WineD3D
- Wine’s internal wrapper. Wraps DirectDraw and Direct3D up to 7 into Vulkan and OpenGL. It works pretty well for running older Direct3D games, though it does not come with a Glide implementation of its own. A custom build is available for Windows here.
- DXGL
- Reimplements DirectDraw using OpenGL. It is considered alpha software despite many applications working.
- glrage
- Reimplements ATI3DCIF, an API from ATI used in a handful of games, and DirectDraw 2 over OpenGL. Originally designed specifically for Tomb Raider 1/UB patched with ATIRage patch, currently also supports Assault Rigs and Wipeout. Additionally, it applies some improvements, fixes and QoL changes to the games.
2000s and later APIs[edit]
(Direct3D 8 and higher, OpenGL 2.x and higher, Vulkan)
Modern Windows games will likely need one of these wrappers to work on other platforms. Usually these are not separate downloads, and will come packaged into compatibility layers like Proton, Wine, or CrossOver.
| Name | Platform(s) | Latest Version | Translates | Into | License | Active | Recommended |
|---|---|---|---|---|---|---|---|
| dgVoodoo2 | 2.8.2 | Direct3D 8-9 | Direct3D 11, 12 | Proprietary | ✓ | ✓ | |
| DXVK | 2.4.1 | Direct3D 8-11 | Vulkan | zlib License (Permissive) | ✓ | ✓ | |
| WineD3D | 10.0 (Linux, macOS) 10.6 (Windows) |
Direct3D 8-11 | Vulkan OpenGL |
LGPLv2.1 (Copyleft) | ✓ | ✓ | |
| VKD3D-Proton | 2.12 | Direct3D 12 | Vulkan | LGPLv2.1 (Copyleft) | ✓ | ✓ | |
| vkd3d | 1.14 | Direct3D 12 | Vulkan | LGPLv2.1 (Copyleft) | ✓ | ✗ | |
| d3d8to9 | 1.12.0 | Direct3D 8 | Direct3D 9 | BSD-2-Clause (Permissive) | ✓ | ✓ | |
| Mesa3D for Windows + MesaInjector | 20.1.8 lightningterror’s builds vogonsdrivers builds |
OpenGL | Software | MIT (Permissive) | ✓ | ✓ | |
| Zink | git pal1000’s Windows builds (requires setting environment variable GALLIUM_DRIVER=zink) |
OpenGL 2.1-4.6 | Vulkan | MIT (Permissive) | ✓ | ✓ | |
| GLon12 | git pal1000’s Windows builds |
OpenGL | Direct3D 12 | MIT (Permissive) | ✓ | ~ | |
| grvk | 0.5.0 | Mantle | Vulkan 1.2 | zlib License (Permissive) | ✓ | ✓ | |
| MoltenVK | 1.3.268 | Vulkan | Metal | Apache 2.0 (Permissive) | ✓ | ✓ | |
| D8VK | 1.0 | Direct3D 8 | Vulkan | zlib License (Permissive) | ✗ | ~ | |
| Gallium Nine | v0.10 (WIP) | Direct3D 9 | Gallium | LGPLv2.1 (Copyleft) | ✓ | ~ | |
| D3D9On12 | git | Direct3D 9 | Direct3D 12 | MIT (Permissive) | ✓ | ~ | |
| D3D11On12 | git | Direct3D 11 | Direct3D 12 | MIT (Permissive) | ✓ | ~ | |
| 3Dmigoto | 1.3.16 | Direct3D 11 (Stereo3D) | no API conversion | GPLv3 (Copyleft) | ✓ | ~ | |
| VorpX ($) | v21.3.2 | Direct3D 11 (Stereo3D) | no API conversion | Proprietary | ✓ | ~ | |
| ToGL | Direct3D 9.0c | OpenGL | MIT (Permissive) | ✗ | ✗ | ||
| Indium | Metal | Vulkan | BSD-0-Clause (Permissive) | ~ | ~ |
Comparisons[edit]
- dgVoodoo2
- Supports Direct3D 8-9. Outputs Direct3D 11 and Direct3D 12 with different device types as wrapping output, such as hardware or software rendering.
- DXVK
- It was originally designed to accelerate support for Direct3D 11 games running under Wine since a native implementation seemed unlikely. Today it is bundled with Proton. D9VK was later merged to add Direct3D 9 support, and D8VK was also merged to add Direct3D 8 support.
- WineD3D
- Wine’s internal wrapper. Wraps Direct3D 8-11 into Vulkan and OpenGL. For newer APIs it has more bugs than DXVK. A custom build is available for Windows here.
- VKD3D-Proton
- A fork of VKD3D funded by Valve, which is more developed and has experimental support for DXR via VK_KHR_ray_tracing. Requires DXVK’s dxgi.dll file to work on Windows.
- vkd3d
- Wine’s work-in-progress Direct3D 12 to Vulkan wrapper.
- d3d8to9
- Not as versatile as dgVoodoo2, however it’s the only wrapper that can wrap Direct3D 8 into 9. Its main advantage is Windows XP support, which dgVoodoo2 lacks. It’s specifically useful for Windows XP running in VMware, since VMware’s Direct3D 8 acceleration has graphical and/or performance issues.
- Indium
- A implementation of Metal on top of Vulkan, originally devolped by iglunix and later by Darling the open-source macOS compatibility layer.
- MoltenVK
- Developed by the Brenwill Workshop under the Khronos Group, it re-implements Vulkan for Metal. Emulators like Dolphin and DuckStation use MoltenVK instead of a native Metal renderer to support Apple devices.
- Gallium Nine
- An implementation of the Direct3D 9 library on top of the Gallium driver for Linux. By using calls native to Linux, applications running under Wine run «at near-native speeds» according to the maintainers. The caveat is that it only works on Mesa, not NVIDIA’s proprietary driver.
- Zink
- A «just-in-case» implementation of OpenGL on top of Vulkan first introduced in 2018 by Collabora for the Mesa driver.[2]
See also[edit]
- Compatibility layers — Allows software written for one platform to run on another.
References[edit]
- ↑ http://www.zeus-software.com/forum/viewtopic.php?f=2&t=2044
- ↑ Erik Faye-Lund (October 31, 2018). Introducing Zink, an OpenGL implementation on top of Vulkan. Collabora.
External links[edit]
-
- VOGONS: The Wrapper Collection Project
- PCGamingWiki: Display wrapper
- State of Direct3D 9-12 translation layers by DXVK author YoRHa-2B (2019-04-02)
- Levan’s Wrapper Benchmarks
Introduction
In the world of game development, graphics rendering is a crucial aspect that requires efficient and compatible APIs. The transition from OpenGL to Vulkan API is a significant step towards achieving better performance and compatibility. In this article, we will explore an example code that demonstrates how to translate OpenGL calls to Vulkan API, allowing almost all OpenGL mods to work seamlessly.
What is Vulkan API?
Vulkan API is a low-overhead, cross-platform API for high-performance, multi-threaded, and multi-GPU acceleration. It provides a more efficient and flexible way to access graphics hardware compared to OpenGL. Vulkan API is designed to work with a wide range of devices, including desktops, laptops, and mobile devices.
Why Translate OpenGL to Vulkan?
Translating OpenGL to Vulkan API is essential for several reasons:
- Performance: Vulkan API provides better performance and efficiency compared to OpenGL.
- Compatibility: Vulkan API is designed to work with a wide range of devices, making it a more compatible choice.
- Future-Proof: Vulkan API is a more modern and flexible API, making it a better choice for future-proofing your game development projects.
Example Code: OpenGL to Vulkan API Translation
The example code provided below demonstrates how to translate OpenGL calls to Vulkan API using the OpenGLCompatibilityLayer class.
package vulkansmod; // Adjust to match VulkanMod’s actual package

import net.fabricmc.api.ModInitializer;
import org.lwjgl.opengl.GL11;
import org.slf4j.Logger;
import org.slf4j.LoggerFactory;
import java.lang.reflect.Field;
import java.lang.reflect.Method;

/**
 * Enhances VulkanMod to translate OpenGL calls from other Fabric mods to Vulkan.
 * This class initializes the compatibility layer and provides translation methods.
 */
public class OpenGLCompatibilityLayer implements ModInitializer {
    private static final Logger LOGGER = LoggerFactory.getLogger("vulkanmod/OpenGLCompatibility");
    private static VulkanRenderer vulkanRenderer; // Hypothetical reference to VulkanMod’s renderer
    private static Method clearMethod; // Example method for Vulkan translation

    @Override
    public void onInitialize() {
        LOGGER.info("Initializing OpenGL to Vulkan compatibility layer");

        // Hook into VulkanMod’s renderer (assumed to exist)
        try {
            setupVulkanRendererHook();
            LOGGER.info("OpenGL compatibility layer successfully initialized");
        } catch (Exception e) {
            LOGGER.error("Failed to initialize OpenGL compatibility layer", e);
            throw new RuntimeException("OpenGL compatibility layer setup failed", e);
        }

        // Register the compatibility layer (e.g., replace OpenGL context or intercept calls)
        redirectOpenGLCalls();
    }

    /**
     * Sets up access to VulkanMod’s internal Vulkan renderer.
     */
    private void setupVulkanRendererHook() throws Exception {
        // Hypothetical: Access VulkanMod’s renderer singleton or instance
        Class<?> rendererClass = Class.forName("vulkansmod.render.VulkanRenderer"); // Adjust class name
        Field instanceField = rendererClass.getDeclaredField("instance"); // Adjust field name
        instanceField.setAccessible(true);
        vulkanRenderer = (VulkanRenderer) instanceField.get(null);

        // Cache method for Vulkan clear operation (example)
        clearMethod = rendererClass.getDeclaredMethod("clear", int.class); // Adjust method name/signature
        clearMethod.setAccessible(true);
    }

    /**
     * Redirects OpenGL calls to Vulkan equivalents.
     * This could use Mixin, but for a PR, we’ll assume a manual hook for simplicity.
     */
    private void redirectOpenGLCalls() {
        // In a real PR, this might involve Mixin or modifying VulkanMod’s classloading
        LOGGER.info("OpenGL call redirection enabled (placeholder)");
        // Example: Replace GL11.glClear with a custom implementation
        // Actual implementation would require bytecode manipulation or renderer overrides
    }

    /**
     * Translated OpenGL glClear to VulkanMod’s Vulkan clear.
     * Callable by Mixin or direct replacement.
     */
    public static void translateGlClear(int mask) {
        try {
            if (vulkanRenderer != null && clearMethod != null) {
                clearMethod.invoke(vulkanRenderer, mask);
                LOGGER.debug("Translated GL11.glClear({}) to Vulkan", mask);
            } else {
                // Fallback to original OpenGL if setup failed
                GL11.glClear(mask);
                LOGGER.warn("Vulkan renderer not available, falling back to OpenGL");
            }
        } catch (Exception e) {
            LOGGER.error("Failed to translate glClear", e);
            GL11.glClear(mask); // Fallback
        }
    }
}
Adding More Translation Methods
To add more translation methods, you can follow the same pattern as the translateGlClear method. For example, you can add a translateGlDrawArrays method to translate OpenGL’s glDrawArrays call to Vulkan’s equivalent.
public static void translateGlDrawArrays(int mode, int first, int count) {
    // Placeholder: Implement Vulkan equivalent via vulkanRenderer
    LOGGER.debug("Translated GL11.glDrawArrays(mode={}, first={}, count={})", mode, first, count);
    // Actual Vulkan draw logic would go here
}
Conclusion
In this article, we explored an example code that demonstrates how to translate OpenGL calls to Vulkan API using the OpenGLCompatibilityLayer class. We also discussed the importance of translating OpenGL to Vulkan API and provided a comprehensive guide on how to add more translation methods. By following this guide, you can create a seamless transition from OpenGL to Vulkan API, allowing your game development projects to take advantage of the benefits offered by Vulkan API.
Future Work
In the future, we plan to expand on this example code by adding more translation methods and exploring other features of Vulkan API. We also plan to provide more detailed documentation and tutorials on how to use Vulkan API in game development projects.
References
- Vulkan API Documentation
- OpenGL to Vulkan API Translation Guide
- Vulkan API Tutorial
OpenGL to Vulkan API Translation: A Q&A Guide
=====================================================
Introduction
In our previous article, we explored an example code that demonstrates how to translate OpenGL calls to Vulkan API using the OpenGLCompatibilityLayer class. In this article, we will provide a Q&A guide to help you better understand the process of translating OpenGL to Vulkan API.
Q: What is the main difference between OpenGL and Vulkan API?
A: The main difference between OpenGL and Vulkan API is that Vulkan API is a more modern and flexible API that provides better performance and efficiency compared to OpenGL. Vulkan API is designed to work with a wide range of devices, including desktops, laptops, and mobile devices.
Q: Why is it necessary to translate OpenGL to Vulkan API?
A: It is necessary to translate OpenGL to Vulkan API because Vulkan API is a more efficient and flexible API that provides better performance and compatibility compared to OpenGL. By translating OpenGL to Vulkan API, you can take advantage of the benefits offered by Vulkan API, such as better performance and compatibility.
Q: How do I get started with translating OpenGL to Vulkan API?
A: To get started with translating OpenGL to Vulkan API, you can follow these steps:
- Familiarize yourself with the Vulkan API documentation and tutorials.
- Choose a suitable library or framework that provides a Vulkan API wrapper, such as the
vulkan-loaderlibrary. - Create a new project and set up the necessary dependencies.
- Implement the translation logic using the
OpenGLCompatibilityLayerclass. - Test and debug the translation logic to ensure that it works correctly.
Q: What are some common challenges when translating OpenGL to Vulkan API?
A: Some common challenges when translating OpenGL to Vulkan API include:
- Understanding the differences between OpenGL and Vulkan API.
- Implementing the translation logic correctly.
- Handling errors and exceptions.
- Optimizing performance and efficiency.
- Ensuring compatibility with different devices and platforms.
Q: How do I handle errors and exceptions when translating OpenGL to Vulkan API?
A: To handle errors and exceptions when translating OpenGL to Vulkan API, you can use try-catch blocks to catch and handle exceptions. You can also use logging and debugging tools to diagnose and fix issues.
Q: Can I use a library or framework to simplify the translation process?
A: Yes, you can use a library or framework to simplify the translation process. Some popular libraries and frameworks that provide a Vulkan API wrapper include:
vulkan-loader: A library that provides a Vulkan API wrapper and simplifies the translation process.vulkan-hpp: A library that provides a Vulkan API wrapper and simplifies the translation process.vulkan-cpp: A library that provides a Vulkan API wrapper and simplifies the translation process.
Q: How do I optimize performance and efficiency when translating OpenGL to Vulkan API?
A: To optimize performance and efficiency when translating OpenGL to Vulkan API, you can use the following techniques:
- Use multi-threading and parallel processing to improve performance.
- Use caching and memoization to reduce the number of API calls.
- Use optimized data structures and algorithms to improve performance.
- Use profiling and debugging tools to identify and fix performance issues.
Conclusion
In this article, we provided a Q&A guide to help you better understand the process of translating OpenGL to Vulkan API. We covered topics such as the main differences between OpenGL and Vulkan API, the importance of translating OpenGL to Vulkan API, and common challenges and solutions when translating OpenGL to Vulkan API. By following this guide, you can successfully translate OpenGL to Vulkan API and take advantage of the benefits offered by Vulkan API.
Future Work
In the future, we plan to expand on this Q&A guide by covering more topics and providing more detailed information on how to translate OpenGL to Vulkan API. We also plan to provide more examples and code snippets to help you better understand the process.
References
- Vulkan API Documentation
- OpenGL to Vulkan API Translation Guide
- Vulkan API Tutorial