
Introduction
Openfire is a powerful instant messaging (IM) and chat server that implements the XMPP protocol. This
document will guide you through installing Openfire. For a full list of features and more information,
please visit the Openfire website:
https://www.igniterealtime.org/projects/openfire/
Note: Openfire installers do not contain a bundled Java runtime (JRE). Therefore, you must have a
JDK or JRE installed on your system. Openfire 4.3 (also 4.2 and older versions) requires Java 8. Starting
with 4.4 version Openfire also supports Java 11. Openfire 4.8 and later require Java 11 and no longer run
with older versions of Java. You can check your java version by typing java -version at the
command line.
To complete the installation of Openfire, you’ll need to perform each of the following steps:
This document also includes information on:
Installation
Windows
Select Openfire installer that is better suiting you (x86 or x64). Run the installer. The application
will be installed to C:\Program Files\Openfire by default.
Note: On Windows systems we suggest using a service to run Openfire (read the Windows Service
section below). When using Openfire Launcher on Windows Vista or newer with UAC protection enabled, it
has to be run with Run as administrator option, to be able to write changes to config and embedded
database (if used) stored in C:\Program files\Openfire\ folder. If Openfire is running via
the launcher without the ‘Run as administrator’ option from Program files, it can’t get proper
permissions to write changes. It shows errors (in red) when running the launcher and during the setup
will require the current password for the administrator account (although this is a new installation.
Normally it doesn’t ask for it). This is an effect of missing permissions and Openfire not being able to
initialize the database and other resources.
Since 4.1.5 Openfire installs and runs the service automatically (also opens the browser and loads
the web setup page). The launcher (if one wants to use it) is also made to run in elevated mode, so
one don’t need to run it as administrator manually. But you shouldn’t use the launcher, if the
service is running. Because this will create a conflict.
Linux
Choose one of the provided installers (x86 or x64, rpm, deb or tar.gz).
If using rpm, run it using your package manager to install Openfire to /opt/openfire:
rpm -ivh openfire_X_Y_Z.rpm
If using deb, run it to install Openfire to /usr/share/openfire:
dpkg -i openfire_X_Y_Z.deb
If using the tar.gz, extract the archive to /opt or /usr/bin:
tar -xzvf openfire_X_Y_Z.tar.gz
mv openfire /opt
macOS
Install Openfire using dmg installer. This should install Openfire into /usr/local/openfire.
Then you can run it via cmd or with the launcher.
Setup Overview
Files in the Distribution
The files in your distribution should be as follows (some subdirectories omitted for brevity):
Openfire distribution directory layout
openfire/
 |- readme.html
 |- license.html
 |- conf/
 |- bin/
 |- jre/
 |- lib/
 |- plugins/
 |    |- admin/
 |- resources/
 |    |-database/
 |    |-security/
 |- documentation/
- The
confdirectory is where Openfire stores configuration files. - The
bindirectory contains the server executables. Depending on which distribution you installed, different executables will be available. - The
jredirectory contains a Java runtime that is bundled with the Windows and RPM versions of Openfire. - The
libdirectory contains libraries necessary for running Openfire. - The
pluginsdirectory contains server plugins. By default, Openfire ships with a web-based admin console plugin and a search plugin. - The
resources/databasedirectory contains SQL schema files to create new Openfire databases, as well as upgrade scripts for existing installations. - The
resources/securitydirectory is where Openfire maintains keystores to support SSL connection security. - The
documentationdirectory contains server documentation.
Setup the Database
Openfire can store its data in an embedded database or you can choose to use an external database such
as MySQL or Oracle. If you would like to use an external database, you must prepare it before proceeding
with installation. View the database setup documentation for more information.
Setup the Server
A web-based, «wizard» driven setup and configuration tool is built into Openfire. Simply launch Openfire
(platform-specific instructions below) and use a web browser to connect to the admin console. The
default port for the web-based admin console is 9090. If you are on the same machine as Openfire, the
following URL will usually work: http://127.0.0.1:9090. Windows
Server administrators might need to add the http://127.0.0.1 address to browser’s Trusted Sites list, if
Enhanced Security Configuration is enabled, to prevent getting a blank screen.
As a security measure, the Openfire administration console is by default, only accessible from the server
itself («localhost»). Openfire can be reconfigured to also allow this to become accessible from a remote
computer using LAN IP address instead or hostname if it is resolvable by the remote computer. To do so,
modify the openfire.xml configuration file, and remove the line that holds the
interface definition (or adjust it to an appropriate interface definition).
Admin console interface definition snippet of openfire.xml
<jive>
  <adminConsole>
    <!-- Disable either port by setting the value to -1 -->
    <port>9090</port>
    <securePort>9091</securePort>
    <interface>127.0.0.1</interface>
  </adminConsole>
After initial setup has been performed, access lists based on IP addresses and ranges can be configured
for fine-grained control of access to the Admin Console. This configuration can be found on the page
called «Admin Console Access» (under the «Server» / «Server Manager» tab).
Autosetup
As an alternative to the web-based «wizard» driven setup described above, Openfire can be configured by
provisioning it with a specially crafted openfire.xml file.
If <setup>true<>/setup> does not exist in openfire.xml (i.e. setup is not
complete), and a block does exist called <autosetup> with a <run>true</run>
property inside it, that looks like this:
Example autosetup configuration in openfire.xml
<autosetup>
        <run>true</run>
        <locale>en</locale>
        <xmpp>
            <domain>localhost</domain>
            <fqdn>localhost</fqdn>
            <auth>
                <anonymous>true</anonymous>
            </auth>
            <socket>
                <ssl>
                    <active>true</active>
                </ssl>
            </socket>
        </xmpp>
        <encryption>
            <algorithm>AES</algorithm>
            <key>some-key</key>
        </encryption>
        <database>
            <mode>standard</mode>
            <defaultProvider>
                <driver>org.postgresql.Driver</driver>
                <serverURL>jdbc:postgresql://localhost:5432/a-database</serverURL>
                <username>a-database</username>
                <password>a-password</password>
                <minConnections>5</minConnections>
                <maxConnections>25</maxConnections>
                <connectionTimeout>1.0</connectionTimeout>
            </defaultProvider>
        </database>
        <admin>
            <email>admin@example.com</email>
        <password>admin</password>
        </admin>
        <authprovider>
            <mode>default</mode>
        </authprovider>
        <users>
            <user1> <!-- Use incremental numbers for more users, eg: user2, user3 -->
                <username>jane</username> <!-- Required -->
                <password>secret</password> <!-- Required -->
                <name>Jane Doe</name>
                <email>user1@example.org</email>
                <roster>
                    <item1> <!-- Use incremental numbers for more items, eg: item2, item3 -->
                        <jid>john@example.com</jid>
                        <nickname>John</nickname>
                    </item1>
                </roster>
            </user1>
        </users>
    </autosetup>
Then setup will be run on first launch, and the <autosetup/> section will be deleted from
openfire.xml
Note that autosetup provides fewer options to setup Openfire as compared to using the setup wizard.
Admin Console
After completing the above steps, Openfire will be configured through, and you can use the web-based admin
console to administer the server. The URL should be the same as you used to setup the server unless you
changed the port during the setup.
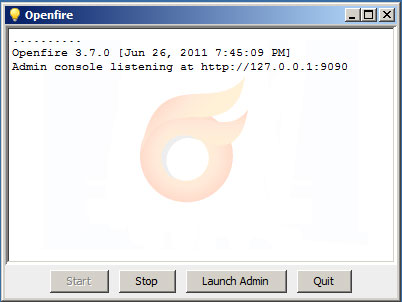
Running Openfire on Windows
Since 4.1.5 version Openfire automatically installs and runs the service (and opens the browser with the web
setup page). But you can also use the launcher, if you need to (service has to be stopped before running the
launcher). If you used the Openfire installer, a shortcut for starting the graphical launcher is provided in
your Start Menu. Otherwise, run openfire.exe in the bin/ directory of your Openfire
installation. A button on the launcher allows you to automatically open your web browser to the correct URL
to finish setting up the server: http://127.0.0.1:9090
Windows Service
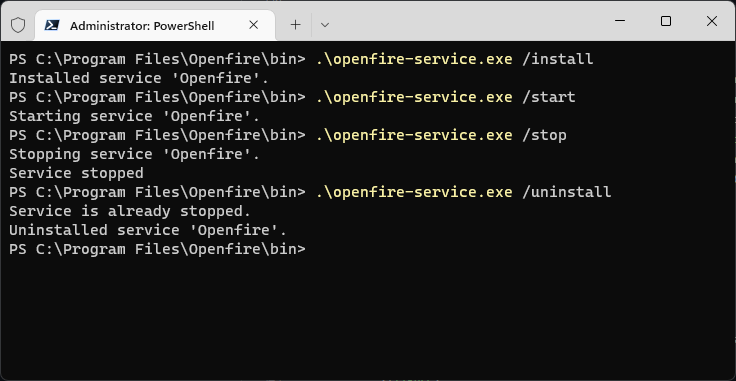
As of 4.1.5 Openfire installs the service automatically. But if you are using older version or want to
reinstall the service, you can use the openfire-service.exe executable in the
bin directory of the installation to install or uninstall the service.
From a console window, you can run the following commands:
openfire-service /install- installs the service.
openfire-service /uninstall- uninstalls the service.
openfire-service /start- starts the service
openfire-service /stop- stops the service.
You can also use the Services tool in the Windows Control Panel to start and stop the service.
Note: the graphical launcher is not compatible with the Windows service. If you install the
service, you should use service controls as described above to control the server rather than the
graphical launcher.
Upgrading Note: you should stop Openfire service before running the installer to upgrade to the
newer version. Starting with 4.1.5 version Openfire will automatically stop and reinstall the service
when upgrading with the installer.
Custom Parameters
Advanced users may wish to pass in parameters to the Java virtual machine (VM) to customize the runtime
environment of Openfire. You can do this by creating a openfire.vmoptions file in the
bin/ directory of your Openfire installation. For the Windows service, you’d create a new
text file called openfire-service.vmoptions.
Each parameter to the VM should be on a new line of the file. For example, to set the minimum heap size
to 512 MB and max VM heap size to 1024 MB, you’d use:
-Xms512m
-Xmx1024m
To create parameters for the normal launcher, create a file called openfired.vmoptions
(since the openfire.exe launcher invokes the openfired.exe executable to actually start the server).
Running Openfire in Linux/Unix
If you are running on a Red Hat or Red Hat like system (CentOS, Fedora, etc.), we recommend using the RPM
distributable, as it contains some custom handling of the standard Red Hat like environment. Assuming that
you have used the RPM, you can start and stop Openfire using the /etc/init.d/openfire script.
# /etc/init.d/openfire
Usage /etc/init.d/openfire {start|stop|restart|status|condrestart|reload}
# /etc/init.d/openfire start
Starting openfire:
If you are running on a different Linux/Unix variant, and/or you have used the .tar.gz ‘installer’, you can
start and stop Openfire using the bin/openfire script in your Openfire installation:
# ./openfire

Usage: ./openfire {start|stop}
# ./openfire start
Starting openfire
If you would like to install Openfire as a service, two scripts are provided in the bin/extra
directory:
redhat-postinstall.sh— automatically installs Openfire as a service on Red Hat. It does so by creating a «jive» user and then copying the openfired script to your init.d directory. This script must be run as root. Please see the comments in the script for additional information.openfired— script to run Openfire as a service. You must manually configure this script. See the comments in the script for additional details.
It is not recommended that you use either of these scripts if you installed via RPM. The RPM has already
taken care of what these scripts take care of.
Custom Parameters
Advanced users may wish to pass in parameters to the Java virtual machine (VM) to customize the runtime
environment of Openfire. If you installed via RPM, you can customize this by editing
/etc/sysconfig/openfire and looking at the OPENFIRE_OPTS option. If you installed via
.tar.gz, you will need to tweak your startup script to fit your needs.
Plugins
Plugins add additional features and protocol support to Openfire. After setting up your Openfire
installation, you may want to download and install plugins to enhance your server. Plugins can be downloaded
from the plugins page on
igniterealtime.org or directly inside the administration console.
Installing Plugins
If you download a plugin from inside the Openfire administration console, it will automatically
be installed. If you manually download the plugin (packaged as a .jar file), you can deploy it
by copying the plugin file to the plugins/ directory of your Openfire installation. A
plugin monitor will automatically extract the plugin into a directory and install the plugin in Openfire.
You may also use the «upload plugin» feature in the admin console (under the Plugins tab) to load
a plugin from your local file system to the server.
Note: For nearly all plugins, a restart of the Openfire server software is not required.
You should be able to install and remove plugins on-demand without impacting Openfire.
Managing Plugins
Plugins can be managed inside the Openfire admin console. You can also manually delete a plugin at any
time by deleting its JAR file (Openfire will automatically remove the plugin from memory and delete its
directory when you do so).
Firewall
Server’s administrator should open TCP ports 5222 and 5223 for incoming
connections for XMPP clients to be able to connect to Openfire.
For secure BOSH / (HTTP-bind) and websocket-based client connections ensure that TCP port 7443
is reachable. The unencrypted port equivalent for this port (which uses HTTP instead of HTTPS, or WS instead
of WSS) is 7070. We recommend only using encrypted connections on port 7443.
For server to server connections one should also open ports TCP 5269 and 5270.
As a general rule, the Openfire Admin Console should not be exposed to the general internet. However, an
administrator can choose to open TCP 9090 (for HTTP) and TCP 9091 (for HTTPS), if
there is a need to remotely administrate Openfire connecting to its Admin Console. We recommend only using
9091 port as it is an encrypted connection, and we strongly recommend limiting access to a
curated list of known, trusted network addresses, if any.
Port number can be different, if the default configuration has been changed by an administrator. Additional
ports may also be in use by Openfire or by plugins to provide additional features. The full list of ports
used by Openfire can be found on the first page of Admin Console in the Server Ports section.
Рассмотрим установку сервера Openfire на компьютеры под управлением ОС Windows в стандартной конфигурации для использования в локальной сети с открытым доступом из Интернет и с использованием службы DynDNS.
Предполагается, что у Вас уже установлена операционная система, настроен доступ в Интернет, а доменное имя на DynDNS (допустим, это будет myjabber.ath.cx) указывает на внешний адрес Вашего компьютера (либо тот, который доступен из Вашей локальной сети, если Вы настраиваете сервер без возможности подключения к нему из Интернета).
Первым делом скачайте программу-установщик на свой компьютер, сделать это можно на официальном сайте Ignite Realtime на странице загрузки. Рекомендуется качать вариант, включающий в себя Java Runtime Environment. После скачивания запустите файл и приступайте к установке.
Установка[править]
После запуска установщика первым делом появится диалог выбора языка. К сожалению, русский язык недоступен, поэтому просто нажмите «OK«. Запустится мастер, который поможет выполнить Вам необходимые шаги для установки сервера. Все настройки делаются уже после установки сервера, но на некоторые вопросы все же придется ответить:
- Принятие лицензионного соглашения. Openfire распространяется на условиях лицензии GPL.
- Каталог для установки программы. Здесь будут находиться основные исполняемые файлы сервера и файлы конфигурации, а также база данных пользовательских аккаунтов.
- Необязательный пункт — указание группы в меню программ.
После ответа на эти вопросы начнется процесс установки, по завершению которого Вам будет предложено запустить сервер. Соглашайтесь и нажимайте кнопку «Finish«, после чего перед Вами появится окно управления состоянием сервера (если не появится — щелкните на значке в трее). На этом установка закончена, время переходить к настройке.
После установки сервер занимает на диске около 100 Мб.
-
Выбираем язык
-
Запуск мастера установки
-
Лицензионное соглашение
-
Выбор каталога для установки
-
Создание группы в системном меню
-
Установка сервера
-
Установка успешно завершена
-
Сервер запущен
Настройка[править]
Для начала настройки нажмите кнопку «Launch Admin» в окне управления сервером. Откроется браузер с веб-интерфейсом, в котором необходимо будет поэтапно произвести 5 основных настроек:
- Язык интерфейса. Теперь доступен русский язык.
- Доменное имя сервера. Как уже говорили выше, пусть это будет myjabber.ath.cx.
- Тип базы данных. В нашем варианте остановимся на встроенной базе — выбираем пункт «Вложенная База данныx«.
- Тип профиля оставляем Default.
- Указываем email и пароль администратора.
На этом настройка завершена. Перезапустите сервер, после чего Вам станет доступна панель администратора по адресу http://127.0.0.1:9090/login.jsp, откуда Вы сможете изменять самые разнообразные настройки, а также просматривать статистику. Для авторизации используйте имя пользователя admin и пароль, указанный при настройке сервера.
Теперь к Вашему серверу можно подключаться с других компьютеров, пользователи могут заводить учетные записи, общаться между собой и устраивать конференции.
-
Выбираем язык
-
Указываем домен сервера
-
Выбираем тип базы
-
Выбираем тип профиля
-
Указываем пароль и почту администратора
-
Настройка завершена
-
Логин в админ-панель
-
Админ-панель и работающий клиент
Не столь давно мы рассматривали настройку корпоративного IM-сервера Openfire на платформе Ubuntu Server. Как показали читательские отклики, интерес к этой теме достаточно велик, в том числе и к реализации данного решения в среде Windows. В данной статье мы решили рассмотреть особенности, с которыми придется столкнуться администратору, решившему установить Openfire на данной платформе.
Онлайн-курс по устройству компьютерных сетей
На углубленном курсе «Архитектура современных компьютерных сетей» вы с нуля научитесь работать с Wireshark и «под микроскопом» изучите работу сетевых протоколов. На протяжении курса надо будет выполнить более пятидесяти лабораторных работ в Wireshark.
Мы не будем рассматривать процесс установки и настройки полностью, он был детально нами описан в предыдущей статье, а остановимся на характерных особенностях связанных с использованием Windows Server и SQL Express.
И почему все таки Openfire? Ответ прост, на сегодняшний день это лучшее решение корпоративного уровня, стабильное, простое в установке и настройке, полноценно интегрирующееся в Active Directory. Наша попытка подружить AD и ejabberd (как альтернативу Openfire) не увенчалась успехом. Несмотря на то, что данная связка в конце концов заработала, рекомендовать ее к применению мы категорически не можем.
Перейдем к практической части. В качестве серверной ОС мы использовали Windows Server 2008 R2. В нашей тестовой лаборатории были приняты следующие обозначения: SRV01 — контроллер домена (10.0.0.1), SRV03 — Jabber сервер (10.0.0.3), interface31.local — имя домена.
Установка Openfire для Windows предельна проста, достаточно скачать инсталляционный пакет и установить его привычным образом. После установки вы увидите окно запуска сервера, позволяющее запустить, остановить и открыть его административную панель.
Собственно уже на этом этапе можно приступить к настройке и эксплуатации IM-сервера, что удобно, если нужно быстро развернуть данную службу на короткое время, например для обеспечения какого-либо мероприятия. Но для повседневного использования в корпоративной среде такой вариант неприемлем. Почему? В настоящее время Openfire запущен как обычное приложение от имени текущего пользователя. Нам же нужно запускать его как службу. Для этого воспользуемся утилитой openfire-serviceидущей в комплекте поставки. Запустим командную строку и перейдем в каталог с утилитой:
cd C:\Program Files (x86)\Openfire\binУстановим Openfire как службу и запустим ее:
openfire-service /install
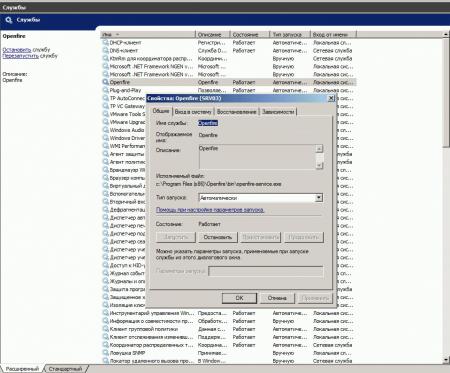
openfire-service /startПосле чего перейдем в оснастку Службы и убедимся, что служба Openfire создана, работает и имеет автоматический тип запуска.
Теперь, набрав в браузере http://localhost:9090, можно приступать к настройке сервера. Однако не будем спешить, для работы IM-сервера нам потребуется база данных. Если у вас в сети развернут сервер БД, то можно использовать его, в небольших сетях можно попробовать обойтись встроенной БД, мы же рекомендуем использовать MS SQLExpress. Возможностей этой версии СУБД с лихвой хватает для данного сервиса, а использование автономной БД повышает надежность и снижает зависимость от других служб и сервисов.
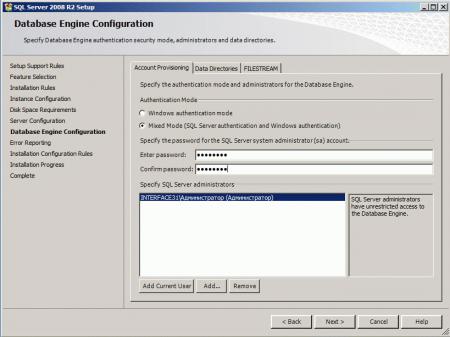
Бесплатно SQLExpress можно получить здесь, при этом не забываем о необходимой разрядности (в нашем случае 64 бита). Перед установкой SQL сервера необходимо добавить роль Сервер приложений, выбрав в опциях Платформа .NET Framework 3.5.1, в более ранних выпусках Windows Server вам потребуется установить .NET Framework отдельно.
При установке SQLExpress в качестве Authentication Mode выбираем Mixed и указываем пароль для SQL администратора sa.
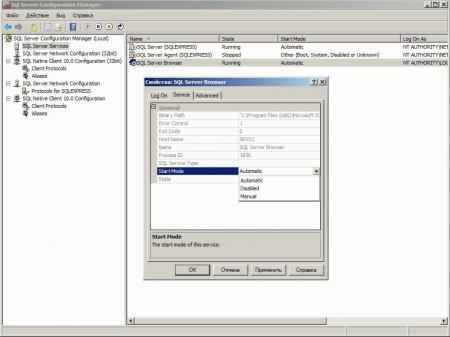
Сразу после установки идем в SQL Server Configuration Manager и проверяем состояние службы SQL Server Browser. При установке по умолчанию она остановлена. Заходим в свойства и устанавливаем для нее автоматический тип запуска, после чего запускаем.
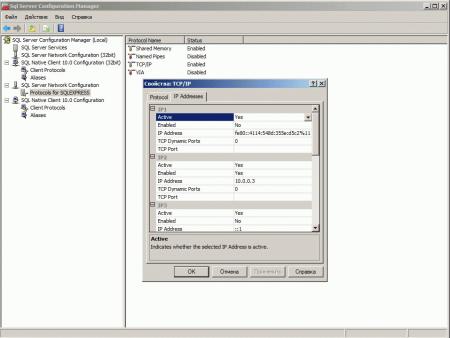
Затем переходим в SQL Server Network Configuration и включаем протокол TCP/IP, не забываем перейти на закладку IP Adresses и явно включить использование протокола для нужных интерфейсов (127.0.0.1 и 10.0.0.3).
Перезапустим SQL Server.
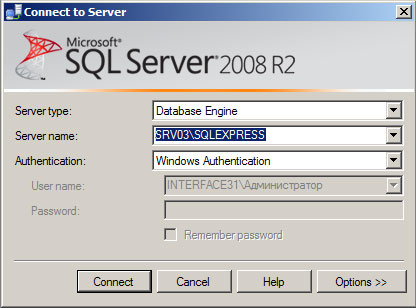
Теперь создадим новую БД, для этого откроем SQL Server Management Studio, обратите внимание что для входа нужно использовать имя_хоста\имя_экземпляра_SQL, в нашем случае SRV03\SQLEXPRESS.
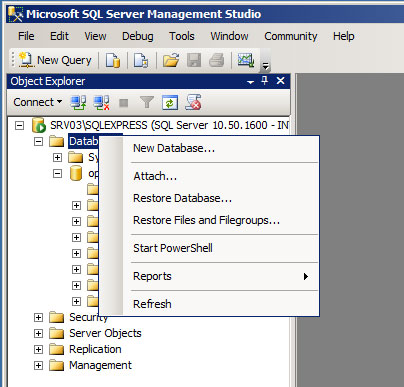
В открывшемся дереве находим пункт Databases и щелкнув на нем правой кнопкой мыши создадим новую БД, достаточно только указать название (в нашем случае openfire), оставив остальные параметры по умолчанию.
Теперь, настроив SQL сервер и создав базу данных, можно переходить к настройке Openfire через веб интерфейс. Процесс настройки ничем не отличается от уже рассмотренного нами, за исключением того, что при настройке БД необходимо выбрать Microsoft SQLServer и указать следующую строку База данных URL:
jdbc:jtds:sqlserver://SRV03/openfire;appName=jive; instance=SQLEXPRESSИмя пользователя должно быть sa с паролем установленным нами на стадии установки SQL сервера. Если все сделано правильно, то Openfire успешно соединится с БД и вы сможете продолжит настройку по уже знакомому сценарию.
Онлайн-курс по устройству компьютерных сетей
На углубленном курсе «Архитектура современных компьютерных сетей» вы с нуля научитесь работать с Wireshark и «под микроскопом» изучите работу сетевых протоколов. На протяжении курса надо будет выполнить более пятидесяти лабораторных работ в Wireshark.
How to Install Openfire on Windows 10
Openfire is an open-source instant messaging server that can be used for internal communication within an organization. In this tutorial, we will guide you through the steps on how to install Openfire on Windows 10.
Prerequisites
Before we proceed, please make sure you have the following:
- Windows 10 operating system
- Administrator access to the computer
- Internet connection
- Latest version of Java
Step 1 — Download Openfire
Go to the official website of Ignite Realtime at https://www.igniterealtime.org/projects/openfire/ and click on the «Download» button.
Select the appropriate package for your system, which in this case is «Windows EXE Installer». Once the download is complete, you can proceed with the installation.
Step 2 — Install Openfire
Double-click on the downloaded file to initiate the installation process. You may encounter a security warning, but you can ignore it and proceed to the next step.
On the first screen of the installer, you will be prompted to choose a language. Select your preferred language and click on «OK».
Next, the installer will ask for the installation folder. You can select the default folder or choose a different location for the installation.
The installer will then ask for the web and admin consoles’ ports, leave the default values and click on «Continue».
On the next screen, the installer will ask you to create an administrator account. Enter your desired username and password, and then click on «Continue».
The installer will proceed to install Openfire on your Windows 10 computer. This process may take a few minutes.
Once the installation is complete, the installer will prompt you to start Openfire. Select the «Launch Admin» checkbox and click on «Finish».
Step 3 — Configure Openfire
You will now see the Openfire admin console on your web browser. Click on «Yes» to continue, and then enter your admin username and password to log in.
On the left-hand menu, go to «Server» and select «Server Settings». On this page, you can configure the server settings according to your preferences.
Once you have configured the server settings, you can create new users, groups and configure other settings as per your requirements.
Conclusion
In this tutorial, we have shown you how to install Openfire on Windows 10. You are now ready to use Openfire for internal communication within your organization.
If you want to self-host in an easy, hands free way, need an external IP address, or simply want your data in your own hands, give IPv6.rs a try!
Alternatively, for the best virtual desktop, try Shells!
Steps 1. Download and install xampp


Click on the download link for XAMPP.

When prompted for the download, click «Save» and wait for your download to finish.

Install the program, and click on «Run.»

Accept the default settings. A command will open and offer an initial installation prompt. Just hit the Enter key, and accept the default settings. To simplify installation, just hit ENTER when prompted on the command line. You can always change settings, by editing the configuration files later.

When your installation is complete
Start the XAMPP Control Panel.

After starting xampp set phpmyadmin password 123123
Steps 2. Download and install JDK
http://www.oracle.com/technetwork/java/javase/downloads/index.html


Congratulations! You have taken your first step to starting Java programming.
Steps 3.
Download and install Openfire
http://www.igniterealtime.org/downloads/index.jsp


Go to
openfire installation folder and change folder access security to everyone with
full access


Lunch
phpmyadmin and create a database for
openfire


Go to start
menu and open openfire


Lunch Admin panel

Give your pc/server ip address


Just
following the instruction
Database URL : change to jdbc:mysql://localhost:3306/openfire_data
Note : this
user name and password is my phpmyadmin username and password


Set the
administrator username and password for login


Login as
admin at http://127.0.0.1:9090 Or

After login
configure it Instruction given below.


After
configuration update the plugins.


————————————————————————————
After installation openfire Install as
service
————————————————————————————
Now close
out the OpenFire GUI, press Quit.
Open a
command prompt and set your working directory as C:\Program Files\Openfire\bin
or whatever your OpenFire install directory is.
Run the
following two commands to install the OpenFire service and to start it:
openfire-service
/install
and
allow port
5222 in firewall
Install
pidgin client in windows or Ubuntu and audiom for mac


===============================================
How To get
Old Messages (Chat History)
===============================================
You need to
install Monitoring service plugin to enable message archiving. You may have to
upgrade your openfire service if this plugin is not appearing in your available
plugins section in the admin console.
You will
need to log into the admin console and go to: Server —> Archiving —>
Archiving Settings to enable message archiving.
1.Go into
your admin console (yourserver.com:9090), login and click on the
«Plugins» option
2.Scroll
down the list and find the one called «Monitoring Service», click on
the check mark to install it
3.Once
installed, a new tab will appear under «Server -> Archiving»
4.Once in
the Archiving tab, click on the «Achiving Settings», check the
«Archive one-to-one chats»
5.Now, go
back to the «Search Archive» option, and click on search, DONE!
These messages
are stored in the openfire database in mysql (I used mysql during server setup,
I didn’t use the default database). If you want to check it, ssh into your
server:
1) mysql -u
username -p password
2) inside
mysql, type «select openfire;» (I named my databasae for the openfire
server as “openfire»)
3) enter
«show tables;», you should see a table called
«ofMessageArchive» and this is the table for storing the
converstations
DELETE FROM
`ofmessagearchive` WHERE messageID=97
DELETE FROM
`ofmessagearchive` WHERE messageID in(96,98,99)
=====================================================================
OpenFire:
Hide all users in the same group from each other?
=====================================================================
http://serverfault.com/questions/191365/openfire-hide-all-users-in-the-same-group-from-each-other
==========================
==========================
There are
three ways to install a plugin:
1. One click
install: You don’t need to download a standard jar file to install it in
Openfire. All you need to do is login to Openfire server as admin, go to tab
«Plugins», there you will find «Available Plugins» and you
can one click to install it without downloading anything.
2.
Installing the downloaded Jar/War file (for example Red5): On the very same
«Plugins» tab, below the list which shows installed plugins you can
find «Upload Plugin» field with Browse button…
3. Manual
copy: Login to computer (not through the web browser) which has Openfire
installed, copy jar/war file to openfire’s plugin directory (on windows —
C:\Program Files\Openfire\Plugins, on Linux it is usually —
/opt/openfire/plugins).
You need to
restart Openfire if you have chosen the last way (manual copy).
Thank You