
Windows 10 comes with default app settings that can be used to choose default apps for opening specific types of files.
The most common default apps include email, maps, music player, video player, photo viewer, and web browser etc.
You can also set default apps by filetype or even protocol.
There are times when a file is not open in your desired application. In this article, we will discuss this situation and how to fix it by adjusting Windows settings in different ways.
Table of Contents
Why is the file not opening in the desired program?
The main reason behind files not opening in your desired program is that the program is not set as a default for that particular file type or protocol. Binding the file type with the app will fix this issue.
How do I configure files to open in the desired program?
1. Using Windows Settings
For higher versions of Windows, you can easily adjust which file should open in what program. Here’s how:
- Open Windows Settings by pressing Windows key + i.
- Go to Apps and then open the default apps menu.

- You will find a list of apps and with which apps they open, right-click on the app and choose another app.


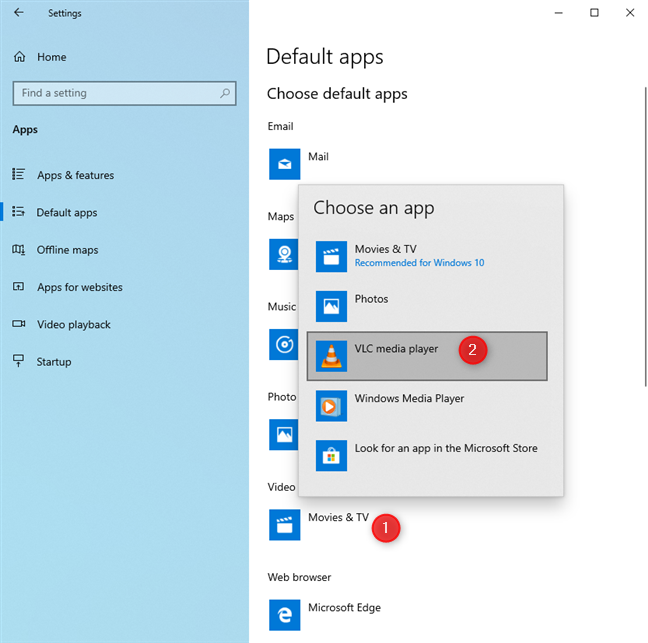
For example, to play music, Microsoft suggests I use the groove music app. But I wish to change it.
Simply click on the app and it will show you other options to play with. If I select Windows Media Player, it will be set as the default app and next time Windows will always play music with Windows Media Player
Similarly, you can select the app you wish to open the file with, using the same procedure I provided in example
2. Using Open With Menu
You can also select with which app you want to open the file while opening it. Here’s how:

- Right-click on the file you want to open and select Open With.
- Select Choose another app.

- Select your desired program from the list. If you can’t find it in the list, click on More apps and then Look for another app on this PC. You will need to browse your desired app executable.
- Once you have selected the app, select Always use this app to open .filetype files and press the OK button.

3. Using Group Policy Editor
If you are a sysadmin or a Power user who wants to set the filetype defaults as per your own requirements, you can use the Group Policy to implement it on multiple users and computers.
We will go through all the steps of using the group policy editor to create a default associations file and then applying it on the complete network using Active Directory group policy or on a single computer but for all users.
- Go to Run –> gpedit.msc. This will open the local group policy editor.
- Go to the following tree in the left hand pane:
Computer Configuration –> Administrative Templates –> Windows Components –> File Explorer
- In the right-hand pane, double-click on Set a default associations configuration file
- Select Enabled and give the path of the file associations xml file.

- To create the default file, you can run the following command in administrative command prompt:
Dism.exe /Online /Export-DefaultAppAssociations:C:\DefaultFileAssociations.xml - After configuring the group policy, run the following command in command prompt:
gpupdate /force
This will apply the group policy immediately.


4. Using the Windows Registry
If the above mentioned methods don’t work, you can use the Windows Registry to set and tweak the default file associations.
The Registry method is also useful when you want to create a single file and distribute it to other users to apply the same settings without configuring anything. Simply running the registry file will make the required changes.
- Go to Run –> regedit. This will open the Registry editor.
- Right-click HKEY_CLASSES_ROOT and go to New –> Key
- Give the name to the key that is exactly the extension name. For example, I wanted to create a new file type extension .itt. So I will name the key as .itt.

- If the name already exists, skip step 3.
- In the right-hand pane, set the Default value to file type name. For example, I will set the default value of .itt to itechticsFile.
- Now create another key under HKEY_CLASSES_ROOT with the name itechticsFile.
- Under itechticsFile, create a new sub-key with the name DefaultIcon.
- Set its default value to C:\Path\Executable,0
- Under itechticsFile, create another sub-key with the name shell.
- Under the shell key, create a sub-key named open.
- Under open, create another sub-key named command.
- Set the default value of the command key to the following:
“C:\Path\to\executable\program.exe” “%1”


This is a long process to create a new file type. You can easily change the current file types easily using the same method.
Also see: How to monitor the system for Registry changes.
How do I reset the default program for opening files?
If you want to reset the default programs for opening files you can do that using Windows settings. Follow these steps:

- Open Windows Settings by pressing Windows key + i.
- Go to Apps and then the Default Apps section.
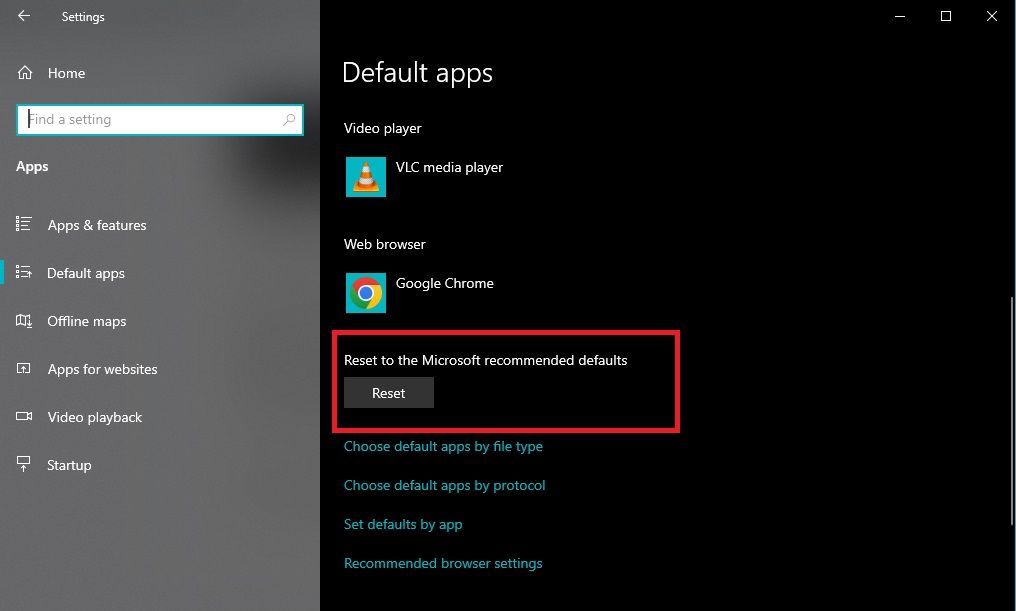
- Scroll down for the option Reset to Microsoft recommended defaults.
- Click Reset. All your files will open with the default Microsoft recommended programs.
Quick Links
-
Configure Stock Default Apps
-
Choose Default Apps by File Type
-
Manage Launch Options by Protocol
The Default Apps setting is not exclusively new to Windows 10 but, much like many of the other Control Panel staples of previous versions, Microsoft has worked in an almost total rehaul of the old system in favor of something a little more streamlined and a lot more functional.
Here’s how to configure which programs open which files, links, and protocols in the Windows 10 OS.
Entering Settings
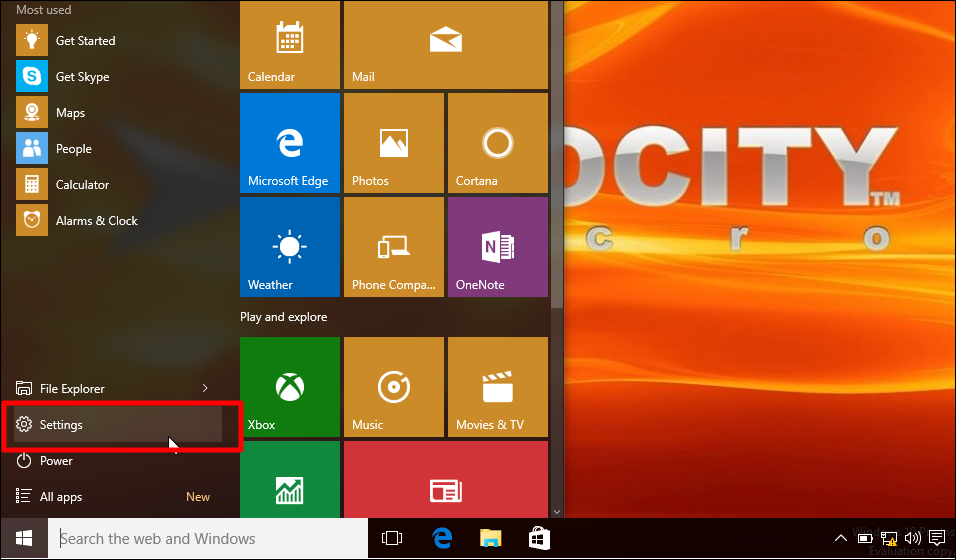
The first step to getting your default applications configured properly is to enter the Settings app through the revamped Start Menu.
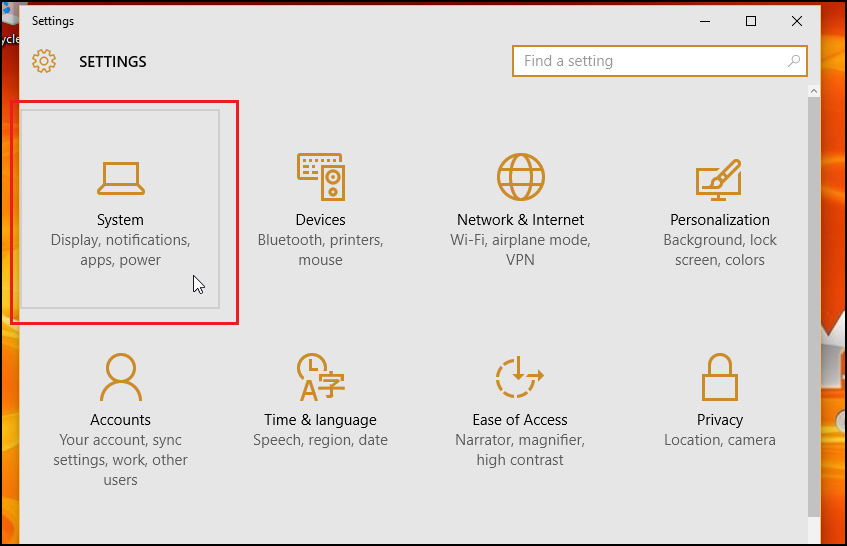
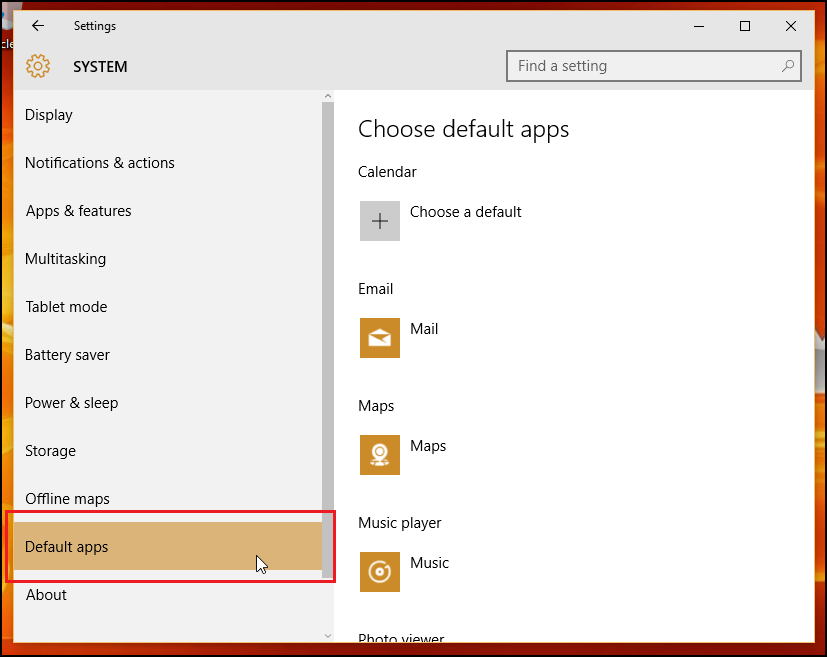
In Settings, click on the «System» icon, and scroll down to «Default Apps» in the left-hand side menu.
Configure Stock Default Apps
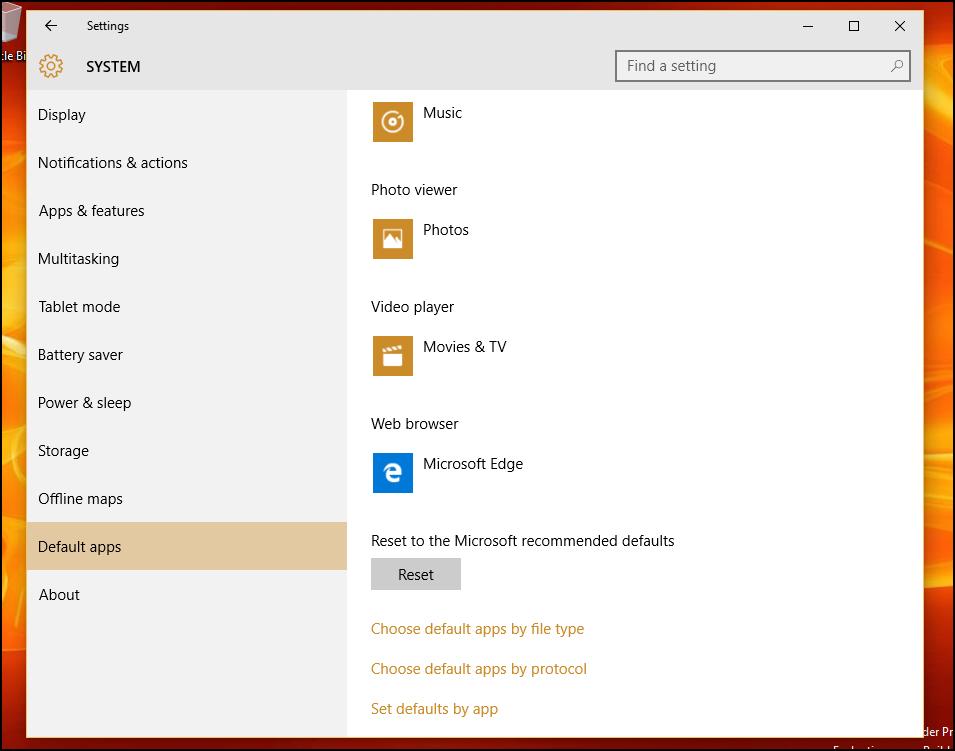
On the splash page of the Default Apps section, you’ll see several different applications which have already been pre-selected to automatically use integrated Windows applications for seven of the main activities you’ll participate in while using the OS. At stock config, any email links clicked on or offline will launch using the default Windows Mail app, web links will open in Microsoft’s new web browser Edge, photos will be routed through the internal Photo Viewer, movies and video files will open in the Video Player app, and Map requests will automatically route to Bing Maps (from within a new tab of Edge).
The only command left up to you by default is Calendar links, which can be tied to your email provider or a third-party scheduling application that’s been installed at a later date.
Though these are the original options you’ll find on a fresh install of Default Apps, you can always use the following options to customize exactly how Windows 10 will handle different requests based on the file type, the program, or an underlying launch protocol.
Choose Default Apps by File Type
Overall, how you choose to organize your app commands is a matter of personal preference, but certain options such as «Default Apps by File Type» can usually tend to be a bit easier to manage for the average everyday user.
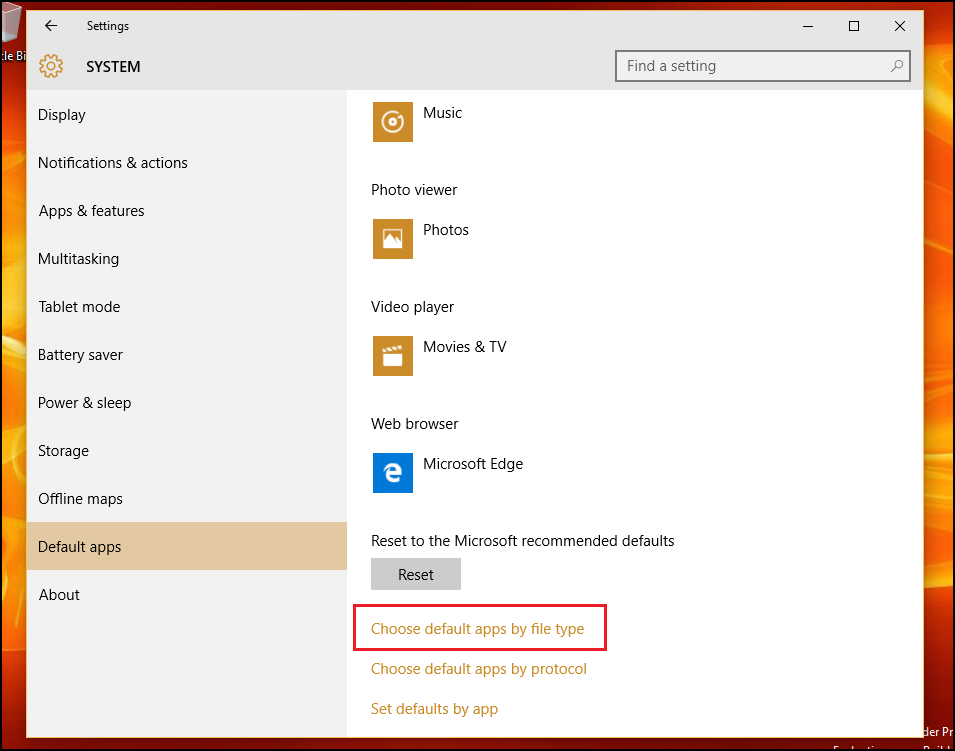
To choose which apps launch which types of media or link by the type of file, select the «Choose Default Apps by File Type» option. Here you’ll be greeted by a two-tiered menu, the first containing every file type that Windows 10 is designed to handle, and the second with the list of apps you currently have installed on the machine.
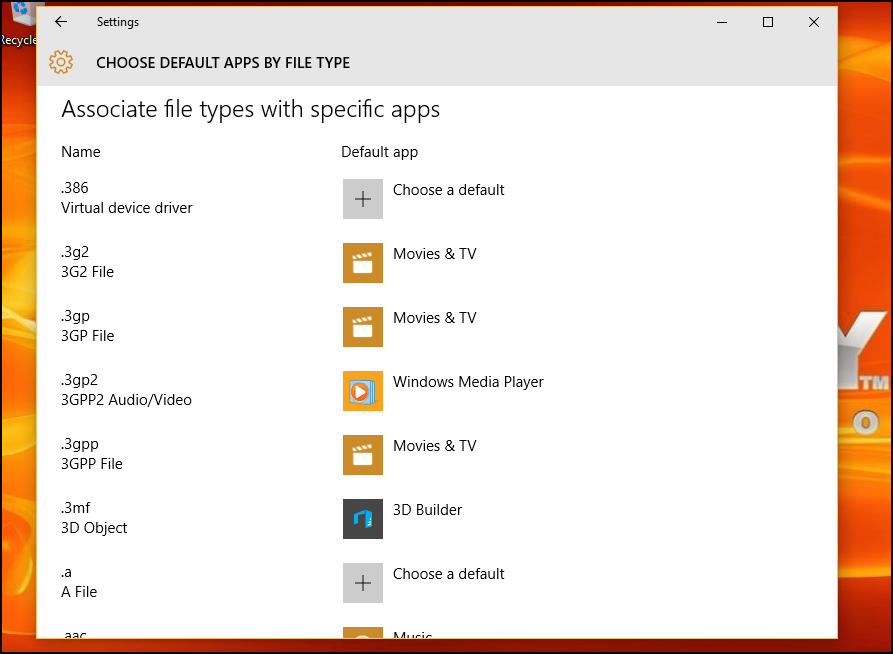
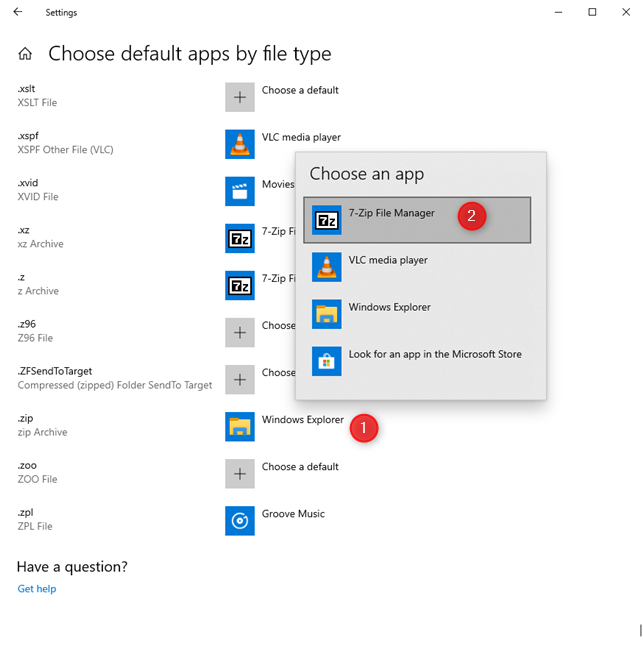
Say for example you want to launch .mkv files in Windows Media Player rather than the in-house Movies app. To change this, just scroll down to «.mkv» on the left, and once selected, choose the corresponding application on the right that you’d like to set as the default.
And that’s it! In theory you could customize all the possible app combinations from this section alone, but in case you prefer a different system of app management, Microsoft has included two other pathways to keeping your default launch instructions in check.
Manage Launch Options by Protocol
Back in the Default Apps section, you’ll find a second section directly underneath the first option, labeled «Choose default apps by protocol».
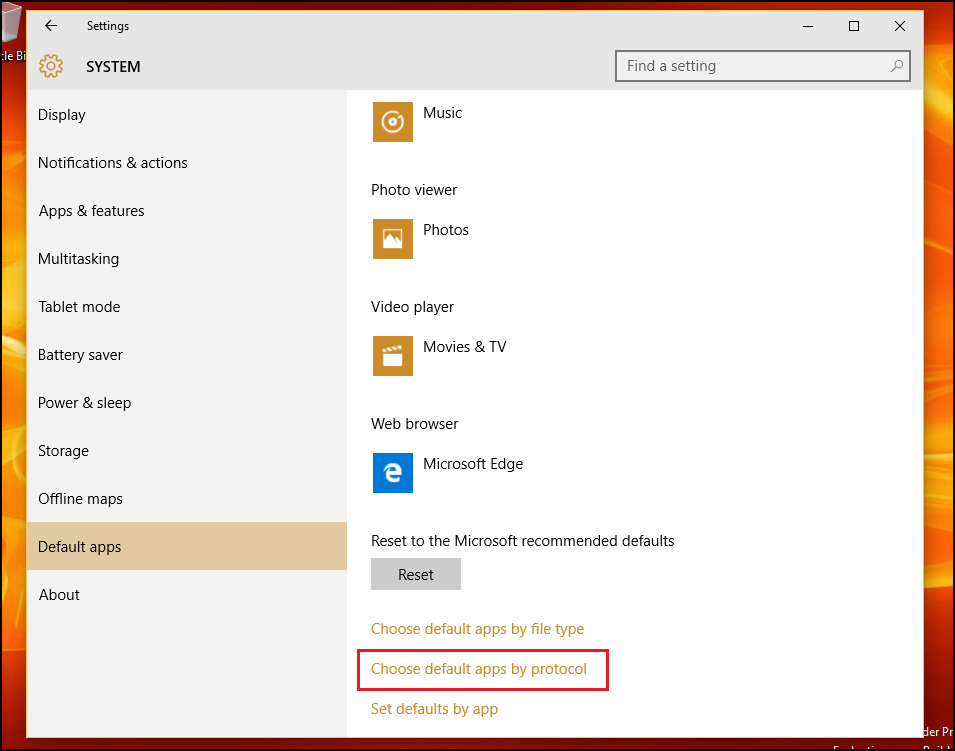
In this section, you’ll find a greater level of control over exactly how your computer handles specific requests from global programs and networked devices like Xboxes, remote desktops, and external email clients.
In general, the types of options included here are commands that you would want routed to Windows applications anyway, unless you have a specific need for URL links to launch in separate programs. Examples of protocol configurations include actions like a specific keyboard command launching into the Windows Search feature, links that contain content from MSN channeling into Windows apps, or .zip files being extracted via the stock archive reader instead of third-party software like WinRar or 7Zip.
Last, But Not Least
Finally, if all these new app settings are a little too jarring for you and you’d rather manage your default apps the old fashioned way, Microsoft has been kind enough to still include the original Windows 7/8 configuration interface for anyone who prefers to keep it old school.
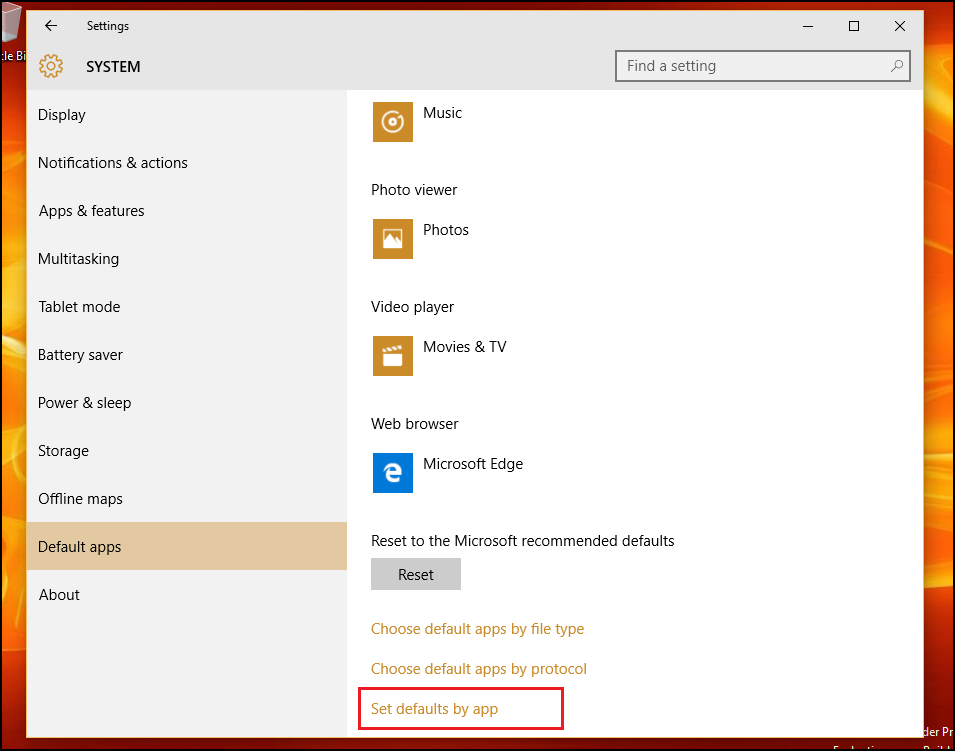
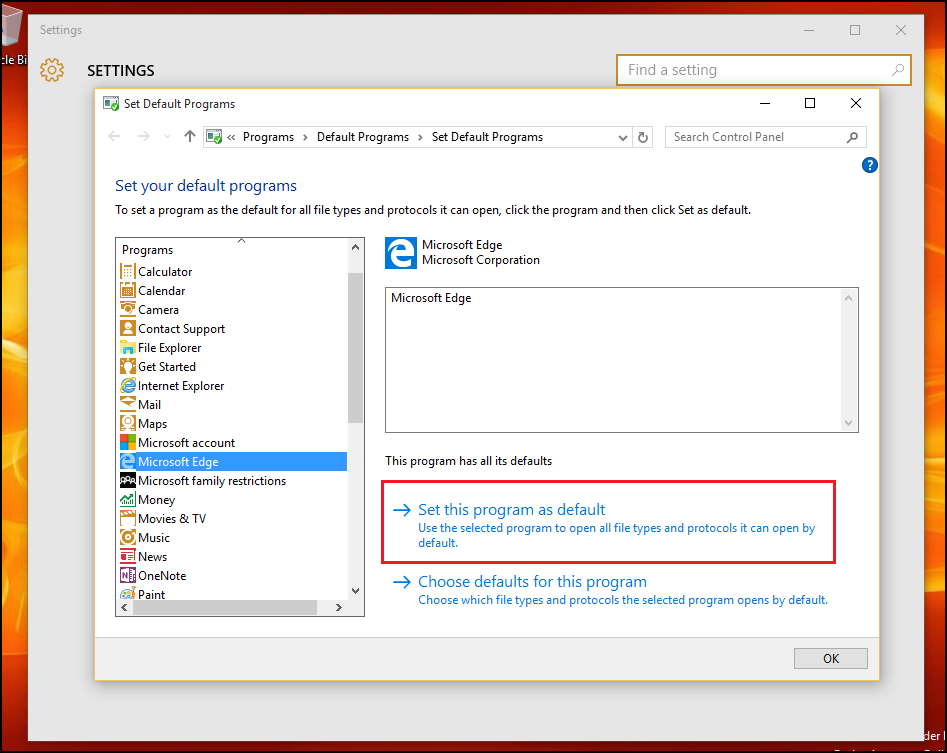
«Set defaults by app» is the last, but also most extensive method of managing which files are handled by the apps installed on your computer. Here you’ll find a familiar face with the list of programs available on your machine pinned to the left, and the list of various commands that will open them individually buried under the «Choose defaults for this program» button.
If you want to make things easy, all you’ll need to do is click «Set this program as default», after which Windows will automatically set that program as the go-to for any protocols, links, or files it’s designed to open on its own. I.e- Microsoft Edge will swoop up any HTTP links, FTP commands, or attached PDFs.
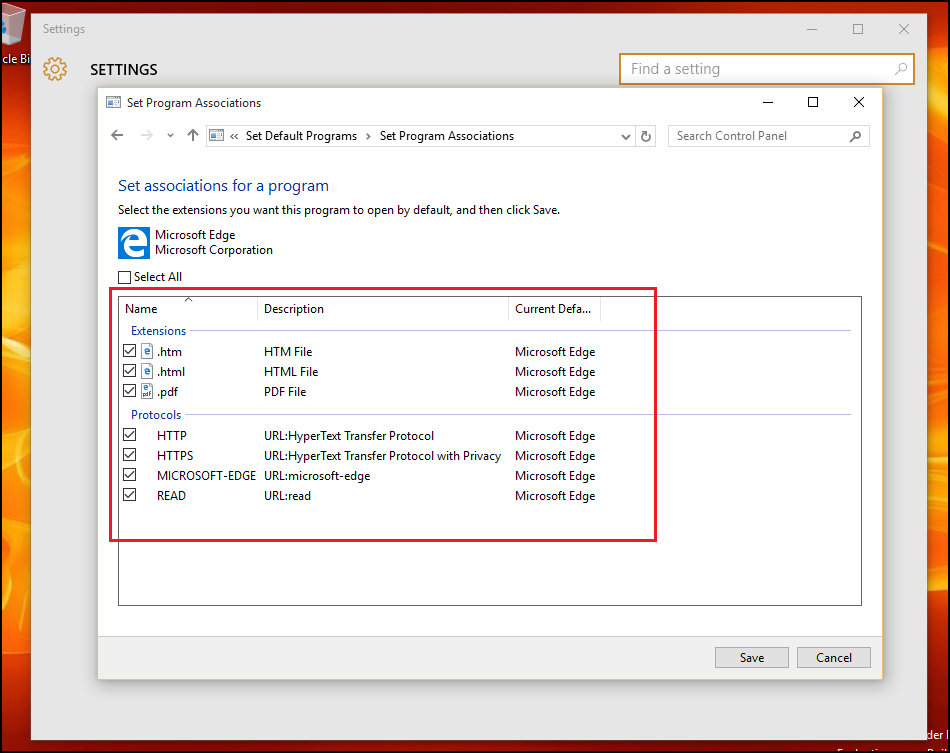
If you want to dig in and get more particular about these commands, you can click the «Choose defaults for this program» option, which will take you to this prompt:
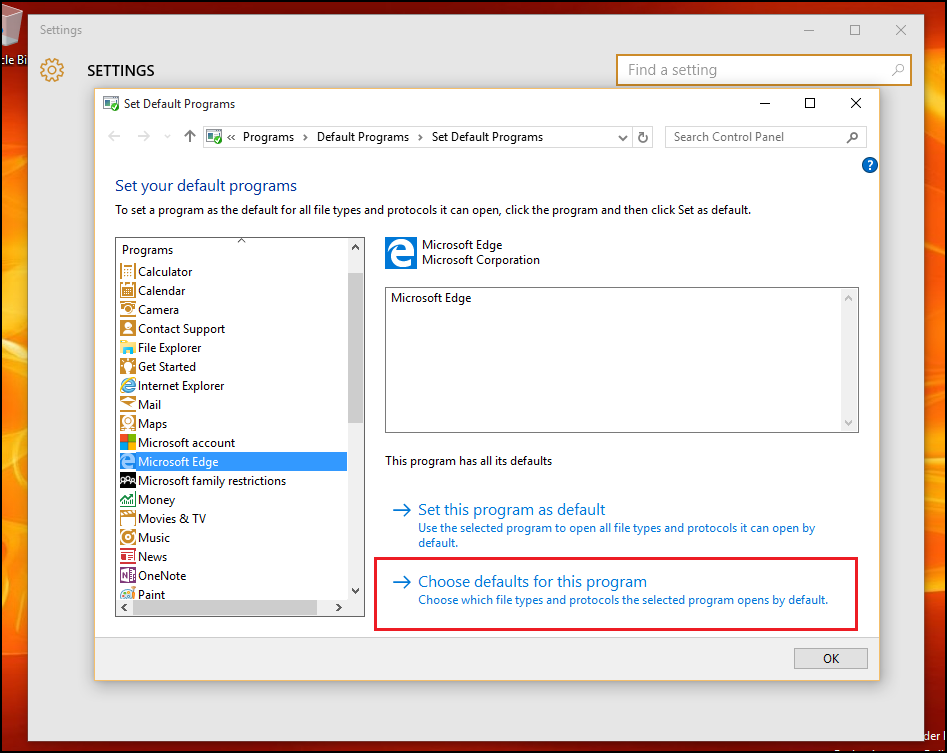
Here you’ll find a list of all the protocols and extensions that the app has been coded to recognize on its own. As an example, you can see below that the Edge browser is already set to look out for any links that contain the HTTP or HTTPS protocol, as well as files ending in .htm or .html. You’re free to pick and choose from these at your own discretion, in case you have multiple web applications that you’d like to spread responsibility around to based on personal preference or daily working requirements.
Reset Default Apps
And as always, if your configurations get a bit too convoluted or you just want to send your account back into the same state as it was when you first booted up, resetting any changes is a quick and painless operation.
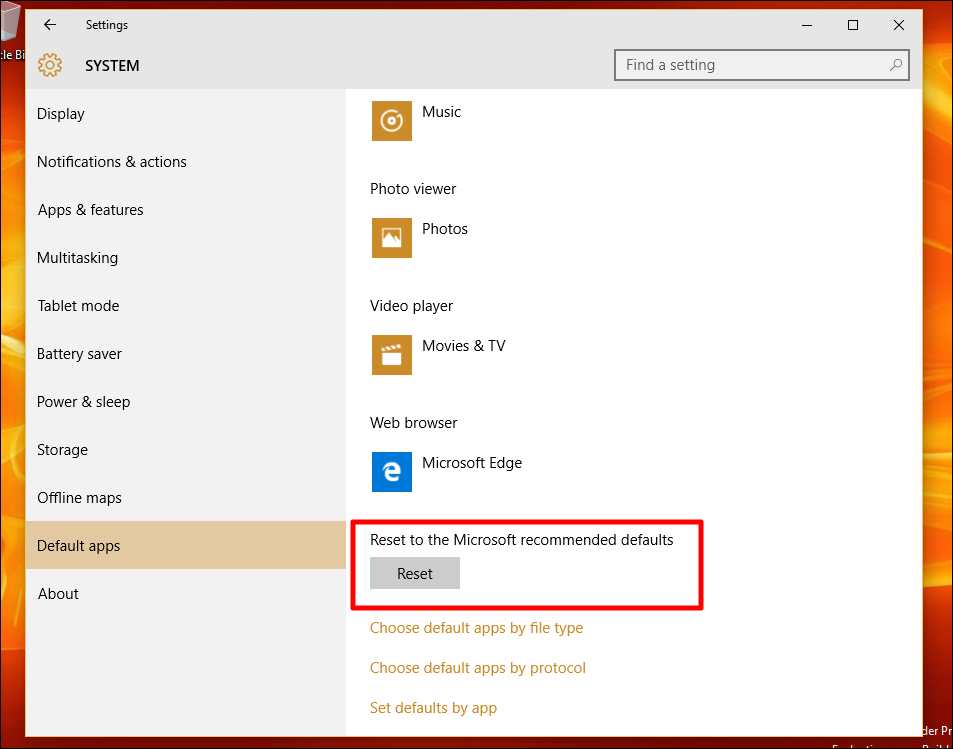
In the main Default Apps window, scroll down to the bottom of the sub-menu, and find the «Reset to Microsoft recommended defaults» option. Click the Reset button, and any alterations you’ve made to the options above will be undone in an instant.
Microsoft has made a lot of changes to the way we manage our applications for the release of Windows 10, but thankfully there isn’t anything too confusing about making sure that your files open flawlessly in the programs you want them to every single time.
Among the plethora of Windows 10 personalization features lies an important customization tool; the Default App Settings. Understanding and managing these settings is key to getting the most enjoyable Windows 10 experience.
This article takes you through the intricacies of default app settings, unraveling their inner workings and providing invaluable tips to optimize them for maximum productivity. Armed with this knowledge, you can take complete command over your Windows 10 experience.
What Are Default App Settings in Windows 10?
Default app settings play a crucial role in defining the behavior of your Windows 10 operating system when handling file types and performing specific actions. They are the default choices for opening files or executing actions unless you specify alternatives.
Imagine you have a collection of memorable photos stored on your computer. You double-click on one of the images, eagerly anticipating its display. Windows 10, equipped with its default app settings, promptly opens the photo using the designated default photo viewing application.
The default app could be the Windows Photos Viewer, a third-party photo app alternative, or any other program you have set as your preferred choice for viewing images. This automated process saves you the hassle of manually selecting an app each time you open a photo, offering convenience and efficiency.
Default app settings go beyond just photos; they extend to various file types and actions. For example, when you launch a web link, Windows 10 relies on the default web browser to handle the action.
Similarly, when you open a music file, the operating system turns to the default Windows Media Player to begin playback. These default settings establish a consistent experience, ensuring that files and actions are associated with the most appropriate applications according to your preferences.
Whether it is a preferred text editor for opening documents, software for handling design files, or an email client for managing your emails, configuring your default app settings allows you to enjoy a smooth Windows experience.
How Default App Settings Work in Windows 10
Windows 10 adopts a hierarchical approach to managing default app settings, giving you the flexibility to apply global defaults for all accounts or tailor them to individual user accounts.
By setting default apps globally, changes are applied system-wide, ensuring consistency across all user accounts. For example, if you prefer a specific web browser for your Windows 10 PC, setting it as the default app globally will ensure that all users on your PC will have the same browser as their default choice when opening web links.
On the other hand, Windows 10 recognizes the need for personalized customization, allowing you to tailor default app settings individually. As such, each user account can have its own unique set of default apps based on personal preferences.
For instance, if one user prefers a particular email client for their PC, they can set it as their default app, while another user on the same device can have a different default email client. This customization allows users to personalize their Windows 10 experience to align with their preferences.
Windows 10 expertly associates file types, protocols, and actions with default apps based on your preferences. When you open a file, Windows 10 consults the default app settings to determine the appropriate application to handle that specific file type.
By aligning actions with default apps, Windows 10 simplifies the process of performing everyday tasks, allowing for quick transitions between applications.
Managing Default App Settings in Windows 10
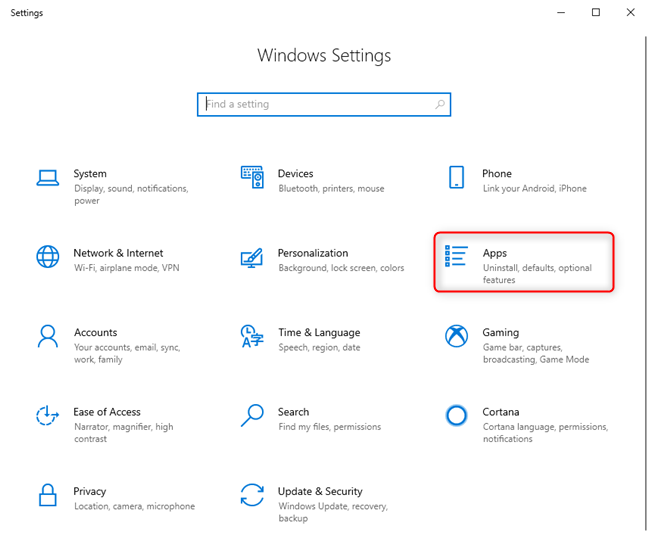
To effectively manage default app settings in Windows 10 and personalize your digital experience, open the Settings app, click on the Apps option, and select the Default apps submenu.
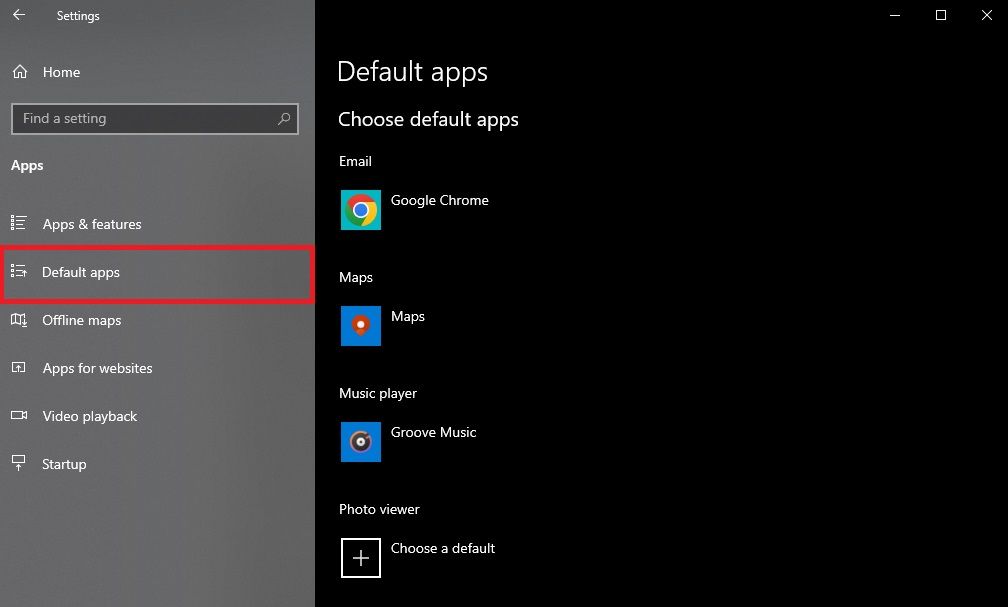
In the Default apps settings, you’ll find various options for web browsing, email, music, photos, links, and file types. To choose the default app for a specific function, simply click on the function you want to customize. For example, if you prefer Google Chrome as your default web browser, select it from the available options.
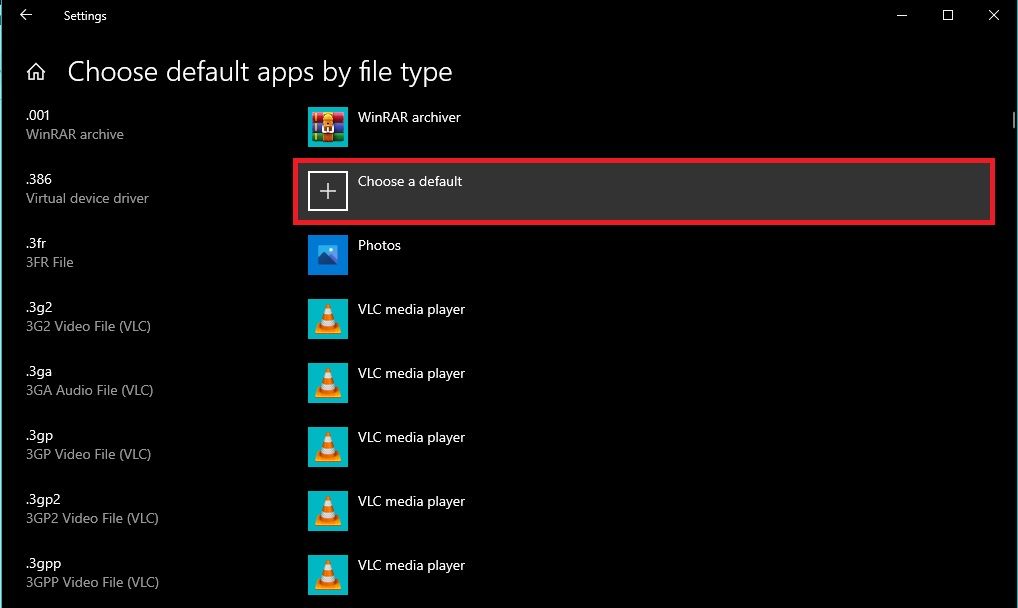
To set default apps for specific file types, scroll down in the Default Apps settings until you reach the Choose default apps by file type section.
Here, you’ll see a comprehensive list of file extensions and their current default apps. To change the default app for a particular file type, click on the app listed under that type or select Choose a default to explore more options.
Windows 10 also allows you to customize default app settings for protocols, autoplay, and background apps. To access these settings, continue scrolling down in the Default Apps settings and select Choose Default Apps by Protocol.

If you ever want to revert to the default app settings that Windows 10 came with, scroll to the bottom of the Default Apps settings page and click the Reset button. This will restore the default app associations for all functions and file types.
Remember to save your changes after customizing default app settings to ensure they take effect.
Tips for Customizing Default App Settings in Windows 10
To further customize your default app settings in Windows 10 and optimize your digital experience, consider these helpful tips.
1. Explore and Experiment
First, take the time to explore the range of default app options available in Windows 10. By experimenting with different apps for various functions, you can discover the ones that best suit your choices.
2. Consider Your Unique Workflow
It’s also important to consider your workflow and the specific types of files and actions you encounter frequently. This will help you choose default apps that align with your work habits and ensure a seamless and efficient experience. For example, selecting a default photo viewer or editor that meets your requirements is essential if you frequently work with image files.
3. Keep the Updates Rolling
Next, keep an eye on app updates. Regularly checking for updates ensures that your apps have the latest features and improvements, enhancing their functionality and compatibility with Windows 10 updates.
4. Utilize Your Options
When setting default apps for specific file types, take advantage of the Choose a default option. This allows you to explore a wider range of apps beyond the pre-defined list. You might discover options that suit your preferences and offer additional features by considering alternative apps.
5. Pay Attention to File Type Associations
When customizing default app settings, it’s crucial to be mindful of file type associations. Ensure your default app is appropriate for the specific file type to avoid compatibility issues or frustrations.
Ultimately, don’t hesitate to experiment and fine-tune your default app choices. Over time, you can adjust your selections based on your evolving requirements and usage patterns, creating the perfect customized.
Following these practical tips, you can maximize the customization options available in Windows 10’s default app settings.
Enhance Your Workflow With Personalized Default App Settings
Customizing default app settings in Windows 10 helps you create a personalized digital environment that aligns with your unique preferences and requirements. By exploring the available options and keeping abreast of updates, you can optimize your default app settings to be perfect for your needs.
However, it’s worth noting that problems can occur with default app configurations. So, it is crucial to remain attentive, proactive, and informed about expert advice and practical solutions for addressing common issues.
How to Manage Default Apps Through Settings in Windows 10 – If you have more than one website or photo editing apps or players or things like this installed on your computer, you would definitely like to put one of them as default for the respective file type. So, to define a Default app, it is the program that is used by Windows all by itself to open a specific file type. The file types can be a video, image, web page, song, and many such things. There is a certain set of programs that Windows uses as default to open the specific type of files. To showcase an example, we will take movies. The Videos app will open up when you choose to open a movie. But if you are not sure to use this app as the default one, you have the option to set another app as a default to open movies.
As we have witnessed the new launch of Windows 10, we are slowly exploring its features. If you are a regular reader of our posts, you must have learned that the PC Settings has been totally changed and it has been named just as Settings. So, with the above touch of introduction, you must have understood that our topic of today’s post is related to Manage Default Apps Through Settings in Windows 10. Here, we will showcase you the steps applying which you can set your needed apps to its related file type. Also, we will tell you how to change the already set default app to another one. Without making much confusion here, let us dive into the main section to Manage Default Apps.
How to Manage Default Apps Through Settings in Windows 10
1. Access Default Apps through Settings
If you were a user of Windows 8 or 8.1, you must have noticed that Default Programs can be accessed from PC Settings and by Control Panel also. But as we are witnessing that PC Settings has been changed to Settings, we will tell you how to access the Default Apps from Settings.
1st Step
Make a click on the Start Menu and choose to open the Settings.
2nd Step
A new Settings window will appear on your display screen. Open the Apps category.
3rd Step
Now, under the Apps section, you will find Default apps. Click on the Default apps and you will see its details on the right pane of the window.
This is how it looks when you make a click on Default apps.
2. Set An App as Default in Windows 10
In the above section, you have learned how to find the Default Apps in Settings. Now we will share with you the steps which will showcase how to set a program as a default for a specific file type. Being on the Default Apps section, you will see a few apps are already listed as a default for certain file types. And some are left empty as there has been no app set for that particular file type.
1st Step
See the below screenshot where you will find there is no default app set for the Video player or Photo viewer. To set an app as a default for the Video player, click on the + (plus) button which is just below the video player.
2nd Step
Now, you will see the list related apps that will be compatible with the video player. Among the shown options, choose the one that you wish to set as a default.
That’s it! You have easily set your required app as a default for the Video player.
3. Change a Default Apps of a File Type
With Respect to Manage Default Apps Through Settings in Windows 10 now, in this section we will portray you the process which will help you in changing the default program. We will explain this by the below illustration.
1st Step
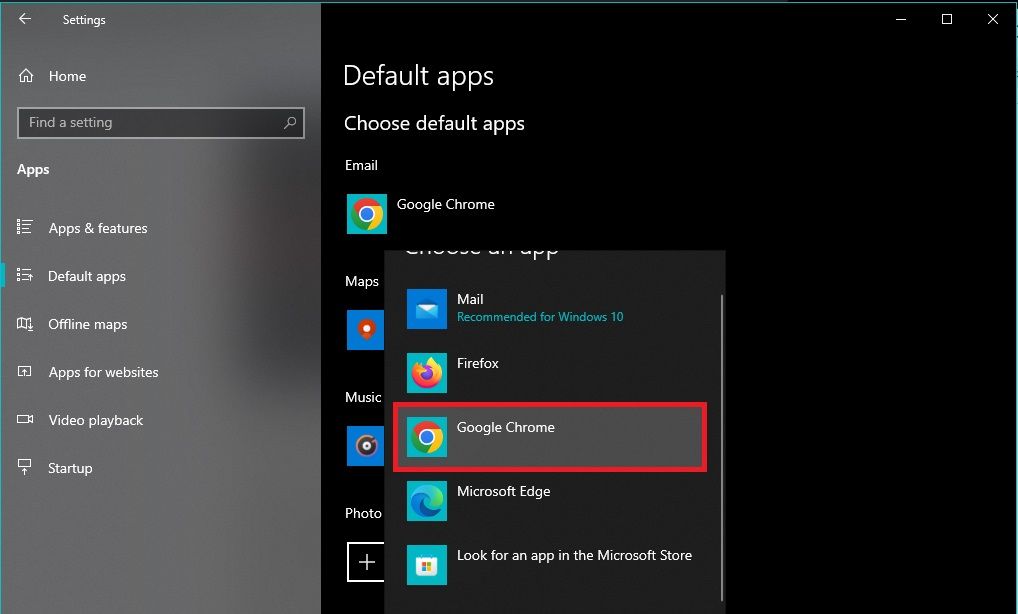
See the below screenshot carefully. The default web browser on this Windows 10 system is Google Chrome. So, we will click on Google Chrome. A list of installed web browsers will arrive. Choose the one that you wished to set as default.
After doing the above step, you will see the default web browser is changed.
4. Choose Default Apps by File Type or Protocol
You can easily set default apps based on their file type or protocol in Windows 10. To make it simpler, for all the .jpg picture files you can choose a single app to open them and access .bmp files using another app.
Note: The default app that you will choose will be applicable to that particular account only. It will not affect other accounts.
1st Step
Get into the Default Apps from the System category of the Settings. Scroll down and you will find two options: Choose default apps by file type and Choose default apps by protocol.
2nd Step
Select the appropriate option.
3rd Step
To change the current default app, click on it and from the list choose the required one. And if there is no default app, click on Choose a default and select the new app and set it as default.
Note: You can’t leave the default app blank when you change the default app for a protocol or file type. You have to choose a new app and set it as default.
In Closing
You have learned to Manage Default Apps Through Settings in Windows 10 furthermore Set, Change pursuant to File Type, designate them by File Type or Protocol. The default apps of System category really provide you enough of provisions to change the default apps. You can see all the default apps at a single place and do the modifications easily. If you are unable to find a suitable app, you can try to access it from the Windows Store. But do remember one thing that whatever change you make that will be affected that account only. The changes will not take place on the other accounts of the computer. Keep in touch with our web page to see more articles on Windows 10. Till then, enjoy changing the default apps or set new default apps.
Do you want to know how to change the default apps used by Windows 10 for activities like viewing pictures, or watching movies? Do you want to set a new app as the default for a particular file type, like images with the PNG file extension? Do you need a new default app to be used for a specific protocol? Then, you are in luck, as we can show you how to change the default apps in Windows 10, for anything that you wish. The guide is long and comprehensive, so let’s get started:
Where to find the default apps settings in Windows 10
To change the default apps that are used in Windows 10, you need to open Settings. Then, go to Apps.
In the column on the left, click or tap «Default apps.»

How to set the default apps for email, maps, music player, photo viewer, video player, and web browser
To change the default app for any of these types of activities, click on the existing default app. Then, in the list that is shown, click or tap the app that you want to set as the default.
The app that you chose immediately becomes the new default, for that type of activity.
How to reset the default apps from Windows 10
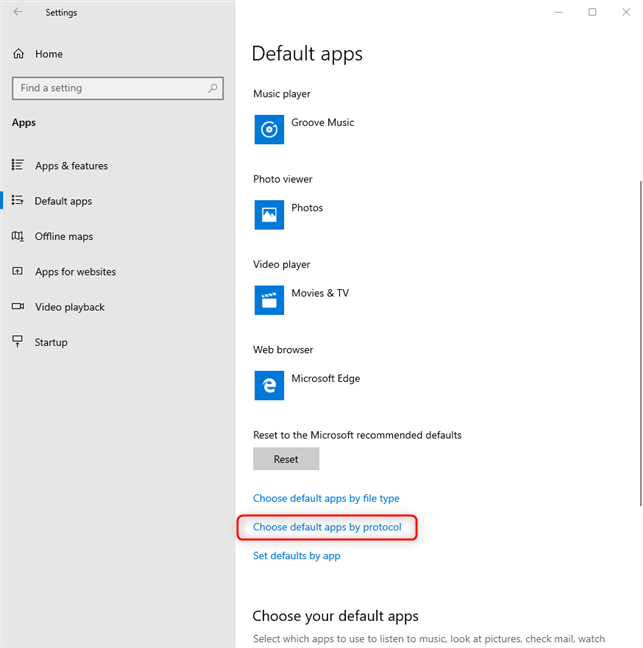
If you have changed your mind, and you do not want to use one or more apps as the default(s) for certain activities, you can reset Windows 10. When you do that, it uses only the Microsoft recommended defaults: Mail, Maps, Groove Music, Photos, Movies & TV, and Microsoft Edge. To do that, go to «Settings -> Apps -> Default apps.» Then, scroll down the list of default apps, until you find the Reset button.
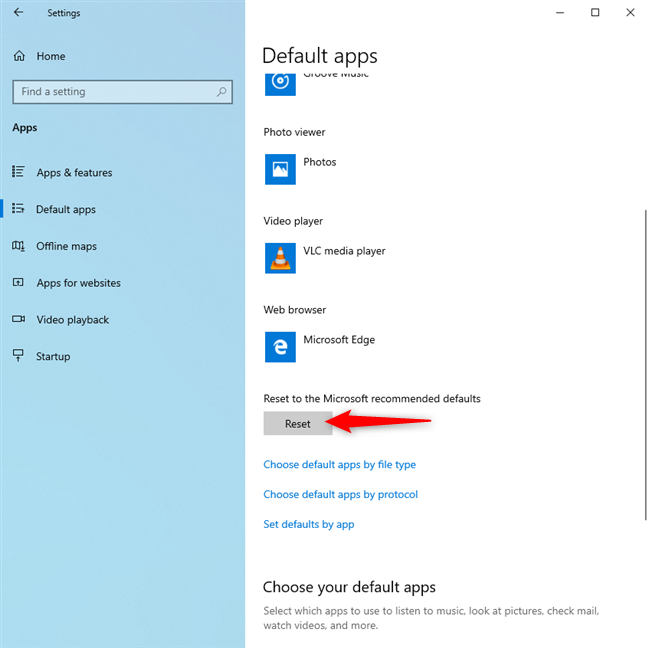
Click or tap Reset, and your Windows 10 default apps are immediately reset to the ones mentioned earlier.
How to set the Windows 10 default apps by file type (extension)
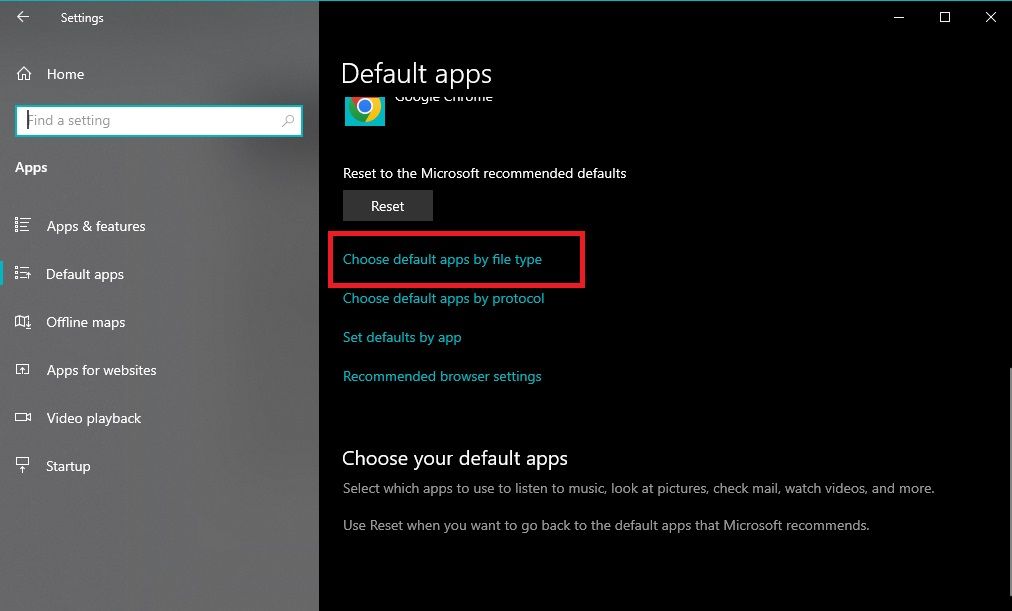
In the Default apps settings, scroll down until you see the link that says: «Choose default apps by file type,» and click or tap on it.
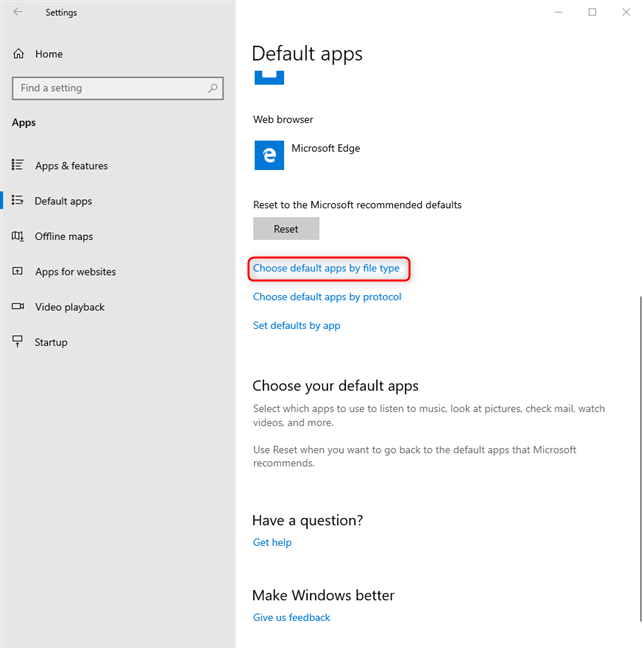
This opens a long list with all the file extensions that are registered in Windows 10. For each, you see the default app that has been set. If a default is not set, you see a + sign, followed by «Choose a default.»
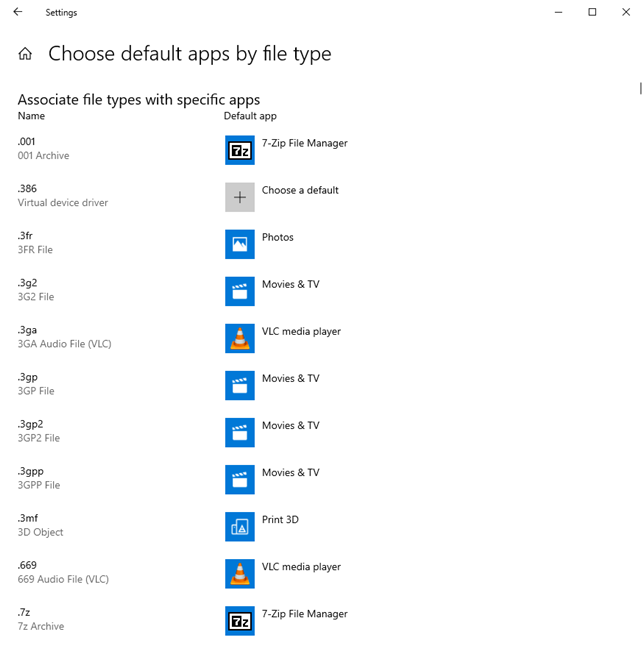
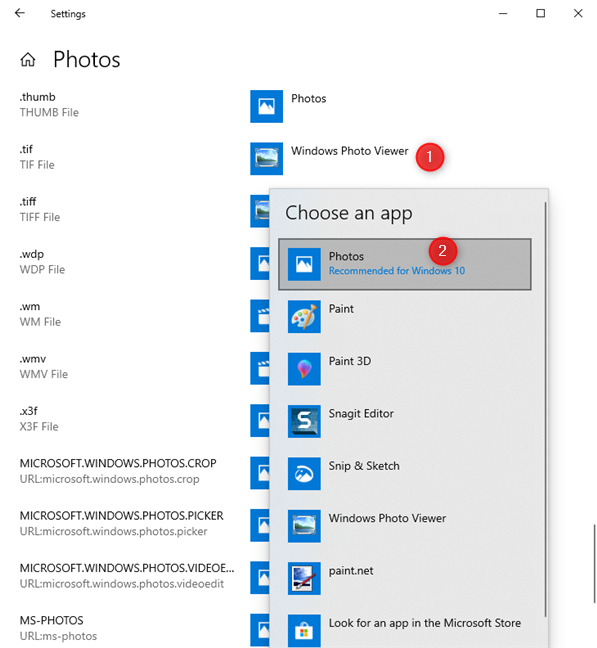
Scroll down the list of file extensions until you find the one that you are looking for. It helps to know that this list is ordered alphabetically. When you find the file type that you want to configure, click on the name of its default app (or on Choose a default). A list of apps is shown, that can open the selected file type. In that list, click or tap the app that you want to set as the default.
The setting is applied immediately by Windows 10. Repeat this procedure for all the file types that you want to configure.
How to set the Windows 10 default apps by protocol
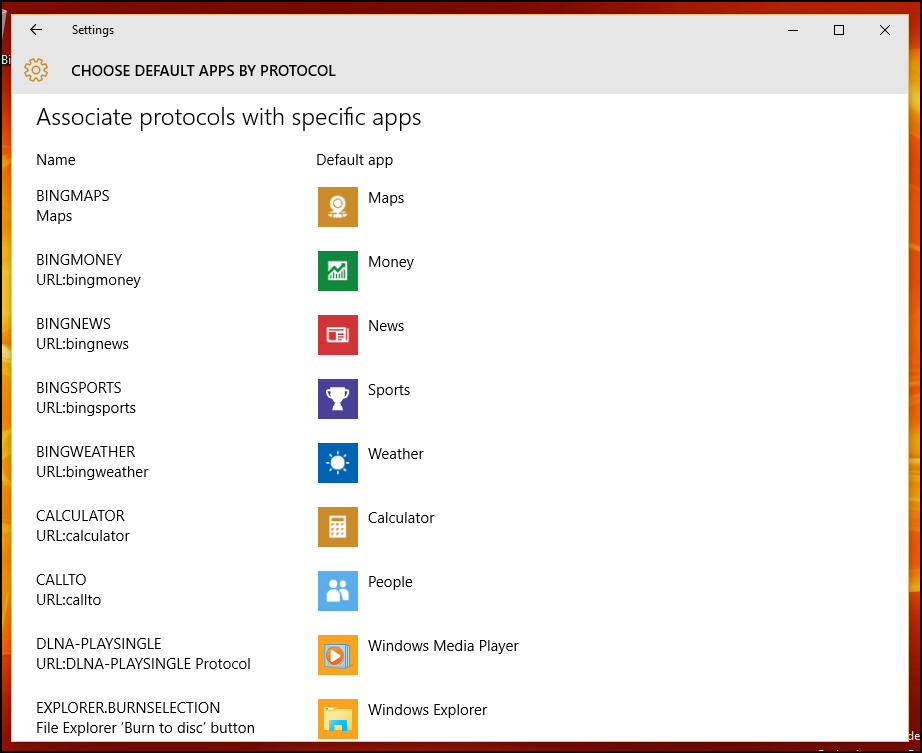
Windows 10 apps can work not only with specific file types but also with particular protocols. For example, Skype uses a few protocols for text, audio and video chat, Spotify users proprietary protocols to open playlists created by its users, and so on. If you have more than one Windows 10 app that can work with a protocol, and you want to change the default for that protocol, go to the default apps settings, as shown earlier. There, scroll down the list of settings, and click or tap the link that says: «Choose default apps by protocol.»
You are shown a list of all the protocols that are registered in Windows 10 and their default apps. Find the protocol that you are interested in and click on its default app. A list of apps is shown, that can work with that protocol. In that list, click or tap on the app that you want to use as the default.
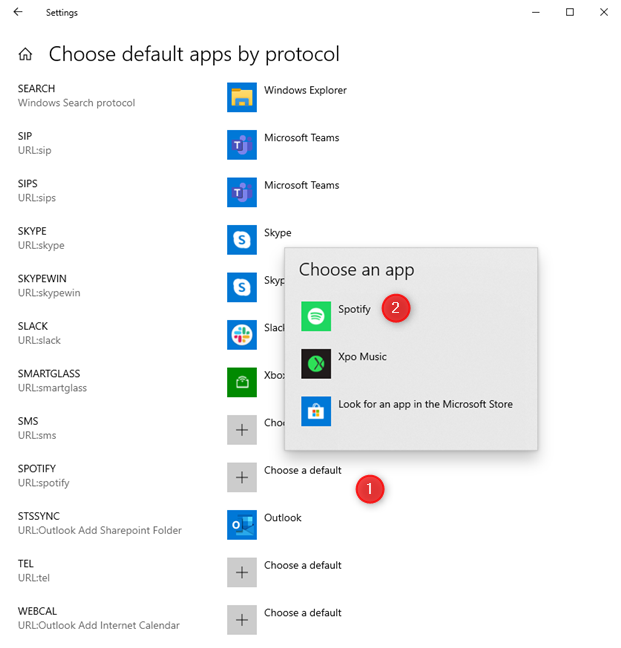
The default app is changed immediately for that protocol.
IMPORTANT: If you cannot choose an app as the default for a specific file type or protocol, it means that the app is not installed correctly in Windows 10, or it cannot work with that file type/protocol.
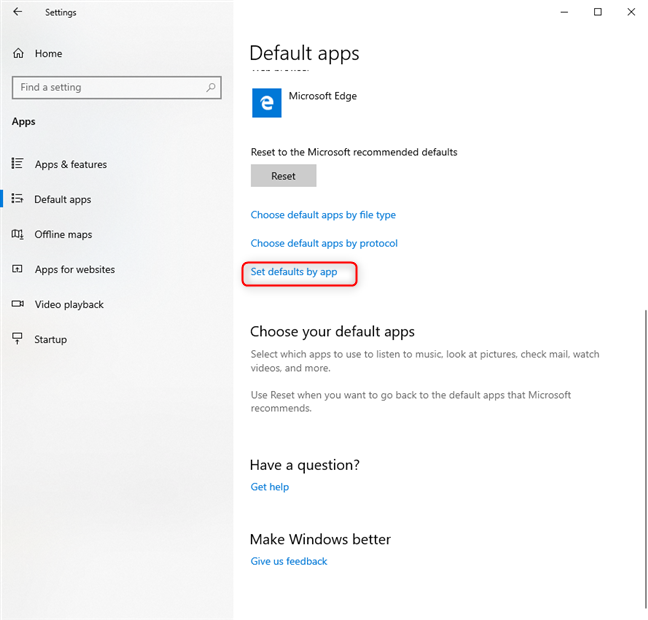
How to set the defaults by app, in Windows 10
Windows 10 apps can work with a specific list of file types, based on what they do, and on how their developer has programmed them. On your Windows 10 PC, you can have more apps working with the same file types. For example, in Windows 10, you can open JPG images with the following apps: Photos, Paint, Snip & Sketch, Paint 3D, and others. One useful trick is to manage each app individually, and set each app’s default file types. To do that, go to the default apps settings. There, scroll down the list of settings, and click or tap the link that says: «Set defaults by app.»
Now you see a list with the apps that are installed in Windows 10. Find the app for which you want to change the default settings, click or tap on its name, and then on Manage.
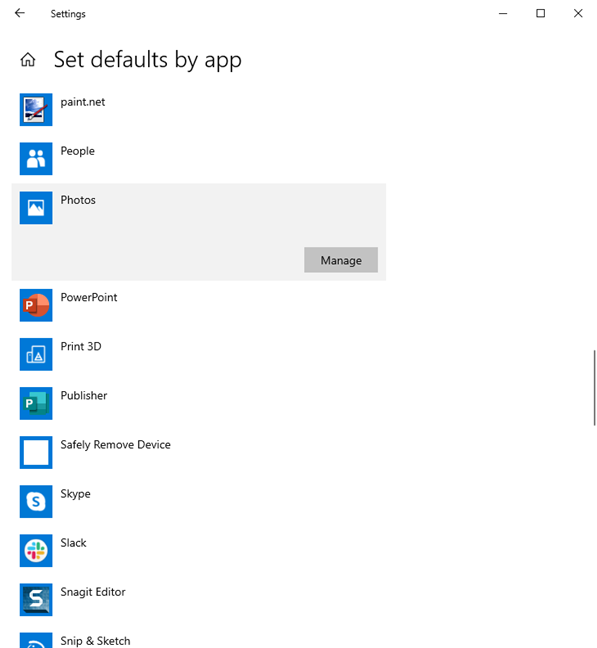
You see a list of file extensions and protocols that the app can work with. For each, you see the default app that is used by Windows 10. To change the default for a file type or protocol, click or tap on the default app set for it (or on Choose a default). A list is shown with the apps that can open that file type or protocol. In it, click or tap the app that you want to use as the new default.
Your changes are applied immediately. Repeat the process for all the apps, file types, and protocols for which you want to change the default, and then close the Settings app.
Which default apps have you set, in Windows 10?
Before closing this tutorial, tell us how it was useful to you: did you use it to change the default web browser or media player? Or did you change the default app for viewing pictures? Comment below and share your story.