
В Windows 10 и Windows Server 2019 появился встроенный SSH клиент, который вы можете использовать для подключения к *Nix серверам, ESXi хостам и другим устройствам по защищенному протоколу, вместо Putty, MTPuTTY или других сторонних SSH клиентов. Встроенный SSH клиент Windows основан на порте OpenSSH и предустановлен в ОС, начиная с Windows 10 1809.
Содержание:
- Установка клиента OpenSSH в Windows 10
- Как использовать SSH клиенте в Windows 10?
- SCP: копирование файлов из/в Windows через SSH
Установка клиента OpenSSH в Windows 10
Клиент OpenSSH входит в состав Features on Demand Windows 10 (как и RSAT). Клиент SSH установлен по умолчанию в Windows Server 2019 и Windows 10 1809 и более новых билдах.
Проверьте, что SSH клиент установлен:
Get-WindowsCapability -Online | ? Name -like 'OpenSSH.Client*'

В нашем примере клиент OpenSSH установлен (статус: State: Installed).
Если SSH клиент отсутствует (State: Not Present), его можно установить:
- С помощью команды PowerShell:
Add-WindowsCapability -Online -Name OpenSSH.Client* - С помощью DISM:
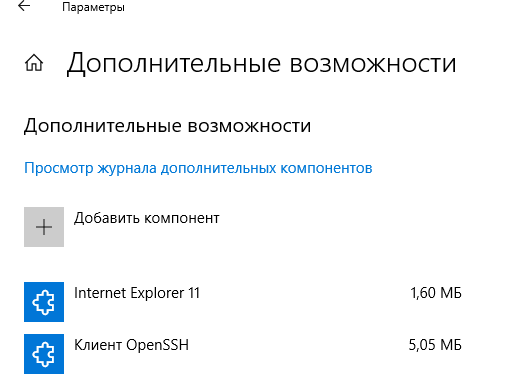
dism /Online /Add-Capability /CapabilityName:OpenSSH.Client~~~~0.0.1.0 - Через Параметры -> Приложения -> Дополнительные возможности -> Добавить компонент. Найдите в списке Клиент OpenSSH и нажмите кнопку Установить.
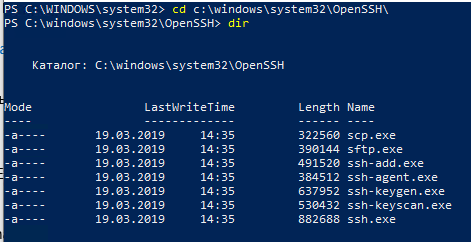
]Бинарные файлы OpenSSH находятся в каталоге c:\windows\system32\OpenSSH\.
- ssh.exe – это исполняемый файл клиента SSH;
- scp.exe – утилита для копирования файлов в SSH сессии;
- ssh-keygen.exe – утилита для генерации ключей аутентификации;
- ssh-agent.exe – используется для управления ключами;
- ssh-add.exe – добавление ключа в базу ssh-агента.
Вы можете установить OpenSSH и в предыдущих версиях Windows – просто скачайте и установите Win32-OpenSSH с GitHub (есть пример в статье “Настройка SSH FTP в Windows”).
Как использовать SSH клиенте в Windows 10?
Чтобы запустить SSH клиент, запустите командную строку
PowerShell
или
cmd.exe
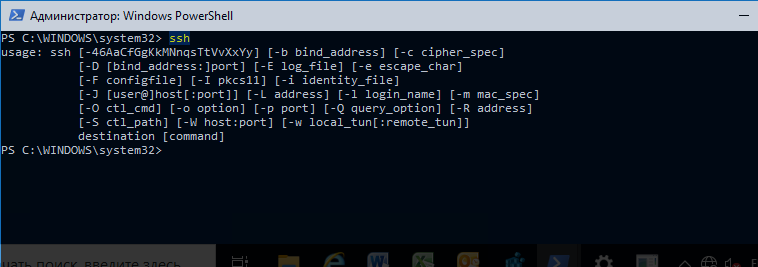
. Выведите доступные параметры и синтаксис утилиты ssh.exe, набрав команду:
ssh
usage: ssh [-46AaCfGgKkMNnqsTtVvXxYy] [-b bind_address] [-c cipher_spec]
[-D [bind_address:]port] [-E log_file] [-e escape_char]
[-F configfile] [-I pkcs11] [-i identity_file]
[-J [user@]host[:port]] [-L address] [-l login_name] [-m mac_spec]
[-O ctl_cmd] [-o option] [-p port] [-Q query_option] [-R address]
[-S ctl_path] [-W host:port] [-w local_tun[:remote_tun]]
destination [command]
Для подключения к удаленному серверу по SSH используется команда:
ssh username@host
Если SSH сервер запущен на нестандартном порту, отличном от TCP/22, можно указать номер порта:
ssh username@host -p port
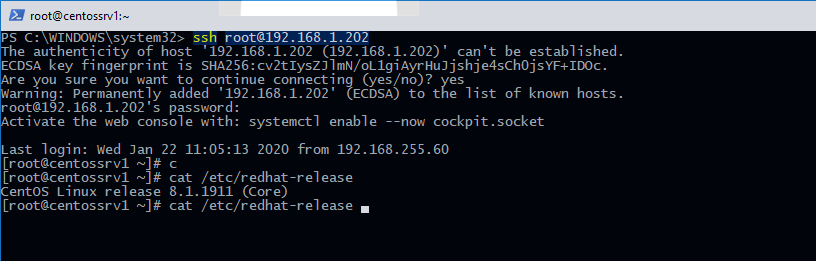
Например, чтобы подключиться к Linux хосту с IP адресом 192.168.1.202 под root, выполните:
ssh [email protected]
При первом подключении появится запрос на добавление ключа хоста в доверенные, наберите yes -> Enter (при этом отпечаток ключа хоста добавляется в файл C:\Users\username\.ssh\known_hosts).
Затем появится запрос пароля указанной учетной записи, укажите пароль root, после чего должна открытся консоль удаленного Linux сервера (в моем примере на удаленном сервере установлен CentOS 8).
С помощью SSH вы можете подключаться не только к *Nix подобным ОС, но и к Windows. В одной из предыдущих статей мы показали, как настроить OpenSSH сервер на Windows 10 и подключиться к нему с другого компьютера Windows с помощью SSH клиента.
Если вы используете SSH аутентификацию по RSA ключам (см. пример с настройкой SSH аутентификации по ключам в Windows), вы можете указать путь к файлу с закрытым ключом в клиенте SSH так:
ssh [email protected] -i "C:\Users\username\.ssh\id_rsa"
Также вы можете добавить ваш закрытый ключ в SSH-Agent. Сначала нужно включить службу ssh-agent и настроить ее автозапуск:
set-service ssh-agent StartupType ‘Automatic’
Start-Service ssh-agent
Добавим ваш закрытый ключ в базу ssh-agent:
ssh-add "C:\Users\username\.ssh\id_rsa"
Теперь вы можете подключиться к серверу по SSH без указания пути к RSA ключу, он будет использоваться автоматически. Пароль для подключения не запрашивается (если только вы не защитили ваш RSA ключ отдельным паролем):
ssh [email protected]
Еще несколько полезных аргументов SSH:
-
-C
– сжимать трафик между клиентом и сервером (полезно на медленных и нестабильных подключениях); -
-v
– вывод подробной информации обо всех действия клиента ssh; -
-R
/
-L
– можно использовать для проброса портов через SSH туннель.
SCP: копирование файлов из/в Windows через SSH
С помощью утилиты scp.exe, которая входит в состав пакета клиента SSH, вы можете скопировать файл с вашего компьютера на SSH сервер:
scp.exe "E:\ISO\CentOS-8.1.1911-x86_64.iso" [email protected]:/home

Можно рекурсивно скопировать все содержимое каталога:
scp -r E:\ISO\ [email protected]:/home
И наоборот, вы можете скопировать файл с удаленного сервера на ваш компьютер:
scp.exe [email protected]:/home/CentOS-8.1.1911-x86_64.iso e:\tmp
Если вы настроите аутентификацию по RSA ключам, то при копировании файлов не будет появляться запрос на ввод пароля для подключения к SSH серверу. Это удобно, когда вам нужно настроить автоматическое копирование файлов по расписанию.
Итак, теперь вы можете прямо из Windows 10 подключаться к SSH серверам, копировать файлы с помощью scp без установки сторонних приложений и утилит.
- OpenSSH for Windows allows you to securely access remote computers with Windows-native tools using the command line interface.
- To install OpenSSH Client and Server on Windows, go to Settings > System > Optional features > View features, search for “OpenSSH“, and continue to install the components.
Windows users normally use the Remote Desktop Protocol to access other Windows devices remotely. As RDP offers a remote graphical user interface (GUI), it is a convenient method for remote access. However, it offers limited functionality, especially if you are a sysadmin. For that purpose, some people prefer to use the Secure Socket Shell (SSH) protocol.
SSH provides a command-line interface to remote computers and servers, and therefore, a more granular control over them. Previously, we used third-party apps like “PuTTY” and “MobaXterm” to develop an SSH connection with the remote devices. However, Microsoft has made a Windows-native SSH client available which can be used instead.
OpenSSH for Windows is a Feature on Demand (FoD) add-on for the Windows operating system. This means that although it is free, it is not installed by default, and needs to be installed manually. If you install it, you can use the SSH protocol through the native command line to access and control the remote computers, provided that your user account has the required privileges.
This guide will show you how to install and use OpenSSH for Windows. These will work on both Windows 11 and Windows 10 (version 1809 and above). Using this guide, you can install both OpenSSH Client and OpenSSH Server in a few easy steps.
Table of Contents
What is OpenSSH
The Secure Socket Shell, or Secure Shell is a networking protocol that allows a remote connection with another device securely. SSH uses a client-server model to communicate with remote computers and ensures data integrity through encryption. It uses multiple layers of the OSI reference model to make sure that the communicated data between the devices is secure.
Originally, OpenSSH was a tool used for remote connection with other devices which comes preinstalled in Linux-based operating systems. Since it is an open-source utility, it has been modified for other platforms, including Windows.
Microsoft has now made “OpenSSH for Windows” available that you can install with a small update package.
Before installing OpenSSH, your system needs to meet a few requirements.
Requirements for OpenSSH for Windows
Before proceeding to install either OpenSSH Client or Server, you must make sure that your PC satisfies the prerequisites, which are:
- OS should be Windows 10 version 1809 or later.
- The PowerShell version should be 5.1 or above
- The user account must be a member of the Administrators group.
To check the OS version, run the following command in the Run Command box:
WinVerTo check the PowerShell version, run the following command in PowerShell:
$PSVersionTable.PSVersionTo check if your user is a member of the Administrators group, run the following command in PowerShell. If it returns “True“, it means that you are a member of the Administrator group.
(New-Object Security.Principal.WindowsPrincipal([Security.Principal.WindowsIdentity]::GetCurrent())).IsInRole([Security.Principal.WindowsBuiltInRole]::Administrator)Once you have made sure that your PC satisfies these requirements, you may continue to install OpenSSH Client, OpenSSH Server, or both.
Install OpenSSH on Windows
Implement the following steps to install OpenSSH on your Windows computer to access it remotely. Optionally, you can also install “OpenSSH Server” to access this device from another PC using the SSH protocol.
-
Press the Windows key + i to open the Settings app.
-
Click System.
-
Go to “Optional Features“.

Open the optional features settings page -
Click “View features“.
View optional features -
Search for “OpenSSH“.
-
Select “OpenSSH Client” and optionally, “OpenSSH Server“, and then click Next.
Select OpenSSH Client and Server -
Click Install.
Install OpenSSH Client and Server on Windows


After performing these steps, OpenSSH Client (and Server) will be installed on your computer.
Note: These features can take some time to install.
Alternative to the steps above, you can also run the following command in an elevated PowerShell instance to install OpenSSH for Windows:
Get-WindowsCapability -Online | Where-Object Name -like 'OpenSSH*'This command will install both OpenSSH Client and OpenSSH Server.
Using OpenSSH Client for Windows
Once OpenSSH Client for Windows has been installed, you can begin using it to connect with remote PCs on the network. Of course, OpenSSH has to be configured on the remote PC first, the method for which has been given below in this post.
First, confirm that it has been installed successfully by running the following command in Command Prompt:
ssh
Once confirmed, you can access a remote PC on the network which has SSH configured using this command:
ssh [Username]@[ServerName]
Note: You may be asked for user credentials if connecting for the first time.
Note that the command above will try to connect to the remote device using the default port, which is 22. If you want to use a different port, then you will need to use this command instead:
ssh [Username]@[ServerName] -p [PortNumber]
Configuring OpenSSH Server for Windows
If you have installed the OpenSSH Server on your Windows PC, you will need to configure it before you can connect to this PC using the SSH protocol.
Configuring the OpenSSH server can be a bit thicker. You need to make sure that it is allowed through the firewall and the proper ports. Therefore, it involves a few steps. Here is what you need to do:
-
First, run the following command in an elevated PowerShell to run the “sshd” service automatically.
Set-Service -Name sshd -StartupType 'Automatic' -
Now start the service with this command:
Start-Service sshd -
Now use the following command to ensure that the SSH server is running and waiting for the connections on port 22:
netstat -na| find ":22" -
Now ensure that the Windows Defender Firewall allows inbound connections to Windows through the TCP port 22 with this command:
Get-NetFirewallRule -Name *OpenSSH-Server* |select Name, DisplayName, Description, Enabled
Confirm rules for SSH server connection -
[Conditional] If you find that the rule is missing or disabled, run the following command to create a new inbound rule:
New-NetFirewallRule -Name sshd -DisplayName 'OpenSSH Server (sshd)' -Enabled True -Direction Inbound -Protocol TCP -Action Allow -LocalPort 22 -
To change the default rules for the SSH connection, run the following command in PowerShell which will open the respective OpenSSH file in Notepad:
start-process notepad C:\Programdata\ssh\sshd_config -
Make the necessary changes in the file to manage the permissions, and then save the file using the CTRL + S shortcut keys.
Here are a few examples of the rules:
- Deny domain user:
DenyUsers itt\administrator@192.168.10.10 - Allow a domain group:
AllowGroups itt\sshadmins - Allow local groups:
AllowGroups Administrators

Manage SSH permissions - Deny domain user:
-
After making the changes, run the following command in PowerShell:
restart-service sshd


After performing the steps above, you should be able to connect to this PC using the SSH protocol. For that purpose, use the command ssh [Username]@[ServerName] as discussed above.
Conclusion
With SSH, you do not need to perform a long string of operations to perform a simple task. Instead, you can access it with Windows-native OpenSSH and continue to manage the remote PC using commands. This makes OpenSSH for Windows an excellent utility for network and system administrators.
How to Download, Install, and Configure OpenSSH for Windows
Download
To get started with OpenSSH for Windows, select the appropriate file from the list on the right. Choose the version that matches your system’s architecture:
- ARM: For ARM-based Windows devices
- ARM64: For 64-bit ARM architecture
- Win32: For 32-bit Windows systems
- Win64: For 64-bit Windows systems
Download the corresponding installer (.msi) or zip file for your platform. Symbol files are also available for debugging purposes if needed.
Install
For MSI Installers:
- Run the downloaded .msi file.
- Follow the on-screen instructions in the installation wizard.
- The default installation location is usually
C:\Program Files\OpenSSH, but you can choose a different path if desired. - After installation, OpenSSH server and client tools will be available on your system.
For Zip Files:
- Download the zip file for your platform.
- Extract the contents to your preferred location, such as
C:\OpenSSH. - Add the OpenSSH binaries to your system’s PATH environment variable to make the command-line tools accessible.
Configure
Server Configuration:
- Go to the OpenSSH installation directory.
- Locate the
sshd_configfile. This file allows you to customize settings such as:- Permitted users
- Authentication methods (password or key-based)
- Port and address configurations
- Edit the configuration file with a text editor to meet your security requirements.
- Save the changes and restart the OpenSSH server service.
Client Configuration:
OpenSSH client tools, including ssh and scp, are included. Use these tools to securely connect to remote systems. For example, use the ssh command to connect to a remote server.
Verify Installation
After installation, verify that OpenSSH is properly installed by checking the version information through the command line.
In the realm of modern computing, secure connections are paramount, especially for developers, system administrators, and anyone working with remote servers. OpenSSH (Open Secure Shell) is a robust suite of tools that provides encrypted communication over an unsecured network. Windows 11, like its predecessor Windows 10, includes an OpenSSH Client, making it easier than ever to connect to remote systems securely. In this comprehensive guide, we will walk through the step-by-step process of installing and configuring OpenSSH Client on Windows 11.
Understanding OpenSSH and its Importance
OpenSSH is a set of tools that allows you to securely connect to servers and machines over a network. It uses cryptographic techniques to protect the communication between your computer and the server, ensuring that sensitive data such as passwords, commands, and files are kept secure from eavesdropping or tampering. The most common tools included in the OpenSSH suite are:
- SSH (Secure Shell): Used for secure remote login to computers.
- SCP (Secure Copy Protocol): Used for securely transferring files between computers.
- SFTP (SSH File Transfer Protocol): Provides a secure way of transferring files and managing file systems over SSH.
Prerequisites for Installation
Before proceeding with the installation of OpenSSH Client on your Windows 11 system, you should ensure that:
- Windows 11 is Installed: Check for any pending updates to ensure you are running the latest version of Windows 11.
- Administrator Privileges: Ensure you have administrator access to your machine, as the installation process may require elevated permissions.
- Internet Access: A stable internet connection is necessary if you are downloading packages or updates.
Checking If OpenSSH Client is Already Installed
Before diving into the installation process, it’s wise to check if OpenSSH Client is already installed on your system. Windows 11 includes OpenSSH Client by default, but it may not be enabled.
Steps to Check OpenSSH Installation:
- Open Windows Terminal: You can do this by searching for «Terminal» in the Start menu.
- Run the SSH Command: Type the following command and hit Enter:
ssh - Interpret the Output:
- If OpenSSH Client is installed, you will see a list of options and instructions for using the
sshcommand. - If you receive an error like “command not found,” it indicates that OpenSSH Client is either not installed or not enabled.
- If OpenSSH Client is installed, you will see a list of options and instructions for using the
Installing OpenSSH Client on Windows 11
If you found that OpenSSH Client is not installed, follow the steps below to install it.
Method 1: Using Windows Settings to Install OpenSSH Client
-
Open Settings: Click on the Start button and select Settings, or use the keyboard shortcut
Windows + I. -
Navigate to Apps: In the Settings window, click on Apps in the left sidebar.
-
Optional Features: Click on Optional features. Here, you’ll find a list of installed features as well as options to add new ones.
-
Add Feature: At the top of the Optional features menu, click on the Add an optional feature button.
-
Search for OpenSSH: In the search bar, type «OpenSSH Client». This should display the OpenSSH Client in the search results.
-
Install OpenSSH Client: Check the box next to OpenSSH Client and then click the Install button. Wait for the installation to complete.
-
Verify Installation: Once installed, you can verify its presence by opening the Windows Terminal and typing
sshagain. If installed correctly, it will show the SSH options.
Method 2: Using PowerShell to Install OpenSSH Client
If you prefer using the command line, PowerShell can be a more efficient way to install OpenSSH Client.
-
Open PowerShell: Right-click on the Start button and select Windows Terminal (Admin) or search for «PowerShell» and run it as an administrator.
-
Check for OpenSSH Client: Before installing, it’s good practice to check if the feature is available:
Get-WindowsCapability -Online | Where-Object { $_.Name -like 'OpenSSH*' } -
Install the Client: If the OpenSSH Client is listed and its state is Not Present, run the following command:
Add-WindowsCapability -Online -Name OpenSSH.Client -
Confirmation Message: After running the command, you will receive a confirmation message once the installation successfully completes.
-
Verification: Just as before, type
sshin the terminal to confirm that the installation was successful.
Using OpenSSH Client
After successfully installing OpenSSH Client, it’s time to get acquainted with its functionalities. Below are some common commands you will frequently use:
1. Connecting to a Remote Server
To connect to a remote server, use the following command, replacing «username» with your actual username and «hostname» with the server address:
ssh username@hostnameExample:
ssh [email protected]2. Using a Specific Port
If your SSH server is running on a non-standard port (other than 22), you can specify it using the -p option:
ssh -p PORT_NUMBER username@hostnameExample:
ssh -p 2222 [email protected]3. Secure Copy (SCP)
To copy files from your local machine to a remote server, use the scp command:
scp /path/to/local/file username@hostname:/path/to/remote/directoryExample:
scp C:UsersYourNameDocumentsfile.txt [email protected]:/home/user/To copy a file from a remote server to your local machine:
scp username@hostname:/path/to/remote/file /path/to/local/directory4. SFTP for Secure File Transfer
For more advanced file management, SFTP provides a better user experience. To start an SFTP session, use the command:
sftp username@hostnameThis will bring up an interface similar to FTP. You can use commands such as put, get, ls, and cd to navigate and transfer files.
5. Generating SSH Keys
For enhanced security, you may want to use SSH keys instead of passwords. To generate SSH keys, use the following command:
ssh-keygenFollow the prompts to choose a file location (defaults to C:UsersYourName.sshid_rsa) and passphrase.
The public key will be saved as id_rsa.pub. You can add this key to the ~/.ssh/authorized_keys file on your remote server to allow password-less authentication.
Troubleshooting Common Issues
While installing and using OpenSSH Client is generally straightforward, you may encounter some issues. Here are some common problems and their solutions:
1. SSH Connection Issues
Symptoms: Unable to connect to the SSH server, timeout or refused connection errors.
Solution:
- Ensure that the SSH server is up and running on the remote machine.
- Check that you are using the correct hostname or IP address.
- Verify that any firewall settings on the local or remote machine are not blocking SSH connections.
- If using a specific port, make sure that you are specifying it correctly.
2. Permission Denied Errors
Symptoms: Receiving a «Permission denied» message when trying to log in.
Solution:
- Check that you are using the correct username.
- Ensure that your public key is correctly added to the
~/.ssh/authorized_keysfile on the SSH server. - Verify permissions on the SSH server. The
.sshdirectory should typically have 700 permissions, and theauthorized_keysfile should have 600 permissions.
3. Slow Connection Speeds
Symptoms: Experiencing lag or slow connection speeds when using SSH.
Solution:
- Check your internet connection. Ensure that there are no bandwidth hogs on your network.
- If connecting over a VPN, consider disconnecting to see if it improves speed.
- Use the
-voption in the SSH command to enable verbose logging and diagnose issues.
Conclusion
Installing OpenSSH Client on Windows 11 is a straightforward process, whether you prefer using the Windows Settings interface or PowerShell. Once installed, OpenSSH Client gives you the ability to securely connect to remote systems, transfer files, and manage file transfers using powerful commands that are essential for any developer or IT professional.
With this guide, you should now have a solid understanding of how to install and utilize OpenSSH Client on your Windows 11 machine. Whether you’re managing remote servers or transferring files securely, OpenSSH Client is an invaluable tool in your toolkit. Embrace the power of secure communications and enhance your productivity in today’s digital landscape!
The latest builds of Windows 10 and Windows 11 include a build-in SSH server and client that are based on OpenSSH.
This means now you can remotely connect to Windows 10/11 or Windows Server 2019 using any SSH client, like Linux distros.
Let’s see how to configure OpenSSH on Windows 10 and Windows 11, and connect to it using Putty or any other SSH client.
OpenSSH is an open-source, cross-platform version of Secure Shell (SSH) that is used by Linux users for a long time.
This project is currently ported to Windows and can be used as an SSH server on almost any version of Windows.
In the latest versions of Windows Server 2022/2019 and Windows 11, OpenSSH is built-in to the operating system image.
How to install SSH Server on Windows 10?
Make sure our build of Windows 10 is 1809 or newer. The easiest way to do this is by running the command:
Note. If you have an older Windows 10 build installed, you can update it through Windows Update or using an ISO image with a newer version of Windows 10 (you can create an image using the Media Creation Tool). If you don’t want to update your Windows 10 build, you can manually install the Win32-OpenSSH port for Windows with GitHub.
Enable feature
We can enable OpenSSH server in Windows 10 through the graphical Settings panel:
-
Go to the
Settings>Apps>Apps and features>Optional features(or run thecommand ms-settings:appsfeatures)
-
Click Add a feature, select
OpenSSH Server(OpenSSH-based secure shell (SSH) server, for secure key management and access from remote machines), and clickInstall
Install using PowerShell
We can also install sshd server using PowerShell:
Add-WindowsCapability -Online -Name OpenSSH.Server*
Install using DISM
Or we can also install sshd server using DISM:
dism /Online /Add-Capability /CapabilityName:OpenSSH.Server~~~~0.0.1.0
If you want to make sure the OpenSSH server is installed, run the following PS command:
Get-WindowsCapability -Online | ? Name -like 'OpenSSH.Server*'
How to uninstall SSH Server?
Use the following PowerShell command to uninstall the SSH server:
Remove-WindowsCapability -Online -Name OpenSSH.Server~~~~0.0.1.0
How to Install SSH Server on Windows 11?
Also, you can add the OpenSSH Server on Windows 11.
- Go to Settings > Apps > Optional features;
- Click View Features;
Select OpenSSH Server from the list and click Next > Install;
Wait for the installation to complete.
The OpenSSH binaries are located in the C:\Windows\System32\OpenSSH\ folder.
Configuring SSH Service on Windows 10 and 11
Check the status of ssh-agent and sshd services using the PowerShell command Get-Service:
As we can see, both services are in a Stopped state and not added to the automatic startup list. To start services and configure autostart for them, run the following commands:
Start-Service sshd
Set-Service -Name sshd -StartupType 'Automatic'

Start-Service 'ssh-agent'
Set-Service -Name 'ssh-agent' -StartupType 'Automatic'
We also need to allow incoming connections to TCP port 22 in the Windows Defender Firewall. We can open the port using netsh:
netsh advfirewall firewall add rule name=”SSHD service” dir=in action=allow protocol=TCP localport=22
Or we can add a firewall rule to allow SSH traffic using PowerShell:
New-NetFirewallRule -Name sshd -DisplayName 'OpenSSH Server (sshd)' -Enabled True -Direction Inbound -Protocol TCP -Action Allow -LocalPort 22
Now we can connect to Windows 10 using any SSH client. To connect from Linux, use the command:
ssh -p 22 admin@192.168.1.90
Here, the admin is a local Windows user under which we want to connect. 192.168.1.90 is an IP address of your Windows 10 computer.
After that, a new Windows command prompt window will open in SSH session.
Hint. To run the PowerShell.exe cli instead of cmd.exe shell when logging in via SSH on Windows 10, we need to run the following command in Windows 10 (under admin account):
New-ItemProperty -Path "HKLM:\SOFTWARE\OpenSSH" -Name DefaultShell -Value "C:\Windows\System32\WindowsPowerShell\v1.0\powershell.exe" -PropertyType String -Force
Now, we change the default OpenSSH shell. From here, when connecting to Windows via SSH, you will immediately see PowerShell prompt instead of cmd.exe.
If you want to use key-based ssh authentication instead of password authentication, you need to generate a key using ssh-keygen on your client.
Then, the contents of the id_rsa.pub file must be copied to the c:\users\admin\.ssh\authorized_keys file in Windows 10.
After that, you can connect from your Linux client to Windows 10 without a password. Use the command:
ssh -l admin@192.168.1.90
Configuration
We can configure various OpenSSH server settings in Windows using the %programdata%\ssh\sshd_config configuration file.
For example, we can disable password authentication and leave only key-based auth with:
PubkeyAuthentication yes
PasswordAuthentication no
Here we can also specify a new TCP port (instead of the default TCP 22 port) on which the SSHD will accept connections. For example:
Using the directives AllowGroups, AllowUsers, DenyGroups, DenyUsers, you can specify users and groups who are allowed or denied to connect to Windows via SSH:
DenyUsers theitbros\jbrown@192.168.1.15— blocks connections to username jbrown from 192.168.1.15 hostsжDenyUsers theitbros\*— prevent all users from theitbros domain to connect host using sshжAllowGroups theitbros\ssh_allow— only allow users from theitbtos\ssh_allow connect hostю- The allow and deny rules of sshd are processed in the following order:
DenyUsers,AllowUsers,DenyGroups, andAllowGroups.
After making changes to the sshd_config file, you need to restart the sshd service:
Get-Service sshd | Restart-Service –force
In previous versions of OpenSSH on Windows, all sshd service logs were written to the text file C:\ProgramData\ssh\logs\sshd.log by default.
On Windows 11, SSH logs can be viewed using the Event Viewer console (eventvwr.msc). All SSH events are available in a separate section Application and Services Logs > OpenSSH > Operational.
For example, the screenshot shows an example of an event with a successful connection to the computer via SSH. You can see the ssh client’s IP address (hostname) and the username used to connect.
sshd: Accepted password for jbrown from 192.168.14.14. port 49833 ssh2