
A collection of utilities bringing back classic features to Windows.
Originally Classic Shell by Ivo Beltchev
Features
- Classic style Start menu for Windows 7, 8, 8.1, 10, 11
- Toolbar for Windows Explorer
- Explorer status bar with file size and disk space
- Classic copy UI (Windows 7 only)
- Title bar and status bar for Internet Explorer
Download
You can find the latest stable version here:
You can find the latest nightly build here:
Get Help
- Report an issue
- Ask in Discussions
- Post in Gitter room
- Join our Discord
Temporary Translation/Language Solution
- Download language DLL
- Place it either in the Open-Shell’s install folder or in the
%ALLUSERSPROFILE%\Open-Shell\Languagesfolder.
For archival reasons, we have a mirror of www.classicshell.net here.
How To Skin a Start Menu
Classic Shell: Custom Start Buttons
4.4.196
What’s Changed
- Add ARM64 support by @Mattiwatti in #641
ExplorerPatchercompatibility by @ge0rdi in #2107
Full Changelog: v4.4.195…v4.4.196
Important
Note for ARM64 users
Recent Windows 11 on ARM64 may block setup due to previous incompatibility with the platform.
If you encounter a message saying This application can't run on this device, just rename setup to something like OpenShell.exe and run again.
4.4.195
What’s Changed
- Fix modern settings on Win11 24H2+ by @ge0rdi in #2091
- Fix custom button with auto-hiding taskbar (#2067)
- Apply taskbar customizations to News and interests (#676)
- Update StartMenuL10N.ini for all languages by @Need74 in #2086
Full Changelog: v4.4.194…v4.4.195
4.4.194
4.4.192
4.4.191
What’s Changed
- Separate taskbar icon for Open-Shell menu settings dialog
- Allow negative horizontal/vertical menu offsets (#1629)
- Fix checkboxes in settings dialog with custom themes (#1630)
- Fix search results overlapping (#1648)
Full Changelog: v4.4.190…v4.4.191
4.4.190
Highlights
- Windows 11 start button support
New
- New default Immersive skin for Windows 10/11 (#538)
- New icons and installer artwork (#31)
- Modern looking icons for Apps folder on Windows 10/11
- Added option to always single-click folders (#692)
- Added option to never highlight modified settings
- Added option to use a custom search hint
- Added option to hide «see more results» in search
- Added option to set custom commands for controls
- Added option to single-expand any Win7 style item
- Added option to open folders to their true path (#555, #653, #691)
- Added option to customize Pinned folder location
- Added new option «Enable accelerators» (#447)
- Added new option «Require Alt key for accelerators» (#117)
- Added -reloadsettings command line switch (#1157)
- Allow shutdown even if limited admin doesn’t have shutdown privilege (#1015)
- Properly handle Windows updates during shutdown (#1250)
- Get nightly (prerelease) builds from Github
- Show Open-Shell version in start context menu (#888)
- Use more convenient format for color settings (#82, #1141)
- Use Segoe Fluent Icons font for modern settings icons on Windows 11
- Updated help (#1173, #880, #524)
- Help: Added skinning tutorial
- Help: Added custom button tutorial
- Show start menu next to taskbar by default
- Setup: Recognize also /h and /help parameters (#1278)
- Setup: Don’t install Classic IE by default
- Don’t show first-time settings dialog if settings were imported from XML already (#1319)
- Improved menu animation timing
- Added menu animation fps logging
Fixes
- Fixed taskbar texture on Windows 11 (#1230)
- Fixed sleep operation on systems with connected standby enabled (#719)
- Fixed corrupted icons in second column (#1088)
- Fixed image rendering on Windows 7 (#1023, #90)
- Fixed search box focusing (#1068)
- Fixed Aero button alignment on multiple monitors (#1310)
- Fixed handling of automatically hiding taskbar on multi-monitor setup (#908)
- Proper start menu alignment in case of vertical taskbar Windows 11 (#1231)
- Make sure tray buttons are properly positioned when custom start button was created (#1232)
- Properly scale modern task icons (#518)
- Properly scale default skin font according to DPI (#1110)
- Properly round font size (#1547)
- Use proper modern settings icon (#495)
- Don’t track usage of Open-Shell modern settings folder (#744)
- Don’t show Windows Shell Experience Host in list of frequent programs (#1164)
- Fixed branding string on Windows 11 (#878, #960, #1063)
Full Changelog: v4.4.170…v4.4.190
4.4.189
Properly scale default skin font according to DPI (#1110)

Original fix introduced in 528d15 was not correct.
The problem is that `SystemParametersInfo` uses DPI that current session
started with.

We should use `SystemParametersInfoForDpi` (available since Win10 1607)
that returns properly scaled font size.

Fixes #1110
4.4.188
What’s Changed
- Start menu keyboard hotkey fix for Win11 Insider (#1165)
- Properly scale default skin font according to DPI (#1110)
- Setup: Recognize also /h and /help parameters (#1278)
Full Changelog: v4.4.187…v4.4.188
4.4.187
What’s Changed
- New default
Immersiveskin for Win10/11 (#538) - Use proper modern settings icon (#495)
- Properly scale modern task icons (#518)
- Update StartMenuL10N.ini (German)
New Contributors
- @Mr-Update made their first contribution in #1270
Full Changelog: v4.4.186…v4.4.187
4.4.186
Select Apps icon based on Windows version

We now have nicer Apps icons for Win10/11 so we will select proper icon
based on Windows version.
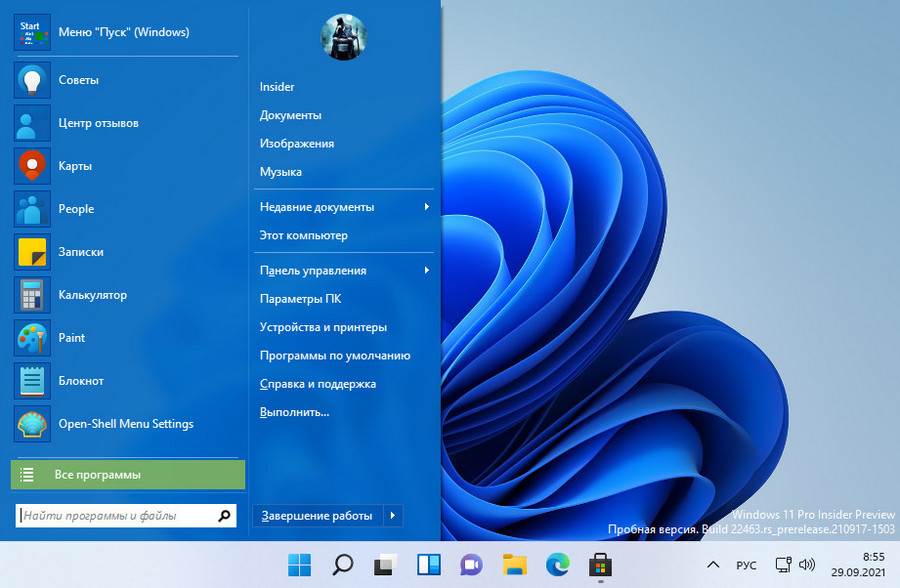
В этой публикации, друзья, поговорим о том, как в Windows 11 сделать меню «Пуск» формата Windows 7. Или как сделать даже два меню «Пуск» — формата Windows 11 и формата Windows 7. У новой 11-й Windows современное, стильное меню «Пуск», более юзабильное из-за своего центрированного расположения на панели задач. Но если вам хочется привнести в современную операционную систему немного привычной архаики, так сказать, кастомизировать систему отголосками прошлого, это можно сделать с помощью программы Open-Shell, реализующей в Windows меню «Пуск» из старой Windows 7. Программа совершенно бесплатная, являет собой замену известной Classic Shell, ставшей популярной с выходом Windows 8 из-а отсутствующего в ней классического меню «Пуск». Разработка Classic Shell впоследствии прекратилась, а Open-Shell переняла все её возможности. Давайте более детально о последней.
Как сделать в Windows 11 меню «Пуск» как в Windows 7 с помощью Open-Shell
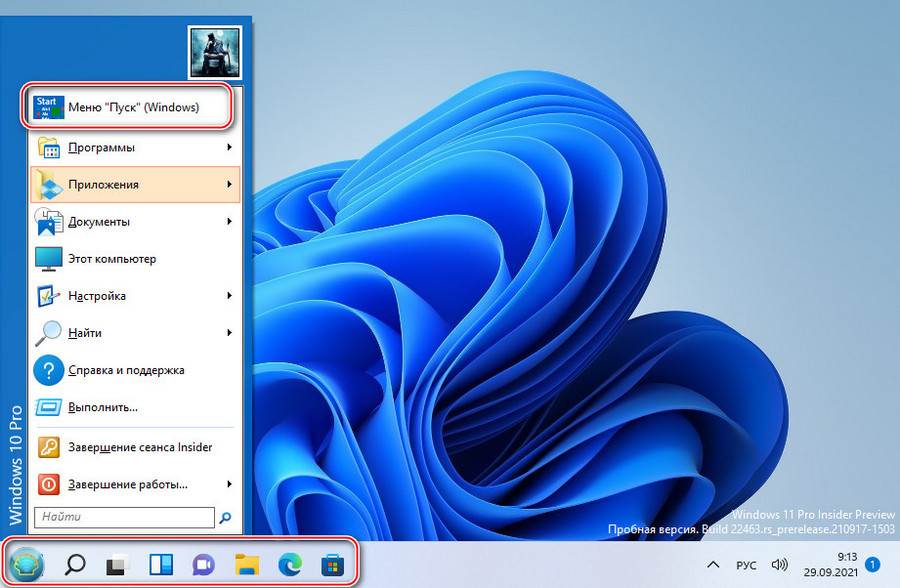
Программа Open-Shell, бесплатно распространяемая на GitHub, реализует в Windows 10 и 11 классическое меню «Пуск» в стиле Windows 7. Но в Windows 11, в отличие от Windows 10, оно не подменяет собой системное меню «Пуск», а реализует второе. И реализует его, как и подобает классике, в левом углу панели задач. Центрированная кнопка «Пуск» запускает системное меню «Пуск» Windows 11, у меню же Open-Shell будет своя кнопка «Пуск». Но она может по умолчанию не установиться, и тогда для запуска меню «Пуск» Open-Shell просто жмём клавишу Win.
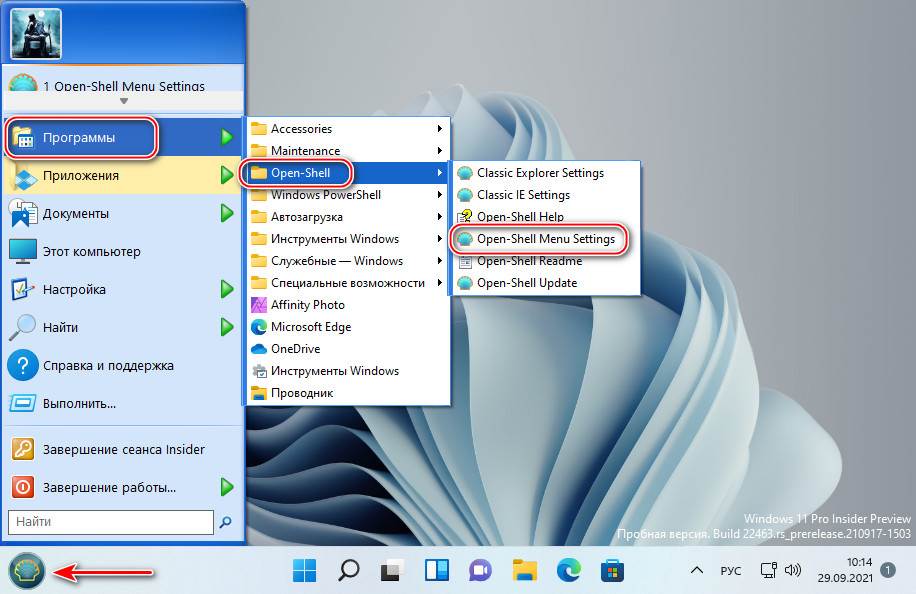
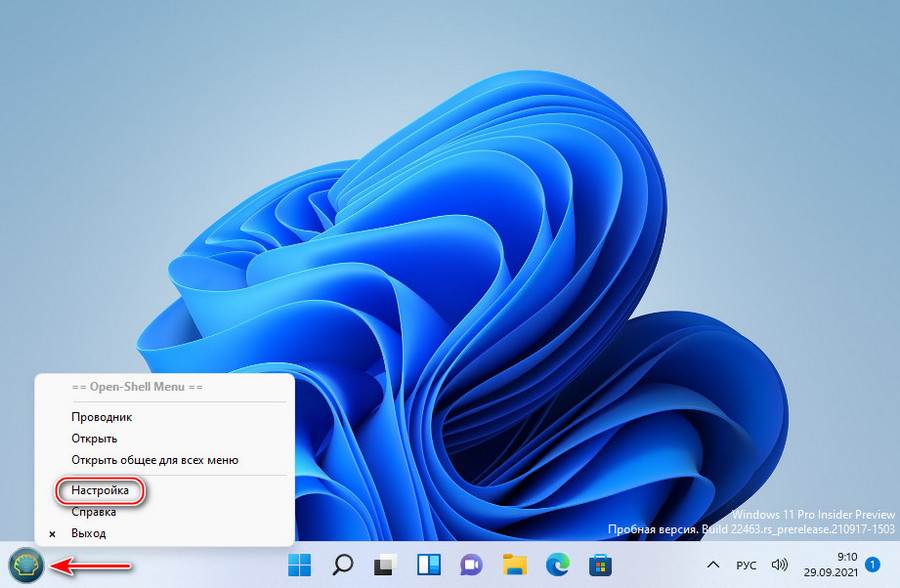
В меню запускаем настройки меню Open-Shell.
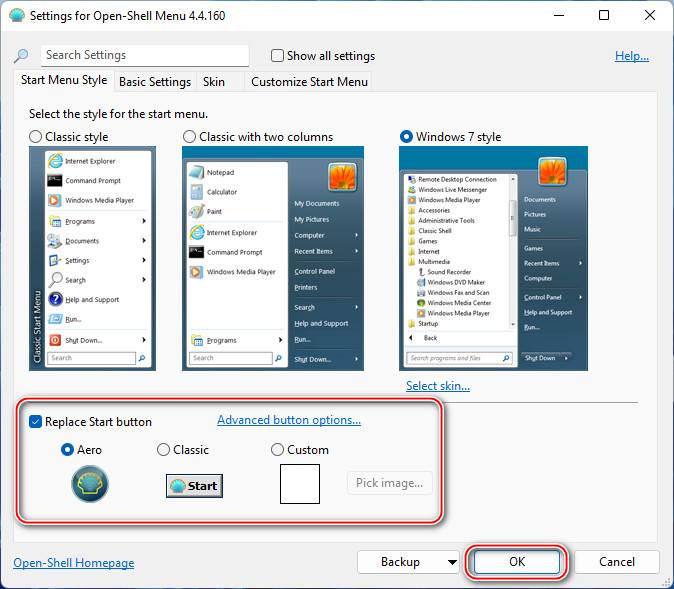
И настраиваем отображение кнопки «Пуск». Можем выбрать вид кнопки из двух предложенных, либо добавить свой вид. Виды кнопки «Пуск» можно скачать на сайтах, посвящённых кастомизации Windows, просто вбейте в веб-поиск запрос «кнопка пуск скин».
После добавления кнопки «Пуск» в дальнейшем можем открывать настройки меню Open-Shell в контекстном меню на кнопке.
В настройках также можем сменить скин меню.
На выбор нам предлагается несколько скинов в стиле Windows XP, 7 или 8.
Есть светлые и тёмные скины.
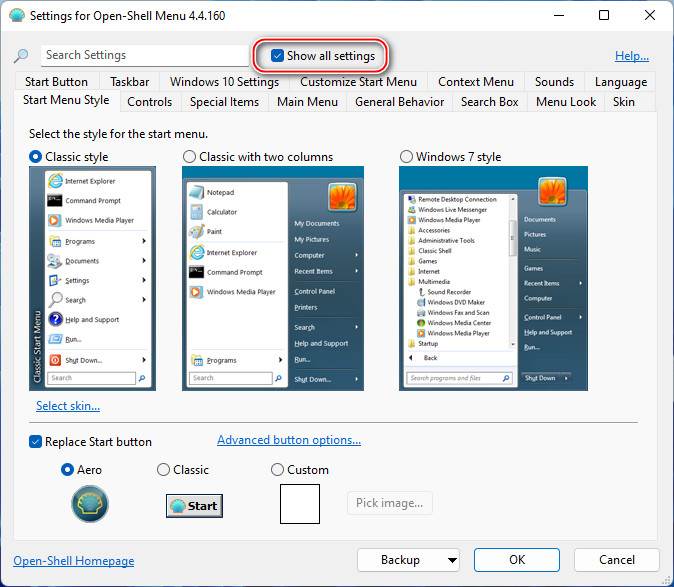
При необходимости можем в настройках установить галочку «Show all settings» и получим доступ ко всем настроечным возможностям программы.
В числе возможностей Open-Shell:
- Настройка внешнего вида меню «Пуск», выбор разных скинов;
- Настройка кнопки «Пуск»;
- Настройка размера меню, шрифтов, иконок, прозрачности, анимации;
- Настройка поведения меню;
- Настройка контактного меню для меню «Пуск»;
- Внедрение панели инструментов для проводника;
- И прочие.
Друзья, в Windows 11 убрать системное меню «Пуск» невозможно, но если вы хотите пользоваться только меню «Пуск» Open-Shell, зайдите в приложение системных параметров по пути «Персонализация → Панель задач». И в блоке настроек «Поведение панели задач» установите выравнивание слева.
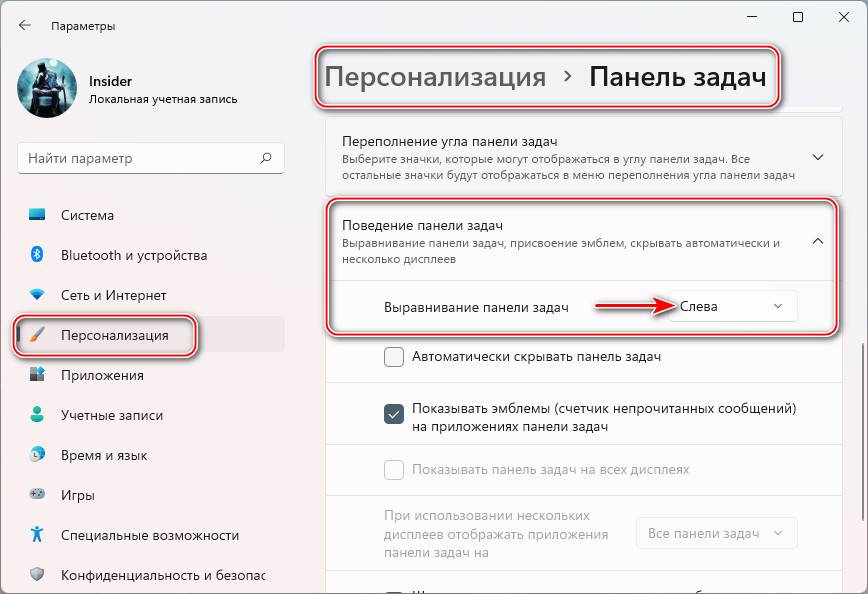
В таком случае кнопка «Пуск» Open-Shell попросту перекроет кнопку системного меню Windows 11. И у вас будет привычный классический формат панели задач и меню «Пуск» Windows. При необходимости системное меню «Пуск» Windows 11 можно запускать специальной кнопкой вверху меню Open-Shell.
(Image credit: Mauro Huculak)
On Windows 11, you can use the «Open-Shell-Menu» utility to bring back the classic Start menu. I’m not a fan of using third-party tools to tweak the behavior of the operating system, but this app caught my eye because it doesn’t seem to add much overhead to the navigation experience, and best of all, it’s free to use.
Open-Shell-Menu is a utility designed to bring some of the classic features to various versions of the operating system, including Windows 11. However, the most interesting feature is the ability to change the default Start menu design to the one that was available on Windows 7.
In addition, you can choose from other menu designs, change skins, and control various settings. Furthermore, the utility allows you to change the Start button for a more classic look, but I don’t think many people would like the available design since it doesn’t match the Windows 11 style.
In this how-to guide, I’ll help you get started with the Open-Shell-Menu to bring a more classic Start menu design to Windows 11.
Warning: Although this utility works as advertised, it’s still a third-party application designed to modify the operating system’s behavior. As such, use it at your own risk. Also, the web browser may complain about downloading the installer with a warning, but it should be OK.
How to replace the Windows 11 Start menu with a classic design
Before you can change the Start menu design, you have to install the Open-Shell-Menu utility and then configure the settings.
To install the utility on Windows 11, use these steps:
All the latest news, reviews, and guides for Windows and Xbox diehards.
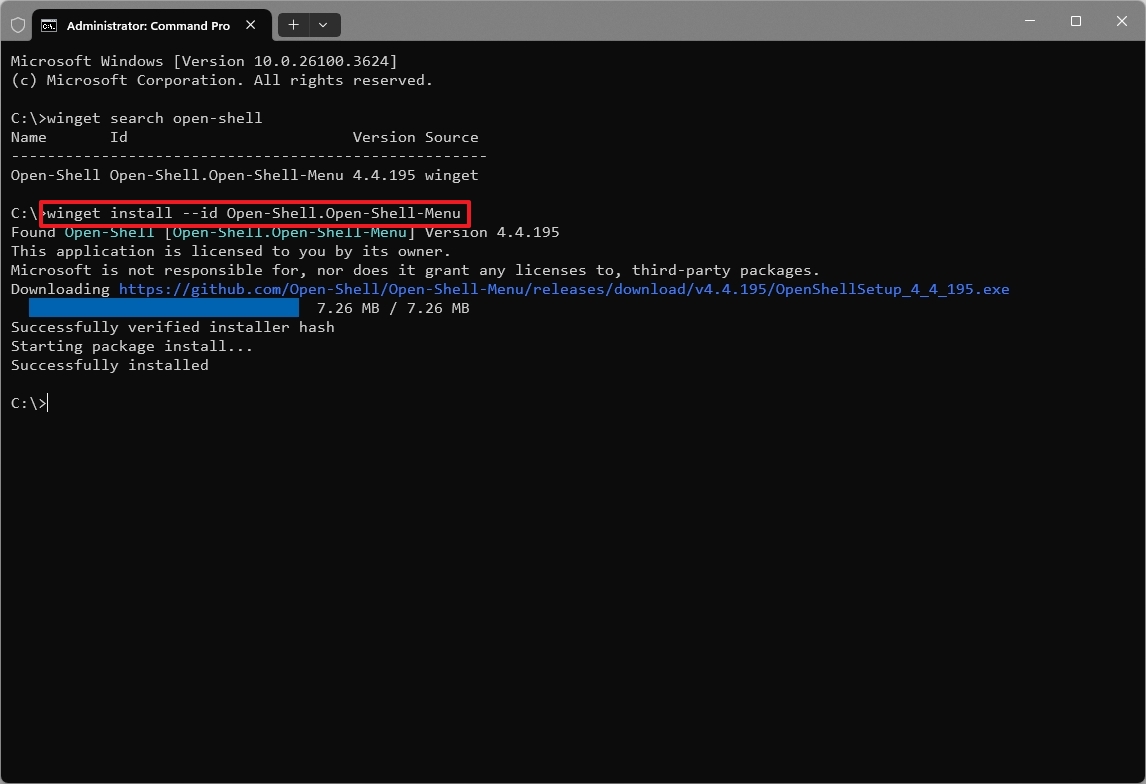
- Open Start.
- Search for Command Prompt, right-click the top result, and choose the Run as administrator option.
- Type the following command to install the Open-Shell app and press Enter: winget install —id Open-Shell.Open-Shell-Menu
Once you complete the steps, you can proceed to configure the experience. However, the default experience of the classic menu should already be enabled.
To enable the classic version of the Start menu on Windows 11, use these steps:
- Open Start.
- Search for Open-Shell Menu Settings and click the top result to open the utility.
- Check the «Show all settings» option.
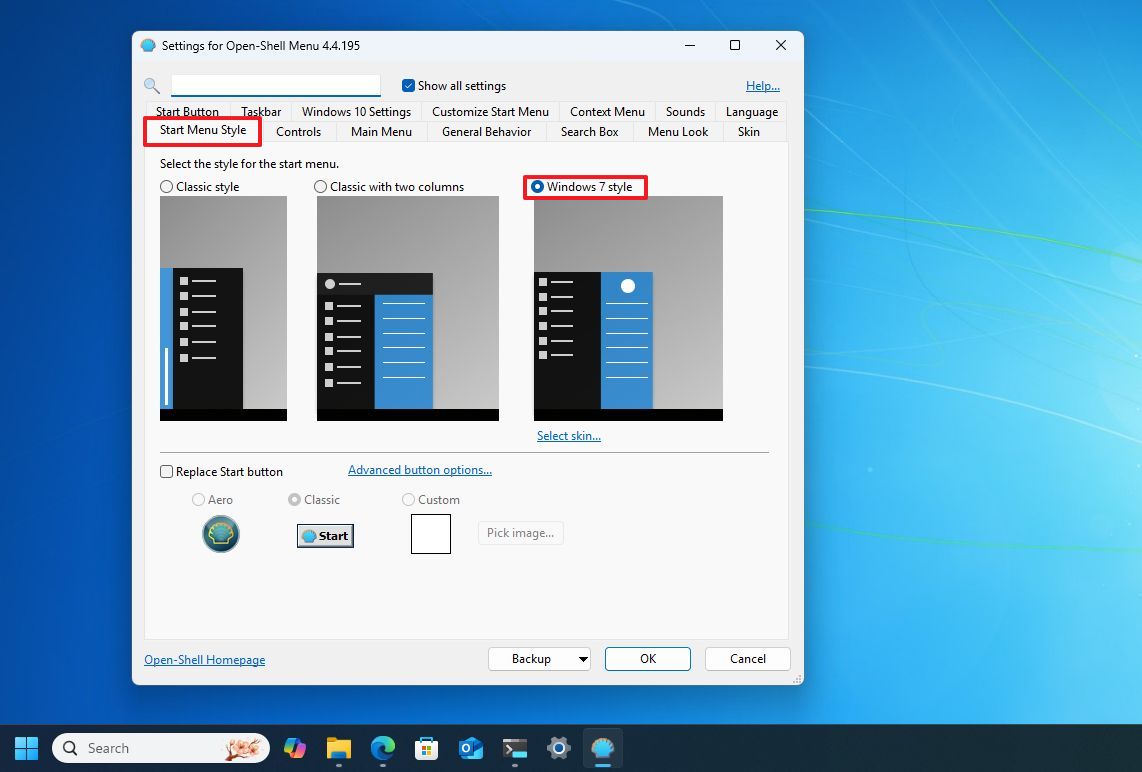
- Click the «Start Menu Style» tab.
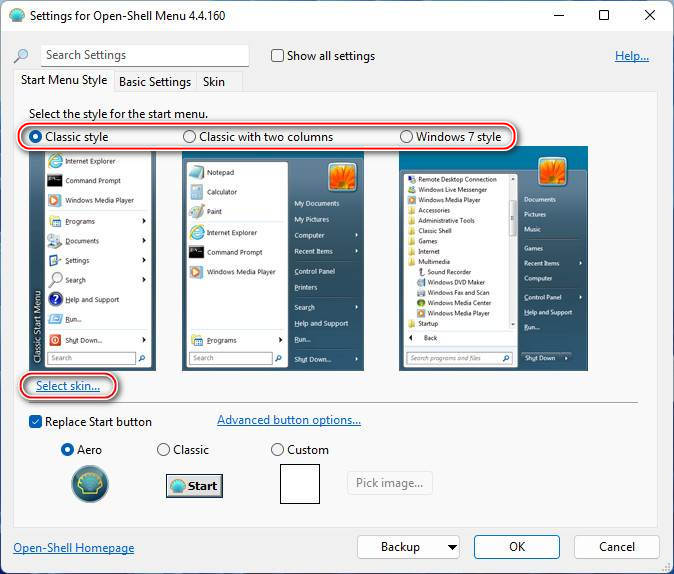
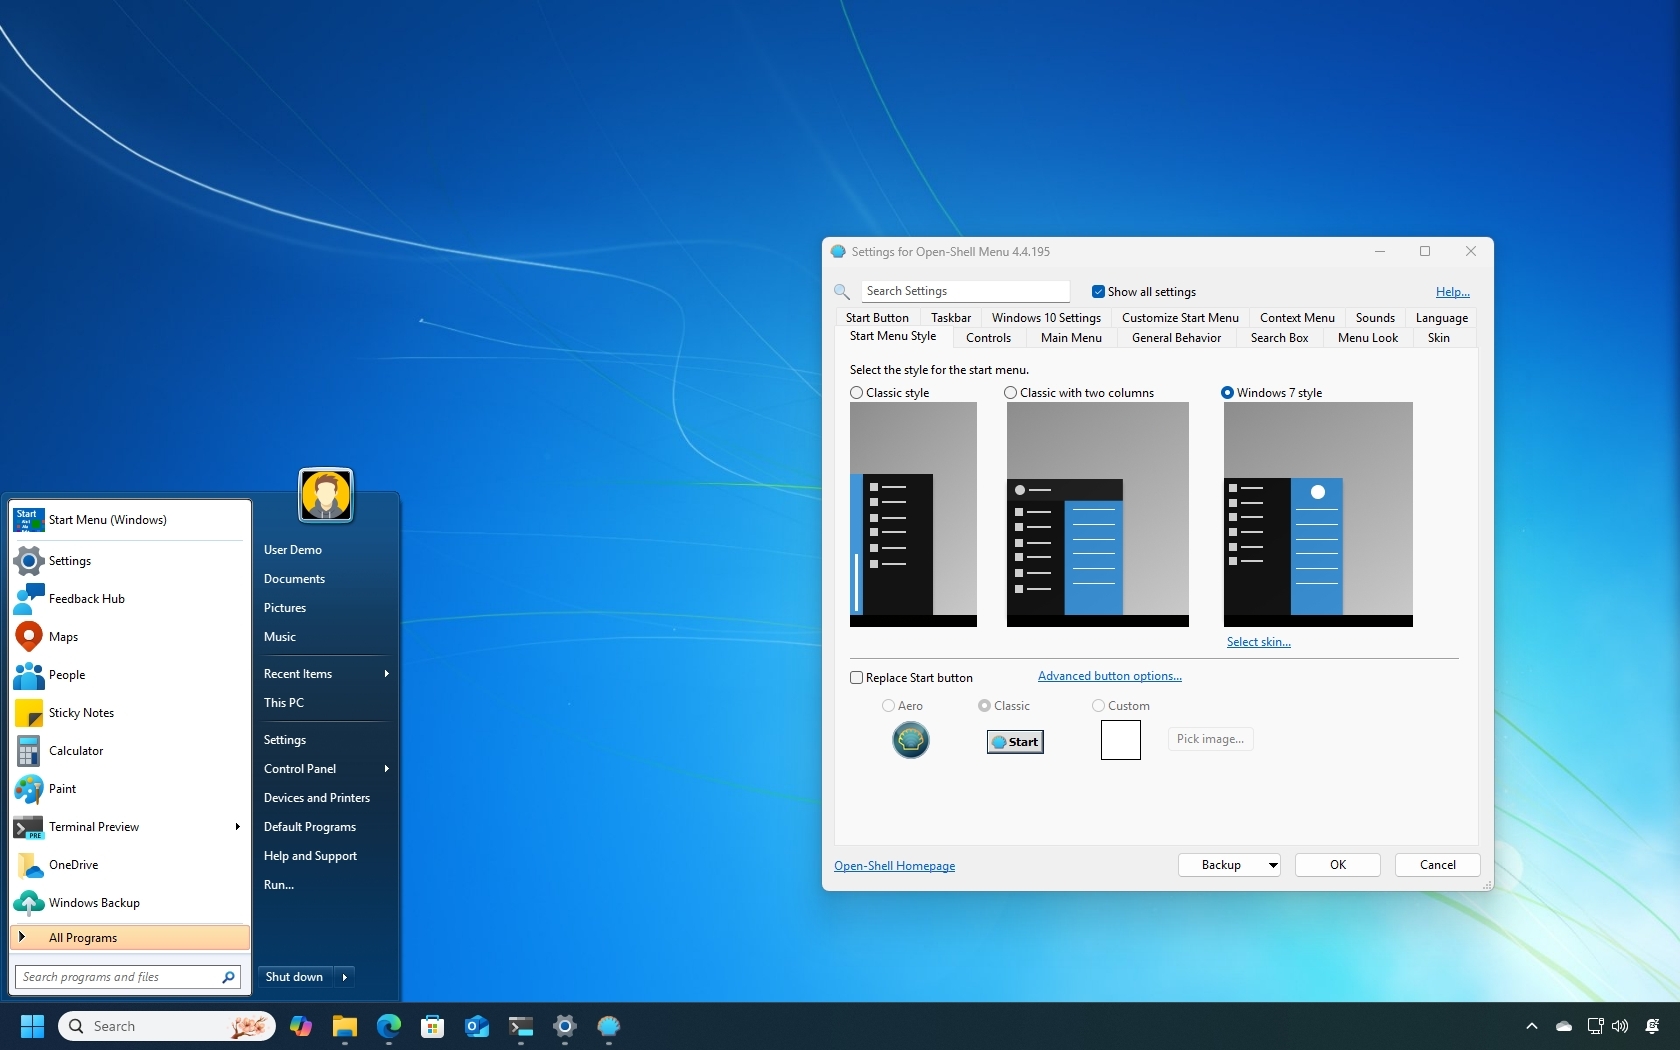
- Select one of the available designs:
- Classic style: This design is like the menu on Windows 95 and 98.
- Classic with two columns: This design combines some aspects of the Windows Vista and Windows 7 designs, but uses a flat style somewhat similar to Windows 10.
- Windows 7 style (recommended): This design is the best option to use with this utility.
- (Optional) Check the «Replace Start button» option.
- Choose the button design.
- Quick tip: You can even choose a custom icon using an image.
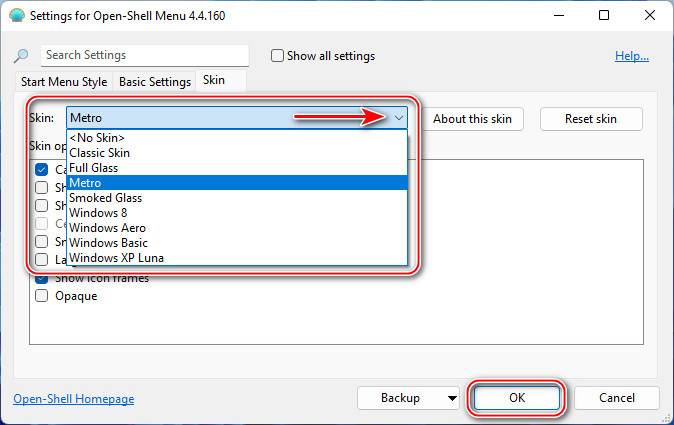
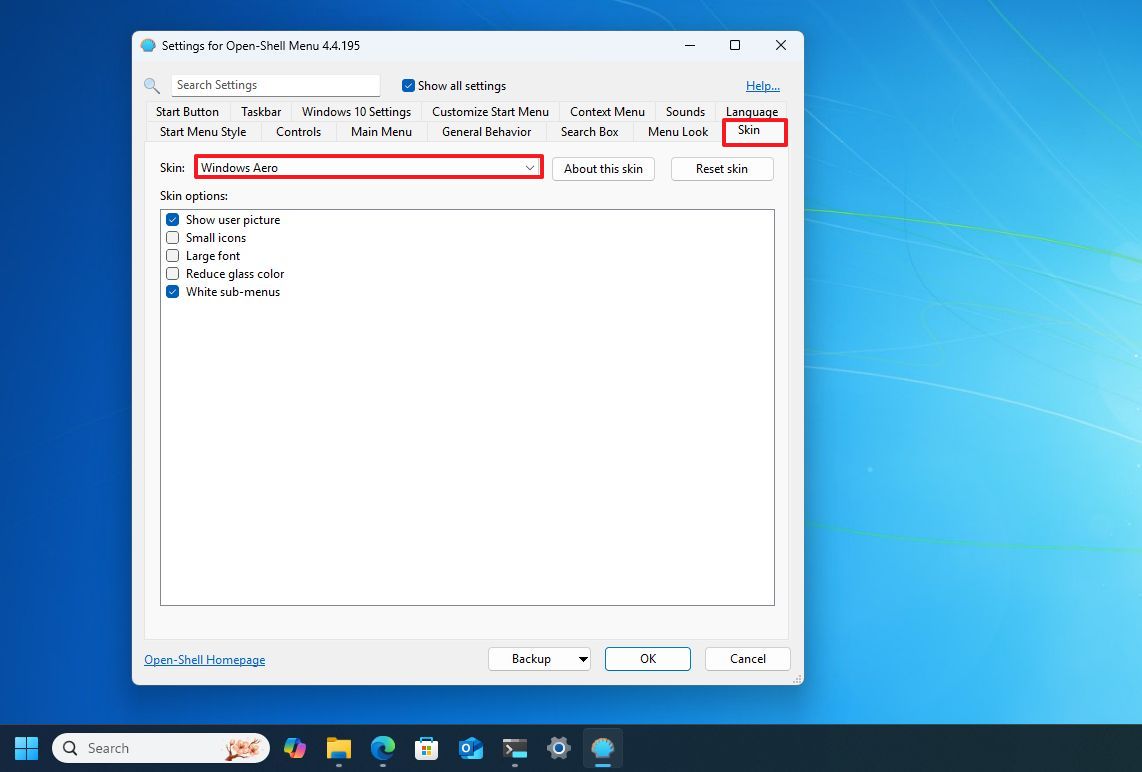
- Click the Skin tab.
- Select the Windows Aero option from the «Skin» setting.
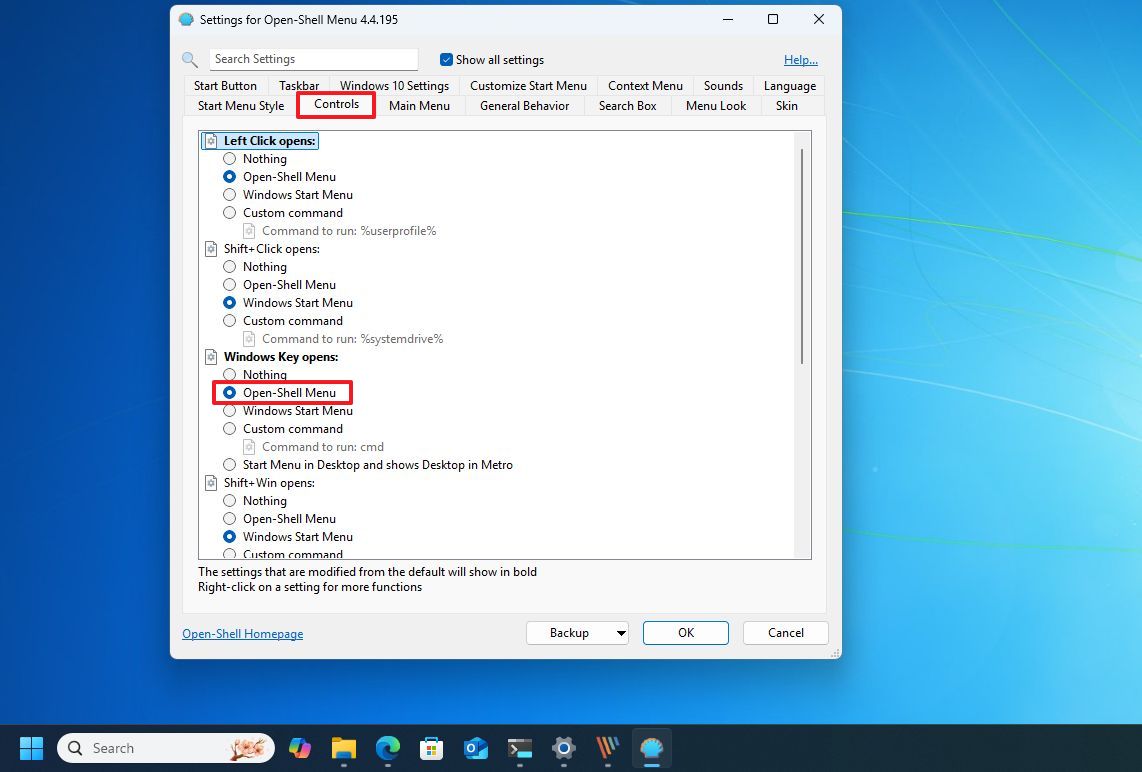
- Click the Controls tab.
- Select the «Open-Shell Menu» option under the «Windows Key opens» setting.
- Click the OK button.
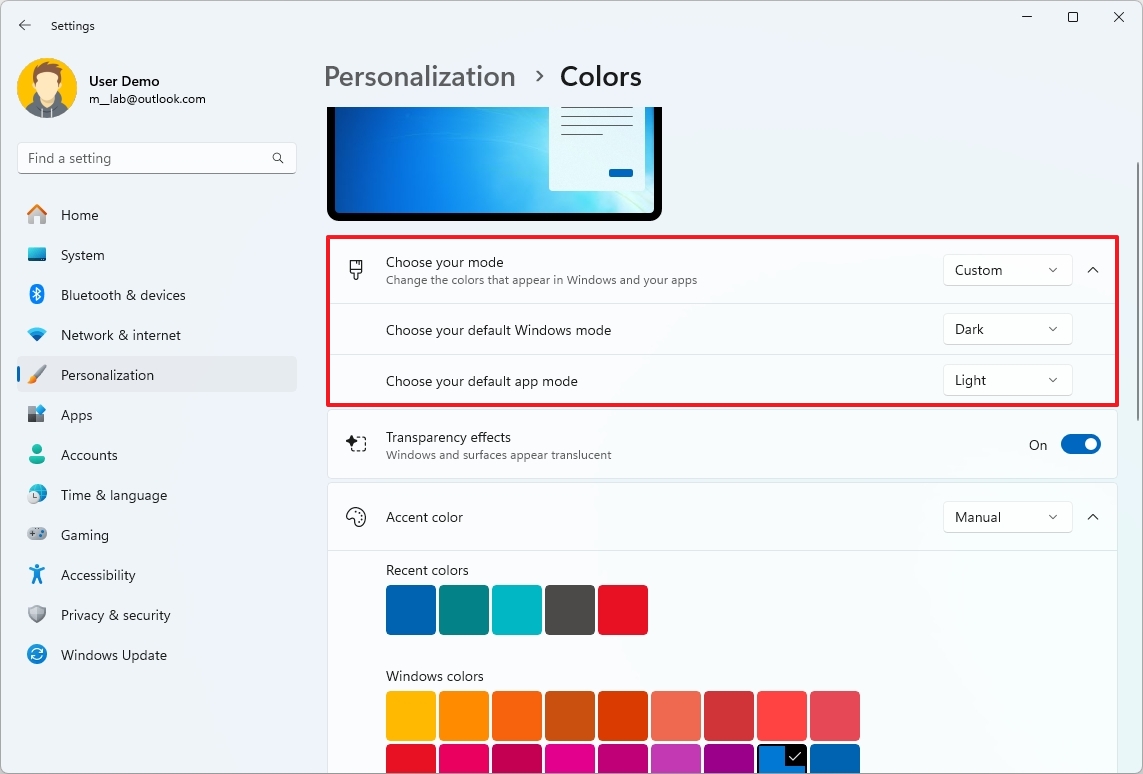
The «Windows Aero» is the best option because it’ll blend better with the desktop experience. In addition, I suggest changing the color mode on Settings > Personalization > Colors to «Custom» for the «Choose your mode» setting and then selecting «Dark» for «Choose your default Windows mode» and «Light» for «Choose your default app mode» to match the menu color with the Taskbar and rest of the desktop.
For the most part, these are the only settings you have to get started, configuring the classic Start menu. However, the utility offers countless options to tweak the experience.

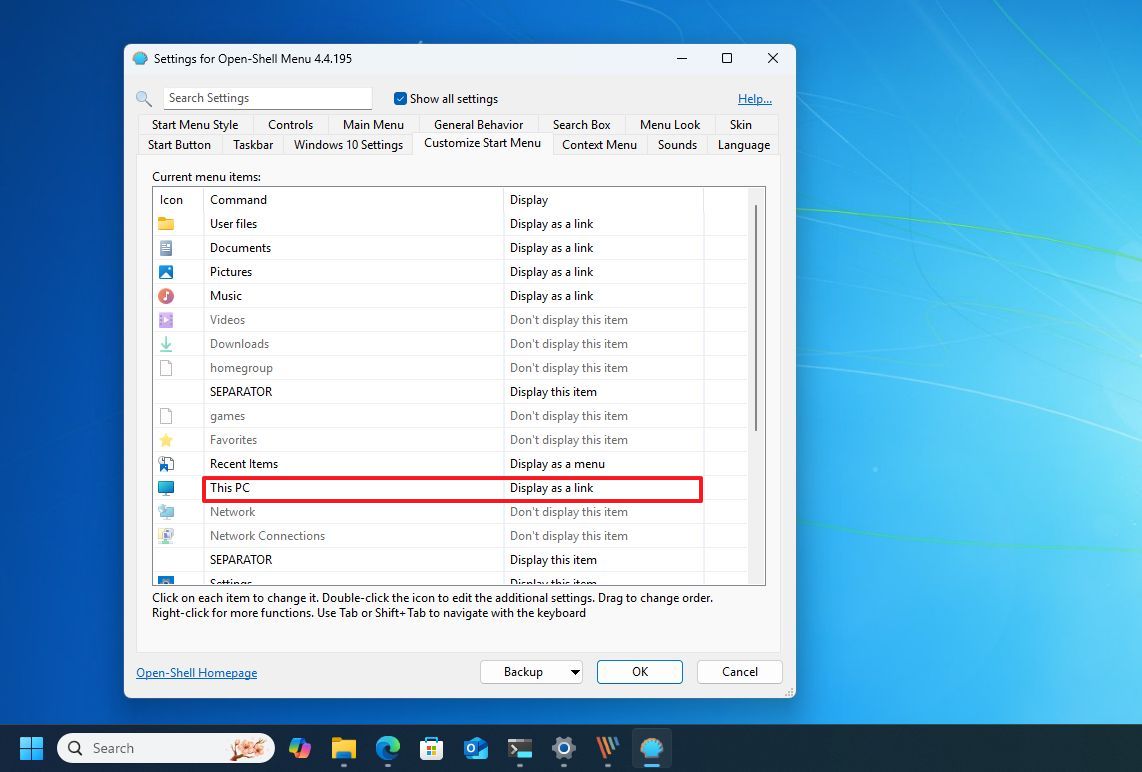
The only other customization I would suggest is the «Customize Start Menu» tab that allows you to change or hide the items that appear in the right pane.
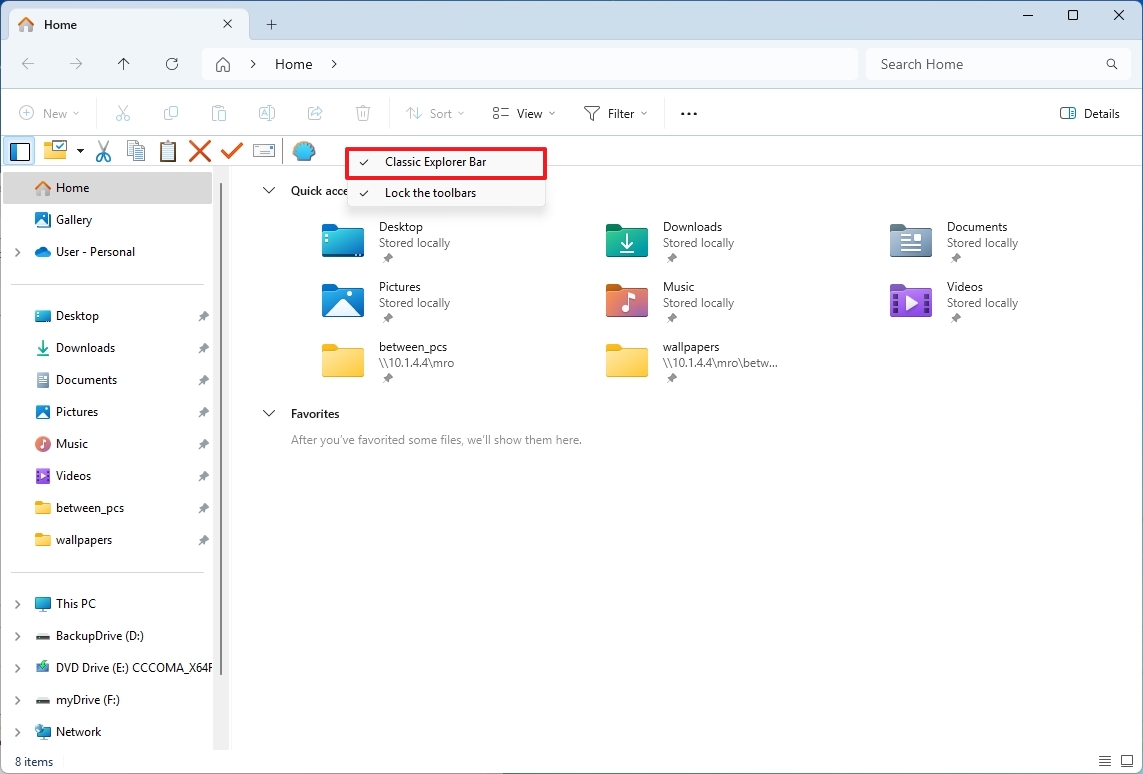
This utility also enables the classic bar for File Explorer with options for Cut, Paste, Delete, etc., if you don’t want to see this menu, you can right-click the bar and toggle the «Classic Explorer Bar» option.
Is the current Start menu design good enough, or do you plan to replace it with this or another utility? Let me know in the comments.
More resources
Find in-depth guides, troubleshooting tips, and the latest updates on Windows 11 and 10 here:
- Windows 11 on Windows Central — All you need to know
- Windows 10 on Windows Central — All you need to know
Mauro Huculak has been a Windows How-To Expert contributor for WindowsCentral.com for nearly a decade and has over 15 years of experience writing comprehensive guides. He also has an IT background and has achieved different professional certifications from Microsoft, Cisco, VMware, and CompTIA. He has been recognized as a Microsoft MVP for many years.
With the release of Windows 11, Microsoft introduced a visually revamped user interface aimed at enhancing user accessibility and experience. Among several features, the new Start menu drew significant attention for its significant departure from the traditional layout seen in Windows 10. While many users appreciate the fresh look, others find themselves longing for the classic Start menu and the customization options it offered. Enter Open-Shell, a powerful tool that enables Windows users to bring back the classic Start menu experience.
This article is a comprehensive guide to using Open-Shell in Windows 11, exploring its features, installation, setup, customization options and some troubleshooting tips.
Understanding Open-Shell
Open-Shell is an open-source project that aims to provide users with the classic Windows Start menu experience. Originally known as Classic Shell, it has been rebranded and continues to be actively developed by a community of contributors. Open-Shell offers various features, including:
-
Classic Start Menu: A familiar and traditional layout, reminiscent of Windows 7 and earlier versions.
-
Customizable Skins: Users can choose from a variety of skins or create their own.
-
Toolbars and Shortcuts: Users can add or remove toolbar items as per their requirements.
-
File Explorer Integration: Access frequently used folders quickly via shortcuts.
-
High Compatibility: Works seamlessly across varied versions of Windows, including Windows 10, 8, and now 11.
By using Open-Shell, users can create a personalized Windows experience that reflects their preferences while improving productivity.
Installing Open-Shell
Installing Open-Shell is a straightforward process. Here’s how to do it on Windows 11:
1. Download Open-Shell
- Visit the Open-Shell GitHub page to download the latest version.
- Scroll down to the Releases section and download the latest version’s installer (.exe file).
2. Run the Installer
- Locate the downloaded file (usually in the Downloads folder) and double-click it to run the installer.
- If prompted by User Account Control (UAC), click «Yes» to allow changes.
3. Choose Installation Options
-
You’ll be greeted by the installation wizard. Select your preferred language.
-
Click “Next” to continue through the license agreement and installation options.
-
You have three components to install:
- Open-Shell Menu: The main component.
- Open-Shell Settings: The configuration tool.
- Open-Shell Theme: For additional themes.
-
It’s generally best to install all components for full functionality.
4. Complete Installation
- Click «Install» to begin the installation process.
- Once completed, you can close the installer. The Open-Shell setup should now appear in the Start menu.
Setting Up Open-Shell
Now that Open-Shell is installed on your Windows 11 machine, it’s time to configure it to suit your needs.
1. Access the Open-Shell Settings
- Click on the Start button and search for «Open-Shell Menu Settings.»
- Open the application to access various settings.
2. Customize the Start Menu
In the Open-Shell Menu Settings, you can redesign your Start Menu layout according to your preferences:
Classic Style
-
Style Tab: Here, you can choose the style of your Start Menu. Options include:
- Classic with two columns: A simple two-column layout resembling Windows 7.
- Classic with one column: A more compact version.
- Windows 7 Style: A visually appealing layout with customizable icons.
-
Select the Style: Click on the corresponding radio button for your preferred style.
Menu Look and Feel
- Look and Feel Tab: You can specify how the menu should appear.
- Options include:
- Set background color.
- Text color.
- Font style and size.
3. Customizing Start Menu Items
-
Start Menu Items Tab: This section allows you to customize which applications, folders, or shortcuts appear in your Start Menu.
-
You can:
- Add new folders or items by clicking on «Add a new item.»
- Sort and rename items as necessary.
4. Additional Features
-
Behaviour Tab: Control how Open-Shell behaves.
- Configure transparency, animations, and the display of the menu.
-
Skin Tab: Implement different skins as per your preference, allowing you to change the overall visual style of the Start menu.
Adding and Removing Items
One of the robust features of Open-Shell is the capability to curate your Start Menu. Here’s how you can add or remove items.
Adding Items
-
Open the Open-Shell Menu Settings.
-
Navigate to the «Start Menu Items» tab.
-
Click on “Add a new item.” You will be prompted to specify the item properties, such as:
- Name: The display text for the item.
- Program Path: The executable file path for the application.
- Icon: You can specify an icon if you wish.
-
Click OK to add the item to your Start Menu.
Removing Items
To remove an item from your Start Menu:
- Open Open-Shell Menu Settings.
- Navigate to the “Start Menu Items” tab.
- Find the item you wish to remove and select it.
- Click “Remove.” Confirm the action if needed.
Configuring Hotkeys
For increased productivity, you can configure hotkeys for launching Open-Shell. This feature allows quick access to your customized Start Menu.
Setting Up Hotkeys
- Open Open-Shell Menu Settings.
- Navigate to the “Settings” tab.
- Look for the Hotkeys section.
- Assign your desired hotkey combination (e.g., Ctrl + Alt + S) to launch or open the Start Menu.
- Click “OK” to save the changes.
Using Open-Shell with Windows 11
Open-Shell not only replicates the classic Start Menu but also integrates seamlessly with Windows 11. Here are some tips on how to maximize its potential:
Accessing Open-Shell
To access Open-Shell that you’ve set up:
- Click the Start button or use the configured hotkey.
- The Open-Shell menu will appear, allowing you to navigate through your customized items.
Using Search and Jump Lists
Open-Shell also includes search functionality and jump lists, closely resembling the classic version:
- Search Function: Type in the item’s name in the search bar at the bottom of the menu.
- Jump Lists: Right-click on an application icon in the Start Menu to access frequently used files and tasks.
File Explorer Shortcuts
Open-Shell allows you to add File Explorer shortcuts for quick access to commonly used folders.
- Open Open-Shell Menu Settings.
- Go to “Start Menu Items” and add new folders as shortcuts.
- Once added, these folders are accessible directly from the Start Menu.
Customizing Appearance Further
Personalization is crucial for many users, and Open-Shell supports extensive options for visual customization:
Themes
Open-Shell comes with built-in themes but allows the integration of custom themes.
- Download additional skins from websites or community repositories.
- Place these skins in the Open-Shell theme folder (usually located in the installation directory).
- Return to the «Skin» tab in Open-Shell Menu Settings to apply the new themes.
Icons
Another visual enhancement can be achieved through custom icons:
- To change an application icon, right-click on the item in Open-Shell settings.
- Choose the «Change Icon» option and add the desired icon file.
Transparency and Effects
You can enhance how the Start Menu appears visually:
- Return to the «Behaviour» tab.
- Adjust transparency settings and add visual effects, such as animations while opening and closing the menu.
Troubleshooting Common Issues
While Open-Shell is generally stable, users may encounter occasional issues. Here are some common problems and solutions:
Open-Shell Not Responding
If Open-Shell freezes or doesn’t open:
- Restart your Windows machine.
- Run Open-Shell as an administrator by right-clicking its icon and selecting “Run as administrator.”
Item Not Appearing
If you’ve added an item that does not show up in the menu:
- Ensure you’ve correctly set the program path and that the executable exists.
- Refresh the settings by reopening Open-Shell Menu Settings.
Compatibility Issues
Some system updates might affect Open-Shell’s functionality:
- Ensure you’re running the latest version of Open-Shell. Check the GitHub repository for updates and new releases.
- If using a custom skin or theme, verify its compatibility with the current version of Open-Shell.
Uninstalling Open-Shell
If you find that Open-Shell doesn’t suit your needs, uninstalling it is simple:
- Navigate to Settings > Apps > Apps & Features.
- Locate Open-Shell from the list of installed applications.
- Click “Uninstall” and follow the prompts.
Once removed, the default Windows 11 Start menu will become active again.
Conclusion
Open-Shell stands out as an invaluable utility for users wishing to regain the classic Start menu functionality while navigating through Windows 11. By following this guide, users can install and customize Open-Shell effectively, enriching their experience with Windows 11 while ensuring their workflow remains smooth and efficient.
Whether you’re a longtime Windows user who cherishes the classic interface or a newcomer seeking to navigate effectively, Open-Shell is the perfect solution — merging the old with the new to create a more personalized and productive environment.