Чтобы предоставить общий доступ к файлу в проводник на Windows 11, выберите файл, а затем на ленте выберите Поделиться . Вы также можете щелкнуть правой кнопкой мыши (или нажать и удерживать) файл > поделиться в проводник или меню Пуск. Затем выберите способ отправки файла и выполните процедуру для этого параметра.
Использование OneDrive
Если у вас есть файлы OneDrive, сохраненные на компьютере, есть несколько способов поделиться ими из проводник:
-
Получите ссылку, по которым можно поделиться. Выберите файл или папку OneDrive и выберите Поделиться. Выберите, с кем будет работать ссылка, нажмите кнопку Применить, а затем нажмите кнопку Копировать ссылку.
-
Email ссылку. Выберите файл или папку OneDrive и выберите Поделиться. Выберите, с кем будет работать ссылка, а затем нажмите кнопку Применить. В поле Кому: введите имена, группы или адреса электронной почты людей, которым вы хотите поделиться. Вы также можете добавить необязательное сообщение. Нажмите кнопку Отправить , чтобы отправить сообщение электронной почты.
Узнайте, как обмениваться файлами и папками в OneDrive
Обмен с устройством поблизости
Общий доступ поблизости позволяет делиться документами, фотографиями, ссылками на веб-сайты и т. д. на близлежащих устройствах с помощью Bluetooth или Wi-Fi. Он будет работать на Windows 10 и Windows 11 устройствах. Дополнительные сведения см. в статье Предоставление общего доступа к устройствам поблизости в Windows.
Отправка сообщения электронной почты
Если у вас установлено классическое почтовое приложение, выберите файл, а затем выберите Поделиться> Email контакта, чтобы открыть новое сообщение с вложенным файлом. Вы можете отправить файл по электронной почте себе или выбрать Найти других пользователей и выбрать в списке контактов.
Общий доступ к приложению
Выберите файл, а затем выберите Общий доступ. В разделе Общий доступ с помощью выберите приложение, с которым вы хотите поделиться, например OneNote.
Предоставление общего доступа по домашней сети
Сведения о том, как предоставлять общий доступ к файлам через домашнюю сеть в Windows 11, см. в статье Общий доступ к файлам по сети в Windows.
Microsoft has incorporated a lot of networking features in its Windows operating system. Shared Folder is one such feature. It allows you to join forces with users connected to the network and work on projects together. In this post, we will see how to access Shared Folder in Windows 11 or Windows 10 so that you can collaborate with other professionals easily.

Shared Folder enables users to share a folder among all the computers connected to the same account, are part of a network, or are connected to a network. To access Shared Folder there are various methods in Windows 11 and 10, we have mentioned them below.
- Open Shared Folder using Run
- Open Shared Folder from File Explorer
- Open Shared Folder from Computer Management
- Open Shared Folder from Command Prompt
- Map Network Drive to access Shared Folder quickly
Let us talk about them in detail.
1] Open Shared Folder using Run
Let us start with one of the simplest ways to open a Shared Folder. We will use the Run dialog box, which can be used to open any utility or folder directly. To do so, follow the steps given below.
- Launch the Run box using Keyboard Shortcut Win + R.
- Once the dialog box appears, type \\<Computer-Name>\<Shared-Folder>. You need to replace <Computer-Name> and <Shared-Folder> with the actual name of the network computer and shared folder name respectively.
- Once you have entered the correct name, click Ok or hit Enter.
This will do the job for you.
Read: What are Public folders in User folder in Windows
2] Open Shared Folder from File Explorer
If you don’t know the name of the Shared folder, navigate to it from the File Explorer. We can also reach the Shared Folder via Network Drive. To do so, follow the steps given below.
- Open Windows File Explorer by Win + R or by clicking on its icon from the Taskbar.
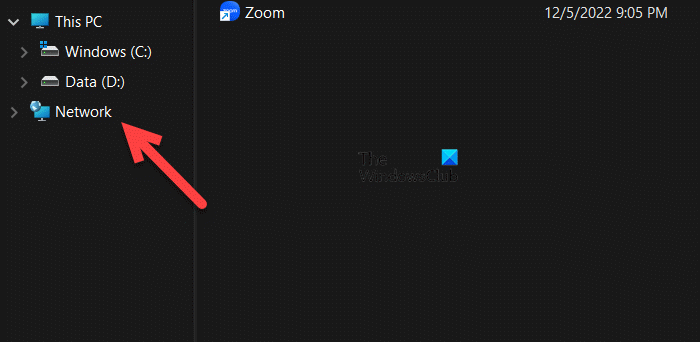
- Now, click on Network.
- You will see a list of all the drives you are connected to, double-click on the one of which you need to access the drive.
- Once you are inside the drive, open the Shared Folder.
The Shared Folder will open, you can then access all the files and folders present inside of it.
Read: File Explorer crashes or freezes while accessing Mapped Network Drives
3] Open Shared Folder from Computer Management
Computer Management is a built-in Windows utility that allows the user to access various Windows tools, manage the storage, and access network drives. We will navigate to the Shared Folder using the Computer Management utility with the help of the following steps.
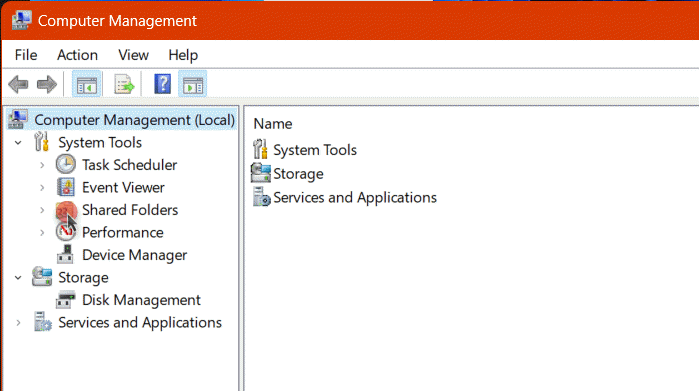
- Launch the Computer Management utility by Win + X > Computer Management.
- Expand System Tools.
- Double-click Shared Folder to open it.
This will do the trick for you.
4] Open Shared Folder from Command Prompt
You can also open the Shared Folder from Command Prompt. Command Prompt is a command-line interpreter that allows Windows users to do various things. If you want to open Shared Folder from CMD, open Command Prompt with administrative privileges. Now, execute the following command.
net use DRIVELETTER \Computer-Name\Shared-Folder
Note: Replace Computer-Name, DRIVELETTER, and Shared-Folder with their actual names
If your folder is password protected, append /user:username pass, so that it would like something like the command mentioned below.
net use DRIVELETTER \Computer-Name\Shared-Folder /user:username pass
Once you have executed the command, the folder will open.
5] Map Network Drive to access Shared Folder quickly
Every single aforementioned method to open the Shared Folder needs you to perform a little lengthy procedure. If you want things to be quick, map the Network Drive to access the Shared Folder quickly. Follow the steps given below to do the same.
- Launch File Explorer.
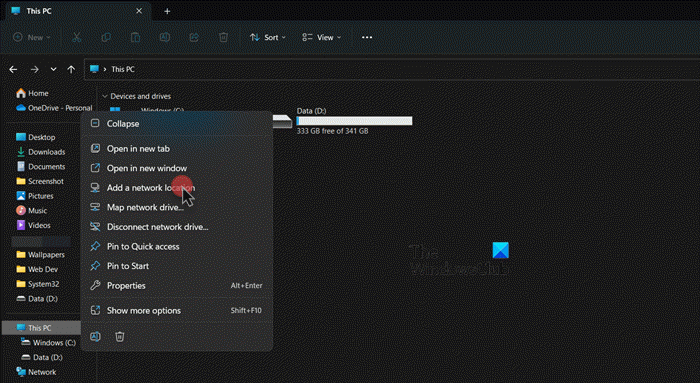
- Right-click on This PC and select Map network drive.
- Enter the details requested and click Finish.
This will add a Network Drive shortcut in the File Explorer. You can then open the Drive and access the Shared Folder.
Hopefully, this will do the job for you.
Read: Mapped Network Drive not showing in Windows
How do I access a shared folder in Windows?
There are various ways to access a Shared Folder in Windows 10 or Windows 11. We have mentioned all the methods in this post. However, if you don’t want the hassle of navigating to the folder every time you want to access it, map it onto your File Explorer. Steps to do the same have been mentioned earlier.
Read: How to clear Mapped Network Drive Cache in Windows?
How do I Connect to a Shared Folder?
The Shared Folder is inside the Network Drive. So when you are connected to a Network Drive, just open it and access Shared Folder from there. There are various other methods to do the same that we have mentioned in this post. So, do check them out as well.
Read: Explorer crashes or freezes while accessing Mapped Network Drives.
Are you looking for an answer to the question: “Where can I see all the folders shared on my Windows computer or device?”. We thought it was a really good question, and we decided to answer it. There are three different alternatives to view your Windows shared folders: one using File Explorer, one using Computer Management, and one using the command line (Terminal, Command Prompt, or PowerShell). Furthermore, all of the following methods work both in Windows 11 and Windows 10. So, if you want to learn how to find the shared folders on your Windows computer, how to find their path, or how to access a shared folder, read on:
NOTE: As all the methods to list shared folders work the same way and everything looks similar in Windows 11 and Windows 10, I used screenshots mainly from Windows 11.
1. How to see your shared folders using File Explorer
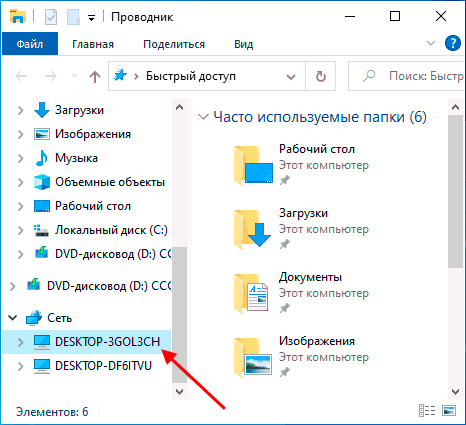
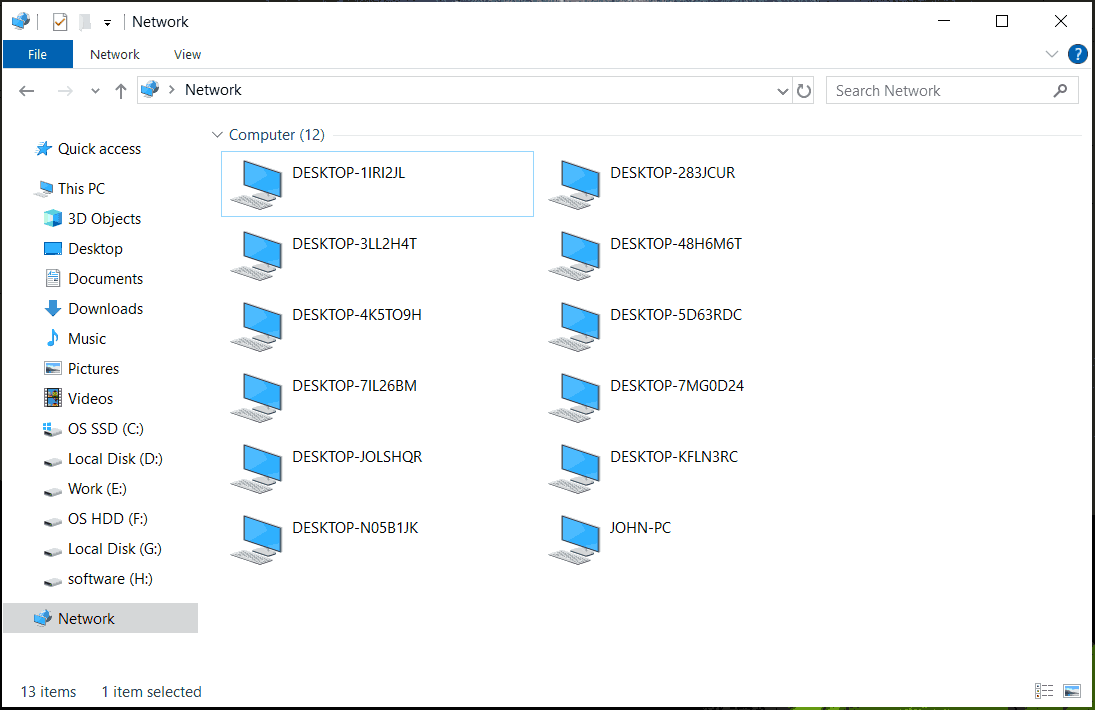
The simplest method to view and access your shared folders in Windows is offered by File Explorer. Regardless of whether you’re using Windows 10 or Windows 11, open File Explorer, expand the Network section from its left navigation pane, and click or tap on the name of your Windows PC. This shows you the list of folders shared on the network. Here’s what it looks like in Windows 11:
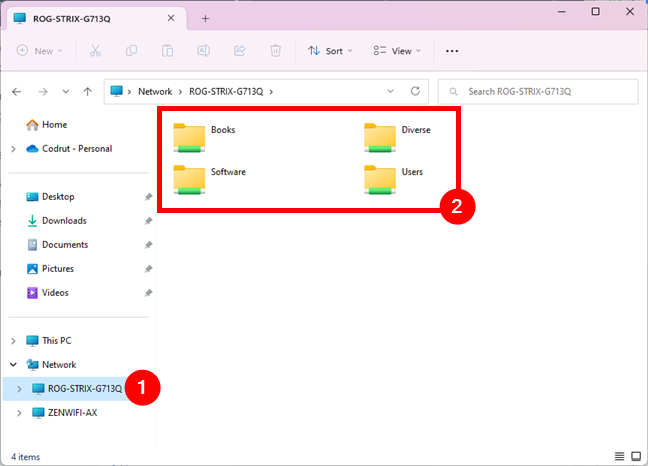
The list of folders shared with the network in Windows 11
If you’re using Windows 10, this is what you should see when accessing your shared folders in File Explorer:
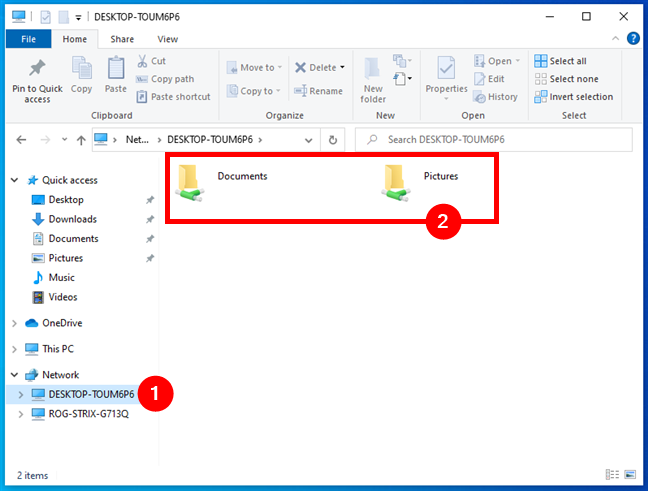
The list of folders shared with the network in Windows 10
TIP: To access any of your shared folders, you only need to double-click or double-tap on its name. Just like you would open a regular folder on your PC or any folder shared on another computer or device in your network.
Unfortunately, the problem with this view is that it doesn’t show hidden shares or give too much information about how each folder is shared. However, you can right-click or press and hold on any folder and then click/tap Properties or hit Alt + Enter on your keyboard.
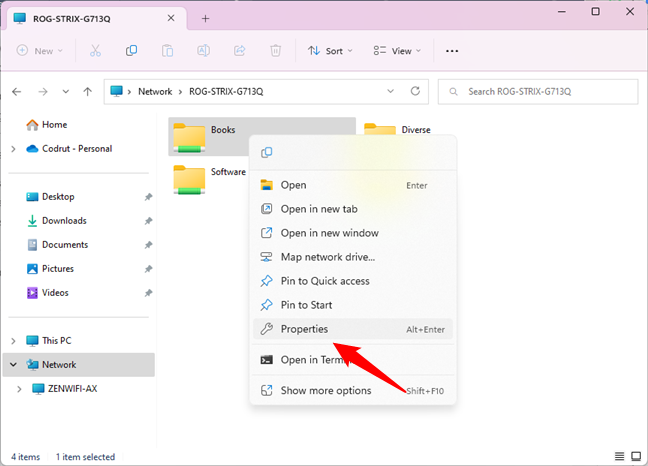
The Properties option from the contextual menu of a shared folder
This opens the Properties window of the selected shared folder. You can use it to access more information about how the folder is shared, the security settings it has, and so on.
Sharing settings and permissions for a folder
Although this method works, it’s not exactly an elegant way to see or manage your shared folders. There are better alternatives, as you’ll find out in the next chapters of this tutorial. Also, for unknown reasons, sometimes Windows doesn’t display your PC in the Network section.
2. How to view your Windows shared folders using Computer Management
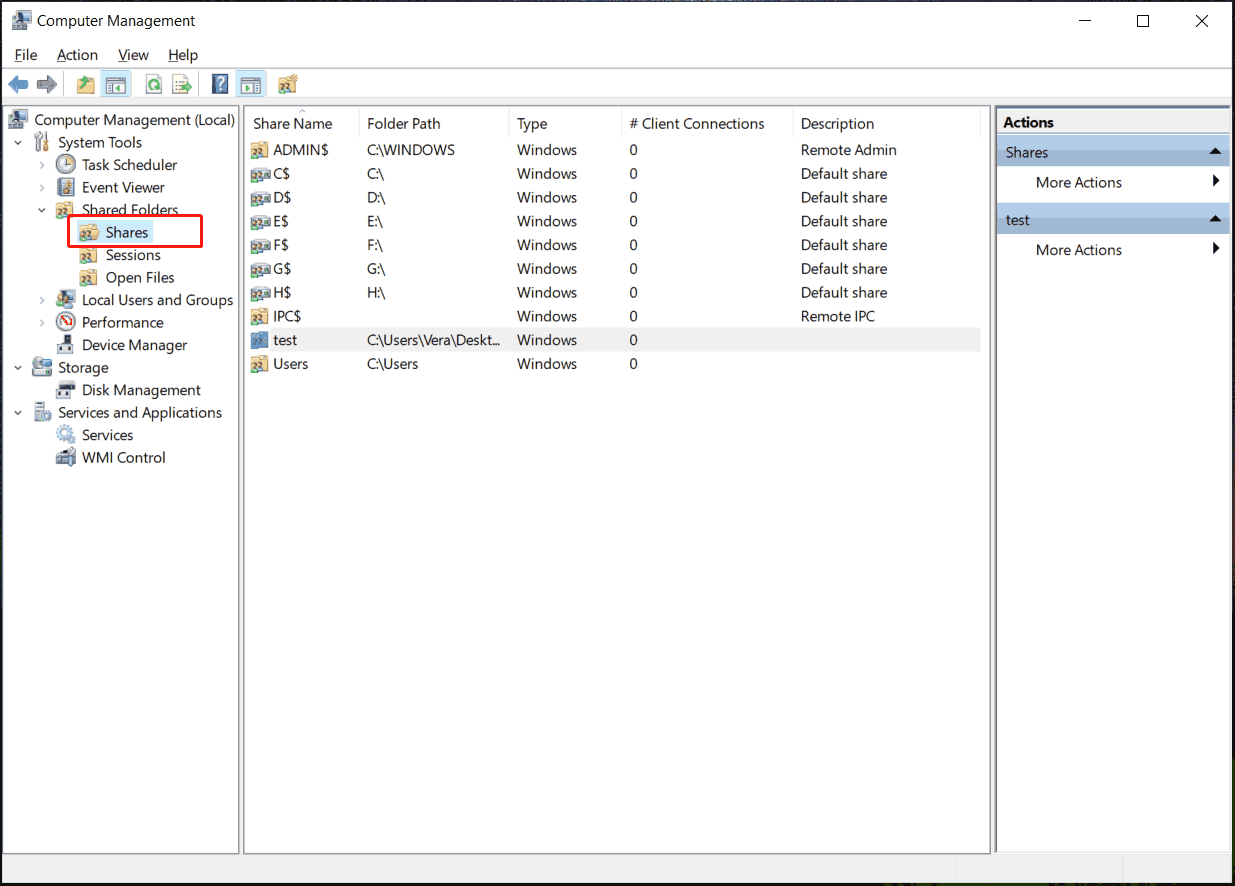
In my opinion, Computer Management is the best Windows tool for getting the complete list of shared folders on your PC. Open Computer Management and, on its left side panel, navigate to System Tools > Shared Folders > Shares. Then, in its central panel, Computer Management lists all the shared folders on your Windows computer or device.
You can see both the folders you shared and the default Windows shares (such as C$, which is the main partition on your PC), as well as the default remote administrative shares created by Windows (like ADMIN$).
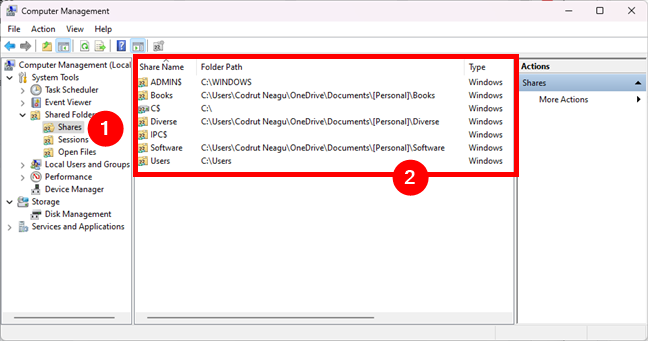
The shared folders can be seen in the Shares section of the Computer Management
For each shared folder or partition, Computer Management shows the official share name (as seen by others on the network, if not hidden), the exact folder path, the type of share, the number of connections made from the network to that folder, and a short description (if available).
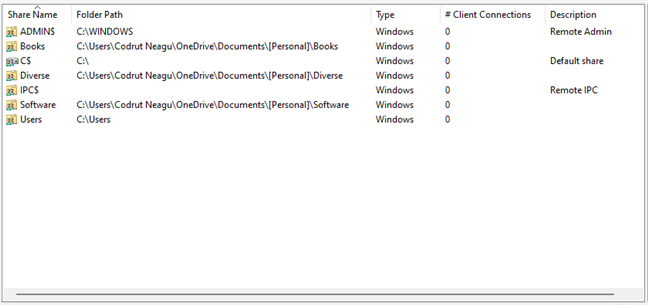
Shared folders are listed with their share name, folder path, type, etc.
TIP: If you want to access a shared folder, you can do that quickly by right-clicking (or pressing and holding) on its name and then selecting Open in the contextual menu.
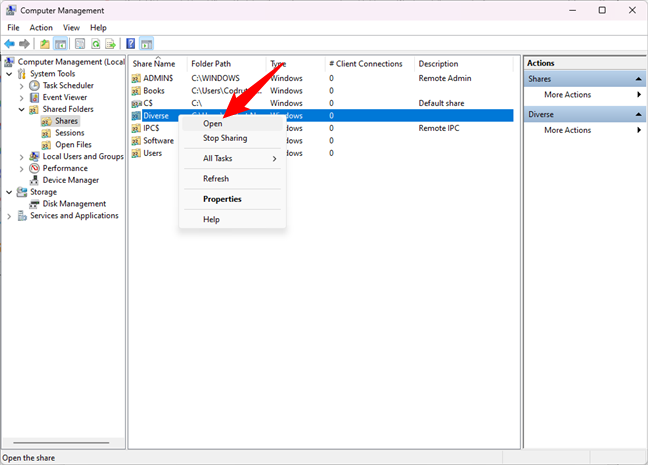
How to access a shared folder from Windows’ Computer Management
Double-clicking or double-tapping on a shared folder opens its Properties window. There, you can manage the different sharing parameters, such as the share name, description, and the maximum number of users allowed to simultaneously access that shared folder.
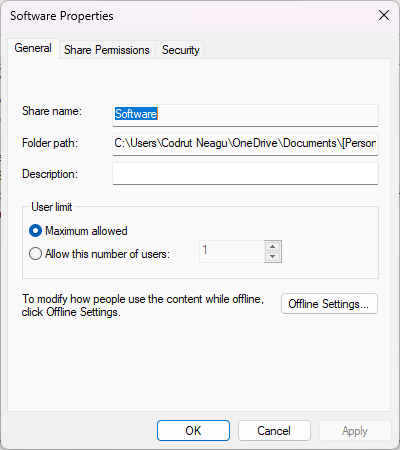
The Properties of a shared folder
If you go to the Share Permissions tab from the Properties window, you can view and set which users and user groups have access to the shared folder and the type of access each of them has.
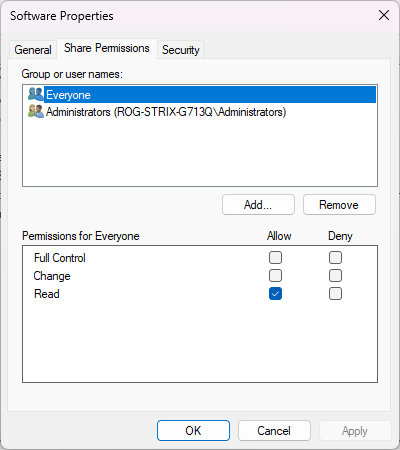
The Share Permissions of a Windows shared folder
Going back to the Computer Management window, if you click or tap Sessions on the left navigation pane, you can see the list of users who are currently connected to your network shares. For each user, you get to see the device where the connection is made, how many files are currently open by the user, the time since the connection was initiated, and so on.

Sessions lists the users currently accessing your shared folders
Select Open Files in the same navigation pane on the left, and Computer Management shows you all the files and folders accessed by the users who are connected to your network shares.
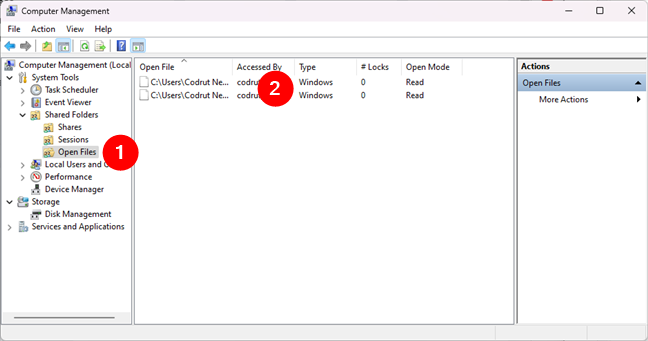
Open Files lists the shared files currently opened by users
All this is really useful information, isn’t it?
3. How to list your shared folders in the command line (with Terminal, Command Prompt, or PowerShell)
You can also get the complete list of the folders you share with the network from the command line. It doesn’t matter which tool you use, it can be Terminal, Command Prompt, or PowerShell. Just open the command-line environment you prefer and run this command to list your shared folders:
net share
Press Enter on your keyboard and the list of Windows shared folders is instantly generated and displayed.
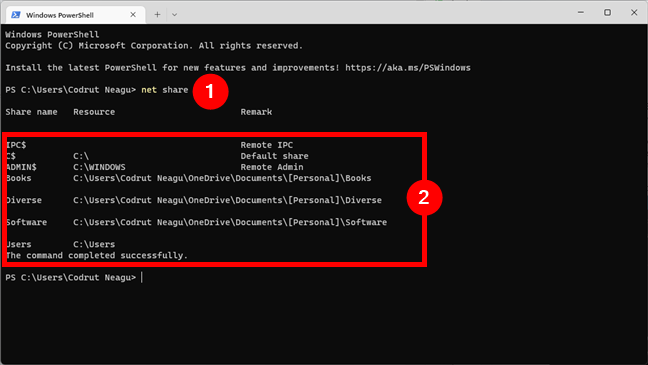
The net share command displays the list of shared folders
Furthermore, if you want to find the path of a shared folder, it’s easy because the net share command also outputs this information in the Resource column.

The net share command tells you the path of each shared folder
Neat, right?
TIP: To access a shared folder on your computer, you can use the simple cd command followed by that shared folder’s path, which you can find in the list under Resource. For other useful commands, check this article: CMD: 11 basic commands you should know (cd, dir, mkdir, etc.).
How do you make Windows show your shared folders?
As always with Windows operating systems, there is more than one way of doing something. Try the methods we’ve shown in this guide, and then tell us which one works best for you. Or, if you know other easy ways to show and access shared folders in Windows, don’t hesitate to let us know in the comments below, and we’ll update this guide as soon as possible.
Предоставление общего доступа к папкам – необходимая процедура для создания локальной сети. Если нужно организовать обмен данными между несколькими компьютерами, без этого не обойтись. Задача несложная, однако у начинающих пользователей часто возникают трудности.
В сегодняшнем руководстве я на пальцах объясню, как создать, настроить и открыть общий доступ к папке в Windows 10.
Настраиваем общий доступ в Windows 10
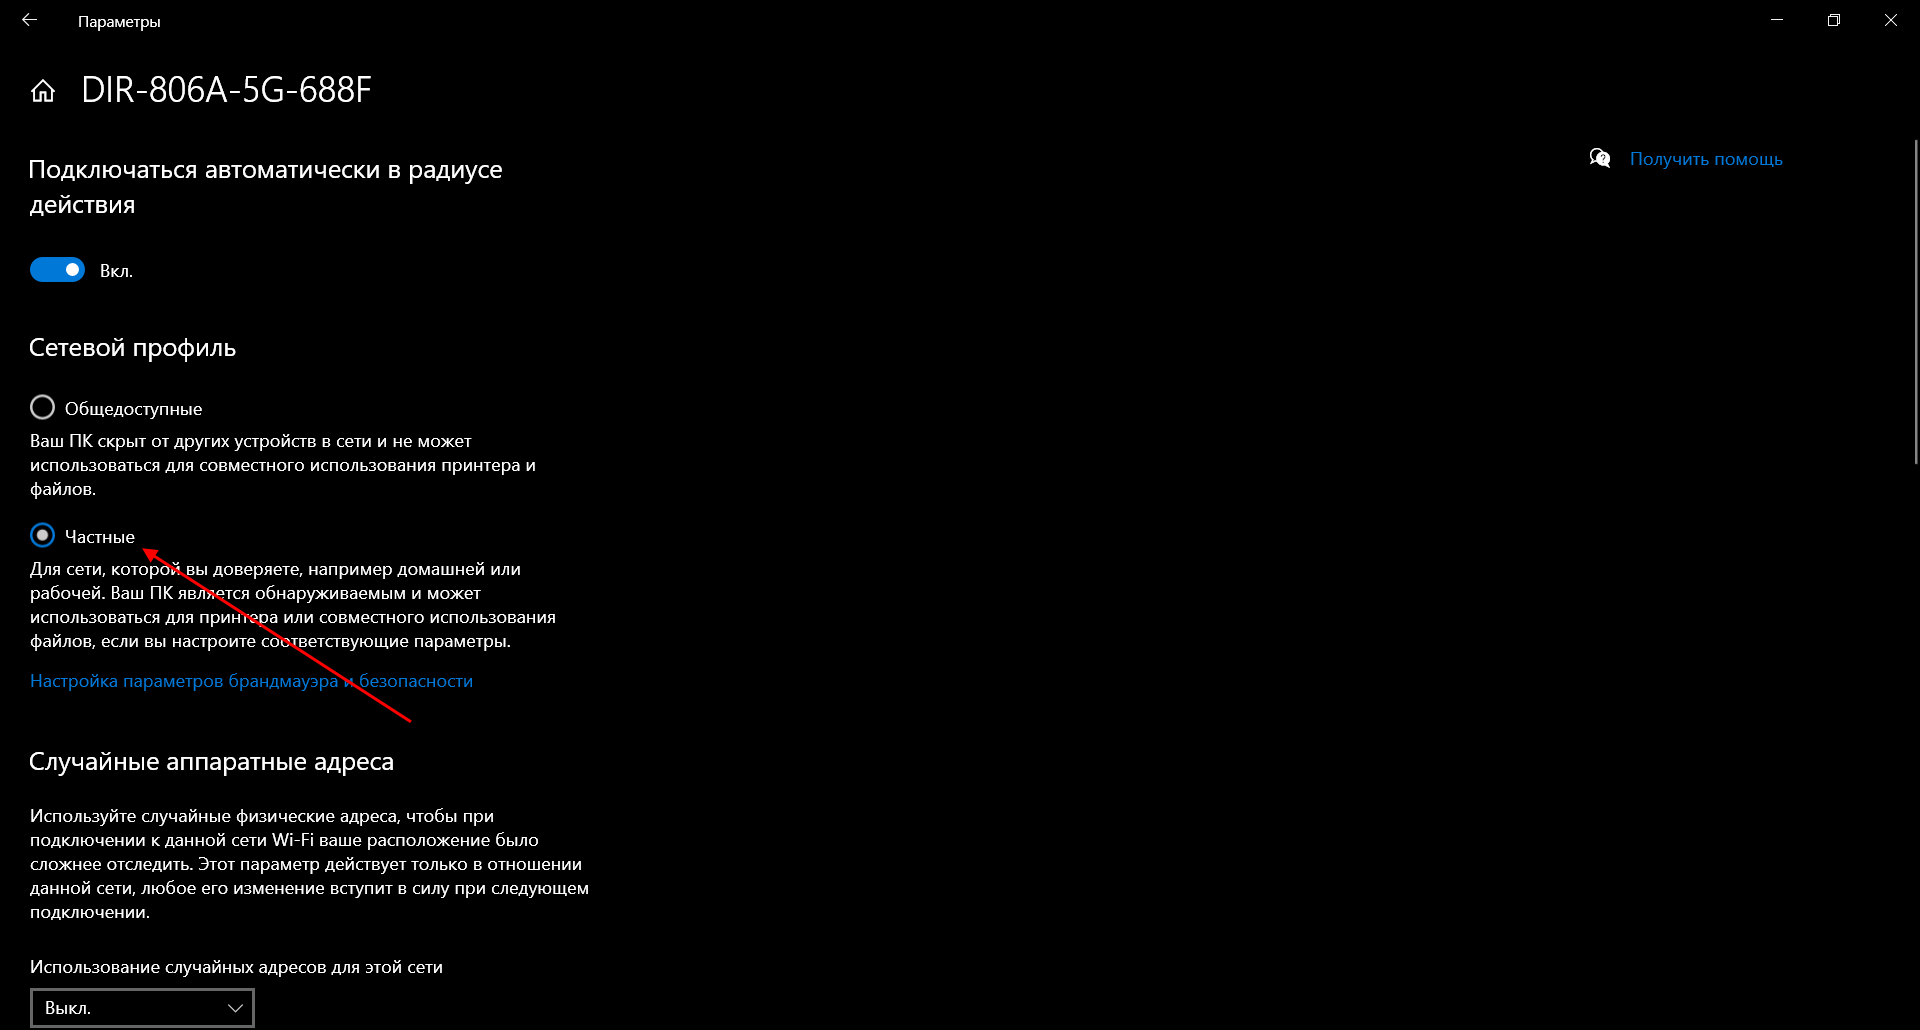
Прежде чем переходить к настройке общего доступа, для начала нам потребуется установить частный сетевой профиль – в таком случае компьютер будет виден прочим устройствам и может быть открыт для совместного использования файлов.
Изменяем профиль сети:
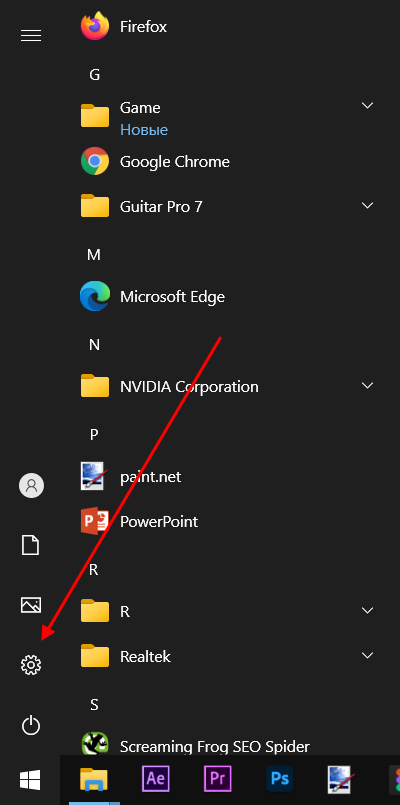
- Открываем меню «Пуск» и переходим в раздел «Параметры».

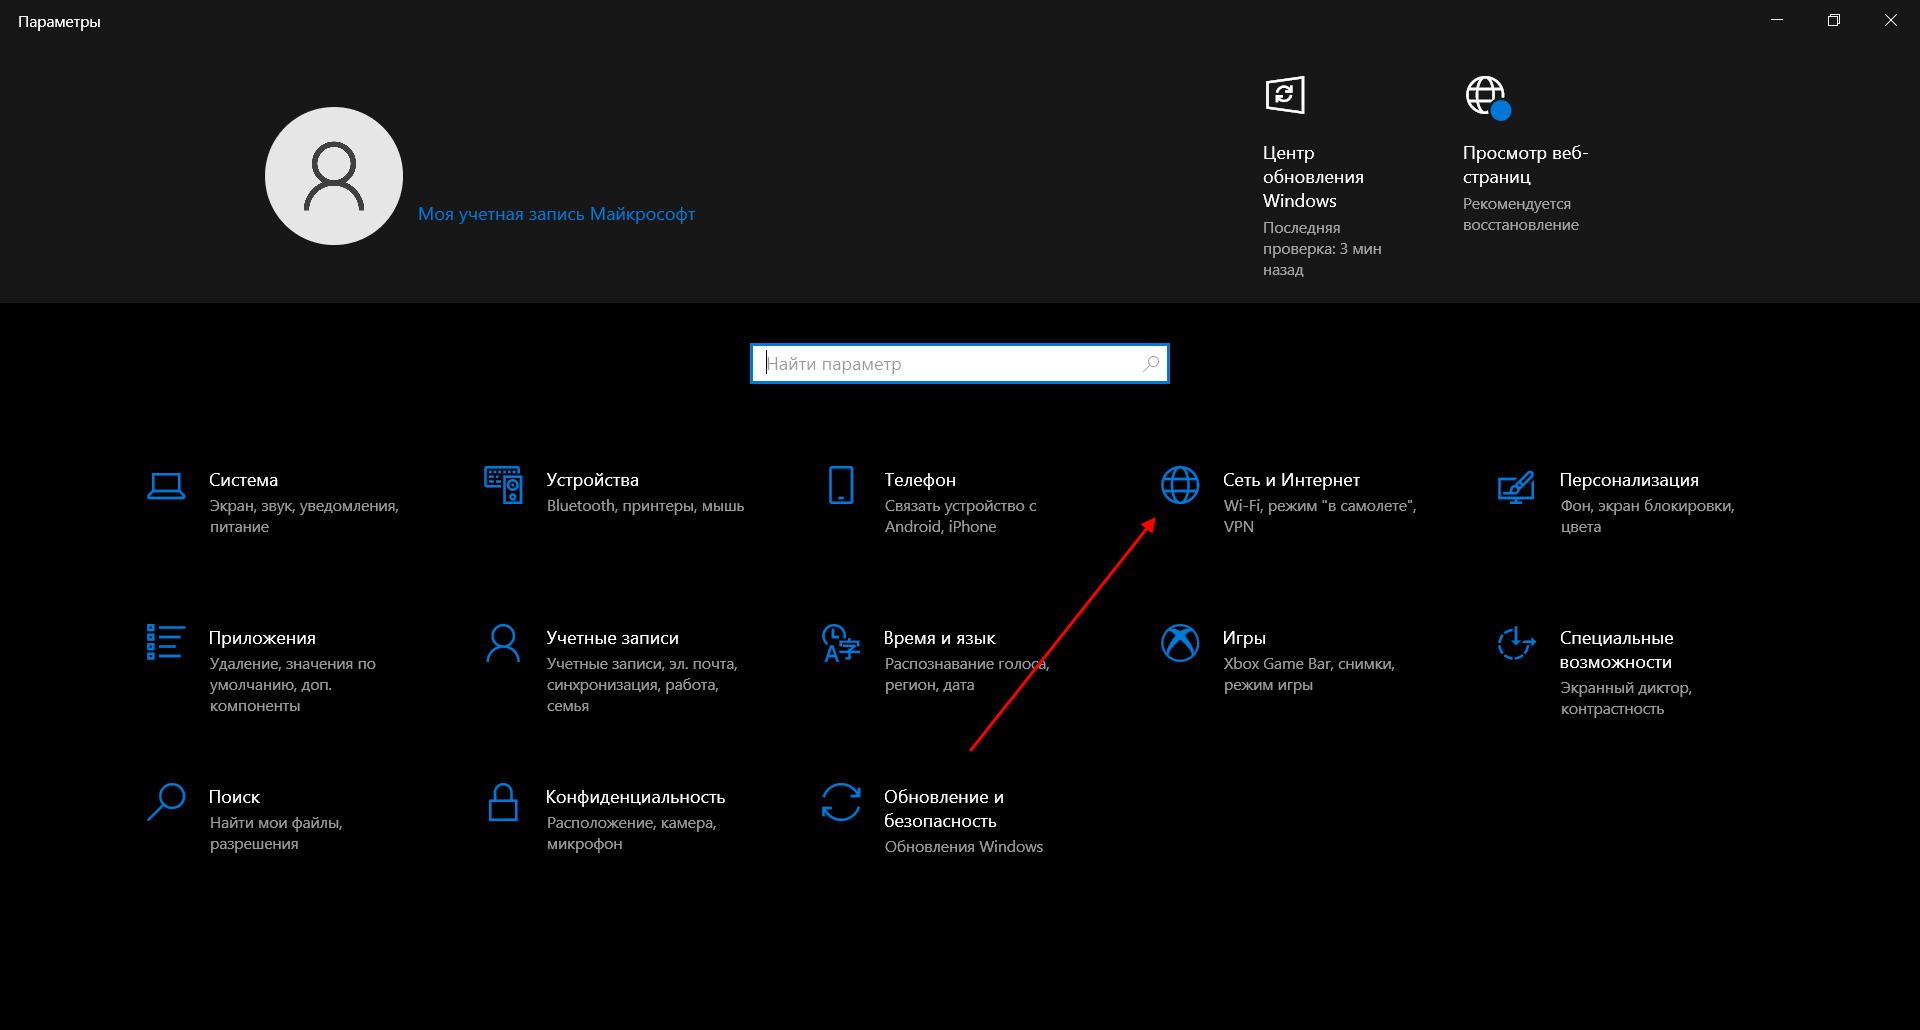
- Следующим шагом открываем подраздел «Сеть и интернет».
- Переходим в свойства подключенной сети.
- Меняем значение сетевого профиля на «Частные».

Теперь можем спокойно переходить к настройке общего доступа.
Способ №1
Открываем доступ к папке:
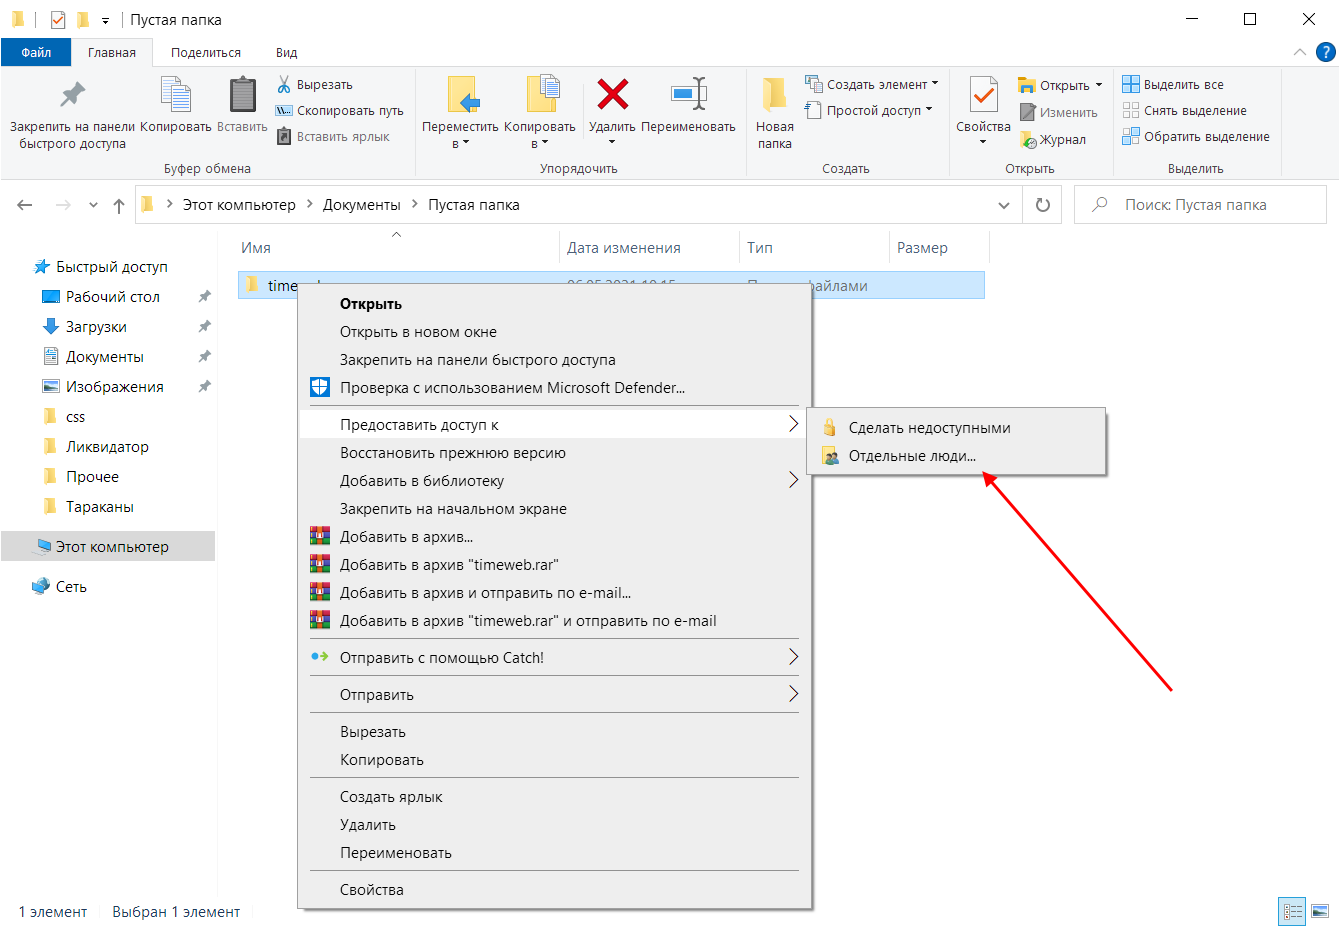
- Выбираем папку, которую нужно открыть для других компьютеров, и кликаем по ней правой кнопкой мыши. В отобразившемся меню выбираем «Предоставить доступ к» -> «Отдельные люди…».
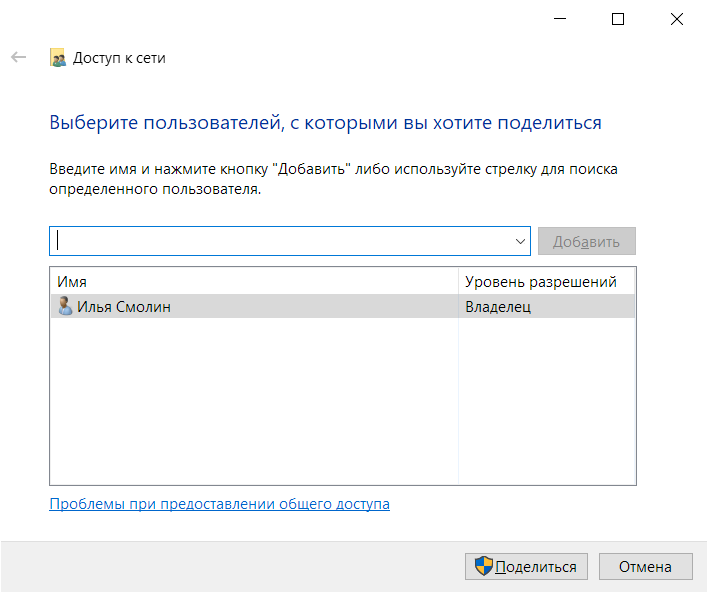
- Осталось нажать «Поделиться», но подождите – в таком случае доступ к папке будет предоставлен, однако войти в нее можно будет только с помощью логина и пароля текущего компьютера. Если вы не хотите, чтобы кто-то знал ваши данные, нужно создать нового пользователя. О том, как это сделать, читайте в следующем пункте.
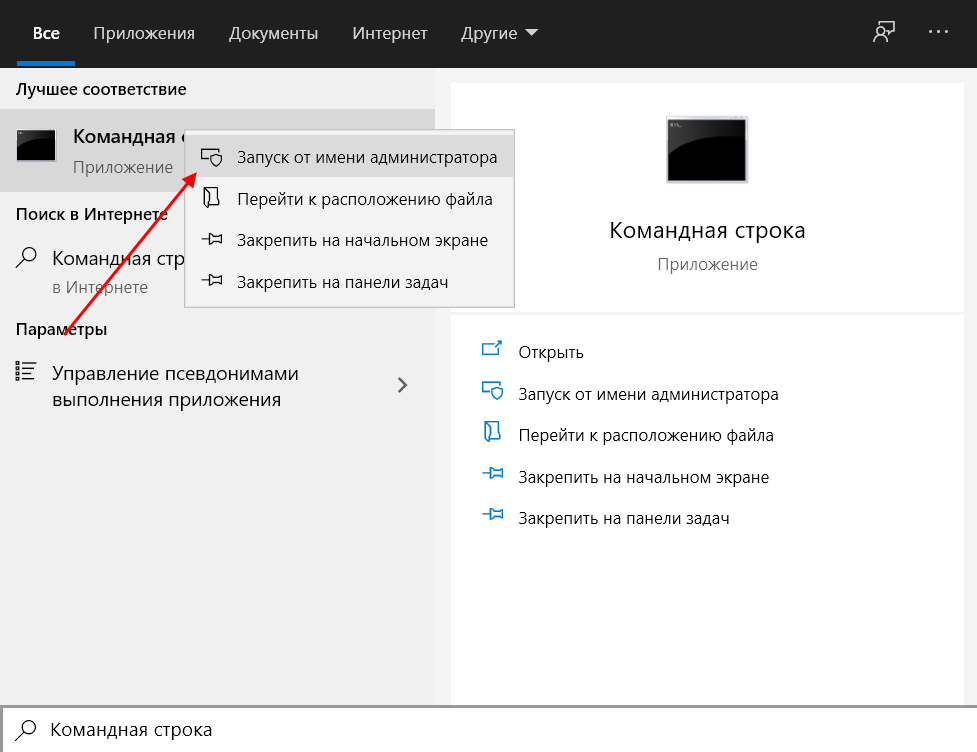
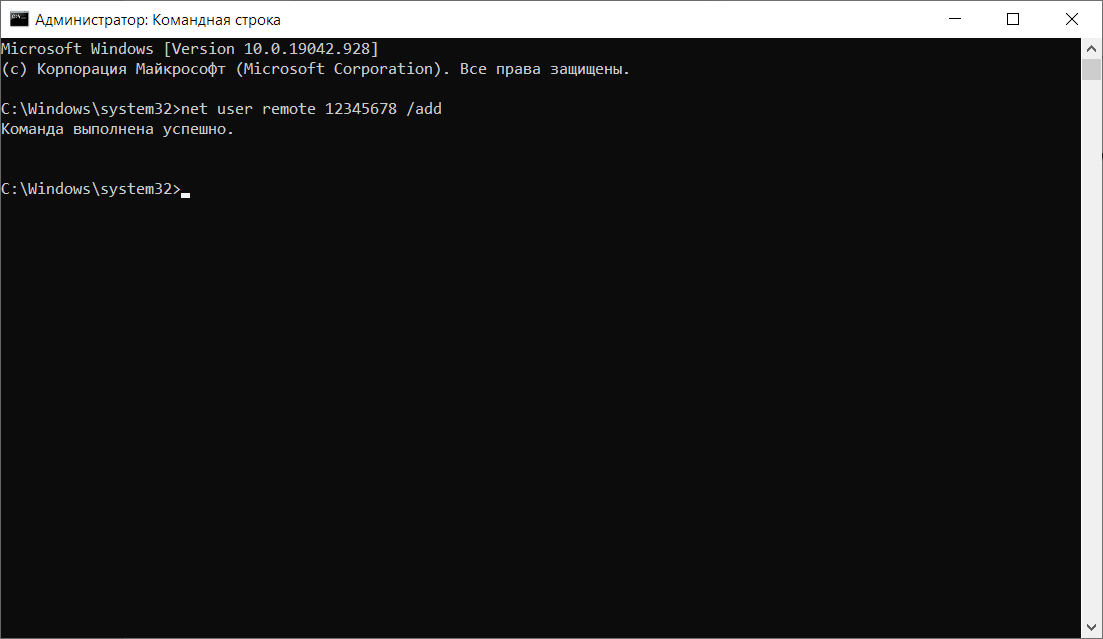
- Откроем командную строку от имени администратора – для этого перейдем в меню Пуск и введем соответствующий запрос. Затем кликнем по приложению правой кнопкой мыши и выберем «Запуск от имени администратора».
- В результате мы попадаем в консольное окно – оно-то нам и нужно. Вводим в него запрос net user Имя_пользователя Пароль /add. Жмем «Enter» и получаем информацию о том, что команда выполнена успешно.
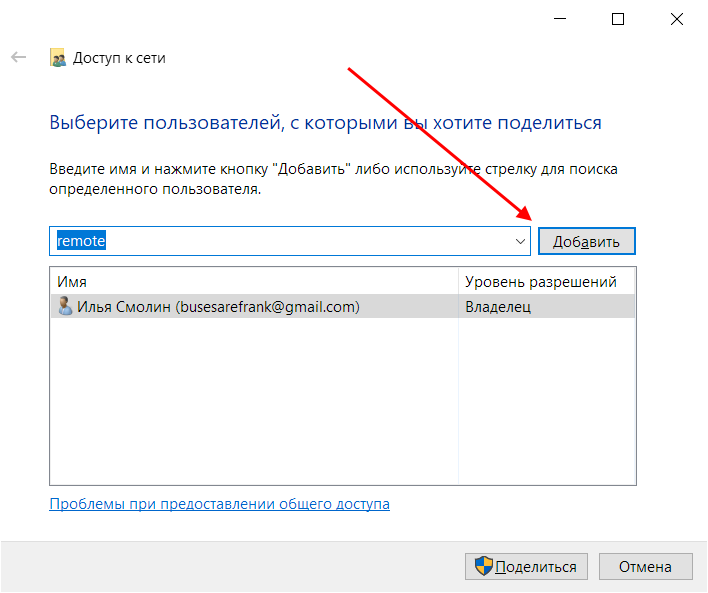
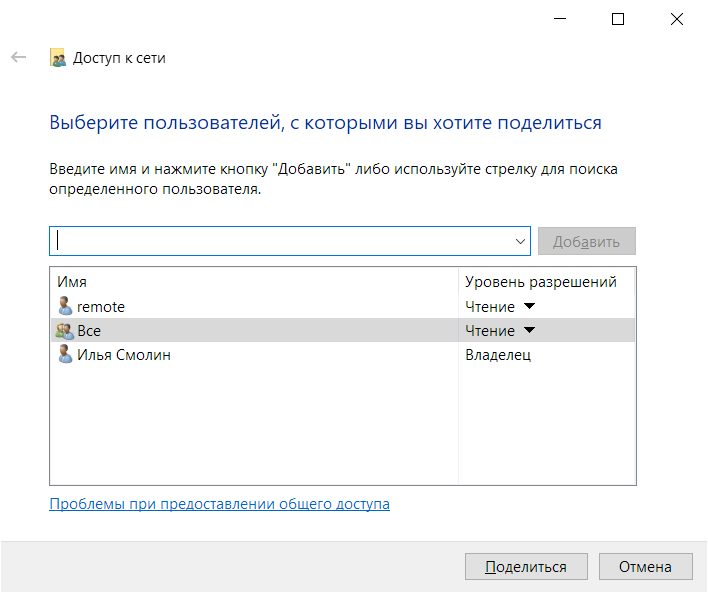
- Теперь снова выполняем действие под первым пунктом. Мы видим, что новых пользователей не прибавилось, и это нормально, так как их нужно добавить в само окно. Для этого в верхней части открываем выпадающее меню и выбираем нужного юзера, затем жмем «Добавить».
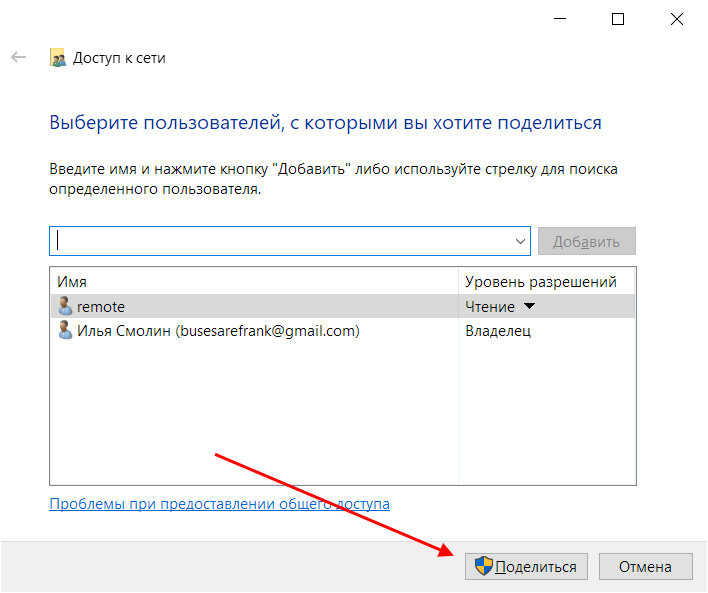
- Осталось выбрать пользователя и нажать на кнопку «Поделиться». Также справа от имени вы можете назначить уровень разрешений.
- Если все прошло успешно, то вы увидите примерно следующее окно:
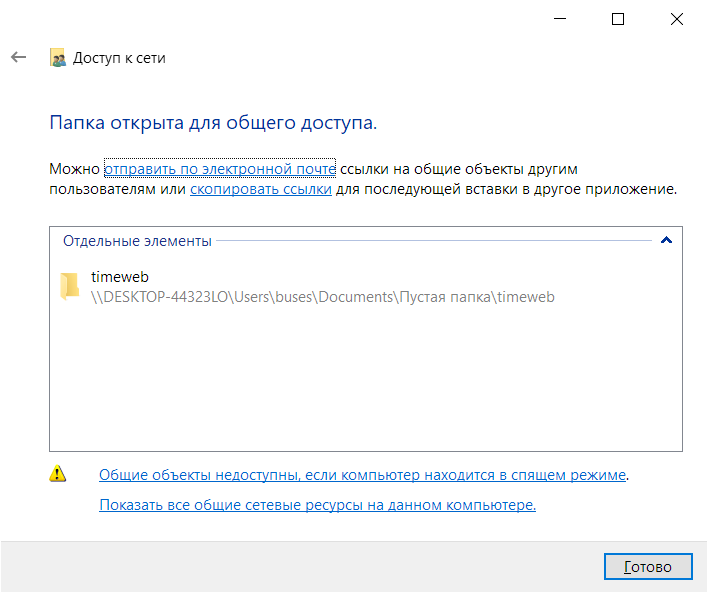
Папка для общего доступа открыта, и теперь в нее можно войти с другого компьютера, подключенного в ту же локальную сеть.
Способ №2
Данный способ подойдет не только для расшаривания папок, но и дисков. Например, вы можете предоставить доступ к локальному диску С. Сделать это можно следующим образом:
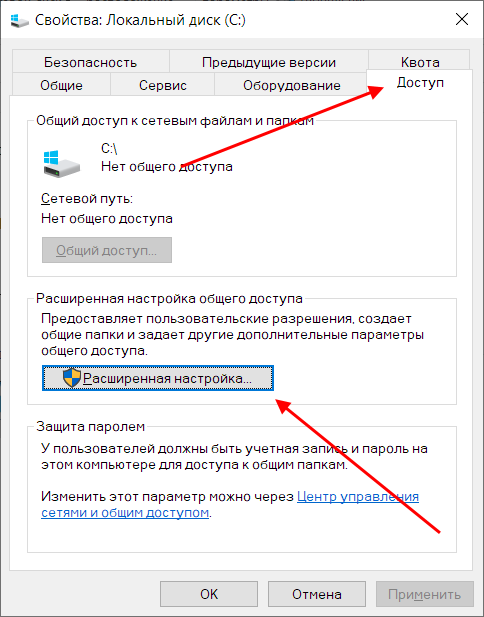
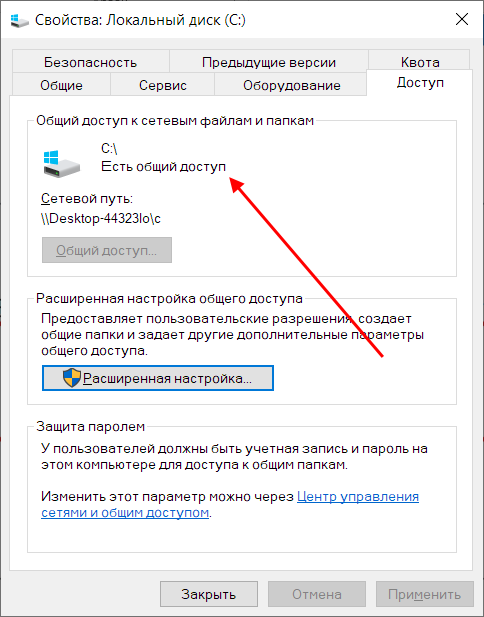
- Открываем папку «Этот компьютер» и выбираем диск, который нужно расшарить. Кликаем по нему правой кнопкой мыши и переходим в его свойства.
- Далее открываем подраздел «Доступ» и выбираем «Расширенная настройка…».
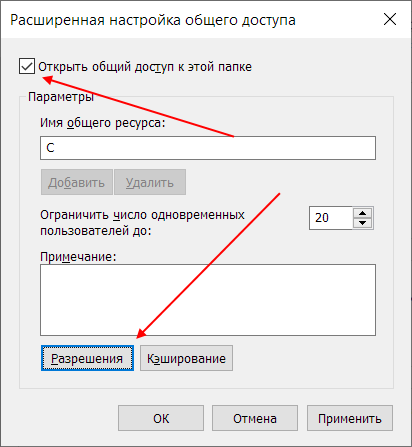
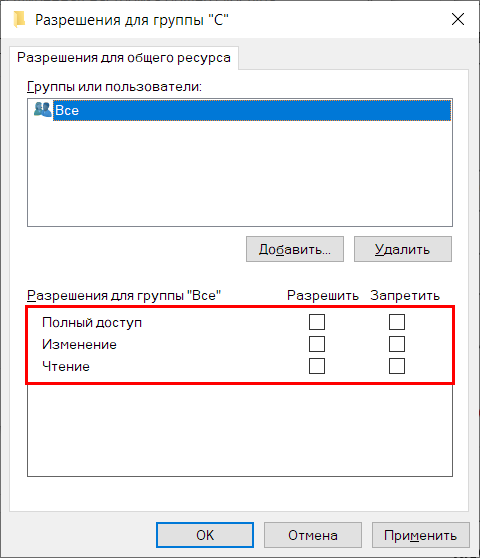
- Отмечаем галочкой пункт «Открыть общий доступ к этой папке». Также можно настроить разрешения – для это откроем соответствующее окно.
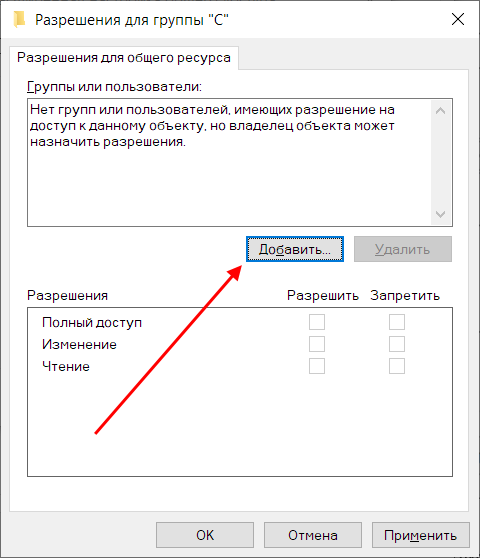
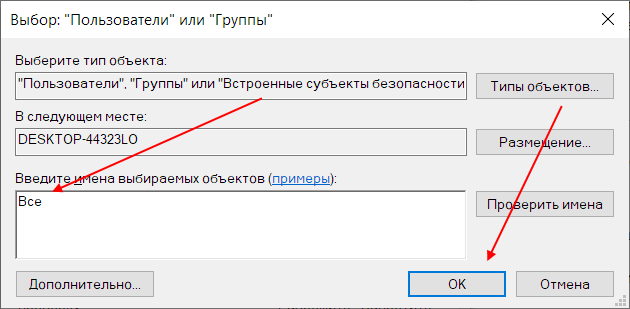
- В отобразившемся окне мы можем настроить различные права. Доступны такие параметры, как полный доступ, изменение и чтение. По умолчанию должна отображаться группа «Все». Если ее нет, то выбираем «Добавить…».
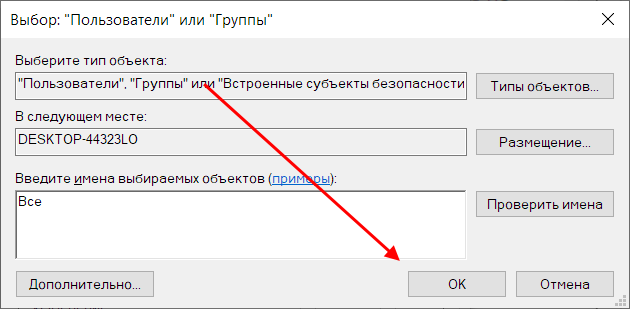
- В нижнее поле вводим «Все» без каких-либо кавычек и жмем «ОК».
- Теперь мы можем настроить права доступа. Достаточно выбрать группу и в нижней части отметить нужные пункты.
- После этого сохраняем все внесенные изменения кнопкой «ОК». В результате в свойствах локального диска будет указано, что общий доступ предоставлен.

Аналогичным образом можно предоставить доступ для любого другого диска или папки.
Комьюнити теперь в Телеграм
Подпишитесь и будьте в курсе последних IT-новостей
Подписаться
Как подключиться к общей папке в Windows 10
Дело за малым – запустить компьютер из локальной сети и всего в несколько кликов перейти в общую папку. Не забудьте, что данный ПК также должен использовать частную сеть, о чем я говорил в начале.
Подключаемся к общей папке:
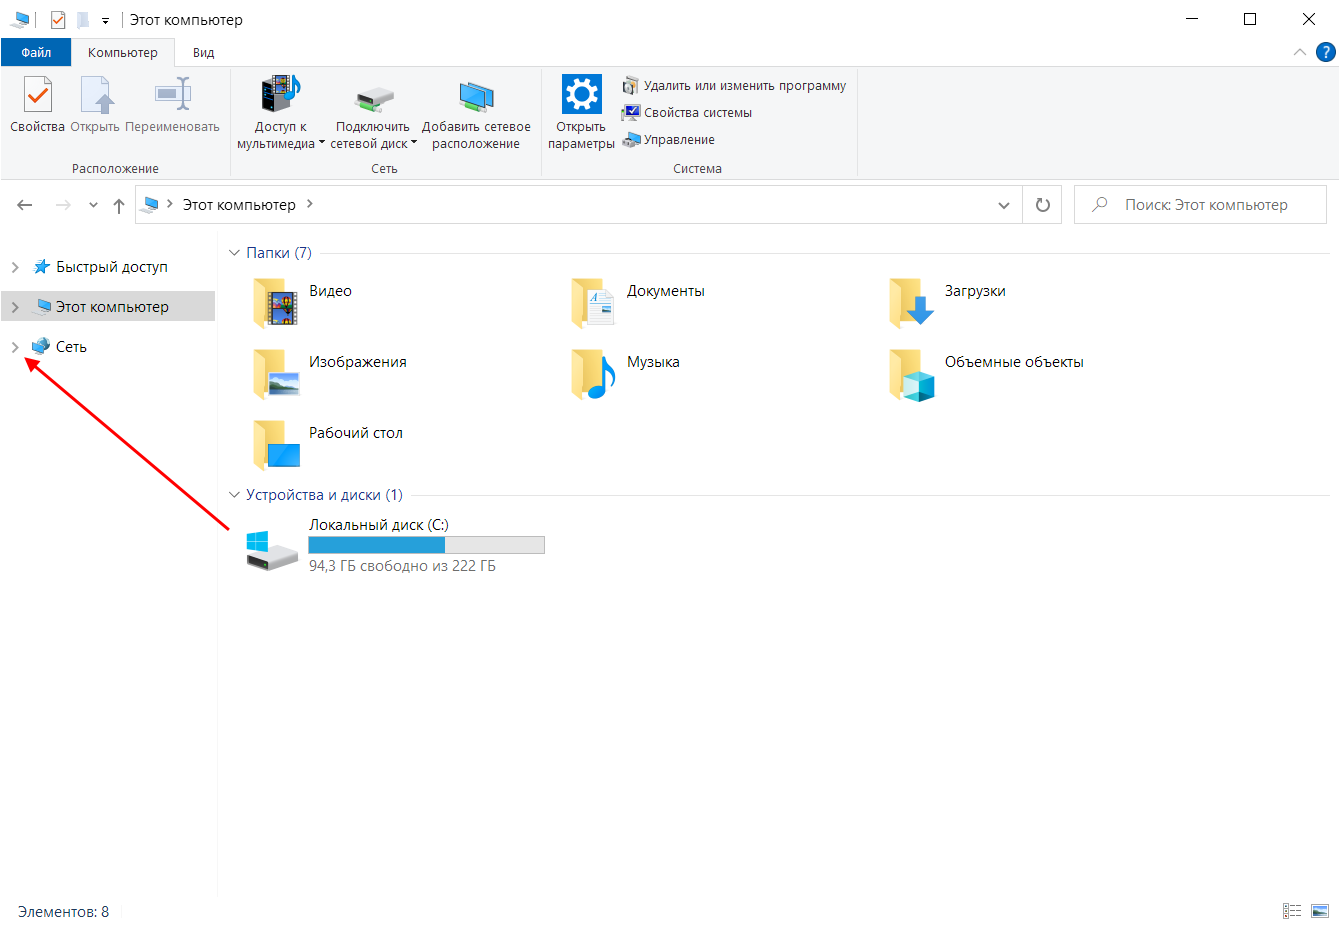
- Открываем любую папку и в левой части раскрываем пункт «Сеть».
- В результате должны отобразиться все компьютеры, подключенные к общей сети. Выбираем тот, где ранее мы открывали доступ к папке.
- Вводим логин и пароль пользователя, которого мы успешно создали на предыдущем этапе.
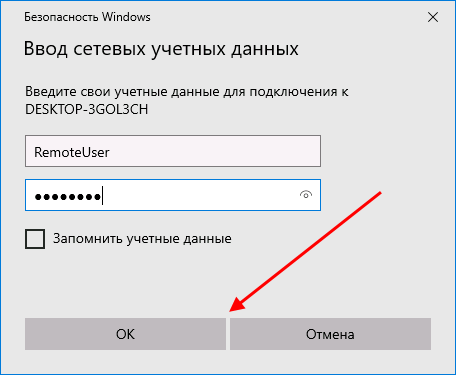
При успешной попытке мы подключимся к другому компьютеру и увидим все файлы, к которым предоставили доступ.
Как включить анонимный доступ без ввода данных
Ранее мы получали доступ к папке через авторизацию – вводили логин и пароль. Иногда в подобных манипуляциях нет необходимости, и их можно избежать. Работает, к сожалению, данный способ только на Windows 10 Pro и Enterprise. Если на вашем компьютере домашняя версия, то активировать анонимный доступ не получится.
Подключаем анонимный доступ:
- Снова переходим к предоставлению общего доступа для папки, как мы это делали в самом начале. Добавляем нового пользователя – теперь это будет группа «Все».
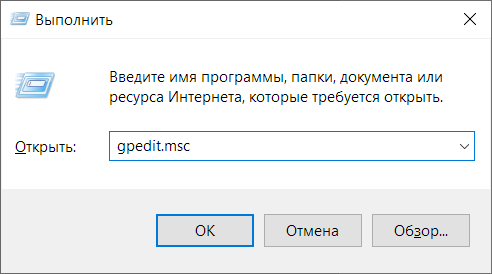
- Следующим шагом переходим в редактор локальной групповой политики – для этого зажимаем на клавиатуре комбинацию клавиш «WIN+R» и вводим запрос gpedit.msc.
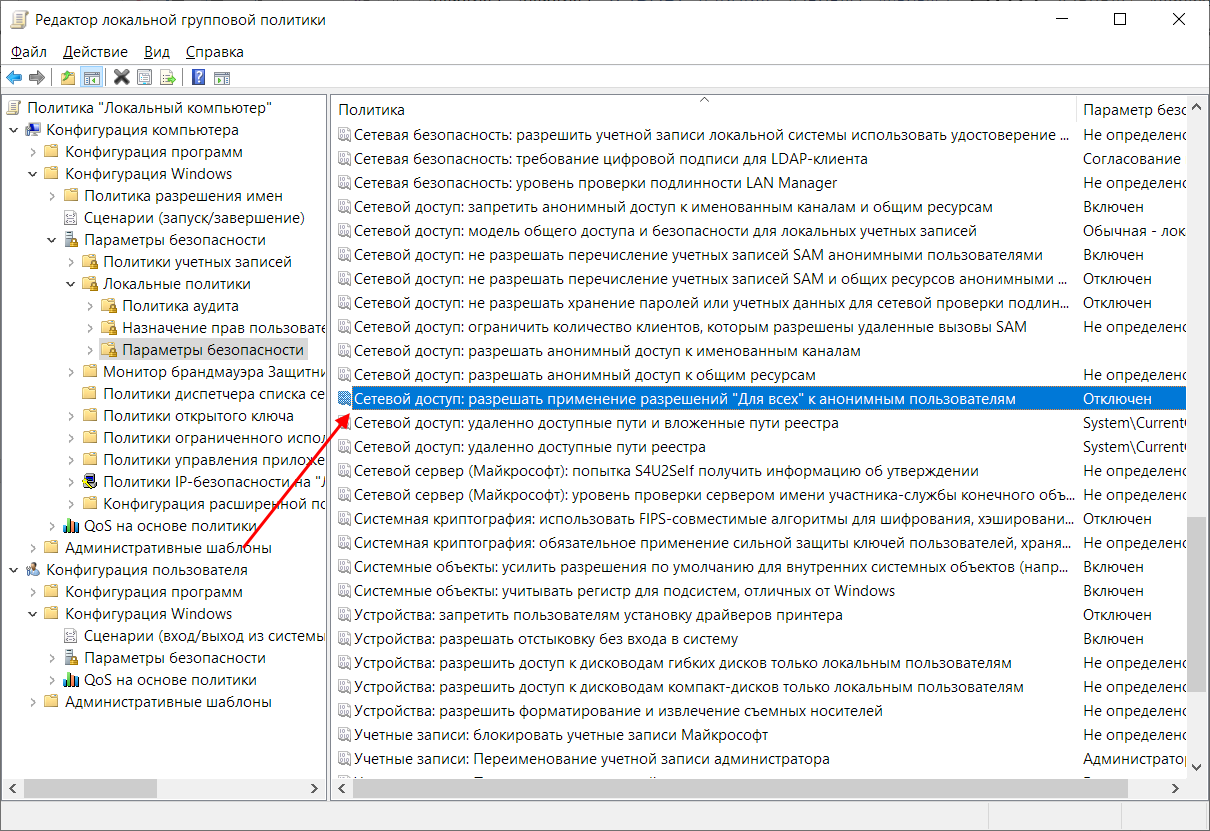
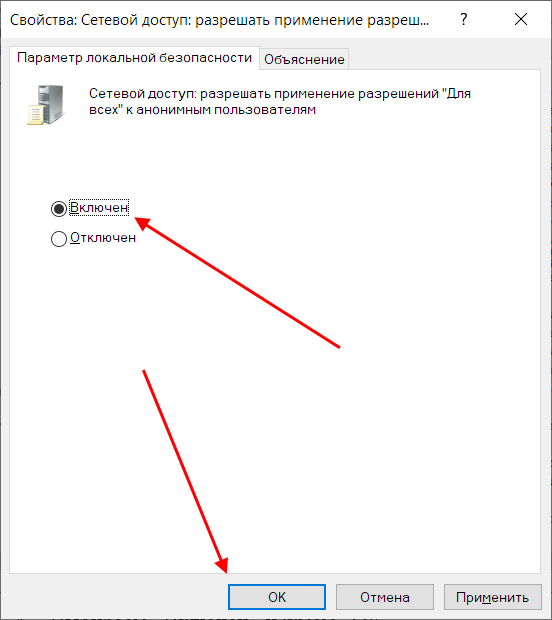
- Переходим в «Конфигурация компьютера» -> «Параметры безопасности» -> «Локальные политики» -> «Параметры безопасности». Затем находим строку «Сетевой доступ: разрешать применение “Для всех” к анонимным пользователям» и кликаем по ней двойным щелчком мыши.
- Выбираем «Включен» и жмем «ОК».
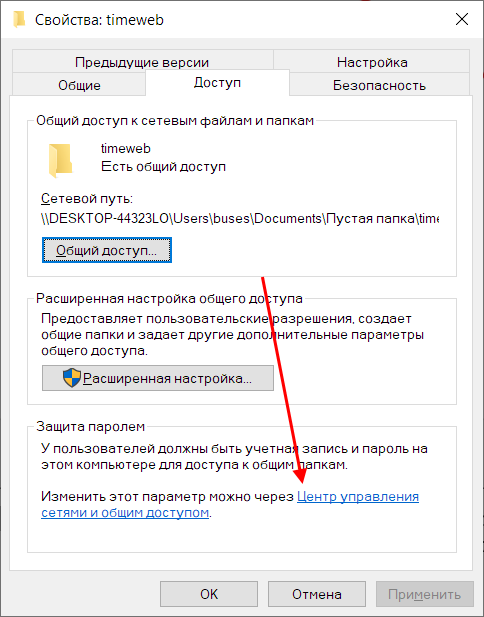
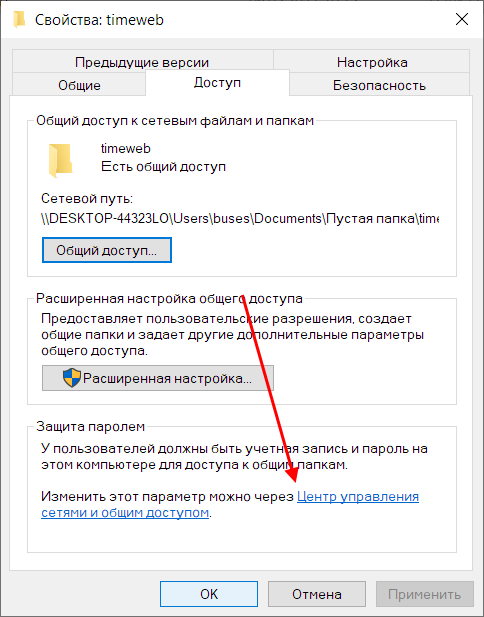
- Возвращаемся к нашей папке и заходим в ее свойства – там переходим в раздел «Доступ» и в нижней части кликаем по кнопке «Центр управления сетями и общим доступом».
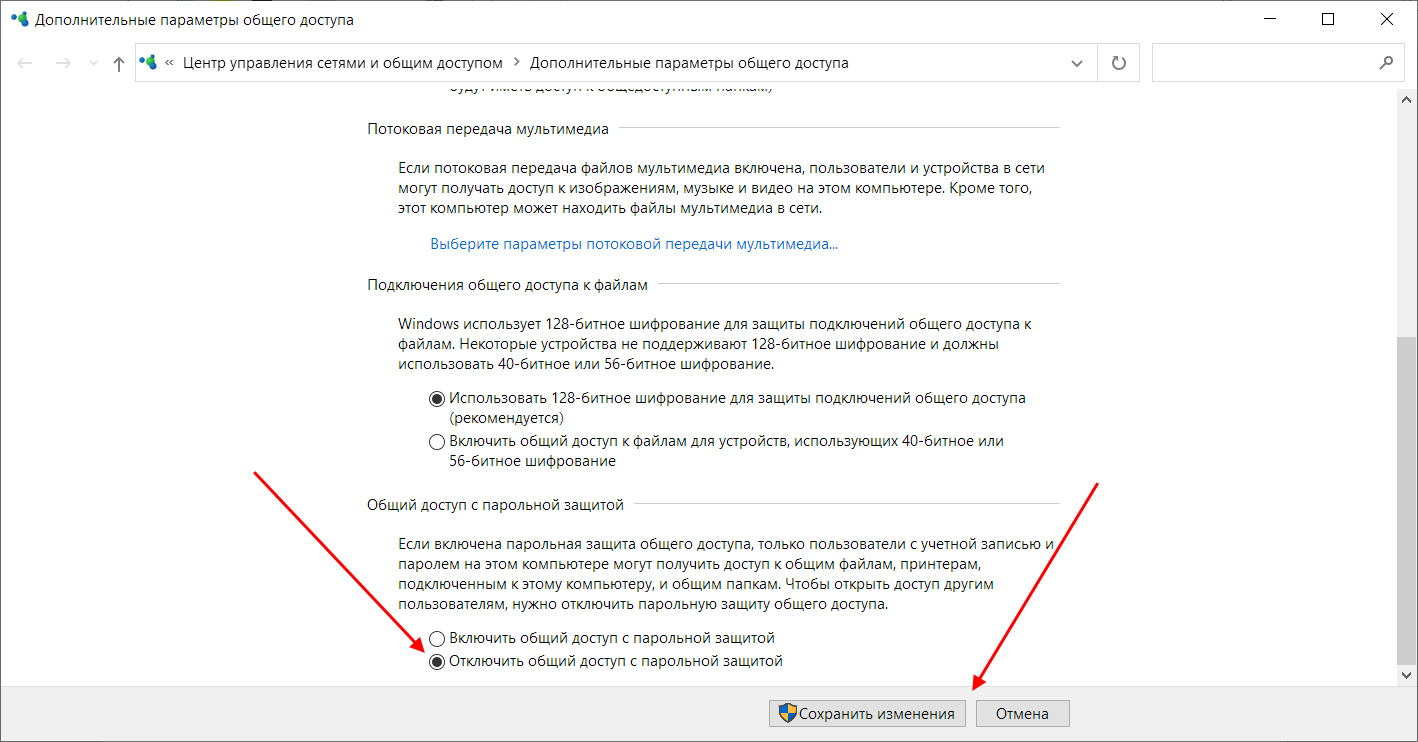
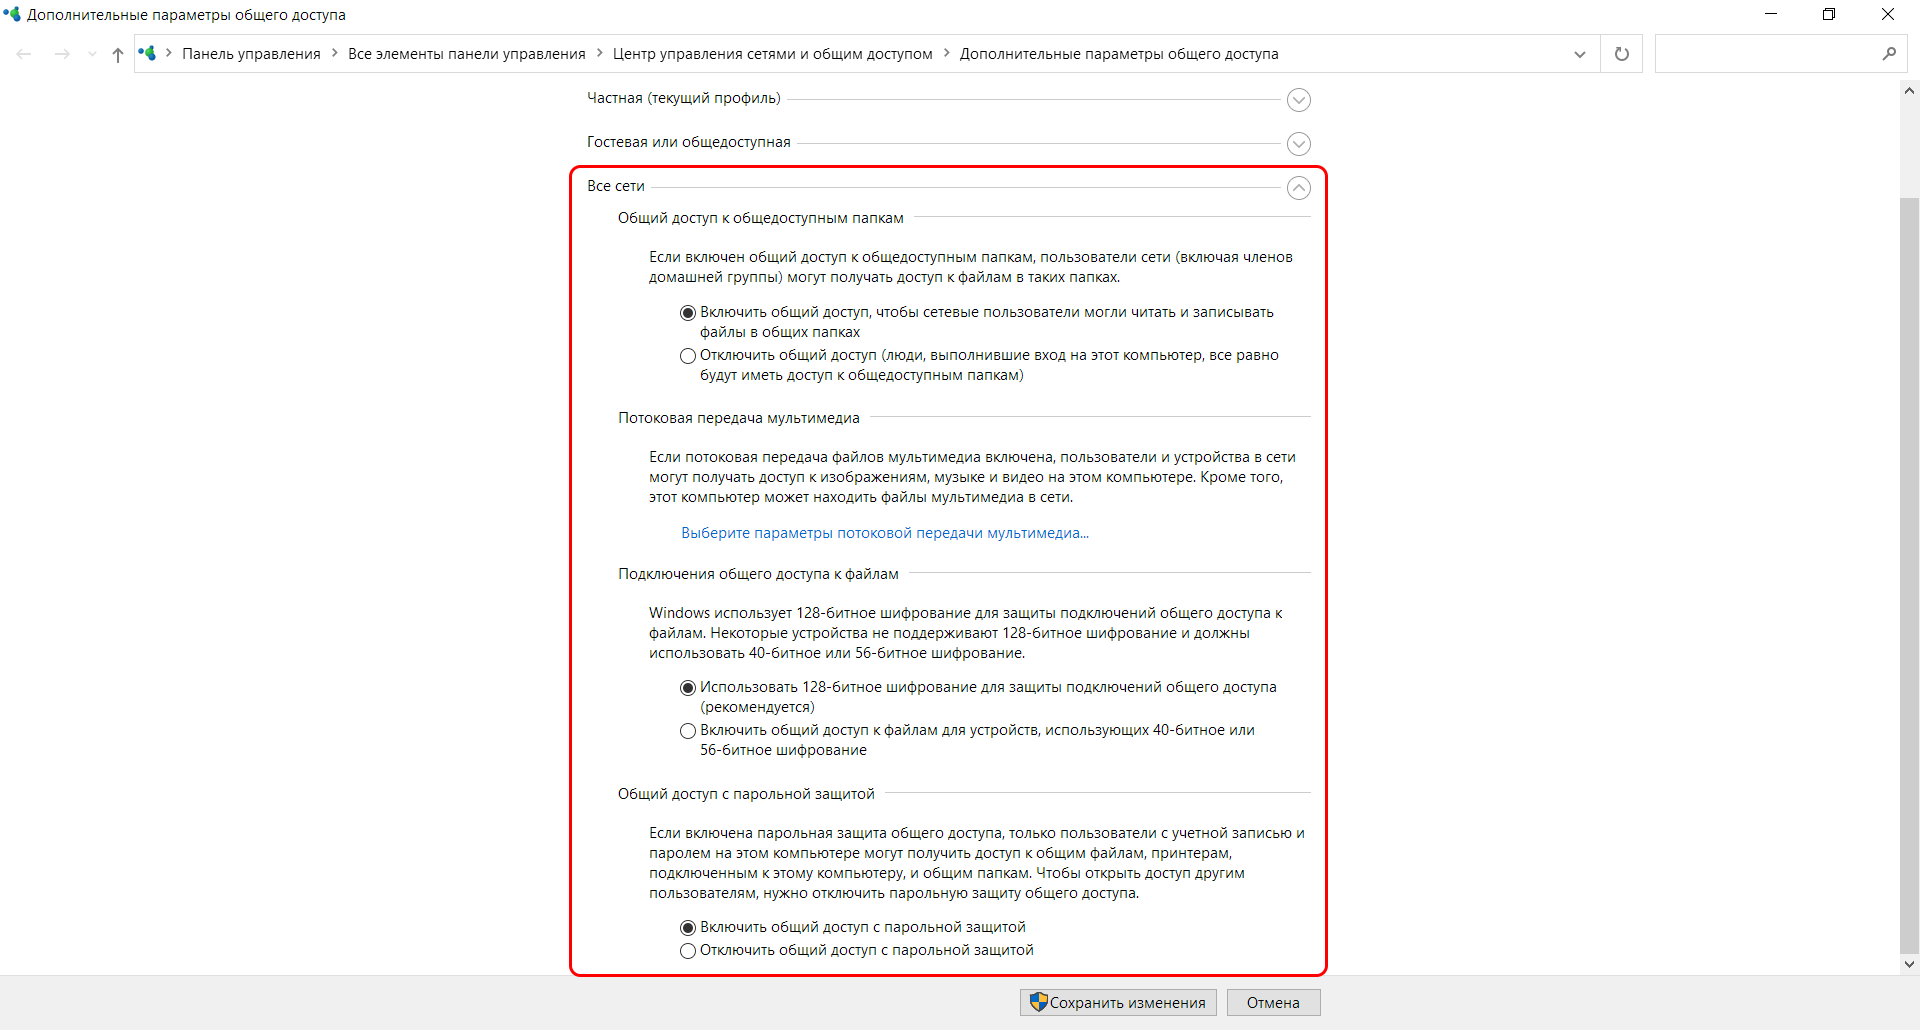
- Раскрываем пункт «Все сети» и в самом низу отмечаем пункт «Отключить общий доступ с парольной защитой». После нажимаем «Сохранить изменения».
На этом все. Теперь мы можем спокойно получить доступ к папке с другого компьютера без ввода логина и пароля.
В случае с диском все немного иначе:
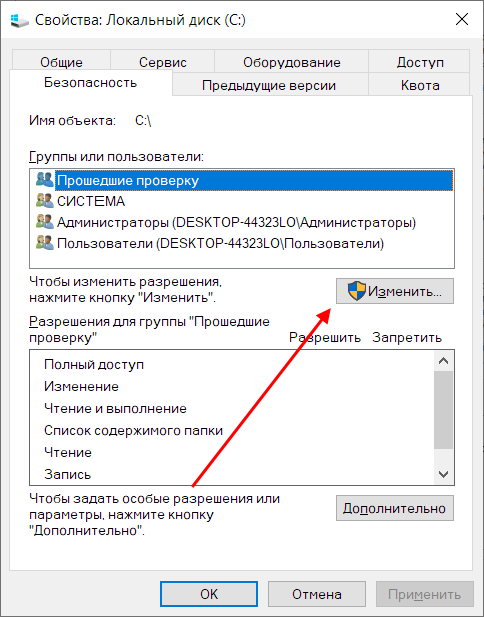
- Переходим в свойства локального диска и открываем раздел «Безопасность». Затем нажимаем «Изменить…».
- Нажимаем «Добавить…».
- Добавляем новую группу «Все».
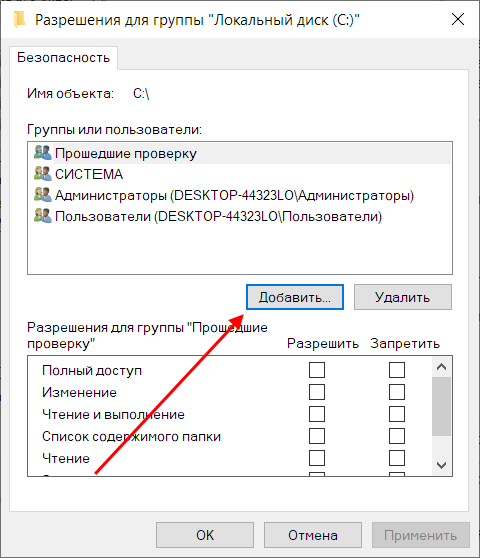
Вот так мы можем предоставить доступ к локальному диску без логина и пароля. Обязательно в конце примените внесенные изменения, по желанию добавьте нужные разрешения. Настройка редактора групповых политик аналогична той, что мы проводили выше.
Устранение неполадок при настройке общего доступа
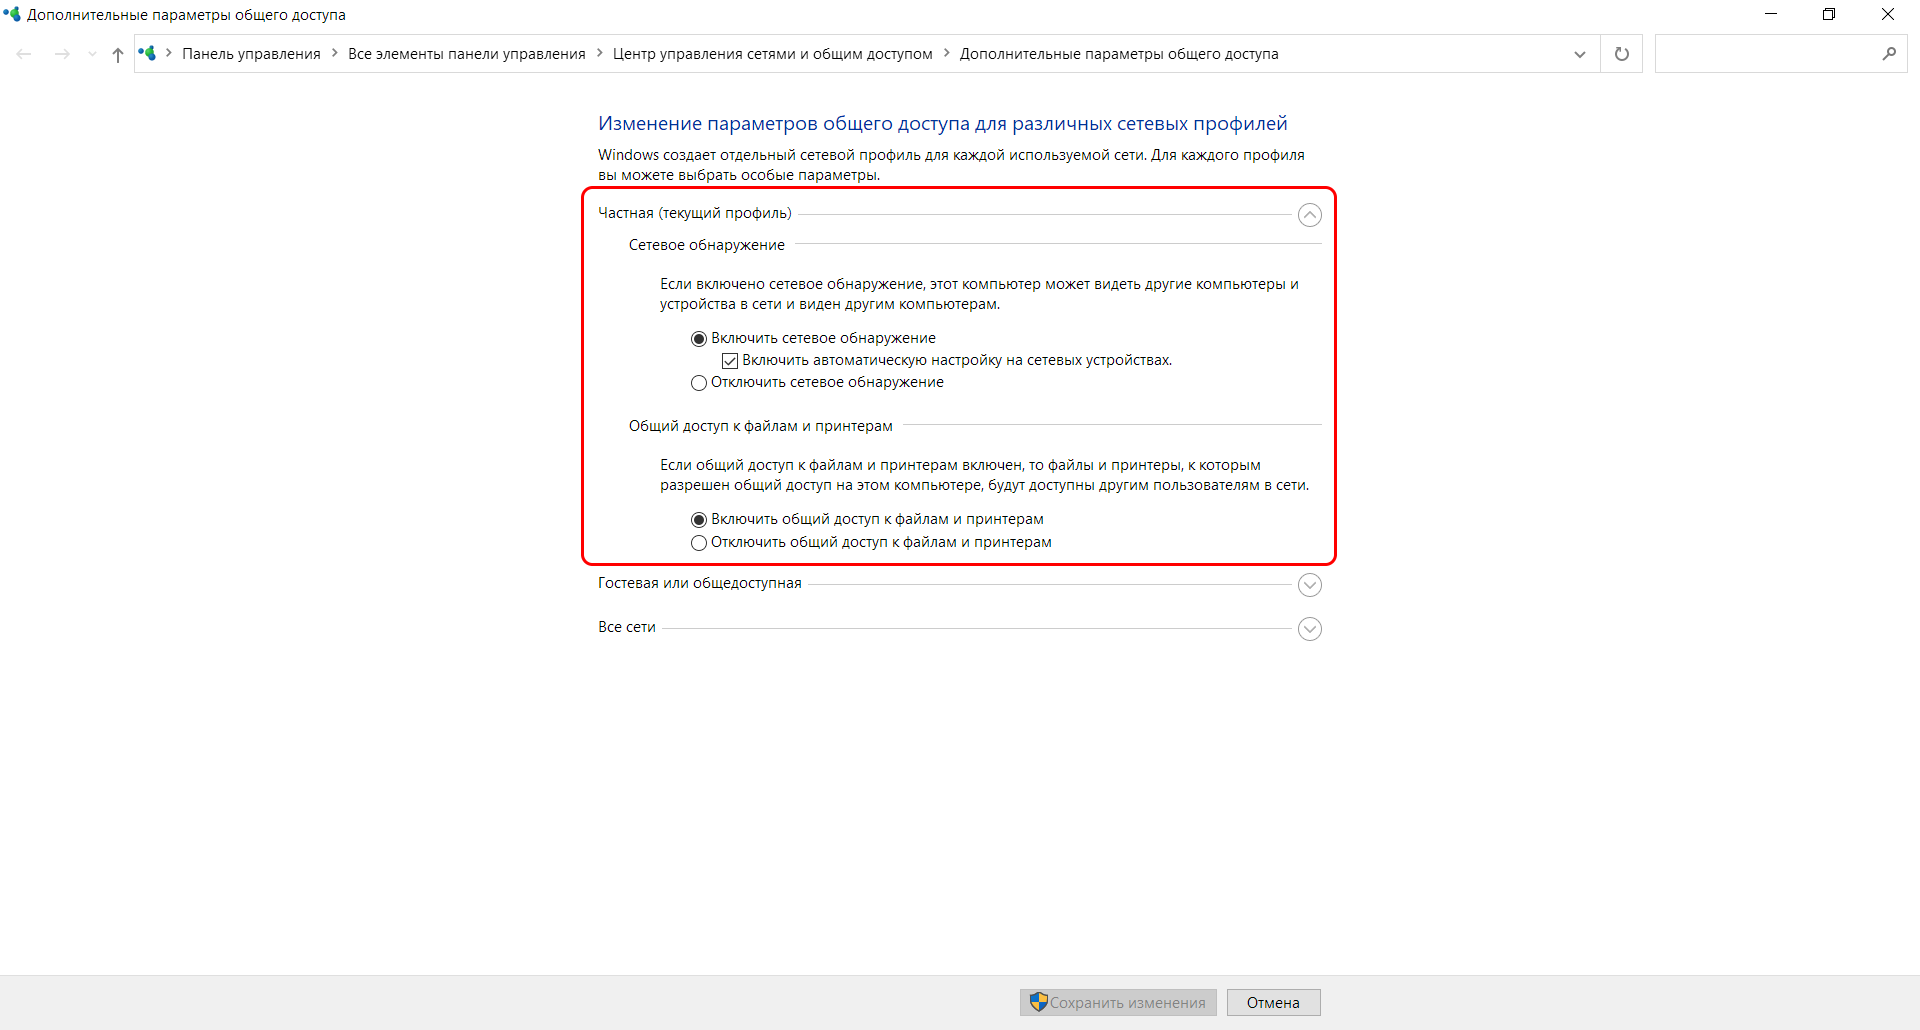
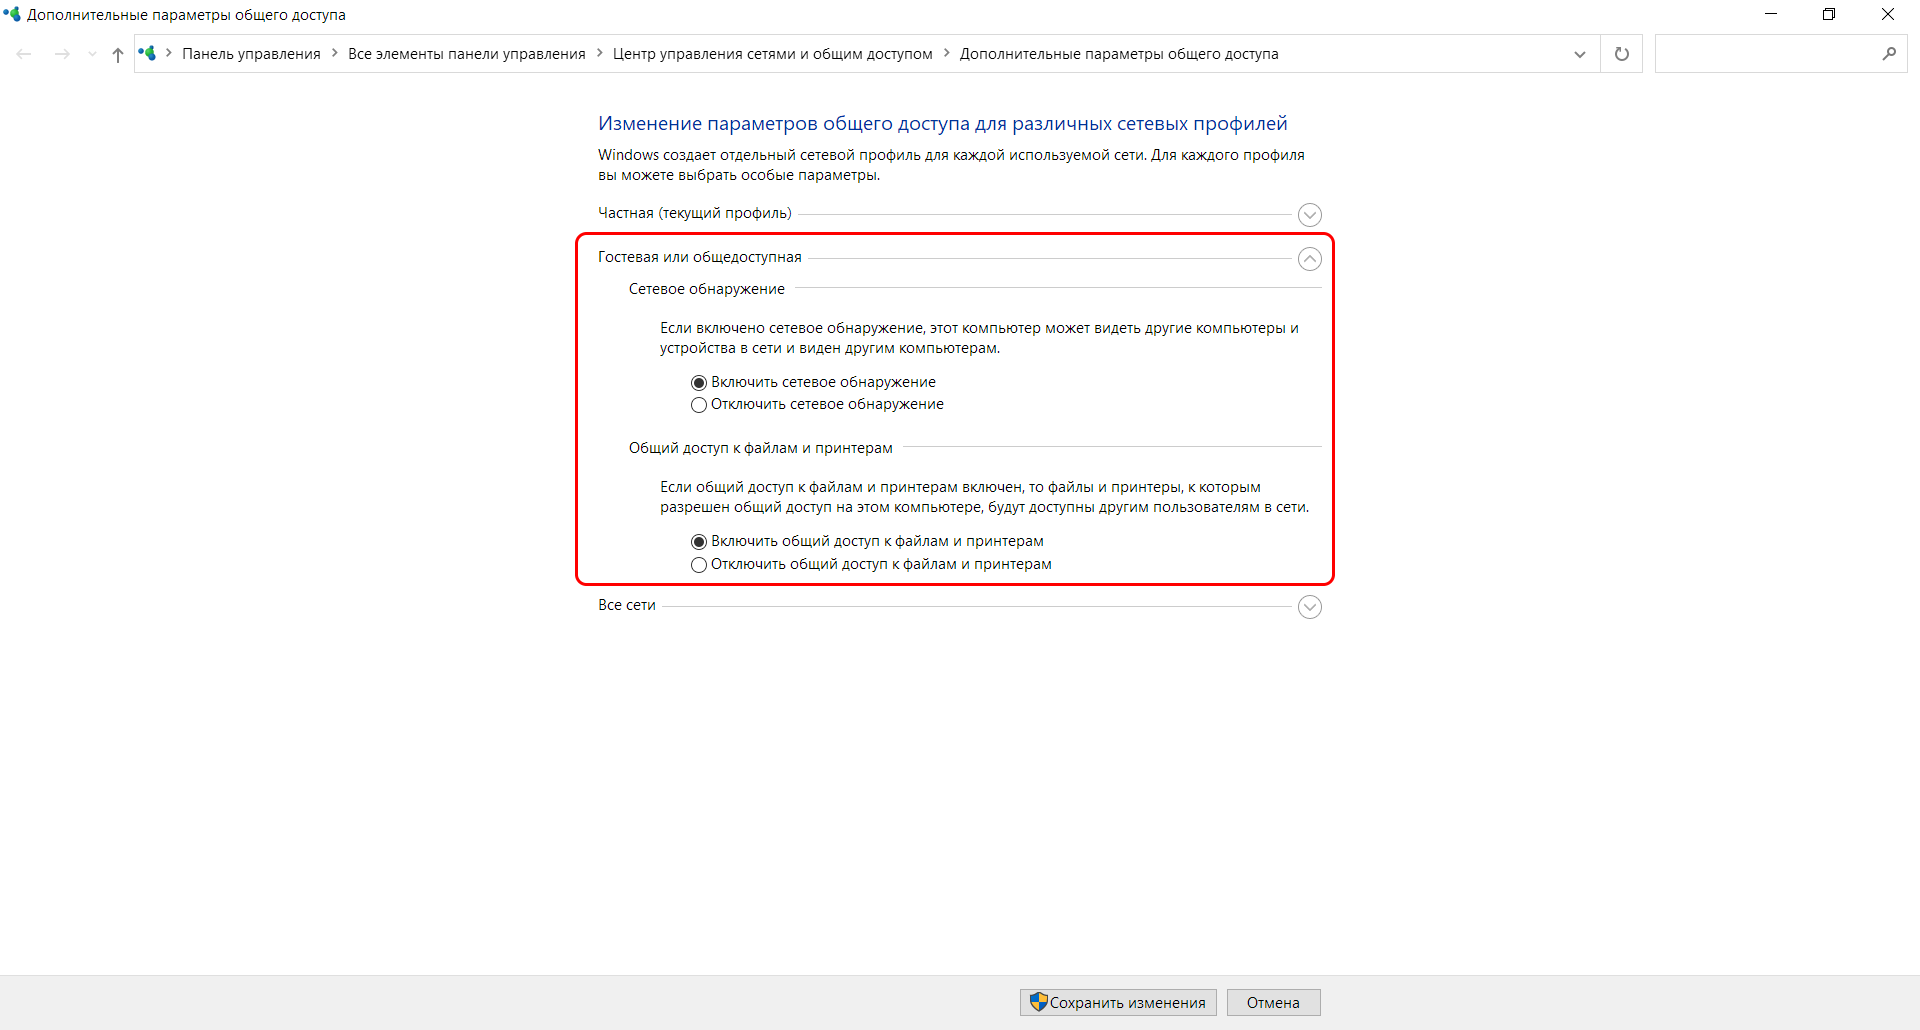
В некоторых случаях система Windows 10 может выдавать предупреждения о недоступности сетевого ресурса либо просто «ругаться» на настройки. Все это можно исправить в «Центре управления сетями и общим доступом». Настройки стоит проверять на компьютере, к которому вы пытаетесь подключиться. Выглядеть они должны следующим образом:
- Для начала зайдем в нужное окно через свойство папки.
- Открываем первый пункт «Частная (текущий профиль)». Настройки должны быть выставлены так, как показано на скриншоте ниже:
- Пункт «Гостевая или общедоступная»:
- Пункт «Все сети». Про последний блок я уже говорил – можно включить или отключить пароль.
Теперь можете снова подключиться к папке – все должно заработать. В некоторых случаях может потребоваться перезагрузка устройства.
Заключение
Получение общего доступа к папке или диску – простая задача, но со своими нюансами. Важно, чтобы оба устройства были подключены к одной сети – это может быть как проводное соединение, так и через Wi-Fi роутер. Если все учтено, но ошибки до сих пор не дают подключиться, то стоит отключить антивирусное средство либо воспользоваться вышеуказанной инструкцией.
Are you looking for the answer to this question: how to access shared folders on a network in a computer? This is a good question and ways to access shared folders in Windows 11/10 are simple. Here MiniTool will outline some tips for you and try them as per your situation.
In Windows, Microsoft offers some networking features and Shared Folder is such a feature. In collaborating and sharing documents with other users on the network, this feature plays a vital role. If you have configured file sharing, how can you access shared folders in Windows 11/10? Targeting this purpose, continue reading and you will discover several simple ways.
Also read: How Do I Create A Shared Drive & How to Use It
One of the simplest ways is to access a shared folder from the Network tab in File Explorer. Check how to do it:
Step 1: Press Win + E on your keyboard to launch File Explorer.
Step 2: Click on the Network tab on the left side and you will see the list of all the devices connected to your network.
Step 3: Double-click on the PC that contains the shared folder to open it, sign in to it with credentials, and then check the shared content.
The Run dialog allows you to directly access some tools or folders via the specific commands. Also, you can view a shared folder in Windows 11/10 using this method.
Step 1: Press Win + R on your keyboard to open Run.
Step 2: Type the specific path \\ComputerName\SharedFolder and click OK. Replace the path as per your situation such as \\MyPC\Myshare. This will open your shared folder.
3. Map the Network Drive
Windows 11/10 offers an option to map a network drive, which creates a copy of the shared folder. In this way, you can view that folder anytime in File Explorer, just like other folders.
To access shared folders in Windows 11/10 by mapping a drive:
Step 1: In File Explorer, right-click on This PC and choose Map network drive.
Step 2: Specify a drive letter for the folder you want to connect to. Tap on Browse to locate the shared network folder.
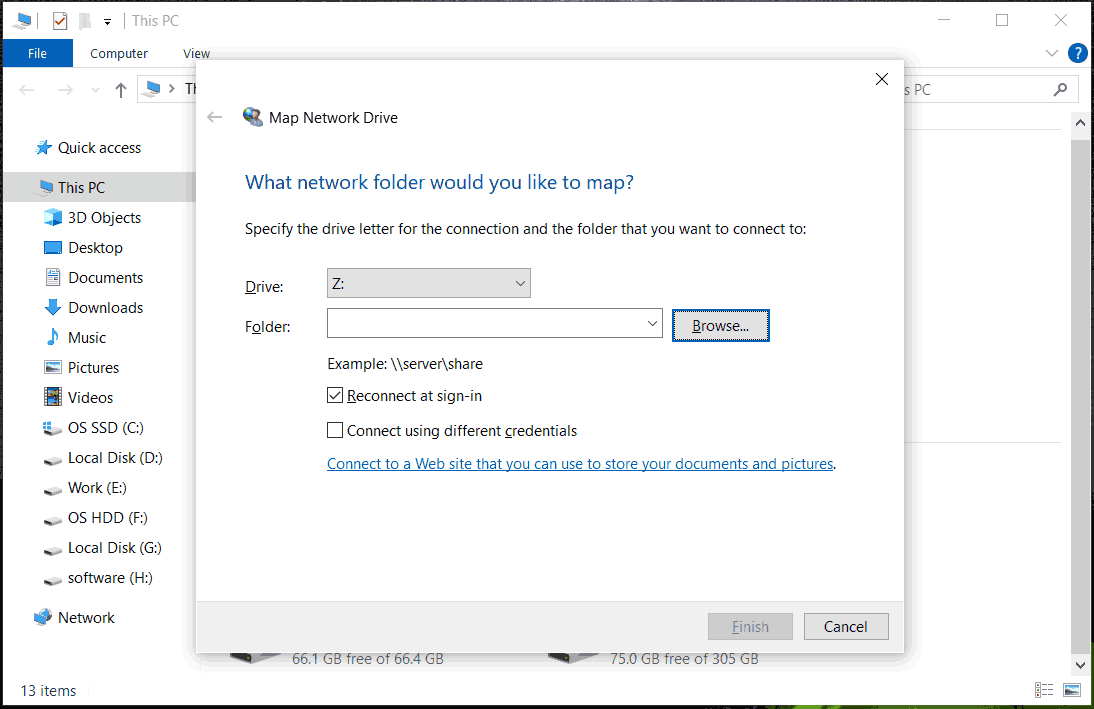
Step 3: Finally, hit Finish.
Computer Management enables you to manage some system tools, shared folders, disk storage, and so on. Let’s focus on how to access shared folders on network Windows 10/11 in Computer Management.
Step 1: Choose Computer Management via the Win + X menu.
Step 2: Under System Tools, go to Shared Folders > Shares.
Step 3: All the shared folders will be listed here. To open one folder, right-click on the target one and choose Open.
This way is a bit confusing, so be careful to take these steps:
Step 1: Run Command Prompt with admin rights.
Step 2: Execute the command – net use Driveletter \ComputerName\SharedFolder. Remember to replace Driveletter, ComputerName, and SharedFolder with the actual names.
If you configure a password for that folder, run this command – net use DRIVE \ComputerName\SharedFolder /user:username pass. Similarly, replace username and password with the actual ones.
Tips:
Those are 5 simple ways to access shared folders in Windows 11/10. But sometimes you may fail to access the shared folder due to some reason. In this situation, find solutions from our previous post — How to Fix the “Windows 11 Cannot Access Shared Folder” Error.
Suggestion: Back up to a Network Drive
A network drive is essential for file sharing. But once the Internet goes wrong, you fail to access all the contents. Besides, the network drive is susceptible to malicious software and viruses. For safety, we recommend backing up your network drive to an external or local hard drive. Apart from that, some of you also consider backing up the PC to a network drive to save disk space.
For these two tasks, you will discover methods in this guide – How to Back up a Network Drive on Windows 11/10? Here Is a Guide.
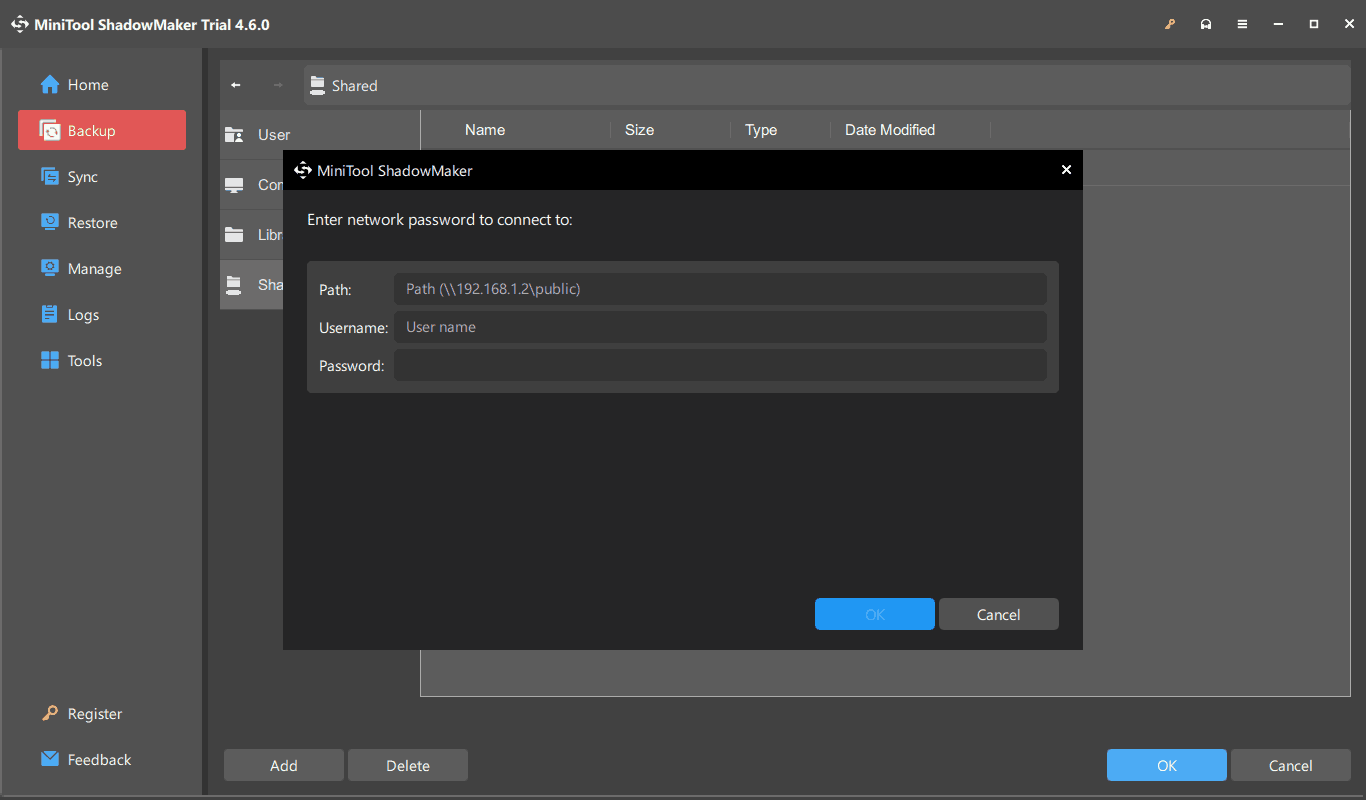
Speaking backing up files, folders, disks, partitions, and Windows to the network or an external hard drive, MiniTool ShadowMaker, the best backup software does wonders. It also allows setting automatic backups for files/folders to the network. Free download and install it, then begin the backup.
MiniTool ShadowMaker TrialClick to Download100%Clean & Safe