
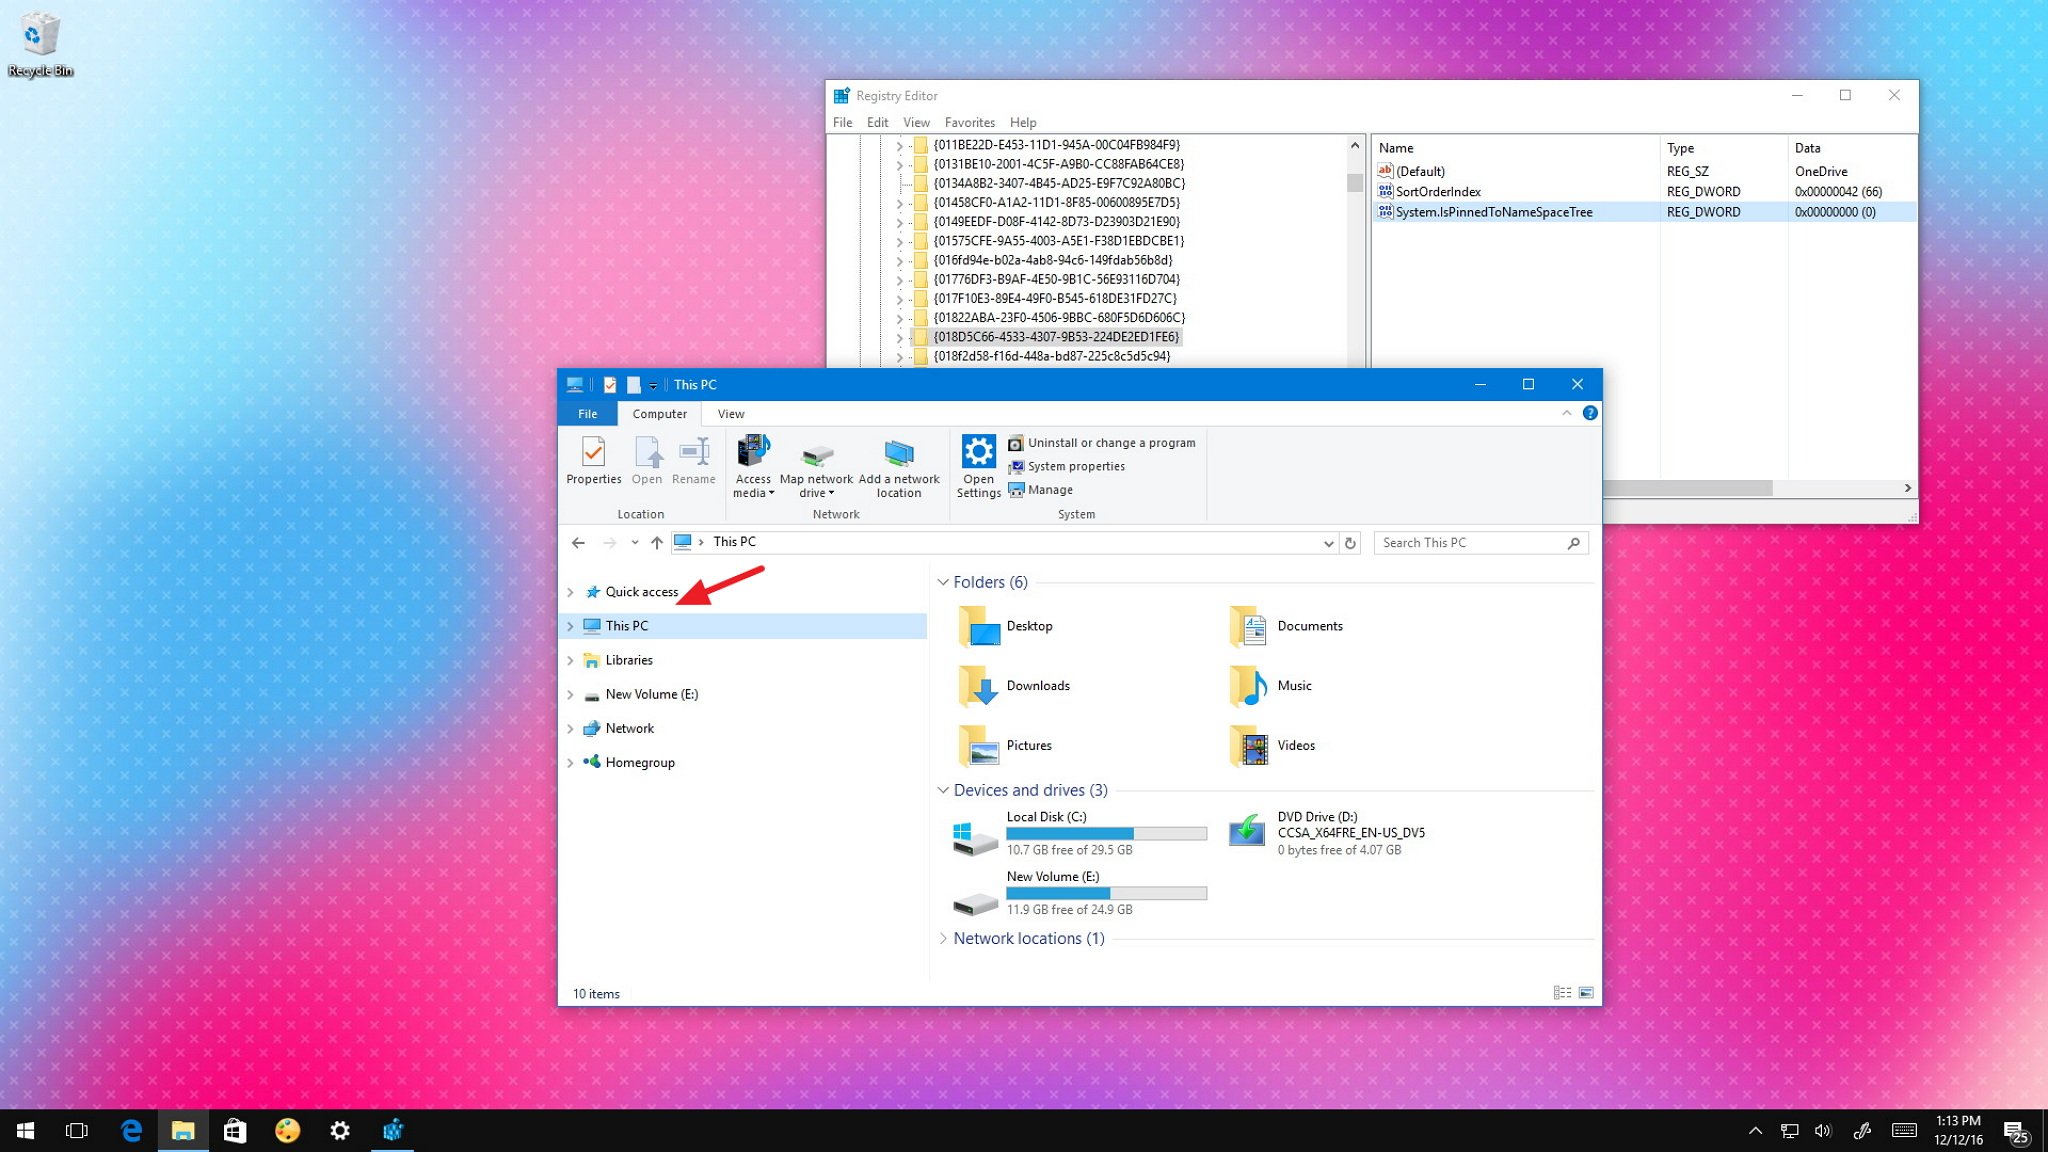
Ранее на сайте уже была опубликована инструкция о том, как отключить OneDrive, убрать значок из панели задач или полностью удалить OneDrive, встроенный в последние версии Windows (см. Как отключить и удалить OneDrive в Windows 10).
Однако, при простом удалении, в том числе и просто в «Программы и компоненты» или параметрах приложений (такая возможность появилась в Creators Update) в проводнике остается пункт OneDrive, причем может выглядеть неправильно (без иконки). Также в некоторых случаях может потребоваться просто убрать этот пункт из проводника, не удаляя само приложение. В этом руководстве — подробно о том, как удалить OneDrive из панели проводника Windows 10. Также может быть полезно: Как переместить папку OneDrive в Windows 10, Как удалить объемные объекты из проводника Windows 10.
Удаление пункта OneDrive в проводнике с помощью редактора реестра
Для того, чтобы убрать пункт OneDrive в левой панели проводника Windows 10 достаточно сделать небольшие изменения в реестре.
Шаги для выполнения задачи будут следующими:
- Нажмите клавиши Win+R на клавиатуре и введите regedit (и нажмите Enter после ввода).
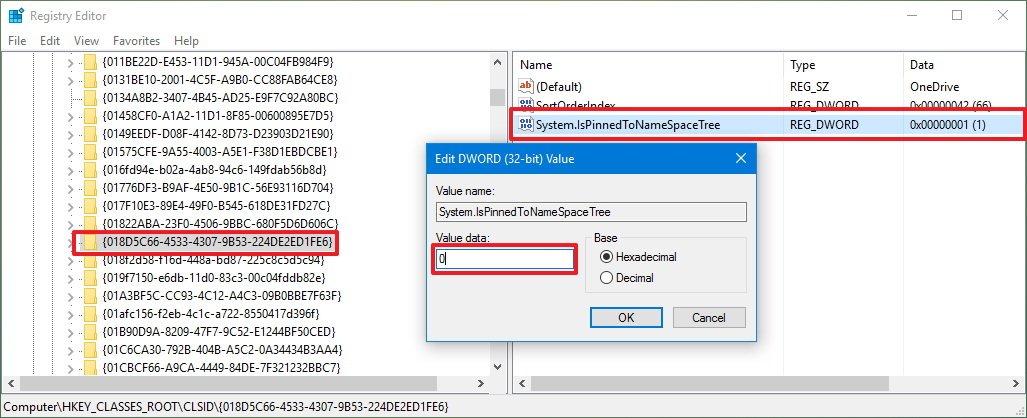
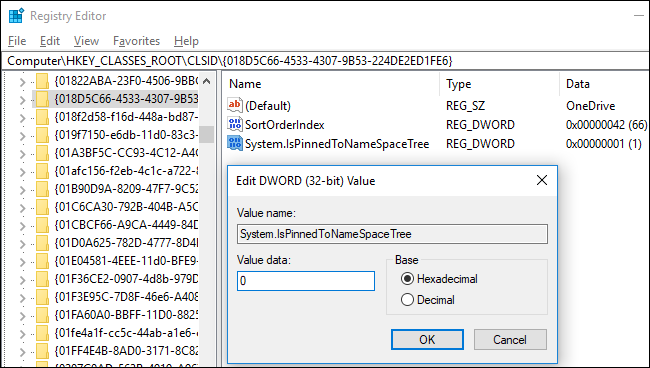
- В редакторе реестра перейдите к разделу (папки слева) HKEY_CLASSES_ROOT\ CLSID\ {018D5C66-4533-4307-9B53-224DE2ED1FE6}

- В правой части редактора реестра вы увидите параметр с именем System.IsPinnedToNameSpaceTree
- Нажмите по нему дважды (или нажмите правой кнопкой мыши и выберите пункт контекстного меню «Изменить» и установите значение 0 (ноль). Нажмите «Ок».
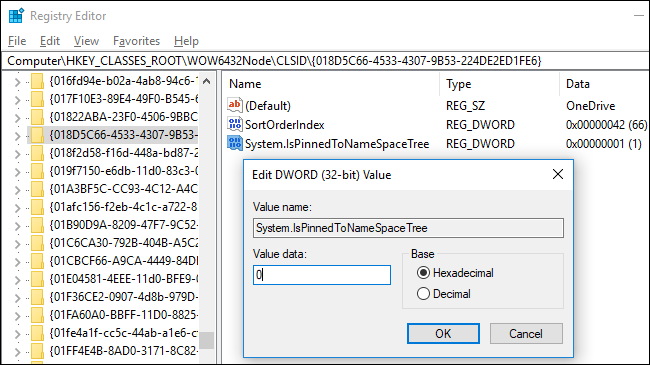
- Если у вас 64-разрядная система, то дополнительно к указанному параметру, измените аналогичным образом значение параметра с тем же именем в разделе HKEY_CLASSES_ROOT\ Wow6432Node\ CLSID\ {018D5C66-4533-4307-9B53-224DE2ED1FE6}\
- Закройте редактор реестра.

Сразу после выполнения этих простых действий пункт OneDrive исчезнет из проводника.
Обычно, для этого перезапуск Проводника не требуется, но если не сработало сразу, попробуйте выполнить его перезапуск: нажмите правой кнопкой мыши по кнопке пуск, выберите пункт «Диспетчер задач» (при наличии, нажмите кнопку «Подробнее»), выберите «Проводник» и нажмите кнопку «Перезапустить».
Обновление: OneDrive можно обнаружить в еще одном расположении — в диалоге «Обзор папок», который появляется в некоторых программах.
Чтобы удалить OneDrive из диалога «Обзор папок», удалите раздел HKEY_CURRENT_
Убираем пункт OneDrive в панели проводника с помощью gpedit.msc
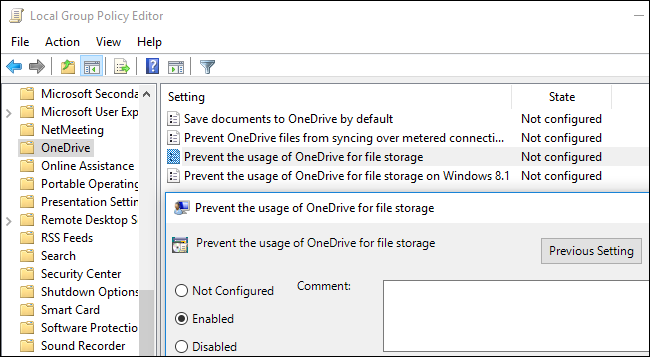
Если на вашем компьютере установлена Windows 10 Pro или Enterprise версии 1703 (Creators Update) или более новая, то убрать OneDrive из проводника, не удаляя самого приложения можно с помощью редактора локальной групповой политики:
- Нажмите клавиши Win+R на клавиатуре и введите gpedit.msc
- Перейдите к разделу Конфигурация компьютера — Административные шаблоны — Компоненты Windows — OneDrive.
- Дважды кликните по пункту «Запретить использование OneDrive для хранения файлов в Windows 8.1» и установите значение «Включено» для этого параметра, примените сделанные изменения.


После указанных действий, пункт OneDrive исчезнет из проводника.
Как было отмечено: сам по себе данный способ не удаляет OneDrive с компьютера, а только убирает соответствующий пункт из панели быстрого доступа проводника. Чтобы полностью удалить приложение, вы можете использовать инструкцию, которая упоминалась в начале статье.
Отключение или удаление OneDrive
Если вы просто не хотите использовать OneDrive, самое простое решение заключается в том, чтобы удалить связь с ней. См. инструкции ниже.
Отмена связи OneDrive с компьютера
Разрыв связи OneDrive с компьютером не приведет к потере файлов и данных. Вы всегда сможете получить доступ к файлам, выполнив вход в систему на сайте OneDrive.com.
Windows 10/11
-
Выберите облако OneDrive в области уведомлений, чтобы отобразить всплывающее окно OneDrive.
-
Нажмите значок справки и параметров OneDrive , а затем выберите Параметры.
-
Перейдите на вкладку Учетная запись.
-
Выберите Удалить связь с этим компьютером, а затем Удалить связь с учетной записью.
macOS
-
Щелкните значок облака OneDrive вверху в строке меню, нажмите Справка и параметры, чтобы открыть меню, и выберите Параметры.
-
Перейдите на вкладку Учетная запись.
-
Щелкните Удалить связь с этим компьютером Mac.
Скрытие или удаление OneDrive
В некоторых версиях Windows также можно скрыть или удалить OneDrive. Кроме того, вы можете удалить мобильное приложение OneDrive на устройствах с Android и iOS.
Приложение OneDrive входит в состав некоторых версий Windows, поэтому удалить его невозможно. Но вы можете скрыть его и отменить синхронизацию, чтобы оно оставалось скрытым. Для этого отключите все параметры OneDrive и удалите папку OneDrive в проводнике.
Отмена связи с OneDrive.
-
Выберите облако OneDrive в области уведомлений, чтобы отобразить всплывающее окно OneDrive.
-
Нажмите значок справки и параметров OneDrive , а затем выберите Параметры.
-
Перейдите на вкладку Учетная запись.
-
Выберите Удалить связь с этим компьютером, а затем Удалить связь с учетной записью.
Скрыть OneDrive.
-
Откройте проводник, щелкните правой кнопкой мыши OneDrive, а затем выберите пункт Свойства.
-
На вкладке Общие рядом с пунктом Атрибуты установите флажок Скрытый. Это действие скроет OneDrive в проводнике.
-
Снова нажмите и выберите Выйти из OneDrive. При этом значок OneDrive будет удален из области уведомлений.
Удаление OneDrive с компьютера не приведет к потере файлов и данных. Вы всегда сможете получить доступ к файлам, выполнив вход в систему на сайте OneDrive.com.
Windows 10/11
-
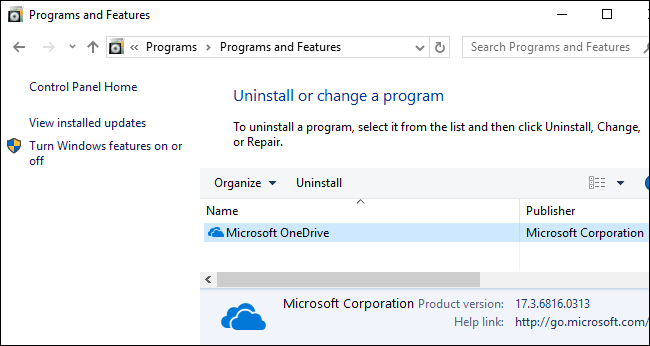
Нажмите кнопку Пуск, введите в поле поиска запрос «Программы» и выберите в списке результатов пункт Установка и удаление программ.
Открытие установленных приложений
-
В разделе Приложения и функции найдите и выберите Microsoft OneDrive, а затем нажмите кнопку Удалить. Если будет предложено ввести пароль администратора или подтвердить операцию, введите пароль или подтвердите выполняемое действие.
Windows 8.1
-
Приложение OneDrive входит в состав Windows 8.1 и Windows RT 8.1, и его невозможно удалить.
Windows 7 или Windows Vista
Важно: С 1 января 2022 года мы прекращаем поддержку определенных классических приложений OneDrive в операционных системах Windows 7, 8 и 8.1. Дополнительные сведения.
-
Нажмите кнопку Пуск. В поле поиска введите Добавить программы, а затем в списке результатов выберите Программы и компоненты.
-
Выберите Microsoft OneDrive, а затем нажмите кнопку Удалить. При появлении запроса на ввод пароля администратора или подтверждение введите пароль или подтвердите выполняемое действие.
Устройства с Android
-
Откройте список приложений.
-
Коснитесь и удерживайте значок OneDrive , чтобы отобразить меню.
-
Удалите приложение.
Устройства с iOS
-
Перейдите на начальный экран, а затем коснитесь значка приложения OneDrive и удерживайте его.
-
Коснитесь элемента X, который появится в левом верхнем углу значка приложения.
macOS
-
Просто перетащите приложение OneDrive в корзину.
Дополнительные сведения
Как отменить отправку или прекратить скачивание в OneDrive
Нужна дополнительная помощь?
Нужны дополнительные параметры?
Изучите преимущества подписки, просмотрите учебные курсы, узнайте, как защитить свое устройство и т. д.
OneDrive can be considered one of the best cloud storage service you can use. If you’re a PC user, OneDrive even comes built-in on Windows 10. It also adds an entry to the left pane in File Explorer, which if you might not want to see if you’re not a OneDrive user — or you’re an advanced user that syncs everything automatically to OneDrive.
While Windows 10 doesn’t include an option to remove the OneDrive shortcut, you can jump into the Registry to remove the shortcut manually.
In this Windows 10 guide, we’ll walk you through the steps to tweak the Registry to remove the OneDrive entry in the left pane of File Explorer, but without ditching the service completely in case you need to manage or upload files to the cloud.
How to remove OneDrive from File Explorer
Important: As always, this is a friendly reminder warning that editing the registry is risky, and it can cause irreversible damage to your installation if you don’t do it correctly. It’s recommended to make a full backup of your computer before proceeding.
- Use the Windows key + R keyboard shortcut to open the Run command.
- Type regedit, and click OK to open the registry.
- Browse the following path:
HKEY_CLASSES_ROOT\CLSID\{018D5C66-4533-4307-9B53-224DE2ED1FE6}If you’re having difficulties finding this particular entry, do the following:- Use the Ctrl + F keyboard shortcut to open Find.
- Copy and paste the Registry entry you’re looking for, in this case:
018D5C66-4533-4307-9B53-224DE2ED1FE6 - Click Find Next to start a search.
This particular entry can be repeated multiple times in the database, as such make sure to click the Find Next button several times until the Status Bar at the bottom of the Registry reads: Computer\HKEY_CLASSES_ROOT\CLSID{018D5C66-4533-4307-9B53-224DE2ED1FE6}.
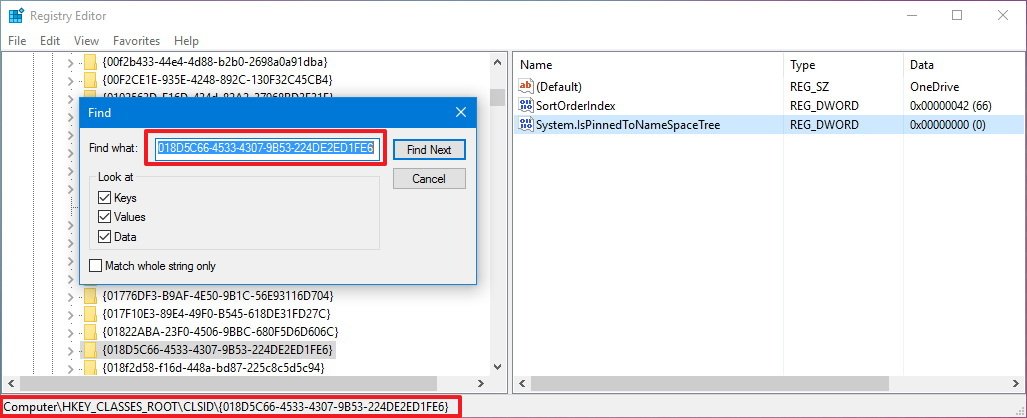
- Select the {018D5C66-4533-4307-9B53-224DE2ED1FE6} key, and on the right side, double-click the System.IsPinnedToNameSpaceTree DWORD.
- Change the DWORD value from 1 to 0.
- Close the Registry to complete the task.
Once you completed the steps, close and reopen File Explorer, and you should no longer see the OneDrive entry on the left pane. If you don’t see the change, try restarting your PC.
Quick Tip: If you ever need to access the OneDrive root folder, simply type OneDrive in the address bar of File Explorer and press Enter.
If you want to revert the changes, follow the same steps mentioned above, but this time on step 5 change the System.IsPinnedToNameSpaceTree DWORD value from 0 to 1.
All the latest news, reviews, and guides for Windows and Xbox diehards.
Keep in mind that this won’t uninstall the OneDrive client from Windows 10, we’re simply removing the entry from File Explorer when you don’t have a use for it.
More Windows 10 resources
For more help articles, coverage, and answers on Windows 10, you can visit the following resources:
- Windows 10 on Windows Central – All you need to know
- Windows 10 help, tips, and tricks
- Windows 10 forums on Windows Central
Mauro Huculak has been a Windows How-To Expert contributor for WindowsCentral.com for nearly a decade and has over 15 years of experience writing comprehensive guides. He also has an IT background and has achieved different professional certifications from Microsoft, Cisco, VMware, and CompTIA. He has been recognized as a Microsoft MVP for many years.
Quick Links
-
Home Users: Uninstall OneDrive Normally
-
Pro and Enterprise Users: Disable OneDrive with the Local Group Policy Editor
-
Home Users: Remove the OneDrive Folder From File Explorer by Editing the Registry
-
Download Our One-Click Registry Hack
Windows 10 includes OneDrive, but if you’d rather not see it, there are several ways to disable OneDrive and remove it from File Explorer on Windows 10.
Home Users: Uninstall OneDrive Normally
Starting in Windows 10’s Creators Update, you can now easily uninstall OneDrive like you would any other desktop program. Only Windows 10 Home users should do this. If you’re using Windows 10 Professional, Enterprise, or Education, skip this step and use the below Group Policy Editor method instead.
Head to either Control Panel > Programs > Uninstall a Program or Settings > Apps > Apps & features. You’ll see a «Microsoft OneDrive» program appear in the list of installed software. Click it and click the «Uninstall» button.
Windows will immediately uninstall OneDrive, and the OneDrive icon will disappear from the notification area.
(If you ever want to reinstall OneDrive in the future, you’ll need to run the OneDrive installer buried in the Windows system folder. Just head to the C:\Windows\SysWOW64\ folder on a 64-bit version of Windows 10 or the C:\Windows\System32 folder on a 32-bit version of Windows 10. Double-click the «OneDriveSetup.exe» file here and Windows will reinstall OneDrive.)
There’s one problem with uninstalling OneDrive this way: The empty OneDrive folder will still appear in File Explorer’s sidebar. If you’re fine with that, you can stop now. OneDrive has been removed and is no longer doing anything. However, if the empty OneDrive folder bothers you, you’ll need to use the below tricks.
Pro and Enterprise Users: Disable OneDrive with the Local Group Policy Editor
If you’re using Windows 10 Professional, Enterprise, or Education, the easiest way to disable and hide OneDrive is by using the Local Group Policy Editor. It’s a pretty powerful tool, so if you’ve never used it before, it’s worth taking some time to learn what it can do. Also, if you’re on a company network, do everyone a favor and check with your admin first. If your work computer is part of a domain, it’s also likely that it’s part of a domain group policy that will supersede the local group policy, anyway.
In Windows 10 Pro or Enterprise, hit Start, type
gpedit.msc
, and press Enter.
In the Local Group Policy editor’s left pane, drill down to Computer Configuration > Administrative Templates > Windows Components > OneDrive. Double-click the «Prevent the usage of OneDrive for file storage» policy setting in the right pane, set it to «Enabled,» and click «OK.»
This completely disables access to OneDrive. OneDrive will be hidden from File Explorer and users won’t be allowed to launch it. You won’t be able to access OneDrive at all, not even from within Windows Store apps or use the camera roll upload feature.
You shouldn’t uninstall OneDrive from the Control Panel or Settings application if you use this method. If you do, you’ll continue to see an empty OneDrive folder in File Explorer. If you see an empty OneDrive folder in File Explorer after changing this group policy setting, you’ll need to reinstall OneDrive from the Windows system folder. Once you do, the empty OneDrive folder will vanish from File Explorer.
To undo this change, just head back to here and change the policy to «Not Configured» instead of «Enabled.»
There doesn’t seem to be an associated registry setting you can modify to get the same effect as the group policy setting on Windows 10. The «DisableFileSync» and «DisableFileSyncNGSC» registry settings that worked on Windows 8.1 no longer works on Windows 10.
Home Users: Remove the OneDrive Folder From File Explorer by Editing the Registry
You no longer have to edit your PC’s registry to do this on Windows 10 Home. We recommend uninstalling OneDrive instead.
If you have Windows 10 Home, you can edit the Windows Registry to remove the OneDrive folder from the File Explorer’s left sidebar. You can also do it this way on Windows Pro or Enterprise, but the Group Policy Editor method is a better solution for cleanly disabling OneDrive.
Standard warning: Registry Editor is a powerful tool and misusing it can render your system unstable or even inoperable. This is a pretty simple hack and as long as you stick to the instructions, you shouldn’t have any problems. That said, if you’ve never worked with it before, consider reading about how to use the Registry Editor before you get started. And definitely back up the Registry (and your computer!) before making changes.
To get started, open the Registry Editor by hitting Start and typing «regedit». Press Enter to open Registry Editor and give it permission to make changes to your PC.
In the Registry Editor, use the left sidebar to navigate to the following key. In the Creators Update, you can also just copy and paste this address into the Registry Editor’s address bar.
HKEY_CLASSES_ROOT\CLSID\{018D5C66-4533-4307-9B53-224DE2ED1FE6}
Double-click the System.IsPinnedToNameSpaceTree option in the right pane. Set it to 0 and click «OK».
If you’re using a 64-bit version of Windows 10, you will also need to navigate to the following key in the left sidebar.
HKEY_CLASSES_ROOT\Wow6432Node\CLSID\{018D5C66-4533-4307-9B53-224DE2ED1FE6}
Double-click the System.IsPinnedToNameSpaceTree option in the right pane. Set it to 0 and click «OK».
The OneDrive folder will vanish from the File Explorer’s sidebar immediately. If it doesn’t, try rebooting your computer.
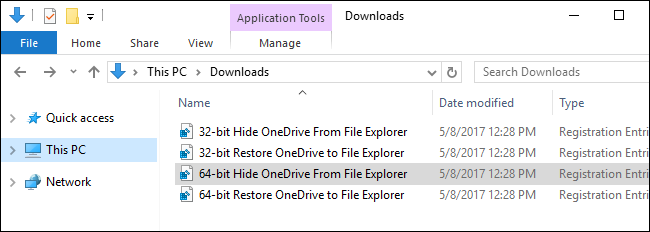
Download Our One-Click Registry Hack
You no longer have to edit your PC’s registry to do this. We recommend uninstalling the OneDrive client on Windows 10 Home, or using Group Policy on Windows 10 Professional.
If you don’t feel like diving into the Registry yourself, we’ve created downloadable registry hacks you can use. One hack removes the OneDrive folder from File Explorer, while another hack restores it. We’ve included versions for both 32-bit and 64-bit versions of Windows 10. Double-click the one you want to use, click through the prompts, and then restart your computer.
Download Remove OneDrive From File Explorer Hacks
To check whether you’re using a 32-bit or 64-bit version of Windows 10, head to Settings > System > About. Look at «System type» and see whether it says you’re using a «64-bit operating system» or «32-bit operating system.»
These hacks just change the same settings we changed above. Running the «Hide OneDrive From File Explorer» hack sets the value to 0, while running the «Restore OneDrive to File Explorer» hack sets the value back to 1. And if you enjoy fiddling with the Registry, it’s worth taking the time to learn how to make your own Registry hacks.
If any local copies of your OneDrive files have synced to your PC, you may want to delete them to free up space. Navigate to the C:\Users\NAME\OneDrive folder, which contains your user’s downloaded OneDrive files. These won’t be automatically deleted when you unlink your account and stop syncing. Deleting them won’t delete them from OneDrive if your account is unlinked from OneDrive—they’ll just be deleted from your local device.
Пользователи теперь могут удалить облачное хранилище OneDrive. Вот как это сделать.
Редактор новостей Hi-Tech Mail

Компания Microsoft разрешила отказаться от своего облачного хранилища OneDrive в операционных системах Windows 10 и 11. Информация об изменениях появилась на сайте техподдержки.
На странице сказано, что теперь можно удалить или отключить OneDrive, если пользователю не нужен этот сервис. Сделать это можно с помощью нескольких простых действий.
Чтобы отменить связь хранилища с компьютером, нужно нажать на значок OneDrive в области уведомлений. Появится всплывающее окно, после чего следует нажать на значок справки и параметров, а после щелкнуть на «Параметры». Во вкладке «Учетная запись» под данным об аккаунте следует выбрать «Удалить связь с этим компьютером» и подтвердить действие.

Также можно скрыть OneDrive. Для этого нужно открыть проводник, нажать правой кнопкой мыши на OneDrive и зайти в свойства. Во вкладке «Общие» возле пункта «Атрибуты» необходимо отметить галочкой пункт «Скрытый». Затем в настройках нужно щелкнуть на «Выйти из OneDrive», после чего иконка приложения исчезнет из области уведомлений.
Чтобы полностью удалить облачное хранилище в Windows 10 или 11, следует нажать «Пуск», ввести в поле поиска «Программы» и выбрать «Установка и удаление программ». В разделе «Приложения и функции» надо выбрать Microsoft OneDrive и щелкнуть на «Удалить». Если система запросит пароль администратора, его необходимо ввести.

Ранее Microsoft анонсировала отказ от поддержки приложений на Android. В Windows 11 больше нельзя будет открыть мобильные программы.