
-
Home
-
Partition Magic
- [Solved] Installer Encountered an Error: 0x800b0101?
By Yamila | Follow |
Last Updated
When you attempt to install a pending update through Windows Update Standalone installer or install a different Windows component via Windows Installer, you may receive the error message: Installer encountered an error 0x800b0101. Here, this post from MiniTool Partition Wizard introduces several solutions to the error.
The “Installer encountered an error 0x800b0101” error message may come out due to various factors and the following are some of them:
- Incorrect Date & Time
- Hardware or driver conflicts
- Corrupted system files
- Missing update components
- …
Once you run into the Windows Update Standalone Installer error 0x800b0101, you should take immediate actions to fix it. Here are several solutions available.
Solution 1: Change Date and Time
The “Installer encountered an error 0x800b0101” message may appear due to wrong date and time on your system. Therefore, when you see this error message, the first thing you can try is to check and correct Date & Time.
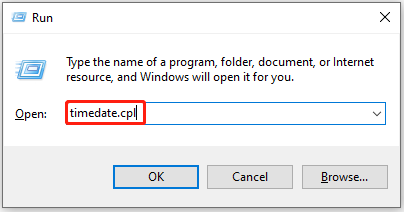
Step 1: Press Windows + R to open the Run dialog.
Step 2: Type timedate.cpl in the text box and then press Enter.
Step 3: After you enter the Date and Time panel, go to Internet Time and click Change settings.
Step 4: In the pop-up window, check Synchronize with an Internet time server and make sure the server is time.windows.com. Then click Update now and OK.
Step 5: Go to the Date and Time tab. Then click Change date and time and Change time zone one by one to make sure your settings are correct.
Once done, restart your computer to see if the error code 0x800b0101 is fixed.
Solution 2: Run the Windows Update Troubleshooter
Usually, the Windows Update troubleshooter can repair plenty of issues that are related to Windows updates. So, you can also try to get rid of the “Installer encountered an error 0x800b0101” message via the troubleshooter.
Step 1: Press Windows and I keys to open Windows Settings and select Update & Security.
Step 2: Go to Troubleshoot and then click Additional troubleshooters from the right side.
Step 3: In the next window, select Windows Update and click Run the troubleshooter.

Step 4: After that, this troubleshooter will begin detecting problems that may cause the error code 0x800b0101. Follow the on-screen instructions to repair the found issues.
Solution 3: Clear Windows Update Cache
Another way that may help you solve the Windows Update Standalone Installer error 0x800b0101 is to clear Windows Update cache. To do this, there are three different ways for you in this article: How to Clear Windows Update Cache (3 Ways for You).
Solution 4: Rename the Pending.xml File
If the “Installer encountered an error 0x800b0101” error message comes out during the process of installing a pending update, you can try to resolve it by renaming the current pending.xml file. To do this, follow the steps below.
Step 1: Run Command Prompt as an administrator.
Step 2: Type the following command in the panel and then press Enter to rename the pending.xml file to pending.old:
Ren c:windowswinsxspending.xml pending.old
Step 3: After the process is completed, restart your computer to check if the error code 0x800b0101 is removed.
Solution 5: Run SFC and DISM Scans
In some cases, the “Installer encountered an error 0x800b0101” message may show up as well due to certain corrupted system files. On this occasion, we recommend you use SFC (System File Checker) and DISM (Deployment Image Servicing and Management) utilities to fix this error.
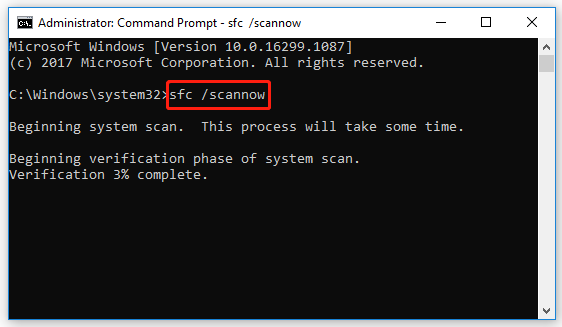
Step 1: Open the elevated Command Prompt. Then type sfc /scannow and press Enter.
Step 2: Once the scan completes, restart your computer to see if the error is resolved. If not, open Command Prompt as an administrator again.
Step 3: In the Command Prompt panel, type the following command and then press Enter to execute the DISM scan:
DISM /Online /Cleanup-Image /ScanHealth
Step 4: After the process finishes, restart your computer and the error may appear.
All these methods mentioned in this post are feasible. When you are facing the message: Installer encountered an error 0x800b0101, follow them one by one until you fix the error. If you have any problems with this error, you can leave a message in our comment part.
If you are interested in MiniTool Partition Wizard – the best partition management software, you can visit its official website to have a better understanding of it.
About The Author
Position: Columnist
Yamila is a fan of computer science. She can solve many common issues for computer users by writing articles with simple and clear words. The very aspect that she is good at is partition management including create partition, format partition, copy disk and so on.
When she is free, she enjoys reading, doing some excerpts, listening to music and playing games.
We usually give direct download links to Windows Updates on this blog, so users can install the updates manually on multiple systems, saving Internet bandwidth. Some users have reported that they encounter an error code 0x800b0101 when trying to install Windows Update using an MSU file.
The issue can be resolved by changing a few things, such as running Windows Update troubleshooter, changing the system date and time, and performing SFC and DISM scans. This will ensure the integrity of your system files and the accuracy of your system clock.
In this article, we will discuss all these topics in detail.
Table of Contents
Windows Update Standalone Installer 0x800b0101 Error

Users often encounter a prompt such as the above stating the following:
Windows Update Standalone Installer
Installer encountered an error: 0x800B0101
A required certificate is not within its validity period when verifying against the current system clock or the timestamp in the signified file.
This error occurs when you try to manually install a standalone Windows update package (.msu file).
An MSU file is installed using the Windows Update Standalone Installer (WUSA) utility. This utility is placed in the %windir%\System32 directory in Windows. If you do not install a Windows update, it throws an error with the relevant error code.
Fix Windows Update Standalone Installer Error 0x800b0101
We have listed the following methods you can mitigate this error in Windows. Since the issue can occur due to several different reasons, any one of these methods could work for you.
Run Windows Update Troubleshooter
Both Windows 11 and 10 come with a pre-installed troubleshooter for several different services and features of the OS. This troubleshooter can be executed automatically to check for Windows Update issues, and then suggest the necessary action to be taken.
To run this troubleshooter, navigate to the following:
Settings app >> System >> Troubleshoot >> Other troubleshooters
Click Run in front of Windows Update.

The troubleshooter will now launch. It will then display any identified issues and ask you to take the appropriate action(s). It is recommended that you perform the necessary actions and see whether the issue is resolved.
Correct System Date and Time
The error message claims it is having trouble verifying the timestamp for the associated certificate. It may be possible that your system’s time or date is out of sync and needs to be corrected. Follow the steps below to do so:
- Open the Date and Time settings by typing in timedate.cpl in Run.
- From the window, switch to the Internet Time tab, and then click Change settings.

- From the Internet Time Settings pop-up, check the box next to “Synchronize with an Internet Time Server,” select time.windows.com from the drop-down menu, and then click Update now. Click OK when done.
- Back in the Date and Time window, click Apply and Ok.


Now restart your computer and try reinstalling the Windows update.
Clear Software Distribution folder
The Software Distribution folder can be found in C:\Windows. This folder contains temporary files within a sub-folder (download) that are required to install a Windows update. Quite often, a Windows update fails to install and experiences an error code because of these corrupted files. In this case, these temporary files need to be removed, and the update process needs to be started from the top.
Navigate to the following location using File Explorer:
C:\Windows\SoftwareDistribution\Download
Now, select all the items by using the Ctrl + A shortcut keys. Then delete all selected items using the Del key while holding down on the Shift key to remove them permanently.

Once removed, restart the computer and try reinstalling the Windows update.
Scan for Corrupted System Files
Windows comes with a built-in tool to fix system files that may have been corrupted. This tool is the System File Checker (SFC), which automatically repairs corrupted system files that may be redundantly available on your PC, or have just gone missing. What it does is replace any damaged or missing files.
Perform the following to run the tool:
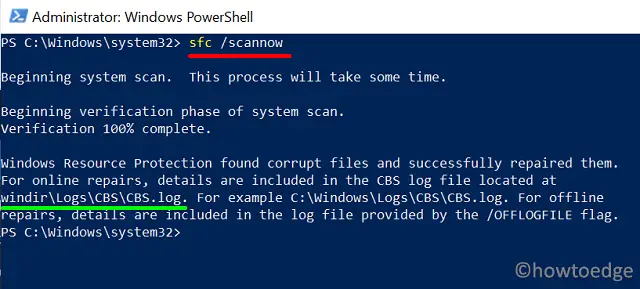
- Launch Windows PowerShell with administrative privileges and then enter the following command:
sfc /scannow - Now allow some time for the command to fully run and scan your PC, and make any fixes if possible along the way.

- Restart the computer.

Once done, check if you can now install the Windows update. If not, perform the next step to rule out system file corruption.
Repair Windows image
Deployment Image Servicing and Management (DISM) also fixes your Operating System automatically, like the SFC scan.
To begin the scan, launch Command Prompt with administrative privileges and enter the following 3 commands, one after the other:
DISM.exe /Online /Cleanup-image /Scanhealth
DISM.exe /Online /Cleanup-image /Checkhealth
DISM.exe /Online /Cleanup-image /Restorehealth

It can take a few minutes for the commands to execute completely. Do not close the Command Prompt and allow them ample time to run.
Once completed, check to see if the issue has been resolved.
Remove Expired Certificates
Digital certificates are used to authenticate software that is who they claim to be, not an imposter. Each certificate is valid until a certain time, after which they expire and need to be renewed (usually automatically). However, expired and faulty certificates can cause the Windows Update Standalone Installer to fail and throw an error.
In that case, the certificate needs to be removed. Follow the steps below to remove expired certificates:
We suggest you create a system restore point if a critical system certificate is removed.
- Open the Certificate Management Console by typing in certlm.msc in Run.
- From the left pane, navigate to the following:
Certificates - Local Computer >> Trusted Root Certification Authorities >> Certificates - Now, in the right pane, look for the expired certificate (using the Expiration Date column), right-click it, and then click Delete from the context menu.

- Repeat the last step until all expired certificates are removed.
- Restart the computer.

Once the computer restarts, check to see if the issue has been resolved.
Closing Words
There are a bunch of errors and error codes associated with Windows updates. Most of them, however, are solved by certain troubleshooting techniques. Applying these methods can save you from repairing, resetting, or redoing your entire operating system.
That is why we strongly recommend that you implement all of the methods given above to try and mitigate the issue.
Recently, a few users complained of not being able to update their Windows using Update Standalone Installer on account of an error code 0X800B0101. Though this issue is restricted to Windows 10, it may occur on Windows 11 as well. When you encounter this issue on your PC, you may receive an error message as well.
The error message resembles the following –
Windows Update Standalone InstallerInstaller encountered an error: 0x800B0101A required certificate is not within its validity period when verifying against the current system clock or the timestamp in the signified file.

Why do Windows updates fail on error 0X800B0101?
After looking into this particular issue thoroughly, we came to know that this is an update-related issue and may occur because of the following reasons –
- Incorrect Date & Time
- Hardware or driver conflicts
- Installed a corrupted update or application
- Presence of pending.xml files
- Corrupt Windows Cache folders
If you are getting an error code 0X800B0101 while updating Windows, check if the date & time are correct on your PC. In case “Date & time” does not match the locale where you live, configure this immediately. Restart your device and check if you can now update Windows 11/10 without getting into any glitches.
If the error persists even after correcting the date & time, go through the below set of solutions sequentially –
1] Run Windows Update Troubleshooter
Whenever you get into any update-related issue on your PC, troubleshoot Windows using an in-built tool “Update Troubleshooter”. You may access and run this tool by following the steps outlined below –
- Press Win + I to open Settings.
- Select “System > Troubleshoot > Other troubleshooters” in Windows 11.
- On the next screen, click the Run button beside Windows update.

- When the troubleshooter window pops in, hit Next and follow the on-screen instructions.
Note: If you are on Windows 10, press Win + I, and follow this route instead –
Settings (Win + I) > Update & Security > Troubleshoot > Additional troubleshooters
- On the next screen, click to expand Windows update and hit the option – Run the troubleshooter.

This program will run to find any issues that exist inside your computer and resolve them.
2] Uninstall Third-party apps
If you have lately installed some third-party application on your PC and this error starts appearing afterward, you must have installed a conflicting app. What you can do now is open the Control Panel and remove all recent programs from your device.
There remain some residual or leftover files even after uninstalling programs from your system. To get rid of such files in Windows, reboot your PC once. Sign back into your device and check if the error 0X800B0101 is resolved by now.
3] Run SFC and DISM scans
There’s one more problem with installing third-party apps on the computer. A problematic app is known to cause problems as it interferes with the core system files and makes them corrupt. To fix this issue, you may try performing SFC and DISM scans. Here’s how to do this –
- First of all, right-click on the Windows icon and select Windows Terminal (Admin).
- If you are still on the Windows 10 operating system, select Windows PowerShell (Admin) instead.
- On the elevated console, type the following, and press Enter.
sfc /scannow
- Wait for 10-15 minutes while the SFC scan reaches 100%.
- Next, run the DISM code to find and fix any problem with Windows 11/10 Image.
Dism /Online /Cleanup-Image /ScanHealth

- The DISM scan also takes 15-20 minutes, so wait patiently.
4] Clear Pending .XML file
The presence of pending.xml files may also cause this exception error 0X800B0101 in Windows. To solve this issue, you may rename the pending.xml file to something pending.old.
To do this, open Command Prompt as an administrator and execute the code below
Ren c:\windows\winsxs\pending.xml pending.old
Restart your PC and check if this resolves the issue that you were dealing with before.
5] Repair outdated drivers to fix Error 0X800B0101
If you haven’t installed any driver updates for a long time on your computer, errors like 0X800B0101 are bound to occur at one time or another. What you can do now is download and install optional updates and see if it resolves the issue.
6] Purge Windows Cache folders
SoftwareDistribution and Catrrot2 are two cache folders that contain all the essential information of recent updates. It is supposed for us to purge these folders frequently. If you haven’t cleared these folders for a long time, try purging them for once. Here’s how this process goes –
- Launch the Run dialog by pressing Win + R.
- Type “
services.msc” and press Enter to open the Services window. - Scroll down to Windows update, right-click over it, and hit Stop.
- Next, stop these services as well – Background Intelligent Transfer Service and Cryptographic Services.
- After you stop these services successfully, purge the Windows Cache folders. You may find these folders at the below location –
SoftwareDistribution - C:\Windows
Catroot2 - C:\Windows\System32

- After you reach out to the respective folder, press Ctrl + A to select all items.
- Use Ctrl + X to cut all the selected items and paste them (Ctrl + V) at some other location.
- Alternatively, you may also rename these folders to
SoftwareDistribution.oldandCatroot2.oldas well. - After purging or renaming the Windows cache folders, restart all the services that you stopped earlier.
Reboot your PC next so that the changes made come into effect from the next login.
How do I update Windows 11/10?
The best way to update Windows 11/10 is through the update section under Settings. You may access the Settings page by clicking Win + I. After that, click Update & Security and hit Check for updates.
If this doesn’t display any pending updates, you may check the Windows update history page for the latest cumulative updates. Following this way, you need to manually download the pending updates and install them on your computer.
This post focuses on “one of your disks needs to be checked for consistency. You may cancel the disk check, but it is strongly recommended that you continue.” error message which appears during Windows booting. If your computer sticks to this black screen, you should continue reading to find out solutions.
Most Windows users must have experienced this issue. We start up computer as normal, but suddenly a black colored screen appears. The onscreen message says your hard drive needs to be checked for consistency, the complete information:
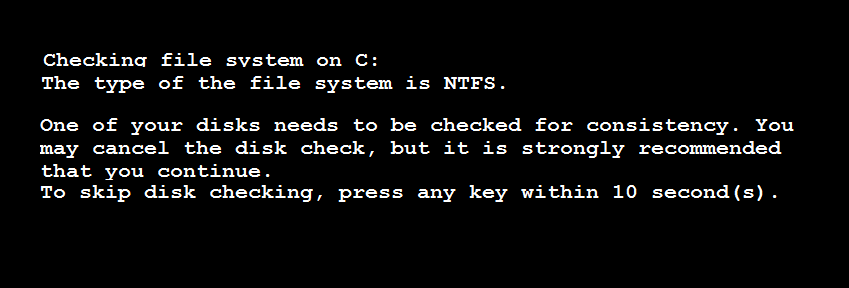
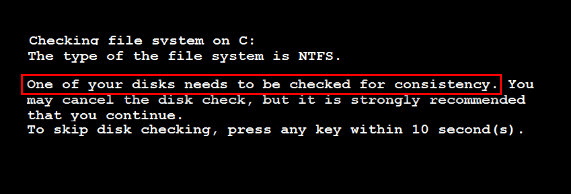
Checking file system on C:

The type of the file system is NTFS.

One of your disks needs to be checked for consistency. You may cancel the disk check, but it is strongly recommended that you continue.

To skip disk checking, press any key within 10 second(s).
If you press any key before the countdown ends, the disk check will be aborted. However, when you restart computer, you’ll get same error message again because operating system still thinks the drive needs to be scanned and checked. If no key is pressed, the disk checking will be done automatically.
Causes of “one of your disks needs to be checked for consistency”
The automatic disk check appears after an improper system shutdown, for example, there is a sudden power outage or your computer froze, battery is removed, or you have to press the restart button
This error also occurs if a USB disk is removed before Windows has finished with it, such as you remove USB disk directly while it is saving data without click the Safely Remove hardware. Therefore, operating system is likely to mark your device as “dirty” and schedule a complete scan before marking it “clean” again.
There is something wrong with operating system. Sometimes Windows just prompts to scan your disk automatically every time you boot even though you have checked disk completely.
How to fix “one of your disks needs to be checked for consistency”?
We suggest you to solutions provided below to deal with the issue that Windows asks to check disk consistency. It should be noted that sometimes chkdsk command may repair error excessively, which might cause data loss. Thus it is necessary to backup important files before performing disk checking and repairing. If your files have been lost, you can restore them following steps provided in next section.
Solution 1: Disable automatic disk check through Registry Editor
Disclaimer: Serious problem might be caused if registry is modified incorrectly. You can backup registry before making any changes so that you can restore it in case of any error occurs. If you follow these steps carefully, you should not any problem.
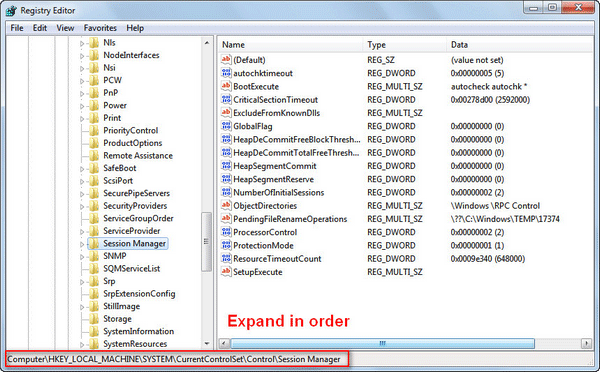
- Click Start menu and enter “regedit” in search box. Then you can right-click regedit.exe and choose “Run as administrator”.
- On the left part of Registry Editor expand the following keys: HKEY_LOCAL_MACHINE\SYSTEM\CurrentControlSet\Control\Session Manager
- Find and double-click key BootExecute on the right pane and you can see the default value is autocheck autochk*. This value means every drive is checked for consistency. To disable aotucheck on C: at system startup, you just need to add /K:C between autochk and *, which will look like: autocheck autochk /k:C *
Solution 2: Run chkdsk command from WINRE
- Remove all floppy disk, DVDs and CDs from your computer and restart computer by pressing power button. Press F8 before Windows logo appears.
- The Advanced Boot Option appears and you can use arrow keys to highlight options. Select Repair your computer and press Enter.
- Choose your keyboard layout and click Next.
- On the System Recovery Options Window click Command Prompt to open a command prompt window.
- Type command chkdsk /f and press enter; then type chkdsk /r and hit Enter.
Solution 3: Test hard drive with a diagnostic tool
If disk check cannot solve the problem, you may need to test hard drive with diagnostic tool.
- Test hard drive with the utility from drive’s manufacture. For example, if your hard drive is WD, then you can go to its site to find if any diagnostic tool is available. If you can find one, then perform a thorough scan for your disk.
- Test hard drive using 3rd party tool like PartitionGuru which provides free function to rest hard drive status and bad sectors.
- Run the program from Windows computer, right-click the disk to be tested and choose “Verify or Repair Bad Sectors”.
- Click Start Verify button and the application starts the complete bad sector scanning.
Recover data from “one of your disks needs to be checked for consistency”?
In some cases files may get lost after performing chkdsk especially after checking disk on corrupt drives. Here are two methods to recover data after chkdsk.
Method 1: Recover lost data from Found.000 folder
Before chkdsk starts deleting files, you can receive a message asking “Convert lost chains to files <Y / N>?” If you enter Y, disk check operation will save each lost chain in found.000 folder which locates the root directory of the disk being checked. If you type N, system will fix the disk without saving lost content of lost allocation units.
Thus, you should find the Found.000 folder first. This folder is usually hidden by default, but you can view it by displaying hidden files and folders: type folder in the search box on the taskbar and select Show hidden files and folders from searching results; select “Show hidden files, folders, and drives” under Advanced settings and click OK.
Now you can see the folder, double-click it to open it, and you can see lots of .chk files. Such files are not accessible before changing extension to correct ones. For example, if you are sure certain file is a .jpg picture file, you can change .chk to .jpg, after which the file can be opened. However, this method won’t be workable if you do not remember the correct extension or there are too many files.
Method 2: Recover lost files with free data recovery software
We recommend you to try free data recovery software to rescue files deleted by chkdsk. Eassos Recovery Free is the free version of Eassos hard drive recovery software, but it works the same as the full version when it searches for lost files. Let’s see how to complete the recovery task using this free tool.
- Launch Eassos Recovery Free and select recovery mode based on data loss causes.

- Select the disk where lost files were stored and click Next button. A quick and deep scanning will start.
- After scan, you can preview all listed files (file preview supports text, documents, picture, video & audio files) and choose files you want to recover. Click Recover button to save selected files to a different drive.


The error message – One of your disks needs to be checked for consistency – appears now and then on the computer; it makes people suffering since they don’t know what’s going on and how to fix the problem properly. That’s why I’m writing this post.
Most people will be freaked out when finding that the system is not booted as usual. Different kinds of error messages may appear on the computer screen. “One of your disks needs to be checked for consistency” is a common one.
Are you familiar with this error? Do you know what the best way is to deal with it? If you happen to be the victim of this problem, congratulations, you’ve got to the right place. In the following content of this article, I’ll show you how to deal with the Windows needs to check disk for consistency situation properly (how to recover files after check disk and how to fix check disk for consistency error according to your needs).
You may jump to the paragraph you are interested in directly.
Error Message – One of Your Disks Needs to Be Checked For Consistency
The situations in which Windows asks to check your hard drive for consistency can be roughly divided into two types:
- The disk check can be finished automatically and completely. Then, you can boot into the system as usual.
- The disk check for consistency freeze, so you cannot start your computer successfully.
In this part, I’ll talk about them respectively and show you how to work with the “CHKDSK deleted my data” issue & how to get data off a hard drive that won’t boot.
Files Are Missing after Check Disk
When encountering the “one of your disks needs to be checked for consistency” error, many users are prone to let the disk check run in order to fix the problems they may think exist on their computer disk. Sometimes, the check process can be finished smoothly, but sometimes, it can’t be done. Well, does it mean everything goes fine when the check disk is finished completely and you start the computer successfully? Of course not!
Please look at this case:
Hi, guys. Just got this error when I switched on my computer: one of your disks needs to be checked for consistency. (G:) The disk in question is one of the two partitions (F: and G:) of an old HD that I just slotted into my new system 3 days ago. It was working fine, and able to browse files on it fine until earlier. I let the chkdsk run, and it found some errors and orphaned files etc. Now when I’m in Windows, under My Computer, F: shows with details of space etc., and G: is there but doesn’t show details. What do you suggest I do next? My OS is in my new drive, so it isn’t a problem. This old drive has been with me for 7 years, and I’m wondering if it could be failing. Also, I was shifting the CPU earlier, could it have been due to that? EDIT: Just tried accessing G: in My Computer, and after the green bar filled up for a while, a message popped up saying: G: needs to be formatted before use. Do you want to format it now? I clicked No, and then an error message popped up saying: G: is not accessible. Data Error: Cyclic Redundancy Check.– asked by shank on SevenForums
Shank said that he was in Windows and found that G: didn’t show details. When he tried accessing G:, the message popped up, saying that G: needs to be formatted before use. In this case, he loses access to all the files saved on G:, obviously. If any of those files are important to him, he will definitely make every effort to recover data after check disk.
Press Any Key to Skip Disk Checking Not Working
When Windows asks to check disk for consistency, there are also some people choose to reject this request. They prefer to press any key to skip the disk checking, as prompt said. Yet, how will you respond when one of your disks needs to be checked for consistency stuck? Are you afraid of losing all the data saved on the current computer? Please don’t be, since I have a way to help you recover data from the internal disk (see the next part).
Let’s see a specific case first:
I am currently having an issue. Whenever I start up my PC, the following message appears: Checking file system on C:. The type of the file system is NTFS. Volume label is ACER. One of your disks needs to be checked for consistency. You may cancel the disk check, but it is strongly recommended that you continue. To skip disk checking, press any key within 1 second(s). This message counts down to 1 second and freezes. I tried leaving it for 4 hours today as I went to school. Came home, and it was still on this screen. As I said, every time I start up my computer, this message appears and I am forced to force shut down the computer if I do not hit a key in time. I am wondering if there is an alternative and recommended option to run this disk check to avoid skipping this message on every startup.– put forward by Sean1082 on SevenForums
Sean said that when the message counted down to 1 second, the process froze. Then, he left the computer opening. But when he came home from school 4 hours later, the computer was still stuck on the same screen. And every time when he starts up the computer, the same message appears. In cases like this, people will be wondering how they can avoid the auto check on startup and how to recover files after check disk was stuck.
How to Recover Data after CHKDSK
I’ll teach you how to recover data in detail in the following content.
Recover Data from External Hard Disk
1. Choose a proper edition of Power Data Recovery.
- If you are worried about the performance, please use the Trial Edition first.
- If you need to recover data immediately but don’t have special requirements, please choose the Personal Edition.
- If you need to recover data in a business environment, please select a license for the business.
Click to see the comparison of different license types and click on the corresponding button to buy.
MiniTool Power Data Recovery TrialClick to Download100%Clean & Safe

2. Download & install the data recovery software.
Download the software and run the setup program to install the data recovery software to your computer.
You should copy & paste your license key into the text box to register first if you are using the advanced edition.
3. Choose the certain disk type.
You need to specify the type of the disk needs to be scanned. For instance, to recover data from the local drive, you should click on “This PC”.
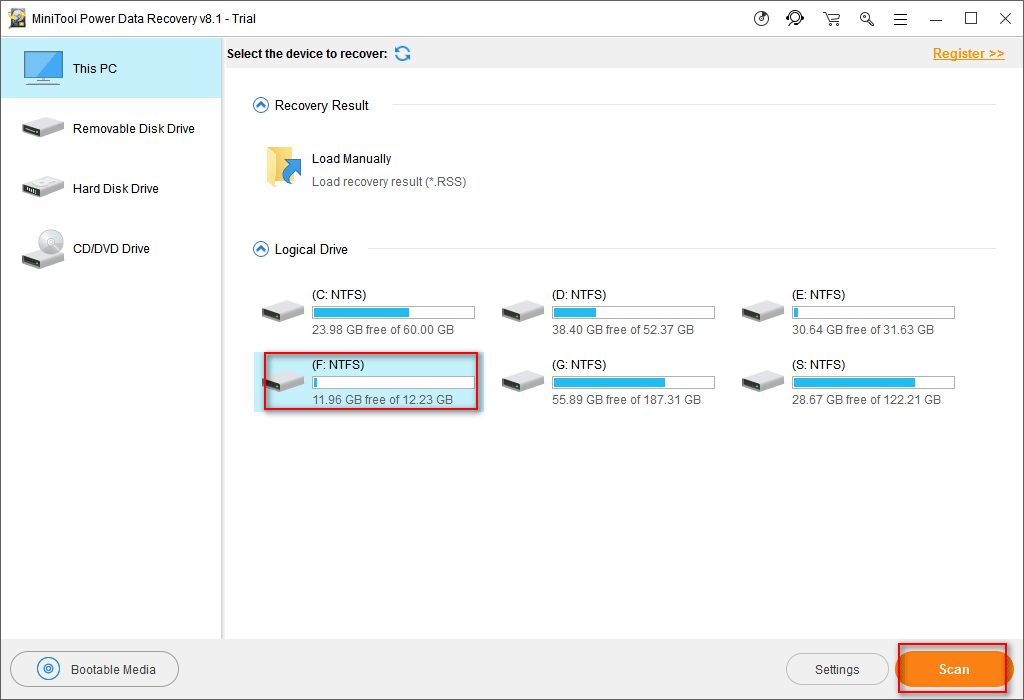
4. Select the target drive to scan.
You’ll see a list of all disks available in the column you have selected. At this time, you must select the one on which the error message appears. Then, click on the “Scan” button in the lower right corner to start detecting files.
5. Select the files you need to recover.
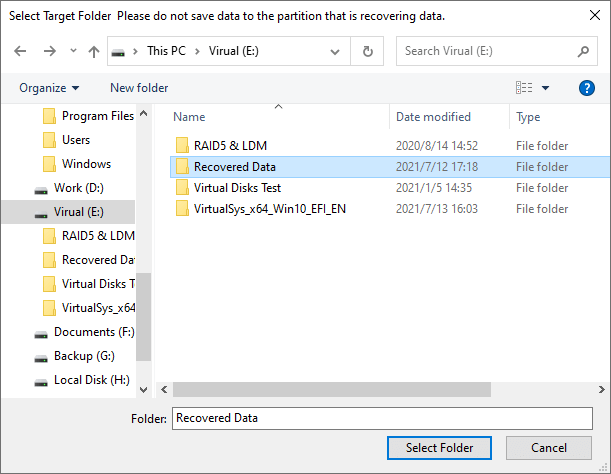
You may browse the scan results during or at the end of the scan. Please make sure which files you need and check them to recover by pressing the “Save” button. Then, set a storage path for them and click on the “OK” button to confirm your selection.
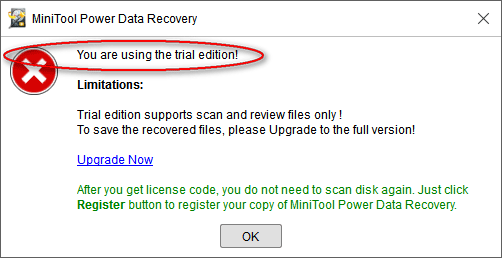
Warning: You can’t finish this step if you’re using the trial edition. The following prompt window will pop up to stop you from continuing recovery. You’d better purchase a license if you really need to recover files found by the software.
Click to Tweet
This method also works for the data recovery from the internal hard disk that is working well
Restore Data from Non-bootable Internal Hard Drive
How to recover data from non-booting computer? You need a bootable edition of MiniTool Power Data Recovery. Of course, you also need to choose a license type for it. The trial edition is not suitable anymore in this case since it is only able to scan the files for you, not recover. (I’ll take Personal License as an example in the rest steps; other license types are basically the same)
Please install the Personal Edition to another computer that works fine. Then, use it to make a bootable disk within a few clicks (see “How to make a Boot Disk?” in part 2 of Data Recovery From Corrupted Internal Hard Disk – Ultimate Guide).
1. Restart your computer and press corresponding button to enter the BIOS. Then, change the boot order of your computer to make this boot disk the first boot device. After that, exit BIOS and save changes.
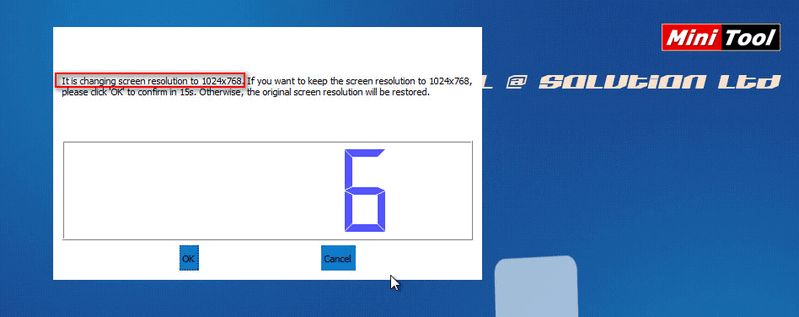
2. After a while, you’ll see the picture shown below. At this time, you may choose to change the screen resolution or not.
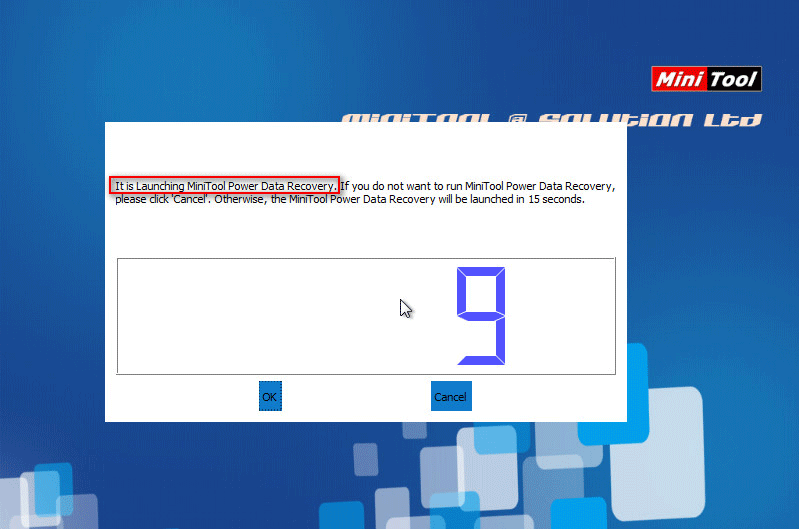
3. Afterwards, the following software launching prompt window will appear. You should choose to run MiniTool Power Data Recovery.
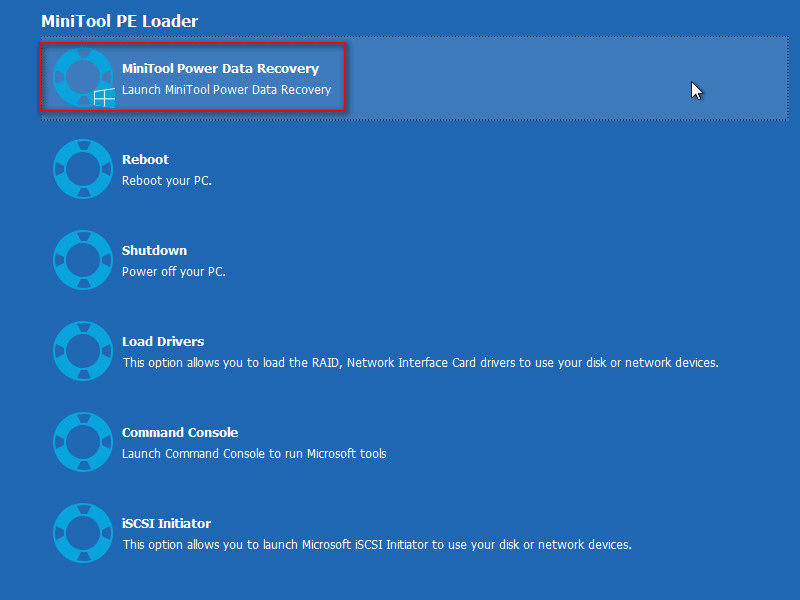
4. Then, select the first option in the MiniTool PE Loader window.
5. Now, you’ll be brought to the main window of MiniTool Power Data Recovery and you should repeat step 3 ~ step 5 mentioned in the previous situation to finish the recovery.
Tip: If you’re running a MacBook and need to recover data from it when it is dead, you’d better read You’re Able To Recover Data From Dead MacBook, That’s Impressive to know how to do exactly.
Solutions – Fix Check Disk for Consistency Error
In general, the automatic disk check may appear when:
- The battery is loose or moved.
- The computer shuts down improperly or illegally.
- A sudden power outage occurs while the computer is running.
- The computer case is moved while the computer is running.
- A USB device is unplugged before the computer has a chance to finish the current activity with it.
Check Disk for Errors in Windows
When that happens, you should let the check run to see whether it can be finished and whether you can access your system after that. If you enter the OS successfully, you may check your hard disk for errors in Windows and try to fix them completely or you can test the hard disk with a diagnostic tool to find and solve the problem.
There are steps of how to check hard disk for errors in Windows 7.
Disable Disk Check on Startup in Windows
But, what if Windows run CHKDSK on every reboot? How to stop checking file system on C in Windows 7 or other systems? Those are questions that bother a lot of users.
Here, I’ll show 4 common ways to cancel a disk check on your Windows computer (take Windows 7 as an example).
Method one: disable the check in the registry editor.
- Click on the start menu; then, type “regedit” into the search box and press “Enter”.
- Right click on the regedit.exe appeared in the result list and choose “Run as administrator”.
- Navigate to “HKEY_LOCAL_MACHINE\SYSTEM\CurrentControlSet\Control\Session Manager”.
- Locate and double-click on the “BootExecute” on the right pane.
- Change the value from “autocheck autochk *” to “autocheck autochk /k:C *” (C refers to the letter of the drive on which disk check is performed).
Method two: make use of disk defragmenting.
- Open Windows Explorer and find the drive on which check disk has been performed.
- Right click on this drive and choose “Properties”.
- Navigate to “Tools” tab and then click on “Defragment now” under “Defragmentation”.
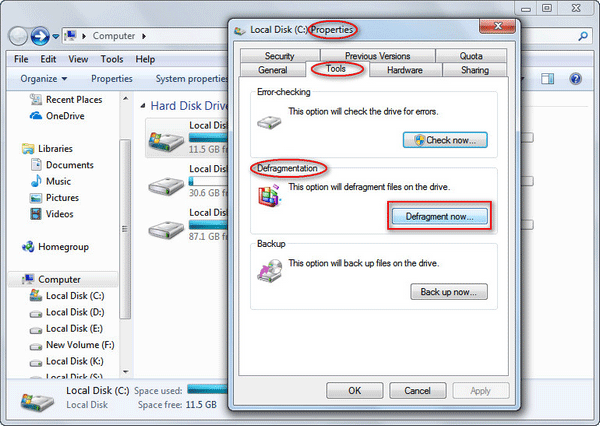
Please note that you can also open the Command Prompt and type “chkdsk *: /f” (* stands for the target drive letter) to complete this task.
Method three: repair the file system error.
- Restart the computer and hold down F8 button.
- Choose to repair the computer.
- Enter the command line mode.
- Type “chkdsk *: /r /f” (* stands for the target drive letter).
Method four: format the disk.
If all the above methods fail, you will have to format the corresponding hard drive.
Click to Tweet
Warning: It is strongly recommended that you use the disk test tool to see if there are bad sectors on your hard disk. Then, decide to shield the bad sectors & continue using it or replace the hard drive with a new one.
Conclusion
When you, unfortunately, run into “one of your disks needs to be checked for consistency” error, you must stay calm. Please remember that your data is always the most important thing of all. So you’re suggested to recover data first before you try any other ways to try to fix the check disk for consistency error (after all, “CHKDSK deleted my files” is not an individual case).
When you’re pretty sure that you have got all the data you need, you can try the methods I have mentioned above or other ways you have found on the internet to fix the error.