
How to fix ole32.dll issue
How to fix ole32.dll issue
Special Offer
Инструкция
Windows 11, 10, 8, 7
Скачать
The following steps may fix the ole32.dll issue:
-
Шаг 1.
Скачайте приложение
См. информацию о компании Outbyte инструкцию по удалению EULA Политику конфиденциальности
-
Step 2.
Install and launch the application -
Step 3.
Нажмите кнопку «Сканировать» для обнаружения проблем -
Шаг 4.
Нажмите кнопку «Исправить» для устранения проблем
| Совместимость | Win 11, 10, 8, 7 |
| Download Size | 21.2 МБ |
| Requirements | 300 MHz Processor, 256 MB RAM, 50 MB HDD |
Ограничения: пробная версия позволяет сканировать, создавать резервные копии и восстанавливать элементы системы Windows без ограничений бесплатно. Регистрация полной версии стоит от USD 29.95.
DLL issues may happen due to a number of different factors. The causes mentioned below are only the most common ones. In certain cases, a ole32.dll issue may occur when your computer system becomes overloaded or important program files go missing, get accidentally deleted or become corrupted. These types of malfunctions may occur on computers that do not undergo regular maintenance, which may lead to critical glitches and system malfunctions. It may be possible to resolve DLL issues with special software that repairs system elements and tunes system settings to restore stability.
В статье приводится подробная информация о значении проблемы, потенциальных причинах и способах ее устранения.
-
1
Meaning of «ole32.dll» issues -
2
Causes of «ole32.dll» issues -
3
Ways to repair «ole32.dll» issues
Meaning of ole32.dll issue
DLL Stands for «Dynamic Link Library.» A DLL (.dll) file contains a library of functions and other information that can be accessed with a Windows program. Dynamic links help programs use resources, such as memory and hard drive space, more efficiently.
There are many types of DLL issues that may appear on a Windows system. Some of the common malfunction messages include issues with the following files: D3dx9_43.dll, Xinput1_3.dll, Hal.dll, Kernal32.dll and others.
No matter what DLL issue you are experiencing, the result can be a slow PC that may freeze or crash, and cause an overall decline in user experience.
Common causes of ole32.dll issues
DLL issues may occur for a variety of reasons. One of the common causes is the DLL file being overridden or shared with an older version of a program across other applications.
Another possibility would be the installation or uninstallation of a program that ran incorrectly.
Ignoring the ole32.dll issue may eventually lead to PC slowdown or a full system crash, so fixing the issue is important to maintaining optimal computer performance.
Ways to fix ole32.dll issues
Для немедленного устранения подобных проблем, продвинутые пользователи ПК могут попытаться вручную отредактировать системные элементы, тогда как остальным может потребоваться нанять специалиста для выполнения этой работы. Т. к. при любых манипуляциях с системными элементами существует риск серьезного повреждения операционной системы, если пользователь не уверен на 100% в своих технических навыках или знаниях, он может воспользоваться специальной программой, предназначенной для отладки элементов Windows и не требующей от пользователя каких-либо специальных знаний.
Следующие шаги могут помочь устранить неполадки:
-
Скачайте приложение
(Ознакомьтесь с информацией о компании Outbyte инструкцией по удалению EULA Политикой конфиденциальности)
- Установите и запустите приложение
- Нажмите кнопку «Сканирование» для обнаружения причин неполадок
- Нажмите кнопку «Исправить все» для устранения найденных проблем
The same application can be used to run preventative measures to reduce the chance of this or other system issues appearing in the future.
Специальное предложение
Инструкция
Следующие шаги могут исправить ошибку ole32.dll:
-
Шаг 1.
Скачайте приложение
См. информацию о компании Outbyte инструкцию по удалению EULA Политику конфиденциальности
-
Шаг 2.
Установите и запустите приложение -
Step 3.
Нажмите кнопку «Сканировать» для обнаружения проблем -
Шаг 4.
Нажмите кнопку «Исправить» для устранения проблем
| Совместимость | Win 11, 10, 8, 7 |
| Размер загрузки | 21.2 МБ |
| Требования | Процессор 300 МГц, 256 МБ RAM, 50 МБ HDD |
Ограничения: пробная версия позволяет сканировать, создавать резервные копии и восстанавливать элементы системы Windows без ограничений бесплатно. Регистрация полной версии стоит от USD 29.95.
A Troubleshooting Guide for Ole32.dll Errors
Ole32.dll Error Messages
There are several different ways that ole32.dll errors can show up on your computer. Here are some of the more common ways that you might see ole32.dll errors:
- “Ole32.dll Not Found”
- “This application failed to start because ole32.dll was not found. Re-installing the application may fix this problem.”
- “Cannot find [PATH]\ole32.dll”
- “The file ole32.dll is missing.”
- “Cannot start [APPLICATION]. A required component is missing: ole32.dll. Please install [APPLICATION] again.”
Ole32.dll error messages might appear while using or installing certain programs, when Windows starts or shuts down, or maybe even during a Windows installation.
The context of the ole32.dll error is an important piece of information that will be helpful while solving the problem.
Cause of Ole32.dll Errors
Ole32.dll errors are caused by situations that lead to the removal or corruption of the ole32 DLL file.
In some cases, ole32.dll errors could indicate a registry problem, a virus or malware issue or even a hardware failure.
Don’t Want to Fix This Yourself?
If you’re interested in fixing this problem yourself, continue with the troubleshooting in the next section.
Otherwise, see How Do I Get My Computer Fixed? for a full list of your support options, plus help with everything along the way like figuring out repair costs, getting your files off, choosing a repair service, and a whole lot more.
How To Fix Ole32.dll Errors
Important: Do not download ole32.dll from a “DLL download” website.
There are many reasons why downloading a DLL file is a bad idea. If you need a copy of ole32.dll, it’s best to obtain it from its original, legitimate source.
Note: Start Windows in Safe Mode to complete any of the following steps if you’re unable to access Windows normally due to the ole32.dll error.
- Restore ole32.dll from the Recycle Bin. The easiest possible cause of a “missing” ole32.dll file is that you’ve mistakenly deleted it.
If you suspect that you’ve accidentally deleted ole32.dll but you’ve already emptied the Recycle Bin, you may be able to recover ole32.dll with a free file recovery program.
Important: Recovering a deleted copy of ole32.dll with a file recovery program is a smart idea only if you’re confident you’ve deleted the file yourself and that it was working properly before you did that.
- Run a virus/malware scan of your entire system. Some ole32.dll errors could be related to a virus or other malware infection on your computer that has damaged the DLL file. It’s even possible that the ole32.dll error you’re seeing is related to a hostile program that’s masquerading as the file.
- Use System Restore to undo recent system changes. If you suspect that the ole32.dll error was caused by a change made to an important file or configuration, a System Restore could solve the problem.
- Reinstall the program that uses the ole32.dll file. If the ole32.dll DLL error occurs when you use a particular program, reinstalling the program should replace the file.
Important: Try your best to complete this step. Reinstalling the program that provides the ole32.dll file, if possible, is a likely solution to this DLL error.
- Update the drivers for hardware devices that might be related to ole32.dll. If, for example, you’re receiving a “The file ole32.dll is missing” error when you play a 3D video game, try updating the drivers for your video card.
Note: The ole32.dll file may or may not be related to video cards – this was just an example. The key here is to pay very close attention to the context of the error and troubleshoot accordingly.
- Roll back a driver to a previously installed version if ole32.dll errors began after updating a particular hardware device’s driver.
- Run the sfc /scannow System File Checker command to replace a missing or corrupt copy of the ole32.dll file. If this DLL file is provided my Microsoft, the System File Checker tool should restore it.
- Install any available Windows updates. Many service packs and other patches replace or update some of the hundreds of Microsoft distributed DLL files on your computer. The ole32.dll file could be included in one of those updates.
- Test your memory and then test your hard drive. I’ve left the majority of hardware troubleshooting to the last step, but your computer’s memory and hard drive are easy to test and are the most likely components that might cause ole32.dll errors as they fail.
If the hardware fails any of your tests, replace the memory or replace the hard drive as soon as possible.
- Repair your installation of Windows. If the individual ole32.dll file troubleshooting advice above is unsuccessful, performing a startup repair or repair installation should restore all Windows DLL files to their working versions.
- Use a free registry cleaner to repair ole32.dll related issues in the registry. A free registry cleaner program may be able to help by removing invalid ole32.dll registry entries that might be causing the DLL error.
Important: I rarely recommend the use of registry cleaners. I’ve included the option here as a “last resort” attempt before the destructive step coming up next.
- Perform a clean installation of Windows. A clean install of Windows will erase everything from the hard drive and install a fresh copy of Windows. If none of the steps above correct the ole32.dll error, this should be your next course of action.
Important: All the information on your hard drive will be erased during a clean install. Make sure you’ve made the best attempt possible to fix the ole32.dll error using a troubleshooting step prior to this one.
- Troubleshoot for a hardware problem if any ole32.dll errors persist. After a clean install of Windows, your DLL problem can only be hardware related.
Applies To
The ole32.dll error message could apply to any program or system that might utilize the file on any of Microsoft’s operating systems including Windows 8, Windows 7, Windows Vista, Windows XP, and Windows 2000.
Still Having Ole32.dll Issues?
See Get More Help for information about contacting me on social networks or via email, posting on tech support forums, and more. Be sure to let me know the exact ole32.dll error message that you’re seeing and what steps, if any, you’ve already taken to fix the problem.
Credit : https://www.lifewire.com
Note: Outbyte PC Repair tool has been proven to identify and fix the OLE32.DLL error. See more information about Outbyte and Uninstall Instructions. Please review Outbyte EULA and Privacy Policy.
Введение
Одной из наиболее распространенных ошибок, с которыми сталкивается пользователь Windows, является ошибка отсутствия DLL. Эта ошибка просто не даст вам запустить приложение. При попытке открыть приложение вы увидите всплывающее окно со следующим сообщением об ошибке:
‘Программа не может запуститься, так как OLE32.DLL отсутствует на вашем компьютере’
Не волнуйся! Это распространенная проблема, с которой сталкиваются пользователи Windows во всем мире, и есть несколько способов ее решить.
В этом подробном посте я предоставлю несколько решений для исправления ошибок DLL-файла, не найденных на ПК с Windows 11, 10, 8.1, 8 и 7.
Что такое ошибка OLE32.DLL?
Термин «DLL» относится к динамически подключаемым библиотекам, которые можно найти в Windows 11, 10, 8, 7 и других предыдущих версиях ОС. Динамическая библиотека (DLL) — это набор небольших программ, которые могут загружать более крупные программы, когда это необходимо для выполнения определенных задач. Небольшая программа, называемая файлом DLL, содержит инструкции, помогающие более крупной программе справиться с тем, что может не являться основной функцией исходной программы. Эти инструкции могут быть вызваны несколькими программами одновременно. Когда вы запускаете программу в любой операционной системе Windows, большая часть функциональных возможностей программы может обеспечиваться библиотеками DLL.
Зависимость создается каждый раз, когда DLL используется программой. Если другая программа использует DLL и каким-то образом нарушает зависимость между двумя программами, первая программа больше не будет выполняться. Именно тогда вы увидите такие ошибки, как
‘Программа не может запуститься, так как OLE32.DLL отсутствует на вашем компьютере. Попробуйте переустановить программу, чтобы решить эту проблему».
Причины отсутствия ошибки OLE32.DLL
Типичные причины ошибки «OLE32.DLL отсутствует» в Windows 10, 11, 8, 7 и других версиях приведены ниже .
а) Удалено или повреждено OLE32.DLL — файл DLL, используемый определенной программой, был изменен или удален OLE32.DLL.
b) Отсутствующие или поврежденные файлы распространяемого пакета Microsoft Visual C++ — файл OLE32.DLL является частью библиотеки времени выполнения программного обеспечения Microsoft Visual C++. Библиотеки среды выполнения VC++ — это файлы DLL, необходимые для запуска программ, скомпилированных с помощью Microsoft Visual Studio. Если некоторые файлы отсутствуют или если Visual Studio установлена неправильно, может появиться ошибка «OLE32.DLL отсутствует».
c) Система заражена вирусом или вредоносным ПО. Существует вероятность, что ваша система повреждена вирусом или вредоносным ПО. В результате OLE32.DLL могла быть повреждена или повреждена.
d) Поврежденные/испорченные системные файлы. Если ваши системные файлы Windows повреждены после взаимодействия с программами, содержащими вирус или некоторые вредоносные приложения, то OLE32.DLL может работать неправильно.
Некоторые другие распространенные ошибки OLE32.DLL включают:
OLE32.DLL отсутствует
Не удается зарегистрировать OLE32.DLL
Проблема с запуском OLE32.DLL
OLE32.DLL Нарушение прав доступа
точки входа в процедуру OLE32.DLL
OLE32.DLL ошибка при загрузке
OLE32.DLL сбой
Не удается найти OLE32.DLL
OLE32.DLL не найдено
OLE32.DLL не удалось найти
The program can’t start because OLE32.DLL is missing from your computer. Try reinstalling the program to fix the problem.
Действия по устранению ошибки отсутствия OLE32.DLL
Есть несколько способов исправить эту ошибку DLL, и мы подробно рассмотрим их ниже.
1. Скачать OLE32.DLL
OLE32.DLL можно загрузить вручную и добавить/заменить отсутствующим или поврежденным файлом DLL.
Шаг 1: Выберите и загрузите файл DLL из таблицы ниже в зависимости от версии вашей Windows (32-разрядная или 64-разрядная),
Скачать OLE32.DLL
| Версия | Описание | Операционные системы | Размер | Язык | MD5 | SHA1 | Скачать |
|---|---|---|---|---|---|---|---|
| 10.0.10240.16384 | Microsoft OLE for Windows | 32 | 0.91 MB | U.S. English |
9e209c6… 9e2… |
70f8a1e… 70f… |
|
| 10.0.10240.16384 | Microsoft OLE for Windows | 64 | 1.25 MB | U.S. English |
4473a0a… 447… |
a2f8149… a2f… |
|
| 10.0.10586.494 | Microsoft OLE for Windows | 32 | 0.91 MB | U.S. English |
f0781a4… f07… |
358c646… 358… |
|
| 10.0.10586.494 | Microsoft OLE for Windows | 64 | 1.26 MB | U.S. English |
642d4e1… 642… |
fcb4a5f… fcb… |
|
| 10.0.14393.0 | Microsoft OLE for Windows | 32 | 0.91 MB | U.S. English |
1bc4f0f… 1bc… |
a8f9fd4… a8f… |
|
| 10.0.14393.0 | Microsoft OLE for Windows | 64 | 1.22 MB | U.S. English |
17b7768… 17b… |
e8d18bc… e8d… |
|
| 10.0.18362.1082 | Microsoft OLE for Windows | 64 | 1.33 MB | U.S. English |
d3baa65… d3b… |
c7ba959… c7b… |
|
| 10.0.18362.113 | Microsoft OLE for Windows | 32 | 0.96 MB | U.S. English |
4c6b9e4… 4c6… |
0619bac… 061… |
|
| 10.0.18362.113 | Microsoft OLE for Windows | 64 | 1.33 MB | U.S. English |
657c78e… 657… |
fa96e83… fa9… |
|
| 10.0.18362.693 | Microsoft OLE for Windows | 64 | 1.33 MB | U.S. English |
890c70e… 890… |
cd37f7a… cd3… |
|
| 5.1.2600.1106 | Microsoft OLE for Windows | 32 | 1.12 MB | U.S. English |
cb598c1… cb5… |
d6eab68… d6e… |
|
| 5.1.2600.2180 | Microsoft OLE för Windows | 32 | 1.22 MB | Swedish |
4d9914a… 4d9… |
82f648f… 82f… |
|
| 5.1.2600.5512 | Microsoft OLE för Windows | 32 | 1.23 MB | Swedish |
4b33b42… 4b3… |
3ab0b48… 3ab… |
|
| 6.0.6001.18498 | Microsoft OLE for Windows | 32 | 1.25 MB | U.S. English |
aa40684… aa4… |
6e60b4f… 6e6… |
|
| 6.0.6001.18498 | Microsoft OLE for Windows | 64 | 1.83 MB | U.S. English |
c7e11f8… c7e… |
2e936eb… 2e9… |
|
| 6.1.7601.17514 | Microsoft OLE for Windows | 32 | 1.35 MB | U.S. English |
928cf72… 928… |
a80bcd3… a80… |
|
| 6.2.9200.16451 | Microsoft OLE for Windows | 32 | 1.1 MB | U.S. English |
6ada7f1… 6ad… |
d37a368… d37… |
|
| 6.3.9600.17042 | Microsoft OLE for Windows | 32 | 1.04 MB | U.S. English |
2bdb085… 2bd… |
8718c2c… 871… |
Шаг 2: Извлеките загруженный ZIP-файл либо с помощью сжатых папок Windows (поставляется с Windows), либо с помощью такого приложения, как WinRAR.
Шаг 3: Поместите извлеченный файл OLE32.DLL в каталог установки уязвимой программы. Если существует файл OLE32.DLL, замените его новым файлом.
Перезапустите затронутую программу, чтобы проверить, устранена ли проблема. Если нет, попробуйте следующий метод.
2. Автоматически исправить отсутствующую ошибку OLE32.DLL
Отсутствующую ошибку DLL можно исправить с помощью инструмента восстановления, такого как Outbyte PC Repair, который помогает решить любые системные проблемы, очищает ненужные файлы и исправляет любые ошибки DLL в процессе.
Шаг 1: Загрузите установочный файл отсюда.
Шаг 2: Установите PC Repair и просканируйте свой компьютер
Шаг 3: Нажмите «Восстановить», чтобы исправить все элементы, которые могут вызывать ошибки отсутствия DLL.
Шаг 4: Запустите приложение, чтобы проверить, исправлена ли ошибка.
Рекомендуемая загрузка: Исправить ошибку OLE32.DLL или отсутствующую ошибку OLE32.DLL с Outbyte.
Совместимость с Windows 11, 10, 8, 7, Vista, XP и 2000
3. Перерегистрируйте DLL-файл
Еще один эффективный способ исправить ошибку DLL — перерегистрировать файл DLL.
Шаг 1: Запустите утилиту «Выполнить», нажав клавиши Windows + R на клавиатуре. Введите « cmd » в поле ввода текста. Затем нажмите клавиши Ctrl+Shift+Enter , чтобы открыть командную строку в режиме администратора.
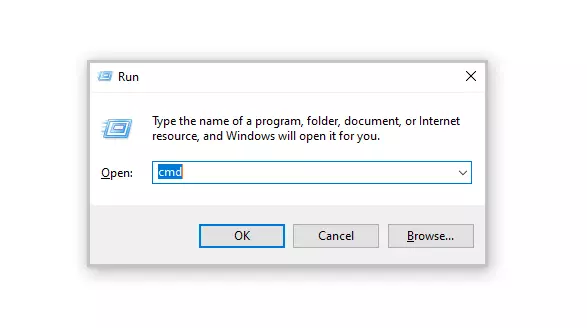
Шаг 2: В окне подсказки выберите «Да», чтобы разрешить командной строке вносить изменения в ваше устройство.
Шаг 3: Теперь пришло время отменить регистрацию DLL-файла на вашем компьютере. Введите или скопируйте и вставьте следующую команду, затем нажмите Enter,
regsvr32 /u OLE32.DLL
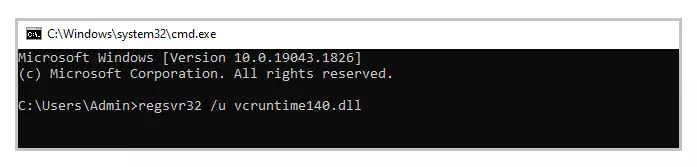
Примечание. Замените vcruntime140.dll на OLE32.DLL
Шаг 4: Далее вам необходимо перерегистрировать файл. Для этого выполните следующую команду:
regsvr32 OLE32.DLL
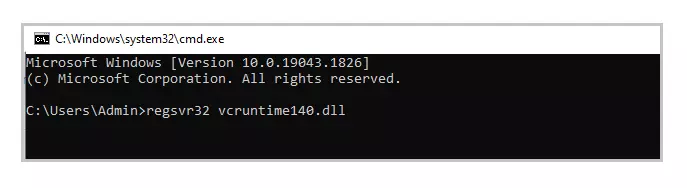
Примечание. Замените vcruntime140.dll на OLE32.DLL
Шаг 5: Выйдите из командной строки и снова запустите приложение.
4. Переустановите последнюю версию распространяемого пакета Visual C++ 2015–2022 для Visual Studio.
Наиболее часто используемое решение — переустановить распространяемый Microsoft Visual C++ для исправления ошибок DLL. Выполните шаги, указанные ниже,
Шаг 1: Чтобы получить доступ к официальной странице, с которой можно загрузить распространяемый пакет Microsoft Visual C++, нажмите на ссылку, представленную здесь.
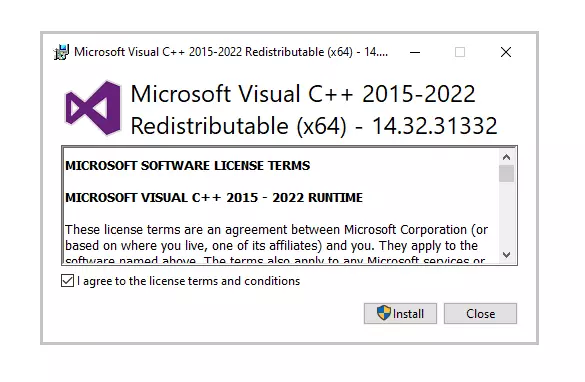
Выберите «Установить». Начнется установка, которая займет пару секунд.
Шаг 2: Кроме того, вы также можете загрузить его снизу в зависимости от версии Windows,
Загрузите версию x86 отсюда
Загрузите версию x64 отсюда
Шаг 3: После того, как вы выбрали файл, перейдите к загрузке. Загрузка может занять некоторое время, в зависимости от скорости вашего интернет-соединения.
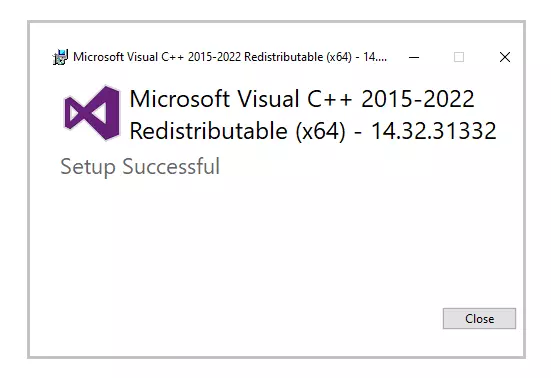
Шаг 4: После завершения загрузки установите загруженный файл. Когда начнется установка, установите флажок «Я согласен с условиями лицензии» и нажмите «Установить».
Шаг 5: Установка может занять несколько минут. После завершения установки перезагрузите компьютер и снова запустите программу, чтобы проверить, исправлена ли ошибка DLL.
5. Запустите сканирование системных файлов (SFC)
Шаг 1: Чтобы открыть утилиту «Выполнить», нажмите Windows + R на своем компьютере. Введите « cmd » в область ввода и нажмите Ctrl+Shift+Enter .
Шаг 2: Выберите «Да» во всплывающем окне, чтобы открыть командную строку в режиме администратора.
Шаг 3: Затем введите приведенную ниже команду и нажмите Enter, чтобы выполнить ее .
ПФС / сканирование
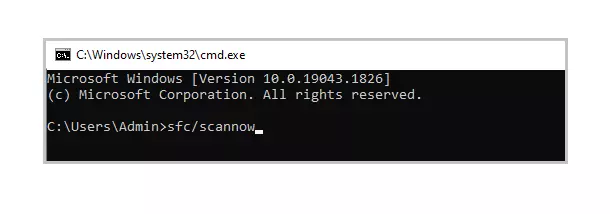
Шаг 4: Эта команда попытается найти и исправить поврежденные системные файлы (включая файлы DLL). После завершения процесса вы можете проверить файл журнала, созданный по пути, указанному в командной строке. Если в файле журнала вы найдете сведения об исправленном файле DLL, вы можете снова запустить приложение.

6. Переустановите Программу, которая не может быть запущена
Шаг 1: Откройте панель управления и нажмите «Удалить программу» в разделе «Программы».
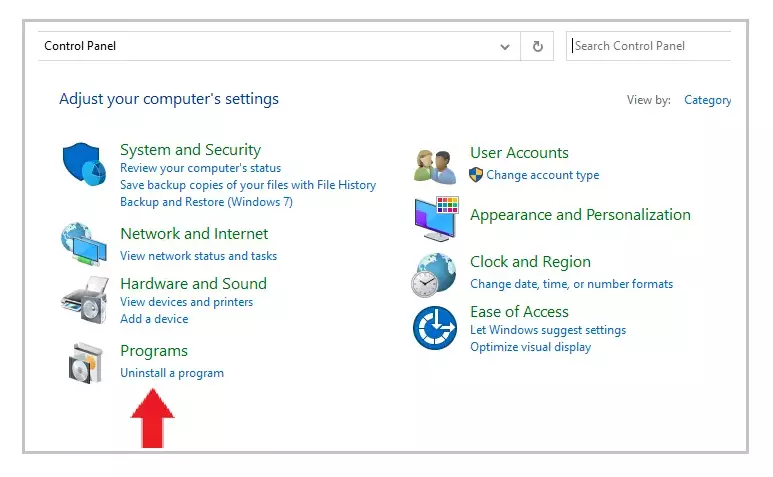
Шаг 2: Найдите и найдите программу, с которой у вас возникли проблемы, и нажмите на нее.
Шаг 3: Затем нажмите кнопку «Удалить» и продолжите процедуру удаления приложения.
Шаг 4: Переустановите программу из исходного кода. Либо загрузите установочный файл, либо, если он у вас уже есть, снова запустите установку, чтобы проверить, сможете ли вы запустить приложение на этот раз.
7. Обновите драйверы
В некоторых случаях ошибки DLL могут возникать из-за драйверов. Если сообщение об ошибке DLL появилось во время или после установки программы, сначала обновите драйверы до последней версии.
Кроме того, существует вероятность того, что вы можете столкнуться с ошибкой DLL после обновления драйверов. В таком случае нужно откатить драйвер до предыдущей версии.
Есть два способа обновить драйверы,
Способ 1: автоматическое обновление драйверов
Шаг 1: Используйте такой инструмент, как Outbyte Driver Updater, который автоматически ищет отсутствующие и устаревшие драйверы в вашей системе и обновляет их. Вы можете скачать инструмент здесь.
Шаг 2: Время загрузки зависит от скорости вашего интернет-соединения. После завершения загрузки начните установку инструмента.
Шаг 3: Запустите приложение.
Шаг 4: Внутри приложения запустите обновление. Затем средство обновления драйверов просканирует ваш компьютер на наличие устаревших и отсутствующих драйверов.
Шаг 5: Наконец, выберите драйверы и нажмите «Обновить».
Способ 2: обновить драйверы вручную
Шаг 1: Перейдите в окно поиска на панели задач — введите текст «Диспетчер устройств» и выберите «Диспетчер устройств».
Шаг 2: Выберите аппаратное устройство, которое необходимо обновить. Разверните выбор — выберите устройство, щелкните правой кнопкой мыши и выберите «Обновить драйвер».
Шаг 3: Выберите параметр «Автоматический поиск драйверов».
Шаг 4: Если будут найдены последние версии драйверов, они будут установлены автоматически.
Шаг 5: Иногда Windows не может найти последнюю версию драйвера. В таких случаях пользователь может посетить веб-сайт производителя, найти драйвер и инструкции по установке.
8. Восстановление системы
В этом методе ваш компьютер должен быть восстановлен до его более ранней версии, когда он работал без каких-либо ошибок. Есть вероятность, что новые обновления для вашего ПК вызвали ошибку, поэтому пользователь должен удалить новые обновления и вернуться к предыдущей версии.
Чтобы применить восстановление системы, сначала проверьте, есть ли у вас предыдущая резервная копия вашей системы. Чтобы проверить это,
Шаг 1: Начните с нажатия на кнопку запуска.
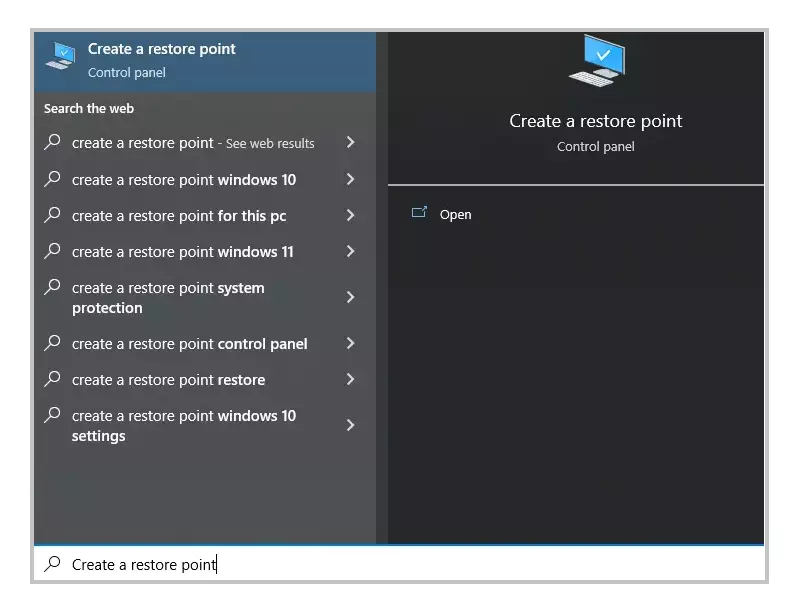
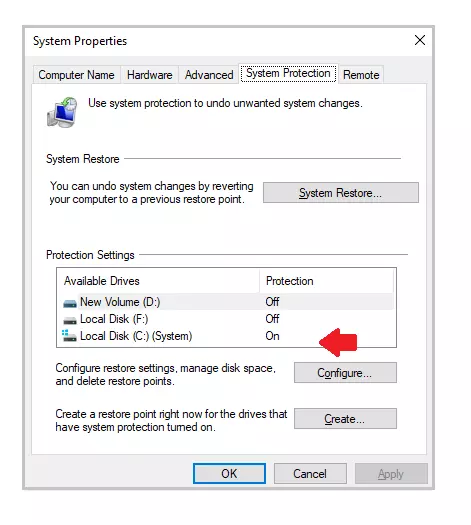
Шаг 2: Чтобы получить доступ к окну «Свойства системы», найдите «Создать точку восстановления» и щелкните первый результат.
Шаг 3: На вкладке «Защита системы» выберите «Системный» диск. Для этого диска должна быть включена «Защита».
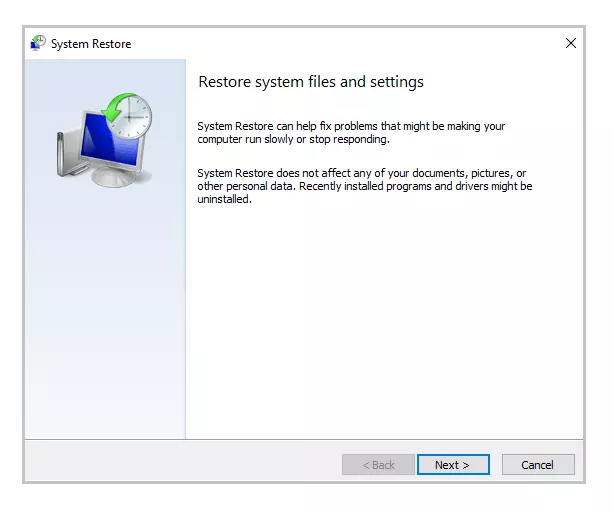
Шаг 4: Выберите «Восстановление системы» и нажмите «Далее» на начальном экране.
Шаг 5: Отобразится список точек восстановления. Выберите точку восстановления, когда ваше приложение работало правильно и без ошибок. Затем выберите «Далее».
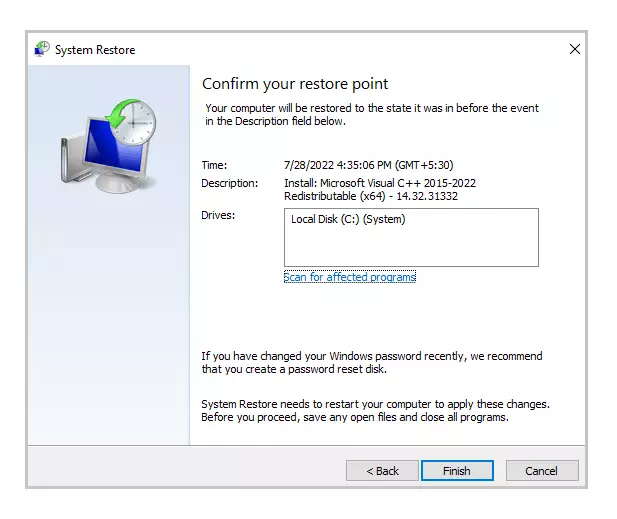
Шаг 6: Проверьте свой выбор и нажмите «Готово». Если появится всплывающее окно с предупреждением, выберите «Да».
Шаг 7: Начнется восстановление системы, и после завершения процесса ваш компьютер перезагрузится. Когда вы снова войдете в систему, вы увидите уведомление о том, что восстановление системы завершено. Теперь вы можете снова запустить приложение, чтобы проверить, исправлена ли ошибка.
Примечание: Если восстановление системы не было настроено ранее или вы никогда раньше не создавали резервную копию своего ПК, этот метод может вам не подойти.
9. Обновление Windows
OLE32.DLL исчезают после обновления до последней версии Windows.
Шаг 1: Перейдите к настройкам, выбрав «Пуск» > «Настройки» или используя сочетание клавиш Windows + I.
Шаг 2: Откройте опцию «Обновление и безопасность».

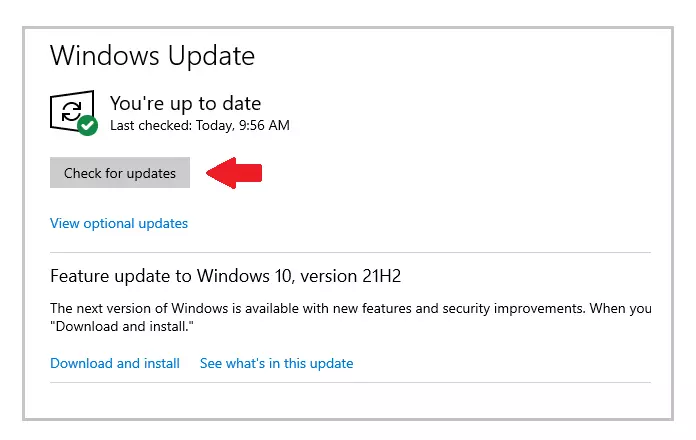
Шаг 3: Проверьте наличие новых обновлений, нажав «Проверить наличие обновлений».
Шаг 4: Если будет обнаружена более новая версия, обновление Windows будет загружено и установлено до последней версии.
Шаг 5: После установки новейшей версии снова запустите программу, чтобы проверить, сталкиваетесь ли вы с ошибкой OLE32.DLL.
Выполнение этих шагов определенно должно было помочь вам исправить отсутствующую ошибку OLE32.DLL.
Attention Before you read this post, I highly recommend you check out my resources page for access to the tools and services I use to not only maintain my system but also fix all my computer errors, by clicking here!
Ole32.dll is an important component of the Microsoft Windows platform, its primary function is OLE or Object Linking and Embedding. The OLE function exists to allow objects to be linked or embedded within files created by different apps. As an example, the OLE library function is used when an end user embeds an image in a PowerPoint file or Word document.
When it comes to the various ole32.dll errors, they can and typically do manifest themselves in several different ways. The most common of which are listed below:
Ole32.dll Not Found
Cannot find [DIRECTORY]\ole32.dll
Cannot start [APP]. A required component is missing: ole32.dll. Please install [APP] again.
These error messages are known to appear in various circumstances, such as when starting or shutting down Windows. When opening a specific application, or during the actual Windows installation. When it comes to fixing any error, the circumstances of when it occurs is a vital aspect of the repair process.
What Are DLL Files?
Ole32.dll is a DLL file, and unlike your more notable .EXE file, it cannot be run directly. Instead, it is called upon and accessed by a program/application that has already been executed. Despite that fact, DLL files, are very similar to your typical .EXE file, and in many cases, would work perfectly fine if converted to an .EXE file. While the vast majority of Dynamic Link Library (DLL) files have the .DLL file extension, others may also use .DRV, .CPL or .OCX extensions.
The main benefit of the DLL file is its ability to separate different functions and components into separate modules, giving the software developer totally freedom to add or exclude certain features at their own leisure. If an application is designed with DLL files in mind, it can use significantly less memory, because not every required component need be loaded at once.
However, in other situations, it’s possible for a harmful .DLL file to be attached to an .EXE file. In situations like thus, your best course of action is to run a full scan of your system, so that it may detect and remove this culprit .DLL file.
Is Ole32.dll A Safe File?
The short answer is yes, ole32.dll is a legitimate Windows file, and thus, should pose little danger to your system.
Can You Remove The Ole32.dll File?
Again, the short answer is no. There are a number of Windows applications that require or use the ole32.dll file. As in the example I presented, Microsoft Word uses the ole32.dll file to embed images in documents that you create. So if you were to remove the file, you would be unable to add images to your files, instead you’d be greeted with the corresponding error message.
What Causes Ole32.dll Errors?
Like with any error you encounter on Microsoft Windows, there are an assortment of possible causes. For the ole32.dll file, we’re going to stick with the most common:
- The Ole32.dll file has been deleted or corrupted.
- Ole32.dll is outdated.
- A malicious file has infiltrated the system and corrupted integral system files.
Of course there are other possible courses for the ole32.dll error you are receiving, however, in most reported cases, Ole32.dll errors can be attributed to one of the causes listed above.
Ole32.dll Errors in Windows 98
Ole32.dll errors are known to occur on virtually every version of Windows, starting from (Windows 95), all the way up to the latest (Windows 10). In Windows 98, the ole32.dll error commonly occurs when attempting to install Microsoft Visual Studio 6.0 Enterprise Edition. When doing some, end users have reported the following error message:
RPCSS caused an invalid page fault in module OLE32.DLL at 015f:65f1cd37
Cause of Error
This particular scenario occurs when the two situations below are true:
- Your ISP connection has been setup via a dial-up.
- Service Pack 1 for Microsoft Office 97 has been installed.
Solution
In order to rectify the above situation you have several options available to you. These are:
- If the OS has been configured to display the login dialog box. Then you can avoid this error simply by dismissing the dial-up dialog box before doing the same with the login dialog box.
- You can disable the AutoDial feature. If you don’t know how, you should be able to find information on AutoDial in Windows 98 in Microsoft Knowledge Base.
Ole32.dll Errors in IE (Internet Explorer)
Internet Explorer is now obsolete, and thus, only accessible on older versions of Windows. So for those end users, they may encounter an Ole32.dll error when starting Internet Explorer. General symptom is a system freeze followed by this error message:
Explorer has caused an error in OLE32.DLL. Explorer will now close. If you continue to experience problems, try restarting your computer.
This Internet Explorer error occurs due to one of two reasons. These are:
- The corruption of integral system files.
- A malicious file infecting the target machine.
To rectify this error, as well as the various other possible encounters of ole32.dll errors, I suggest you continue reading.
How to Fix It
If something happens to the ole32.dll file, whether it’s accidently erased or corrupted by another program, it can have a severe adverse effect on your system. This can and typically does result in an inability to access or utilise certain features. As I previously explained.
To rectify this issue, you have a wide assortment of possible solutions.
All of which are outlined below, so I suggest you execute them, in the order that they appear.
Run a Malware Scan to Fix Ole32.dll Errors
Malicious files such as rootkits, viruses, worms and Trojan horses, get onto your system and corrupt integral files, such as .EXE and DLL files (like ole32.dll). They do this by injecting their malicious code into them. The end result is an error message every time you attempt to run a program that calls upon the ole32.dll file.
Fortunately it is possible to fix this error, by carrying out a full scan of your system using an antimalware tool. There are several of these kinds of tools around, but I personally recommend SpyHunter.
You can learn more about this powerful tool and how it can help you, from the link below:
CLICK HERE TO CHECK OUT SPYHUNTER
Update Device Drivers
Ole32.dll errors are known to occur when the end user attempts to run a particular device, such as the printer. The error may be the result of an outdated driver that is incompatible with the version of Ole32.dll on the system. To fix this problem, the end user would only need update their printer drivers.
There are two ways to do this. The first is simply to locate and download the drivers off the manufacturer’s website. Just be sure to download the correct ones.
The second option, and undoubtedly the simplest solution is to use an automated updater tool like DriverFinder. Which will locate, download and install the latest drivers for all the components connected either internally or externally to your system. All with a simple mouse click.
If you prefer the software option, you can learn more about DriverFinder from the link below:
CLICK HERE TO CHECK OUT DRIVERFINDER
Replace the Ole32.dll
This option entails acquiring the latest version of the ole32.dll file and copying it to your system. If the ole32.dll file has been corrupted or erased, then this solution should rectify the problem.
Simply follow the instructions below:
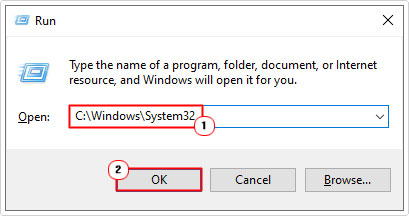
1. First, boot into your computer as a full administrator.
2. Then press + R, type C:\Windows\System32 and click on OK.
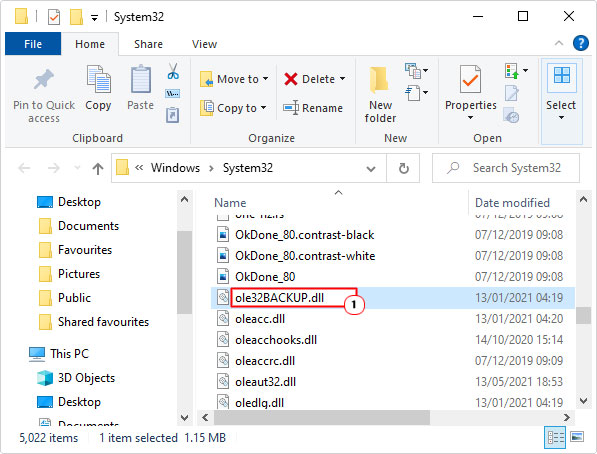
3. When the System32 folder loads up, locate and rename ole32.dll to ole32BACKUP.dll, by right-clicking on it and selecting Rename.
4. Once you’ve done that, download the ole32.dll file from the following link(s):
Ole32.dll for 32-bit Windows: https://www.mediafire.com/file/wfasg2epeokue47/ole32+32bit.zip/file
Ole32.dll for 64-bit Windows: https://www.mediafire.com/file/1epx8t5ns1mz4la/ole32+64bit.zip/file
Note: Be sure to download the correct version for your operating system.
5. Next, open the ole32.zip file, then click on Extract To.
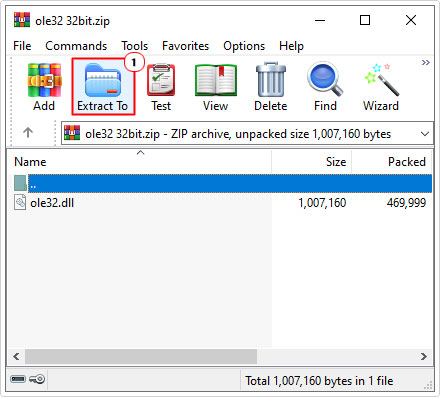
Note: This step may vary depending on the file utility program you’re using. For this tutorial we’re using WinRAR.
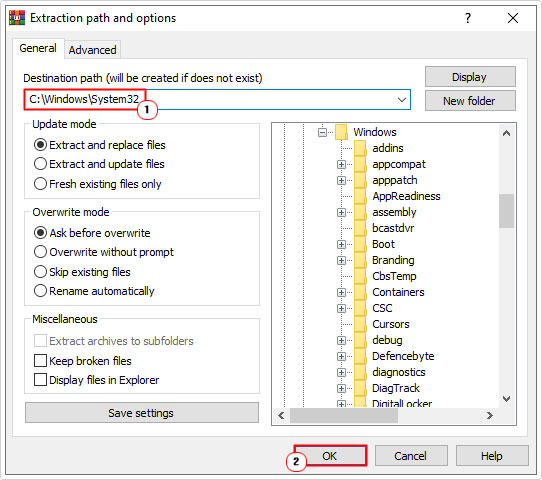
6. This will bring up the Extraction path and options dialog box, just type C:\Windows\System32 into the Destination path box, and then click on OK.
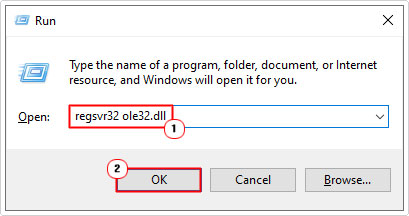
7. Lastly, press + R, type regsvr32 ole32.dll and click on OK.
8. Restart your computer.
Run System File Checker (SFC)
Another fairly safe and simple way to repair missing and/or corrupted system files (like ole32.dll) is to run the built-in system file checker tool. Effectiveness of this tool varies, however, that doesn’t mean you should rule it out.
For help on how to access and use this tool, I suggest you check out my post on how to run SFC Scannow.
Are you looking for a way to repair all the errors on your computer?
If the answer is Yes, then I highly recommend you check out Advanced System Repair Pro.
Which is the leading registry cleaner program online that is able to cure your system from a number of different ailments such as Windows Installer Errors, Runtime Errors, Malicious Software, Spyware, System Freezing, Active Malware, Blue Screen of Death Errors, Rundll Errors, Slow Erratic Computer Performance, ActiveX Errors and much more. Click here to check it out NOW!
Ole32.dll is a crucial file in the Windows operating system that plays a significant role in the functioning of various applications and processes. It is an essential component of the Object Linking and Embedding (OLE) technology, which allows different software programs to communicate and share data with each other.

Understanding Ole32.dll
Ole32.dll, also known as the OLE Automation DLL, is responsible for managing the creation and manipulation of objects in the OLE environment. It provides a set of functions and interfaces that enable applications to interact with each other, allowing for the embedding of objects from one application into another.
When an application needs to access the functionality provided by Ole32.dll, it calls upon the appropriate functions within the DLL. These functions handle tasks such as object creation, data transfer, and inter-process communication.
Common Ole32.dll Errors
Despite its importance, Ole32.dll can sometimes encounter errors that can disrupt the normal functioning of your system. Some of the most common errors associated with Ole32.dll include:
- Missing Ole32.dll: This error occurs when the Ole32.dll file is not found in the specified location. It can be caused by accidental deletion, malware infection, or a faulty installation of a software program.
- Corrupted Ole32.dll: If the Ole32.dll file becomes corrupted, it can lead to various issues, such as application crashes, system freezes, and error messages.
- Outdated Ole32.dll: Over time, new updates and patches are released for the Windows operating system. If your system is running an outdated version of Ole32.dll, it may not be compatible with the latest software and can cause compatibility issues.
How To Fix Ole32.dll Errors
When encountering Ole32.dll errors, it is crucial to address them promptly to ensure the stability and performance of your system. Here are some effective methods to fix Ole32.dll errors:
1. Run the DISM and SFC scans
DISM (Deployment Image Servicing and Management) and SFC (System File Checker) are built-in Windows tools that can repair corrupted or missing system files and restore the health of your computer. Both DISM and SFC scans can be run from an elevated command prompt (with administrative privileges). Here are the steps to do so:
- To open the Command Prompt as an administrator in Windows, type “cmd” in the search bar and then right-click on the Command Prompt result and select “Run as administrator” as shown in the image below.

- To run a DISM scan, type the following command and press Enter:
dism /online /cleanup-image /restorehealth
This will check your Windows component store for corruption and automatically fix any problems it finds. This process may take several minutes or longer depending on your system
- To run an SFC scan, type in the Command Prompt the following command and press Enter:
sfc /scannow
This will scan all protected system files and replace any corrupted or missing ones with a cached copy. Wait for the scan to complete. It may take some time depending on your system configuration.
- After both scans are completed, you should restart your computer to apply any changes. Check to see if the issue is solved.


2. Check for faulty software.
If there is a specific program that is causing this issue, try uninstalling and then reinstalling it (eg. Microsoft DirectX, Microsoft Visual C++ Redistributable, NET Framework) to check if it will solve the problem.
Windows 11Windows 10Windows 8Windows 7
-
First, open Windows Settings by pressing Windows+I on your keyboard. You can also right-click your Start button and select “Settings” from the list.

-
When Settings opens, click “Apps” in the sidebar, then select “Apps & Features”.

-
In Apps & Features settings, scroll down to the app list and search for the program you want to uninstall. When you find the program, click the three dots button beside it and select “Uninstall” in the menu that appears.

-
In the next message box, confirm the uninstall process by clicking on Uninstall, then follow the prompts to uninstall the program.


- Press the Windows key + I on your keyboard to open the Settings app. You can also ope the Settings app by clicking the Start button on the taskbar, then select “Settings” (gear icon).

-
When the “Windows Settings” window opens, click on “Apps“. By default, it should open “Apps and Features” but if it doesn’t, select it from the list on the left.

-
In Apps & Features settings, scroll down to the app list and search for the program you want to uninstall. When you find the program, click on it and select “Uninstall” in the menu that appears.

-
In the next message box, confirm the uninstall process by clicking on Uninstall, then follow the prompts to uninstall the program.


-
Right-click on the Start button in the taskbar, then select “Programs and Features”. This will take you directly to your list of installed programs.

-
The “Programs and Features” screen will be displayed with a list of all the programs installed on your computer. Scroll through the list until you find the program, then click to highlight it, then click the “Uninstall” button.

- In the next message box, confirm the uninstall process by clicking on Yes, then follow the prompts to uninstall program.


3. Scan for your computer for malware
Malware can damage your system files and registry entries and cause various errors. We will now, download and run a scan with Malwarebytes to check if you’re device is clean.
Malwarebytes is one of the most popular and most used anti-malware software for Windows, and for good reasons. It is able to destroy many types of malware that other software tends to miss, without costing you absolutely nothing. When it comes to cleaning up an infected device, Malwarebytes has always been free and we recommend it as an essential tool in the fight against malware.
-
You can download Malwarebytes by clicking the link below.
-
When Malwarebytes has finished downloading, double-click on the MBSetup file to install Malwarebytes on your computer. In most cases, downloaded files are saved to the Downloads folder.

You may be presented with a User Account Control pop-up asking if you want to allow Malwarebytes to make changes to your device. If this happens, you should click “Yes” to continue with the Malwarebytes installation.

-
When the Malwarebytes installation begins, you will see the Malwarebytes setup wizard which will guide you through the installation process. The Malwarebytes installer will first ask you what type of computer are you installing this program on, click either Personal Computer or Work Computer.

On the next screen, click “Install” to install Malwarebytes on your computer.

When your Malwarebytes installation completes, the program opens the Welcome to Malwarebytes screen.
-
Malwarebytes is now installed on your computer, to start a scan click on the “Scan” button. Malwarebytes will automatically update the antivirus database and start scanning your computer for malicious programs.

-
Malwarebytes will now scan your computer for browser hijackers and other malicious programs. This process can take a few minutes, so we suggest you do something else and periodically check on the status of the scan to see when it is finished.

-
When the Malwarebytes scan is finished scanning it will show a screen that displays any malware, adware, or potentially unwanted programs that it has detected. To remove the malicious programs that Malwarebytes has found, click on the “Quarantine” button.

-
Malwarebytes will now remove all the malicious files and registry keys that it has found. To complete the malware removal process, Malwarebytes may ask you to restart your computer.


4. Check for updates
Make sure your operating system, drivers, and other software are up to date. If the errors started happening after an update, you can uninstall that specific update patch.
To check for Windows updates, follow the below steps:
- Press the Windows key + I to open the Settings menu. Click the “Windows Update” tab on the left side of the screen.
For Windows 10 users, the Windows Update menu can be found in Settings > Update & Security > Windows Update. - Click the “Check for updates” button. This will initiate a scan for updates. If any updates are available, they will be downloaded and installed automatically.

- If you want to check for updates for other software, you can do so by opening the software and looking for a “Check for updates” option in the menu. You can also check the software’s website for updates.

5. Disable any unnecessary startup programs
Startup programs are applications that automatically launch when you start your computer. While some of these programs may be necessary for your system to function properly, others may be unnecessary and can cause errors.
- Open the Task Manager by pressing the Ctrl + Shift + Esc keys on your keyboard simultaneously.

- In the Task Manager, go to the “Startup” tab and disable any programs that you do not need to start automatically when you turn on your computer.
Keep in mind that some startup programs may be essential to the functioning of your system, so be careful not to disable any important programs.


6. Run a memory test
A faulty RAM module can cause random crashes. Run a memory test to check for any issues with your RAM. To run a memory test, follow these steps:
- Press the Windows key + R to open the Run dialog.
- Type “mdsched.exe” into the Run dialog and press Enter. This will launch the Windows Memory Diagnostic tool.

- You will be asked whether you want to restart your PC and run the test immediately or schedule the test to run the next time you start your PC. Choose the option you prefer and click “OK”.

If you choose to run the test immediately, your PC will restart and the test will begin. The test will run automatically and may take several minutes to complete.
- If the test finds any errors, it will display a message indicating the type and location of the error. You may need to replace your RAM if the test finds any errors.
- If the test completes without finding any errors, it will display a message indicating that the test has completed successfully.


7.Check your hardware
Start by inspecting your computer’s hardware components for any signs of damage or failure. Ensure that all connections are secure and that there are no loose cables. If you suspect a faulty component, consider consulting a professional or replacing it if necessary.
Next, check your RAM, hard drive, graphics card, and any other hardware components using the Windows Device Manager.
-
To access the Device Manager, type “devmgmt.msc” into the search bar on the Start menu and select “Device Manager” from the list of results.

-
In the Device Manager, you can view a list of all the hardware devices connected to your computer and check for any errors or issues. If you see a yellow exclamation point next to a device, it may indicate a problem with that device. You can right-click on the device and select “Update driver” or “Troubleshoot” to try and fix any issues.


8. Try a system restore.
If you have a restore point saved, you can try using it to revert your system to a previous state. This may fix the issue if it was caused by a recent change. To do a system restore follow these steps:
- Press the Windows key + S to open the Search menu.
- Type “system restore” into the search bar and click the “Create a restore point” result.

- Click the “System Restore” button.

- In the System Restore window, click “Next.”

- Select a restore point from the list and click “Next.” A restore point is a saved state of your system that you can use to revert your system to a previous state. Make sure to select a restore point that was created before you started experiencing problems.
- Click “Finish” to begin the restore process. Your PC will restart and the restore process will begin. This may take several minutes to complete.

- When the restore is complete, your PC will restart again. You may need to adjust your settings and reinstall any software that was installed after the restore point was created.


9. Reset your PC
One of the most drastic solutions is to reset your PC to its default configuration. This can be considered the nuclear option for fixing errors because it will wipe out all the third-party software you installed on your computer. However, this option can also be effective if none of the other methods work for you.
Before you reset your PC, make sure you back up your important data and files. You can also choose to keep your personal files in the Reset this PC tool, but it is better to have a separate backup just in case something goes wrong.
To reset your PC, follow these steps:
- Open Settings by pressing Windows + I keys.
- Click on System and then on Recovery.

- Under Reset this PC section, click on Reset PC button.
- Choose whether you want to keep your files or remove everything.
- Follow the on-screen instructions to complete the process.


After resetting your PC, you should be able to run your applications without getting any errors. However, keep in mind that this solution will also remove any custom settings and preferences you had on your computer. You will need to reinstall and configure your programs again after resetting.
Summary
Ole32.dll is a vital component of the Windows operating system that enables applications to communicate and share data with each other. However, errors related to Ole32.dll can occur, leading to system instability and application crashes.
To fix Ole32.dll errors, it is recommended to run a virus/malware scan using Malwarebytes Free to ensure your system is not infected. Additionally, restoring the file from the Recycle Bin, reinstalling the application, and updating Windows can help resolve Ole32.dll errors and ensure the smooth functioning of your system.
By following these steps and taking appropriate measures, you can effectively address Ole32.dll errors and maintain the stability and performance of your Windows operating system.
Here are 10 basic security tips to help you avoid malware and protect your device:
To avoid potential dangers on the internet, it’s important to follow these 10 basic safety rules. By doing so, you can protect yourself from many of the unpleasant surprises that can arise when using the web.