
Среди прочих ошибок в Windows при установке обновлений, в том числе при использовании автономного установщика обновлений, во время установки компонентов Windows, таких как Visual C++ Redistributable или .NET Framework, а также в Microsoft Store — ошибка с кодом 0x80070424. Ошибка может возникнуть как результат использования программ для «оптимизации» и отключения обновлений, в некоторых случаях — после заражения компьютера вредоносными программами.
В этой инструкции подробно о способах исправить ошибку 0x80070424 при обновлении, установке компонентов или использовании Microsoft Store в Windows 11 и Windows 10. Эта же ошибка может возникнуть при создании установочного накопителя в Media Creation Tool.
Отсутствие службы «Центр обновления Windows» — самая частая причина ошибки

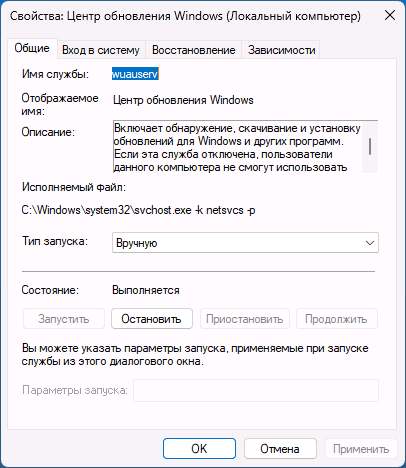
Чаще всего причиной ошибки с кодом 0x80070424 является отключение или отсутствие службы «Центр обновления Windows» (или Windows Update). В некоторых случаях об этом прямо сказано в сообщении об ошибке, например: «0x80070424 — Указанная служба не установлена» или «Произошла ошибка. Одна из служб обновления работает неправильно».
Первоочередные шаги для решения проблемы:
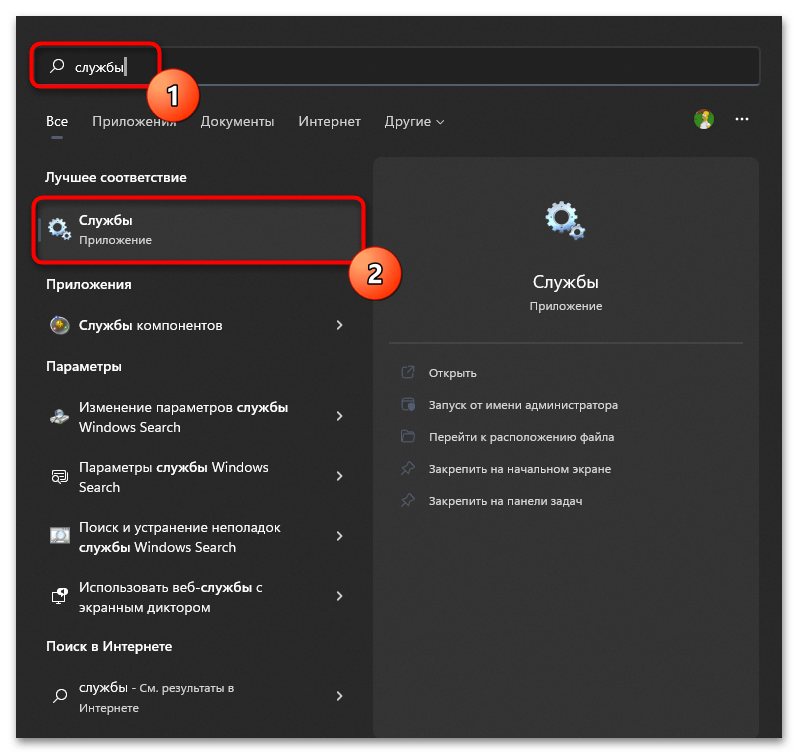
- Зайдите в «Службы» Windows, для этого нажмите правой кнопкой мыши по кнопке «Пуск», выберите пункт «Выполнить», введите services.msc и нажмите Enter.
- Проверьте наличие службы «Центр обновления Windows» или «Windows Update» в списке служб. При наличии, дважды нажмите по этой службе, измените тип запуска на «Вручную», если служба была отключена.

- Если служба отсутствует, используйте методы из инструкции Нет службы «Центр обновления Windows» в списке служб для её восстановления, либо сразу создайте файл reg со следующим кодом и добавьте его в реестр («запустив» созданный файл):
Windows Registry Editor Version 5.00

[HKEY_LOCAL_MACHINE\SYSTEM\CurrentControlSet\Services\wuauserv]
"DependOnService"=hex(7):72,00,70,00,63,00,73,00,73,00,00,00,00,00
"Description"="@%systemroot%\\system32\\wuaueng.dll,-106"
"DisplayName"="@%systemroot%\\system32\\wuaueng.dll,-105"
"ErrorControl"=dword:00000001
"FailureActions"=hex:80,51,01,00,00,00,00,00,00,00,00,00,03,00,00,00,14,00,00,\
  00,01,00,00,00,60,ea,00,00,00,00,00,00,00,00,00,00,00,00,00,00,00,00,00,00
"ImagePath"=hex(2):25,00,73,00,79,00,73,00,74,00,65,00,6d,00,72,00,6f,00,6f,00,\
  74,00,25,00,5c,00,73,00,79,00,73,00,74,00,65,00,6d,00,33,00,32,00,5c,00,73,\
  00,76,00,63,00,68,00,6f,00,73,00,74,00,2e,00,65,00,78,00,65,00,20,00,2d,00,\
  6b,00,20,00,6e,00,65,00,74,00,73,00,76,00,63,00,73,00,20,00,2d,00,70,00,00,\
  00
"ObjectName"="LocalSystem"
"ServiceSidType"=dword:00000001
"Start"=dword:00000003
"SvcMemHardLimitInMB"=dword:000000f6
"SvcMemMidLimitInMB"=dword:000000a7
"SvcMemSoftLimitInMB"=dword:00000058
"Type"=dword:00000020
"RequiredPrivileges"=hex(7):53,00,65,00,41,00,75,00,64,00,69,00,74,00,50,00,72,\
  00,69,00,76,00,69,00,6c,00,65,00,67,00,65,00,00,00,53,00,65,00,43,00,72,00,\
  65,00,61,00,74,00,65,00,47,00,6c,00,6f,00,62,00,61,00,6c,00,50,00,72,00,69,\
  00,76,00,69,00,6c,00,65,00,67,00,65,00,00,00,53,00,65,00,43,00,72,00,65,00,\
  61,00,74,00,65,00,50,00,61,00,67,00,65,00,46,00,69,00,6c,00,65,00,50,00,72,\
  00,69,00,76,00,69,00,6c,00,65,00,67,00,65,00,00,00,53,00,65,00,54,00,63,00,\
  62,00,50,00,72,00,69,00,76,00,69,00,6c,00,65,00,67,00,65,00,00,00,53,00,65,\
  00,41,00,73,00,73,00,69,00,67,00,6e,00,50,00,72,00,69,00,6d,00,61,00,72,00,\
  79,00,54,00,6f,00,6b,00,65,00,6e,00,50,00,72,00,69,00,76,00,69,00,6c,00,65,\
  00,67,00,65,00,00,00,53,00,65,00,49,00,6d,00,70,00,65,00,72,00,73,00,6f,00,\
  6e,00,61,00,74,00,65,00,50,00,72,00,69,00,76,00,69,00,6c,00,65,00,67,00,65,\
  00,00,00,53,00,65,00,49,00,6e,00,63,00,72,00,65,00,61,00,73,00,65,00,51,00,\
  75,00,6f,00,74,00,61,00,50,00,72,00,69,00,76,00,69,00,6c,00,65,00,67,00,65,\
  00,00,00,53,00,65,00,53,00,68,00,75,00,74,00,64,00,6f,00,77,00,6e,00,50,00,\
  72,00,69,00,76,00,69,00,6c,00,65,00,67,00,65,00,00,00,53,00,65,00,44,00,65,\
  00,62,00,75,00,67,00,50,00,72,00,69,00,76,00,69,00,6c,00,65,00,67,00,65,00,\
  00,00,53,00,65,00,42,00,61,00,63,00,6b,00,75,00,70,00,50,00,72,00,69,00,76,\
  00,69,00,6c,00,65,00,67,00,65,00,00,00,53,00,65,00,52,00,65,00,73,00,74,00,\
  6f,00,72,00,65,00,50,00,72,00,69,00,76,00,69,00,6c,00,65,00,67,00,65,00,00,\
  00,53,00,65,00,53,00,65,00,63,00,75,00,72,00,69,00,74,00,79,00,50,00,72,00,\
  69,00,76,00,69,00,6c,00,65,00,67,00,65,00,00,00,53,00,65,00,54,00,61,00,6b,\
  00,65,00,4f,00,77,00,6e,00,65,00,72,00,73,00,68,00,69,00,70,00,50,00,72,00,\
  69,00,76,00,69,00,6c,00,65,00,67,00,65,00,00,00,53,00,65,00,4c,00,6f,00,61,\
  00,64,00,44,00,72,00,69,00,76,00,65,00,72,00,50,00,72,00,69,00,76,00,69,00,\
  6c,00,65,00,67,00,65,00,00,00,53,00,65,00,4d,00,61,00,6e,00,61,00,67,00,65,\
  00,56,00,6f,00,6c,00,75,00,6d,00,65,00,50,00,72,00,69,00,76,00,69,00,6c,00,\
  65,00,67,00,65,00,00,00,53,00,65,00,53,00,79,00,73,00,74,00,65,00,6d,00,45,\
  00,6e,00,76,00,69,00,72,00,6f,00,6e,00,6d,00,65,00,6e,00,74,00,50,00,72,00,\
  69,00,76,00,69,00,6c,00,65,00,67,00,65,00,00,00,53,00,65,00,43,00,72,00,65,\
  00,61,00,74,00,65,00,53,00,79,00,6d,00,62,00,6f,00,6c,00,69,00,63,00,4c,00,\
  69,00,6e,00,6b,00,50,00,72,00,69,00,76,00,69,00,6c,00,65,00,67,00,65,00,00,\
  00,53,00,65,00,49,00,6e,00,63,00,72,00,65,00,61,00,73,00,65,00,42,00,61,00,\
  73,00,65,00,50,00,72,00,69,00,6f,00,72,00,69,00,74,00,79,00,50,00,72,00,69,\
  00,76,00,69,00,6c,00,65,00,67,00,65,00,00,00,00,00

[HKEY_LOCAL_MACHINE\SYSTEM\CurrentControlSet\Services\wuauserv\Parameters]
"ServiceDll"=hex(2):25,00,73,00,79,00,73,00,74,00,65,00,6d,00,72,00,6f,00,6f,\
  00,74,00,25,00,5c,00,73,00,79,00,73,00,74,00,65,00,6d,00,33,00,32,00,5c,00,\
  77,00,75,00,61,00,75,00,65,00,6e,00,67,00,2e,00,64,00,6c,00,6c,00,00,00
"ServiceDllUnloadOnStop"=dword:00000001
"ServiceMain"="WUServiceMain"

[HKEY_LOCAL_MACHINE\SYSTEM\CurrentControlSet\Services\wuauserv\Security]
"Security"=hex:01,00,14,80,78,00,00,00,84,00,00,00,14,00,00,00,30,00,00,00,02,\
  00,1c,00,01,00,00,00,02,80,14,00,ff,00,0f,00,01,01,00,00,00,00,00,01,00,00,\
  00,00,02,00,48,00,03,00,00,00,00,00,14,00,9d,00,02,00,01,01,00,00,00,00,00,\
  05,0b,00,00,00,00,00,18,00,ff,01,0f,00,01,02,00,00,00,00,00,05,20,00,00,00,\
  20,02,00,00,00,00,14,00,ff,01,0f,00,01,01,00,00,00,00,00,05,12,00,00,00,01,\
  01,00,00,00,00,00,05,12,00,00,00,01,01,00,00,00,00,00,05,12,00,00,00

[HKEY_LOCAL_MACHINE\SYSTEM\CurrentControlSet\Services\wuauserv\TriggerInfo]

[HKEY_LOCAL_MACHINE\SYSTEM\CurrentControlSet\Services\wuauserv\TriggerInfo\0]
"Type"=dword:00000005
"Action"=dword:00000001
"Guid"=hex:e6,ca,9f,65,db,5b,a9,4d,b1,ff,ca,2a,17,8d,46,e0

[HKEY_LOCAL_MACHINE\SYSTEM\CurrentControlSet\Services\wuauserv\TriggerInfo\1]
"Type"=dword:00000005
"Action"=dword:00000001
"Guid"=hex:c8,46,fb,54,89,f0,4c,46,b1,fd,59,d1,b6,2c,3b,50
После восстановления службы (на 3-м шаге) перезагрузите компьютер и проверьте, была ли исправлена ошибка 0x80070424
В большинстве случаев восстановление работы службы «Центр обновления Windows» решает проблему, и ошибка 0x80070424 оказывается исправленной.
Если предыдущий способ не сработал, дополнительно попробуйте выполнить следующие шаги, проверяя результат после каждого из них:
- Запустите PowerShell или Терминал Windows от имени администратора (сделать это можно в контекстном меню кнопки Пуск) и по порядку введите следующие команды:
Set-Service trustedisntaller -StartupType Manual
Set-Service usosvc -StartupType Automatic
Set-Service bits -StartupType Automatic
Set-Service wuauserv -StartupType Manual
start-service -Name wscsvc,wuauserv,bits,usosvc -Verbose
- Попробуйте использовать встроенное средство устранения неполадок обновлений Windows (Устранение неполадок Windows 11, Устранение неполадок Windows 10), либо используйте дополнительные способы исправить ошибки центра обновлений Windows.
- Проверьте содержимое раздела реестра
HKEY_LOCAL_MACHINE\SOFTWARE\Policies\Microsoft\Windows\WindowsUpdate
и при наличии в нем параметра DisableWindowsUpdateAccess удалите его.

- Проверьте, появляется ли ошибка, если отключить VPN и сторонние файрволлы.
- При появлении указанной ошибки в Microsoft Store, выполните команду wsreset в командной строке, запущенной от имени администратора.
- Попробуйте проверить ваш компьютер на наличие вредоносных программ и вирусов, например, с помощью Kaspersky Virus Removal Tool, Dr.Web CureIt! или других аналогичных инструментов. Здесь может пригодиться: лучшие средства удаления вредоносных программ.

В крайнем случае можно попробовать использовать следующие подход: смонтируйте в системе ISO-образ с той же версией Windows, которая установлена у вас на компьютере, запустите файл setup.exe и выполните переустановку с сохранением всех данных и программ (такая опция будет доступна) — это полностью сбросит параметры служб и другие системные настройки, но не затронет ваши данные.

Ещё одна возможность — Сброс Windows 11 или Сброс Windows 10 в исходное состояние (позволяет оставить данные, но не установленные программы).
If you’re seeing the “Error encountered – One of the update services is not running properly” error as soon as you open Microsoft Store, it means that the store app is unable to fetch or display any apps at all, or even show available updates, usually due to issues with the relevant services.
Also see: Can’t Download or Install Apps on Microsoft Store

Why does the “One of the update services is not running properly” error occur?
The Microsoft Store relies on several services and components within Windows, like the Windows Update services, to function correctly. If one of these services isn’t running as it should or has been accidentally disabled (whether intentionally or unintentionally), the Store will not be able to display any apps or process any updates.
Pro tip: How to Restart Windows Update Service on Windows 11
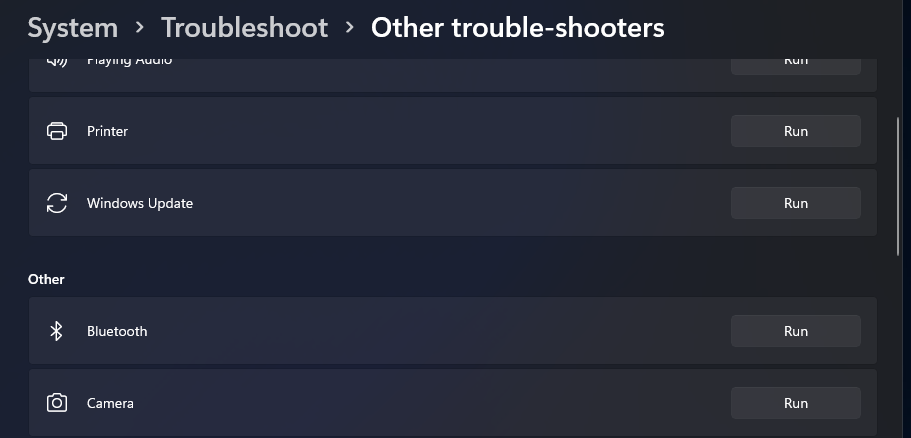
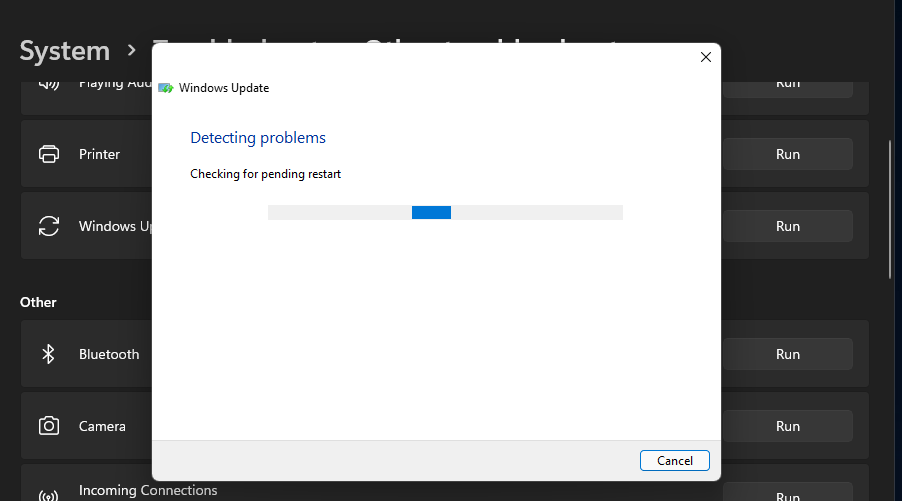
Run the Windows Update Troubleshooter
The very first step you should try is running the Windows Update troubleshooter if you’re using Windows 11 or Windows 10. Yes, it may sound too good to be true, given the notoriously useless troubleshooter, but in this case, it will detect any disabled services that the store needs and enable them.
- Open “Settings” by pressing Win + i.
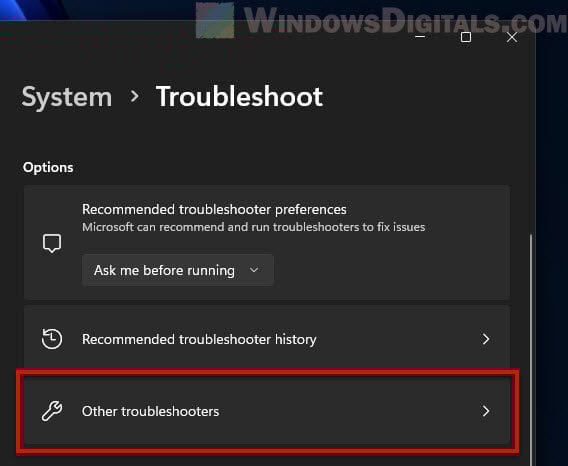
- Then, go to “System” > “Troubleshoot” > “Other troubleshooters“.

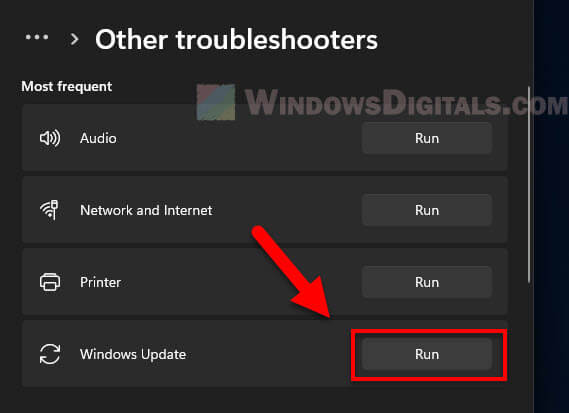
- Under the “Most frequent” section, find and select “Windows Update“. Click “Run” and let the troubleshooter automatically find and fix any issues.

If you’re using Windows 10 or an older build of Windows 11, you should also run the Windows Store Apps troubleshooter. This troubleshooter is specifically aimed at fixing problems with Microsoft Store and its apps.
- Go to Settings > Update & Security > Troubleshoot > Additional troubleshooters.
- Run the Windows Store Apps troubleshooter.

- Follow the on-screen instructions, and the troubleshooter will check for any issues with the Microsoft Store app itself.

Linked issue: 0x8D050003 Microsoft Store Error on Windows 11 or 10
Set the Windows Update service to “Automatic” and restart it
Another solution is to make sure the “Windows Update” service is set to “Automatic” instead of “Manual” or even “Disabled” (which is especially common for users who wanted to disable Windows Update). If the service is not running as it should, Microsoft Store will not be able to retrieve apps data and end up presenting you with the error. Here’s what you should do:
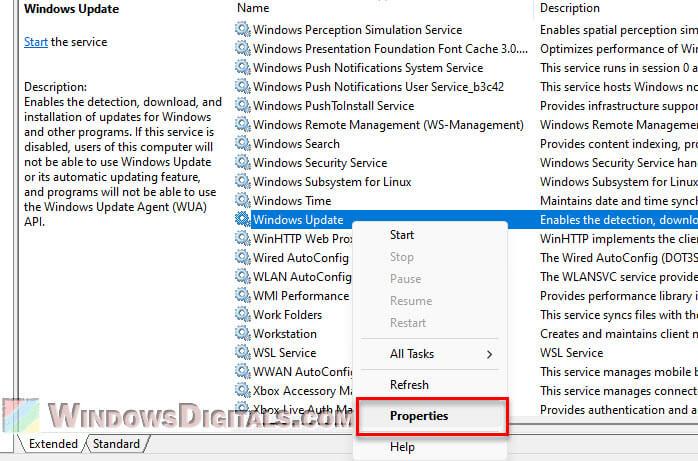
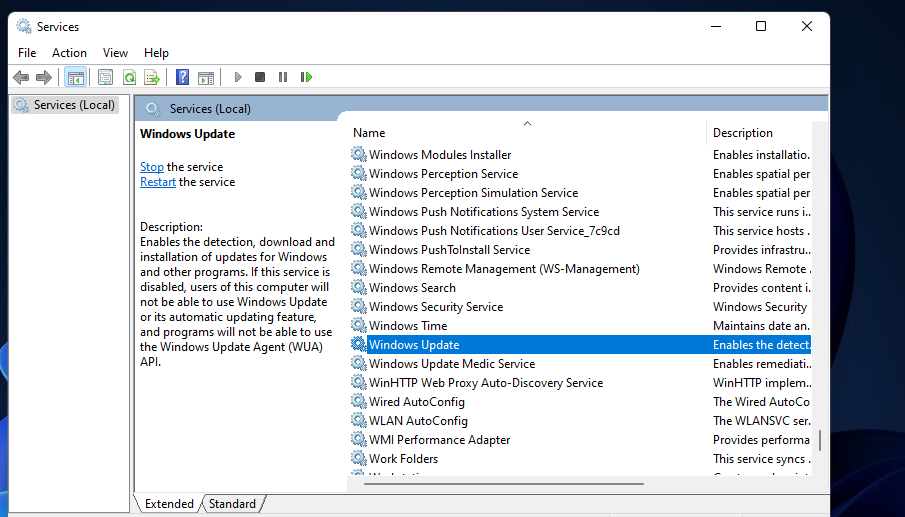
- Go to the Start menu, and type “services.msc” to open the Services window.

- In the right pane, scroll down and look for “Windows Update“.
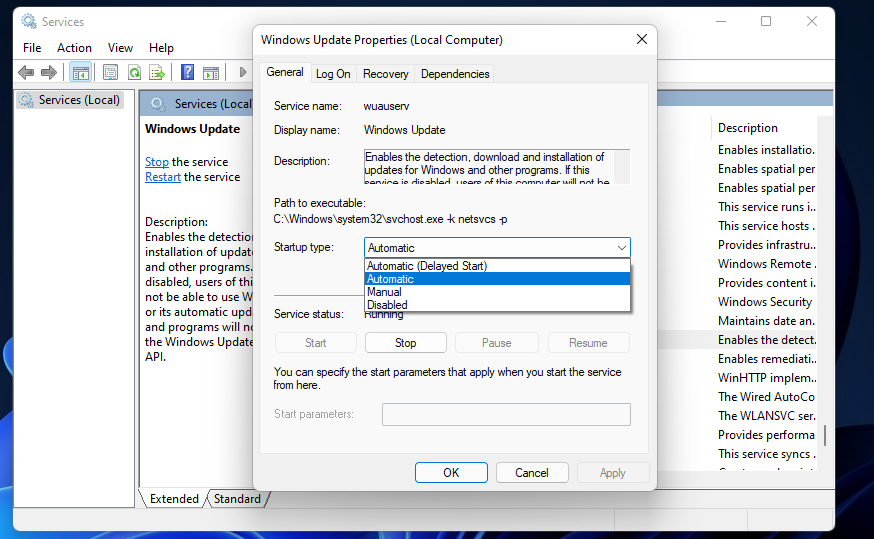
- Right-click on “Windows Update” and select “Properties“.

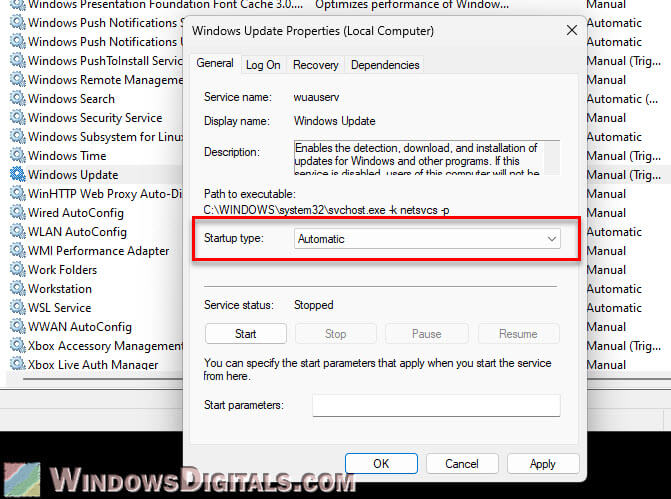
- Under “Startup type“, set it to “Automatic“. If it is set to “Manual” or “Disabled“, the service might not run as needed.

- Click “Apply“, then “OK“.
- Now, in the same window, click “Stop” to stop the Windows Update service. After it has stopped, click “Start” to restart the service.

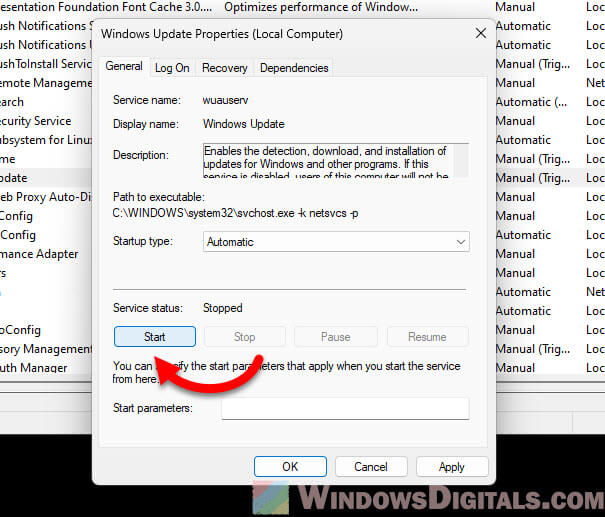
Restarting the service will clear any errors or stuck processes and give the update service a fresh start. If the issue persists, you can also try restarting other related services such as Background Intelligent Transfer Service (BITS) and Cryptographic Service.
Repair and reset Microsoft Store
For the “One of the update services is not running properly” error in Microsoft Store, these two solutions should usually solve it. But if the error persists, you can try to repair and reset Microsoft Store through the settings. Follow the steps below to do so.
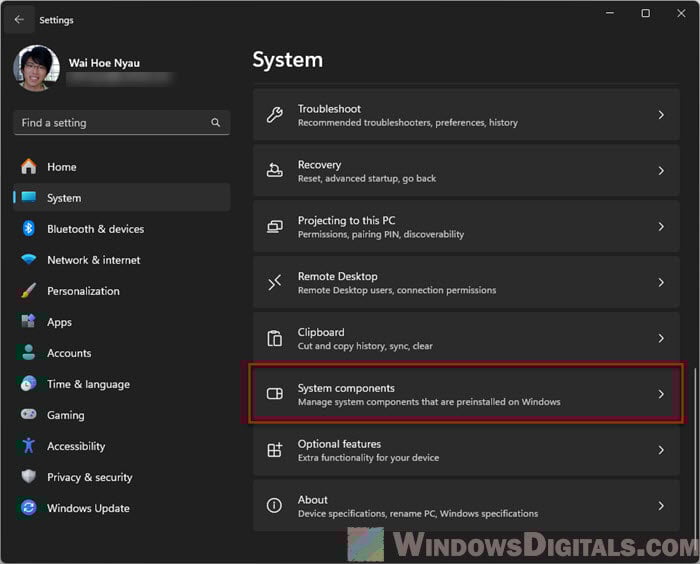
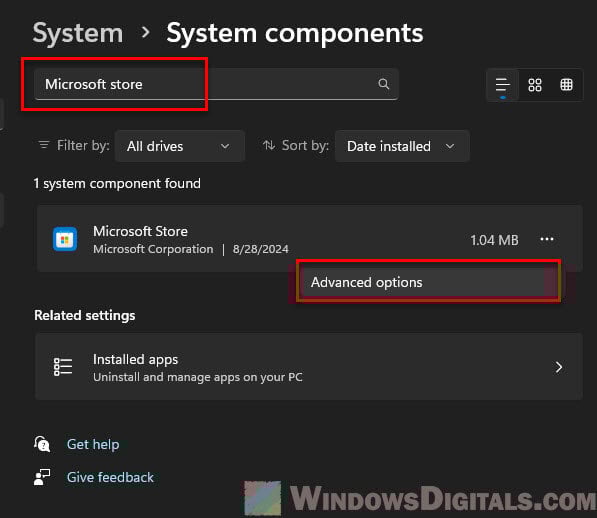
- Open “Settings“.
- Go to “System” and select “System Components“.

- Scroll down and find “Microsoft Store“. Click on it, and then click “Advanced options“.

- In the advanced options, you’ll see two choices: “Repair” and “Reset.”
- Clicking “Repair” will attempt to fix the Microsoft Store without affecting any app data.
- If that doesn’t work, click “Reset“. This will remove the app’s data, including login details and settings, but it will not uninstall any apps you’ve downloaded through the Store.

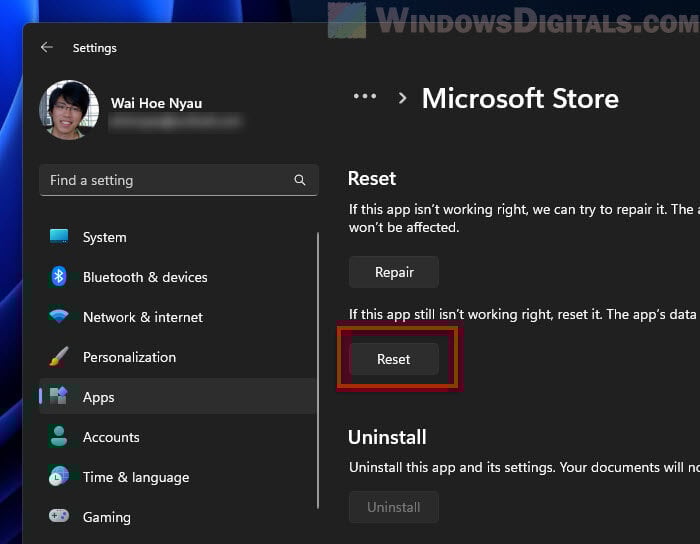
This reset process will basically make Microsoft Store start fresh, which should clear any issues with the Store app itself, such as corruption or incomplete updates.
Check the Microsoft servers
Sometimes, the issue may not be on your end at all. While extremely rare, Microsoft servers can go down or face temporary issues that disrupt the Microsoft Store’s functionality. There could also be problems with the data center nearest to you.
You can check Microsoft’s Service Health page to see if there are any widespread outages affecting the Store. If there is an issue on Microsoft’s end, you may need to wait for them to resolve it.
Readers help support Windows Report. We may get a commission if you buy through our links.
Read our disclosure page to find out how can you help Windows Report sustain the editorial team. Read more
Some users have posted about a Windows Update: Something went wrong error on support forums. When that error occurs, the Windows Update Settings tab displays a Something went wrong error. One user’s forum post said this:
I found an issue in my Windows Update setting that says “Something went wrong. Try to reopen Settings later.” Fyi, I’ve tried to fix this problem by watching certain videos that are supposed to help me. However, things getting worse… I still can’t update my Windows to the latest version.
Consequently, users can’t download and install Windows updates via Settings because of that error. This issue can occur on Windows 11 and 10. If you need to fix the Windows Update Something went wrong Windows 11/10 error, check out the potential resolutions below.
Why is my Windows Update saying something went wrong?
The Windows Update: Something went wrong error can often occur because the Update Orchestrator Service needed for updates isn’t configured right. That service should be enabled and running with an automatic startup type. So, you might need to check that service to fix this error.
However, this error can also be due to a corrupted Windows Update database. In this case, you would need to reset Windows Update components.
Aside from that, you might need to repair corrupted system files or even a user profile to resolve this issue. System File Checker, System Restore, or even Reset this PC are some of the built-in Windows tools you might then need to fix the Something went wrong error.
How do I fix Windows Update something went wrong?
1. Run the Windows Updater troubleshooter
- To launch Settings, press the Windows and I keys at the same time. Click the Troubleshoot option, and then on Other trouble-shooters.

- Select the Run option for opening Windows Update.

- Apply any potential resolutions the troubleshooter suggests.


2. Check if the Update Orchestrator Service is enabled
-
1. Launch Run by pressing the Windows + R hotkey.
-
2. To open Services, enter services.msc in Run’s text box and click OK.

-
3. Double-click Update Orchestrator Service to open the properties window for it.

-
4. Select the Automatic option on the Startup type drop-down menu.

-
5. Click Start if the service isn’t running.
-
6. Press the Apply and OK buttons to save the new service settings.
-
7. Open the Start menu and click Power, followed by Restart. The Something went wrong try to reopen settings later error in Windows 10/11 will be fixed.


Another quick fix for this error is to manually enable the Update Orchestrator Service. It is responsible for keeping the Windows Update tool working and it’s possible that it was accidentally disabled at some point.
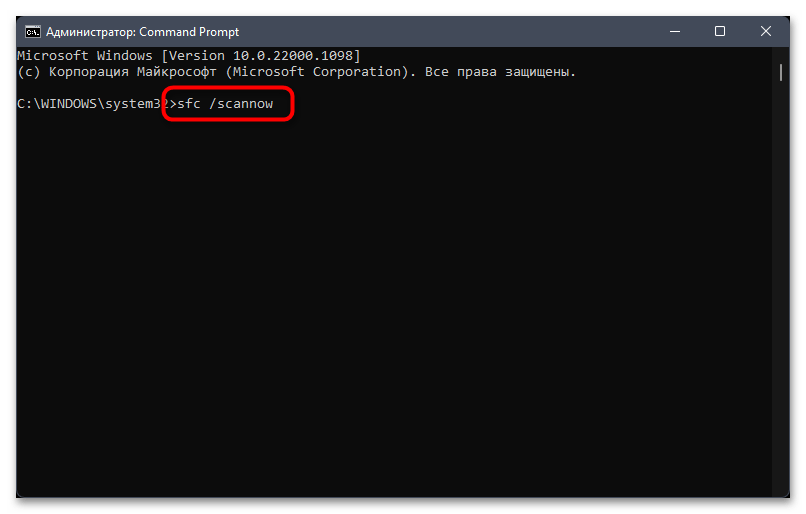
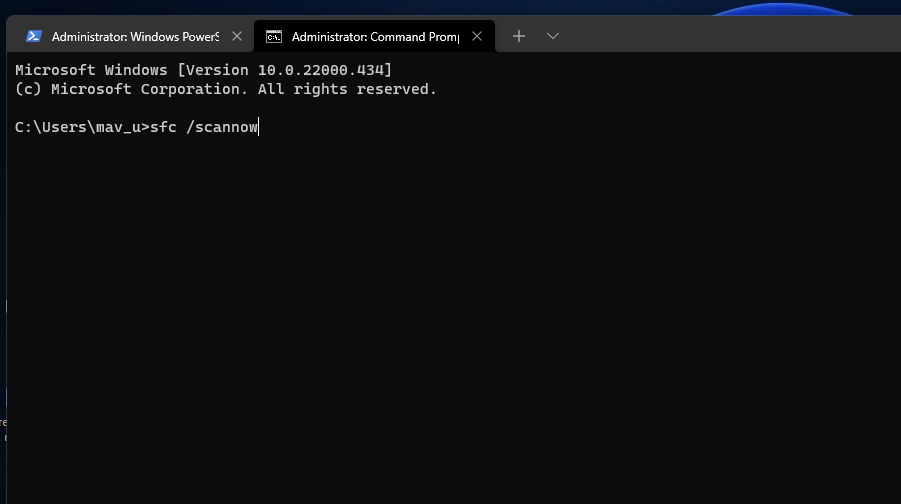
3. Run an SFC scan
- Open the Windows search box by pressing the Windows + S hotkey. Enter Command Prompt in the search text box then click the Run as administrator option shown directly below.
- Then type in this command and hit Enter:
DISM.exe /Online /Cleanup-image /Restorehealth
- To initiate a system file scan, input the following command and press Enter:
sfc /scannow
- Wait until the SFC displays an outcome in the Command Prompt window.


You can also try a specialized system repair tool that automatically scans your PC and repairs any error related to corrupted files, missing DLLs, or BSoDs.
4. Run a Chkdsk scan
- Open the Command Prompt as outlined in the preceding resolution.
- Enter this disk command, and press the Return key:
chkdsk /f C:
- Press the Y keyboard key to confirm.
- Restart Windows to initiate the chkdsk scan.


5. Rename the SoftwareDistribution and Catroot2 Folder
- Open the Command Prompt with elevated rights as covered in the first three steps of resolution three.
- Input these four different commands pressing Enter after each:
Net Stop bits
Net Stop wuauserv
Net Stop appidsvc
Net Stop cryptsvc - Rename the SoftwareDistribution folder by inputting this command and pressing Enter:
Ren %systemroot%SoftwareDistribution SoftwareDistribution.bak
- To rename catrook2, enter this Ren command and press Enter:
Ren %systemroot%system32catroot2 catroot2.bak
- Input and execute these four separate Command Prompt commands:
Net Start bits
Net Start wuauserv
Net Start appidsvc
Net Start cryptsvc - Restart Windows from the Start menu.


6. Edit the Registry
- Press the Windows + X hotkey, and select Run on the menu.
- Type this text into Run’s Open box and click OK:
regedit
- Then go to the UsoSvc key at this registry location:
Computer\HKEY_LOCAL_MACHINE\SYSTEM\CurrentControlSet\Services\UsoSvc - Double-click the Start DWORD shown directly below.
- Delete the current value, and enter 2 in the data box.
- Then press OK to exit the window.
- Repeat steps four to six for the Start DWORD at these registry key locations:


HKEY_LOCAL_MACHINE\SYSTEM\CurrentControlSet\Services\WaaSMedicSvc
HKEY_LOCAL_MACHINE\SYSTEM\CurrentControlSet\Services\wuauserv
7. Roll back Windows to a restore point
- Bring up the Run tool. Type this command in the search box and click OK:
rstrui - Select Choose a different restore point if that option is available, and click the Next button.
- Then select a restore point that predates the Something went wrong error on your PC if you can. Alternatively, select the oldest date available.
- Select the Next and Finish options to roll back Windows.


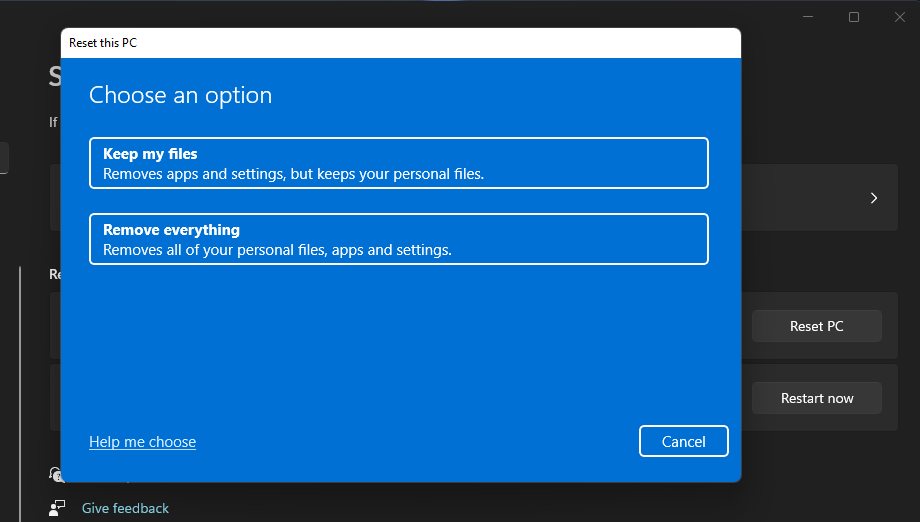
8. Reset Windows
- Press the Windows + I key combination. Click Recovery on the Settings app that opens.
- Press the Reset PC button.
- Select Keep my files in the Reset this PC window.
- Click the Cloud download or Local reinstall option you prefer.
- Press the Next button, and select Reset to finish.


NOTE
You’ll need to reinstall any software that didn’t come pre-installed with Windows 11/10 after resetting the platform. Therefore, this is the last resort resolution if none of the other potential fixes resolve the Something went wrong error.
Can I manually install Windows updates?
You can manually download Windows patch updates from the Microsoft Update Catalog and install them. Doing so, however, probably won’t resolve the Windows Update: Something went wrong error. Nevertheless, you can manually update Windows 11 or 10 in that way like this.
- Open the Microsoft Update Catalog homepage.
- Enter a KB Windows update code in the search box, and click the Search button.
- Click the Download option for an update.
- Right-click the download link and select Save link as on the context menu.
- Choose the folder to download to, and select the Save option. Click File Explorer’s taskbar button shown below, and open the folder you saved the update package in.
- Double-click the update’s MSU file to install.


Note that you can only download and install patches, not build, updates via the Microsoft Update Catalog. You can, however, still, update Windows 11/10 to the latest version without Settings with the Media Creation Tool. Our Media Creation Tool review provides further details for that utility.
Can I fix the Something went wrong error with third-party repair software?
Possibly, but much depends on the repair software you’re utilizing. As Windows’ built-in repair tools can feasibly resolve this issue, you might not need third-party system repair software. Our Windows 10/11 repair software guide provides the full low-down on the best third-party repair utilities.
There’s a good chance you’ll be able to fix the Windows Update: Something went wrong error by applying the potential resolutions above. The second resolution for checking the Update Orchestrator Service settings is especially widely confirmed to fix that error.
Yet, we can’t promise those resolutions will fix the Something went wrong error for all users. You can get further troubleshooting guidance from Microsoft’s Windows support service if needed. Enter a description for the error on the Contact Microsoft Support page and click Get Help to do so.
You can chat about the Windows Update: Something went wrong error in the comments section below. If you’ve found any other fix for that error not mentioned above, let us know about it there.
Matthew Adams
Windows Hardware Expert
Matthew is a freelancer who has produced a variety of articles on various topics related to technology. His main focus is the Windows OS and all the things surrounding it.
He is passionate about the tech world, always staying up-to-date with the latest and greatest. With an analytical view, he likes problem-solving, focusing on errors and their causes.
In his free time, he likes to read and write about history and tries to always develop new skills.
Все способы:
- Способ 1: Использование стандартного средства устранения неполадок
- Способ 2: Очистка временных файлов Центра обновления
- Способ 3: Отключение обновлений других продуктов Microsoft
- Способ 4: Ручной поиск и установка обновлений
- Способ 5: Освобождение дискового пространства
- Способ 6: Проверка целостности системных файлов
- Вопросы и ответы: 3
В рамках этой статьи будут предоставлены общие инструкции по решению ошибок Центра обновления Windows 11. Они пригодятся в тех случаях, когда пользователю неизвестен код ошибки или же инсталляция апдейта просто прерывается на каком-то моменте. Если у вас есть информация с кодом ошибки или на экране отображаются сообщения с информацией о проблеме, рекомендуем использовать поиск на нашем сайте, введя в нем код ошибки или текст из уведомления. Это поможет отыскать специализированные статьи, в которых будут разобраны все нюансы конкретно под ваш случай.
Способ 1: Использование стандартного средства устранения неполадок
Для начала предлагаем запустить автоматическое средство решения ошибок в Windows 11, которое проверит основные составляющие, работающие при поиске и установке обновлений. В результате этого будут перезапущены службы и проверены системные файлы. Это поможет избавиться от часто встречающихся проблем без выполнения лишних действий вручную.
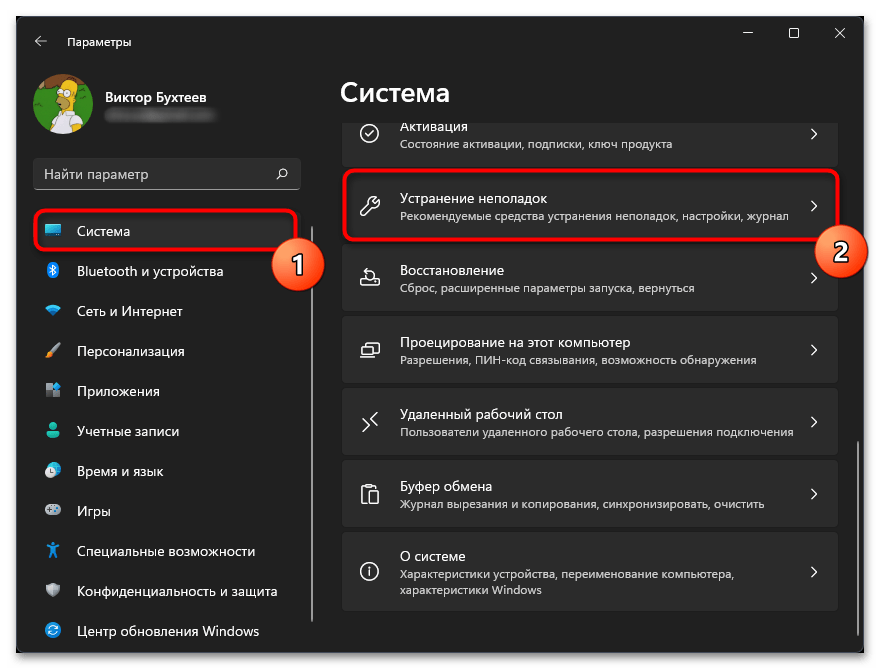
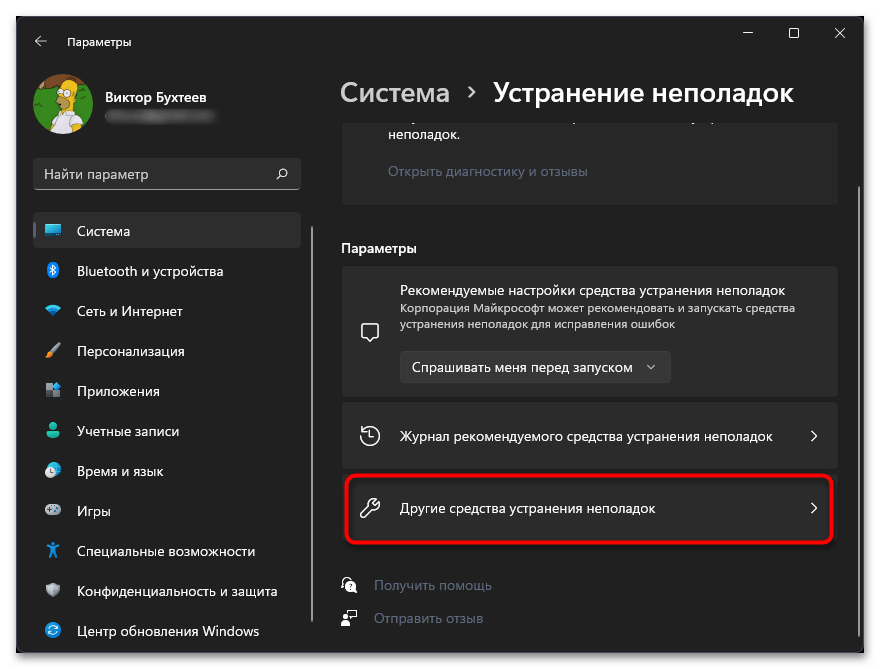
- Откройте меню «Пуск» и перейдите в «Параметры», кликнув по значку с изображением шестеренки.
- В новом окне выберите раздел «Система» и щелкните по плитке с названием «Устранение неполадок».
- В блоке «Параметры» перейдите в «Другие средства устранения неполадок».
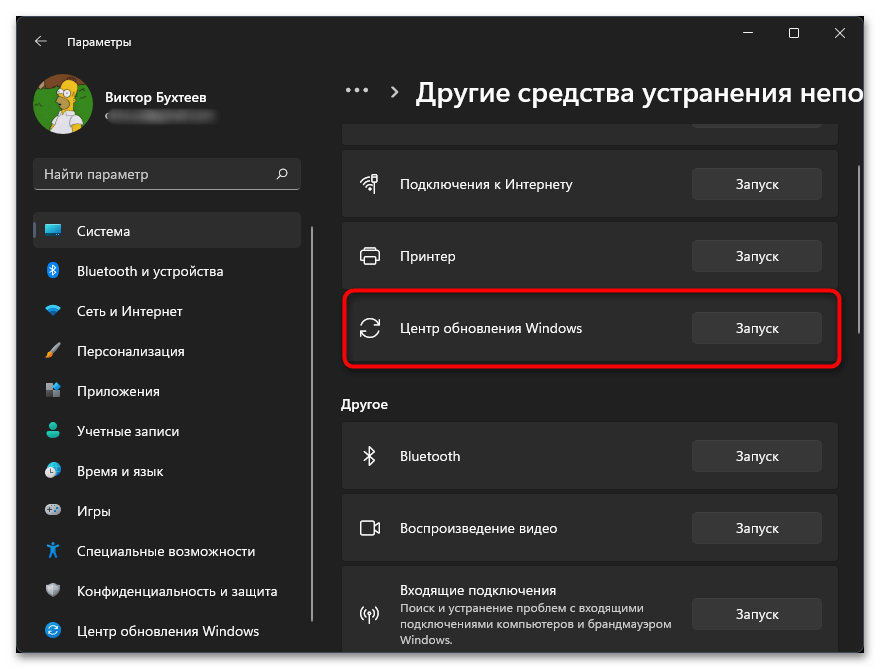
- На экране отобразится список доступных инструментов, в котором вас интересует пункт «Центр обновления Windows» и кнопка «Запуск».
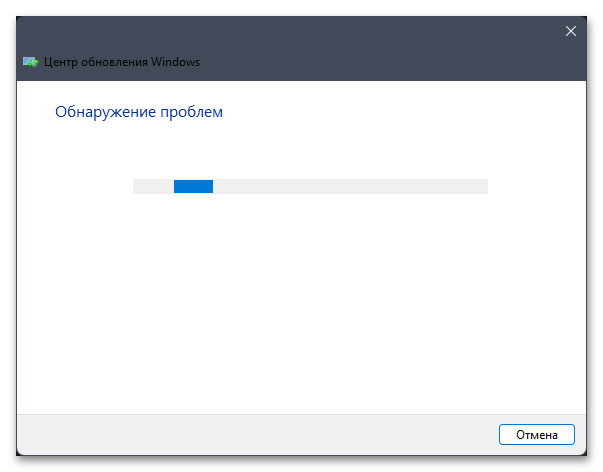
- Дождитесь окончания обнаружения проблем, что займет буквально одну минуту.
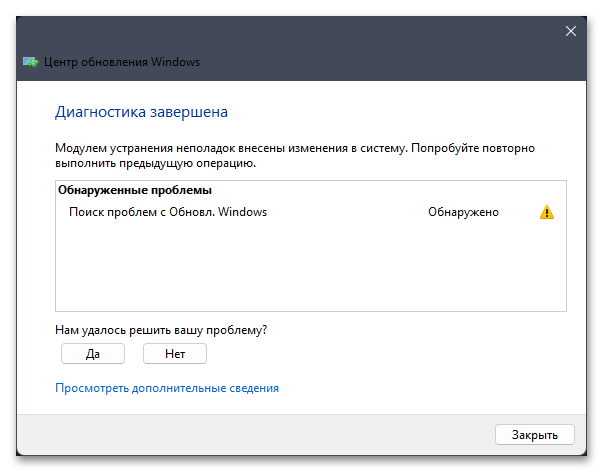
- Ознакомьтесь с информацией на экране и выполните рекомендации от разработчиков, если такие будут. В случае нахождения и исправления проблем переходите к проверке установки апдейтов.
Способ 2: Очистка временных файлов Центра обновления
Иногда проблема с установкой обновлений связана с тем, что их файлы уже находятся в системе, но по каким-то причинам не могут быть распакованы или же являются поврежденными при случайном прерывании скачивания. Поэтому мы рекомендуем очистить кеш Центра обновления Windows, чтобы недостающие файлы загрузились повторно и началась их чистая установка.
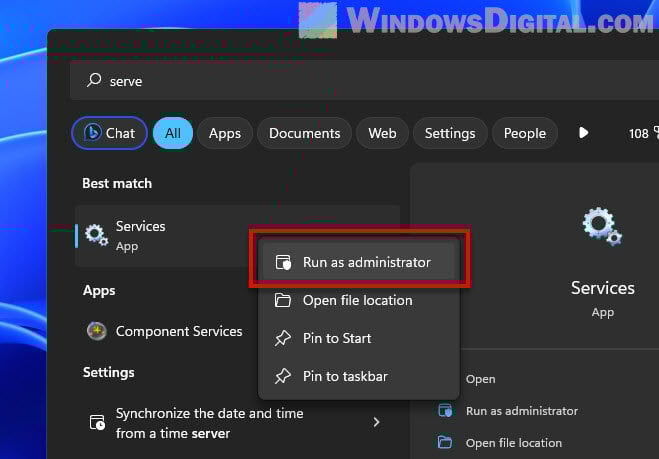
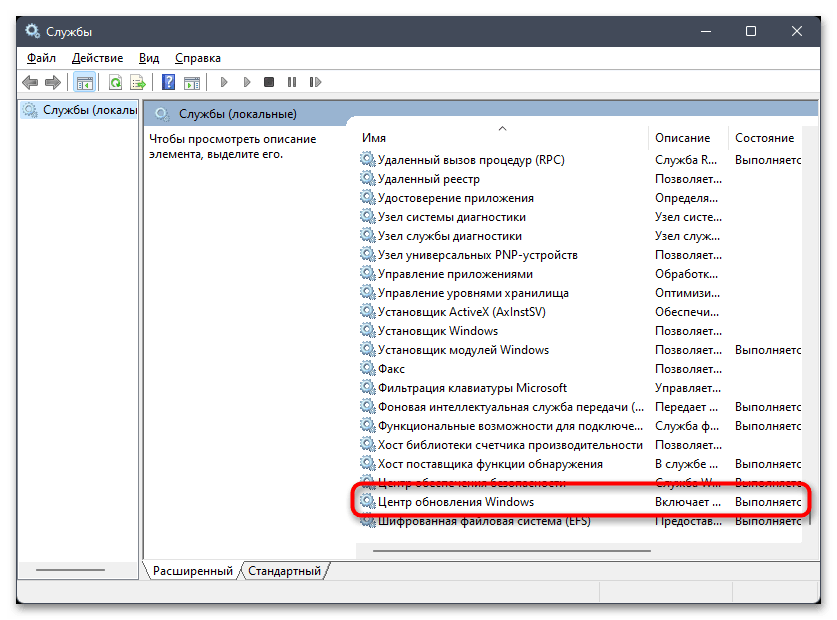
- Удалить кеш с включенной службой Центра обновления не получится, поскольку на экране появится ошибка об использовании файлов процессами Windows. Поэтому сначала нужно отключить службу, для чего отыщите приложение «Службы» через поиск в «Пуске» и запустите его.
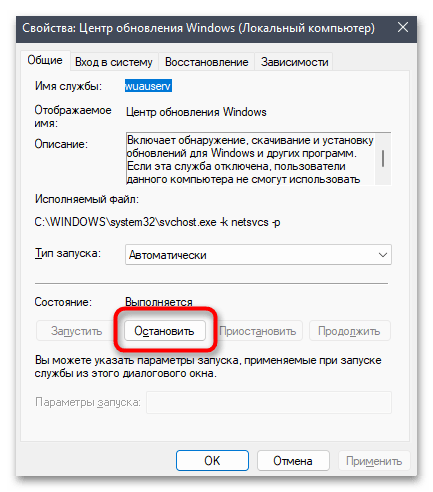
- В новом окне отыщите службу с названием «Центр обновления Windows» и дважды кликните по ней, чтобы открыть окно с настройками.
- В нем нажмите кнопку «Остановить» и дождитесь выполнения этой операции. Можете оставить данное окно открытым, поскольку оно еще пригодится в дальнейшем.
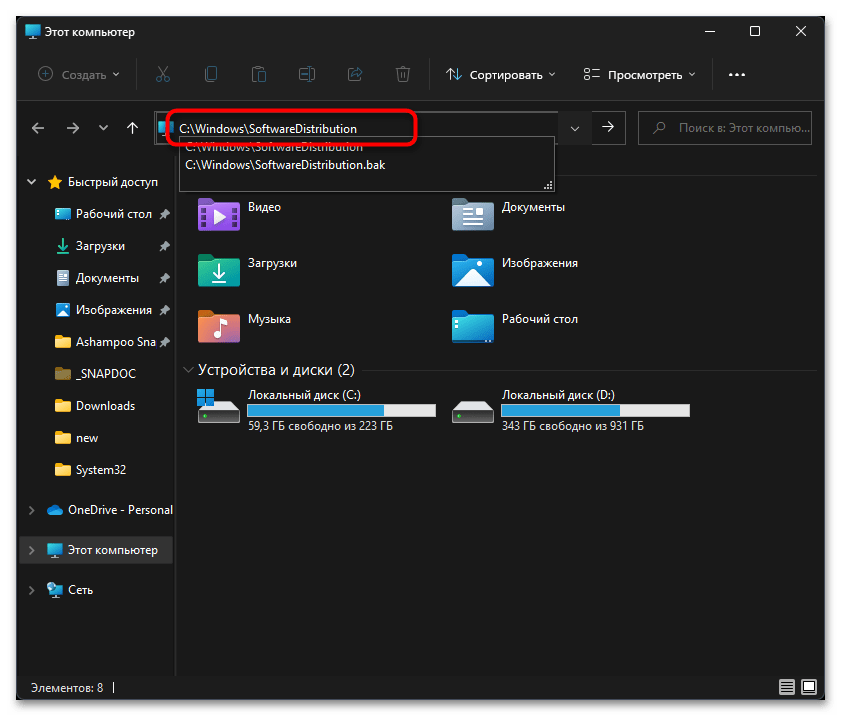
- Далее перейдите по пути
C:\Windows\SoftwareDistribution, где и хранятся файлы кеша обновлений. - Выделите их все левой кнопкой мыши, кликните по любому из них правой и в появившемся контекстном меню щелкните по кнопке с изображением корзины, чтобы удалить файлы.
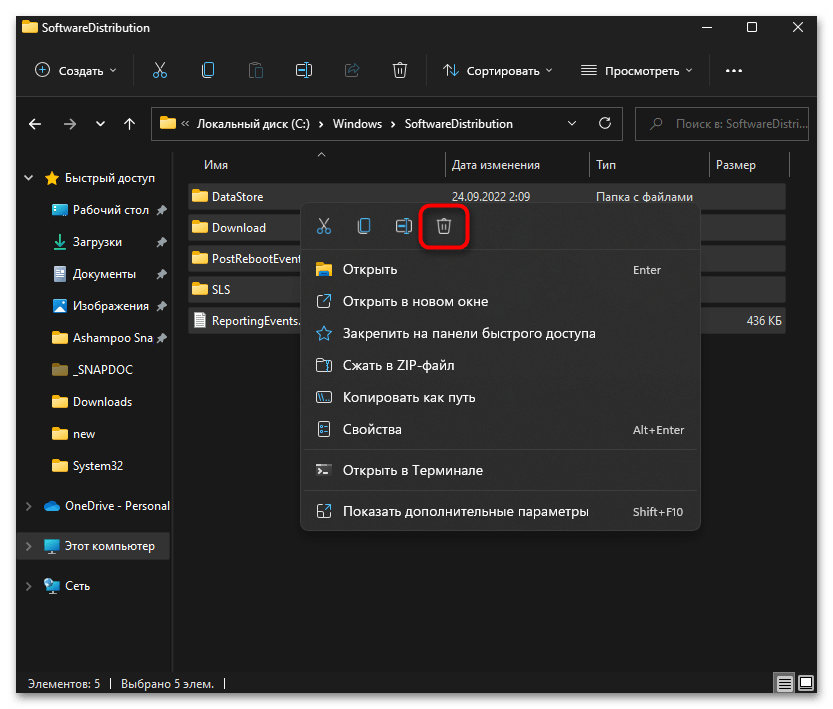
Служба, связанная с обновлениями Windows, ранее была отключена вручную, поэтому запустите ее через то же самое окно, о котором шла речь в инструкции. Как только служба перейдет в активное состояние, можете вручную запустить поиск апдейтов, дождаться завершения и установки файлов. Если проблема не была решена, переходите к следующим методам.
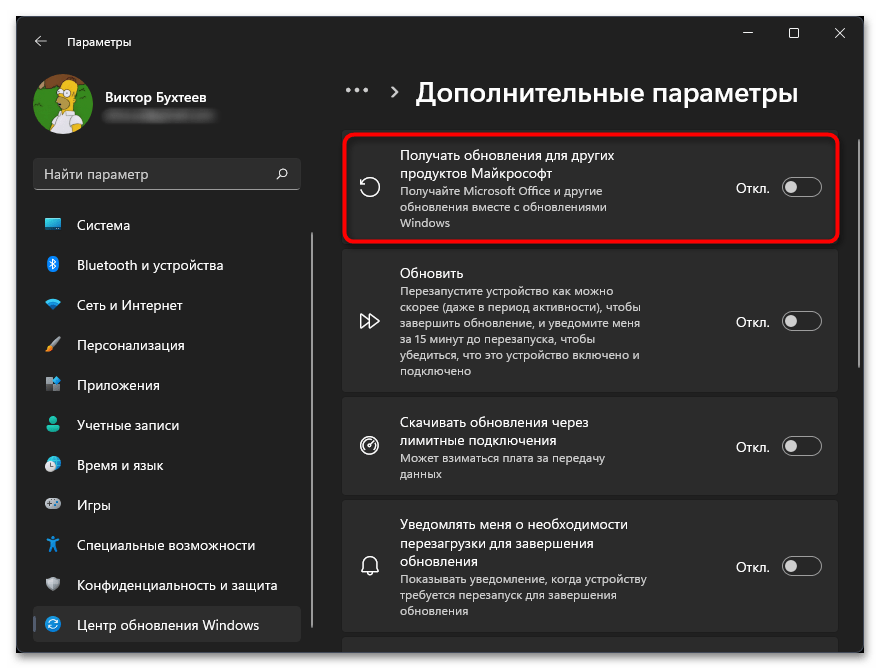
Способ 3: Отключение обновлений других продуктов Microsoft
Во время инсталляции системных обновлений могут быть установлены и новые файлы для других продуктов Microsoft. Не всегда этот процесс заканчивается успешно —
и иногда вызывает конфликты при взаимодействии с компонентами Microsoft. Мы бы рекомендовали на время отключить обновление других продуктов и проверить, поможет ли это завершить установку актуальной версии Windows 11.
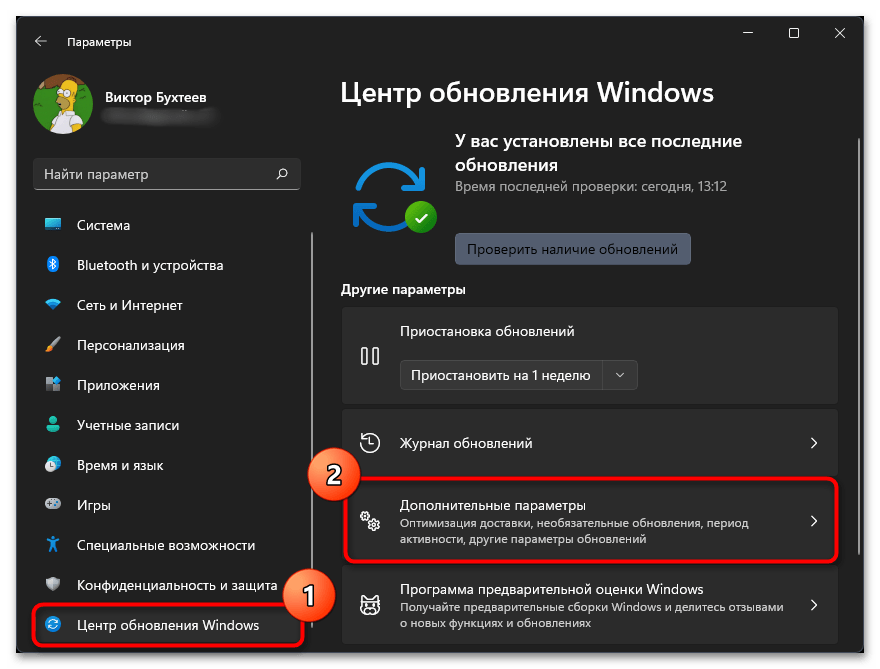
- В приложении «Параметры» выберите раздел «Центр обновления Windows» и перейдите в «Дополнительные параметры».
- Переместите переключатель «Получать обновления для других продуктов Майкрософт» в состояние «Откл.».
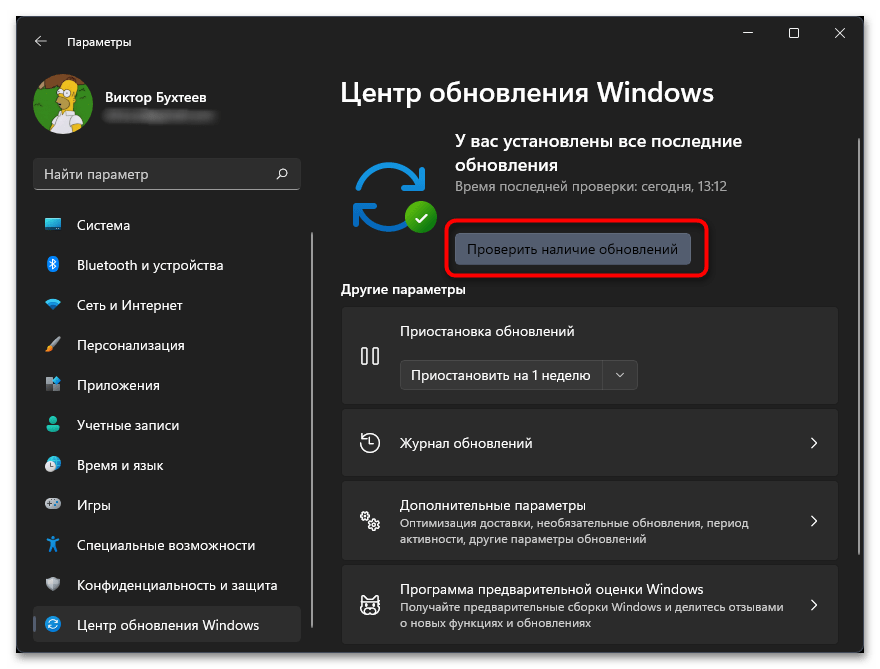
- Вернитесь к предыдущему разделу и нажмите кнопку «Проверить наличие обновлений». Теперь Виндовс 11 будет искать и устанавливать исключительно системные апдейты.
Способ 4: Ручной поиск и установка обновлений
Существует вероятность, что ошибка, появляющаяся при попытке установить апдейт в Виндовс 11, связана исключительно с конкретной сборкой. Могут возникнуть конфликты в системных файлах или есть неполадки на сервере, из-за чего временно не получается загрузить все апдейты. Если раньше все было нормально, но вдруг вы заметили, что какое-то обновление не устанавливается, советуем отыскать его вручную и скачать инсталлятор напрямую через Каталог Центра обновления Майкрософт.
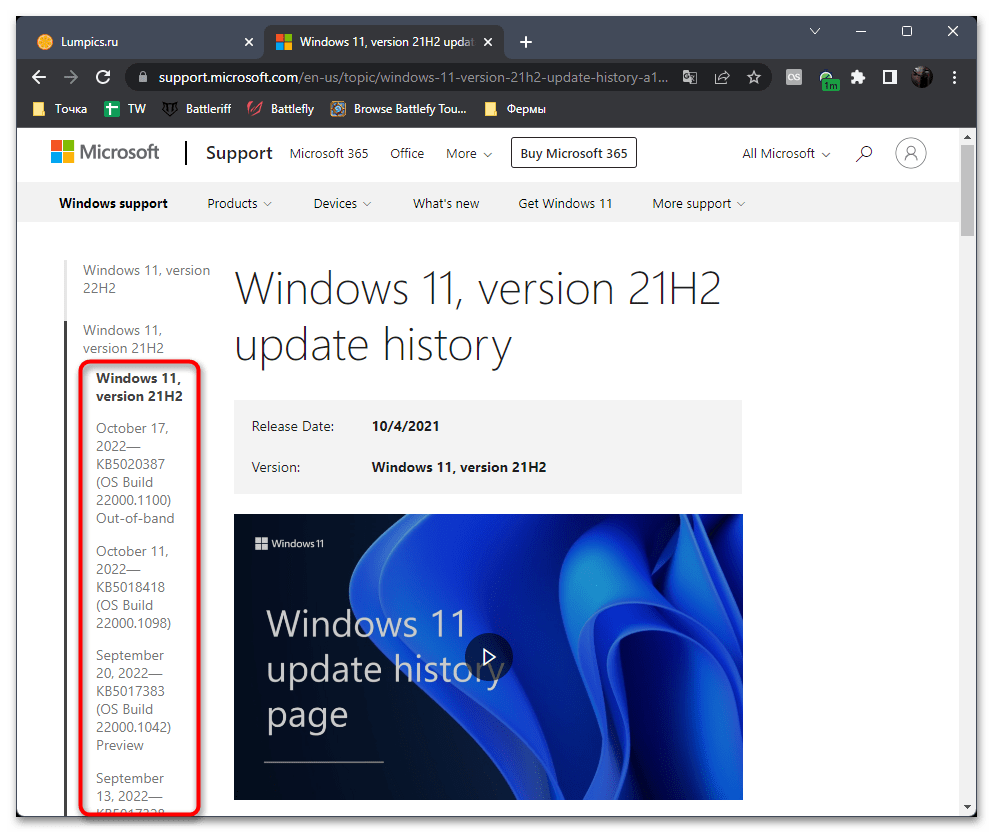
Перейти на официальную страницу Windows 11 update history
- Первоочередная задача — узнать, какие апдейты уже вышли, если вы еще не знаете, какие файлы загружаются через Центр обновления. Для этого перейдите по ссылке выше, выберите свою сборку Виндовс 11 и посмотрите историю выхода обновлений. Скопируйте номер последнего апдейта.
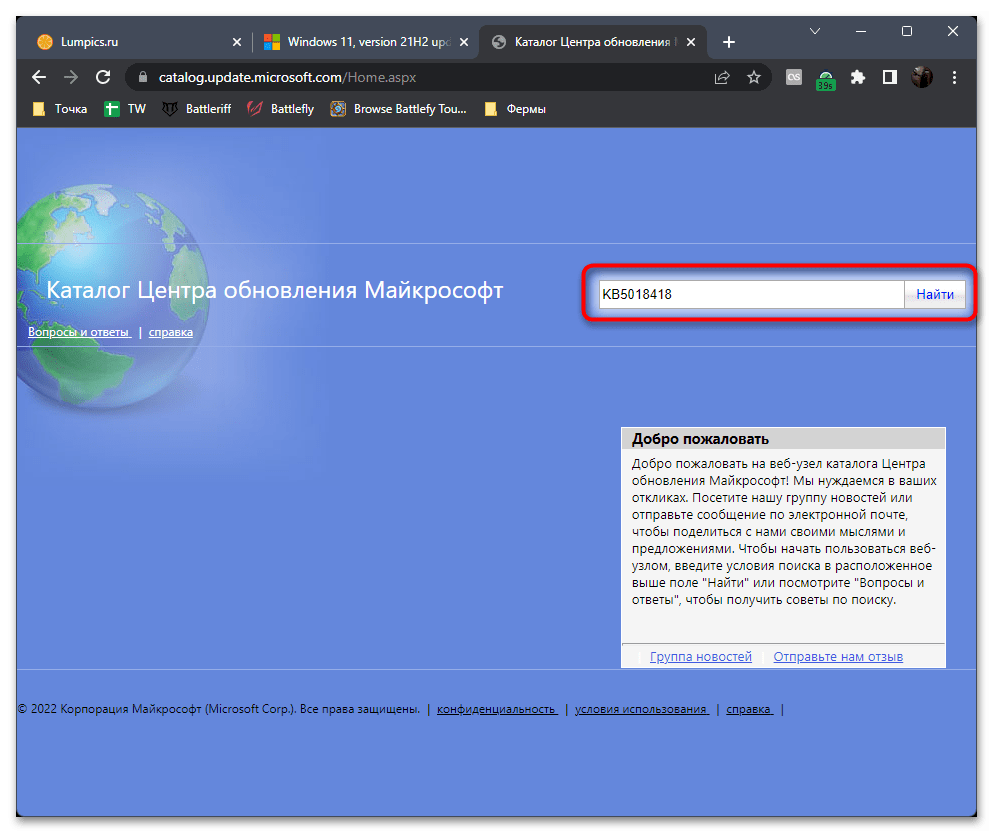
- Воспользуйтесь ссылкой ниже, чтобы попасть на страницу Каталога Центра обновления Майкрософт. На ней активируйте строку поиска и вставьте номер скопированного ранее обновления. Нажмите «Найти» для перехода к результатам поиска.
Перейти на страницу Каталога Центра обновления Майкрософт
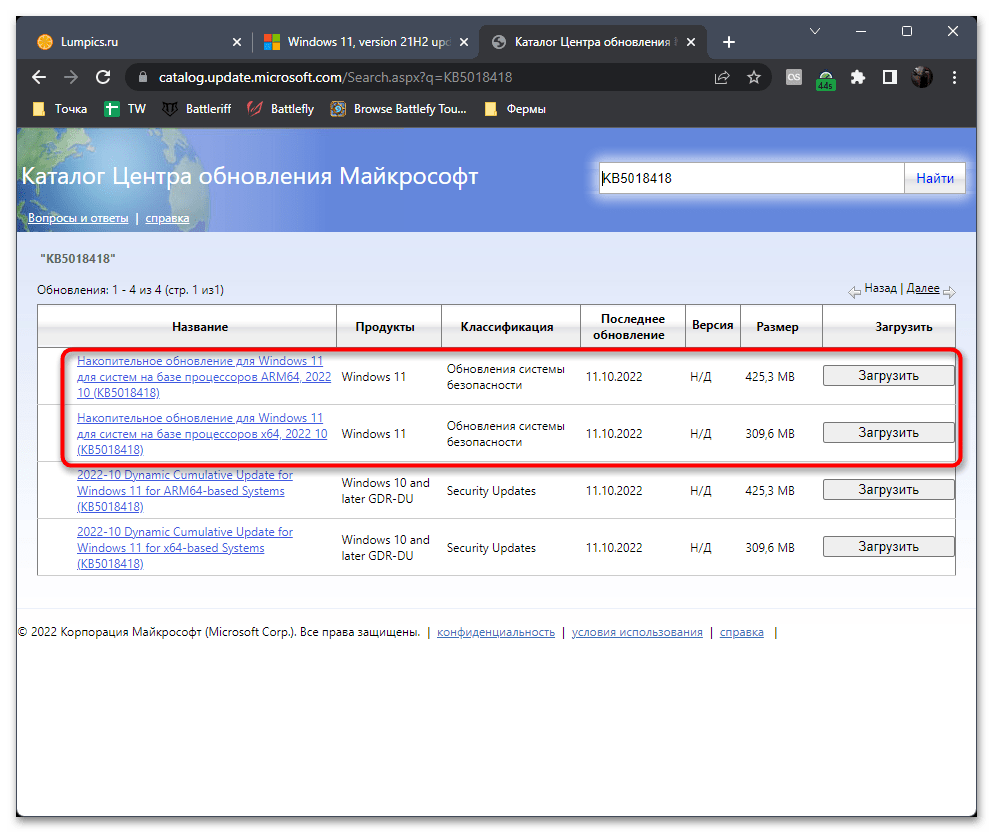
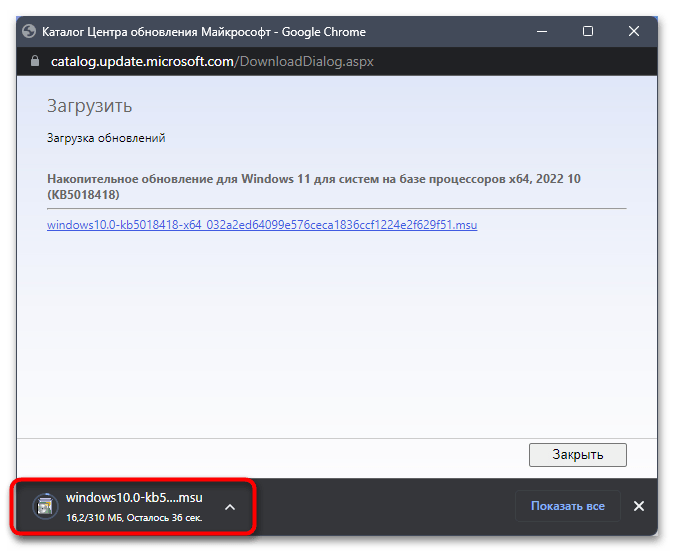
- Ознакомьтесь со списком обновлений и выберите среди них подходящее для своего типа процессора (почти всегда это x64). Кликните по «Загрузить», чтобы открыть всплывающее окно для получения ссылки на скачивание.
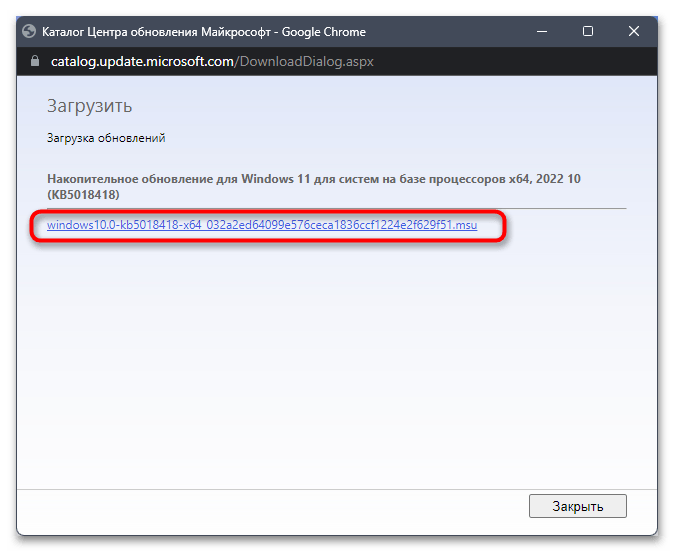
- Щелкните левой кнопкой мыши по полученной ссылке для начала скачивания файла.
- Ожидайте окончания загрузки исполняемого файла, после чего запустите его прямо через браузер или директорию, в которую он был помещен.
- Появится окно Автономного установщика обновлений Windows, а вам понадобится только дождаться завершения установки. Если этот процесс прошел удачно, перезагрузите компьютер и переходите к штатной работе с операционной системой.
Способ 5: Освобождение дискового пространства
Проблема с нехваткой свободного места на системном разделе жесткого диска возникает довольно редко, к тому же пользователи часто видят это и самостоятельно предпринимают решения по удалению ненужных файлов. Однако мы рекомендуем проверить свободную память и активировать автоматическое средство контроля свободного места, чтобы оно время от времени удаляло временные файлы, которые никак не используются в Windows. Иногда такие действия действительно становятся решением проблем с установкой обновлений в Виндовс 11.
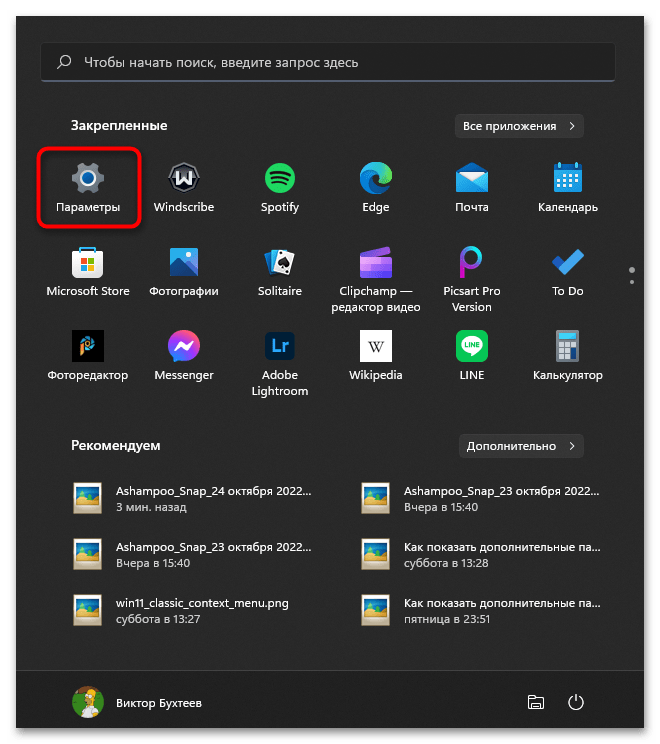
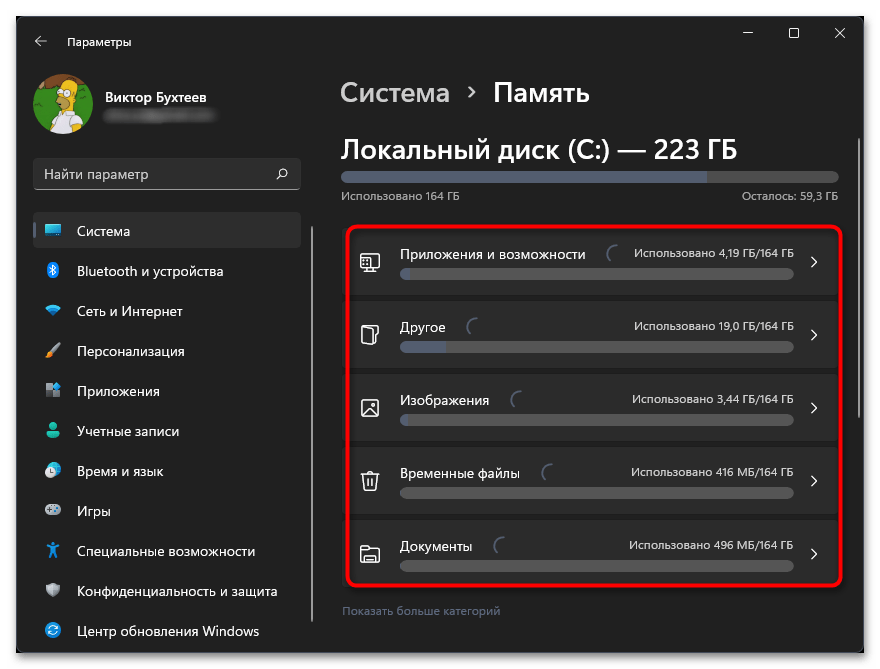
- Откройте меню «Пуск» и нажмите по значку с шестеренкой для перехода в «Параметры».
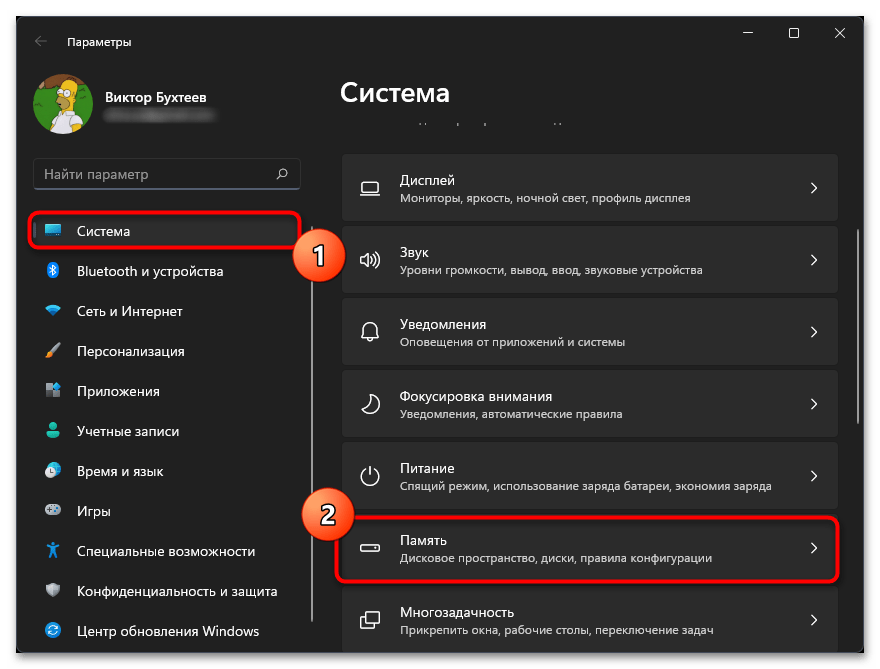
- На панели слева выберите раздел «Система» и перейдите к категории «Память».
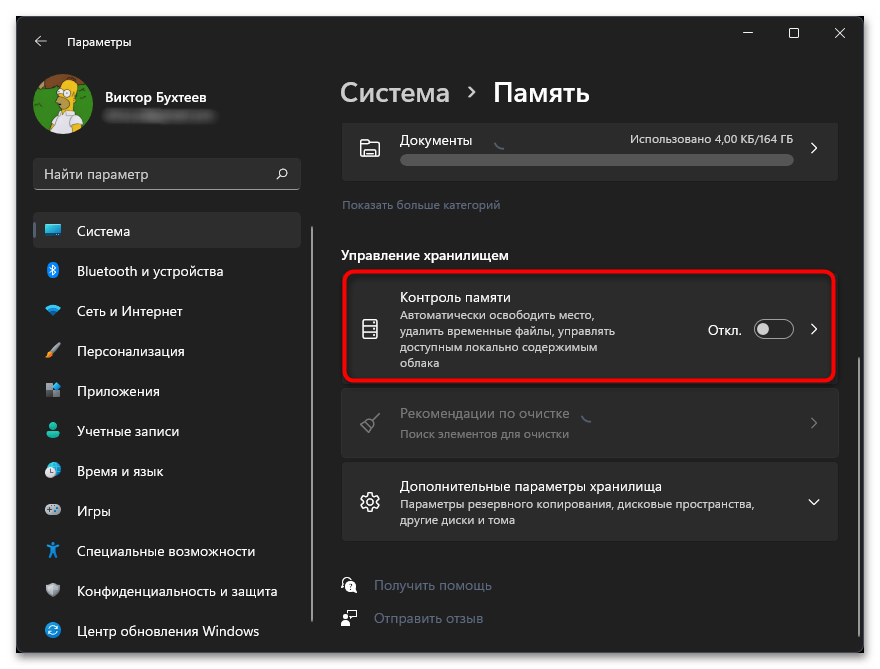
- Активируйте переключатель «Контроль памяти», если хотите доверить системе автоматическую очистку от временных файлов.
- Далее дождитесь загрузки информации о том, сколько сейчас в системе занято места. Вы можете кликнуть по любой шкале, чтобы перейти к детальному отчету и получить сведения о том, в каких папках находятся те или иные файлы. Удалите ненужные, если считаете, что дискового пространства для установки апдейтов Виндовс недостаточно.
Способ 6: Проверка целостности системных файлов
Если ничего из предложенного выше не помогло решить ошибки, связанные с Центром обновления, советуем запустить системные средства для проверки целостности файлов. Иногда отсутствие или поломка различных компонентов ОС может привести к неполадкам в работе системных компонентов, включая службу установки обновлений. Вам понадобится только запустить необходимые утилиты, а проверка и исправление ошибок осуществляются автоматически. Детальную информацию по этой теме вы получите в другой статье на нашем сайте по следующей ссылке.
Подробнее: Использование и восстановление проверки целостности системных файлов в Windows
Наша группа в TelegramПолезные советы и помощь
Users often report Windows update errors on Microsoft’s support forum, as well as other tech support-related websites. Those are issues that occur when users try to update Windows 10 and 11 via Settings. When such an update issue arises, Settings displays an error message that reads, “there were some problems installing updates, but we’ll try again later.»
Those update errors have unique codes, such as 0x800f0816, for reference. Although they have different codes, they all stop Windows downloading and installing patches or build updates much the same. These are the various ways you fix those update errors in Windows 11.
1. Run the Windows Update Troubleshooter
The Windows Update Troubleshooter is a tool designed specifically for fixing the update process. That troubleshooter won’t necessarily fix every update error, but it can resolve quite a few update issues nonetheless. As it’s a straightforward troubleshooting method, Windows Update Troubleshooting is always worth a try. This is how you can launch that troubleshooter in Windows 11.
- Click Start and select to open the menu’s pinned Settings app.
- Select Troubleshoot on the System tab in Settings.
- Then click Other-troubleshooters to view Windows 11’s troubleshooting tools.
- Click the Run option for the Windows Update troubleshooter.
The Windows Update troubleshooter tool will then open and automatically detect issues. Wait for the troubleshooter to do its stuff. If it applies any fixes, it will say it found issues and made some changes to your system.
2. Run a System File Scan
Windows update errors can arise because of corrupted system files. System File Checker is one of the best tools included in Windows 11 for repairing system files. That command-line utility will verify the integrity of system files and replace corrupted ones. You can run an SFC scan with the Command Prompt like this.
- Right-click the Start menu’s button to select and open Windows Terminal (Admin).
-
Click the Open a new tab button, and select Command Prompt on the menu.

-
Enter this Deployment Image Servicing command and hit Return:
DISM.exe /Online /Cleanup-image /Restorehealth -
To initiate an SFC scan, input the following command and press Enter:
sfc /scannow - Wait for the SFC scan to finish and display an outcome within the Command Prompt.
Running a Deployment Image Servicing scan is an optional step. It’s recommended you run that scan in case an image repair is required. If such a repair is needed, the system file scan won’t be effective without running a Deployment Image Servicing scan beforehand.
3. Check the Windows Update Service Is Enabled and Running
Windows Update is a service that needs to be enabled and running to download and install updates. The OS can’t download and install updates when that service isn’t on. So, check that service, and others needed for updates, are enabled and running when update errors occur.
- Press Win + R to open the Run dialog box.
- Type services in the Open box.
- Click OK to open Services.
-
Double-click the Windows Update service.

-
Make sure Automatic is the selected Startup type option.

- Click Start if the service isn’t running.
- Press the Apply button to save the new options.
- Then click the OK option on the window.
Also, check that other related services required by Windows Update are enabled and running. These are three other services you should check as outlined above:
- Application Identity
- Background Intelligent Transfer Service (BITS)
- Cryptographic Services
4. Check and Free Up Drive Storage Space
Although space is reserved for Windows updates, issues might still arise when there’s very little free storage space on your hard drive. So, make sure there are at least a few gigabytes of space available on your PC’s C: drive (or primary partition) for updates. Check how much space is left on it by clicking This PC in File Explorer to view the drive storage icon shown directly below.
If that icon shows your storage drive is more than 90 percent full, you should free up some space on it. The best way to free up HDD or SDD storage space is to uninstall larger software packages you don’t need. Also, run a disk cleanup scan to erase junk files.
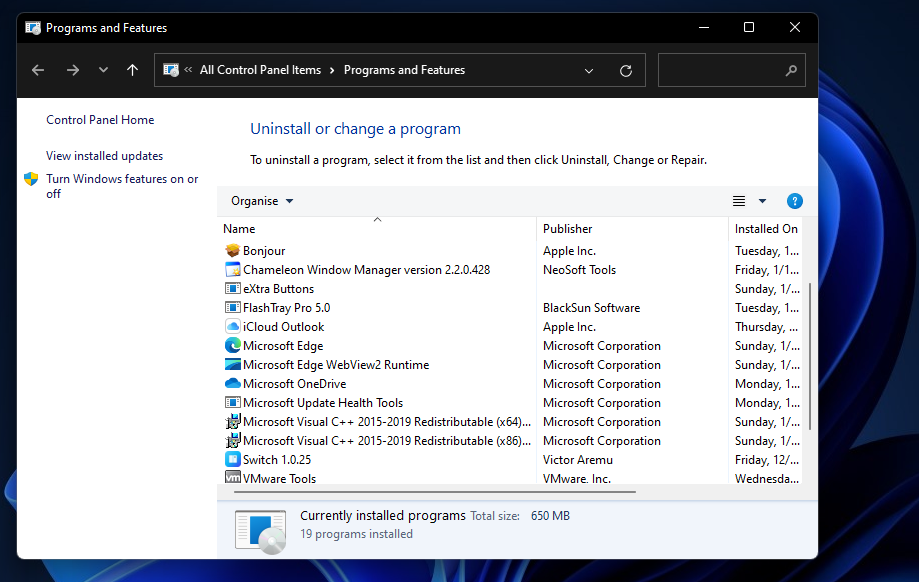
5. Disable (or Uninstall) Third-Party Antivirus Software
Third-party antivirus utilities can sometimes interfere, or conflict, with Windows updating. To ensure your third-party software isn’t causing any update issues, try temporarily disabling it before checking for updates in Settings. You can turn off many third-party antivirus shields by right-clicking their system tray icons and selecting a disable or pause context menu option.
Alternatively, you can uninstall your third-party antivirus software (and rely on Windows Security) to ensure it can’t undermine Windows updates in any way. To do so, input appwiz.cpl in Run’s Open box and click OK. Then you can remove the antivirus software by selecting it in Programs and Features and clicking Uninstall. Or you might be able to uninstall your antivirus package with a dedicated uninstaller tool for it, such as the Avast Uninstall Utility for example.
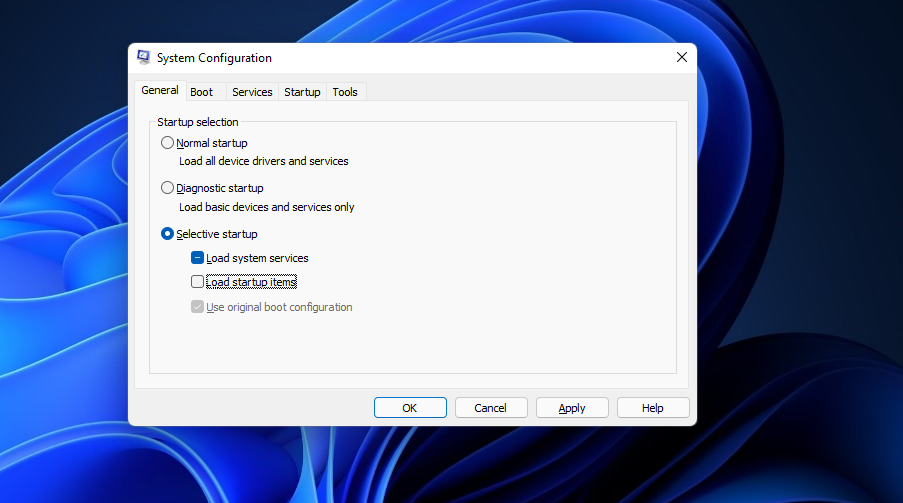
6. Clean Boot Windows
Clean-booting Windows 11 will eliminate the possibility of startup software and services conflicting with the update process. You can configure Windows to clean boot by disabling all third-party startup programs and services. To do so, you’ll need to adjust some MSConfig settings as follows.
- Launch Run by right-clicking the Start taskbar button and selecting its shortcut on the Power User menu.
- Type msconfig in the Open box, and select the OK option.
-
Deselect the checkbox for the Load startup option. However, the Load system services and Use original boot configuration options should be selected there.

-
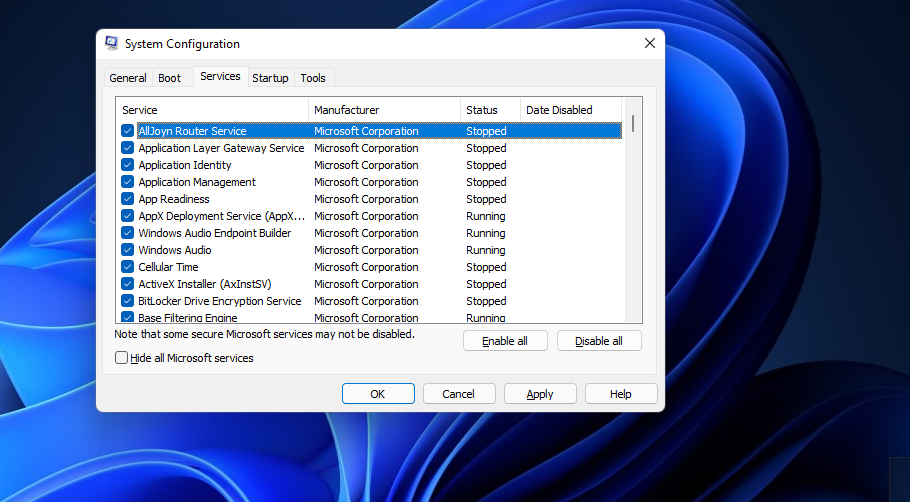
Select Hide all Microsoft services on the Services tab shown directly below.

- Click Disable all to remove all listed third-party services from the startup.
- Press the Apply button, and click OK to exit MSConfig.
- Select Restart on the dialog box prompt that will open after you close MSConfig.
- Try updating Windows 11 after the restart.
7. Reset Windows Update Components
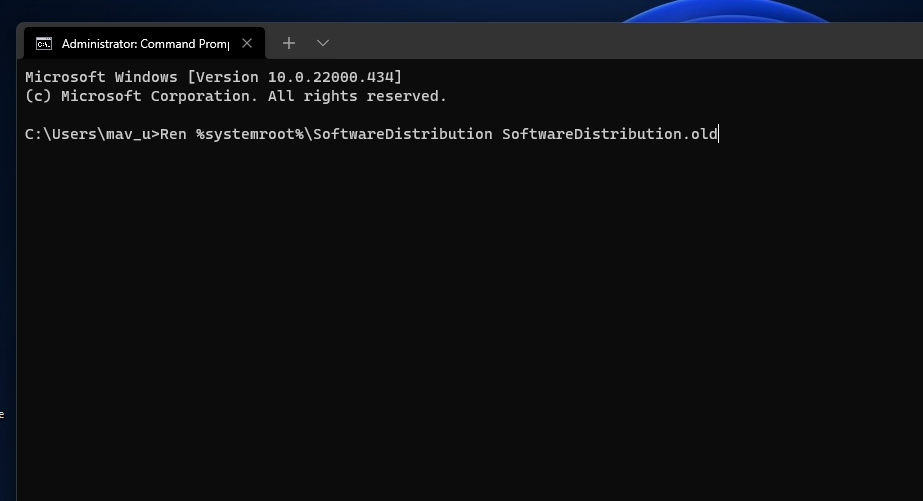
Update errors can often be due to corrupted Windows Update components. Therefore, resetting those components is another potential solution for numerous update issues. You can update the Windows Update components by renaming the SoftwareDistribution and catroot2 folders.
- Open the Command Prompt as an administrator within Windows Terminal as outlined in the first couple of steps of the second resolution.
-
Input these four separate commands pressing Return after each:
        net stop bits
net stop wuauserv
net stop appidsvc
net stop cryptsvc -
To rename the SoftwareDistribution folder, input this command and press Enter:
Ren %systemroot%\SoftwareDistribution SoftwareDistribution.old -
Then input this command for renaming catroot2 and press Return:
Ren %systemroot%\System32\catroot2 catroot2.old - To restart the services, input these separate commands pressing Enter after each one.
        net start bits
net start wuauserv
net start appidsvc
net start cryptsvc
Windows will set up new SoftwareDistribution and catroot2 folders for Windows Update when you rename them as outlined above. The net stop and start commands restart the services needed for updating the platform. When you’ve applied this potential resolution, restart Windows 11 and try installing updates again.
8. Reset Windows 11
Windows 11 includes a Reset this PC tool, which is a built-in utility for reinstalling the platform. Resetting the platform will restore it to factory (default) settings and remove all software packages that weren’t pre-installed on your PC. However, you can select an option to reset your PC and preserve user files.
Resetting Windows 11 is the last resort for resolving update errors that will likely fix OS issues other potential resolutions do not. Give other potential resolutions for update errors a try before resetting the platform. If you’ve run out of options, however, you can reset Windows 11 as covered in the MUO guide linked below.
9. Manually Download and Install Updates
Although more of a workaround than a fix, you can manually download and install Windows 11 updates your PC needs from the Microsoft Update Catalog. Thus, you don’t need to click the Check for updates option in Settings to download and install them. You can manually install updates like this.
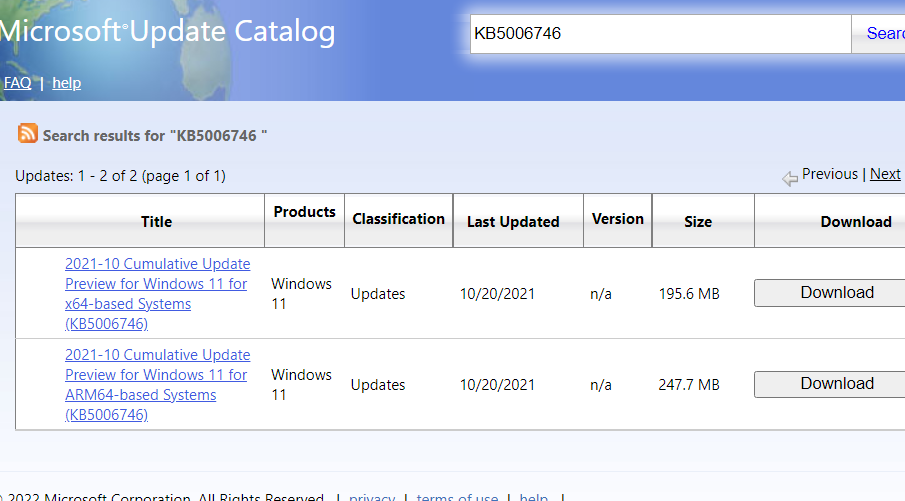
- Open the Microsoft Update Catalog website.
- Enter the KB code number for an update you want to install in the search box there.
-
Select the Download option for a compatible Windows update in the search results.

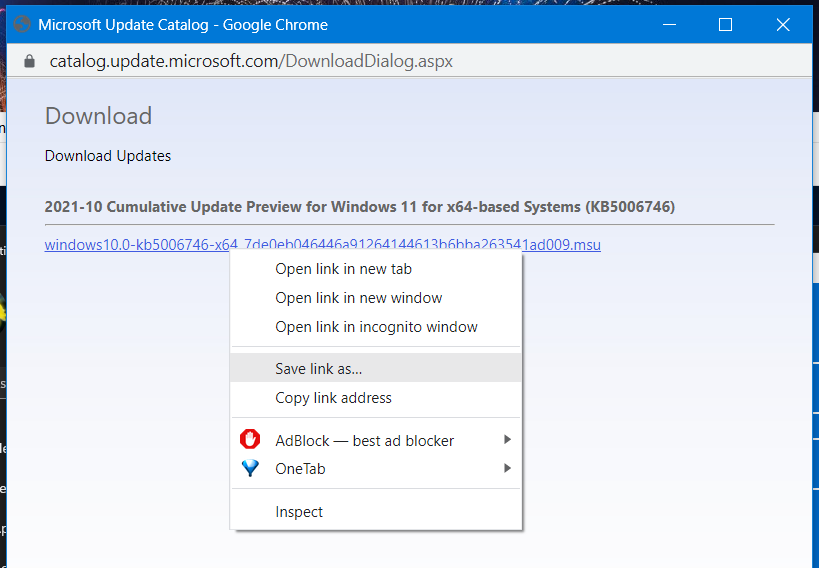
-
Then right-click the download link in the window and select Save link as.

- Choose a folder to download the update package to, and click the Save button.
- Bring up File Explorer (with the Win + E hotkey), and open the folder that includes the downloaded update package.
- Then double-click the update’s MSU file to install it.
Now Windows Update Will Work Again
Although it’s not necessarily essential to fix all update errors, patch updates are important for addressing bugs and the Windows Security app. Those potential resolutions will likely resolve most Windows 11 errors for installing updates so that your PC can receive all the latest updates. Aside from those fixes, restoring Windows to a system restore point and generally updating your PC’s device drivers can also feasibly fix such issues.