
If you want to clean up your computer and improve its performance, one way to do that is by deleting temporary files. You can easily do this using Command Prompt in Windows 10. This task involves a few steps to enter specific commands that will remove these unnecessary files and free up space on your hard drive.
Deleting temporary files using Command Prompt is a straightforward process that will help you clear out the clutter from your system. Here’s how you can do it:
Step 1: Open Command Prompt
First, you need to access the Command Prompt.
To do this, type «cmd» in the Windows search bar and right-click on Command Prompt from the results. Select «Run as administrator.» This will give you the necessary permissions to delete temporary files.
Step 2: Type the Command to Navigate to the Temp Folder
Next, you need to navigate to the temporary files folder.
Type cd %temp% and press Enter. This command will take you straight to the Temp folder where temporary files are stored.
Step 3: Delete All Files in the Temp Folder
Now, you can delete the temporary files.
Type del *.* /s /q and hit Enter. This command will delete all files in the current directory and subdirectories without prompting for confirmation.
Step 4: Navigate to the Windows Temp Folder
You should also clear the Windows Temp folder.
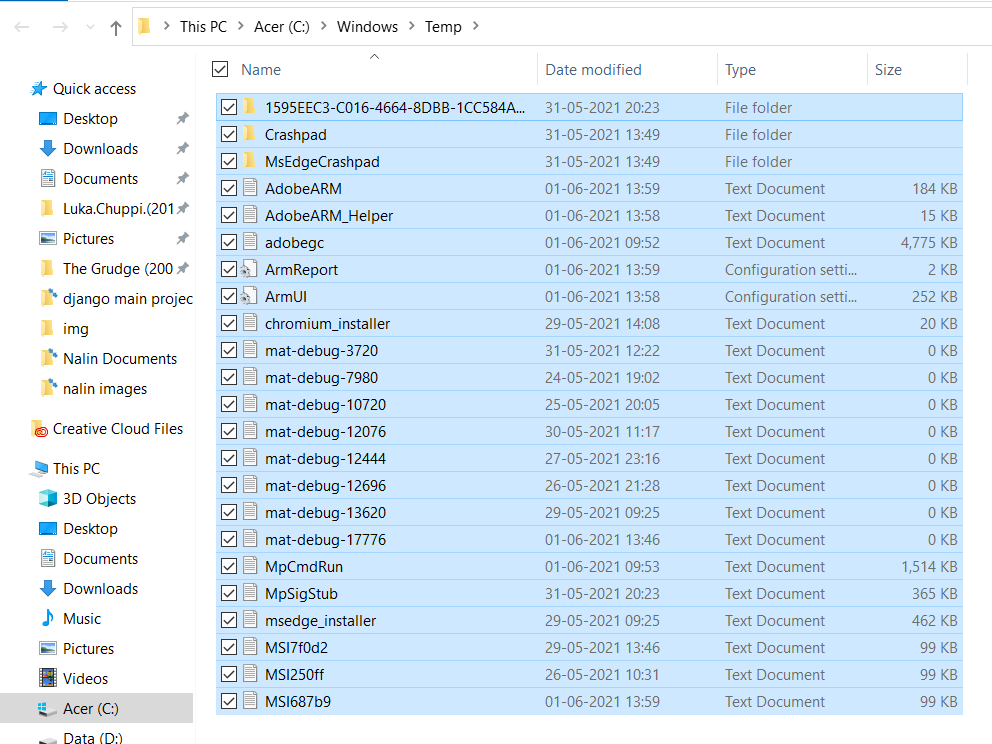
Type cd C:WindowsTemp and press Enter. This will navigate you to the Windows Temp folder.
Step 5: Delete All Files in the Windows Temp Folder
Finally, delete the files in the Windows Temp folder.
Type del *.* /s /q and hit Enter. This will remove all temporary files in this folder as well.
After completing these actions, you should notice a bit more free space on your hard drive and possibly a slight improvement in system performance.
Tips for Deleting Temporary Files in Windows 10 Using CMD
-
Run as Administrator: Always run Command Prompt as an administrator to ensure you have the required permissions.
-
Be Cautious: Double-check the commands before hitting Enter to avoid deleting important files.
-
Regular Cleanup: Perform this cleanup regularly to keep your system running smoothly.
-
Use Other Tools: Combine this method with other cleaning tools like Disk Cleanup for thorough maintenance.
-
Backup Important Data: Always have a backup of important files before performing any system-level operations.
Frequently Asked Questions
What are temporary files?
Temporary files are created by Windows and programs to store temporary data. They are usually deleted automatically, but sometimes they linger on your system.
Why should I delete temporary files?
Deleting temporary files can free up space on your hard drive and improve your computer’s performance.
Can I delete temporary files using other methods?
Yes, you can use built-in tools like Disk Cleanup or third-party software like CCleaner.
Is it safe to delete temporary files?
Generally, yes. Temporary files are not essential for the operation of your system. However, be cautious and make sure you are only deleting files from the Temp folders.
How often should I delete temporary files?
It depends on your usage, but doing it once a month is a good practice.
Summary
- Open Command Prompt as an administrator.
- Type
cd %temp%and press Enter. - Type
del *.* /s /qand hit Enter. - Type
cd C:WindowsTempand press Enter. - Type
del *.* /s /qand hit Enter.
Conclusion
Cleaning up your computer is like giving it a breath of fresh air. When you delete temporary files in Windows 10 using CMD, you’re not just freeing up space—you’re also potentially speeding up your system. Think of it as decluttering your room. The steps outlined are simple and effective, making this a powerful tool in your computer maintenance toolkit.
For those who want to take their computer maintenance a step further, consider exploring additional built-in tools like Disk Cleanup or investing in third-party software. The more you proactively manage your system, the better it will perform in the long run. So why not start today? Follow these steps and see the difference it makes.
Happy cleaning!
Matt Jacobs has been working as an IT consultant for small businesses since receiving his Master’s degree in 2003. While he still does some consulting work, his primary focus now is on creating technology support content for SupportYourTech.com.
His work can be found on many websites and focuses on topics such as Microsoft Office, Apple devices, Android devices, Photoshop, and more.
Over time, temporary files in Windows 10 can accumulate and take up valuable disk space, potentially slowing down your system. These files are usually created by various applications for short-term use, but they can linger long after they’re needed. Knowing how to delete temporary files in Windows 10 is a quick and effective way to free up space and improve your computer’s performance. In this article, we’ll show you several methods to clear temp files safely and efficiently.
Table of Content
- Are Temporary Files the Same as Junk Files?
- Why Should You Delete Temporary Files From Your PC?
- How to Delete Temporary Files in Windows 10?
- Automated Methods
- Method 1: Delete Temporary Files in Windows Using System Settings
- Method 2: Delete Temporary Files in Windows Using Disk Cleanup Tool
- Manual Methods
- Method 1: Delete Temporary Files in Windows Using CMD
- Method 2: Delete All Temp Files Using Run Command
- Method 3: Delete local Temp Files Using Run Command
- Method 4: Delete Local Temp Files Using Prefetch
- Delete Hidden Temporary Files by Cleaning Up Browser Cache
- Delete Browser Cache from Windows 10
Are Temporary Files the Same as Junk Files?
Temporary files are created by programs to store information temporarily. Temporary files speed up tasks by storing data temporarily. For example, while working on a document, a temporary file may be created to save the changes made, reducing the time it takes for processes to complete.
However, not all temporary files become junk. Junk files are unnecessary, or unused files that gather over time, and they may include temporary files. Therefore, while some temporary files may become junk, not all temporary files are considered junk.
Why Should You Delete Temporary Files From Your PC?
Deleting temporary files from your PC is important for several reasons. First, it frees up space on your computer systems, helping your computer run faster. It also maintains your online privacy by removing traces of your activities. Deleting temporary files can improve system performance and prevent potential errors. Moreover, it reduces the risk of malware hiding in these files. In short, advantages include increased storage, enhanced privacy, improved speed, error prevention, and better protection against malware.
How to Delete Temporary Files in Windows 10?
Deleting temporary files ensures that your system doesn’t hang due to unnecessary space occupied by temporary files in your system. So delete these temp files and keep your system cool. Here we have segregated the methods of deleting temp files into automated and manual methods. So go ahead and try these methods and improve your PC’s performance now.
Automated Methods
These methods involve system configuration changes that remove temp files from your Windows regularly. Once you make these changes, your system will delete these temp files periodically when accumulated over time.
Method 1: Delete Temporary Files in Windows Using System Settings
Step 1: Open Settings by pressing Win + I.
Step 2: Go to System > Storage.
Step 3: Now click on “Temporary files”, under the “Local Disk (C:)” section.

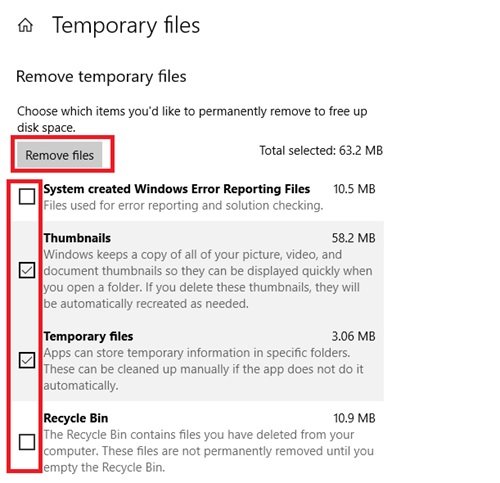
Step 4: Check the boxes for the types of files you want to remove.
Step 5: Click “Remove files” to clear the cache.

Step 6: Click on “Continue”
Method 2: Delete Temporary Files in Windows Using Disk Cleanup Tool
Microsoft has included disk cleanup as a part of your Windows 10 that will enable you to get rid of temporary and cached files from your PC.
Step 1: Type “Disk Cleanup” in the search bar.
Step 2: Now select the drive you want to clean up and click “OK.”
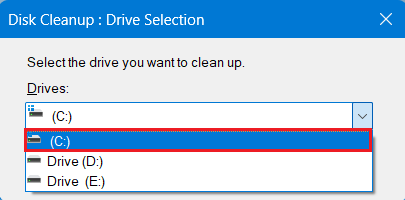
Step 3: Check the box next to file you want to delete, Click “OK” at the bottom.
.png)
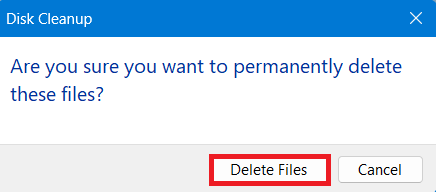
Step 4: A Dialogue box to confirmation will appear claiming to permanently delete files from your PC. Click “Delete Files”
Alternatively, you can perform Disk Cleanup Using Powershell Scripts to delete temp files or recycle bin data
Manual Methods
Unlike automated methods these methods don’t remove temp files on regular basis. Manual methods are performed explicitly. Here we have provided four different methods to delete temp files from your Windows PC.
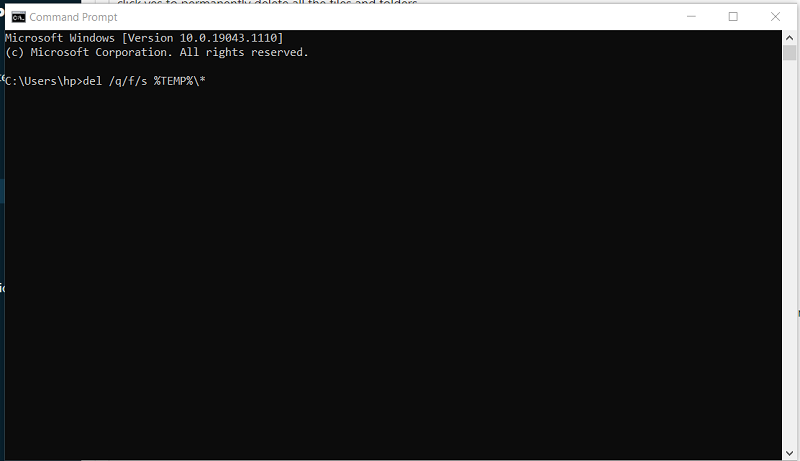
Method 1: Delete Temporary Files in Windows Using CMD
To delete the temporary files from the command prompt:
- Open Command Prompt.
- Run the following command
del /q/f/s %TEMP%\*
Method 2: Delete All Temp Files Using Run Command
To delete all the temporary files follow these simple steps:
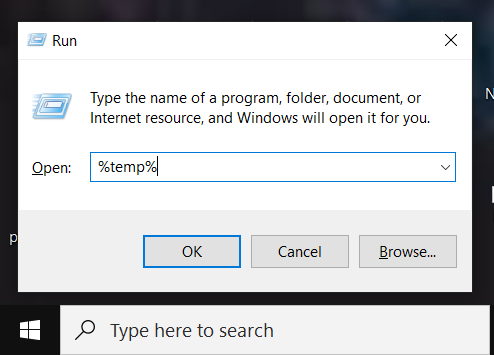
Step 1: Press the Windows key + R to open the Run command. Then type “temp” in the search field and press OK.
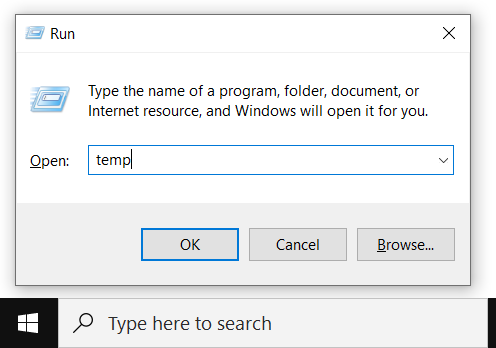
type in “temp” and press ok
Step 2: Now, select all temp files using ctrl + A and then press delete.
Select all and press delete
Method 3: Delete local Temp Files Using Run Command
There are some local temporary files into your system, you can delete these specific files using following steps:
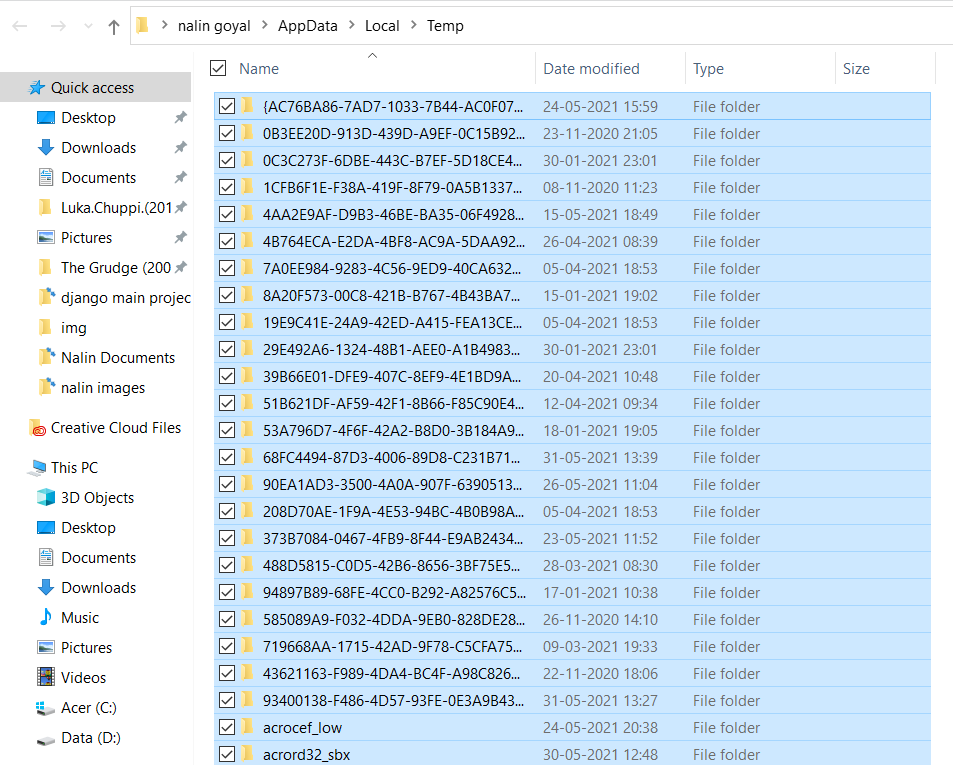
Step 1: Press the Windows key + R to open the Run command. Then type “%temp%” in the search field and press OK.
Type %temp% and press OK
Step 2: Now, select all local temp files using Ctrl + A and then press delete.
Select all files and press delete
Method 4: Delete Local Temp Files Using Prefetch
To delete the local temporary files using Prefetch follow the below steps:
Step 1: Press Windows key + R to open the Run command. Then type “Prefetch” in the search field and press OK.
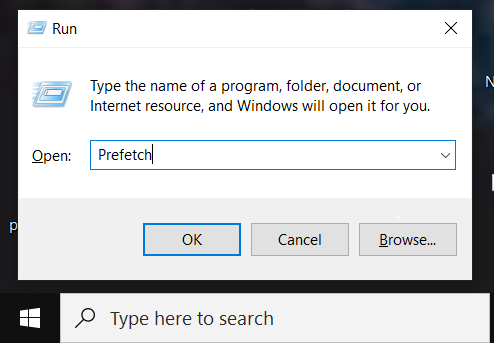
Type “prefetch” and press ok
Step 2: Now, select all prefetch files using ctrl + A and then press delete.
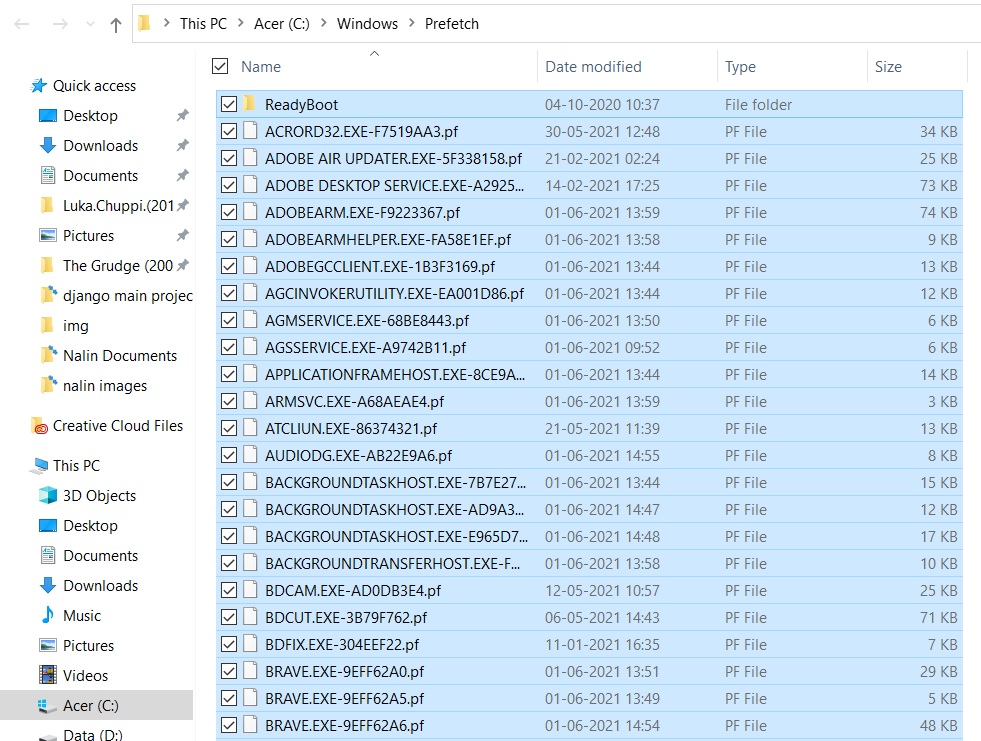
Select all prefetch files and press delete
Finally, delete all the files from recycle bin too. All temporary files are deleted, and now you are good to go!!
Temporary files are generated in various segments of application programs. Even after deleting all visible temporary files, browser cache often remains unnoticed. Is it important to clear browser cache? The answer is yes! It’s essential to regularly clear these hidden files as they occupy significant space in your system. So don’t overlook the browser cache; cleaning it helps maintain system performance by freeing up storage space and ensuring a smoother experience. Regularly cleaning up browsers cache helps to speed up internet browsing speed.
There are different Browser Cache Stored in Your System like stored data from websites, like images, pages, your saved passwords and other browsing activities are stored to speed up future visits. These Cached data are stored in specific folders on your system.
Delete Browser Cache from Windows 10
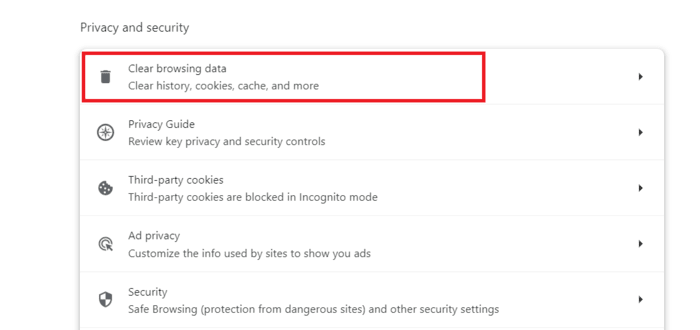
Step 1: Open your browser and Go to Settings > Privacy and security
Step 2: Select “Clear Browsing Data”.
Step 3: Check the box as per your preference and hit “Clear Data” to remove the cache.
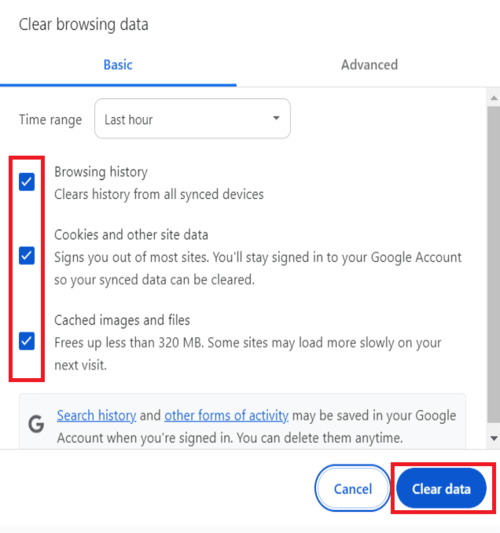
Regularly clearing browser cache helps maintain privacy and ensures updated content.
Alternatively, you can clear your Browser Cache using run command
Conclusion
Regularly deleting temporary files in Windows 10 is an important maintenance task that can help keep your system running smoothly. Whether you use the built-in Disk Cleanup tool, manually delete files from the Temp folder, or automate the process with Storage Sense, these methods will ensure that your system remains clutter-free. By following the steps outlined in this guide, you can easily clear temp files in Windows 10 and enjoy a more responsive computer.
Also Read
- How to Format a Hard Drive in Windows?
- How to clean temporary files from Ubuntu?
- How to Create Partitions of a Hard Drive in Windows 10?
Your Windows operating system and many third-party applications create hundreds of Temporary files on your system in one single day. Normally, these files do not cause any issue, but when they increase exponentially in numbers, they block valuable space on the hard drive and degrade the overall performance of your system.
By deleting all such Cache files, you can free up a lot of disk space and keep your machine running at peak efficiency. There are many ways to delete Temporary files on Windows 10. Read further to know them.
Temporary files are created by both the Operating System and the software running on your computer system. Temporary files are denoted with a file type of .tmp or prefaced with a tilde (~). Typically, temporary files are created in the Windows Temp folder and are used for many reasons, these include the following:
- OS requirements, like providing space for virtual memory.
- Back-up files created for work-in-progress like MS Office creates for its open documents.
- Work files for applications that hold data while the program is running.
There are two main reasons to clear out the temporary files in Windows 10 or any other version of Windows. These include regaining storage space and improving computer performance. For these reasons, it is advised that you delete the temporary files periodically.
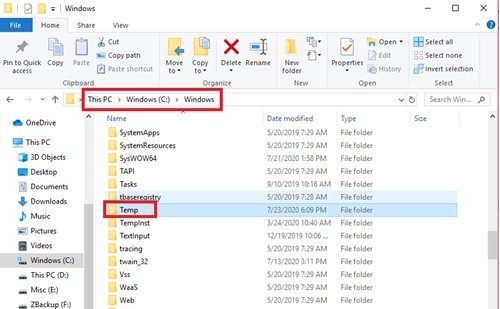
This folder is located at c:/Windows/Temp and mainly used by the operating system to store the temporary files. You can press Win + R key, type ‘temp’ and hit ‘Enter’ to go to this folder.
Used by the current logged in user:
This folder is related to the user logging into the system. You can use the search field on the Windows Start menu to locate this temp folder. Click open the start menu and type %temp% and select the top result from the option.
Here is the guide that will take you through the steps of clearing temporary files. Some of these methods are as follows:
- Using Windows Settings
- Using File Explorer (Manual Method)
- Use “Storage sense” to automatically delete temporary files
- Create a BAT file
- Using Command Prompt
- Using Disk Cleanup
- Use 3rd-party Disk Cleaner software.
Let us look at each of these methods in more detail.
1] Using Windows Settings
Windows allows you to use its Settings App to remove the temporary files. Here is how you can use this application:
1] Open the Start Menu and select the Settings shortcut appearing on the left sidebar. Once you select the little gear-shaped icon, the Windows Settings page opens in front of you.
2] In the new windows, navigate to the System section.
3] From the left side options, select Storage
4] You will see your disk’s option on the right section, select your disk, and click on the Temporary files option.
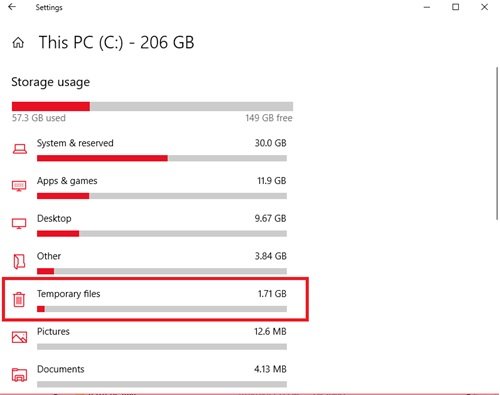
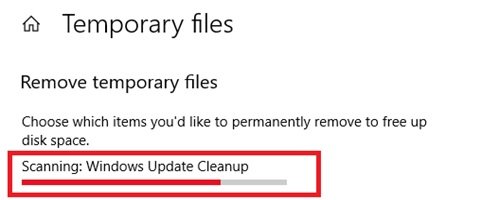
5] Windows will now scan the temporary files folder; once the process is completed, you can select the files you want to remove.
6] To delete check the boxes and then click Remove files to confirm your action.
Done! After you successfully complete the above steps, the junk files will be removed from your system.
2] Using File Explorer (Manual Method)
Using the Windows File Explorer is another simple way of removing temporary files in Windows 10. Follow these steps:
1] Press Win + R keys to open the Run dialog.
2] Type the command %temp% and press Enter to open the temporary files folder on your system.
3] Use shortcut Ctrl + A to select all the files inside the folder. Once the files are selected, right-click and select the Delete option from the context menu.
Please note – you will need an administrator account to perform this action. Also, once the temporary files are deleted, these are moved to the Recycle Bin hence, restoring them is possible.
3] Use Storage sense to automatically delete temporary files
A user can use Storage Sense to remove temporary files automatically from the system. Here is how you can use:
1] Go to the Settings application.
2] Click on the System option and select Storage from the left-hand panel options.
3] In the Storage section, turn the toggle named Storage Sense ON.
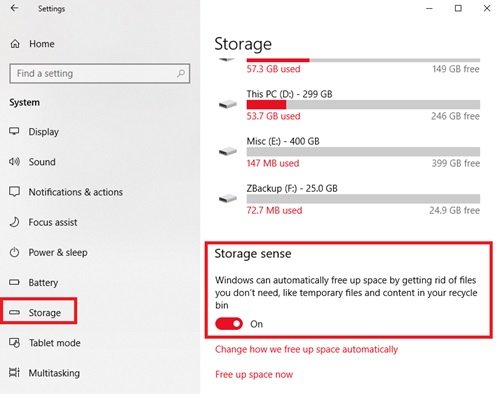
Once you activate Storage sense on your system, it will delete the temporary files including the ones which have been in the recycle bin for more than 30 days. This was the default configuration, but the user can always configure the default settings of Storage Sense.
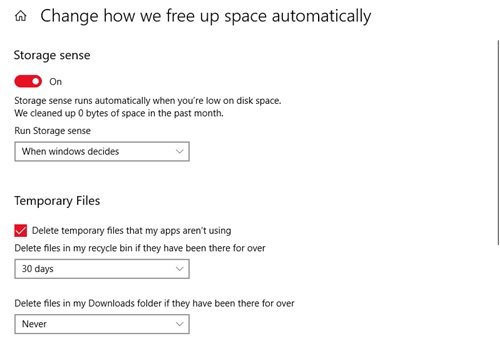
To do this, click Change how we free up space automatically tab and adjust the cleanup settings or run Storage Sense on-demand.
4] Create a BAT file
In this method, you need to create a BAT file. Once this file is created it can be used repeatedly to delete the temporary files on Windows 10. This very simple option works quickly. To create a BAT File, follow these steps:
1] From the Start Menu open the Notepad
2] In the Notepad app, copy the following:
del C:\Users\%username%\AppData\Local\Temp /f /s /q

rd C:\Users\%username%\AppData\Local\Temp /s /q

del c:\Windows\Temp /f /s /q

rd c:\Windows\Temp /s /q

pause
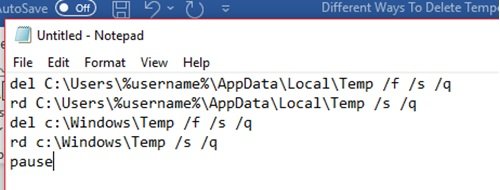
3] Save this file to your desktop using the extension .bat. Here the file is named as Clean Temp.
4] Once done, a BAT file will be created on your desktop.

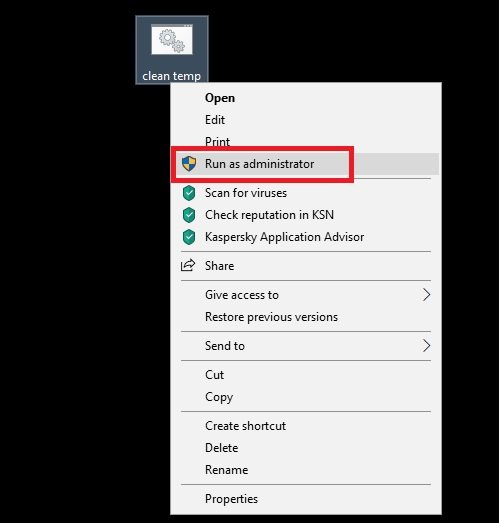
5] Now, whenever you wish to delete the temporary files on Windows 10, right-click on this file and select the option Run as Administrator.
Done!
5] Using Command Prompt
Temporary files on Windows 10 can also be deleted by running some commands in the Command Prompt. Follow these steps:
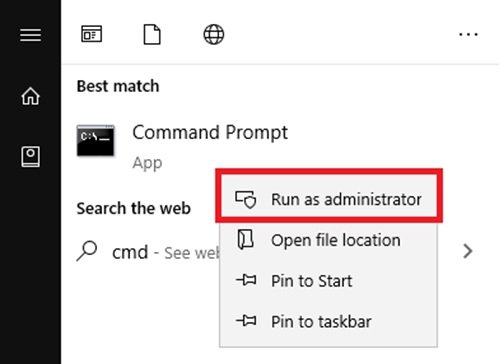
1] Open the Start Menu and type cmd.
2] In the search results, right-click and click the Run as Administrator option.
3] Once the command prompt window is open with the administrative right, copy the following command:
cleanmgr /d <driveletter>
Do not forget to alter the <driveletter> field in the command and remove the brackets.
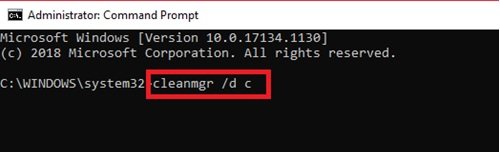
4] Now, execute the command by hitting the Enter key.
Wait for the process to complete.
6] Using Disk Cleanup
The Disk Cleanup utility is another simple and efficient way to clean temporary files on Windows 10. Read our guide Delete Temporary Files using Disk Cleanup Tool.
7] Use 3rd-party Disk Cleaner software
You can also use a free junk file and disk cleaner software to delete your junk files.
TIP: See this post if Temporary files not deleting in Windows.
We hope that this guide did help you in deleting the temporary files on Windows 10 and you successfully made some room for storing new files. If you any similar tricks to perform this process, do share them with us in the comments section below.
Вопрос: Как удалить временные файлы из Windows 10?
“Моя система сильно зависает из-за временных файлов, занимающих ценное место на моем диске. Я хочу удалить их, чтобы освободить место на моем ПК с Windows. Кто-нибудь может сказать мне, как удалить эти временные файлы? И каков наилучший способ убедиться, что я делаю это безопасно и эффективно?”
Временные файлы, также называемые temp или foo-файлами, — это файлы, которые ваша операционная система или программа создает для ускорения и бесперебойной работы вашего компьютера. Временные файлы Windows могут доставлять неудобства, так как чаще всего компьютеры не удаляют их автоматически, и со временем они могут накапливаться, занимая место на вашем диске и иногда приводя к замедлению работы системы и сбоям. Знание того, как удалить временные файлы в Windows 10/11, повысит производительность вашего компьютера, гарантируя его бесперебойную работу. В этой статье мы кратко объясним, где хранятся временные файлы. Мы также обсудим пять лучших способов удаления временных файлов ручными и автоматическими методами.
- Часть 1: Где хранятся Временные файлы?
- Часть 2: Как удалить временные файлы в Windows 10/11?
- Способ 1: Удалите временные файлы в Windows 10/11 с помощью Run
- Способ 2: Удалите временные файлы в Windows 10/11 из настроек
- Способ 3: Автоматическое удаление временных файлов Windows 10/11 путем активации Storage Sense
- Способ 4: Удалите временные файлы в Windows 10/11 с помощью очистки диска
- Способ 5: Используйте командную строку для удаления временных файлов Windows 10/11
- Бонусный совет: Как восстановить удаленные временные файлы в Windows 10/11
- Часто задаваемые вопросы о временных файлах в Windows 10/11
Часть 1: Где хранятся Временные файлы?
Прежде чем мы перейдем к методам удаления временных файлов, давайте сначала разберемся с вопросом – где хранятся временные файлы Windows 10/11?
Временные файлы можно найти расположенными в разных папках в зависимости от того, что их создало. Те, которые создает ОС Windows, обычно хранятся в папке “%system%\Windows\Temp” — вероятно, именно там хранится большинство временных файлов на вашем компьютере. В то время как другие, которые создают “Пользователи”, сохраняются в папке их профиля пользователя “%userprofile%\AppData\Local\Temp.”
Чтобы получить доступ к этим файлам и удалить их, вы можете легко воспользоваться поиском Windows, который мы объясним далее в следующих разделах.
Когда необходимые временные файлы не удаляются регулярно, они превращаются в ненужные файлы, которые накапливаются и замедляют работу вашего компьютера. Чтобы повысить производительность вашей системы, ниже мы перечислили пять способов безопасного удаления временных файлов Windows 10/11. Проверьте их:
Способ 1: Удалите временные файлы в Windows 10/11 с помощью Run
Первый способ удалить временные файлы Windows 10 вручную и полностью — это использовать встроенное в систему средство запуска. Вот как удалить временные файлы в Windows 10 с помощью команды Выполнить:
- Нажмите клавиши Win + R вместе, чтобы открыть диалоговое окно “Выполнить”.
-
Введите %temp% и нажмите “ОК”. Это откроет временную папку.
- Выберите конкретные ненужные папки и временные файлы или выделите все элементы, одновременно нажав клавиши Ctrl + A.
-
Нажмите клавишу “Удалить” и выберите “Да” при появлении запроса. Если в окне использования появится папка, просто нажмите Пропустить, чтобы продолжить удаление выбранных временных файлов.
Удаленные временные файлы отправятся в корзину. Если вы хотите удалить их безвозвратно, перейдите в корзину и очистите ее.
Способ 2: Удалите временные файлы в Windows 10/11 из настроек
Другой способ вручную удалить временные файлы из Windows — это перейти к хранилищу через настройки. Вот как удалить временные файлы в Windows 10/11 из настроек:
-
Откройте настройки Windows 10, нажав клавиши Win + I , и перейдите в раздел «Система».
- Выберите “Хранилище” на левой панели.
-
В разделе “Локальный диск” (C:) выберите «Временные файлы». Если вы не можете увидеть этот параметр, возможно, они скрыты. Итак, выберите “Показать больше категорий”.
-
Вы увидите список временных файлов, которые вы можете удалить. Выберите все временные файлы, которые вы хотите удалить, и нажмите “Удалить файлы”.
Теперь ваш ПК с Windows начнет удалять выбранные временные файлы.
Способ 3: Автоматическое удаление временных файлов Windows 10/11 путем активации Storage Sense
Если вы не хотите удалять временные файлы Windows 10 вручную, вы можете использовать функцию Storage Sense, чтобы удалять их автоматически и с заданной периодичностью. Вот как автоматически удалить временные файлы в Windows 10, активировав Storage Sense:
- Нажмите клавиши Win + I, чтобы открыть настройки.
- Перейдите в раздел «Система» > «Хранилище(Storage)».
-
В разделе Хранилище нажмите на “Настроить Storage Sense или запустите его сейчас”.
-
Включите функцию Storage Sense. Затем установите флажок рядом с опцией “Удалить временные файлы, которые не используются моими приложениями”.
Примечание: Вы также можете запланировать очистку диска и указать, хотите ли вы удалять временные файлы из корзины и папки загрузок по мере необходимости.
- После настройки параметров очистки по требованию нажмите “Очистить сейчас” внизу, Storage Sense начнет освобождать место, удаляя большинство временных файлов, которые оставались в корзине более 30 дней.
Способ 4: Удалите временные файлы в Windows 10/11 с помощью очистки диска
Если на диске не хватает места, вы также можете воспользоваться встроенной утилитой Windows — Очистка диска для сканирования и удаления временных файлов, которые больше не нужны. Давайте посмотрим, как очистить временные файлы в Windows 10 с помощью очистки диска:
-
Нажмите клавиши Win+ E, чтобы запустить “Проводник файлов”. Затем выберите “Этот компьютер”.
-
Щелкните правой кнопкой мыши на жестком диске и затем выберите “Свойства”.
-
На вкладке “Общие” нажмите «Очистка диска».
-
В разделе Файлы для удаления выберите файлы или папки, которые вы хотите удалить. В качестве альтернативы вы можете выбрать “Очистить системные файлы”, очистка диска подсчитает, сколько места система может безопасно освободить.
-
Нажмите “ОК”. Дождитесь окончания уборки, и все будет в порядке.
Способ 5: Используйте командную строку для удаления временных файлов Windows 10/11
Вы также можете использовать командную строку Windows для удаления временных файлов из вашей Windows. Вот как удалить временные файлы в Windows 10 с помощью CMD:
- Нажмите клавиши Win + S и введите “CMD” в появившейся строке поиска.
-
В списке результатов щелкните правой кнопкой мыши командную строку и выберите опцию Запуск от имени администратора.
-
Появятся окна командной строки. Введите команду “del /q/f/s %TEMP%\*” и затем нажмите Enter.
- Как только команда будет запущена, вы увидите строки кода, которые указывают на то, что временные файлы были удалены из папки Temp.
Бонусный совет: Как восстановить удаленные временные файлы в Windows 10/11
Иногда при удалении ненужных временных файлов пользователи могут также удалить некоторые временные файлы, которые необходимы приложениям. Если это случилось с вами, вы можете легко восстановить их с помощью стороннего программного обеспечения, такого как Tenorshare 4DDiG Windows Data Recovery. Это универсальное решение для восстановления удаленных, потерянных, скрытых и поврежденных файлов с внешних и внутренних устройств хранения. Вот что еще предлагает 4DDiG:
- Восстанавливает более 1000 типов файлов, включая фотографии, аудио, видео и документы.
- Восстанавливает данные с жестких дисков, USB-накопителей, корзины, SD-карт и цифровых камер.
- Восстанавливает удаленные данные с потерянных разделов, при сбоях системы и вирусных атаках.
- Удобный для пользователя и простой в навигации интерфейс.
- Поддерживает все старые и новые версии ОС Windows.
Вот как вы можете использовать 4DDiG для восстановления ваших удаленных временных файлов:
- Выберите локальный диск
- Просканируйте локальный диск
- Предварительный просмотр и восстановление удаленных временных файлов
Скачайте и установите инструмент 4DDiG на свой компьютер. Запустите инструмент и выберите диск, с которого вы удалили временные файлы.
Нажмите кнопку “Начать». Инструмент будет искать случайно удаленные файлы. Вы также можете указать тип целевого файла в правом верхнем углу.
Как только сканирование начнется, вы можете приостановить или остановите его, чтобы просмотреть нужные файлы. Нажмите “Восстановить” после того, как вы определили свои целевые временные файлы.
Сохраните восстановленные временные файлы в безопасном месте на вашем компьютере, и вы готовы к работе.
Часто задаваемые вопросы о временных файлах в Windows 10/11
Вопрос 1: Почему я должен удалять временные файлы?
Со временем временные файлы занимают место на диске и могут привести к системным ошибкам и зависанию. Таким образом, необходимо удалить избыточные временные файлы, чтобы избежать различных проблем, вызванных поврежденными или зараженными файлами, хранящимися на вашем компьютере, и повысить производительность системы.
Вопрос 2: Безопасно ли удалять временные файлы?
Да, удалять ненужные временные файлы совершенно безопасно. Временные файлы создаются для хранения временной информации, чтобы задача могла быть выполнена плавно во время ее выполнения. И их не нужно постоянно хранить на вашем компьютере. Но имейте в виду, что не удаляйте их, когда они запущены, потому что это может привести к программным ошибкам.
Вопрос 3: Когда вам нужно удалить временные файлы?
Когда у вас заканчивается место для хранения, самое время удалить все или некоторые временные файлы, чтобы освободить место для других файлов и данных и ускорить работу вашего компьютера.
Вывод
Надеемся, мы ответили на ваш запрос “Как удалить временные файлы в Windows 10”, используя пять проверенных методов. Временные файлы необходимо удалить, поскольку они замедляют работу системы, а также занимают много места на диске. Удаление их поможет вам повысить производительность вашей системы.
Однако, если вы случайно удалили какие-то важные данные вместе с временными файлами, вы можете легко восстановить их с помощью программного обеспечения для восстановления данных Tenorshare 4DDiG. Это ваш незаменимый инструмент и лучший вариант для восстановления случайно удаленных файлов со всех видов устройств хранения. Восстановите ваши файлы прямо сейчас всего за три клика!
Tenorshare 4DDiG Data Recovery
4DDiG — это ваш непревзойденный выбор для восстановления всех потерянных данных на компьютере Windows / Mac после различных сценариев потери, таких как удаление, форматирование, RAW и т.д. с более высокой вероятностью успеха.
Скачать Бесплатно
Скачать Бесплатно
Купить Сейчас
Купить Сейчас
Как вы удаляете временные файлы? Вручную запускаете CCleaner или аналогичную программу, либо настроили ее запуск по расписанию? Я обхожусь встроенными средствами Windows, причем все сводится буквально к одной команде. Я хочу поделиться с вами двумя скриптами, которые давно служат мне верой и правдой для удаления ненужных файлов.
В Windows есть утилита для очистки диска, которую можно настроить для удаления заданных категорий файлов по расписанию. Она легко справится с очисткой временных файлов из расположений, известных системе, но не позволит удалять ненужные файлы из заданной вами папки. С помощью скриптов можно очищать не только временные файлы, но и любую папку. Например, я удаляю файлы из папок Test и Temp, которые служат для экспериментов и временного хранения файлов как в загрузках, так и документах.
В отличие от программных чистильщиков, скрипты можно гибко настроить, а регулярность выполнения очистки легко реализовать с помощью планировщика заданий Windows.
Эти скрипты позволяют удалять только файлы заданного «возраста» вместо полной очистки папки.
В статье вы найдете примеры скриптов и рассказ о том, как настроить задачу в планировщике одной командой. Вы также сможете скачать готовые файлы и создать задание для очистки папок за пару минут.
Скрипты
Вы можете воспользоваться на выбор скриптами CMD, VBS и PowerShell.
CMD
Можно использовать утилиту командной строки forfiles.exe, входящую в состав Windows 7 и новее (когда-то она входила в Windows 2000 Resource Kit). Одной командой удаляются все файлы из указанной папки и вложенных в нее.
Команда для выполнения
forfiles.exe /p %temp% /s /m *.* /d -14 /c "cmd /c del /q /f @file"
- Вместо %temp% (временной папки в профиле) подставьте свою папку (параметр /p)
- Возраст файлов по умолчанию 14 дней (параметр /d), но вы можете задать любое значение
- Можно удалять файлы определенного расширения по маске (например, /m *.log)
- За рекурсивное удаление (во вложенных папках) отвечает параметр /s
Конечно, в скрипте вы можете использовать несколько команд, каждая из которых будет удалять заданную папку. Справка по использованию утилиты вызывается командой forfiles /?.
VBS
Приведенный ниже скрипт VBS удаляет все файлы и папки, включая защищенные, с выводом списка удаленных файлов.
On Error Resume Next
intDays = Int(Wscript.arguments.Item(0))
strFldr = Wscript.arguments.Item(1)

Set objFSO = CreateObject("Scripting.FileSystemObject")
DelOld strFldr, intDays

Function DelOld(sFldr, iDays)
On Error Resume Next
   Dim oD, cF, cD, oI

   Set oD = objFSO.GetFolder(sFldr)
   Set cF = oD.Files
   Set cD = oD.SubFolders

   For Each oI In cF
      If DateDiff("d", oI.DateLastModified, Now) > iDays Then
         WScript.Echo oI.Path
         oI.Attributes = 0
         oI.Delete
      End If
   Next

   For Each oI In cD
      DelOld oI.Path, iDays
      If oI.Size = 0 Then
         oI.Attributes = 0
         oI.Delete
      End If
   Next
End Function
- Файлы удаляются по дате изменения. Чтобы удалять по дате создания, замените .DateLastModified на .DateCreated
- Если не хотите удалять защищенные файлы, закомментируйте строку
‘ oI.Attributes = 0
Команда для выполнения
Скрипт можно запускать из командного файла (CMD).
cscript //Nologo MyCleanUp.VBS 14 %windir%\temp >MyCleanupScript.Log
- Вместо %windir%\temp подставьте свою папку (в этом примере удаляются файлы из временной папки в системном каталоге)
- Возраст файлов по умолчанию 14 дней, но вы можете задать любое значение
- Список удаленных файлов будет по умолчанию сохранен в файле %windir%\system32\MyCleanupScript.Log, хотя можно указать любой путь и имя файла
Как и в случае с утилитой forefiles.exe, можно реализовать очистку различных папок, указав каждую в отдельной команде.
PowerShell
Скрипт на PowerShell был в блоге Сергея Мариничева в рамках урока об операциях с файлами, но теперь страница доступна только в архиве интернета. Я скопировал ключевое содержимое для вас:
#из заданной папки удалять все файлы и папки старше 14 дней
$Path = "C:\temp"
$Days = "-14"
$CurrentDate = Get-Date
$OldDate = $CurrentDate.AddDays($Days)
Get-ChildItem $Path -Recurse | Where-Object { $_.LastWriteTime -lt $OldDate } | Remove-Item
Запуск скрипта:
powershell.exe -ExecutionPolicy Bypass -noprofile -file Script.ps1
Выполнение очистки по расписанию
Для выполнения очистки папки по расписанию нужно создать скрипт с именем cleanup.cmd, содержащий команду для запуска, и скопировать его в любую папку из PATH (например, %windir%\system32). Поместите туда же скрипт VBS или PowerShell, если вы решили использовать его, а не утилиту forfiles.ехе.
Задание в планировщике создается одной командой:
Schtasks.exe /Create /RL Highest /TN CleanUP /SC Weekly /D SUN /ST 14:00 /TR "%WINDIR%\system32\cleanup.cmd"
Задание с именем CleanUp будет выполняться:
- с наивысшими правами (параметр /RL)
- раз в неделю (параметр /SC)
- по воскресеньям (параметр /D)
- в 14:00 (параметр /ST)
Откройте Пуск – Поиск – Планировщик заданий и вы увидите в библиотеке планировщика задание CleanUp.

Увеличить рисунок
Можете проверить работу задания в планировщике. Для этого щелкните правой кнопкой мыши по заданию и выберите Выполнить.
Готовые файлы
Загрузите архив и распакуйте в любую папку. В архиве варианты forfiles и VBS.
- Задайте путь к папке и возраст файлов в скрипте CleanUp.cmd в одной из папок (каждая соответствует одному из описанных выше способов), после чего скопируйте все содержимое папки в %windir%\system32.
- Щелкните правой кнопкой мыши на файле schedule.cmd и выберите Запуск от имени администратора, чтобы создать задание.
Благодарности
Авторами скриптов, которые я когда-то почерпнул из этой темы конференции OSZone, являются Keeper2006 и amel27 соответственно. В этой же теме вы найдете другие интересные варианты решения данной задачи, и туда же следует направлять вопросы по доработке скриптов под свои нужды.
А как вы избавляетесь от ненужных файлов – программой или скриптом? Настроена ли у вас очистка по расписанию?