
Несмотря на то, что Shadow копии удаляются системой, в соответствии с настройкой службы Volume Shadow Copy Service (VSS), иногда, возникает необходимость удалить их вручную.
Давайте посмотрим, как удалить Shadow копии для определенного диска.
Ниже покажу примеры использования и командную строку
Синтакс
vssadmin delete shadows /for=<ForVolumeSpec> [/oldest | /all | /shadow=<ShadowID>] [/quiet]
Параметры
| Параметр | Описание |
| /for=<ForVolumeSpec> | Указывает диск на котором будет удалена Shadow копия |
| /oldest | Удаляет только старые копии |
| /all | Удаляет все Shadow копии для указанного диска |
| /shadow=<ShadowID> | Удаляет shadow копию по указанному ShadowID. Чтобы получить идентификаторы всех shadow копий, можно использовать команду
Когда набираете идентификатор shadow копии, используйте следующий формат. Каждый Х означает шестнадцатеричный символ. XXXXXXXX-XXXX-XXXX-XXXX-XXXXXXXXXXXX |
| /quiet | «Тихий» режим. При выполнении команды никакая информация выводится на экран не будет |
Замечание
- Вы можете удалить только те Shadow копии, которые вам доступны.
Примеры:
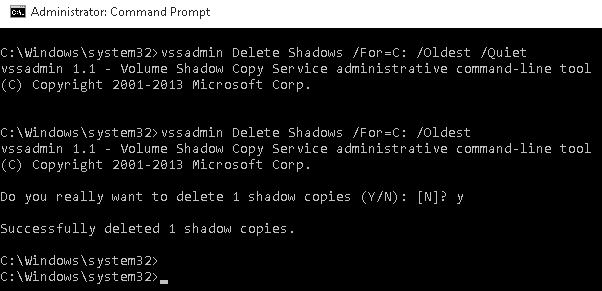
Чтобы удалить старые shadow копии с диска С, наберите:
vssadmin Delete Shadows /For=C: /Oldest [/Quiet]
Чтобы удалить shadow копию с конкретным ID, наберите:
vssadmin Delete Shadows /Shadow=ShadowId [/Quiet]
Обратите внимание:
- В этом случае диск не указывается
- ShadowID нужно вводить вместе с фигурными скобками
Например:
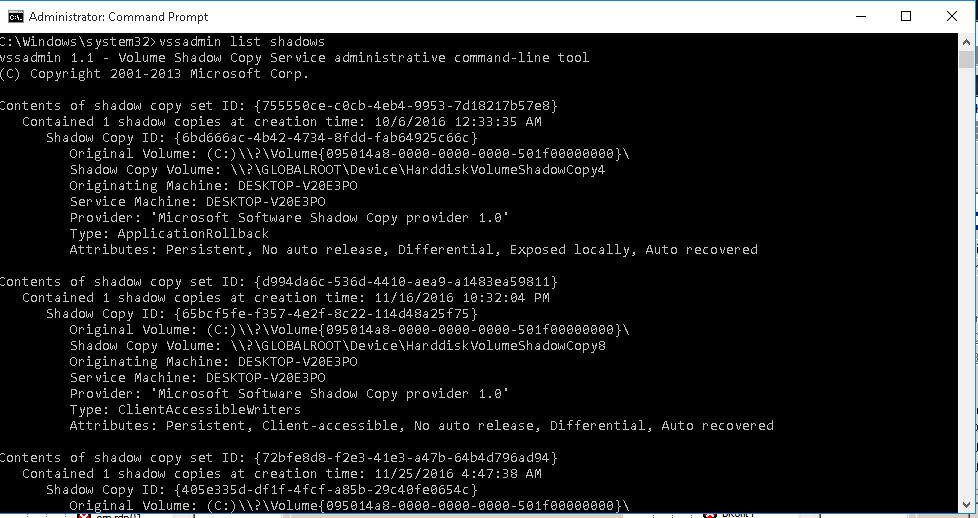
- Определяем ID shadow копии которую хотим удалить
vssadmin list shadowsContents of shadow copy set ID: {7205c3b3-81f9-4485-b594-7c4cb999fcb6}
Contained 1 shadow copies at creation time: 28-Nov-16 23:00:19
Shadow Copy ID: {442e95eb-b6c1-4ceb-a02b-425912cdfae3}
Original Volume: (D:)\\?\Volume{969f87c8-f206-4f9d-ab16-1c702776abdf}\
Shadow Copy Volume: \\?\GLOBALROOT\Device\HarddiskVolumeShadowCopy104
Originating Machine: fileserver.dom.local
Service Machine: fileserver.dom.local
Provider: ‘Microsoft Software Shadow Copy provider 1.0’
Type: ClientAccessible
Attributes: Persistent, Client-accessible, No auto release, No writers
Differential - Удаляем

vssadmin Delete Shadows /Shadow={442e95eb-b6c1-4ceb-a02b-425912cdfae3}
Vssadmin позволяет управлять Shadow копиями из командной строки. Остальные команды можно посмотреть набрав:
C:\Windows\system32> vssadmin /?
vssadmin 1.1 — Volume Shadow Copy Service administrative command-line tool
(C) Copyright 2001-2013 Microsoft Corp.
—- Commands Supported —-
Add ShadowStorage — Add a new volume shadow copy storage association
Create Shadow — Create a new volume shadow copy
Delete Shadows — Delete volume shadow copies
Delete ShadowStorage — Delete volume shadow copy storage associations
List Providers — List registered volume shadow copy providers
List Shadows — List existing volume shadow copies
List ShadowStorage — List volume shadow copy storage associations
List Volumes — List volumes eligible for shadow copies
List Writers — List subscribed volume shadow copy writers
Resize ShadowStorage — Resize a volume shadow copy storage association
Revert Shadow — Revert a volume to a shadow copy
Query Reverts — Query the progress of in-progress revert operations.
Работает на: Windows Server 2003, Windows Server 2008, Windows Server 2003 R2, Windows Server 2008 R2, Windows Server 2012, Windows 8
This post from MiniTool introduces how to delete shadow copies in your Windows 11/10/Server. After deleting them, your PC can obtain more space. Now, refer to this post to delete your shadow copies.
What Is Shadow Copy
Shadow Copy is known as VSS or Volume Snapshot Service. It creates backup copies or snapshots of computer files and volumes, even if they are in use. It is available in Windows XP, Vista, 7, 8, 10, 11, and Windows Server 2003, 2008 (R2), 2012, 2016, 2019, and 2022.
Your shadow copies are usually located on the C:/ partition and stored in the System Volume Information folder.
Why Should You Delete Shadow Copies
Why should delete shadow copies? There are two main reasons:
- Take up a lot of storage space: Excessive volume shadow copies can take up a lot of storage space, which can lead to low disk space, slow computer performance, and even system instability.
- Possess security risks: Volume shadow copies may bring some security risks. For example, attackers may find SAM files in volume shadow copies and read user password hashes, and even use them to log in to remote servers.
How to Delete Shadow Copies on Windows 11/10/Server?
Way 1: Via System Properties
To delete shadow copies on Windows 10/11/Windows Server, you can use System Properties. Here are the steps:
For Windows 11/10
Step 1: Press the Windows + R keys together to open the Run dialogue box.
Step 2: Type SystemPropertiesProtection in the box and press Enter to open the System Properties window.
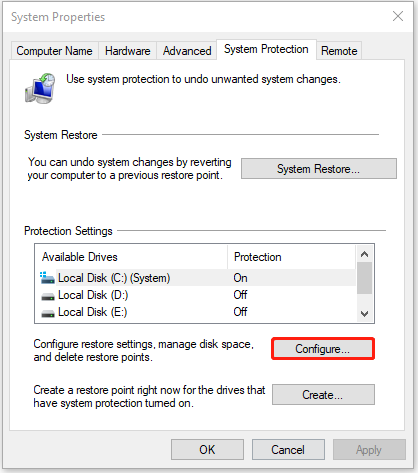
Step 3: Now, you are under the System Protection tab. Click the Configure… button.
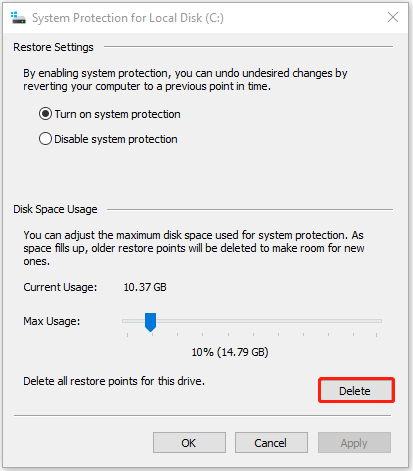
Step 4: Click the Delete button. When you see a warning message, please click the Continue button to delete all shadow copies.
For Windows Server
Step 1: Open File Explorer by pressing the Windows + E keys together.
Step 2: Click This PC and right-click your C drive to choose Configure Shadow Copies….
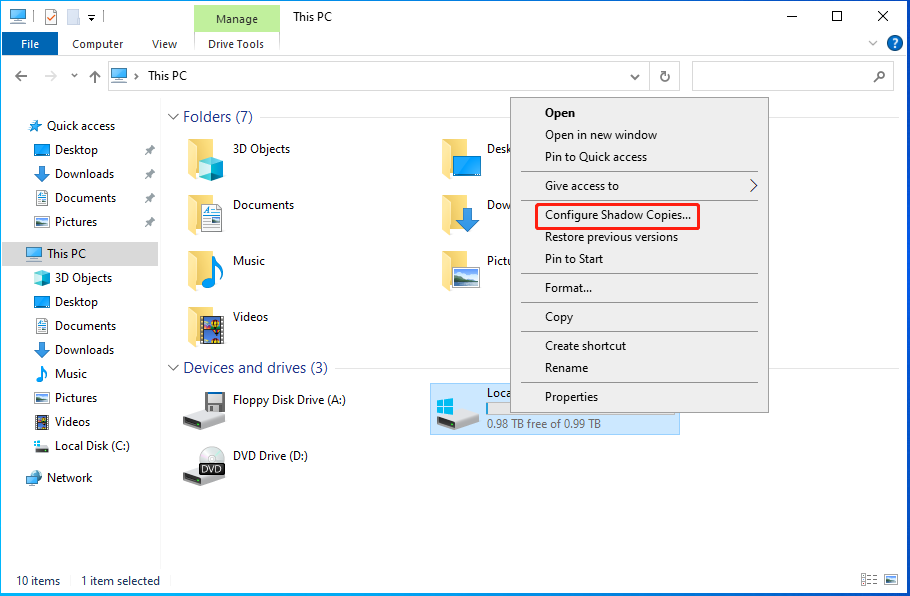
Step 3: Select the shadow copy you want to delete and click the Delete Now button to continue. When you receive a warning message, click Yes to allow it to make changes.
Alt-delete shadow copies on Windows Server
Way 2: Via Disk Cleanup
The method can be applied to Windows 11/10 and Windows Server, that is, delete shadow copies via Disk Cleanup.
Step 1: Type Disk Cleanup in the Search box and click the best-matched result to open it.
Step 2: Choose the drive or partition that you want to delete shadow copies and click OK.
Step 3: Go to the More Options tab. Under the System Restore and Shadow Copies part, click the Clean up… button.
Step 4: When you receive the message, click the Delete button to continue.
Way 3: Via Command Prompt
The vssadmin command can delete all shadow copies or specific shadow copies from a volume. The following provides information about the parameters and meanings of vssadmin.
- /for=: Specifies the volume for which the shadow copy is to be deleted.
- /oldest: Deletes only the oldest shadow copy.
- /all: Deletes all of the shadow copies for the specified volume.
- /shadow=: Deletes the shadow copy specified by ShadowID. To get the shadow copy ID, use the vssadmin list shadows command.
- /quiet: Specifies that the command will not display messages while it is running.
Then, you can remove shadow commands using vssadmin in Command Prompt.
Step 1: Type cmd in the Search box and choose Run as administrator in the right panel.
Step 2: Enter the following command based on your needs.
1. To delete all shadow copies on a specific volume, type the below command and press Enter.
vssadmin delete shadows /for=c: /all
2. To delete a specific shadow copyfrom any volume, type the below command and press Enter.
vssadmin delete shadows /shadow=[Shadow ID].
3. To delete the oldest shadow copy on a specific volume, type the below command and press Enter.
vssadmin delete shadows /for=c: /oldest
Step 3: Type exit and press Enter to exit Command Prompt.
Resize Shadow Storage to Delete
You can also resize shadow storage to delete shadow copies via vssadmin command. This operation will delete all your shadow copies on the specified volume.
Here is the Syntax:
vssadmin resize shadowstorage /for= /on= [/maxsize=]
- ForVolumeSpec: Specifies the volume for which to adjust the maximum amount of storage space.
- OnVolumeSpec: Specifies the volume storage.
- Maxsize: Should be 1MB or larger and accept the following suffixes: KB, MB, GB, TB, PB, and FB. Or you can use percentages with “%” to define. If no suffix is provided, in bytes.
There is how to run this command:
- Type cmd in the Search box and choose Run as administrator in the right panel.
- Then input the command for example:
vssadmin Resize ShadowStorage /For=C: /On=C: /Maxsize=600MB
Way 4: Delete Shadow Copies using PowerShell
How to delete shadow copies on Windows Server/Windows 11? The last method for you is via PowerShell.
Step 1: Type PowerShell in the Search box and choose Run as administrator.
Step 2: To delete shadow copies using PowerShell, type the command: shadowcopy delete /nointeractive.
As the alternative to Windows’ built-in backup utility using Volume Shadow Copy, MiniTool ShadowMaker is worth recommending.
The backup software is an all-in-one data protection and disaster recovery solution for PCs. It is compatible with Windows 7/8/8.1/10/11 and Windows Servers. It allows you to back up your systems, important files, folders, partitions, and even the whole disk. Once a disaster occurs, you can restore data with a copy of the backup.
MiniTool ShadowMaker also lets you create bootable media to restore your system to a normal state when your computer fails to boot. It’s easy to use MiniTool Media Builder and MiniTool PXE Boot Tool to maintain hard drives. You can download MiniTool ShadowMaker Trial to back up the system.
MiniTool ShadowMaker TrialClick to Download100%Clean & Safe
Back up System
Step 1: Launch the software and select Keep Trial on the lower right.
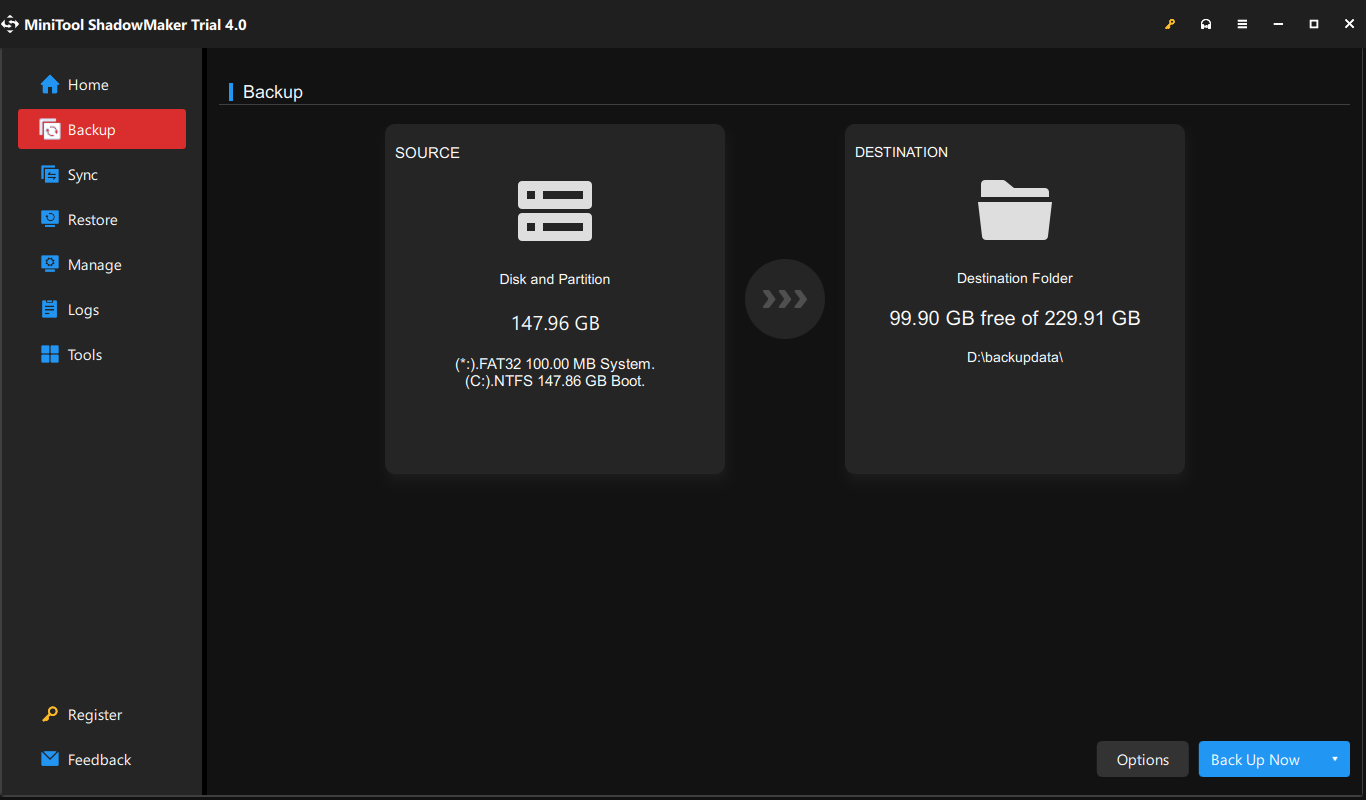
Step 2: On its main interface, switch to the Backup tab.
Step 3: Go to the SOURCE part on the left. Here, your system is selected by default, and you don’t need to choose it.
Step 4: Click the DESTINATION rectangle on the right and select the address where you plan to save the image file in the pop-up window. It’s recommended to choose the external hard drive as the backup destination.
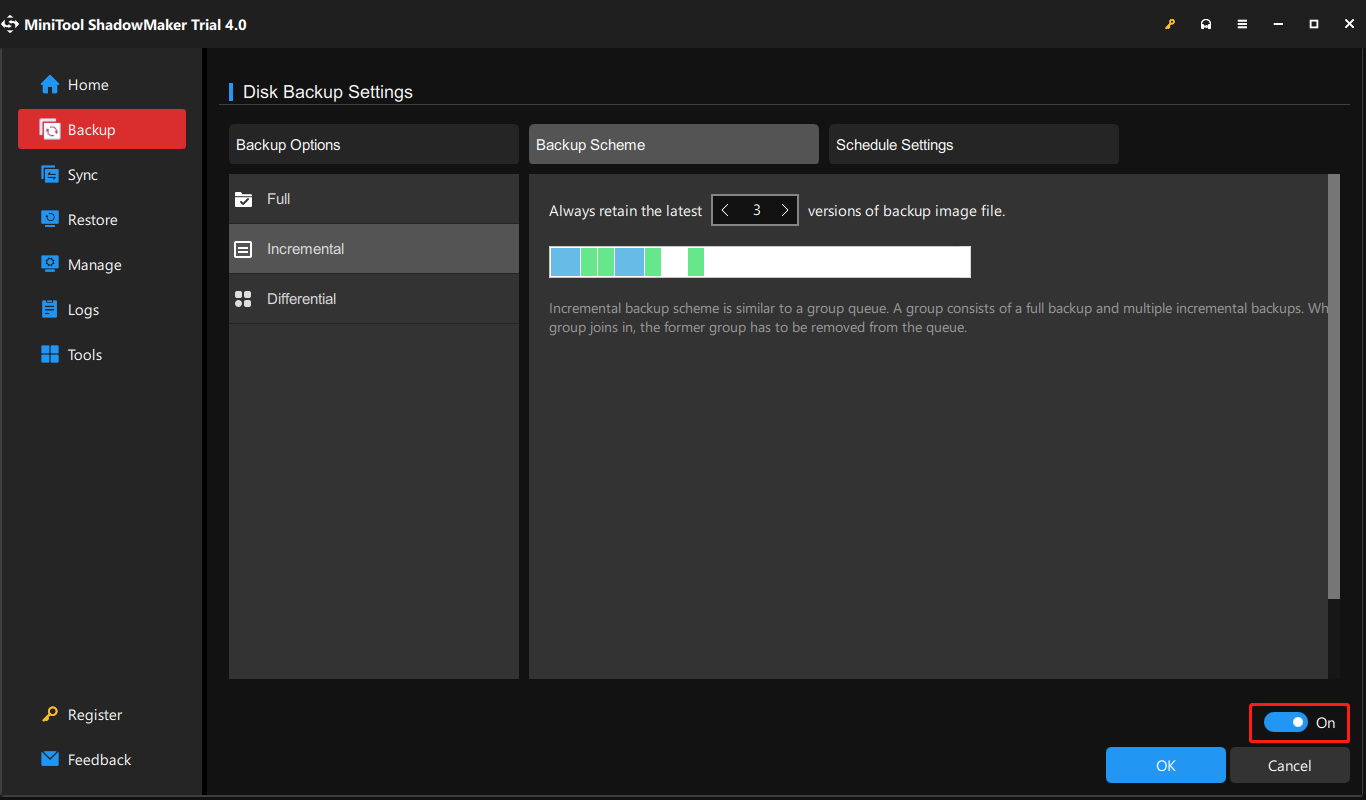
Step 5: Then, on the lower right, click Options > Backup Scheme. It is turned off by default. So, you need to turn it on in the bottom right corner first and then set up your backup type there. You can decide how many backup image versions to keep on your backup destination.
Step 6: When all settings are done, just click Back Up Now in the lower right and it will redirect you to the Manage tab. There, you can view the status of your backup. Just wait until it finishes.
If you already created a full backup, you can set further full, incremental, or differential backup based on it from the Manage section.
Way 1. Click the inverted triangle beside Back Up Now and choose the backup type you prefer.
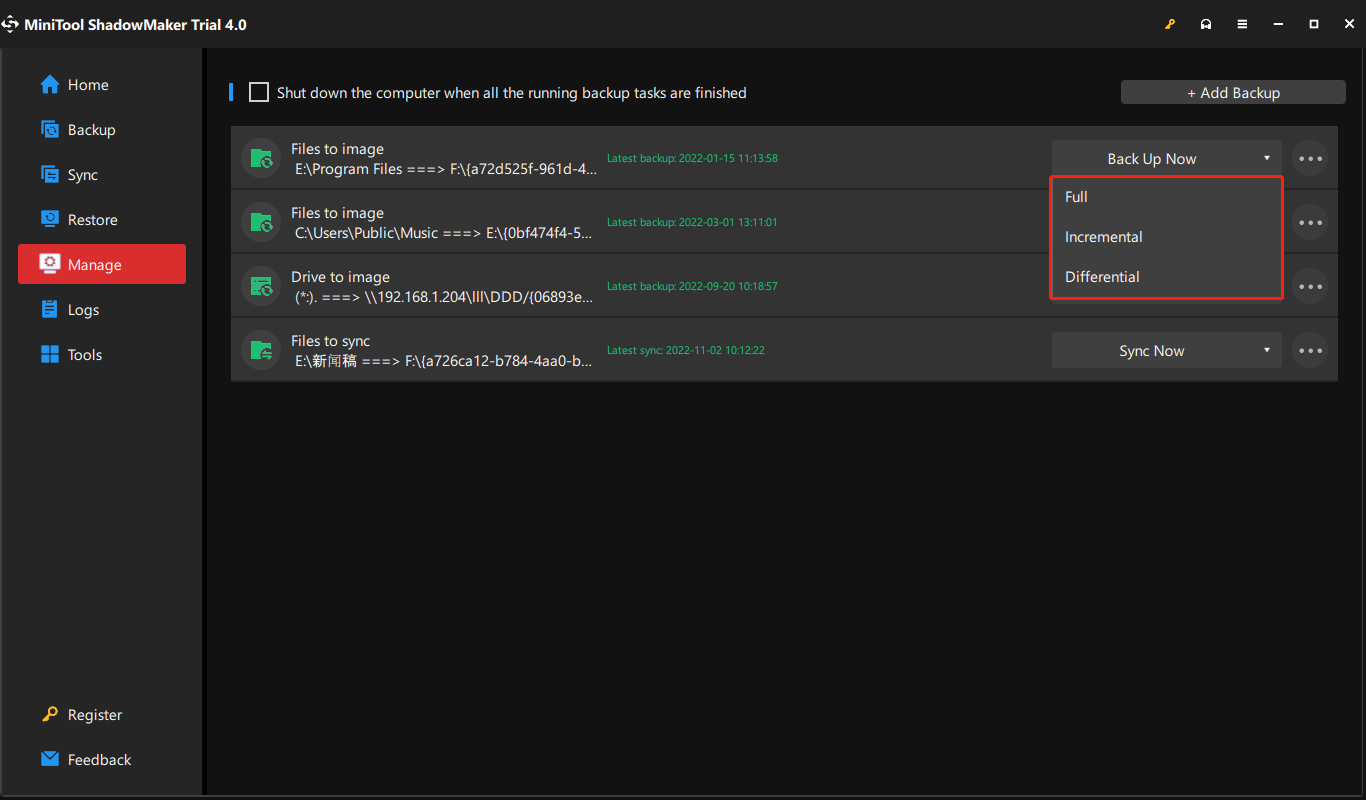
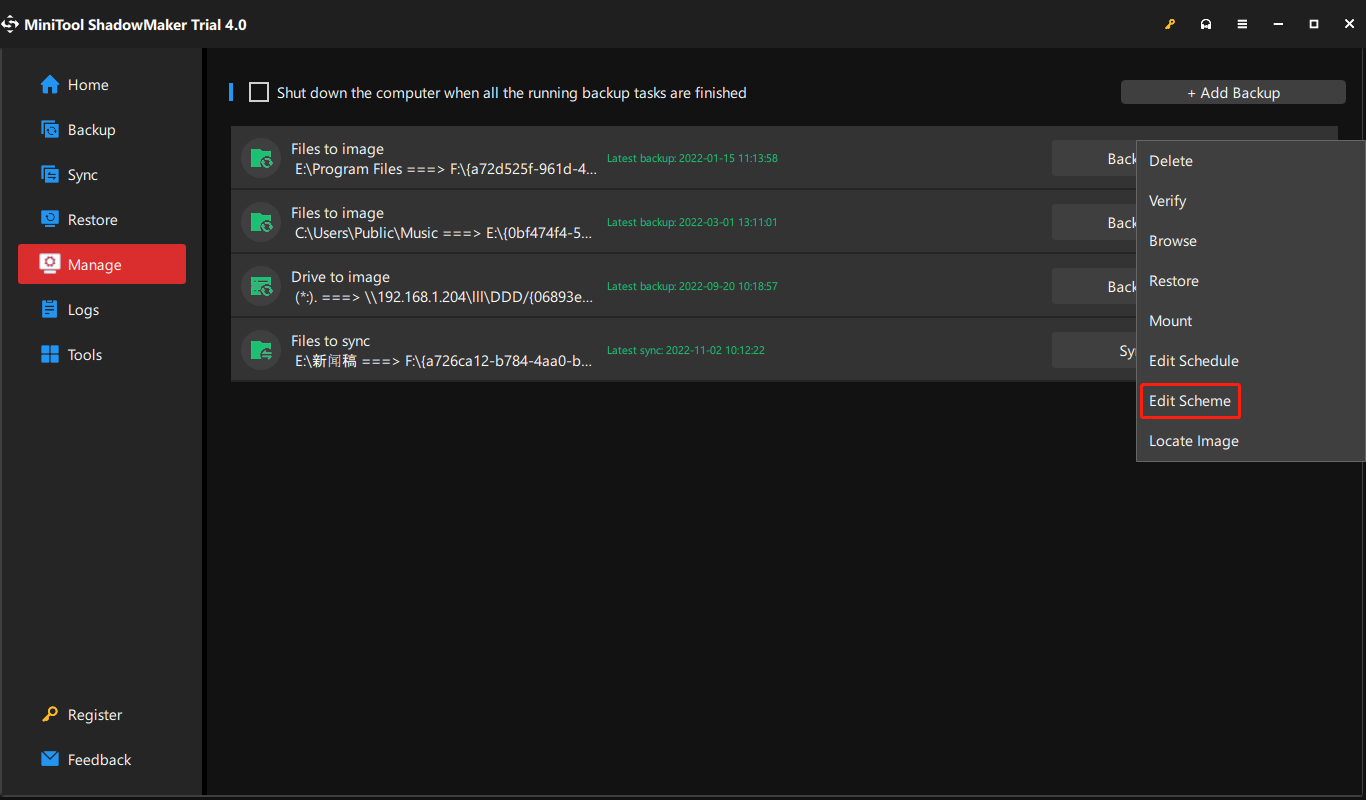
Way 2. Click on the three slashes on the right end of the backup task graphic bar and select Edit Scheme. Then, follow above Step 5 to finish the settings.
Besides different backup types based on how the backup performs, MiniTool ShadowMaker also supports most backup types classified by data types or data carriages listed at the start of this article. Moreover, MiniTool ShadowMaker enables you to set a schedule to automatically back up your important data daily, weekly, monthly, or even on the event (when you log on or log off the computer).
Restore the System from an External Hard Drive
MiniTool ShadowMaker is helpful to restore your computer in case of unexpected disasters. How to do this job?
Tips:
Tip: First of all, please use the Media Builder feature of MiniTool ShadowMaker to create a bootable disc to boot your computer. Then, you can start a system recovery in WinPE.
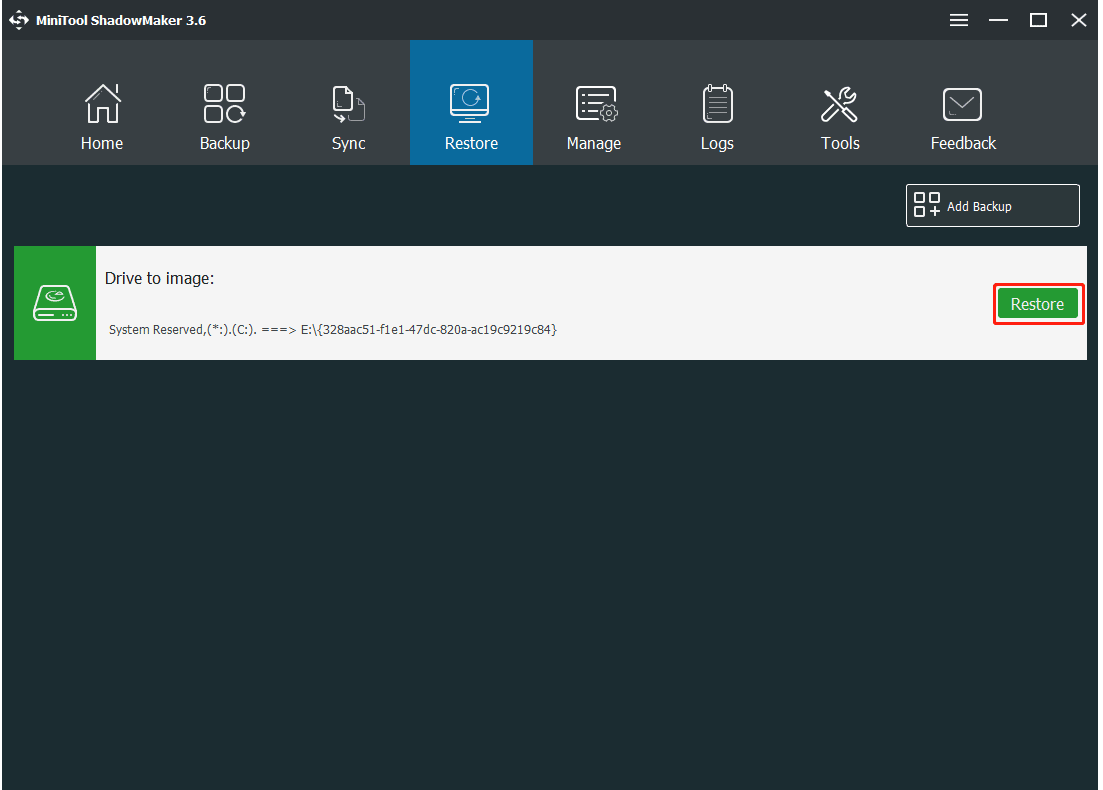
Step 1: In the Restore page, find the system image or system disk image you have created and click the Restore button.
Step 2: The backup time will be shown, choose the backup version and click Next to continue.
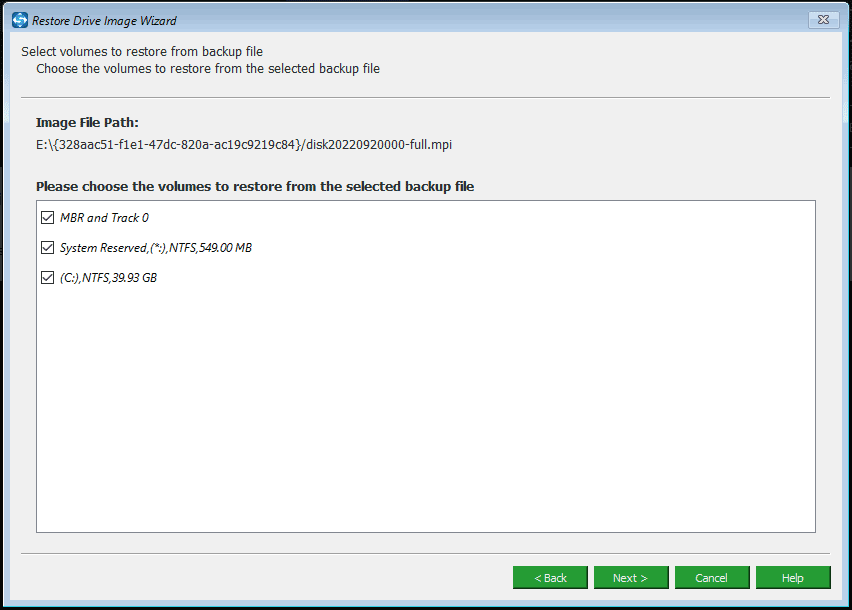
Step 3: Next, choose all system partitions as well as MBR and Track 0 to restore. The MBR and Track 0 option is essential for the restore, otherwise, the system will fail to boot after restoration. Therefore, please be sure to check it.
Step 4: Choose the disk you want to restore the image file to and this freeware will tell you the drives that will be overwritten during restoration. Click OK to the next step.
Step 5: Now the software is performing the system image recovery process. After the operation, restart your computer and it can run properly.
Bottom Line
To sum up, this article has shown you how to delete shadow copies to free up space in your Windows 11/10/Server. It also told you how to perform a backup to keep your system and data safe with MiniTool ShadowMaker.If you encounter any question or have any suggestion, feel free to contact us via [email protected].
How to Delete Shadow Copies FAQ
Does shadow copy take up space?
Windows uses the Volume Shadow Copy service to make a copy of the hard drive for restoration from System Restore. Sometimes this takes up too much space, especially with small hard drives, so you may want to reduce the disk space used by shadow copy storage.
How do Windows shadow copies work?
A shadow copy is a snapshot of a volume that replicates all data held on that volume at a well-defined moment in time. VSS identifies each shadow copy by a persistent GUID. A shadow copy set is a collection of shadow copies of various volumes taken simultaneously.
What is the difference between Restore Point and Shadow Copy?
Any data not transferred to the disk will be lost when the snapshot is taken. However, when you use a restore point, you’re not making a new copy of the disc in question; instead, you’re instructing Windows to start recording changes to it and backing up the original so you can go back to it if something goes wrong.
If the VSS writers employed during a backup or replication snapshot process do not finish the shadow copy creation or deletion tasks before/after a snapshot is taken, corrupt shadow copies may be left behind on the source machine(s). These corrupt shadow copies cannot be deleted by issuing the «vssadmin delete shadows /all» command. Instead, you receive the error:
- «Error: Snapshots were found, but they were outside of your allowed context. Try removing them with the backup application which created them.»
Solution
Launch an elevated command prompt on the Agent machine(s) involved and type the following:
diskshadow <enter>

list shadows all <enter>

delete shadows set  {id of shadow to be deleted if selective deletion is to be performed}<enter>
OR
delete shadows all {if all shadows are to be deleted}.
This will delete the corrupted shadow copies.
Was this article helpful?
That’s Great!
Thank you for your feedback
Sorry! We couldn’t be helpful
Thank you for your feedback
Feedback sent
We appreciate your effort and will try to fix the article
A client uses Windows Server Backup to back up a small Hyper-V server running Windows Server 2008 R2. Today free space on the backup drive F: dropped below 100GB of 698GB, triggering a 15% monitoring threshold. Some quick notes on what I did.
Research
Review this Microsoft blog post:
Backup Version and Space Management in Windows Server Backup
List shadow copies:
wbadmin get versions -backupTarget:f:

vssadmin list shadows /for=f:
Delete Old Shadow Copies
Delete 5 oldest shadow copies on the target volume:
diskshadow

delete shadows oldest f:

delete shadows oldest f:

delete shadows oldest f:

delete shadows oldest f:

delete shadows oldest f:
That freed up about 4.5GB per shadow copy, so now 122GB free (17%), 175GB in shadow copies. I could delete more—there must be 20 left.
No System State Backups to Delete
Tried this command to delete system state backups:
wbadmin delete systemstatebackup -deleteOldest
Got this message:
Enumerating system state backups...

ERROR - No system state backups were found.

This command can be used to delete backups that only contain the system state.
So apparently that’s only needed if you’re doing separate system state backups. I do system state backups together with other backups.
Update November 17, 2012
About three hours after I did the above, free disk space fell under 15% again. By the next morning, it was 97.7GB free and 199GB in shadow copies. What? How did I drop from 122GB free to 97.7GB free in a matter of hours? I did delete the shadows while a backup was running, but should that matter? Does Windows Server Backup just use as much space as possible? I just deleted another five shadow copies, this time with no backup running, and I’m back to 126GB free and 171GB in shadow copies. We’ll see what happens.
Update November 19, 2012
Two days and two backups later, the F: drive is showing 115GB (16.5%) free and 187GB in shadow copies. Better.
Update January 17, 2013
2012 Essentials Issues and References
I’m having similar issues with Windows Server Backup (WSB) on Server Essentials 2012. I had a backup fail for lack of disk space, even though 61 backups were available. I had to manually delete old shadow copies to get the backup running again. More research and forum posts have turned up some additional information.
The Windows Server Backup Overview on TechNet says, “Windows Server Backup does not require user intervention to periodically delete older backups to free up disk space for newer backups—older backups are deleted automatically.” Unfortunately, that is not always the case.
Windows Server Backup automatic disk usage management, also on TechNet, explains how the auto-delete works, why it sometimes doesn’t delete enough, and why backups fail. Basically WSB always leaves 1/8 of the backup volume allocated to shadow copies, which is how it stores previous backups. If that doesn’t leave enough space for the backup (which, I’ve discovered, is not compressed), the backup fails.
Update February 26, 2013
Configure Shadow Copies
I’m trying a different approach for maintaining free space on a dedicated backup volume: Configure Shadow Copies.
- In Disk Management, assign a drive letter to the backup drive. You probably did this already if you’ve been using wbadmin or vssadmin as described above.
- In Windows Explorer, right-click on the drive and select Configure Shadow Copies.
- In the Shadow Copies dialog, make sure the drive is highlighted. The Next Run Time should show Disabled. Click on Settings.
- Change Maximum Size from No limit to Use limit and set the value to leave about 15% of the drive free. For example, if a 100GB drive has become full using 40GB of shadow copy space, reduce the shadow copy space to a fixed 25GB to leave 15GB free.
I’ve had that set for a few days and it does seem to be maintaining 15% free space without my having to manually delete backups.
Caution I have not seen this method recommended anywhere so I can’t promise that it’s a safe approach to managing backup space. Use at your own risk!
Update April 14, 2016
To configure shadow copies on a desktop computer, you can select Control Panel > System, open System Protection, select the target drive, then click the Configure button. You’ll want to leave Restore Settings off for the backup target, but you can still adjust maximum Disk Space Usage for shadow copies on that drive.
This article mentions a couple more helpful vssadmin commands for doing the same thing. This should work on a desktop (if it’s a Pro version of Windows) or a server.
List shadow storage in use on all drives:
vssadmin list shadowstorage
Change shadow storage on one drive:
vssadmin resize shadowstorage /on=F: /for=F: /maxsize=25%
После появления предупреждение о нехватке места на диске всплывает в Windows 2008 server, это означает, что системный диск C заполнен и на нем недостаточно свободного места. В этой ситуации вам лучше попытаться решить эту проблему как можно быстрее, потому что операционная система сразу же начинает работать намного медленнее. Это может привести к неожиданной перезагрузке сервера, сбою системы или потере данных. Для решения этой проблемы наиболее важны 2 шага – освободить место на диске и расширить диск C как можно больше.
Освободить дисковое пространство в Windows Server 2008 R2 легко, и существует множество способов, здесь я расскажу о 6 наиболее распространенных способах.
1. Удалите временные файлы, чтобы освободить место на диске
Нажмите Начните > Run, ввод «% Temp%»Или шаг за шагом открыть каталог« C: \ Users \ Administrator \ AppData \ Local \ Temp »
2. Удалите старые теневые копии.
Откройте «Мой компьютер», щелкните правой кнопкой мыши диск C, выберите НЕДВИЖИМОСТИ
, перейдите на вкладку «Теневые копии», удалите старые тома.
3. Очистите корзину и уменьшите размер диска
Очистите корзину, чтобы удалить неиспользуемые файлы, но перед этим вам лучше еще раз проверить, можно ли удалить эти файлы навсегда.
Чтобы уменьшить размер использования диска корзины:
Щелкните правой кнопкой мыши Корзина> НЕДВИЖИМОСТИ
Вы можете легко настроить размер.
4. Очистите или уменьшите использование диска в веб-браузерах для кэшированных файлов.
Каждый веб-браузер имеет область настроек или опций для настройки временных интернет-файлов и использования кэша.
5. Удалить старые вещи
Просто зайдите в «Установка и удаление программ» или «Программы и компоненты» и приведите в порядок. Скорее всего, там куча старого дерьма, занимающего место.
6. Запустите утилиту очистки диска Windows.
Чтобы освободить место на диске в Windows Server 2008 r2, лучший вариант — запустить Очистка диска который является родным инструментом Windows. Он может быстро и безопасно удалить большую часть нежелательных и ненужных файлов с вашего сервера. Конечно, вы можете использовать стороннее программное обеспечение для оптимизации системы, но, на мой взгляд, Disk Cleanup достаточно для выполнения этой задачи.
Действия по освобождению дискового пространства в Windows Server 2008 R2 с помощью очистки диска:
- Нажмите Начните -> Выполнить -> введите cleanmgr -> нажмите Enter.
- Выберите диск C: и нажмите ОК.
- Установите флажки напротив файлов, которые вы хотите удалить.
- Подтвердите эту операцию.
- Повторите шаг 1 и нажмите Очистить системный файл на шаге 3.
Если не удается освободить более 20 ГБ свободного места, диск C может снова заполниться через короткое время, поскольку новые ненужные файлы создаются постоянно. Чтобы полностью решить эту проблему, вам лучше продолжить следующие шаги:
- Устанавливать программы в отдельный раздел, не закидывать все на диск C.
- Измените путь загрузки и кэширования приложений по умолчанию.
- Если вы включаете точку резервного копирования и восстановления Windows, не устанавливайте ее слишком большой.
- Регулярно удаляйте кэши и временные файлы с помощью утилиты очистки Windows.
- Добавьте свободное место из другого раздела и расширьте диск C: как можно больше.
Разверните диск C как можно больше
к расширить диск C в Windows Server 2008 r2, вам лучше сделать резервную копию заранее и запустить программу безопасного раздела диска. Лучше, чем другие инструменты, NIUBI Partition Editor имеет уникальные технологии 1-Second Rollback, Virtual Mode, Cancel-at-well и Hot Clone для защиты системы и данных. Чтобы изменить размер раздела и расширить диск C, вам просто нужно перетащить его на карту диска. После этого все (кроме размера раздела) останется таким же, как и прежде.
Как увеличить место на диске C в Windows Server 2008 R2:
Помимо изменения размера раздела и расширения диска C, NIUBI Partition Editor поможет вам сделать много других операций управления разделами диска.
Скачать