
Выражаю свою большую благодарность ival за помощь и корректировку направления моих мыслей
Ранее, в процессе решения данного вопроса, на просторах сети наткнулся на очень любопытную статью:
«Автоматическое удаление старых файлов [скрипт PowerShell]»
https://www.mytechnote.ru/article/avtomaticheskoe-udalenie-staryh-faylov-skript-powershell
Там автор еще более изящно чистит файлы и папки, учитывая их возраст (дату создания).
Может кому-то в будущем будет в самый раз, например, для чистки определённых папок на терминальном сервере.
С позволения уважаемой администрации форума приведу содержимое всего PS-скрипта и пояснения автора тут (вдруг исчезнет та статься) с уже внесенной моей поправкой на пути к папкам, которые будем чистить — «C:\Windows\Temp\» и «C:\Users\имя_текущего_пользователя\Appdata\Local\Temp» (в скрипте это выглядит как «$env:temp\»)
В этом блоке указываем количество дней (в данном случае это – 7 дней), файлы старше которых должны быть удалены, задаем путь до очищаемой папки/папок (пути к нужным папкам пишутся в кавычках и разделяются между собой запятой + пробел) и желаемые расширения файлов.
Если вам нужно удалять определенные типы файлов, например можно задать «*.js» — тогда будут удалены все старые JavaScript файлы.
$Days = "7"
$TargetFolder = "C:\Windows\Temp\", "$env:temp\"
$Extension = "*"
В следующем участке мы находим все файлы, которые подходят под наши критерии. А также сортируем список, что бы всё шло от большего пути к меньшему. Это нужно, если у вас будут вложенные папки, что бы скрипт всегда сперва удалял файлы, а потом уже пытался удалить папку, где расположены эти папки.
$LastWrite = $Now.AddDays(-$Days)
$Files = Get-Childitem $TargetFolder -Include $Extension -Recurse | Where{$_.CreationTime -le "$LastWrite" -and $_.LastWriteTime -le "$LastWrite"} | Sort-Object -Descending {$_.FullName.Split('\').Count},FullName
Собственно, удаляем файл.
foreach ($File in $Files)
{
 if ($File -ne $NULL -and !$File.PSIsContainer)
 {
  write-host "Deleting File $File" -ForegroundColor "Magenta"
  Remove-Item $File.FullName -Force | out-null
 }
Тут мы удаляем папку, но перед ее удалением, проверяем, что бы она была пустая.
elseif ($File -ne $NULL -and $File.PSIsContainer)
 {
                               $FolderInfo = get-Childitem $File.FullName | Measure-Object
                               if ($folderInfo.count -eq 0)
                               {
                                               write-host "Deleting directory - $File" -foregroundcolor "green"
                                               Remove-Item $File.FullName -Force | out-null
                               }
 }
По сути, это повторение уже проделанной операции. Но тут мы проходимся по всем папкам, ищем пустые папки и удаляем их.
$folderInfo=""
 $Folders = Get-Childitem $TargetFolder -Recurse | Where{$_.PSIsContainer} | Sort-Object -Descending {$_.FullName.Split('\').Count},FullName
 foreach ($Folder in $Folders)
 {
                if ($Folder -ne $null)
                {
                               $FolderInfo = get-Childitem $Folder.FullName | Measure-Object
                               if ($folderInfo.count -eq 0)
                               {
                                               write-host "Deleting directory - $Folder" -foregroundcolor "yellow"
                                               Remove-Item $Folder.FullName -force | out-null
                               }
                }
 }
Работоспособность указанного скрипта проверено лично мной. Со своей задачей он справляется без проблем.
Также в архиве «delete-old-files.zip», прикрепленном к этому сообщению, находится уже модифицированный PS-скрипт для чистки указанных выше папок:
«C:\Windows\Temp\» и «C:\Users\имя_текущего_пользователя\Appdata\Local\Temp».
Если кому-то нужно чистить другие папки — просто замените пути на свои в «$TargetFolder =».
Batch Scripts for Cleaning Temporary Files
Description
This repository contains two batch scripts, clean_temp_files.bat and clean_ver2.bat, designed to automate the cleanup of temporary files and directories on a Windows system. These scripts help users free up disk space and enhance system performance by removing unnecessary files.
Features
clean_temp_files.bat
- Deletes temporary files from the Windows Temp directory.
- Clears the Recycle Bin.
- Removes temporary internet files.
- Cleans up user-specific temporary files.
- Customizable to delete additional files or directories as per user requirements.
clean_ver2.bat
- Includes all features of
clean_temp_files.bat. - Deletes temporary files from additional system directories.
- Cleans up Windows Update cache.
- Removes old prefetch files.
- Option to clear browser cache for popular web browsers.
- Enhanced logging for better tracking of cleanup activities.
Usage
- Download the Script: Ensure the respective batch file (
clean_temp_files.batorclean_ver2.bat) is present on your system. - Run as Administrator: Right-click on the batch file and select «Run as administrator» to grant the necessary permissions for deleting system files.
- Follow Prompts: Adhere to any on-screen instructions provided by the script to complete the cleaning process.
Examples
clean_temp_files.bat
@echo off
echo Cleaning up temporary files...
del /q /s %TEMP%\*
echo Cleaning up Recycle Bin...
rd /s /q C:\$Recycle.Bin
echo Cleaning up temporary internet files...
rd /s /q "%LocalAppData%\Microsoft\Windows\INetCache"
echo Cleaning up user-specific temporary files...
del /q /s "%USERPROFILE%\AppData\Local\Temp\*"
echo Cleanup complete!
pause
clean_ver2.bat
@echo off
echo Cleaning up temporary files...
del /q /s %TEMP%\*
echo Cleaning up Recycle Bin...
rd /s /q C:\$Recycle.Bin
echo Cleaning up temporary internet files...
rd /s /q "%LocalAppData%\Microsoft\Windows\INetCache"
echo Cleaning up user-specific temporary files...
del /q /s "%USERPROFILE%\AppData\Local\Temp\*"
echo Cleaning up Windows Update cache...
rd /s /q C:\Windows\SoftwareDistribution\Download
echo Cleaning up old prefetch files...
del /q /s C:\Windows\Prefetch\*
echo Cleanup complete!
pause
Customization
Both scripts can be tailored by adding or modifying commands to target specific files or directories for cleanup. It is advisable to test any changes in a controlled environment to prevent unintended data loss.
Disclaimer
Use these scripts at your own risk. Ensure that backups of important data are created before executing the scripts, as they will permanently delete files.
This post shows you how to create batch file to delete temp files on Windows 10 or 11 PC. We all know that temporary files occupy a lot of disk space on Windows and deleting them saves a lot of disk space. If you are looking to clean up your temp files using a batch file (.bat), this post is for you.
The term “temporary files” refers to files that are created either by Windows or user-installed programs. These files serve a dual purpose, assisting the computer in processing related programs or tasks and acting as a backup in case your system or program crashes unexpectedly.
The majority of temporary files are automatically removed after the task is completed, but some remain on your hard drive for future reference. If you do not delete them, they will continue to take up space on your hard drive, eventually running out of disk space and slowing down your computer.
The temp folder is created for every user account that you create on a Windows PC. The temp folder can be accessed by navigating to the following path in the Explorer: C:\Users\useraccountname\AppData\Local\Temp. You can also run the shortcut command %temp% to access the temp folder for your user account.
You can create a simple batch file to clear temporary files using the built-in Windows commands. Here’s an example:
@echo off
echo Clearing temporary files...

rem Clean up temporary files using built-in Windows commands
del /q /f %temp%\*.*
rmdir /q /s %temp%\

echo Temporary files cleared.
Save the above code as a .bat file (e.g., ClearTempFiles.bat) and run it. This batch file will delete all files in the %temp% directory and remove the directory itself. The /q flag is used for quiet mode, and the /f flag is used to force delete files. The /s flag is used to remove the directory and all its contents.
Please note that running this batch file will permanently delete the files in the temporary directory. Make sure you don’t have any important files in the temporary folder that you want to keep.
Also, keep in mind that some applications may be using files in the temporary folder, so running this batch file might interfere with those applications. It’s generally safe, but exercise caution.
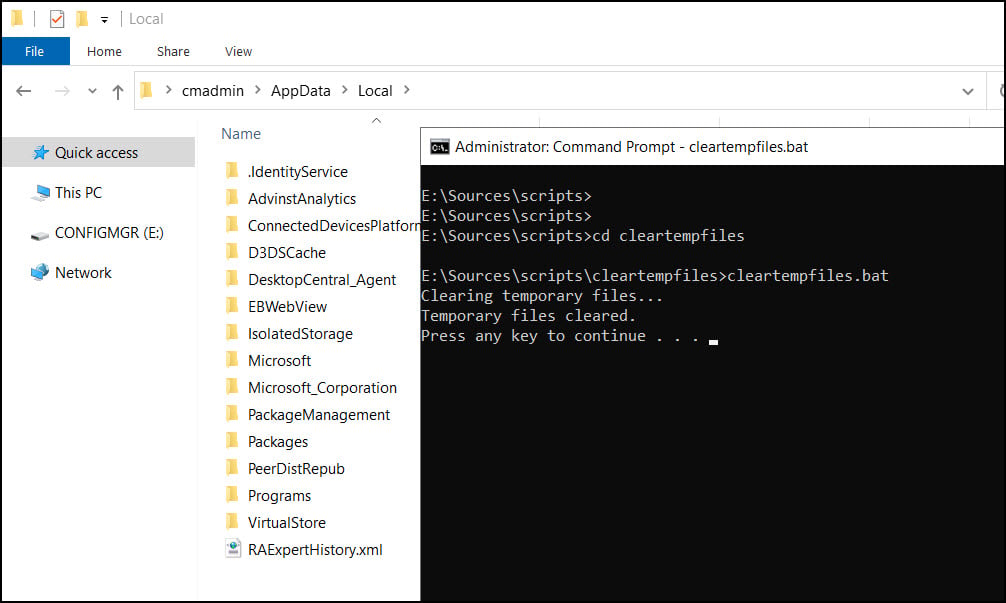
Run the ClearTempFiles.bat to clean Temp Files
To run the batch file, launch the command prompt as an administrator and navigate to the folder where you have saved the ClearTempFiles.bat file. Run the command ClearTempFiles.bat and this will clear all the temp files on your computer.

In the below screenshot, we see that all the temp files have been deleted. The script also deletes the temp folder but don’t worry, the folder will be automatically created upon a system restart.
Further Reading
- Install SysInternals Suite from Microsoft Store
- How to Disable Bitdefender Notifications
- How to Disable Tools Pane in Adobe Acrobat Reader DC
В ОС Windows, кроме автоматических средств существует простой способ, который позволяет быстро очистить все временные файлы при помощи командной строки.
В Интернете существует огромное множество различных программ-оптимизаторов компьютера для очистки от ненужных временных файлов. Но наверняка вам хотелось бы контролировать процесс собственноручно, чтобы не устанавливать сторонние оптимизаторы и не тратить свое время на активацию и регистрацию. В этом посте я научу, как чистить ваш ПК стандартными средствами операционной системы Windows.
Создание собственного оптимизатора
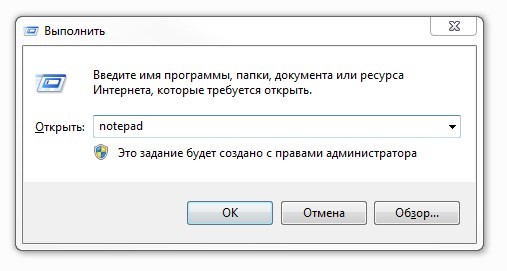
Первым делом откроем Блокнот через «Пуск» — «Все программы» — «Стандартные» — «Блокнот«, либо через программу «Выполнить«, нажав на клавиатуре сочетание клавиш «Win» + «R» и набрав команду «notepad«.
Теперь создадим BAT-файл. В открывшемся Блокноте щелкаем по кнопке «Файл» — «Сохранить как…«, далее выбираем местоположение на вашем ПК, например, я выбрал рабочий стол, далее пишем имя будущей программы и указываем расширение «cleaner.bat» (имя можно придумать любое, но расширение .bat менять не нужно!).

В ново созданном файле будем писать команды для очистки системы.
Очистка временных файлов
Первым делом очистим все временные папки на вашем ПК, для этого будем использовать команду «DEL» с параметрами «/q /f /s» — файлы, подпапки, папки.
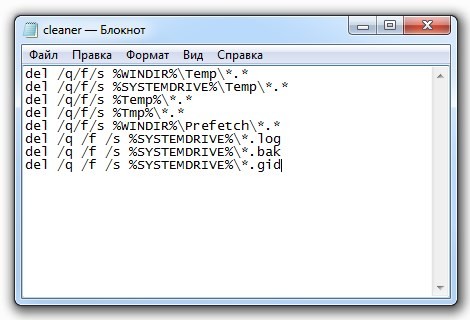
Набираем в Блокноте (bat-файле) следующее:
del /q /f /s %WINDIR%\Temp\*.*
del /q /f /s %SYSTEMDRIVE%\Temp\*.*
del /q /f /s %Temp%\*.*
del /q /f /s %Tmp%\*.*
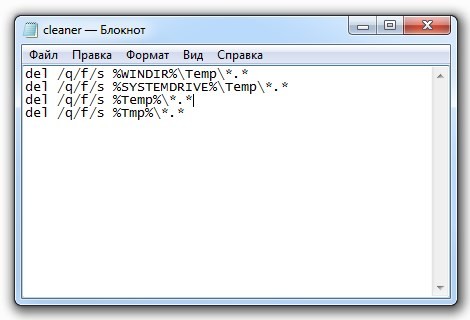
где, «%WINDIR%\Temp» — равносильно, что и «C:\Windows\Temp«, а «%SYSTEMDRIVE%» — системный раздел, в большинстве случаев это — «C:\«, «%Temp%» и «%Tmp%» — папки с временными файлами пользователей.
Очистка папки Prefetch
В папке Prefetch (файлы с расширением .pf) находится информация о часто открываемых программах и сервисах, для более быстрой их последующей загрузки. Из этой папки можно удалить все файлы, что позволит системе быстрее грузится, но при этом в первый раз программы будут загружаться медленнее. После удаления всех файлов и папки система снова создаст кэш этих часто запускаемых программ. Зачем нужно чистить эту папку? Часто в этой папке Prefetch содержится кэш давно удаленных программ, поэтому размер папки может достигнуть по умолчанию до 400 Мб.
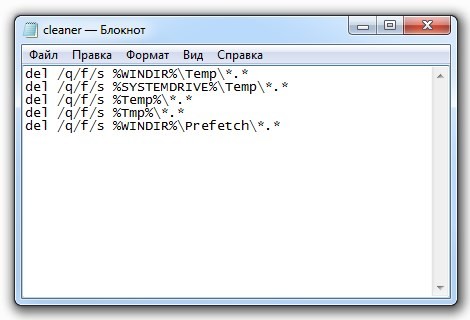
Команда на очистку папки Prefetch:
del /q /f /s %WINDIR%\Prefetch\*.*
Очистка бортового журнала — логи, баки, гиды и прочее
Винда и другие программы любят вести журнал логов об ошибках и различных действий, в зависимости от количества программ, этих файлов может накопиться несколько десятков мегабайт.
Команда для очистки этих файлов:
del /q /f /s %SYSTEMDRIVE%\*.log
del /q /f /s %SYSTEMDRIVE%\*.bak
del /q /f /s %SYSTEMDRIVE%\*.gid
Команда удалит все файлы по маске (*.log, *.bak, *.gid) на системном диске, включая подкаталоги системного диска.
Итог
Что у нас получилось?
del /q /f /s %WINDIR%\Temp\*.*
del /q /f /s %SYSTEMDRIVE%\Temp\*.*
del /q /f /s %Temp%\*.*
del /q /f /s %Tmp%\*.*
del /q /f /s %WINDIR%\Prefetch\*.*
del /q /f /s %SYSTEMDRIVE%\*.log
del /q /f /s %SYSTEMDRIVE%\*.bak
del /q /f /s %SYSTEMDRIVE%\*.gid
Полученный результат сохраняем: «Файл» — «Сохранить«. Теперь можем запускать bat-файл для очистки системы от мусора.
Your Windows operating system and many third-party applications create hundreds of Temporary files on your system in one single day. Normally, these files do not cause any issue, but when they increase exponentially in numbers, they block valuable space on the hard drive and degrade the overall performance of your system.
By deleting all such Cache files, you can free up a lot of disk space and keep your machine running at peak efficiency. There are many ways to delete Temporary files on Windows 10. Read further to know them.
Temporary files are created by both the Operating System and the software running on your computer system. Temporary files are denoted with a file type of .tmp or prefaced with a tilde (~). Typically, temporary files are created in the Windows Temp folder and are used for many reasons, these include the following:
- OS requirements, like providing space for virtual memory.
- Back-up files created for work-in-progress like MS Office creates for its open documents.
- Work files for applications that hold data while the program is running.
There are two main reasons to clear out the temporary files in Windows 10 or any other version of Windows. These include regaining storage space and improving computer performance. For these reasons, it is advised that you delete the temporary files periodically.
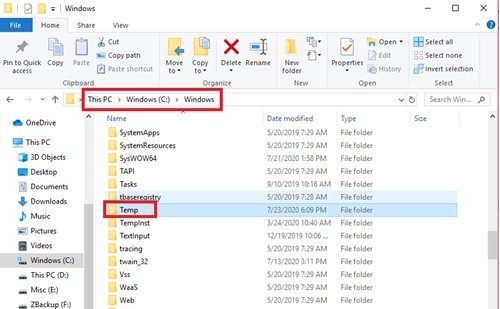
This folder is located at c:/Windows/Temp and mainly used by the operating system to store the temporary files. You can press Win + R key, type ‘temp’ and hit ‘Enter’ to go to this folder.
Used by the current logged in user:
This folder is related to the user logging into the system. You can use the search field on the Windows Start menu to locate this temp folder. Click open the start menu and type %temp% and select the top result from the option.
Here is the guide that will take you through the steps of clearing temporary files. Some of these methods are as follows:
- Using Windows Settings
- Using File Explorer (Manual Method)
- Use “Storage sense” to automatically delete temporary files
- Create a BAT file
- Using Command Prompt
- Using Disk Cleanup
- Use 3rd-party Disk Cleaner software.
Let us look at each of these methods in more detail.
1] Using Windows Settings
Windows allows you to use its Settings App to remove the temporary files. Here is how you can use this application:
1] Open the Start Menu and select the Settings shortcut appearing on the left sidebar. Once you select the little gear-shaped icon, the Windows Settings page opens in front of you.
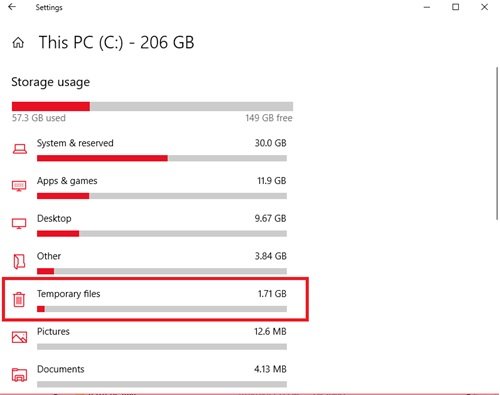
2] In the new windows, navigate to the System section.
3] From the left side options, select Storage
4] You will see your disk’s option on the right section, select your disk, and click on the Temporary files option.
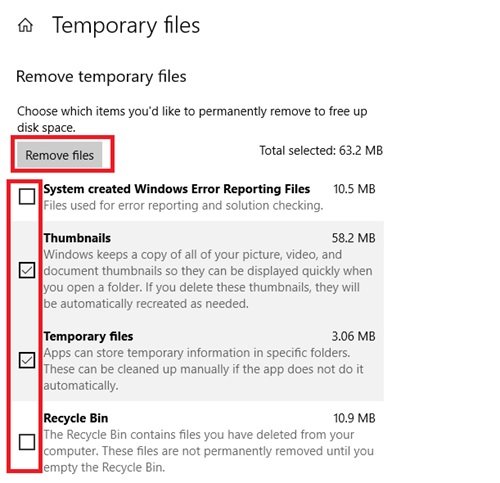
5] Windows will now scan the temporary files folder; once the process is completed, you can select the files you want to remove.
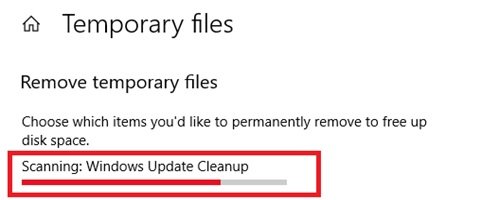
6] To delete check the boxes and then click Remove files to confirm your action.
Done! After you successfully complete the above steps, the junk files will be removed from your system.
2] Using File Explorer (Manual Method)
Using the Windows File Explorer is another simple way of removing temporary files in Windows 10. Follow these steps:
1] Press Win + R keys to open the Run dialog.
2] Type the command %temp% and press Enter to open the temporary files folder on your system.
3] Use shortcut Ctrl + A to select all the files inside the folder. Once the files are selected, right-click and select the Delete option from the context menu.
Please note – you will need an administrator account to perform this action. Also, once the temporary files are deleted, these are moved to the Recycle Bin hence, restoring them is possible.
3] Use Storage sense to automatically delete temporary files
A user can use Storage Sense to remove temporary files automatically from the system. Here is how you can use:
1] Go to the Settings application.
2] Click on the System option and select Storage from the left-hand panel options.
3] In the Storage section, turn the toggle named Storage Sense ON.
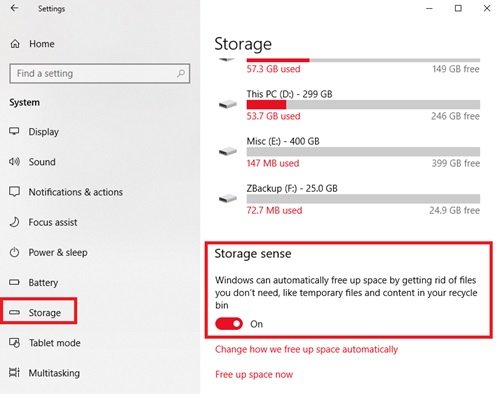
Once you activate Storage sense on your system, it will delete the temporary files including the ones which have been in the recycle bin for more than 30 days. This was the default configuration, but the user can always configure the default settings of Storage Sense.
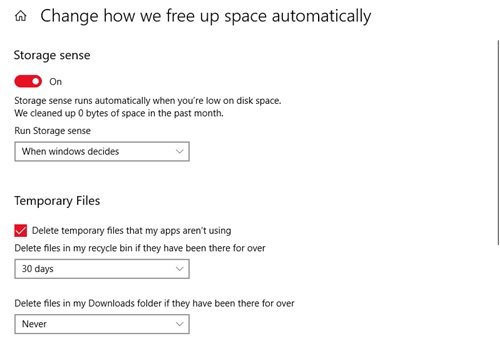
To do this, click Change how we free up space automatically tab and adjust the cleanup settings or run Storage Sense on-demand.
4] Create a BAT file
In this method, you need to create a BAT file. Once this file is created it can be used repeatedly to delete the temporary files on Windows 10. This very simple option works quickly. To create a BAT File, follow these steps:
1] From the Start Menu open the Notepad
2] In the Notepad app, copy the following:
del C:\Users\%username%\AppData\Local\Temp /f /s /q

rd C:\Users\%username%\AppData\Local\Temp /s /q

del c:\Windows\Temp /f /s /q

rd c:\Windows\Temp /s /q

pause
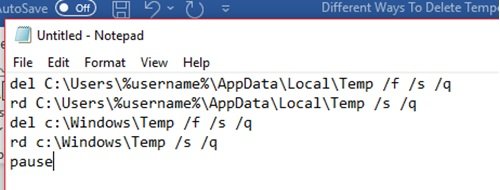
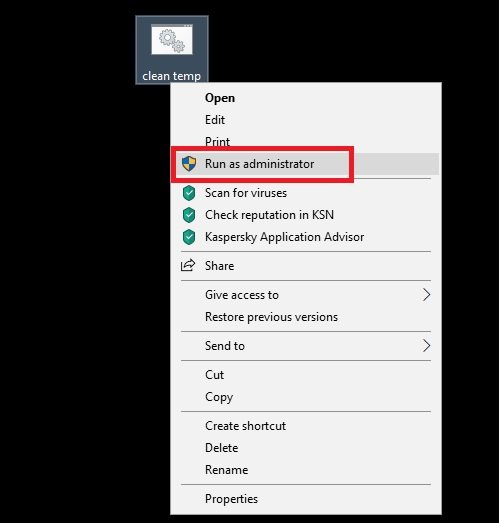
3] Save this file to your desktop using the extension .bat. Here the file is named as Clean Temp.
4] Once done, a BAT file will be created on your desktop.

5] Now, whenever you wish to delete the temporary files on Windows 10, right-click on this file and select the option Run as Administrator.
Done!
5] Using Command Prompt
Temporary files on Windows 10 can also be deleted by running some commands in the Command Prompt. Follow these steps:
1] Open the Start Menu and type cmd.
2] In the search results, right-click and click the Run as Administrator option.
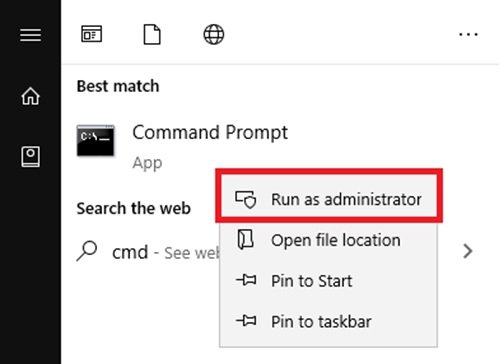
3] Once the command prompt window is open with the administrative right, copy the following command:
cleanmgr /d <driveletter>
Do not forget to alter the <driveletter> field in the command and remove the brackets.
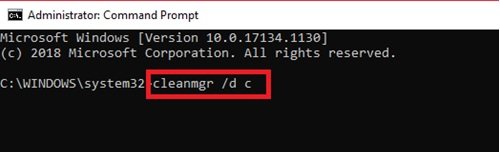
4] Now, execute the command by hitting the Enter key.
Wait for the process to complete.
6] Using Disk Cleanup
The Disk Cleanup utility is another simple and efficient way to clean temporary files on Windows 10. Read our guide Delete Temporary Files using Disk Cleanup Tool.
7] Use 3rd-party Disk Cleaner software
You can also use a free junk file and disk cleaner software to delete your junk files.
TIP: See this post if Temporary files not deleting in Windows.
We hope that this guide did help you in deleting the temporary files on Windows 10 and you successfully made some room for storing new files. If you any similar tricks to perform this process, do share them with us in the comments section below.