
Рассмотрим особенности очистки «подвисшей» очереди печати в системах Windows. Рассмотренная методика позволяет удалить из очереди документы, которые по какой-то причине не печатаются и мешают отправке на печать других файлов и документов.
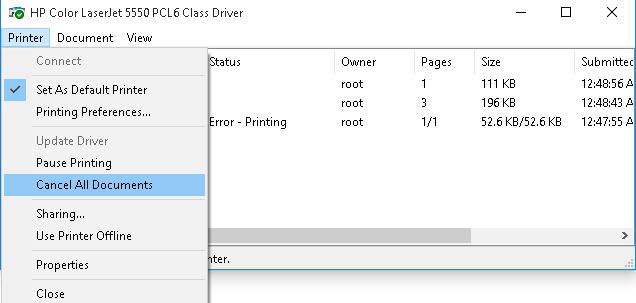
«Мягкий» способ очистки текущей очереди печати принтера выполняется из окна Панели управления (Control Panel ->Devices and Printers). В списке принтеров нужно найти проблемный принтер, щелкнуть по нему ПКМ и выбрать в меню пункт See what’s printing.

В открывшемся окне управления очередью печати принтера в меню выбираем пункт Printer-> Cancel All Documents . Все документы, в том числе зависшие, должны удалиться из очереди печати принтера.
В том случае, если какие-то документы не удаляются из очереди печати, значит они в данный момент заблокированы системой или драйвером самого принтера. Они пропадут из очереди печати после перезагрузки. Если перезагрузка выполнить проблематично, можно принудительной удалить все задания из очереди службы печати Windows.
Важно. Приведенная ниже методика очистки очереди печати удаляет ВСЕ имеющиеся задания печати на ВСЕХ принтерах системы. Это нужно иметь в виду, особенно при очистке зависшей очереди печати на выделенном принт-сервере на базе Windows.
Напомним, что при отправке документа на печать на принтер, служба печати Windows (Print Spooler) формирует задание печати и создает два файла: один с расширением .SHD (содержит настройки задания печати), второй — .SPL (хранит собственно данные, которые нужно распечатать). Таким образом, задания печати будут доступны службе печати, даже после закрытия программы, инициировавшей печать. Данные файлы хранятся в каталоге спулера (по умолчанию, «%systemroot%\System32\spool\PRINTERS”). После успешной печати, эти файлы автоматически удаляются из этого каталога, и, соответственно, из очереди печати.
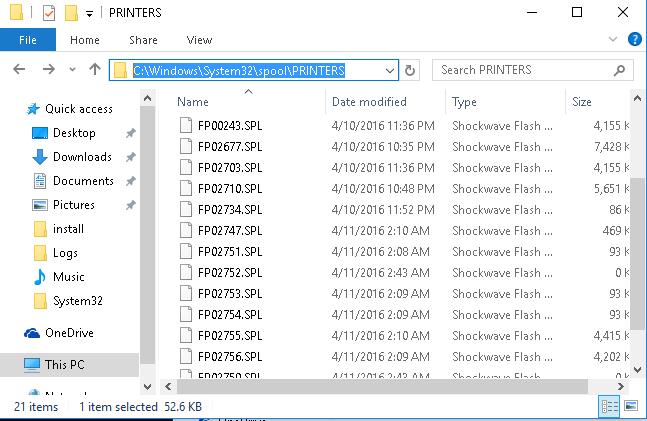
Нам нужно вручную очистить содержимое этой папки, тем самым мы удалим все задания в памяти Print Spooler.
Откройте командную строку с правами администратора и последовательно выполните команды:
net stop spooler
del %systemroot%\system32\spool\printers\*.shd /F /S /Q
del %systemroot%\system32\spool\printers\*.spl /F /S /Q
net start spooler

Этот набор команд последовательно останавливает службу печати Windows, рекурсивно удаляет все файлы с расширениями *.shd и *.spl из каталога %systemroot%\system32\spool\printers и запускает остановленную службу.
Архив с готовым bat файлом можно скать по ссылке reset_spooler.zip (запускать от имени администратора)
Примечание. В том случае, если скрипт не работает, проверьте, что в свойствах принт-сервера (Панель управления -> Devices and Printers -> кнопка Print Server Properties в верхнем меню -> вкладка Advanced -> в поле Spool folder location указан каталог C:\windows\system32\spool\Printers. В 99% случаев это должно быть так. Если путь к каталогу спулера отличается, нужно будет поправить путь к нему в скрипте.

Рассмотренные выше методики помогут очистить очередь печати в любой версии Windows, будь то Windows 7, 8 или Windows 10.
Clearing the printer spooler on Windows 10 can resolve pesky printing issues, like stuck print jobs or the printer not responding. First, open the Run dialog using Windows + R, then type “services.msc” to access the Services window. Next, scroll to find “Print Spooler” and right-click to stop the service. Navigate to the spooler folder in File Explorer, delete all files, then return to Services and restart the print spooler. This quick fix should get your printer back to working smoothly.
To clear the printer spooler on Windows 10, follow these steps to stop the spooler service, delete stuck print jobs, and restart the service. This process can help resolve common printer problems and improve your printing experience.
Step 1: Open the Run Dialog
Press Windows + R on your keyboard to open the Run dialog box.
The Run dialog is a quick tool that helps you access various Windows settings and applications. By typing commands here, you can swiftly navigate to different system utilities.
Step 2: Access Services
Type “services.msc” in the Run dialog and hit Enter.
This command opens the Services window, which lists all the services running on your computer. These services include the Print Spooler, which manages your print jobs.
Step 3: Locate and Stop Print Spooler
Scroll down to find “Print Spooler” in the list. Right-click it and select “Stop.”
Stopping the Print Spooler halts all printing tasks, allowing you to clear stuck jobs without interference. This step is essential before you can delete backlog files.
Step 4: Delete Print Job Files
Navigate to C:WindowsSystem32spoolPRINTERS using File Explorer. Delete all files in this folder.
These files are temporary print job files. Removing them clears the spool, effectively resolving any document jams or print errors you’ve been experiencing.
Step 5: Restart Print Spooler
Return to the Services window, right-click “Print Spooler” again, and select “Start.”
Restarting the Print Spooler reactivates the printing process on your device. Any issues with previously stuck print jobs should now be resolved.
After completing these steps, your printer should be free of any stuck print jobs, and it should function as expected. If you previously experienced problems with documents failing to print or getting stuck in the queue, they should now be resolved, and you can resume printing seamlessly.
Tips for Clearing Printer Spooler Windows 10
- Regularly clearing the print spooler can prevent future printing issues.
- Temporarily stop the Print Spooler to troubleshoot print jobs safely without affecting ongoing tasks.
- If you frequently encounter spooler issues, consider updating your printer drivers.
- Remember to restart the Print Spooler after clearing the print jobs to re-enable printing.
- Use caution when deleting files in the spool folder to avoid removing necessary files.
Frequently Asked Questions
What is a print spooler?
A print spooler is a service that manages print jobs by sending them to the printer one by one. It helps the computer communicate with the printer effectively, handling multiple printing tasks seamlessly.
Why should I clear the printer spooler?
Clearing the printer spooler resolves issues like stuck print jobs or unresponsive printers. It removes any backlog of print tasks that might be causing disruptions in your printing process.
Can I clear the spooler without stopping the service?
No, you must stop the Print Spooler service before clearing print jobs. This ensures that no files are in use, allowing you to safely delete temporary print job files without causing further issues.
Do I need to restart my computer after clearing the spooler?
Restarting your computer is not necessary after clearing the spooler. Simply restarting the Print Spooler service should suffice to resume normal printing operations.
What if clearing the spooler doesn’t fix my printing problems?
If clearing the spooler doesn’t resolve your issues, consider checking for driver updates, inspecting printer connections, or consulting the printer’s troubleshooting guide for further help.
Summary
- Press Windows + R to open Run dialog.
- Type “services.msc” and press Enter.
- Locate “Print Spooler” and stop it.
- Delete files in C:WindowsSystem32spoolPRINTERS.
- Restart “Print Spooler.”
Conclusion
Clearing the printer spooler on Windows 10 is like hitting the reset button for your printer. It alleviates those frustrating moments when your printer just won’t cooperate. Think of it as decluttering your printer’s queue, akin to tidying up a messy desk to boost productivity. This simple task doesn’t require fancy tools or deep technical knowledge, just a few steps to restore order.
If you’re grappling with recurring printer issues, clearing the spooler should be your first troubleshooting step. But remember, like any good practice, consistency is key. Regular maintenance by clearing the spooler can prevent issues before they arise, saving you from unexpected hiccups during critical print jobs.
For those eager to ensure a seamless printing experience, consider exploring further printer maintenance tips or even delving into advanced printer settings that could improve your overall workflow. Keep in mind that technology is here to make our lives easier, so take charge of your devices, and keep them running smoothly. Happy printing!
Matt Jacobs has been working as an IT consultant for small businesses since receiving his Master’s degree in 2003. While he still does some consulting work, his primary focus now is on creating technology support content for SupportYourTech.com.
His work can be found on many websites and focuses on topics such as Microsoft Office, Apple devices, Android devices, Photoshop, and more.
How to clear print spooler in Windows 10 is our next guide. Clearing and restarting the print spooler it comes handy when you are trying to fix print jobs in queue. You as a user sometimes can set a few bunch of documents to print and this can stuck print job by holding up the entire process. At this point you can’t delete or cancel the stuck print job from the queue.
There are different reasons why you can’t print, such as connection problems or hardware issues with the printer. Usually it is an issue with the Windows 10 print spooler. This is a service that spools print jobs and handles the interactions with the printer. Sometimes it will stop working, even after restarting your computer device and printer. In Windows, the print files are not directly sent to the printer. They arrive first in the spooler, which is a windows service responsible for all print jobs. The spooler is useful as it enables you to change the order of pending print jobs or delete them. When there’s a problem, the files just remain in the print queue. And once the first document cannot be printed, neither will al l the other documents behind it.
In order to clear print spooler there are a couple of different ways and we are going to cover them.
Method 1 – How to clear print spooler in Windows 10 Manually
- Press Windows key + R to open up a Run dialog box.
- Type ‘services ‘ inside the text box and press Ctrl + Shift + Enter to open up an elevated CMD prompt.
- Click the Services app.
- Scroll down to Print Spooler.
- Right click Print Spooler and select Stop.
- Navigate to C:\Windows\System32\spool\PRINTERS and delete all files in the folder.
- In the Services window, restart the Print Spooler service by clicking Start in the left pane when Print Spooler is highlighted.
How to clear print spooler in Windows 10
Method 2 – How to clear print spooler using a Command Prompt
- Press Windows key + R to open up a Run dialog box.
- Type ‘cmd‘ inside the text box and press Ctrl + Shift + Enter to open up an elevated CMD prompt.
- Once you have opened CMD prompt as an administrator with elevated privilege type the following command and press Enter:
net stop spooler
del /Q /F /S "%systemroot%\System32\Spool\Printers\*.*"
net start spooler
After you run the command successfully, you should be able to send a print job to the printer, and this time the printer should work.
Method 3 – How to clear print spooler using a Batch File
If clear print spooler is a task that you are forced to do it frequently then the best recommended is to create by yourself a .bat script which will be configured to run at every system startup. The idea behind the script is to search clear print spooler automatically
Step 1: Create the batch script
- Press Windows key + R to open up a Run dialog box.
- Type ‘notepad.exe’ inside the text box
- Press Ctrl + Shift + Enter to open up an elevated Notepad
- Inside the opened Notepad window, paste the following code:
net stop spooler
del /Q /F /S "%windir%\System32\spool\PRINTERS\*.*"
net start spooler
- Click on File(from the ribbon at the top) and click on Save As…
- Name the script something recognizable
- Place it in a location that’s easily accessible and ensure that you change the extension to .bat before clicking on
Step 2: Configure the batch script to run at every system startup.
In order to do this we have already publish two article explaining in details every step. You can easily find them on the following links: Create Windows Task Scheduler and schedule to run bat file and How to create scheduled task with windows task scheduler. Make sure to configure the Task Schedule to begin At Startup. And ensure that the checkbox associated with Enabled (at the bottom) is checked.
Conclusions
Dear followers of Get IT Solutions, in our step-by-step tutorial, we have provided all the possible solutions on how to clear print spooler. We hope you will find this method helpful. Have you managed to solve it? Please let us know in the comments below.
Are you in dire need of printing a document but can’t do so because of a stuck print job in Windows 10? Here are some ways to clear the print queue in Windows 10 easily.
Printers may appear easy to use but can be very flimsy at times. Handling print Queue when you urgently want to use a printer can be quite frustrating. The print queue not only prevents the present document but all future documents from printing. The problem is not hard to detect either. If the message ‘Printing’ remains indefinitely even though the paper is not stuck and the ink is right, then certainly there is a Print queue issue. There are certain ways that can be used to clear the print queue in Windows 10.

Table of Contents
Why does a print job gets stuck in Windows 10?
The answer lies in the fact that the printing document isn’t directly sent for printing. The document is first received at the spooler, i.e., a program used to manage and queue the print jobs. This spooler is particularly helpful while rearranging the order of print jobs or deleting them entirely. A stuck print job prevents the documents in the queue from printing, which affects all the documents further down the queue.
Often you can solve the error by deleting the print job from the queue. To delete a stuck print job in Windows 10, go to ‘Printers’ in the setting and click on ‘Open Queue.’ Cancel the print job causing a problem, and you are good to go. If you can’t delete a particular print job, then try deleting the entire print queue. If this doesn’t work either, then try restarting all your devices. Unplug all your connections and plug them to reboot your device completely. This is the first approach that you should have for a stuck print job. If these traditional methods don’t work, then here are some other detailed methods for clearing a print job in Windows 10.
There are a few methods that can be employed to clear a print job in Windows 10. Clearing and restarting the Print Spooler is one of the best methods to use for fixing the stuck print job. It doesn’t delete your documents but creates an illusion that the documents are being sent for the first time to the printer. The process is done by stopping the Print Spooler until you clear the entire temporary cache used by the spooler and then starting it again. This can be accomplished by using a manual method or by making a batch file.
Method 1: Manually Clearing and Restarting the Print Spooler
1. Type ‘Services.’ in the Windows search bar and open the ‘Services’ app.

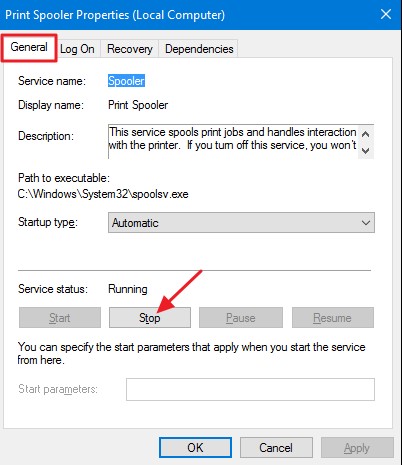
2. Find ‘Print Spooler’ in the menu and double-click to open the Properties.

3. Click on ‘Stop’ in the Properties tab and minimize the window to use it again later.

4. Open ‘File Explorer’ and go to the below address location:
C:\Windows\System 32\spool\PRINTERS

5. You may be asked for permission to access the location. Click on ‘Continue’ to move forward.
6. Once you reach the destination, select all the files and press Delete on your keyboard.
7. Now go back to the Spooler properties window and click on ‘Start.’

8. Click on ‘Ok’ and close the ‘Services’ app.
9. This will restart the spooler, and all the documents would be sent to the printer for printing.
Method 2: Clear Print Queue using a Batch File for the Print Spooler
Creating a batch file is a viable option if your print jobs frequently get stuck. Using the Services app every now and then can be a hassle that can be solved by a batch file.
1. Open a text editor like Notepad on your computer.
2. Paste the commands below as separate lines.
Net stop spooler
Del/Q/F/S “%windir%\System32\spool\PRINTERS\*.*”
Net start spooler

3. Click on ‘File’ and choose ‘Save as.’ Name the file with the extension ‘.bat’ at the end and choose ‘All files (*.*)’ in the ‘Save as type’ menu. Click on Save, and you are good to go.

4. Simply double-click on the batch file, and the work will be done. You can place it at the most accessible place on your desktop for easy access.
Also Read: How to Get Your Printer Back Online in Windows 10
Method 3: Clear Print Queue Using Command Prompt
You can delete a stuck print job in Windows 10 by using Command Prompt as well. Using the method will stop and start the print spooler again.
1. Type ‘cmd’ in the search bar. Right-click on the ‘Command Prompt’ app and choose the run as administrator option.

2. Type the command ‘net stop spooler’, which will stop the spooler.

3. Again type the following command and hit Enter:
Del %systemroot%\system32\spool\printers\*/Q
4. This will do the same task as the methods above.
5. Start the spooler again by typing the command ‘net start spooler’ and press enter.
Method 4: Use the Management Console
You can use the service.msc, shortcut in the management console to clear the print queue in Windows 10. This method will stop the spooler and clear it to delete a stuck print job:
1. Press the Windows Key + R key together to open the run window.
2. Type ‘Services.msc’ and hit Enter.
Note: You can also access the ‘Services’ window via Windows Management. Right-click the Windows icon and choose Computer Management. Choose Services and Application then double-click on Services.

3. In the Services window, right-click on Print Spooler and select Properties.

4. Click on the ‘Stop’ button to stop the Print Spooler service.

5. Minimize the window and open file explorer. Type the address ‘C:\ Windows\ System32\ Spool\ Printers’ or navigate to the address manually.
6. Select all the files in the folder and delete them. They were the files that were in the print queue at the instance.
7. Go back to the Services window and click on the ‘Start’ button.

Recommended:
- Fix Common Printer Problems in Windows 10
- Fix Printer Driver is unavailable on Windows 10
- How To Lock Or Unlock Cells In Excel?
- How to Fix Whatsapp Images Not Showing In Gallery
We hope the above guide was helpful and you were able to successfully clear the print queue in Windows 10. If you’re still stuck, then there may be compatibility issues with the printer and the data to be printed. Outdated printer drivers can also be an issue. You can also run the Windows Printer Troubleshooter to identify the correct problem. It will help you fix the errors in the print jobs. Follow the methods above to delete a stuck print job and clear the print queue in Windows 10, and you shouldn’t have any problems.
Download Article
Remove print jobs stuck in the queue with these simple steps
Download Article
- Clear the Print Queue (Windows 10)
- Clear the Print Queue (Windows 11)
- Restart the Printer Spooler (Services)
- Restart the Printer Spooler (CMD)
- Video
- Q&A
|
|
|
|
|
This wikiHow teaches you how to clear pending documents from your printer’s queue when you’re using Windows 10 or 11. If you are having trouble with documents sitting in the queue without ever printing, or you can’t clear the printer queue, we’ll show you how to fix the problem by restarting the printer spooler.
Quickly Clear the Print Queue on Windows 10
Open your Windows Settings, go to Devices > Printers & scanners, and select your printer. Click Open Queue, click the Printer menu at the top of the queue, and then select Cancel All Documents.
-

Press the Windows key on your keyboard, then click the gear icon in your Start menu. You can also get to Settings by pressing Windows key + i.
-
It’s the second icon at the top of the window.
Advertisement
-
It’s in the left column.
-
Connected printers appear in the right panel under “Printers & scanners.” Two buttons will appear beneath the printer’s name.
-
A list of pending print jobs will appear.
-
A context menu will appear.
-
This removes the document from the queue.
-
- To cancel all documents at once, click the Printer menu at the top-left corner of the window, then select Cancel All Documents.
- If the files stay in the queue even after you’ve canceled them, try restarting the computer.
- If you can’t clear the print queue, or clearing the queue doesn’t fix your printer issues, see Restarting the Printer Spooler Service in Services.msc or at the command prompt for a fix.


Advertisement
-
Press the Windows key on your keyboard, then click the gear icon in your Start menu. You can also get to Settings by pressing Windows key + i.
-
This option is near the top of the left panel.
-
You’ll find this option in the right panel. A list of connected printers will appear.
-
This displays some printer settings, as well as the option to open the print queue.
-
This is near the top of the right panel. All print jobs in the queue will appear.
-
The three horizontal dots are near the top-right corner. All jobs will be removed from the print queue.
- If the files stay in the queue even after you’ve canceled them, try restarting the computer.
- If you can’t clear the print queue, or clearing the queue doesn’t fix your printer issues, see Restarting the Printer Spooler Service in Services.msc or at the command prompt for a fix.


Advertisement
-
1
Turn off your printer. If you can’t clear the print queue, or print jobs keep getting stuck in the queue, you can use this method to fix problems with the printer spooler.
-
This opens the “Services” window.
-
It’s in the right panel. A context menu will appear.
-
Now that the queue is stopped, you can clear the documents.
-
Don’t close the Services window, as you’ll need it again in a few moments. Just click the search icon (or the search bar, if it’s permanently in your taskbar), or press the Windows key.
-
A folder will appear.
-
To do this, click a blank area inside the folder, then press Ctrl+A. You can also highlight all the files with your mouse.
-
This clears the print queue, and you can close this folder window.
-
The menu will expand.
- If you can’t find the Services window, click the overlapping gear icons in the taskbar, or press Alt + Tab until it appears.
-

The print queue should now be completely clear.


Advertisement
-
If you can’t clear the printer queue in Windows, try this method to stop the print spooler and clear the queue in the command prompt. It will work best if your printer is turned off.
-
Another way to clear the printer queue on any version of Windows is to use some simple commands at the command prompt. To open the prompt as an admin, follow these steps:
- Press the Windows key.
- Type cmd.
- Right-click Command Prompt.
- Click Run as administrator.
- Click Yes to confirm.
-
This command stops the printer spooler.
-
This command will clear the Windows print queue.
-
The printer spooler will now restart.
-
Try printing again. Now that you’ve stopped and restarted the print spooler and cleared the queue, you should be able to print.


Advertisement
Add New Question
-
Question
How do I clear out 1688 on an inkjet printer?
Lain Yensoon
Community Answer
On the right hand side of your taskbar there should be a printer icon. If you can’t see it, it may be hidden behind the arrow; click the arrow to see it. Right click the printer icon and click open printer queue. A new window should open with all current print jobs. Delete the files in queue that you don’t want by either right clicking and then selecting delete or left clicking and pressing the delete button on your keyboard.
Ask a Question
200 characters left
Include your email address to get a message when this question is answered.
Submit
Advertisement
Video
Thanks for submitting a tip for review!
Video
Thanks for submitting a tip for review!
About This Article
Thanks to all authors for creating a page that has been read 138,762 times.