
Все способы:
- Основные причины задержки очистки
- Способ 1: Очистка вручную
- Способ 2: Точки восстановления
- Проверка жесткого диска
- Вопросы и ответы: 0
Основные причины задержки очистки
Автоматическая очистка в процессе обновления Windows обычно запускается, если алгоритмы системы обнаруживают недостаток свободного места на диске C. Продолжительность такой очистки зависит прежде всего от объема удаляемых данных, а также от типа накопителя. Так, на старых HDD она занимает больше времени, что обуславливается не только медленной скоростью устройства, но и проведением дефрагментации содержимого системного тома.
Поэтому спешить предпринимать что-либо не стоит, для начала достаточно подождать. И только если через два или три часа прогресс очистки не сдвинется с места, можно будет делать выводы о том, что на компьютере возникла какая-то проблема, например ошибка кеша обновлений, сбой установки обновлений. Также возможно повреждение файловой системы или физической памяти диска.
Способ 1: Очистка вручную
Если система не может удалить временные файлы в автоматическом режиме, проведите очистку вручную. Для начала перезагрузите ПК принудительно и посмотрите, что сообщит система. Если на экране появится сообщение «Не удалось установить обновления. Идет отмена изменений», нужно просто подождать. В случае успешной загрузки компьютера выполните следующие действия.
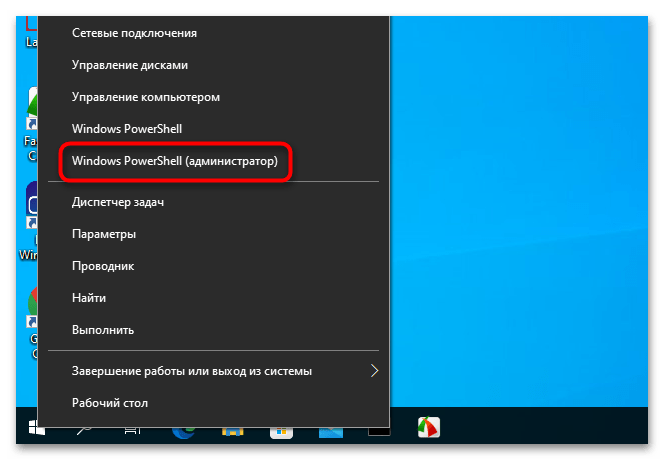
- Запустите от имени администратора консоль «PowerShell» из контекстного меню кнопки «Пуск».
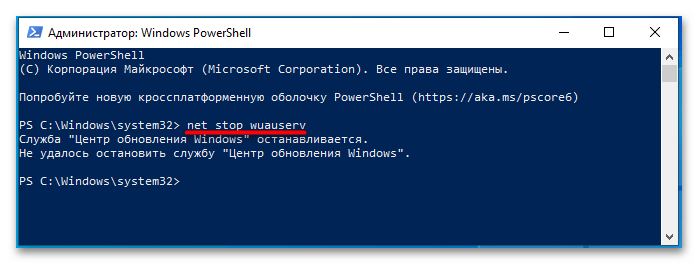
- Выполните команду
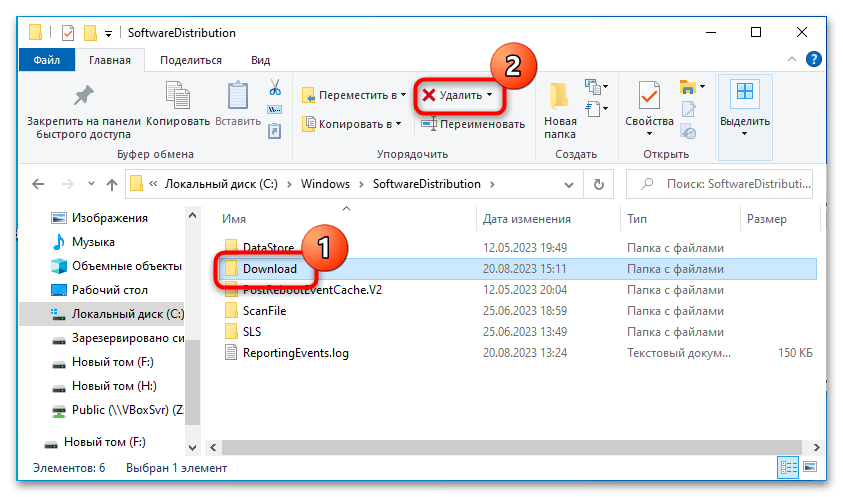
net stop wuauserv, чтобы остановить службу обновления Windows. - Перейдите в «Проводнике» в расположение
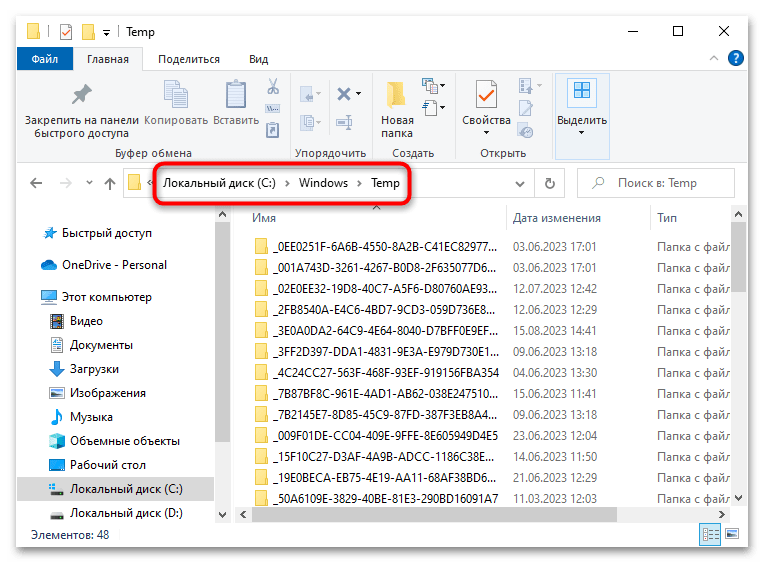
C:\Windows\SoftwareDistributionи удалите папку «Download» со всем ее содержимым. - Очистите временную папку системы
C:\Windows\Temp. - Очистите временную папку пользователя, расположенную по адресу
C:\Users\Имя_пользователя\AppData\Local\Temp. По умолчанию каталог «AppData» скрыт, поэтому перед тем как переходить по указанному пути, включите в свойствах папок показ скрытых объектов.Подробнее: Отображение скрытых папок в Windows 10
- Очистите «Корзину» и перезагрузите компьютер.

Если попасть на рабочий стол не получается, загрузите компьютер с любого LiveCD с файловым менеджером на борту и очистите перечисленные выше папки из-под него. Отключение служб, включение показа скрытых объектов в этом случае не понадобится, так как работа из-под LiveCD предполагает монопольный доступ к файловой системе.
Читайте также: Инструкция по записи LiveCD на флешку
Способ 2: Точки восстановления
Воспользуйтесь функцией отката к системным точкам восстановления. Это отменит все запланированные действия по очистке диска, а также установку обновлений.
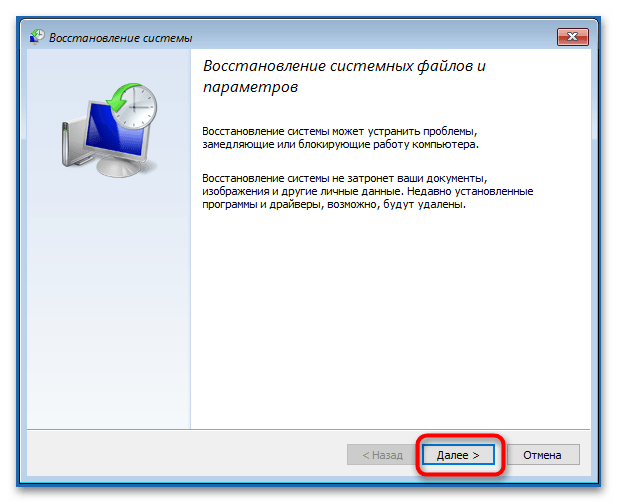
- Если после принудительного завершения работы ПК загрузится в штатном режиме, запустите встроенный мастер отката, выполнив в вызванном нажатием клавиш Win + R диалоговом окошке команду
rstrui. - В окне открывшегося матера нажмите «Далее» и проследуйте дальнейшим указаниям.
Подробнее: Откат к точке восстановления в Windows 10

Если попасть на рабочий стол не удается, сделайте следующее:
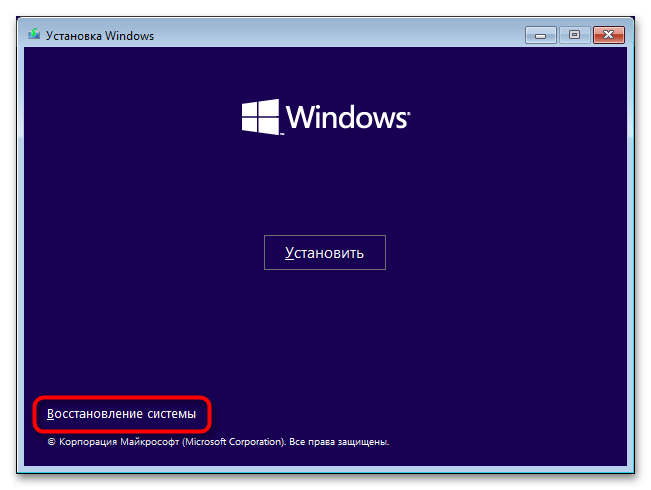
- Загрузите компьютер с установочной флешки с Windows 10, а когда на экране появится мастер установки, нажмите в нем «Далее», а в следующем окне — «Восстановление системы».
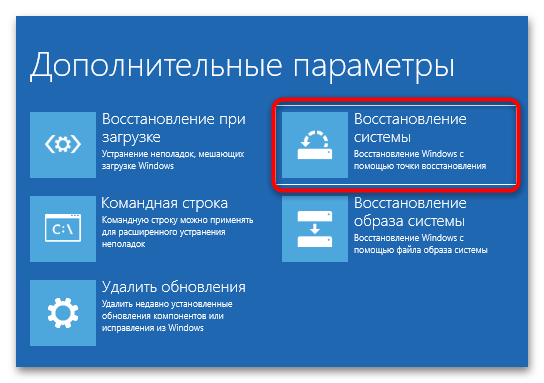
- На экране выбора действия выберите «Поиск и исправление неисправностей» → «Дополнительные параметры» → «Восстановление системы».
- Запустится стандартный мастер отката к точкам восстановления. Нажмите кнопку «Далее» и проследуйте дальнейшим указаниям.
Проверка жесткого диска
Зависание компьютера при работе с файлами также может быть вызвано наличием на диске поврежденных или медленных секторов, в меньшей степени – наличием ошибок файловой системы. Для проверки диска на предмет бэд-блоков лучше использовать специальные программы, в частности Victoria, при этом проверяемый диск желательно снять и подключить к другому компьютеру. Если такая возможность отсутствует, необходимо загрузить ПК с LiveCD c Victoria на борту и выполнить проверку накопителя из-под него. Примером такого LiveCD является WinPE 11-10-8 Sergei Strelec.
Скачать WinPE 11-10-8 Sergei Strelec с официального сайта
Читайте также: Восстанавливаем жесткий диск программой Victoria
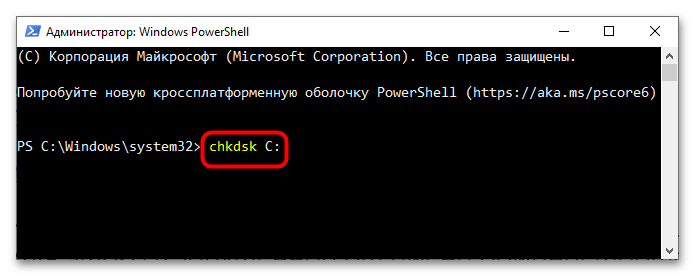
Проверить разделы диска на предмет ошибок файловой системы можно и средствами самой Windows. Для этого в запущенной от имени администратора «PowerShell» нужно выполнить команду chkdsk C:, где C – буква проверяемого раздела. В случае обнаружения ошибок команду нужно повторить с параметром исправления, вот так: chkdsk C: /F.
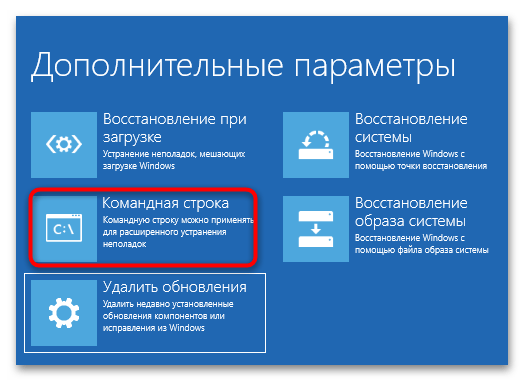
Если попасть на рабочий стол не удается, проверку средствами утилиты «chkdsk» можно будет выполнить, загрузив ПК в среду восстановления и запустив консоль из раздела «Поиск и исправление неисправностей» → «Дополнительные параметры» → «Командная строка».
Подробнее: Как запустить среду восстановления в Windows 10
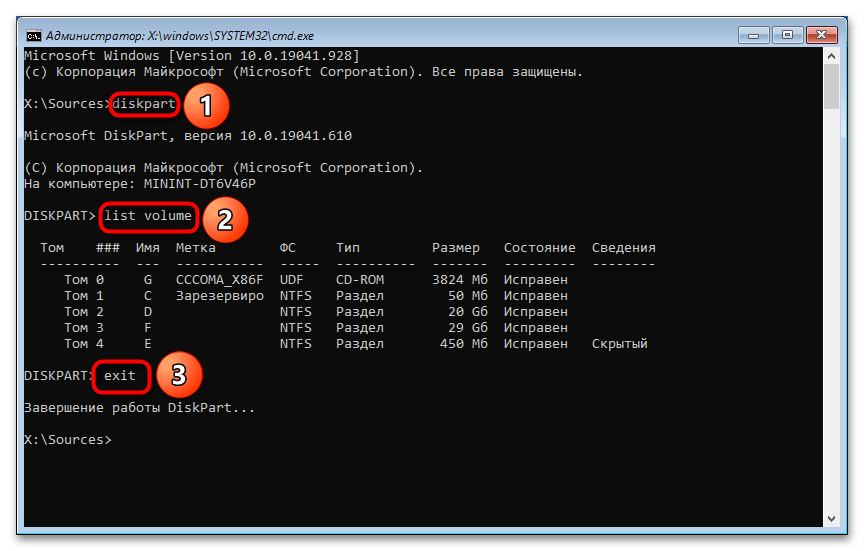
Обратите внимание! В среде восстановления буква, присваиваемая системному диску, может отличаться от той, что в Windows. Для уточнения буквы перед запуском «chkdsk» введите следующие команды: diskpart — для запуска утилиты работы с дисками, list volume — для отображения списка подключенных дисков, где определите ваш накопитель при помощи столбца «Размер» и посмотрите его букву через столбец «Имя», exit — для выхода из утилиты DiskPart.
Если устранить неполадку не удается ни одним из способов, можно будет всегда выполнить сброс системы в исходное состояние при условии, что жесткий диск и другие аппаратные компоненты исправны.
Подробнее: Восстановление Windows 10 к исходному состоянию
Наша группа в TelegramПолезные советы и помощь
After installing a feature update, your Windows 7 or Windows 10 computer may be stuck on the “Cleaning up. Do not turn off your computer” screen. This post offered by MiniTool teaches you how to get rid of the issue.
After installing Windows updates, your computer may display quite a few messages during the startup sequence. One of the messages you may see on the screen is “Cleaning up. Do Not Turn off Your Computer”. The display message is a little different based on your system.
Windows 10: – Cleaning up 0% or 100% complete, Do not turn off your computer
Windows 7: – Cleaning up. Do not turn off your computer
This problem can occur for several reasons. Some of them are listed below:
- Computer infected with a virus – If your computer is infected with a virus or malware, it may take a long time for updates to install.
- Unwanted software – Maybe there are some unwanted applications on your PC, which can influence your PC’s performance.
- Poor network connection – Your Internet could also be to blame.
Tips:
Discover MiniTool System Booster: Unlock Disk Space and Deep-Clean Your PC.
MiniTool System Booster TrialClick to Download100%Clean & Safe
Fix 1: Wait It out
If it’s stuck for more than 15 minutes, it could be a problem, though this also depends on the number of junk files and how clean the system is. This process may take longer if you haven’t performed Disk Cleanup in a while and your hard drive is almost full. You should wait, even for a few hours, until the Disk Cleanup utility finishes its work.
If your update gets stuck after it reaches a specific percentage, then this method might be suitable for you. Sometimes, the update may be delayed from the server-side because it needs some time.
Therefore, if your update is stuck, you don’t need to do anything, just wait for several hours. If the update wizard still doesn’t proceed, you can try the below-mentioned solutions.
Fix 2: Run Startup Repair
When your PC is stuck in “Cleaning up. Do Not Turn off Your Computer”, performing Windows Startup Repair might be able to fix the issue. This also requires entering the Windows Recovery Environment (WinRE) using the Windows installation disc.
Windows 7:
Step 1: Go to download an ISO file of Windows 7 online and then create an installation disc with a USB drive or DVD.
Step 2: Insert this disc and restart your computer. You should change the BIOS settings so that the disc is the first boot order.
Step 3: Choose your language, keyboard, and time settings, and click Next.
Step 4: In the pop-up window, click Repair your computer.
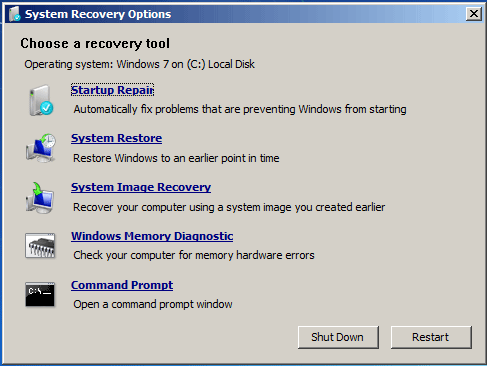
Step 5: Choose your system to repair.
Step 6: You will get the following interface. Click Startup Repair to automatically fix problems that are stopping Windows from starting.
Then, the repair process starts. This may take several minutes to complete and you just need to wait patiently. Also, it may require the system to restart.
Windows 10:
Step 1: Connect the installation medium to your Windows 10 PC, enter BIOS by pressing F2, Del, etc., and change the boot order to run the computer from the disc or USB drive.
Step 2: Choose a language and keyboard options, and click the Repair your computer button to enter WinRE or access System Recovery Options.
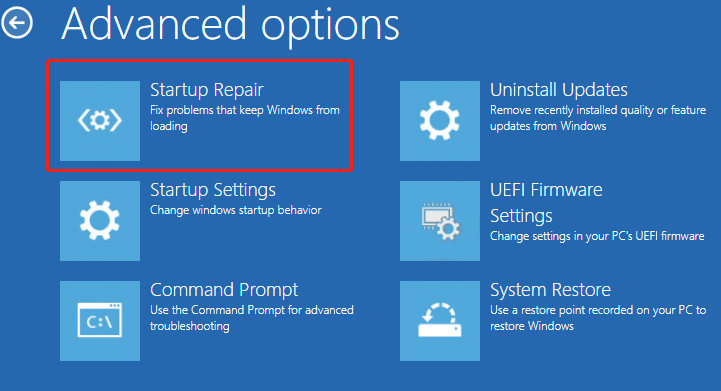
Step 3: Go to Choose an option > Troubleshoot > Advanced options. Then, click Startup Repair to start fixing problems that keep Windows from loading.
Fix 3: Run Windows Update from Safe Mode
To fix the “Cleaning up. Do Not Turn off Your Computer” issue, you can run Windows Update from Safe Mode.
Windows 7:
Step 1: Restart your computer and press F8 while your computer is booting to display the Advanced Boot Options menu.
Step 2: Use the arrow keys to highlight Safe Mode and press Enter.
Step 3: Run Windows Update again. After the updates are installed successfully, you can repeat steps 1-2 and select Start Windows Normally to return to your normal Windows configuration.
Windows 10:
Step 1: Enter WinRE. Go to Choose an option > Troubleshoot > Advanced options.
Step 2: Choose Startup Settings. Click Restart. Once the PC restarts, choose Safe Mode with Networking.
Step 3: Press the Windows key + I key together to open the Settings application. Then, go to Update & Security.
Step 4: Next, click Check for updates. Wait for Windows to download and install the latest updates.
Fix 4: Perform a System Restore
If you have created a system restore point or system image backup with Windows snap-in tools, you can try using the restore point or image file to restore your computer to fix the “Cleaning up. Do Not Turn off Your Computer” error message.
Step 1: Restart your computer and press the Shift key continuously.
Step 2: After that, click Troubleshoot, then click Advanced options to continue.
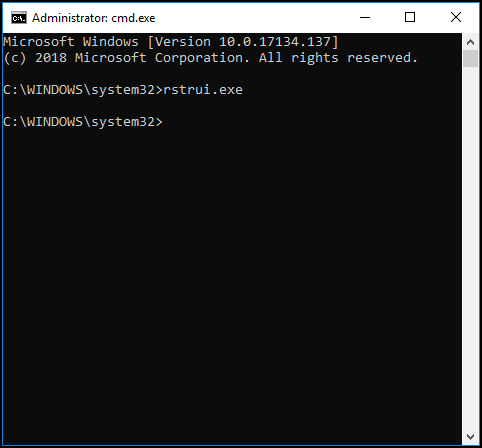
Step 3: Then click Startup Setting > Restart> Enable Safe Mode with Command Prompt.
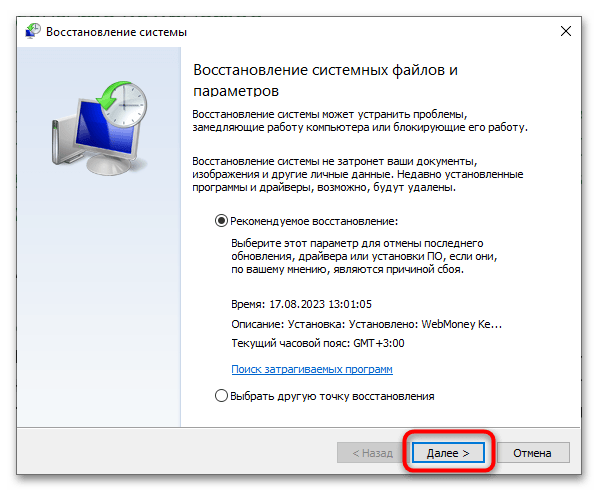
Step 4: Type rstrui.exe and press Enter to continue.
Step 5: In the next interface, click Next to continue.
Step 6: Choose the time to restore your computer to the state it was in the selected event and click Next to continue.
Step 7: You need to confirm the restore point and click Finish. After the system restore is finished, try to shut down your computer again.
When the system restore process is finished, you can reverse your computer to a previous state. Then you can check if the error has gone.
Fix 5: Repair Corrupted System Files
Windows system files corruption can cause the issue. In such an event, you can use two command-line utilities – SFC (System File Checker) and DISM (Deployment Image Servicing and Management) to fix your Windows system files.
SFC is a tool that can scan your system and repair any corrupted files. However, when SFC isn’t able to get the errors, DISM can help you do this work. It will perform a thorough search of your system and fix the corrupted files.
Here is how to use SFC to fix corrupt system files:
Step 1: Input Command Prompt in the search bar and click Run as administrator from the context menu.
Step 2: Type the following command and press Enter.
sfc /scannow
After the verification is 100% completed, you can check the scan results to see if there are some errors found.
If sfc /scannow command is unable to fix Check the Hide All Microsoft Services box, you can run DISM to fix the Windows system image. Type the following command.
Dism /Online /Cleanup-Image /CheckHealth
Dism /Online /Cleanup-Image /ScanHealth
Dism /Online /Cleanup-Image /RestoreHealth
After that, you can check whether you still encounter the issue.
Fix 6: Perform a Clean Boot
Performing a Clean Boot can avoid software conflicts while installing Windows updates. To perform a clean boot, you need to do:
Step 1: Type msconfig in the Run box, and click OK.
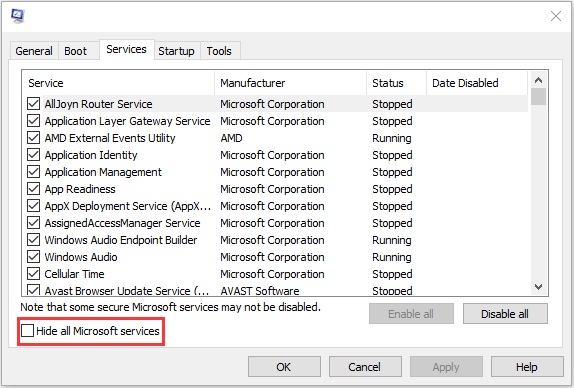
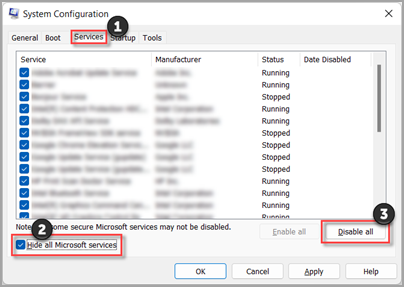
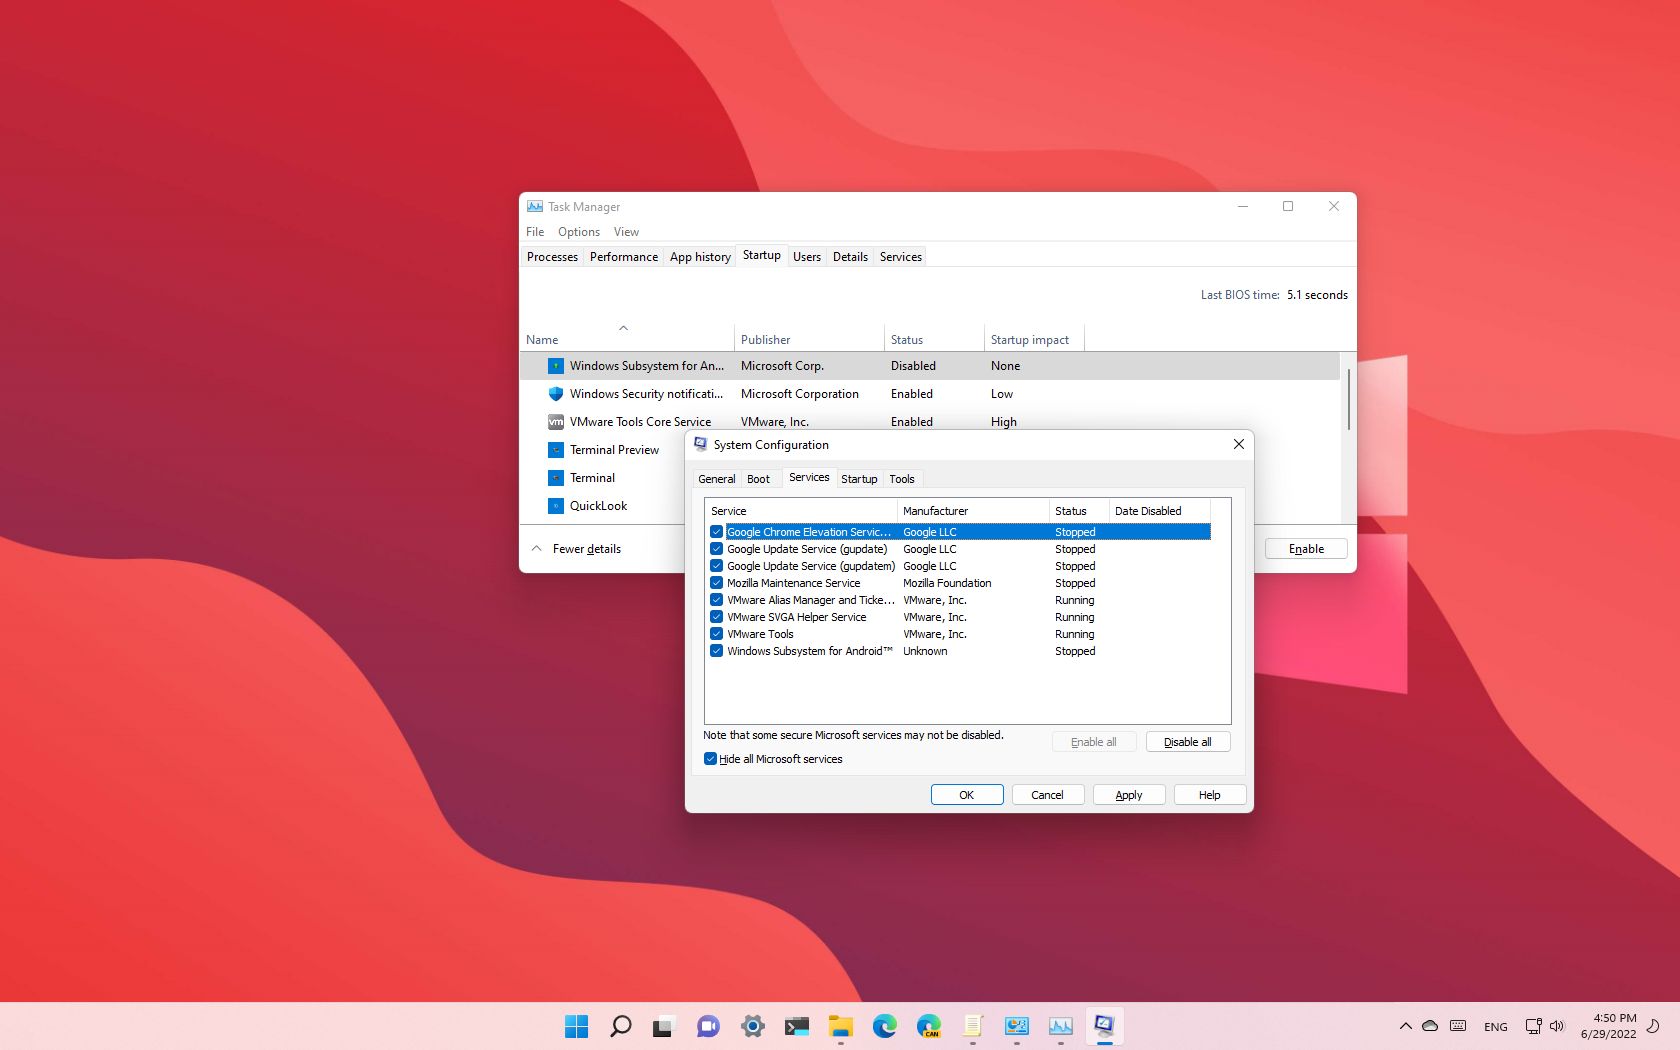
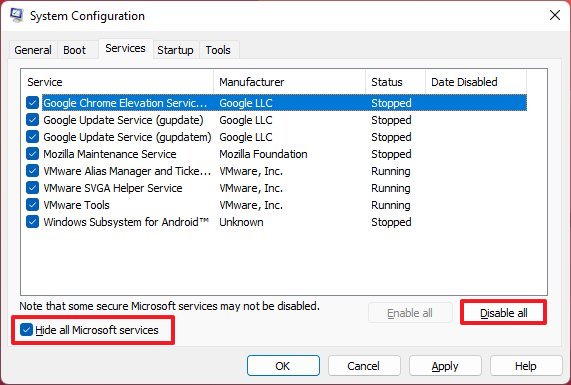
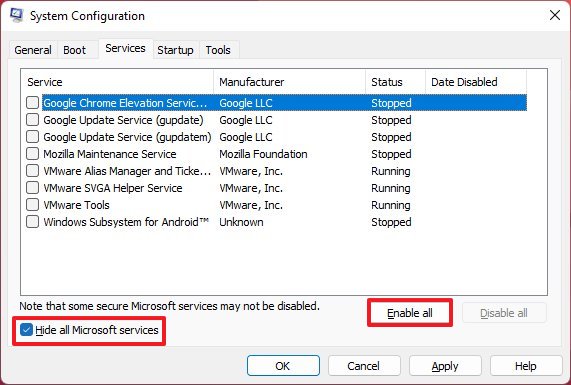
Step 2: Then go to the Services tab. Check the Hide All Microsoft Services box.
Step 3: Now, click the Disable all button, and click Apply to save the change.
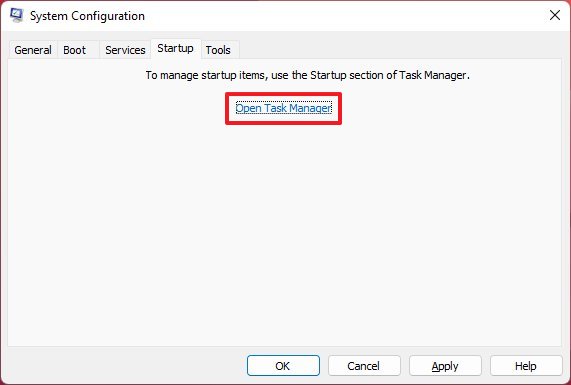
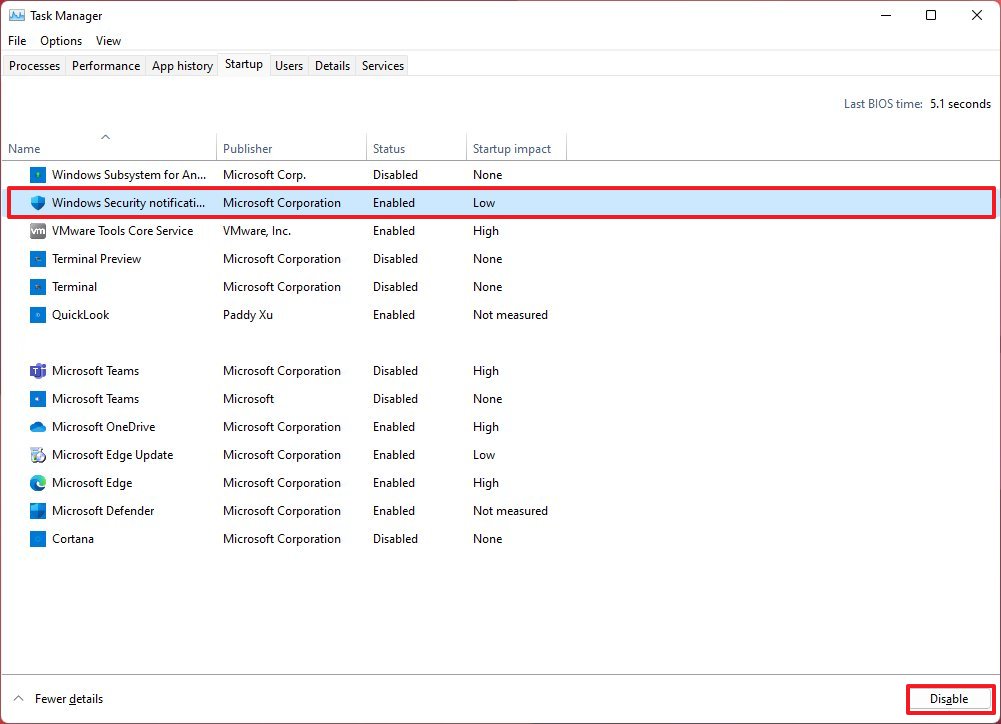
Step 4: Navigate to the Startup tab and click Open Task Manager.
Step 5: In the Task Manager tab, select the first enabled application and click Disable. Here you need to disable all enabled applications one by one. After disabling all programs, close Task Manager and click OK.
Afterward, you can restart the computer to update Windows again.
Fix 7: Reset Your PC
Finally, if none of the above solutions can fix the “Cleaning up. Do Not Turn off Your Computer” error, there is only one solution left – reset your Windows. This is more like a refresh of the system than reinstalling.
Step 1: Enter the WinRE. Then go to Choose an option > Troubleshoot > Reset this PC.
Step 2: Choose Keep my files and continue with the resetting process.
Back up System
After solving the problem of “stuck at Cleaning up. Do Not Turn off Your Computer”, you had better create a system image to restore your system when it crashes.
Refer to creating a system image, it is highly recommended you use MiniTool ShadowMaker – a piece of fantastic and professional backup software. It is pretty easy and safe to back up and restore your system.
In addition to backing up your operating system, you can also use MiniTool ShadowMaker to back up files and folders, disks, and partitions. What’s better, you can use it for free within 30 days, so just download it and have a try.
MiniTool ShadowMaker TrialClick to Download100%Clean & Safe
Here are the instructions to create a system image with MiniTool ShadowMaker:
Step 1: Launch MiniTool ShadowMaker, then click Keep Trial.
Step 2: MiniTool ShadowMaker selects the source by default. Thus, you just need to choose the backup destination.
Step 3: Go to the Backup page. Click Back Up Now to start creating a system image.

Tips:
Tip: If you click Back Up Later, then you can click Back Up Now to begin the backup task on the Manage page.
Step 4: Wait for MiniTool ShadowMaker to finish backing up the operating system.
Bottom Line
To sum up, this post has introduced what causes the error “Cleaning up. Do Not Turn off Your Computer” and shown some solutions to fix it. If you come across the same issue, try these solutions. If you have any better solution to fix the issue, you can share it in the comment zone.
After fixing this problem, it is recommended you create a system image. If you have any problem when using the MiniTool program, please feel free to contact us via the email [email protected] and we will reply to you as soon as possible.
Cleaning up. Do Not Turn off Your Computer FAQ
What does cleaning up your computer do?
This will delete temporary files, empty the Recycle Bin, and delete various files and other items you no longer need. Your computer will run faster by reducing the number of unnecessary and temporary files on your hard drive.
Does cleaning your PC make it faster?
Cleaning your PC frees up storage space so you can install more programs or save pictures, sound files, and movies. If you haven’t cleaned your PC in a while, your PC will run faster than before after cleaning up.
What does it mean when your laptop says getting windows ready don t turn off your computer?
When you are prompted with the «Windows is ready, please do not turn off your computer» message, your system may be processing certain tasks in the background, such as downloading and installing files, starting the Windows 10 update process, modifying settings apps and modules, etc.
Applies ToWindows 11 Windows 10
Note: If your issue prevents you from booting into Windows, you won’t be able to follow the steps in this article. After the device tries to restart a few times, it should automatically enter the Windows Recovery Environment. To find information about restoring your device in this scenario, please visit the article, Windows Recovery Environment.
Summary
A «clean boot» starts Windows with a minimal set of drivers and startup programs, so that you can determine whether a background program is interfering with your game or program. This is similar to starting Windows in Safe Mode, but provides you more control over which services and programs run at startup to help you isolate the cause of a problem.
How to perform a clean boot
These steps might look complicated at first glance, but following them in order, step-by-step, will help get you back on track.
-
Sign in to the computer as an administrator. See Manage user accounts in Windows to learn more about configuring a user account as an administrator.
-
Select Search , type msconfig , and then select System Configuration from the list of results.
Important: If the computer is connected to a network, network policy settings might prevent you from following these steps. Only use the System Configuration utility to change the advanced boot options on the computer with guidance from a Microsoft support engineer. Using the System Configuration utility might make the computer unusable.
-
On the Services tab of System Configuration, select Hide all Microsoft services, and then select Disable all. Select Apply.

-
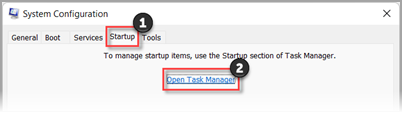
On the Startup tab of System Configuration, select Open Task Manager.

-
On the Startup apps tab in Task Manager, for each Enabled startup item, select the item and then select Disable. (Keep track of which items have been Disabled. You will need to know this later.)
-
Close Task Manager.
-
On the Startup tab of System Configuration, select OK. When you restart the computer, it will be in a clean boot environment. You can now try to troubleshoot your problem by trying the troubleshooting steps in the section, Install, uninstall, or run an application.
Warning: Your computer might temporarily lose some functionality while in a clean boot environment.
-
Once you are done troubleshooting your problem and want to return your computer to a normal startup, follow the steps in the section, Reset the computer to start normally after clean boot troubleshooting.
Install, uninstall, or run an application
After you restart the computer, you’ll have a clean boot environment. Then, do one of the following, as appropriate for your situation:
Note: If you receive the error, «The Windows Installer service could not be accessed», you’ll need more information. Follow the steps in the section, How to start the Windows Installer service when system services are not loaded. Then try installing or uninstalling the app or update again.
If the installation or uninstallation is successful, your issue is resolved. To return your computer to a normal startup, follow the steps in the section, Reset the computer to start normally after clean boot troubleshooting.
If the installation or uninstallation still fails, that means this issue is not caused by interference from a service or an app. You might need to contact the program manufacturer for more specific support.
If the app runs correctly while in a clean boot environment, then your problem was caused by interference from another app or service. You can find out which app or service is causing the issue by following the steps in the section, How to determine what is causing the problem after you do a clean boot.
If your app still doesn’t run as expected while in a clean boot environment, then your problem is not caused by interference from another app or service. You might need to contact the program manufacturer for more specific support.
If you run a Setup program without starting the Windows Installer service, you might receive the following error message:
The Windows Installer service could not be accessed. Contact your support personnel to verify that the Windows Installer service is properly registered.
The Windows Installer service doesn’t start if you clear the Load system services check box in the System Configuration utility. To use the Windows Installer service when system services are not loaded, start the service manually. Here’s how:
-
Select Search , then type computer management. Select Computer Management from the list of results.
-
In the console tree, select the arrow to expand Services and Applications, and then select Services.
-
In the details pane, right-click Windows Installer, and then select Start.
How to determine what is causing the problem after you do a clean boot
If your problem does not occur while the computer is in a clean boot environment, then you can determine which startup app or service is causing the problem by systematically turning them on or off and restarting the computer. While turning on a single service or startup item and rebooting each time will eventually find the problematic service or application, the most efficient way to do this is to test half of them at a time, thus eliminating half of the items as the potential cause with each reboot of the computer. You can then repeat this process until you’ve isolated the problem. For detailed steps for how to do this, expand the following section:
-
Sign in to the computer as an administrator. See Manage user accounts in Windows to learn more about configuring a user account as an administrator.
-
Select Search , then type msconfig. Select System Configuration from the list of results.
-
Select the Services tab, and then select Hide all Microsoft services.
-
Select each of the check boxes in the upper half of the Service list.
-
Select OK, then restart Windows.
-
After the computer restarts, determine whether the problem still occurs.
-
If the problem still occurs, one of the checked items is the problematic service. Repeat steps 1 through 6, but in Step 4, clear the lower half of the boxes in the Service list that you selected in your last test.
-
If the problem doesn’t occur, the checked items are not the cause of the problem. Repeat steps 1 through 6, but in Step 4, turn on the upper half of the boxes that you cleared in the Service list in the last test.
-
Repeat these steps until you’ve either isolated the problem to a single service, or until you’ve determined that none of the services are the cause of the problem. If you experience the problem when only one service is selected in the Service list, then that startup service is the one causing the problem, and you should go to step 9. If none of the services cause the problem, go to step 7.
-
-
Select the Startup tab, then select Open Task Manager. On the Startup apps tab on Task Manager, one at a time, select the upper half of the items you Disabled earlier, then select Enable.
-
Restart Windows.
-
If the problem still occurs, repeat step 7, but this time disable the lower half of the items you enabled in your last test.
-
If the problem does not occur, repeat step 7, but disable everything you enabled in your last test and enable the other half of the items you disabled.
-
If you still experience the problem after only one Startup item is enabled, then the enabled item is the one causing the problem, and you should go to step 9. If no Startup item causes the problem, there might be a problem with a Microsoft service. See Recovery options in Windows.
-
-
After you determine the startup item or the service that causes the problem, contact the program manufacturer to determine whether the problem can be resolved, or run Windows with the service unchecked or the Startup item disabled.
Reset the computer to start normally after clean boot troubleshooting
After you finish troubleshooting, follow these steps to reset the computer to start normally.
-
Select Search , then type msconfig. Select System Configuration from the list of results.
-
On the General tab, select Normal Startup.
-
Select the Services tab, clear the check box beside Hide all Microsoft services, select Enable all, then select Apply.
-
Select the Startup tab, then select Open Task Manager.
-
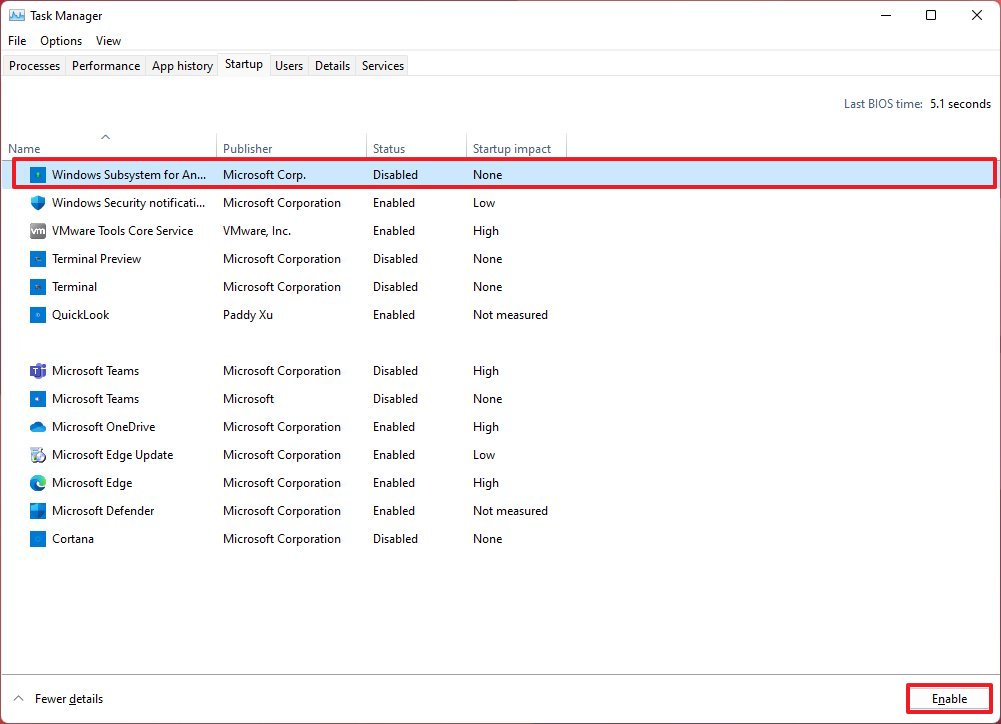
In Task Manager, Enable all of the startup programs you had disabled before, and then select OK.
-
When you’re prompted to restart the computer, select Restart.
Need more help?
Want more options?
Explore subscription benefits, browse training courses, learn how to secure your device, and more.
On Windows 11, a «clean boot» is a way to start the system with a minimal set of drivers and apps at startup. Usually, you would boot your computer this way to troubleshoot issues while running or installing applications (including games) or applying updates to discard conflicts with other components.
This startup mode is similar to Safe Mode, but a clean boot gives you much more control to troubleshoot the problem on Windows 11.
If your device isn’t starting correctly or the system refuses to apply a cumulative or feature update, starting with a clean boot is always recommended to rule out a conflict. In other words, if the problem persists during a clean boot, you will know it may be an issue with the app. Otherwise, if the problem goes away, it could be a conflict with another component.
This guide will teach you the steps to perform a clean boot of your computer to troubleshoot possible problems between applications.
How to do a clean boot of Windows 11
To perform a clean boot on Windows 11, use these steps:
- Open Start.
- Search for msconfig and click the top result to open the System Configuration app.
- Click the Services tab.
- Check the Hide all Microsoft services option.
- Click the Disable all button.
- Click the Startup tab.
- Click the Open Task Manager option.
- Select each enabled application.
- Click the Disable button.
- Restart the computer
Once you complete the steps, Windows 11 will only load the essential drivers and applications.
In the case that you previously had a problem installing an update or application, try to proceed with the installation one more time. If the problem was an app not starting up correctly, try relaunching it.
All the latest news, reviews, and guides for Windows and Xbox diehards.
If the problem continues in this environment, you will know that it could be an issue with the update or application and not a conflict with anything on the current setup.
On the other hand, if the problem no longer occurs, you will know that it’s a conflict with another application or service. In this case, enable one process or app at a time (refer to the instructions below), restart the computer, and test until the conflict appears again.
Once you stumble upon the conflict, you will know where the problem lies, and you can research online to find a solution.
How to stop clean boot on Windows 11
To boot Windows 11 normally, use these steps:
- Open Start.
- Search for msconfig and click the top result to open the System Configuration app.
- Click the Services tab.
- Check the Hide all Microsoft services option.
- Click the Enable all button.
- Click the Startup tab.
- Click the Open Task Manager option.
- Select each application previously enabled.
- Click the Enable button.
- Restart the computer.
After you complete the steps, the computer will start with all services and applications as usual.
More resources
For more helpful articles, coverage, and answers to common questions about Windows 10 and Windows 11, visit the following resources:
- Windows 11 on Windows Central — All you need to know
- Windows 10 on Windows Central — All you need to know
Mauro Huculak has been a Windows How-To Expert contributor for WindowsCentral.com for nearly a decade and has over 15 years of experience writing comprehensive guides. He also has an IT background and has achieved different professional certifications from Microsoft, Cisco, VMware, and CompTIA. He has been recognized as a Microsoft MVP for many years.
Немного изменив настройки системы, вы сможете повысить приватность и расчистить место на диске.
Если вашим компьютером пользуется ещё несколько человек, вы опасаетесь, что ваши данные могут попасть в чужие руки, или вам очень не хватает места на жестком диске, можно заставить систему удалять ненужные данные при перезагрузке.
Недавние документы
Windows запоминает, какие файлы вы редактируете, и отображает их, чтобы вы быстро получали к ним доступ. Открываемые файлы демонстрируются в меню «Недавние документы» и в выпадающих списках, появляющихся при щелчке по значкам программ на панели задач. Это удобно, но если вы не хотите, чтобы эти данные сохранялись, то можно сделать следующее.
Откройте «Редактор реестра». Для этого нажмите Windows + R, введите
regedit
и нажмите OK.
Отыщите в боковой панели следующий путь:
HKEY_CURRENT_USERSOFTWAREMicrosoftWindowsCurrentVersion
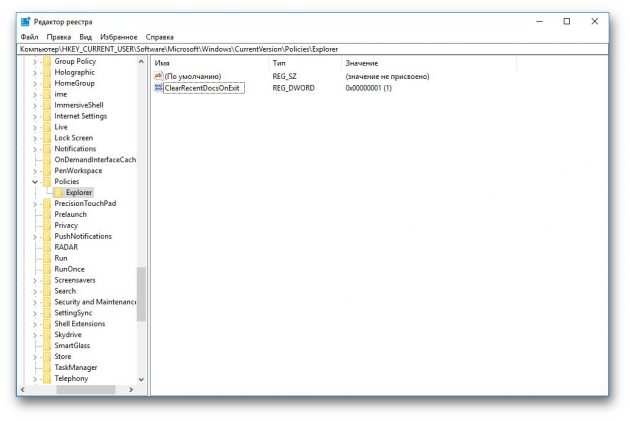
Посмотрите, есть ли здесь раздел Policies, содержащий раздел Explorer. Если нет, их нужно создать. Щёлкните по разделу CurrentVersion правой кнопкой мыши и выберите «Новый» → «Раздел». Назовите созданный раздел Policies и нажмите Enter. Затем таким же образом создайте в нём раздел Explorer.
В Explorer создайте новый параметр DWORD (32-bit). Назовите этот параметр ClearRecentDocsOnExit и установите ему значение 1. Если нужно будет отключить очистку списка недавних документов, поменяйте значение на 0.
Файл подкачки
Когда Windows не хватает оперативной памяти, она переносит временные файлы в файл подкачки. При перезагрузке оперативная память очищается, файл подкачки — нет. Но это можно исправить, если вы не хотите, чтобы он занимал место.
Откройте «Редактор реестра» и отыщите в нём следующую ветку:
HKEY_LOCAL_MACHINESYSTEMCurrentControlSetControlSession ManagerMemory Management

Здесь можно найти параметр ClearPageFileAtShutdown. Если его нет, создайте параметр DWORD (32-bit) и присвойте ему имя ClearPageFileAtShutdown. Затем измените его значение на 1. Чтобы отключить очистку файла подкачки, смените значение обратно на 0.
Данные браузера
История, cookies и прочие данные в браузерах сохраняются, если, конечно, вы не пользуетесь приватным режимом. Можно настроить очистку этих данных при перезапуске браузеров, чтобы повысить приватность.
Firefox
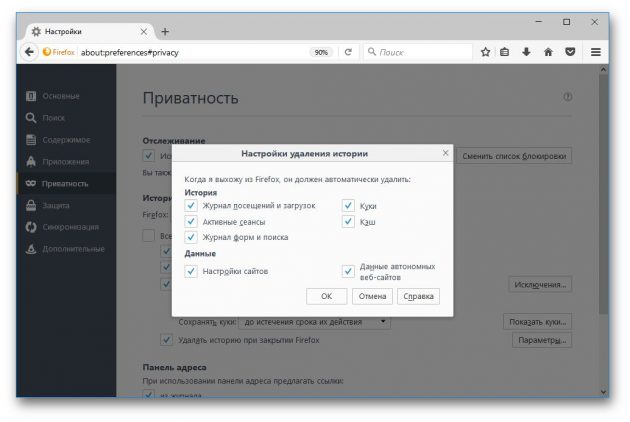
Откройте настройки Firefox в главном меню. Выберите настройки приватности слева. В выпадающем списке найдите «Firefox будет использовать ваши настройки хранения истории». Выберите «Удалять историю при закрытии Firefox», затем отметьте в параметрах, что именно вы хотите удалять. Либо используйте опцию «Всегда работать в режиме приватного просмотра».
Chrome
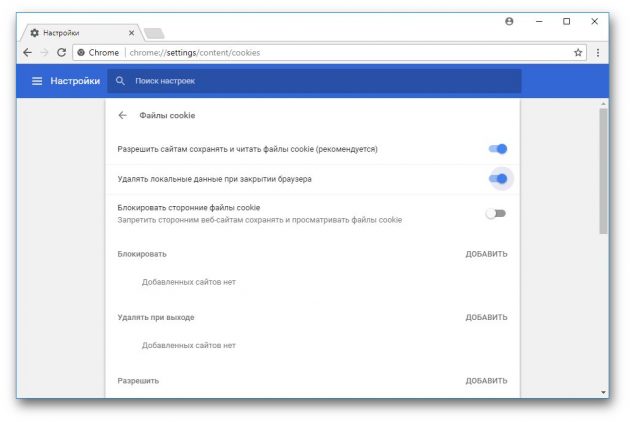
Чтобы очищать файлы cookies при выходе, войдите в настройки Chrome, промотайте страницу настроек вниз, к «Дополнительным», и откройте настройки контента. Активируйте опцию «Удалять локальные данные браузера».
Таким образом вы избавитесь от cookies, но история и прочие параметры будут сохраняться. Чтобы автоматически удалять и их, воспользуйтесь расширением Click&Clean. Установите его и в настройках выберите «Удалять приватные данные при выходе из Chrome».
Click&Clean
www.hotcleaner.comЦена: Бесплатно
Загрузить
Edge

Зайдите в настройки Edge, под пунктом «Очищать данные браузера» выберите «Всегда удалять это при закрытии браузера». Нужно отметить, что именно вы хотите удалять.
Уведомления «живых тайлов»
«Живые тайлы» — это разноцветные плитки в меню «Пуск», отображающие различную информацию: вашу почту, погоду, новости и прочее. Можно заставить Windows очищать кеш, содержащий данные «живых тайлов».
Снова запустите «Редактор реестра». Найдите в нём путь:
HKEY_CURRENT_USERSoftwarePoliciesMicrosoftWindows
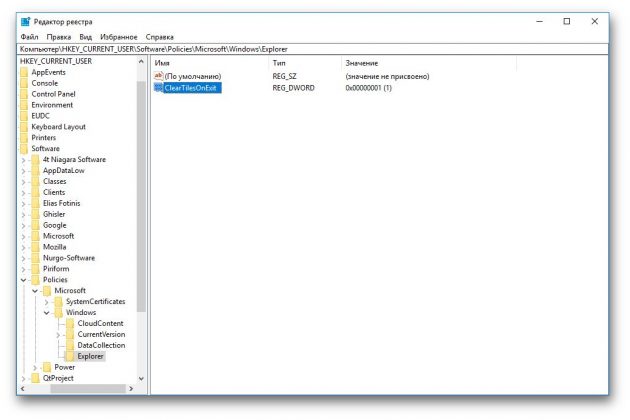
Создайте в нём раздел под названием Explorer, если его там нет. Добавьте в него параметр DWORD (32bit) и назовите его ClearTilesOnExit. Присвойте параметру цифру 1. Если захотите вернуть всё как было, введите 0.
Временные файлы
Во время работы в папке TEMP накапливаются различные временные файлы. Если не хотите, чтобы они занимали место, их можно удалять.
Чтобы открыть папку, нажмите Windows + R, введите
%temp%
и щёлкните OK.
Если вам нужно, чтобы система очищала папку при перезагрузке, можно автоматизировать это следующим образом.
Создайте текстовый файл в «Блокноте» и добавьте в него следующее:
rd %temp% /s /q
md %temp%
Выберите «Сохранить как…» и введите путь для сохранения файла:
%appdata%microsoftwindowsstart menuprogramsstartuptemp.bat
Если вам больше не нужно очищать временные файлы, удалите этот файл из папки Startup.