
Загрузить PDF
Загрузить PDF
Из этой статьи вы узнаете, как прочистить печатающую головку принтера. Из-за длительного простоя принтера в печатающих головках может образоваться засор, приводя к обрывистой и некачественной печати. Печатающие головки можно прочистить как при помощи встроенной программы, так и вручную.
-

Нажмите на логотип Windows в левом нижнем углу экрана.
-
Введите панель управления, чтобы найти приложение «Панель управления».
-
Нажмите на Панель управления (синяя иконка платы вверху меню «Пуск»).
-
- Если Панель управления находится в режиме просмотра по категориям, а не значкам, выберите пункт «Просмотр устройств и принтеров» в разделе «Оборудование и звук».
-
Под заголовком «Принтеры», вверху окна, щелкните правой кнопкой мыши по принтеру, который нужно прочистить. После этого на экране появится выпадающее меню.
- Если у вас мышь без правой кнопки, нажмите на правую сторону мыши или нажмите на мышь двумя пальцами.
- Если вместо мыши вы используете сенсорную панель, нажмите на нее двумя пальцами или нажмите на правую нижнюю часть панели.
-
На экране появится новое окно.
-
- В некоторых принтерах функцию очистки можно найти на вкладке «Дополнительно» или «Оборудование».
-
В общем, ищите опции, в названии которых есть слово «очистка».
- Если вам не удается найти опцию, отвечающую за очистку печатающих головок («сопел» или «картриджей»), сверьтесь с руководством пользователя или поищите информацию в интернете. Возможно, у вашего принтера нет функции самоочистки.
-
Если в ходе очистки вас попросят нажать на какую-то клавишу, так и сделайте. Когда принтер завершит процедуру очистки, можно будет вернуться к печати документов.
- Система предложит вам напечатать пробную страницу, чтобы вы могли убедиться в успехе очистки.
- Если печать покажет, что головки все еще засорены, попробуйте прочистить их вручную.
Реклама


-
Нажмите на логотип Apple в левом верхнем углу экрана, чтобы отобразить выпадающее меню.
-
-
Нажмите на иконку Принтеры и сканеры в правой части системных настроек.
-
На левой панели выберите принтер, который нужно прочистить.
-
-
-
-
В зависимости от модели принтера, расположение и внешний вид этой опции могут быть разными. На этой странице должны быть расположены такие опции, как «Очистка» и «Глубокая очистка».
- Если вверху окна есть выпадающее окно, нажмите на него, а затем выберите опцию «Очистка».[1]
- Если вам не удается найти нужную опцию, возможно, ваш принтер не поддерживает функцию очистки. Сверьтесь с инструкцией пользователя или поищите информацию в интернете.
- Если вверху окна есть выпадающее окно, нажмите на него, а затем выберите опцию «Очистка».[1]
-
Если во время очистки вас попросят нажать на какую-то клавишу, сделайте это. Когда принтер завершит процедуру очистки, можно будет вернуться к печати документов.
- Система предложит вам напечатать пробную страницу, чтобы вы могли убедиться в успехе очистки.
- Если печать покажет, что головки все еще засорены, попробуйте прочистить их вручную.
Реклама


-
Для прочистки печатающих головок вам понадобятся следующие материалы:[2]
- изопропиловый спирт;
- вода;
- миска или форма для выпечки пирогов;
- бумажные полотенца.
-
Это обезопасит вас и принтер от возможных повреждений при извлечении картриджей и каретки печатающей головки.
-
Откройте крышку принтера, а затем извлеките картриджи по одному, пока не достанете их все.
- Чтобы узнать, как правильно извлекать картриджи, сверьтесь с инструкцией пользователя или поищите информацию в интернете.
-
Это лоток, в котором закрепляются картриджи. Вы увидите внизу каретки несколько отверстий.
- Сверьтесь с инструкцией пользователя или поищите информацию в интернете, чтобы узнать, как извлечь каретку в данной модели принтера.
- Если печатающие головки находятся на самих картриджах, пропустите этот шаг.
-
Для начала возьмите по 120 мл каждой жидкости. Разбавленный спирт будет менее абразивным и не навредит печатающим головкам.
-
Не лейте слишком много жидкости (достаточно 1 см в высоту).
-
Каретку (или картридж) необходимо погрузить в раствор примерно на 1 см в глубину.
- Если печатающие головки находятся на самих картриджах, положите в раствор именно их.
-
Этого времени будет достаточно, чтобы засохшая краска начала растворяться.
-
Промокните печатающую головку бумажным полотенцем, чтобы убрать жидкость и краску с поверхности головки.
- Прежде чем продолжить, печатающая головка должна полностью высохнуть.
-
Вставьте каретку печатающей головки и/или картриджи обратно в принтер и распечатайте пробную страницу. Принтер должен работать как новый.
- Если принтер все еще печатает неправильно, оставьте каретку печатающей головки (или картриджи) в растворе на всю ночь.
Реклама


Советы
- Печать страницы раз в неделю предотвратит образование засоров в печатающих головках.
- Если печатающие головки находятся на картриджах, засоренный картридж всегда можно заменить новым.
Реклама
Предупреждения
- В некоторых картриджах есть губка, которая соединяет картридж и каретку печатающей головки. Не мойте и не прикасайтесь к этой губке.
Реклама
Об этой статье
Эту страницу просматривали 52 650 раз.
Была ли эта статья полезной?
When your printer starts producing random smudges and lines in the print results, it’s a symptom that signal a clogged print head nozzles and that a printer head cleaning is needed to fix the issue. This guide will show you how to clean the printhead of your printer in Windows 11.
Clean Print Head in Windows 11
The print head cleaning button is usually accessible under Maintenance settings in the Printing preferences which can be accessed through Windows 11 Settings. Below is a detailed step-by-step guide on how to access the print head cleaning option in Windows 11 (for most printers).
1. First, press Win + i keys to open Settings. On the left pane, click Bluetooth & devices.
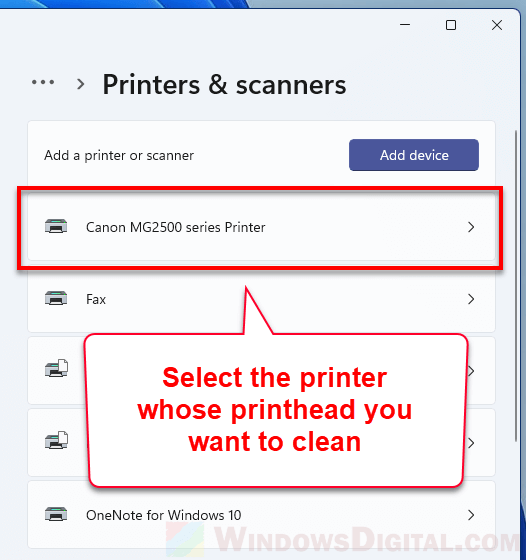
2. Next, select Printers & scanners.

3. In the list of printers, select the printer whose printhead you want to clean.
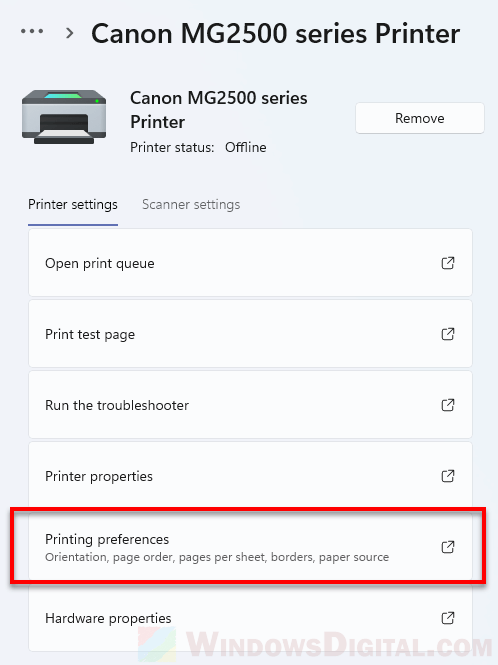
4. Then, click on Printing preferences.
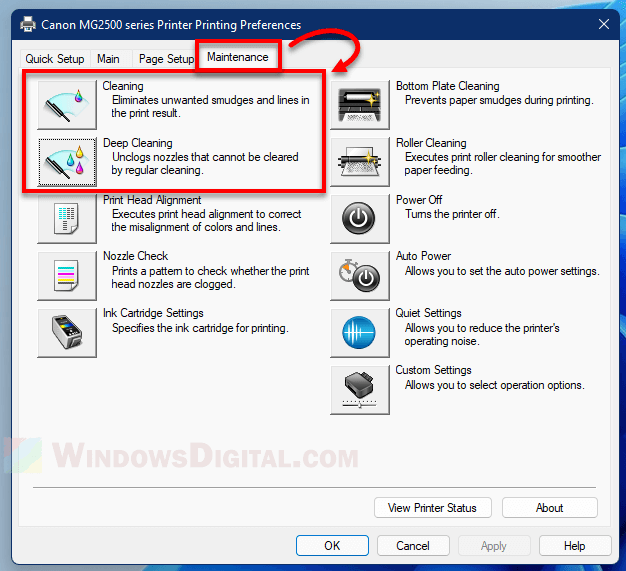
5. In the printing preferences window, click on Maintenance tab. From there, you should be able to see the cleaning options such as “Head Cleaning“, “Cleaning” or “Deep Cleaning” depending on what printer you have. Click on the Cleaning option.
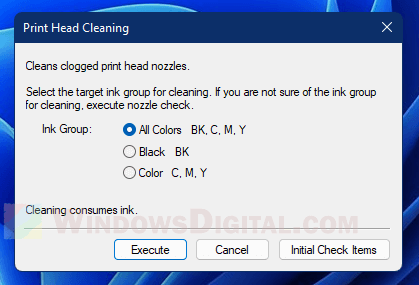
6. Depending on what printer you have, you may be asked to select the ink group you want to clean. Select an ink group and click Execute to proceed. If you’re not sure which ink group you should clean, you should run a nozzle check first.
7. You will then be lead through a series of on-screen instructions to complete the print head cleaning.
The printer used in the guide above is a Canon MG2500 series printer. As for printers of other brands such as Epson and HP printers, though the settings may look different depending on what printer you have, the print head cleaning option can usually be found in the same settings window – Printing preferences > Maintenance.
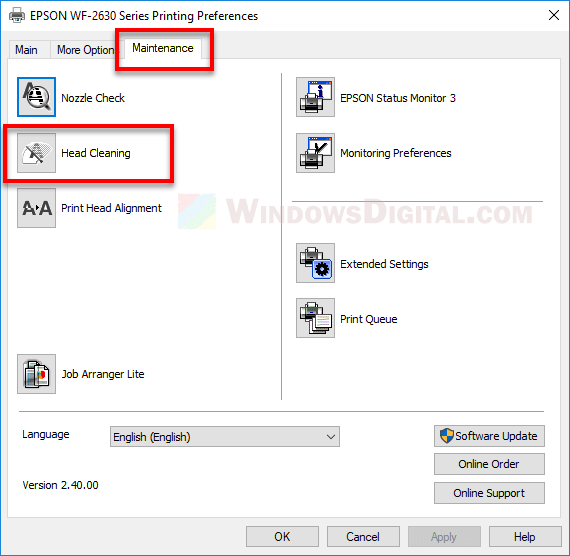
Epson printer’s Printing preferences > Maintenance > Head Cleaning
Note that not all printers have the print head cleaning function, but most modern printers have it. If there is no button or whatsoever related to print head cleaning under the Maintenance tab in your printer’s printing preferences, it may indicates that the printer does not have the feature.
Also, different printers may have different print head cleaning option(s) which work differently depending on the printers. For example, the Canon MG2500 series has both the casual cleaning and deep cleaning options for print head cleaning, while my Epson WF-2630 only has the head cleaning option.
How to run a nozzle check on Windows 11
When you execute print head cleaning, the system will usually ask which ink group you want to clean, whether you want to clean all colors ink group, black only or color only ink group. If you are not sure which ink group for cleaning, you should execute a nozzle check first to see which ink group(s) produces symptoms of a clogged nozzle.
To run a nozzle check for your printer on Windows 11, follow the step 1-4 in the instruction above to open the Printing preferences of your printer in Windows 11.
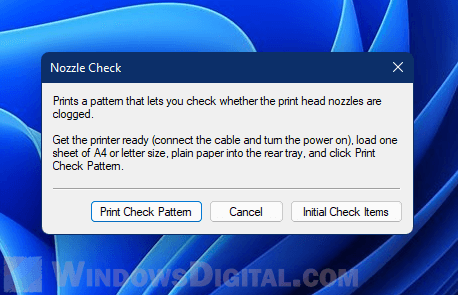
Then, go to the Maintenance tab, and select the Nozzle Check option.

Click on Print Check Pattern to print a pattern that lets you see whether the print head nozzles are clogged. Follow the rest of the on-screen instruction to complete the nozzle check.
If print results display any of the following symptoms, you may need to run a printhead cleaning for the printer.
- Smudges and lines appear randomly on the print results.
- The printer did sound and look like it was printing but you only get a blank page instead.
- Black, or one or more other colors are missing from the print.
- Gaps in print.
Все способы:
- Очищаем головку принтера HP
- Способ 1: Инструмент очистки в Windows
- Способ 2: Экранное меню МФУ
- Вопросы и ответы: 42
Если вы начали замечать ухудшение качества печати, на готовых листах появляются полосы, некоторые элементы не видны или отсутствует определенный цвет, рекомендуется провести процедуру очистки печатающей головки. Далее мы детально рассмотрим, как выполнить это обладателям принтеров компании HP.
Очищаем головку принтера HP
Печатающая головка является самым важным компонентом любого струйного устройства. Она состоит из множества сопел, камер и различных плат, которые распыляют чернила по бумаге. Конечно, такой сложный механизм иногда может давать сбои в работе, а связано чаще всего это с засорением участков. К счастью, прочистка головки – дело несложное. Произвести его под силу любому пользователю самостоятельно.
Способ 1: Инструмент очистки в Windows
При создании программной составляющей любого принтера для него практически всегда разрабатываются специальные обслуживающие инструменты. Они позволяют обладателю оборудования без проблем провести определенные процедуры, например, проверку сопел или картриджа. В сервис включена и функция по очистке головки. Ниже мы расскажем о том, как ее запустить, однако сначала вам потребуется подключить девайс к ПК, включить его и удостовериться в корректности работы.
Подробнее:
Как подключить принтер к компьютеру
Подключение принтера через Wi-Fi роутер
Подключение и настройка принтера для локальной сети
Далее вам необходимо сделать следующее:
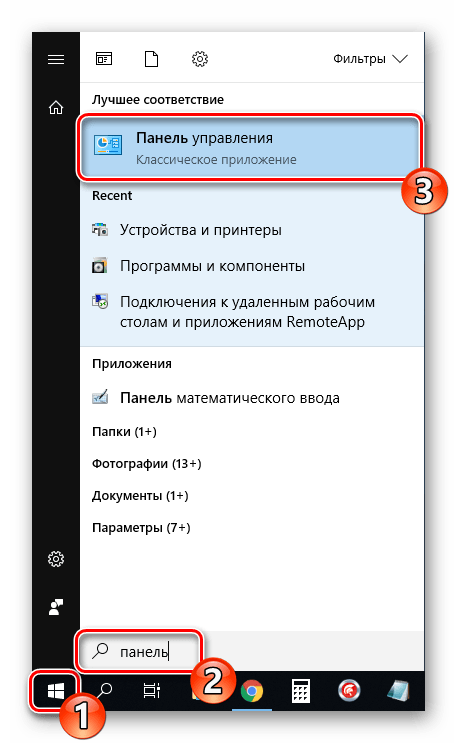
- Через меню «Пуск» перейдите в «Панель управления».
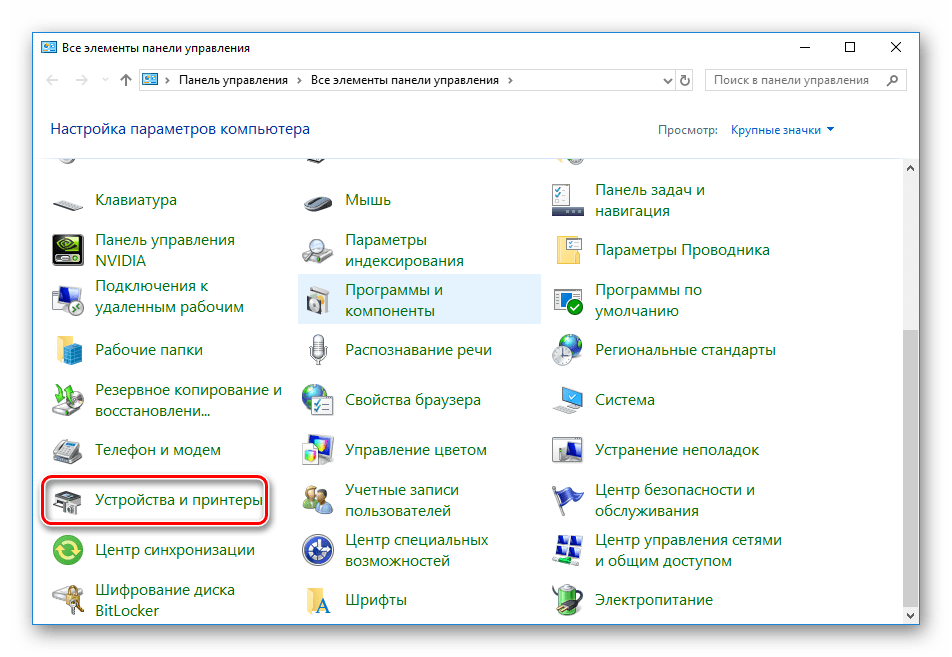
- Отыщите там категорию «Устройства и принтеры» и откройте ее.
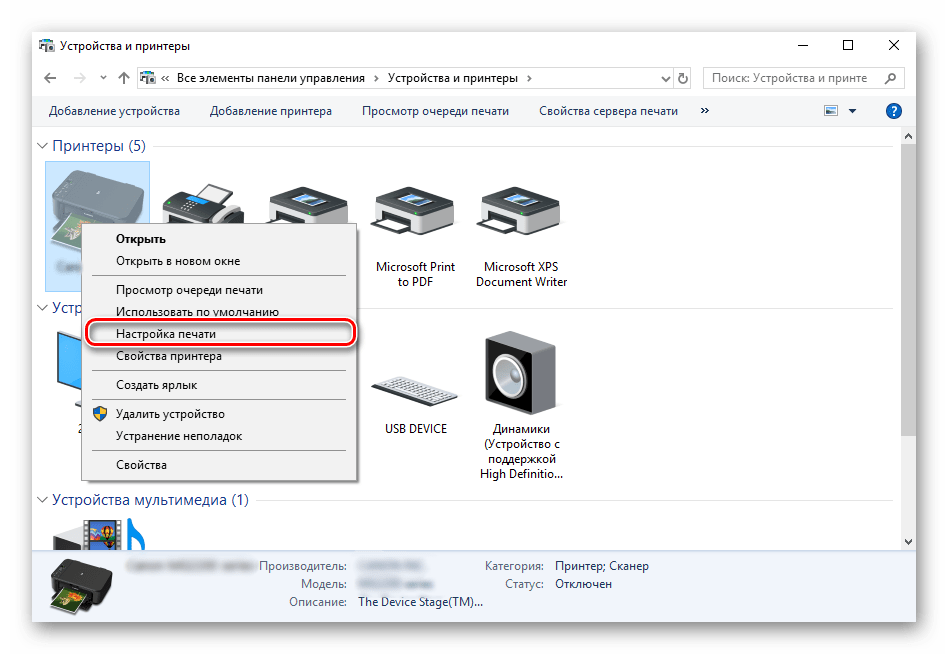
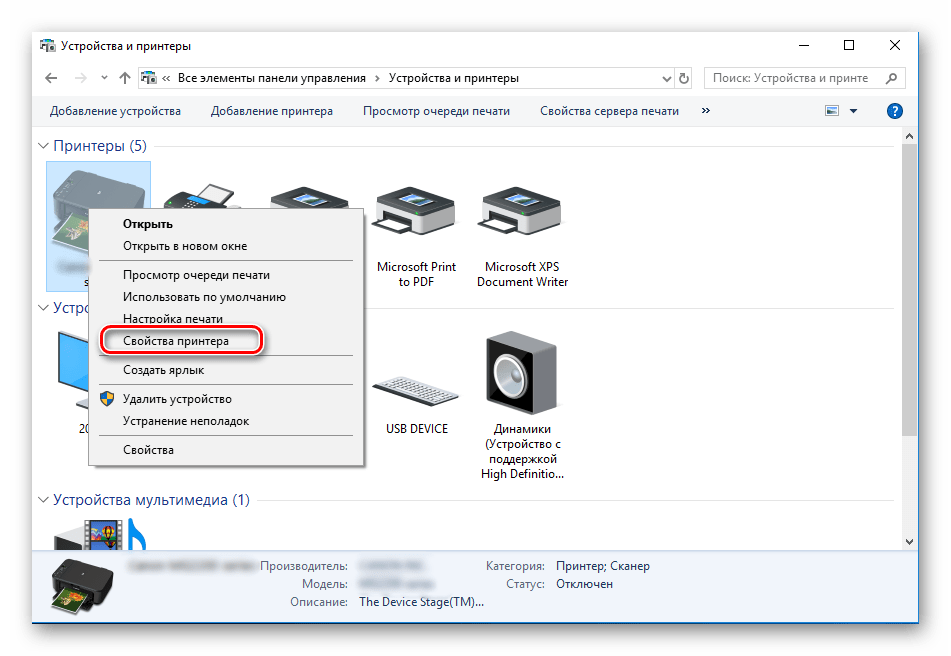
- В списке найдите ваше оборудование, кликните на нем правой кнопкой мыши и выберите пункт «Настройка печати».
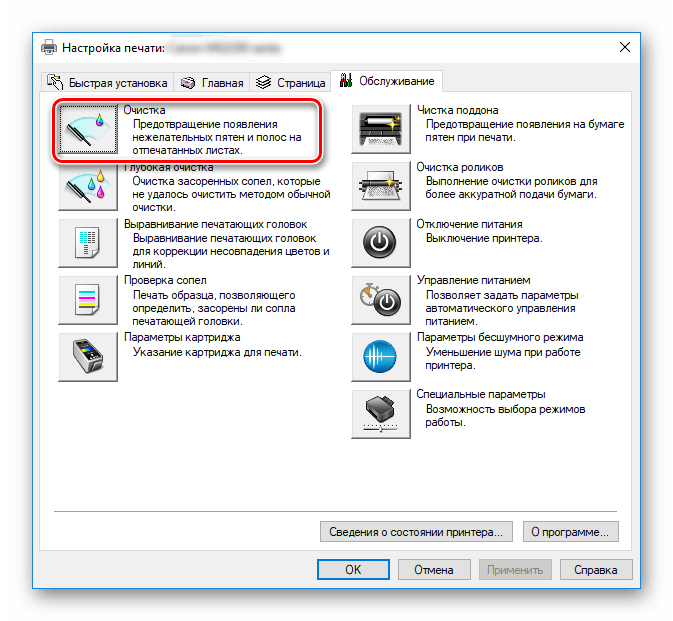
- Переместитесь во вкладку «Обслуживание» или «Сервис», где нажмите на кнопку «Очистка».
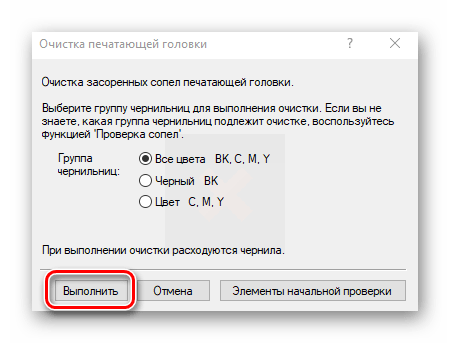
- Ознакомьтесь с предупреждениями и инструкциями, приведенными в отображенном окне, после чего кликните на «Выполнить».
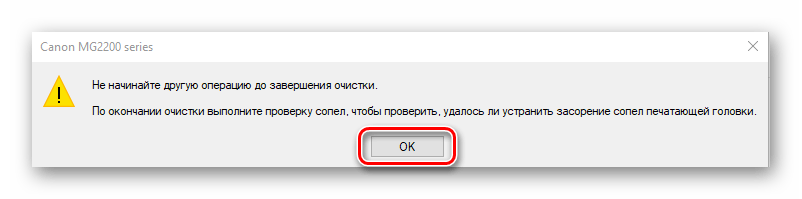
- Дождитесь завершения очистки. Во время нее не запускайте никаких других процессов — эта рекомендация появится в открывшемся предупреждении.
Если по каким-либо причинам устройство не отображается в списке, советуем обратиться к статье по следующей ссылке. В ней вы найдете развернутые инструкции о том, как исправить возникшую проблему.
Подробнее: Добавление принтера в Windows
В зависимости от модели принтеров и МФУ тип меню может выглядеть по-разному. Чаще всего встречается вариант, когда вкладка имеет название «Сервис», а в ней находится инструмент «Прочистка печатающей головки». Если вы нашли такой, смело запускайте.
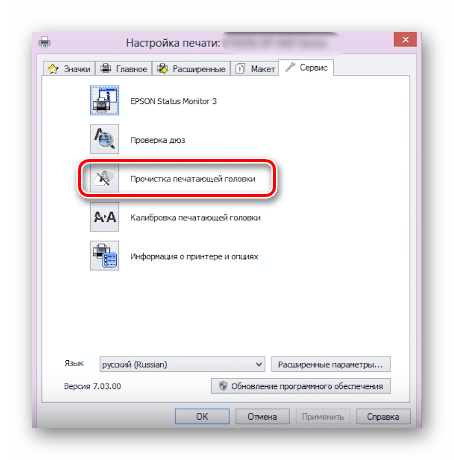
Различия относятся также к инструкциям и предупреждениям. Обязательно перед запуском прочистки ознакомьтесь с текстом, что должен отобразиться в открывшемся окне.
На этом процесс очистки закончен. Теперь можно запустить пробную печать, чтобы убедиться в достижении желаемого результата. Делается это так:
- В меню «Устройства и принтеры» правым кликом мыши на своем принтере и выберите «Свойства принтера».
- Во вкладке «Общее» отыщите кнопку «Пробная печать».
- Дождитесь распечатки тестового листа и проверьте его на наличие дефектов. При их обнаружении повторите процедуру очистки.

Выше мы рассказали о встроенных инструментах обслуживания. Если вас заинтересовала данная тема и вы желаете далее проводить регулировку параметров своего девайса, ознакомьтесь со статьей по ссылке ниже. Там приведено детальное руководство о правильной калибровке принтера.
Читайте также: Правильная калибровка принтера
Способ 2: Экранное меню МФУ
Для обладателей многофункциональных устройств, которые оснащены экраном управления, есть дополнительная инструкция, не требующая соединения оборудования с ПК. Все действия производятся через встроенные функции обслуживания.
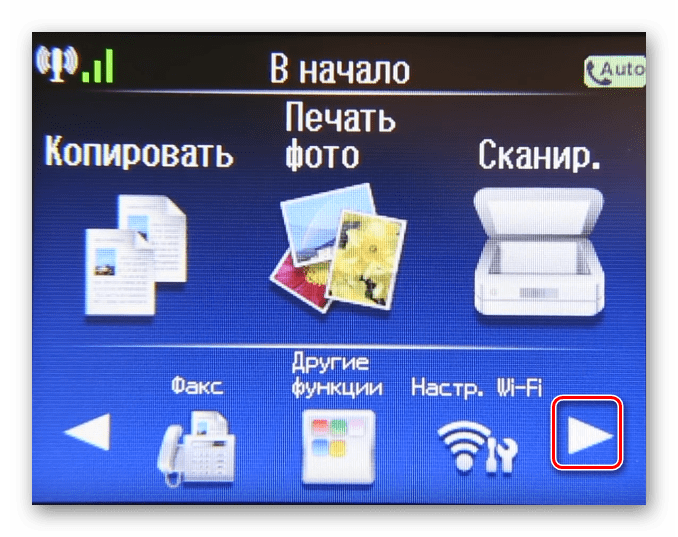
- Перемещайтесь по списку нажатием на стрелочку влево или вправо.
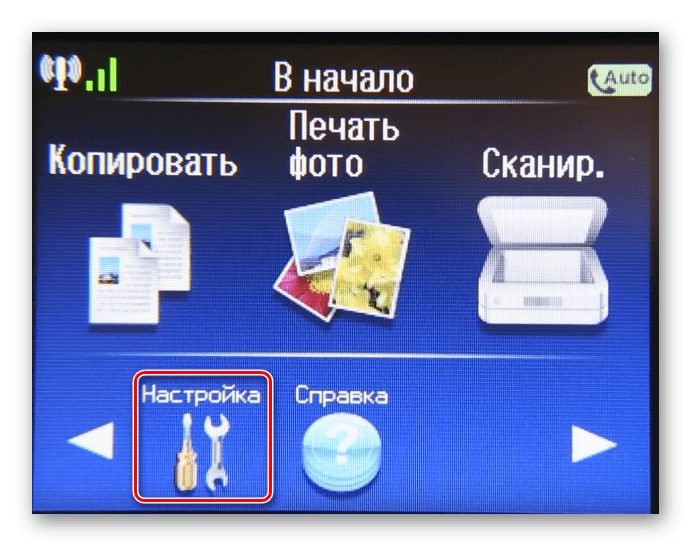
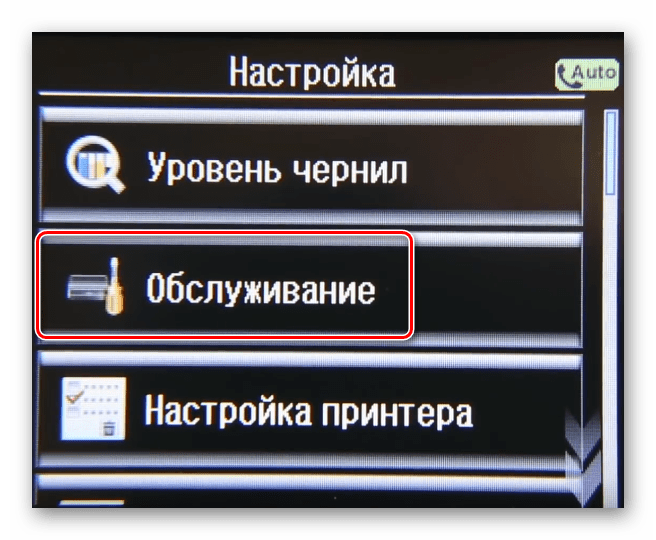
- Отыщите и тапните на меню «Настройка».
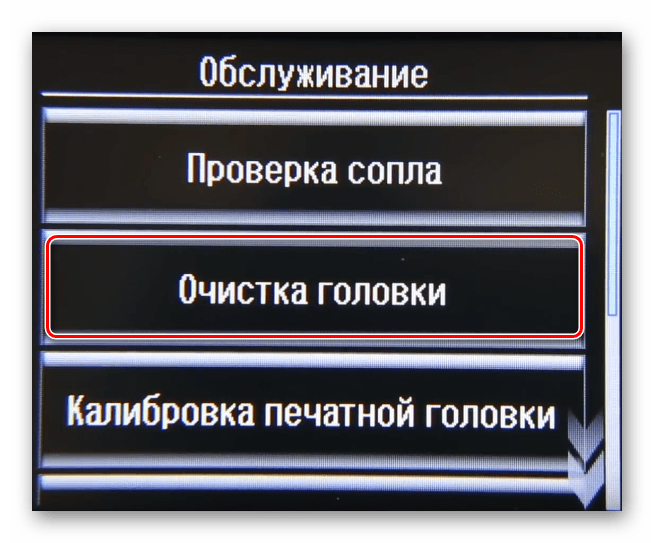
- Откройте окно «Обслуживание».
- Выберите процедуру «Очистка головки».
- Запустите процесс нажатием на указанную кнопку.
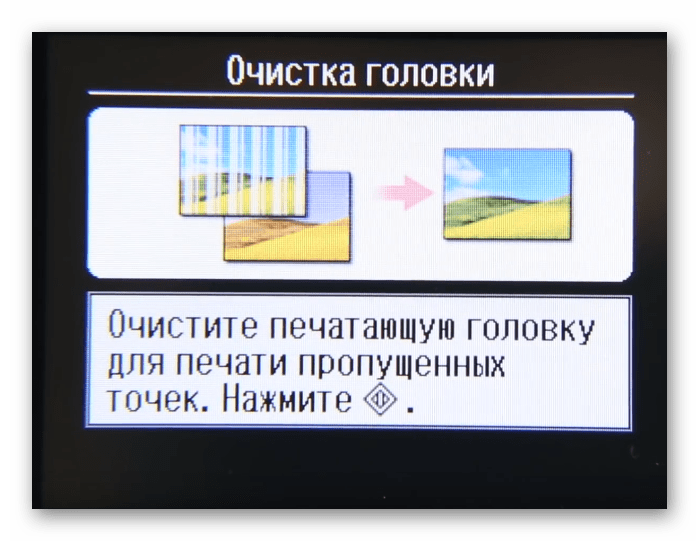
По завершении вам будет предложено выполнить тестовую печать. Подтвердите это действие, проверьте лист и повторите прочистку в случае необходимости.
В случае когда все цвета на готовой бумаге отображаются корректно, отсутствуют разводы, но появляются горизонтальные полосы, причина может крыться не в загрязнении головки. Существует еще несколько факторов, влияющих на это. Подробнее о них читайте в другом нашем материале.
Подробнее: Почему принтер печатает полосами
Вот мы и разобрались, как в домашних условиях самостоятельно очистить печатающую головку принтера и многофункционального устройства. Как видите, справится с этой задачей даже неопытный пользователь. Однако если даже повторные прочистки не приносят никакого положительного результата, советуем обратиться за помощью в сервисный центр.
Читайте также:
Правильная чистка принтерного картриджа
Решение проблем с захватом бумаги на принтере
Наша группа в TelegramПолезные советы и помощь
При постоянной рабочей загрузке устройств печати не редко случаются неполадки с печатающими головками. Это происходит, когда при распечатке документов на бумаге остаются полосы или пробелы. В основном, такой проблемой страдают струйные принтеры производства известных фирм Epson, HP и Canon.
Загрязнения и способы их устранения
Даже при нормальных условиях эксплуатации печатной аппаратуры нельзя быть уверенным в том, что все элементы будут идеально работать. Если использование расходных материалов не удается правильно контролировать, зачастую, происходят неожиданные сбои в работе оборудования. Можно назвать несколько вариантов событий, при которых подвергаются влиянию самые чувствительные рабочие узлы принтера, а именно головка. Засорение дюз происходит, когда:
- подсохли чернила внутри головки;
- забились каналы подачи краски;
- повысился уровень подачи чернил в картридж;
- разгерметизировалась система подачи чернил.
Для решения проблем с забитой головкой создатели печатной техники включили в систему контроля за ее работой специальную утилиту. В большинстве случаев она помогает избавиться от проблем дефектов печати.
Этапы проведения прочистки принтера фирмы Epson
Существует два способа прочистки печатающей головки: аппаратный и ручной. В первом случае нужно поступать следующим образом:
через меню «Пуск» откройте окно «Устройства и принтеры»;

выберите подключенный принтер с данной проблемой и откройте, нажав на него правой кнопкой, контекстное меню «Настройки печати»;

во вкладке «Сервис» найдите функцию «Прочистка печатающей головки» и выполните ее.

Возможно, придется провести эту процедуру несколько раз, чтобы чернила под рабочим давлением пробили дюзы головки. Для проверки качества печати воспользуйтесь распечаткой тестовой страницы, которую устройство автоматически предложит сделать после каждой чистки.
Восстановление работы устройств Canon и HP
Совершенно такие же действия нужно провести для прочистки головок в устройствах печати фирмы Canon.
В драйверах струйных принтеров НР есть система программного контроля, которая связана с Центром решения проблем НР. В него можно войти через меню принтера «Параметры», где найдете «Панель инструментов принтера». Вкладка «Очистка» поможет вам провести программную чистку печатающей головки аналогично вышеприведенной процедуре.
After your printer has been used for a number of projects, it’s common for users to begin running into quality issues. This can include streaking, fading, or even missing text on your prints, and it can often be the result of a dirty printhead.
What is a printhead? The answer is simpler than you may imagine. The printhead is a component in a printer that houses ink cartridges. It’s typically located under the cover of your printer, and it can become clogged with ink over time.
No matter which type of cartridge you use — compatible, reusable, or branded — ink can dry out and cause problems with the appearance of your prints. If this is left unaddressed, then your printer has the potential to break down and may have to be replaced entirely.
A printhead can usually be cleaned in one of two ways: through software on your PC or manually by taking out the printhead.
Here’s a quick rundown of how you can clean your printer head from the HP experts:
- Run the “Clean Printhead” function from your computer.
- If the above step doesn’t work, open the cover of your printer and then unplug it from the electrical outlet.
- Remove each ink cartridge and clean the contacts with a cloth.
- Clean printhead contacts.
- Reinsert print cartridges.
- Plug in your printer to the electrical outlet.
- Allow the printer to boot up and run the automated startup sequence.
- Print a test sheet to see if this simple procedure fixed the issue.
- You may need to do this procedure several more times.
- If all else fails, bring your printer to a repair shop.
It’s important to remember that these parts are delicate. If you choose to perform the repair yourself, you should be careful not to damage the contacts on both the printhead and your ink cartridges. If they’re damaged, it’s likely that you’ll need to take the printer to a professional for repair.
How printers work
Inkjet printers function by spraying tiny droplets of liquid ink over the surface of the paper. With smaller droplets, you can make sharper images. Ink comes in three major colors (cyan, yellow, and magenta) as well as black. By combining the colors together in a specific pattern, the other shades of the color palette are formed.
To create crisp, clear prints, the ink must be applied with precision. One way to ensure this is by getting the best home printer. Another is to be sure you are only using the highest-quality inks. When you purchase an HP inkjet printer, you are getting both of these — as long as you take care of the printer and only purchase genuine HP Ink products.
When should I clean the printhead?
A printhead can become dirty after it has been sitting idle for a period of time. It’s recommended that you perform a few print jobs each month in order to maintain print quality and to keep the ink from drying in the cartridges. However, even if you print a few times a week, you may still find yourself dealing with HP printhead problems.
You’ll know fairly quickly if your printhead is causing you problems. If your PC or the LCD screen on your printer is telling you that your ink cartridges are full but no ink is passing through to the paper, then it’s most likely that you are dealing with a clogged printhead. Blurry documents and images that appear faded are also signs that it’s time to remove the excess ink.
Before you start the process of cleaning, you’ll need to perform a nozzle check to make sure it’s actually causing the issues. You can usually do this from either your computer or your printer on newer models. This can help you avoid touching the printhead and damaging the contacts on either the ink cartridges or the printhead itself.
Why printer maintenance is necessary
You wouldn’t drive your car more than 5,000 miles without an oil change, so why would you run your printer for an extended period of time without completing regular maintenance tasks? You wouldn’t.
Cleaning the printhead is just one thing you can do to ensure smooth operation. It’s also one of the easiest tasks to do at your home or office.
Automated maintenance mode is often enough
Today’s HP printers are equipped with innovative software that can sense the first signs of trouble and automatically put the printer into maintenance mode. This usually includes tasks such as print head cleaning and alignment.
If you haven’t printed in some time, however, it may be necessary to perform an extra step or two to clean ink heads on an HP printer.
Streaky prints call for additional steps
You may be notified by your printing software or the display on the printer itself that maintenance is needed. Another way to tell that your print heads are dirty is if your print jobs come out partially printed or streaky. If your printer display says that you’re low on ink but you have a full cartridge, this may also be a sign of a dirty printhead.
Whether the printer notifies you or you suspect it’s an issue from the quality of your prints, don’t do any more printing until you’ve taken the following steps.
Before you clean your printer
First, make sure that you are using genuine HP printer cartridges. HP printers are designed to maximize efficiency and quality with HP original components. Check to see that your cartridge is an HP ink product and is the right fit for your model.
If you see that the cartridge shows sign of damage, has exploded, or doesn’t fit correctly, remove the cartridge and insert a new one. Wait for the printer to go through the automated maintenance tasks for the new cartridge and try printing again.
How can I clean an HP printhead from my computer?
- Start the process of cleaning your inkjet printer printhead by clicking the “Start” button.
- Access your Control Panel which allows you to see several menus including “Printers and Scanners” (You’ll find a list of any printers you have connected to previously as well as the ones you currently use).
- Click on the printer icon and choose “Properties” (This window allows you to see how much ink you have available in your ink cartridges or if there are any issues associated with your devices).
- If you see an indication that your ink cartridges are all full but your print jobs are fuzzy or smudged, then this is a clear indication that you need to clean the printhead.
- Choose “Printing Preferences,” and then the “Service” tab.
- From there, you have the option to choose “Printer Services” on the next window.
- You’ll see a command to “Clean Printheads,” which will start the process of cleaning the printhead without you physically removing it.
How can I clean HP printhead by hand?
If you have tried cleaning the printhead through the software but you’re still noticing problems with your print jobs, then you may need to manually clean it. Again, it’s important to be careful when dealing with the ink cartridges and the printhead because they’re easily damaged.
- Turn on the printer then open the access door (This varies by model).
- The printer carriage will move to the center and you can access the printhead and cartridges.
- Wait until the cartridges have stopped moving before unplugging your device from the electrical outlet — about 3 seconds (This keeps the printer carriage in one place so you can remove the clogged printhead).
- Remove the cartridges by lifting up or pushing on the tab that holds them in place and pulling them out (Remove one at a time and try not to leave them out of the printer from more than 30 minutes).
- Set the cartridges on a clean piece of paper on their side making sure the nozzle is pointing away from any surface.
First clean the ink cartridge contact points.
- Use a lint-free cloth in order to wipe off excess ink from the contacts located on the bottom of each ink cartridge, but do not clean off or touch the nozzle itself.
- The contacts should be pointing away from any surface to avoid damage and the nozzle should not be pointing down, otherwise you can cause the rest of the ink in the chamber to drain out (Laying it on its side is your best bet).
- If ink remains on the contacts, use a cotton or foam rubber swab moistened with bottled water to gently clean it off (Note: DO NOT use alcohol or any other cleaning fluid to clean the contact points or print head).
- Dry the contact point with a clean swab or allow to air dry for 10 minutes before replacing the ink cartridge in the printer.
- Once you are done with one cartridge, lay it on its side on your clean sheet of paper and use the same method to clean the rest of the cartridges.
Now it’s time to clean the printhead itself.
- Look for the contact points on the print carriage inside the printer and gently wipe them off using a lint-free cloth.
- Make sure there isn’t any ink left on the printer contacts.
- Just as on the ink cartridges, if you are having difficulty removing the excess ink, use a cotton swab and mineral water until it is clean.
- Wait around five minutes for the print carriage to dry and then reinsert the ink cartridges into the printer.
- Snap them into place and make sure they’re secure before you plug in the power cord.
- Close the cover to the printhead and wait for the initialization process to finish before trying to print any documents.
What if my printer still isn’t working?
If you’re still experiencing quality issues or printhead errors, then there may be other problems at play. Before taking any other actions, it’s recommended that you clean the printhead and ink cartridges four or five more times.
Also, leave your printer unplugged overnight and double check the nozzle on your ink cartridges to make sure they aren’t full. You want to give everything a chance to dry out before cleaning.
Old or damaged ink cartridges can also cause issues with your printer’s performance. If the above steps haven’t fixed the problem, replacing your cartridges could be the answer.
Go through the process of cleaning your printhead’s contacts again before you insert new printer cartridges. After the initialization process, try printing another document to see if your images are clear and that there is no streaking or fading.
If there are still problems with your printer, it may be time to take it into a repair shop that specifically works on the brand you have purchased.
Call on an expert from HP®
A skilled HP expert may be able to identify the problem and fix your printhead so you no longer have issues with your print jobs. He or she can also make recommendations for keeping your printer clean so you can avoid running into similar problems in the future.
Also, make sure you avoid using a harsh cleaner on your printer or taking it apart. You don’t want to do anything that would void the warranty on either your printer or the HP ink cartridge.
HP representatives are there to help with the best printhead cleaning solution for your particular model of printer and can offer solutions or repair options to get you printing again quickly.