
Утилита очистки диска (Disk Cleanup) позволяет администратору быстро очистить системный диск Windows Server, удалив ненужные и временные файлы, в том числе очистить каталог WinSxS от файлов устаревших компонентов, которые остались после установки обновлений. Утилита Disk Cleanup (cleanmgr.exe) по умолчанию уже установлена в графической версии Windows Server 2016/2019 (Desktop Experience), однако в предыдущих версиях Windows Server (2012 R2/ 2012/ 2008 R2) утилита cleanmgr.exe по-умолчанию отсутствует.
Содержание:
- Очистка диска с помощью Disk Cleanup в Windows Server 2016
- Очистка диска с помощью cleanmgr.exe из командной строки
- Запуск cleanmgr в Windows Server 2012 R2/ 2008 R2 без установки Desktop Experience
- Использование Disk Cleanup в Windows Server Core
Очистка диска с помощью Disk Cleanup в Windows Server 2016
Чтобы очистить системный диск от ненужных файлов в Windows Server 2016 с помощью утилиты Disk Cleanup, нужно в File Explorer открыть свойства диска и нажать кнопку Disk Cleanup.
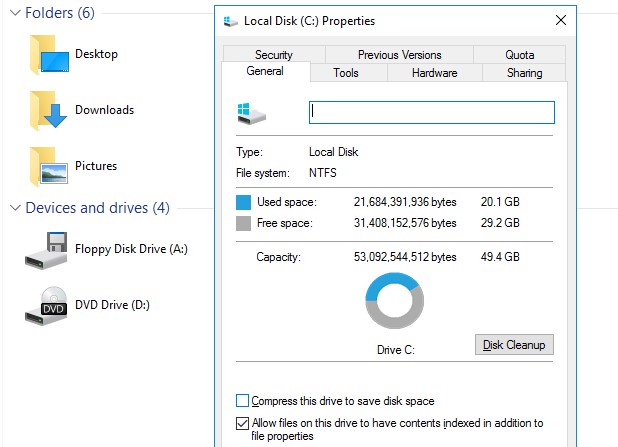
Также можно в поисковой строке набрать «disk cleanup» или cleanmgr.exe.
Выберите диск, который вы хотите очистить.
Дождитесь пока мастер очистки проверит ваш диск и найдет ненужные файлы, которые можно безболезненно удалить.
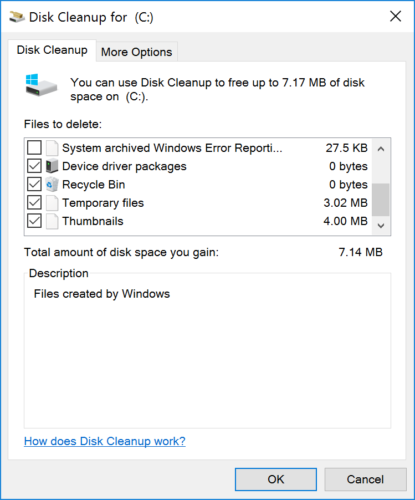
Вы можете выбрать компоненты, файлы которых можно удалить. Вам предлагается удалить следующие временные файлы:
- Setup Log Files
- Downloaded Program Files
- Temporary Internet Files
- Recycle Bin
- Temporary files
- Thumbnails
Чтобы удалить ненужные системные файлы нажмите на кнопку Clean up system files.
Дополнительно предлагается очистить:
- Устаревшие файлы Windows Defender
- System archived Windows Error Reporting (каталог C:\ProgramData\Microsoft\Windows\WER\ReportQueue)
- System queued Windows Error Reporting
- Device driver packages
- Windows Update Cleanup — при этом выполняется очистка хранилища компонентов в каталоге WinSxS. Удаляются старые версии компонентов, которые остались после установки обновленных версий.
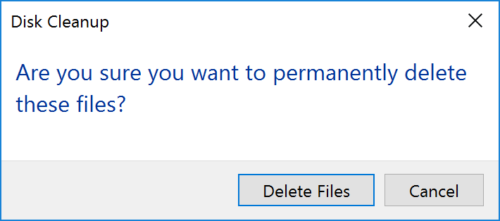
Выберите нужные опции, при этом Disk Cleanup покажет количество места, которое освободится. Нажмите Ок и подтвердите удаление временных файлов.
Дождитесь, пока утилита cleanmgr.exe удалит ненужные файлы.
Очистка диска с помощью cleanmgr.exe из командной строки
Утилита
cleanmgr.exe
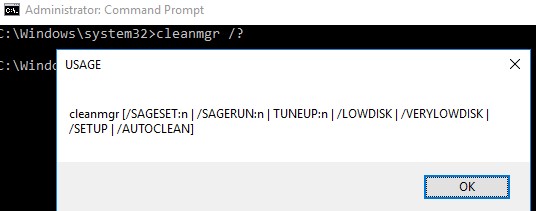
имеет различные параметры командной строки, которые позволяют использовать ее в различных сценариях автоматической очистки системного диска. Их можно использовать как в Windows Server, так и на рабочих станциях пользователей с Windows 10.
cleanmgr [/d driveletter] [/SAGESET:n | /SAGERUN:n | TUNEUP:n | /LOWDISK | /VERYLOWDISK | /SETUP | /AUTOCLEAN]
Ключ
/AUTOCLEAN
используется для очистки старых файлов, оставшихся после апгрейда билда Windows. Параметр
/SETUP
позволяет удалить файлы, оставшиеся от предыдущей версии Windows (если вы выполняли in-place upgrade).
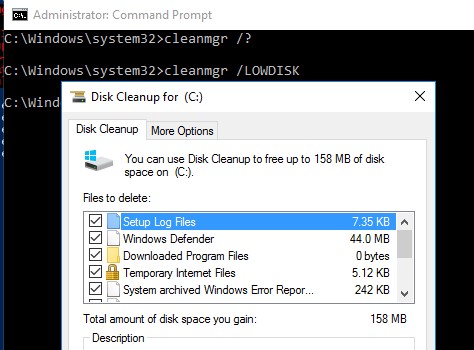
Команда
cleanmgr /LOWDISK
– запускает графический интерфейс Disk Cleanup с уже выбранными параметрами очистки.
Команда
cleanmgr /VERYLOWDISK
выполняет автоматическую очистку, а после окончания оторажает информацией о выполненных действиях и свободном месте.
You have successfully resolved the low disk space condition. Your C:\ volume now has 10000 Mb of free space remaining.
С помощью параметров
/sageset:n
и
/sagerun:n
вы можете создать и выполнить настроенный набор параметров очистки.
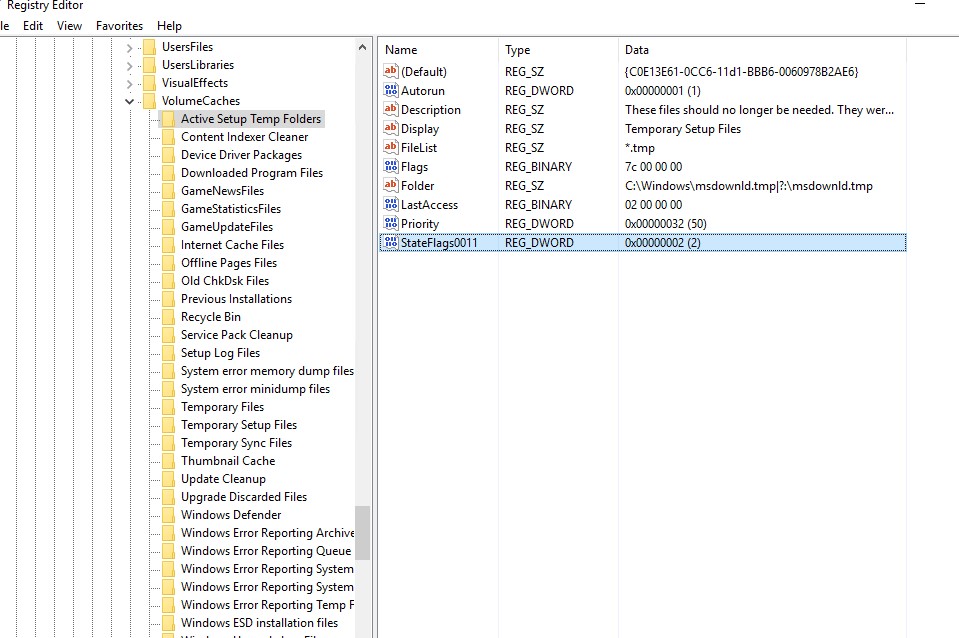
Например, выполните команду
cleanmgr /sageset:11
. В открывшемся окне выберите компоненты и файлы, которые нужно автоматически очищать (я выбрал все опции).
Эти настройки сохраняются в ветке реестра HKEY_LOCAL_MACHINE\SOFTWARE\Microsoft\Windows\CurrentVersion\Explorer\VolumeCaches. В этой ветке перечислены все компоненты Windows, которые можно очистить с помощью Disk Cleanup. Для каждой опции, которую вы выбрали создается параметр типа DWORD с именем StateFlags0011 (
0011
это число, которое вы указали в параметре sageset).
Чтобы запустить процесс очистки с выбранными параметрами, выполните команду:
cleanmgr /sagerun:11
Если вам нужно настроить автоматическую очистку дисков на компьютерах (или серверах) в домене, вам достаточно экспортировать эту ветку реестра и распространить ее через GPO.
Для автоматического запуска очистки системного диска на рабочих станциях с Windows 10 можно создать задание в планировщике со следующим PowerShell скриптом:
Start-Process -FilePath CleanMgr.exe -ArgumentList '/sagerun:11' -WindowStyle Hidden -Wait
Запуск cleanmgr в Windows Server 2012 R2/ 2008 R2 без установки Desktop Experience
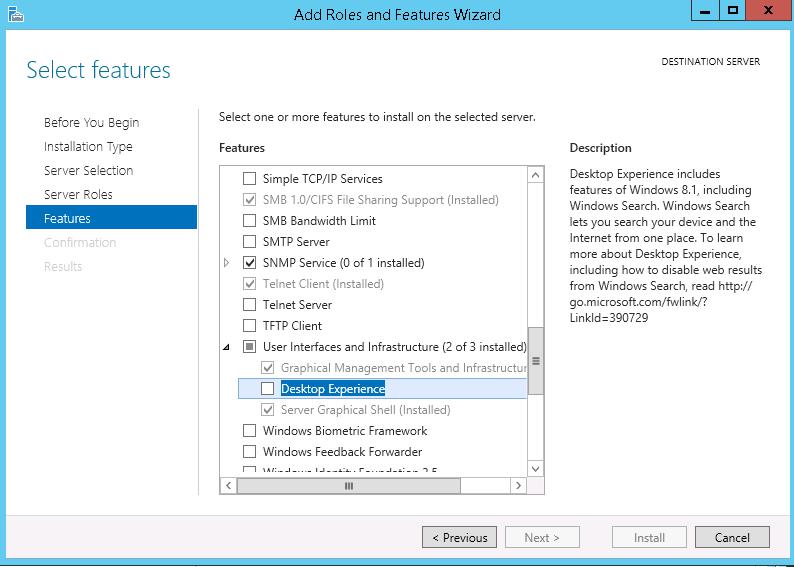
В Windows Server 2012 / R2 и 2008 /R2 по умолчанию не установлена утилита очистки диска Disk Cleanup (cleanmgr.exe). Чтобы воспользоваться утилитой cleanmgr сначала нужно установить отдельный компонент сервера Desktop Experience (Возможности рабочего стола) с помощью Server Manager или PowerShell (
Install-WindowsFeature Desktop-Experience
).
Но вместе с Desktop Experience устанавливается множество других компонентов, которые абсолютно не нужны на сервере:
- Windows Media Player
- Темы рабочего стола
- Поддержка AVI для Windows
- Windows SideShow
- Windows Defender
- Disk Cleanup
- Sync Center
- Запись звука
- Character Map
- Snipping Tool
Для запуска мастера очистки дисков в Windows Server можно воспользоваться более простым методом: достаточно скопировать в системный каталог два файла из каталога WinSxS: Cleanmgr.exe и Cleanmgr.exe.mui. Ниже представлены команды для копирования файлов cleanmgr из каталога WinSxS для разных версий Windows Server (во всех случаях используется путь для английских редакций ОC).
| ОС | Команда копирования файлов cleanmgr |
| Windows Server 2008 R2 x64 |
copy C:\Windows\winsxs\amd64_microsoft-windows-cleanmgr_31bf3856ad364e35_6.1.7600.16385_none_c9392808773cd7da\cleanmgr.exe C:\Windows\System32\
|
| Windows Server 2008 x64 |
copy C:\Windows\winsxs\amd64_microsoft-windows-cleanmgr_31bf3856ad364e35_6.0.6001.18000_none_c962d1e515e94269\cleanmgr.exe C:\Windows\System32\
|
| Windows Server 2012 x64 |
copy C:\Windows\WinSxS\amd64_microsoft-windows-cleanmgr_31bf3856ad364e35_6.2.9200.16384_none_c60dddc5e750072a\cleanmgr.exe C:\Windows\System32\
|
Windows Server 2012 R2 x64
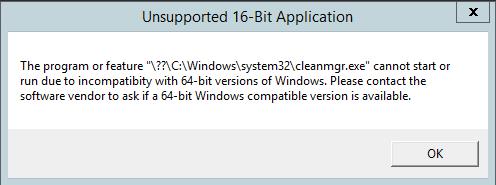
Рассмотренный выше трюк не работает в Windows Server 2012 R2 из-за изменений, внесенных обновлением KB2821895. Дело в том, что после установки данного обновления для хранения бинарных файлов компонентов стала использоваться компрессия. При попытке запустить скопированный cleanmgr.exe появляется ошибка:
The Program or feature \??\C:\Windows\system32\cleanmgr.exe cannot start or run due to incompatibility with 64-bit version of Windows
В качестве обходного решения можно воспользоваться такой методикой:
- Установить компонент Windows Desktop Experience:
Install-WindowsFeature Desktop-Experience - Перезагрузить сервер;
- Скопировать файлы %windir%\system32\cleanmgr.exe и %windir%\system32\en-US\cleanmgr.exe.mui в произвольный каталог (c:\temp)
- Удалить компонент:
Uninstall-WindowsFeature Desktop-Experience - Перезагрузка;
- Скопировать файлы cleanmgr.exe и cleanmgr.exe.mui в указанные выше каталоги
В дальнейшем эти два файла можно скопировать и на все другие сервера или интегрировать в шаблоны виртуальных машин с Windows Server 2012 R2.
Ссылка на скачивание готового комплекта файлов cleanmgr.exe.mui + cleanmgr.exe для Windows Server 2012 R2 на ЯндексДиске (thks Alex Kornev).
Для запуска утилиты очистки диска теперь достаточно выполнять с правами администратора команду
cleanmgr.exe
.

Совет. Для очистки устаревших файлов компонентов, оставшихся после установки обновлений, в Windows Server R2 можно воспользоваться командой DISM:
dism.exe /online /Cleanup-Image /StartComponentCleanup /ResetBase
В Windows Server 2008 R2, чтобы cleanmgr могла удалять устаревшие файлы обновлений нужно установить отдельный патч KB2852386.
Использование Disk Cleanup в Windows Server Core
В Windows Server Core 2016, в котором отсутствует полноценный графический интерфейс, утилита Disk Cleanup также не установлена. Если вы хотите использовать cleanmgr.exe для очистки диска в Server Core, достаточно скопировать следующие файлы из каталога WinSXS:
copy C:\Windows\WinSxS\amd64_microsoft-windows-cleanmgr_31bf3856ad364e35_10.0.14393.0_none_9ab8a1dc743e759a\cleanmgr.exe C:\Windows\System32\
copy C:\Windows\WinSxS\amd64_microsoft-windows-cleanmgr.resources_31bf3856ad364e35_10.0.14393.0_en-us_8b4adb68af596a23\cleanmgr.exe.mui C:\Windows\System32\en-US\
Очень часто C диск не хватает места in Windows Server 2016/2019/2022 и предыдущие версии. В этой ситуации вы можете попытаться освободить место на диске, не заменяя диск на новый. В этой статье показано, как освободить место на диске в Windows Server 2016 с родной утилитой очистки диска и дополнительными 4 способами. Если вы все еще не можете получить много свободного места, вам лучше добавить больше свободного места в C диск с другого раздела на диске.
Содержание:
- Освободите место на диске с Server 2016 Утилита очистки диска
- Дополнительные возможности для освобождения места в Windows Server 2016
- Добавить свободное место на диск C после очистки места на диске
Освободите место на диске с Server 2016 Утилита очистки диска
Чтобы освободить место на диске Windows Server 2016, первый выбор Windows родной Очистка диска утилита. Хотя существует множество программ для очистки и оптимизации дисков, Windows Рекомендуется использовать функцию очистки диска, поскольку она безопасна и способна удалить многие типы ненужных файлов.
Шаги, чтобы освободить дисковое пространство в Windows Server 2016 с очисткой диска:
- Press Windows + E вместе, чтобы открыть Проводник, щелкните правой кнопкой мыши диск C: и выберите НЕДВИЖИМОСТИ
. - Нажмите Очистка диска во всплывающем окне.
- Дождитесь очистки диска, чтобы сканировать файлы, которые можно безопасно удалить. (Время зависит от производительности сервера и количества ненужных файлов.)
- Установите флажки напротив файлов, которые вы хотите удалить, а затем нажмите OK, (Если вы не знаете, что это за файлы, щелкните по нему, и вы увидите соответствующее описание внизу.)
- Нажмите Удалить файлы во всплывающем окне подтвердить и начать удаление.
Если вам нравится использовать командную строку, обратитесь как запустить очистку диска из cmd.
Для серверов, которые никогда или не освобождали дисковое пространство в течение длительного времени, Disk Cleanup может помочь вам освободить несколько гигабайт дискового пространства. Если вы не можете получить много свободного места, продолжайте дополнительные 4 метода, чтобы освободить больше дискового пространства в Windows Сервер 2016
Дополнительные методы для освобождения места в Windows Server 2016
1. Уменьшите корзину
Все файлы, которые были удалены нажатием клавиши DEL без клавиши SHIFT, перейдут в Корзинагде вы можете вернуть эти файлы в исходное местоположение вручную, если вы удалили их по ошибке. По умолчанию в корзине используется часть пространства диска C, поэтому больше файлов в корзине означает меньше свободного места на диске C.
Вы можете уменьшить размер и изменить расположение корзины на другой больший раздел.
- Щелкните правой кнопкой мыши Корзина.
- Выберите диск для корзины.
- Выберите Размер клиента и введите сумму, нажмите OK , чтобы подтвердить действие.
2. Сбросить файл подкачки
Файл подкачки использует часть дискового пространства в качестве виртуальной оперативной памяти, и по умолчанию он также находится на диске C. Вы можете изменить его на другой раздел, когда диск C заполнится. шаги:
- Press Windows и R чтобы открыть Run, наберите sysdm.cpl, 3 и нажмите Enter.
- Нажмите Настройки недооценивают ее Эффективности поверх окна свойств системы.
- В окне «Параметры производительности» переключитесь на Фильтр вкладку и нажмите Изменить ниже виртуальная память.
- Снимите флажок «Автоматически управлять файлом подкачки», затем щелкните диск C:> Без файла подкачки> Установить. Затем нажмите D или другой диск> Другой размер> Введите сумму> Установить. Нажмите OK чтобы подтвердить. (Для вступления в силу может потребоваться перезагрузка.)
3. Удалить теневые копии
Если вы включили теневое копирование, вы можете удалить предыдущие копии.
- Открыть окно проводника
- Щелкните правой кнопкой мыши диск C> щелкните НЕДВИЖИМОСТИ
> переключиться на Теневые копии. - Выберите предыдущие копии и нажмите Удалить сейчас.
4. Удалите программы
Press Windows и X на клавиатуре> Программы и компонентыудалите программы, которые вам больше не нужны.
Недостаточно, если вы получаете менее 20 ГБ. Свободное место на диске будет занято новыми сгенерированными ненужными файлами, поэтому многие люди жалуются, что диск C снова заполняется за короткое время.
Чтобы полностью решить эту проблему, вам лучше добавить больше свободного места и увеличить размер диска C. То же самое и со смартфоном: если вы используете устройство на 16 ГБ, вам приходится очень часто удалять файлы и чистить, но вы не столкнетесь с этой проблемой в течение длительного времени, если вы используете устройство на 128 ГБ или 256 ГБ.
Добавить свободное место на диск C после очистки места на диске
Если на других томах того же диска есть свободное неиспользуемое пространство, вы можете сжать его, чтобы получить Нераспределенное пространство, а затем добавить его на системный диск C. Операционная система, программы и все остальное остались прежними.
Скачать NIUBI Partition Editor и следуйте инструкциям в видео, чтобы увеличить свободное место на диске C для Server 2016:

Действия одинаковы, независимо от того, используете ли вы SSD/HDD, любой тип оборудования. RAID массивы или виртуальные диски в VMware/Hyper-V виртуальная машина.
В итоге
Чтобы освободить место на диске Windows Server 2016, вы можете использовать либо Windows встроенная программа очистки диска или стороннее программное обеспечение. Но в большинстве случаев вы не можете получить большое количество свободного места. Если вы не можете получить более 20 ГБ свободного места, вам лучше добавить больше с другого тома с помощью NIUBI Partition Editor. Помимо сжатия и расширения раздела, он помогает перемещать, объединять, копировать, конвертировать, дефрагментировать, скрывать, оптимизировать, стирать раздел, сканировать поврежденные сектора и многое другое.
Скачать
Обновлено 1 ноября 2024 г. в 5:35| Рекомендуемые
C диск не хватает места в большинстве серверов Windows 2016. Следовательно, не хватает свободного места для установки обновлений и приложений Windows. Если диск C почти заполнен, некоторые службы Windows перестают работать, сервер может неожиданно перезагрузиться или даже выйти из строя. Когда это происходит, первое, что вам следует сделать, это очистка диска C. После этого вы можете освободить дисковое пространство и получить больше свободного места на диске C. Однако, немногие серверы могут освободить достаточно свободного места. В качестве дополнительного, вам нужно переместить больше свободного места из других разделов. В этой статье я расскажу, как освободить дисковое пространство в Windows Server 2016 и как добавить больше места на диске C.
Преимущества очистки диска C
Освобождая дисковое пространство на сервере Windows 2016, вы можете удалить мусор и ненужные файлы, чтобы повторно использовать дисковое пространство. Как я уже сказал выше, Недостаточно места на диске опасно для сервера, если вы сможете вернуть драгоценное свободное пространство, сервер продолжит работать в правильном режиме. Даже если вы не можете получить большой объем свободного пространства, вы можете установить некоторые приложения, которые помогут решить эту проблему. Очистка диска очень полезна, особенно для сервера, который никогда не делал этого раньше.
Несовершенство для освобождения места в Server 2016
- Чтобы освободить место на диске в Windows Server 2016, есть много вариантов, таких как встроенная в Windows утилита Disk CleanUp, стороннее ПО для оптимизации или удаление файлов самостоятельно. За исключением утилиты Disk Cleanup, существует потенциальный риск потери данных.
- Выполнение этой задачи может занять много времени.
- Как я сказал выше, не каждый сервер может освободить большое количество свободного места. Это означает, что диск C вскоре снова заполнится.
Поэтому вам лучше расширить диск C как можно больше.
Как очистить диск C в Windows Server 2016
Я много раз использовал встроенную утилиту очистки в большинстве версий Windows. На мой взгляд, родной инструмент очистки диска достаточно хорош. Он способен быстро и безопасно удалять наиболее распространенные типы ненужных файлов.
Действия по освобождению места на диске в Windows Server 2016 с помощью инструмента очистки диска:
Шаг 1: Откройте проводник, щелкните правой кнопкой мыши диск C и выберите «НЕДВИЖИМОСТИ
».
Шаг 2: Нажмите «Очистка диска»И ОК, чтобы продолжить. (Другой способ — нажать Windows + R ключи вместе, введите cleanmgr и нажмите Enter)
Шаг 3: В следующем окне установите флажок напротив файлов, которые нужно очистить.
Шаг 4: Нажмите ОК и подтвердите эту операцию.
Шаг 5: Перейдите на вкладку «Дополнительные параметры», где вы можете удалить программу и удалить файлы восстановления системы / теневого копирования.
Важный шаг после освобождения места на диске
Если после очистки диска C вы не получаете более 20 ГБ свободного места, вам лучше добавить больше свободного места из других разделов. С помощью безопасного программного обеспечения для разделов диска вы можете сжать другой большой раздел, чтобы освободить свободное место. Это свободное место будет преобразовано в нераспределенное и может быть объединено с диском C. За исключением размера раздела, все сохраняется тоже самое с до.
Как добавить место на диске C в Windows 2016 server после освобождения места на диске:
Шаг 1. Скачать и установить NIUBI Partition Editor, правой кнопкой мыши громкость D и выберите «Изменить размер / переместить объем».

Шаг 2: Во всплывающем окне перетащите оставил граница к правую сократить этот раздел.

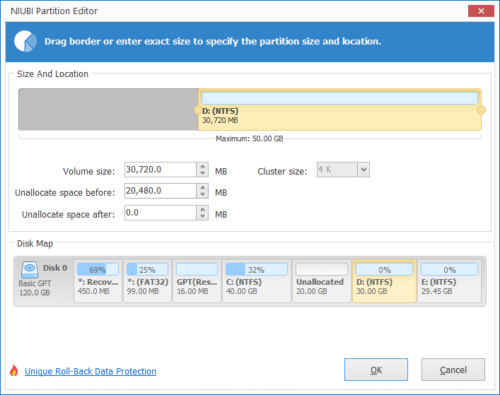
Нажмите OK и обратно в главное окно, часть свободного места на диске D слева преобразуется в Незанятое.
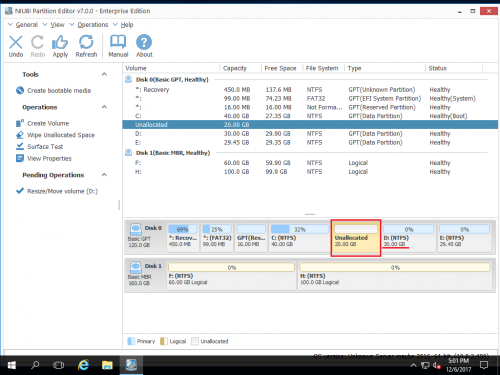
Шаг 3: Щелкните правой кнопкой мыши C диск и снова выберите «Изменить размер/Переместить том». В всплывающем окне перетащите правую граница к правую объединить это нераспределенное пространство.

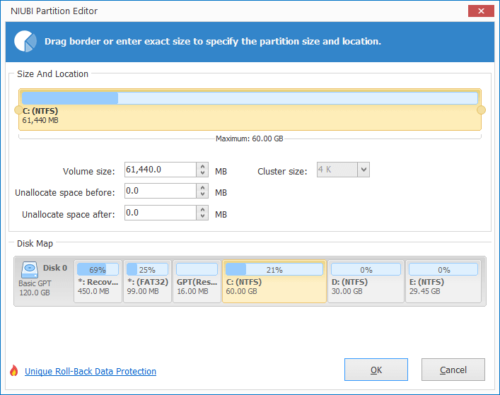
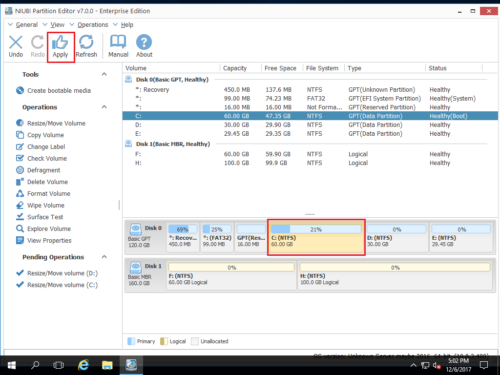
Шаг 4: Нажмите OK и вернитесь в главное окно, свободное место перемещается на диск C в виртуальном режиме. Нажмите Применить выполнить, сделано.
Если в непрерывном разделе D недостаточно свободного места, вы можете сжать любой несмежный том на том же диске.
Посмотрите видео, как добавить больше места на диск C:
Помимо сокращения и расширения перегородок, NIUBI Partition Editor поможет вам сделать много других операций управления разделами диска.
Подробнее Скачать
Summary
Cleaning up C Drive in Windows Server becomes crucial to avoid many issues. To eradicate these issues, you need to use disk cleanup server 2016 2019 2022. You can also check out other suggested ways to deal with the issue effectively. By moving apps, you can also lead with system optimization to an extent, thereby resulting in its performance.
Table of Contents
- How to install/run Disk Cleanup on Windows Server (Disk Cleanup Wizard or Cleanmgr cmd)
- 4 Extra Ways to Free Up Disk Space on Windows Server 2022
- Add 100GB + Space to Extend C Drive with Partition Resizer Server Edition
Introduction: Install/Run Disk Cleanup on Windows Server 2008/2012/2016/2019/2022
How to Run/Install Disk Cleanup on Windows Server 2012/2016/2019/2022
Disk Cleanup is a built-in utility in Windows operating systems, including Windows Server, which helps to free up disk space by deleting unnecessary files. The utility can be used to remove temporary files, system files, and other types of files that are taking up valuable space on a hard drive. This can help to improve the performance of a server, as well as free up space for other applications and data. In this article, we will explain how to install Disk Cleanup on Windows Server.
Prerequisites:
Before installing Disk Cleanup on Windows Server, make sure that you have the following:
- Administrative privileges on the server: You need to be logged in as an administrator in order to install Disk Cleanup on the server.
- Windows Server installation media: You will need the installation media for the version of Windows Server that you are running in order to install the required components.
Installing Disk Cleanup on Windows Server:
The process of installing Disk Cleanup on Windows Server is straightforward and involves the following steps:
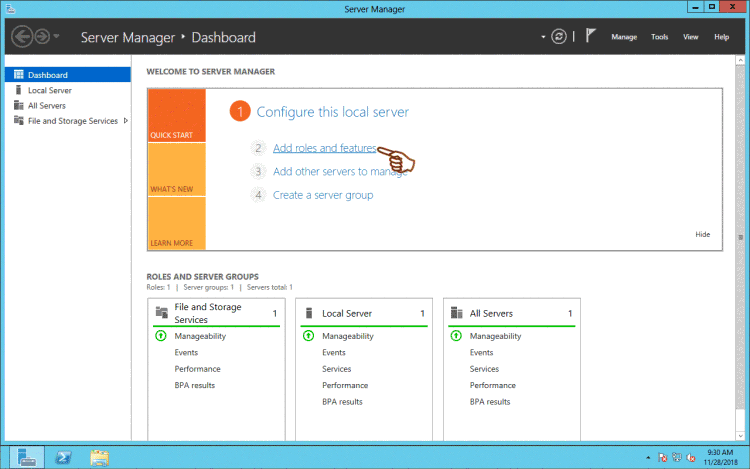
Step1:Open Server Manager: To open the Server Manager, click the Start button and then click on the Server Manager icon.
Step2: Add Roles and Features: In the Server Manager, click on the «Add Roles and Features» option. This will launch the Add Roles and Features wizard.
Step3: Select Installation Type: In the Add Roles and Features wizard, choose the «Role-based or Feature-based Installation» option and click Next.
Step4: Select Server: Choose the server on which you want to install Disk Cleanup and click Next.
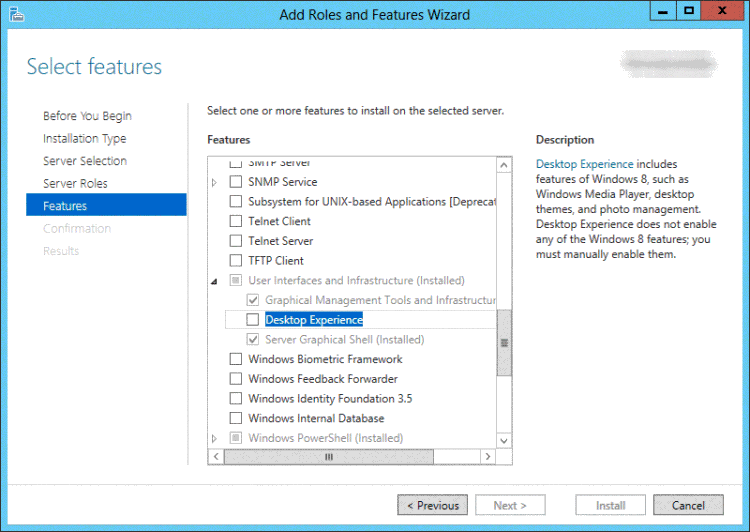
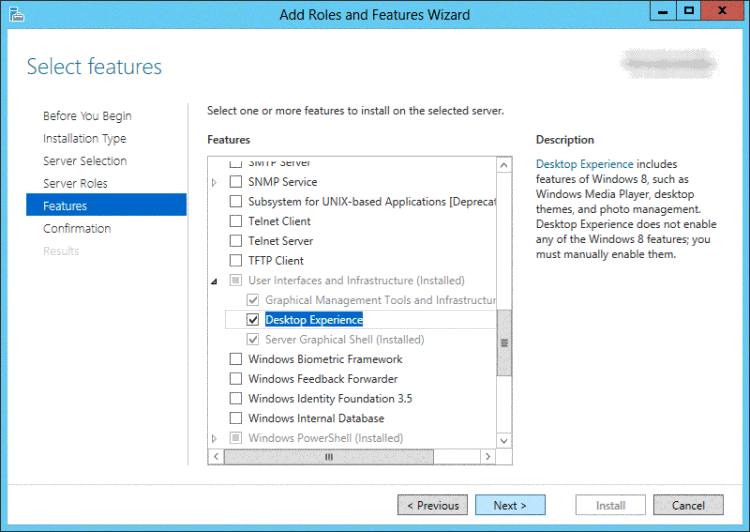
Step5: Select Features: In the Features section, scroll down and select the «Desktop Experience» option. This will install the required components for Disk Cleanup, including Windows Media Player and Themes.

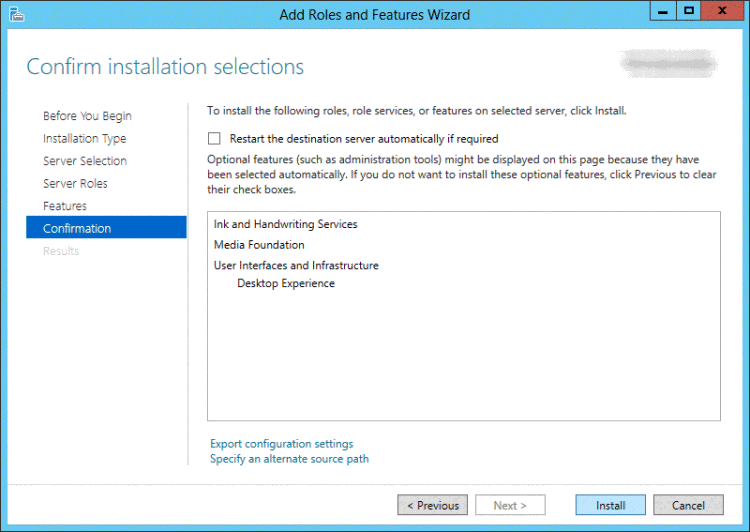
Step6: Confirm Installation: Review the features that will be installed and click Next.
Step7: Install: The installation process will begin and may take several minutes to complete.
Step8: Restart Server: After the installation is complete, restart the server to apply the changes.
Also read: how to enable disk cleanup on server 2016/2019/2022
Using Disk Cleanup on Windows Server:
Once Disk Cleanup is installed on the server, you can use it to free up disk space. To use Disk Cleanup, follow these steps:
Step1: Open Disk Cleanup: To open Disk Cleanup, click the Start button and type «cleanmgr» in the search box. Click on the Disk Cleanup utility to launch it.
Step2: Select Drive: In Disk Cleanup, select the drive that you want to clean up and click OK.
Step3: Analyze Files: Disk Cleanup will analyze the drive and display a list of files that can be safely deleted.
Step4: Delete Files: Select the files that you want to delete and click OK. Disk Cleanup will then delete the selected files and free up disk space.
Or you may run Disk Cleanup Wizard with the following steps.
Cleanup Using Disk Cleanup Wizard
If you are looking for an option that works for disk cleanup servers 2016 2019 2022, then you can try Disk Cleanup Utility. It is an excellent option in Windows that assists in cleaning your C drive effortlessly. It helps delete all the temporary or residual files you do not require now and provides extra space for saving new data.
Steps to Use:
Step 1: Start by simultaneously tapping on the ‘Windows+E’ keys to open File explorer. Then make a right tap on C drive and tap on ‘Properties.’
Step 2: From the pop-up window, tap the ‘Disk Cleanup’ feature.
Step 3: Wait until the utility for Server 2016 Disk Cleanup appears on the screen for scanning the junk along with files that are not needed.
Step 4: Now tap on the check boxes near the files you want to delete and tap on the ‘Ok’ option.
Step 5: Tap on the ‘Delete File’ option from the pop-up window to give confirmation and delete the files.
It’s important to note that before running Disk Cleanup on a server, it’s a good idea to back up important data, as Disk Cleanup may delete files that are important to the functioning of the server. Additionally, you should be careful when selecting files to delete, as some system files may be necessary for the proper functioning of the server.
Run Disk Cleanup using Cleanmgr command on Windows Server
If you want to erase any files that are not required but taking up space on your PC, then apart from using disk cleanup server 2016 2019 2022, you can use the MGR command. Using the command line switches, you can do the configuration of cleanmgr.exe. It will let you schedule the task for running at a particular time by utilizing a tool for Scheduled Tasks.
Steps to Use:
Step 1: Start by tapping on the ‘Windows+R’ keys to open the ‘Run’ dialog and typing ‘cleanmgr.exe/?’ and then move ahead by tapping the Enter key.
As soon as you do that, you will be able to see switches for the Disk Cleanup. It includes;
/D DRIVELETTER
/SAGEST:n
?SAGERUN;n
/TUNEUP;n
/LOWDISK
/VERYLOWDISK
/SETUP
/AUTOCLEAN
Step 2: Now, you can use the cleanmgr command to clean up the disk. For this, tap on the ‘Windows+R’ keys to open Run. Then type ‘cleanmgr.exe/d c’ and tap on the Enter key. Do this without using quotes.
You will notice that specific files will be selected as a default feature. If you want to change the files, tap on the checkboxes and the ‘Ok’ button.
Step 3: Then run the following command;
Cleanmgr.exe /low disk /dc
Whenever your disk drive runs low on space /LOWDISK is used, once Disk Cleanup gets launched as a default feature, all checkboxes are already marked.
Step 4: Now go ahead by typing and running the command:
Cleanmgr.exe /verylowdisk /dc
This command works the same as the /LOWDISK switch; however, it works for the automatic cleanup of the files. You will not see any confirmation, but you can see free space via a dialog box indication.
Additional 4 Ways of Cleaning C Drive on Windows Servers
Besides using native ways to clean up your C drive to create additional space, we suggest ways to clear the clutter. Check them out below.
#1 Emptying Windows Temp along with User Temp temporary Files Locations
If you want to create extra space in C Drive to promote disk cleanup server 2016 2019 2022 try this method. You can empty TEMP, which stands for locations of temporary files, safely as;
- Using C:\Windows\Temp
- C:\Users\%USEPROFILE%\AppData\Local\Temp
In the folder location below, you can find updated installations for old Windows, which takes up a lot of space on your disk.
C:\Users\%USEPROFILE%\AppData\Local\Temp
You can use a PowerShell snippet to clean up the temporary files for IIS IUSR, and it covers everything two days older.
#2 Turning Off Hibernation
You can see a file by the name of ‘hiberfil.sys’, which is used for hibernation in the C drive of Windows Server. It gets created when you enter hibernation mode. During this mode, the Windows server gets saved in its current state. However, it leaves you with little to no space in the C drive, which results in the need for a disk cleanup server 2016 2019 2022. If you turn off the hibernation mode, it also assists you with saving some extra space on your device.
Steps to Use:
Step 1: Start by opening CMD. Go ahead with tapping on the ‘Win + R’ keys and tap on the ‘Enter’ key.
Step 2: Once cmd opens, type ‘powercfg.exe /hibernateoff’ in the CMD Window and tap on Enter.
As soon as you enter the command, you will notice hibernation turning off on your device.
#3 Removing Apps That Are Not Useful
You can clear data from your C drive by keeping apps that are not useful at bay. Sometimes, large apps need to be removed to create space on disk and run your Pc efficiently.
Steps to Use:
Step 1: Start by opening the Control panel. If you cannot find it, look for it using the taskbar search bar.
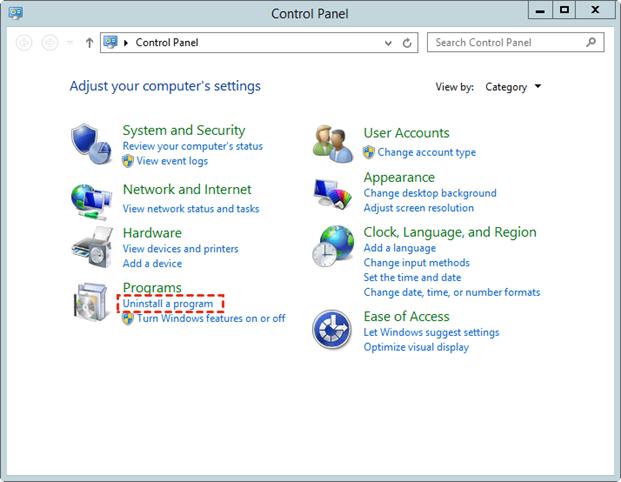
Step 2: Using the Control Panel, locate the Programs section and tap ‘Uninstall a program.’
Step 3: Remove useless apps by uninstalling them.
#4 Turning On Storage Sense
If you cannot carry out disk cleanup server 2016 2019 2022 all by yourself, you can use the storage sens feature. Once you enable storage sense in your Windows server, you will be able to wipe out files and data that are not required anymore in an intuitive way.
Steps to Use:
Step 1: Complete the launching of apps for Windows settings.
Step 2: Go toward the System menu and then the storage section.
Step 3: Now, use the Storage sense slider by toggling it.
Step 4: Now make the configuration of the storage sense. You can use the settings given beforehand or customize them as per your use.
Also read: 7 ways to free up disk space on server 2022
Add 50+GB space to c drive on Windows Server without formatting or losing data
Data Safety: This disk space expanding relies on a 3rd party software that can safely redistribute disk space on the same disk without formatting or repartitioning disk. It can also help add extra space to c drive or any drive from another disk using the RAID array.
#1 Same Disk: Shrinking partitions, moving partitions, extending partitions without losing data.
#2 Another Disk: RAID array shall be applied, initialize the new disk as unallocated space in Disk Management, and then add unallocated space to any drive without rebuilding RAID.
Example: Shrink D Volume, and extend c drive using Partition Resizer
Video Tutorial to Extend Boot Partitions with Partition Resizer
Step1: Download, install and open the IM-Magic Partition Resizer Server Edition
Step2: Choose the big D drive that has a lot of free space and shrink it for producing unallocated space which is vital in the disk space management.
The unallocated space is now available.
Note: If the unallocated space is not close to c drive, you need to right click the partition that stands in the way, and go to RESIZE/MOVE PARTITION in Partition Resizer to safely move the whole partition right forward.
Also read: how to move unallcoated space without losing data
Step3: Right click on the c partition and click “Resize/Move”
Step4: Now extend the boot partition by dragging the cursor over the bar showing the storage space to get the unallocated space added to the c drive.
Extend c partition with IM-Magic Partition Resizer Unlimited
Step5: Click APPLY button in the software to get every step applied and get volume extended.
Background
While using your windows system, you may often see several warnings indicating insufficient disk space. In this situation, you need to reclaim abundant space, so your Pc does not show notifications and runs smoothly. You can also add some free space in your C drive after you are done with the cleanup. To help you with the issue, you need a native ‘Disk Cleanup’ utility on your PC. You can use this disk cleanup server 2016 2019 2022 as per your Windows PC.
The facility is capable of removing files and junk that are not needed anymore in a safe manner. For example, you can run the cleanmgr command or use the suitable wizard for disk cleanup to serve your purpose. We have also mentioned additional ways to create space on your PC.
Conclusion:
Installing Disk Cleanup on Windows Server is a simple process that can help free up disk space and improve the overall performance of the server. By removing unnecessary files, Disk Cleanup can help to optimize the server and ensure that it runs smoothly and efficiently. Additionally, by freeing up disk space, Disk Cleanup can help to ensure that there is enough space available for other applications and data.
Also read: how to expand c volume server 2022
Over time, as your Windows Server runs longer, more and more disk space is eaten. Simply gone! Investigating the disk usage leaves you clueless; there are no large log files, crash dumps, or there is no software to be removed. Where did that space go?
The answer: Windows Updates, Service Pack, and hotfix installations.
The Windows disk cleanup utility cleanmgr is not available in Windows Server 2012 if the Desktop Experience-feature is not installed. This makes cleaning up used disk space a bit harder. You can utilize your cmd.exe or PowerShell command-line, and use Deployment Image Servicing and Management (DISM) to clean up the Windows Component Store (WinSxS) in Windows Server 2012 and up.
This post also shows you how to move the Windows Server SoftwareDistribution folder and user’s Documents folder to a different partition.
WinSxS cleanup in Windows Server — using DISM and PowerShell
The WinSxS folder is located in the Windows folder, for example C:\Windows\WinSxS. It’s the location for Windows Component Store files.
The Windows Component Store contains all the files that are required for a Windows installation. And, any updates to those files are also held within the component store as the updates are installed (source: KB 2795190 — and do read Manage the Component Store). The WinSxS folder will become large…
Let’s clean up WinSxS!
Regain used disk space with Deployment Image Servicing and Management (DISM)

Dism disk cleanup: Deployment Image Servicing and Management (DISM) is a command-line tool that allows you to install, uninstall, configure, and update Windows features, packages, drivers, and international settings. The /Cleanup-Image parameter of dism.exe provides advanced users more options to further reduce the size of the WinSxS folder.
The Dism.exe /Online /Cleanup-Image has a few extra parameters (or switches):
/AnalyzeComponentStore/StartComponentCleanup/ResetBasewith/StartComponentCleanup/SPSuperseded
Throughout this article, I assume you’ll read help options, just add /?, like: dism.exe /Online /Cleanup-Image /?.
If you enjoyed this, you might also enjoy the following post summing up 5 extra ways to clean up disk space in Windows Server!
Analyze WinSxS folder (Component Store) with /AnalyzeComponentStore
First you can use the /AnalyzeComponentStore parameter. This analyzes the size of the Component Store in Windows. The AnalyzeComponentStore option is available in Windows 8.1 Windows Server 2012 R2, and it’ll notify you whether a Component Store Cleanup is recommended or not.
& dism.exe /Online /Cleanup-Image /AnalyzeComponentStore

In the above image, AnalyzeComponentStore recommends a Component Store Cleanup. Let’s do so.
/StartComponentCleanup parameter
Dism.exe removes superseded and unused system files from a system with the /StartComponentCleanup parameter.
& dism.exe /Online /Cleanup-Image /StartComponentCleanup

There is also a registered scheduled task called StartComponentCleanup. You can start this task from the command line:
schtasks.exe /Run /TN "\Microsoft\Windows\Servicing\StartComponentCleanup"
The /StartComponentCleanup parameter is supported on Windows 8, Windows Server 2012 and up.
Using the /StartComponentCleanup parameter of Dism.exe on Windows 10 gives you similar results to running the StartComponentCleanup task in Task Scheduler, except previous versions of updated components will be immediately deleted (without a 30 day grace period) and you will not have a 1-hour timeout limitation.
From an elevated command prompt, type the following:
Dism.exe /online /Cleanup-Image /StartComponentCleanup
/ResetBase switch with /StartComponentCleanup parameter
Using the /ResetBase switch with the /StartComponentCleanup parameter of dism.exe, all superseded versions of every component in the component store is removed.
Dism.exe /Online /Cleanup-Image /StartComponentCleanup /ResetBase

All existing service packs and updates cannot be uninstalled after this command is completed. This will not block the uninstallation of future service packs or updates.
The /ResetBase parameter is supported on Windows 8.1 and Windows Server 2012 R2.
/SPSuperseded parameter
The /SPSuperseded parameter removes any backup components needed for de-installation of a service pack. The service pack cannot be uninstalled after this command is completed.
Dism.exe /Online /Cleanup-Image /SPSuperseded
The Service Pack cannot be uninstalled after this command is completed.
The /SPSuperseded parameter is supported on Windows 7 or Windows Server 2008 R2 Service Pack 1, 2012, 2012 R2.
The
/AnalyzeComponentStoreoption is available in Windows 8.1 and Windows Server 2012 R2. Use this to analyze the size of the Component Store (WinSxS folder) in Windows.
As said at the beginning of this article, the Disk Cleanup Tool is available in Windows Server 2012, if you install the Desktop Experience-feature.
In some versions of Windows Server, you can simply copy the Disk Cleanup Tool executable cleanmgr.exe and cleanmgr.exe.mui to C:\Windows\system32 and C:\Windows\system32\en-Us from an old Windows 2008 R2 server, if you don’t want to install the Desktop Experience feature.
The following steps to install (copy) cleanmgr may not work on all versions of Windows Server. Try for yourself.
Disk Cleanup Wizard addon on Windows Server 2008 R2
Microsoft KB2852386 adds a Disk Cleanup option on Windows Server 2008 R2, similar to the Windows 7 update. I’ve tested this on Windows Server 2012. It may not clean up everything, but at least a lot.
Here’s how to make cleanmgr.exe available on Windows Server 2012 Standard (Windows version 6.2.9200), without installing the Desktop Experience feature:
Microsoft Windows [Version 6.2.9200]
(c) 2012 Microsoft Corporation. All rights reserved.
PS C:\Users\jan> $osversion = [System.Environment]::OSVersion.Version
PS C:\Users\jan> write-host $osversion
6.2.9200.0
C:\Windows\System32>cd ..
C:\Windows>copy WinSxS\amd64_microsoft-windows-cleanmgr.resources_31bf3856ad364e35_6.2.9200.16384_en-us_b6a01752226afbb3\cleanmgr.exe.mui \Windows\system32\en-US
        1 file(s) copied.
C:\Windows>copy WinSxS\amd64_microsoft-windows-cleanmgr_31bf3856ad364e35_6.2.9200.16384_none_c60dddc5e750072a\cleanmgr.exe \Windows\system32
        1 file(s) copied.
C:\Windows>system32\cleanmgr.exe
C:\Windows>
Unfortunately, this no longer works on Windows Server 2012 R2 (6.3.9600), probably due to KB2821895. As Aaron pointed out in the comments, the above solution to copy over the cleanmgr.exe and cleanmgr.exe.mui files doesn’t always work well. Therefore I removed this information for Windows Server 2012 R2.
Fortunately, the Disk Cleanup functionality is back in Windows Server 2016 (at least TP5).
After cleaning up the disk, a server reboot is required. Don’t forget to reboot your computer — or server — afterwards! The actual cleanup of the WinSxs directory occurs during the next reboot.
Error 0x800f0906 with DISM /Online /Cleanup-Image, PowerShell Install-WindowsFeature and SFC /scannow
Some reports are available explaining Microsoft Security Bulletin MS14-046 broke DISM /Online /Cleanup-Image /RestoreHealth, PowerShell Install-WindowsFeature with -Source parameter, and SFC /scannow. Yes, it broke a lot…
An update is made available by Microsoft: KB3005628
Update for the .NET Framework 3.5 on Windows 8, Windows 8.1, Windows Server 2012, and Windows Server 2012 R2. This update resolves an issue that prevents the optional Microsoft .NET Framework 3.5 feature from being enabled after you install security update 2966827 or 2966828 (described in Microsoft Security Bulletin MS14-046) for the Microsoft .NET Framework 3.5.
Move Windows Server SoftwareDistribution folder
Over time, your Windows Updates SoftwareDistribution folder in c:\Windows\SoftwareDistribution can become quite large, for example when multiple updates were not installed successfully.
Windows Update files are downloaded to this folder and removed after successful installation. When you find yourself in a situation where your C: partition is rather small, and SoftwareDistribution folder eats up too much disk space, follow these steps to move the SoftwareDistribution folder to a different location.
All in a cmd.exe shell (Start > Run > cmd and press enter). In this example the new location is D:\Windows-SoftwareDistribution.
-
Stop the Windows Update service:
net stop wuauserv -
Rename the folder
c:\Windows\SoftwareDistributiontoc:\Windows\SoftwareDistribution.old:rename c:\windows\SoftwareDistribution SoftwareDistribution.old -
Create a link using Windows Sysinternals Junction, or Windows mklink
-
Create the new directory:
mkdir D:\Windows-SoftwareDistribution -
Create the Junction:
c:\>junction C:\Windows\SoftwareDistribution "D:\Windows-SoftwareDistribution", or:
c:\>mklink /J C:\Windows\SoftwareDistribution "D:\Windows-SoftwareDistribution"
-
-
Restart the Windows Update Service:
net start wuauserv
When, after a while, everything seems to run and update fine, you can delete your SoftwareDistribution.old folder safely.
Move User Documents folder
Another way for you to gain some extra free space is to move the User Documents folder (and others, like Downloads), for instance from C:\Users\$USER$\Documents to D:\User\$USER$\Documents (substitute \(USER\) with the username whose Documents folder you want to move). Here are the steps for you to follow (screenshots taken from Windows Server 2016 TP5):
- Open Explorer and right click on the Documents folder and then Properties
- Choose Location
- Change the location where files are stored
- When the destination does not exist, Windows asks to create the folder for you
- After completion, files are moved to their new location.

Conclusion
Yes, the Windows component store (WinSxS folder) can become large, very large. But fortunately, Microsoft provides us the tools to monitor, manage and clean up the WinSxS folder to regain that used disk space.
If you are comfortable with installing the Desktop Experience Windows feature on your system, you can have the Disk Cleanup utility on your system. Otherwise, you can use the DISM (Deployment Image Servicing and Management) command for various clean up tasks.
To gain some extra free space, you can also move the Windows SoftwareDistribution folder to a different partition.