
Утилита очистки диска (Disk Cleanup) позволяет администратору быстро очистить системный диск Windows Server, удалив ненужные и временные файлы, в том числе очистить каталог WinSxS от файлов устаревших компонентов, которые остались после установки обновлений. Утилита Disk Cleanup (cleanmgr.exe) по умолчанию уже установлена в графической версии Windows Server 2016/2019 (Desktop Experience), однако в предыдущих версиях Windows Server (2012 R2/ 2012/ 2008 R2) утилита cleanmgr.exe по-умолчанию отсутствует.
Содержание:
- Очистка диска с помощью Disk Cleanup в Windows Server 2016
- Очистка диска с помощью cleanmgr.exe из командной строки
- Запуск cleanmgr в Windows Server 2012 R2/ 2008 R2 без установки Desktop Experience
- Использование Disk Cleanup в Windows Server Core
Очистка диска с помощью Disk Cleanup в Windows Server 2016
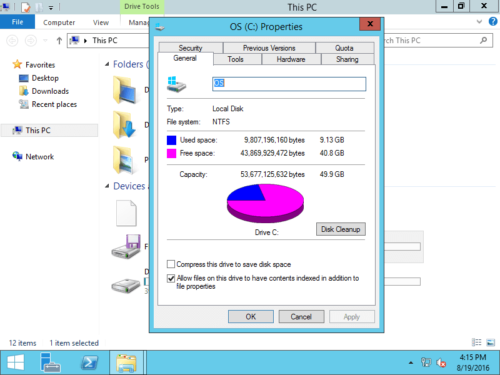
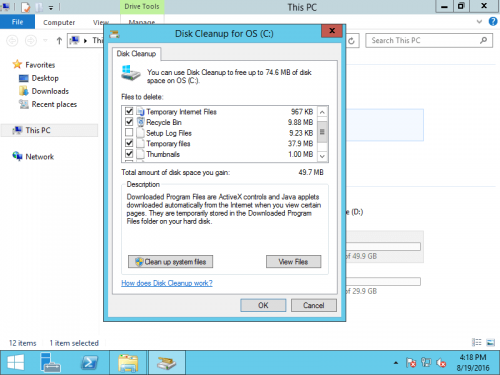
Чтобы очистить системный диск от ненужных файлов в Windows Server 2016 с помощью утилиты Disk Cleanup, нужно в File Explorer открыть свойства диска и нажать кнопку Disk Cleanup.
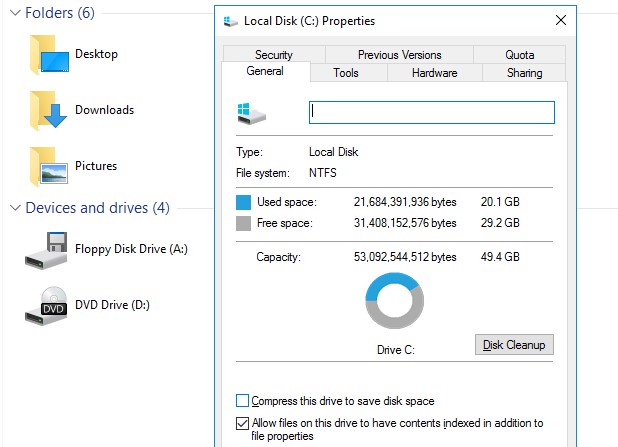
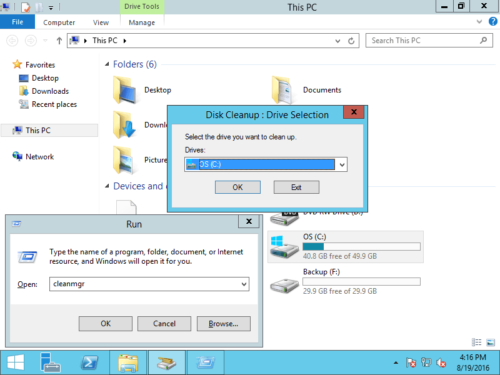
Также можно в поисковой строке набрать «disk cleanup» или cleanmgr.exe.
Выберите диск, который вы хотите очистить.
Дождитесь пока мастер очистки проверит ваш диск и найдет ненужные файлы, которые можно безболезненно удалить.
Вы можете выбрать компоненты, файлы которых можно удалить. Вам предлагается удалить следующие временные файлы:
- Setup Log Files
- Downloaded Program Files
- Temporary Internet Files
- Recycle Bin
- Temporary files
- Thumbnails
Чтобы удалить ненужные системные файлы нажмите на кнопку Clean up system files.
Дополнительно предлагается очистить:
- Устаревшие файлы Windows Defender
- System archived Windows Error Reporting (каталог C:\ProgramData\Microsoft\Windows\WER\ReportQueue)
- System queued Windows Error Reporting
- Device driver packages
- Windows Update Cleanup — при этом выполняется очистка хранилища компонентов в каталоге WinSxS. Удаляются старые версии компонентов, которые остались после установки обновленных версий.
Выберите нужные опции, при этом Disk Cleanup покажет количество места, которое освободится. Нажмите Ок и подтвердите удаление временных файлов.
Дождитесь, пока утилита cleanmgr.exe удалит ненужные файлы.
Очистка диска с помощью cleanmgr.exe из командной строки
Утилита
cleanmgr.exe
имеет различные параметры командной строки, которые позволяют использовать ее в различных сценариях автоматической очистки системного диска. Их можно использовать как в Windows Server, так и на рабочих станциях пользователей с Windows 10.
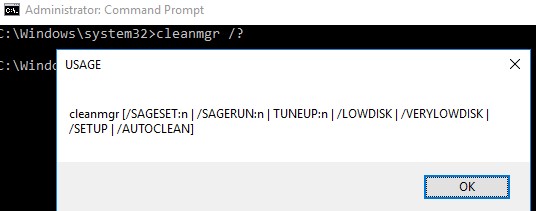
cleanmgr [/d driveletter] [/SAGESET:n | /SAGERUN:n | TUNEUP:n | /LOWDISK | /VERYLOWDISK | /SETUP | /AUTOCLEAN]
Ключ
/AUTOCLEAN
используется для очистки старых файлов, оставшихся после апгрейда билда Windows. Параметр
/SETUP
позволяет удалить файлы, оставшиеся от предыдущей версии Windows (если вы выполняли in-place upgrade).
Команда
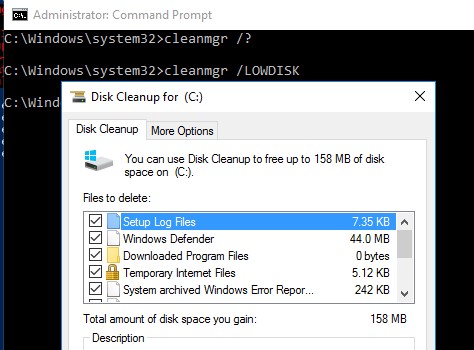
cleanmgr /LOWDISK
– запускает графический интерфейс Disk Cleanup с уже выбранными параметрами очистки.
Команда
cleanmgr /VERYLOWDISK
выполняет автоматическую очистку, а после окончания оторажает информацией о выполненных действиях и свободном месте.
You have successfully resolved the low disk space condition. Your C:\ volume now has 10000 Mb of free space remaining.
С помощью параметров
/sageset:n
и
/sagerun:n
вы можете создать и выполнить настроенный набор параметров очистки.
Например, выполните команду
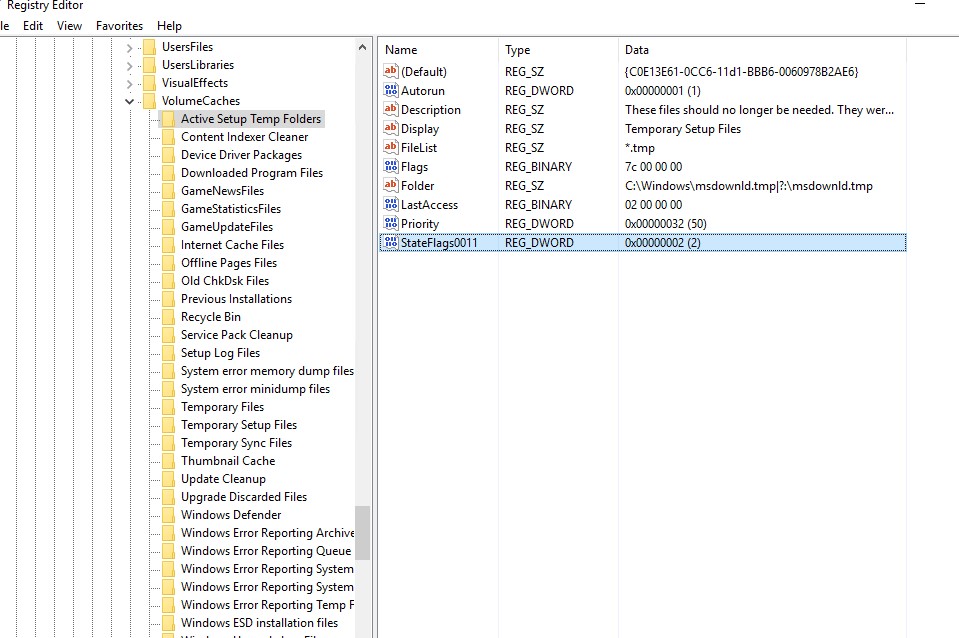
cleanmgr /sageset:11
. В открывшемся окне выберите компоненты и файлы, которые нужно автоматически очищать (я выбрал все опции).
Эти настройки сохраняются в ветке реестра HKEY_LOCAL_MACHINE\SOFTWARE\Microsoft\Windows\CurrentVersion\Explorer\VolumeCaches. В этой ветке перечислены все компоненты Windows, которые можно очистить с помощью Disk Cleanup. Для каждой опции, которую вы выбрали создается параметр типа DWORD с именем StateFlags0011 (
0011
это число, которое вы указали в параметре sageset).
Чтобы запустить процесс очистки с выбранными параметрами, выполните команду:
cleanmgr /sagerun:11
Если вам нужно настроить автоматическую очистку дисков на компьютерах (или серверах) в домене, вам достаточно экспортировать эту ветку реестра и распространить ее через GPO.
Для автоматического запуска очистки системного диска на рабочих станциях с Windows 10 можно создать задание в планировщике со следующим PowerShell скриптом:
Start-Process -FilePath CleanMgr.exe -ArgumentList '/sagerun:11' -WindowStyle Hidden -Wait
Запуск cleanmgr в Windows Server 2012 R2/ 2008 R2 без установки Desktop Experience
В Windows Server 2012 / R2 и 2008 /R2 по умолчанию не установлена утилита очистки диска Disk Cleanup (cleanmgr.exe). Чтобы воспользоваться утилитой cleanmgr сначала нужно установить отдельный компонент сервера Desktop Experience (Возможности рабочего стола) с помощью Server Manager или PowerShell (
Install-WindowsFeature Desktop-Experience
).
Но вместе с Desktop Experience устанавливается множество других компонентов, которые абсолютно не нужны на сервере:
- Windows Media Player
- Темы рабочего стола
- Поддержка AVI для Windows
- Windows SideShow
- Windows Defender
- Disk Cleanup
- Sync Center
- Запись звука
- Character Map
- Snipping Tool
Для запуска мастера очистки дисков в Windows Server можно воспользоваться более простым методом: достаточно скопировать в системный каталог два файла из каталога WinSxS: Cleanmgr.exe и Cleanmgr.exe.mui. Ниже представлены команды для копирования файлов cleanmgr из каталога WinSxS для разных версий Windows Server (во всех случаях используется путь для английских редакций ОC).
| ОС | Команда копирования файлов cleanmgr |
| Windows Server 2008 R2 x64 |
copy C:\Windows\winsxs\amd64_microsoft-windows-cleanmgr_31bf3856ad364e35_6.1.7600.16385_none_c9392808773cd7da\cleanmgr.exe C:\Windows\System32\
|
| Windows Server 2008 x64 |
copy C:\Windows\winsxs\amd64_microsoft-windows-cleanmgr_31bf3856ad364e35_6.0.6001.18000_none_c962d1e515e94269\cleanmgr.exe C:\Windows\System32\
|
| Windows Server 2012 x64 |
copy C:\Windows\WinSxS\amd64_microsoft-windows-cleanmgr_31bf3856ad364e35_6.2.9200.16384_none_c60dddc5e750072a\cleanmgr.exe C:\Windows\System32\
|
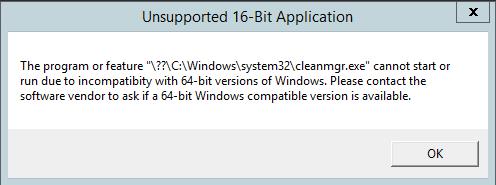
Windows Server 2012 R2 x64
Рассмотренный выше трюк не работает в Windows Server 2012 R2 из-за изменений, внесенных обновлением KB2821895. Дело в том, что после установки данного обновления для хранения бинарных файлов компонентов стала использоваться компрессия. При попытке запустить скопированный cleanmgr.exe появляется ошибка:
The Program or feature \??\C:\Windows\system32\cleanmgr.exe cannot start or run due to incompatibility with 64-bit version of Windows
В качестве обходного решения можно воспользоваться такой методикой:
- Установить компонент Windows Desktop Experience:
Install-WindowsFeature Desktop-Experience - Перезагрузить сервер;
- Скопировать файлы %windir%\system32\cleanmgr.exe и %windir%\system32\en-US\cleanmgr.exe.mui в произвольный каталог (c:\temp)
- Удалить компонент:
Uninstall-WindowsFeature Desktop-Experience - Перезагрузка;
- Скопировать файлы cleanmgr.exe и cleanmgr.exe.mui в указанные выше каталоги
В дальнейшем эти два файла можно скопировать и на все другие сервера или интегрировать в шаблоны виртуальных машин с Windows Server 2012 R2.
Ссылка на скачивание готового комплекта файлов cleanmgr.exe.mui + cleanmgr.exe для Windows Server 2012 R2 на ЯндексДиске (thks Alex Kornev).
Для запуска утилиты очистки диска теперь достаточно выполнять с правами администратора команду
cleanmgr.exe
.

Совет. Для очистки устаревших файлов компонентов, оставшихся после установки обновлений, в Windows Server R2 можно воспользоваться командой DISM:
dism.exe /online /Cleanup-Image /StartComponentCleanup /ResetBase
В Windows Server 2008 R2, чтобы cleanmgr могла удалять устаревшие файлы обновлений нужно установить отдельный патч KB2852386.
Использование Disk Cleanup в Windows Server Core
В Windows Server Core 2016, в котором отсутствует полноценный графический интерфейс, утилита Disk Cleanup также не установлена. Если вы хотите использовать cleanmgr.exe для очистки диска в Server Core, достаточно скопировать следующие файлы из каталога WinSXS:
copy C:\Windows\WinSxS\amd64_microsoft-windows-cleanmgr_31bf3856ad364e35_10.0.14393.0_none_9ab8a1dc743e759a\cleanmgr.exe C:\Windows\System32\
copy C:\Windows\WinSxS\amd64_microsoft-windows-cleanmgr.resources_31bf3856ad364e35_10.0.14393.0_en-us_8b4adb68af596a23\cleanmgr.exe.mui C:\Windows\System32\en-US\
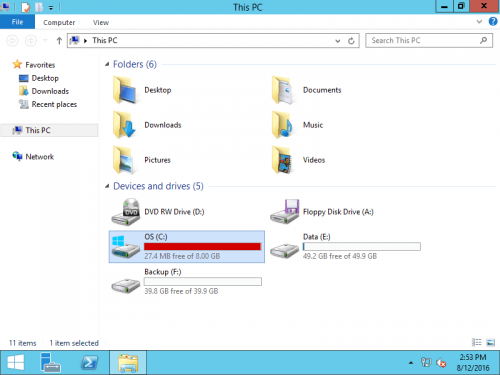
Чем дольше вы используете сервер, тем меньше свободного места остается на системном диске C:. Обновления Windows, системные службы, приложения, кеш и многие другие файлы очень быстро съедают свободное место. Однажды системный диск C заполнится и станет красным в проводнике.
В этой ситуации лучше освободить место на диске в Windows 2012 server как можно быстрее. В противном случае этот сервер станет медленным, зависнет или даже выйдет из строя, если диск C полностью заполнен. Чтобы очистить диск C в Windows Server 2012 R2, вы можете использовать либо собственный инструмент очистки диска, либо стороннее программное обеспечение для оптимизации. Но я всегда рекомендую собственный инструмент очистки диска Windows, потому что он безопасен, быстр и способен удалять большинство типов ненужных файлов.
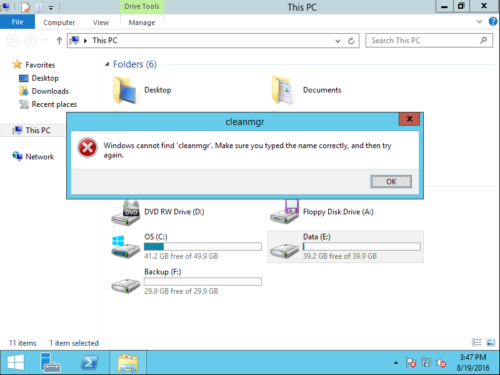
В отличие от других версий Windows, Очистка диска в Server 2012 по умолчанию не включен. Когда вы щелкаете правой кнопкой мыши по мало места на диске C в проводнике вы не увидите кнопку «Очистка».
Если вы попытаетесь запустить из «Выполнить», вы получите сообщение об ошибке: Windows не может найти cleanmgr. Убедитесь, что вы правильно ввели имя, а затем повторите попытку..
Перед освобождением места на диске в Windows Server 2012 R2 следует включить или установить утилиту очистки диска.
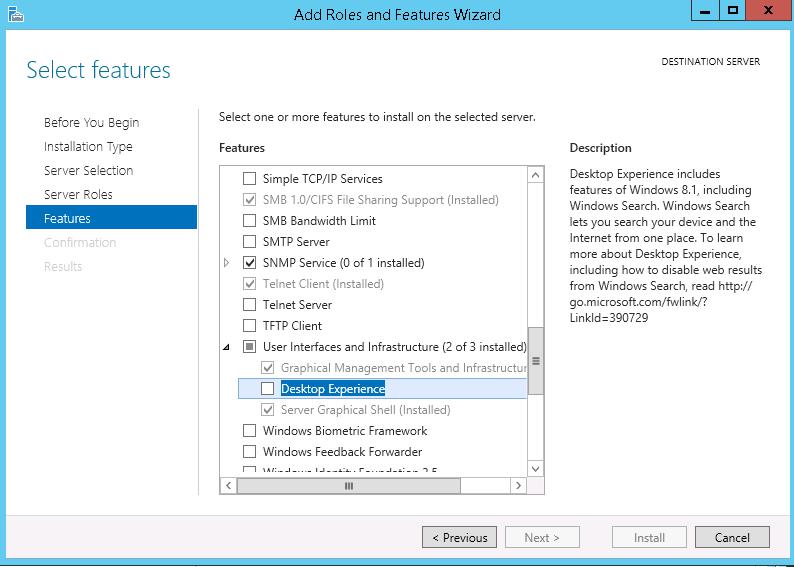
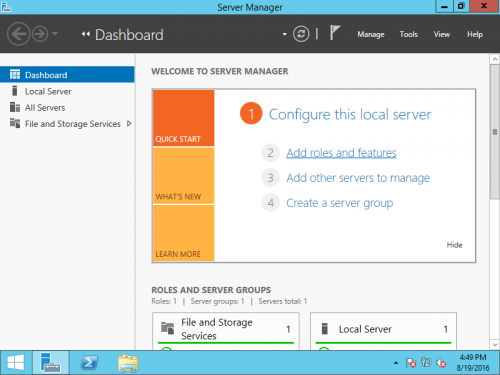
Как включить/установить очистку диска в Windows Server 2012
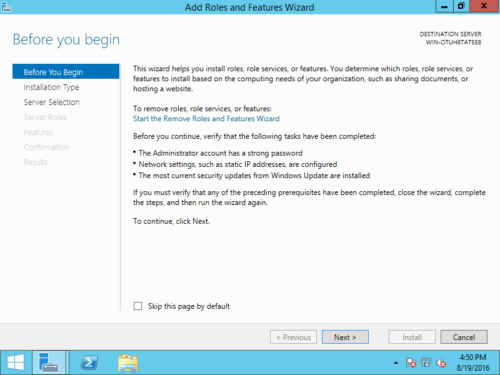
Шаг 1: Нажмите Диспетчер серверов в левом нижнем углу нажмите второй вариант «Добавить роли и функции».
Шаг 2: Нажмите Следующая пока не увидишь Особенности.
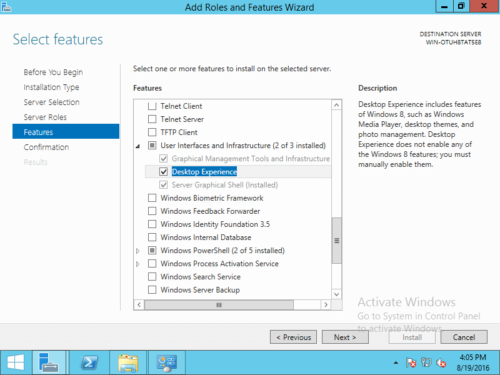
Шаг 3: Установите флажок напротив «Рабочий стол«И нажмите Следующая.
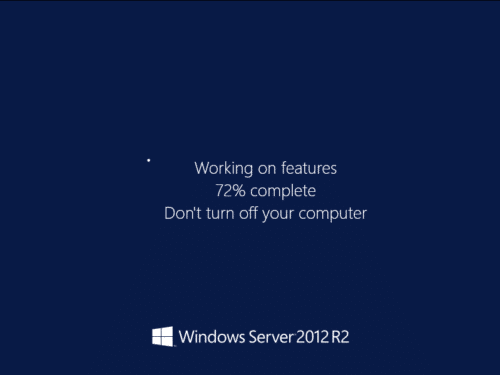
Шаг 4: В течение нескольких минут, установка завершена, нажмите Закрыто.
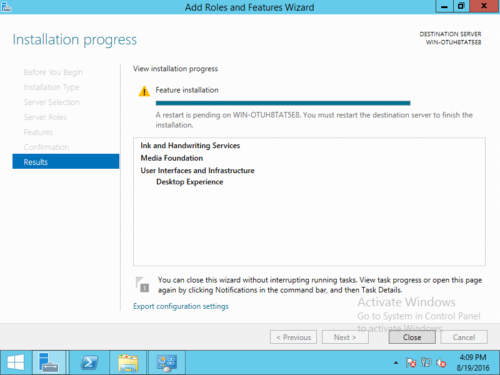
Шаг 5: Перезапустите сервер, чтобы завершить добавление функций.
После загрузки на рабочий стол, щелкнув правой кнопкой мыши диск C в проводнике, вы увидите утилиту очистки.
Другим способом является нажатие Windows + R на клавиатуре, чтобы начать с Run, напишите cleanmgr, Очистка диска будет запущена.
Как освободить место в Windows Server 2012 R2
Шаг 1: используйте любой из описанных выше способов, чтобы открыть Очистку диска.
Шаг 2: установите флажок напротив файлов, которые вы хотите удалить, и нажмите кнопку ОК. Нажмите на каждый тип файлов, вы увидите соответствующее описание внизу. В общем, все типы файлов могут быть выбраны для безопасного удаления. Однако вам лучше прочитать описание, а затем решить, удалять их или нет.
Шаг 3: Подтвердите, если вы хотите очистить эти файлы.
Шаг 4: повторите с шага 1 и нажмите Очистить системные файлы на этапе 2.
Очистка диска — отличный инструмент для освобождения места в Windows Server 2012 (r2). Он может очищать многие типы файлов, такие как временные файлы Интернета, файлы в корзине, временные файлы, файлы журналов, эскизы и файлы отчетов об ошибках Windows. Я не предлагаю удалять файлы с помощью стороннего программного обеспечения, потому что некоторые люди сообщали о проблемах после использования этого программного обеспечения.
Расширьте диск C после освобождения места на диске
Администратор сервера с более чем 15-летним опытом работы говорит, что лучший способ решить проблему нехватки места на диске — расширить диск C:, потому что:
- Удаление всех ненужных файлов требует слишком много времени.
- В большинстве случаев вы не получите большого количества свободного места.
- Существует потенциальный риск потери данных или выхода из строя сервера, если вы попробуете некоторые методы, с которыми вы не знакомы.
- На сервере через короткое время снова заканчивается место на диске.
В программное обеспечение серверного раздела, вы можете расширить диск С с помощью перемещение свободного пространства из других разделов. Ваша операционная система, программы и все остальное остаются такими же, как и прежде. Если ваш системный диск невелик, вы можете клонировать диск на больший и расширить диск C дополнительным дисковым пространством.
Как увеличить свободное место на диске C:
Помимо сжатия и расширения разделов в Windows Server 2003/2008/2012/2016/2019/2022, этот инструмент помогает вам выполнять множество других операций по управлению разделами диска. Например: перемещение местоположения раздела, клонирование диска/раздела, преобразование типа диска/раздела, дефрагментация, очистка, скрытие раздела, сканирование поврежденных секторов, оптимизация файловой системы и т. д.
Подробнее Скачать
Когда C диск не хватает места, важно действовать быстро. В противном случае сервер может зависнуть или неожиданно перезагрузиться. Чтобы решить эту проблему, первым шагом будет освобождение места на диске, что позволит серверу продолжать работать без сбоев. Кроме того, это обеспечивает больше места для установки программ, которые могут помочь решить проблему. Чтобы освободить место на диске в Server 2012 R2, вы можете использовать встроенную утилиту очистки диска или стороннее программное обеспечение для оптимизации системы. Если очистка диска не освободила достаточно места, рекомендуется выделить дополнительное свободное место на диске C: из другого раздела.
Содержание:
- Как освободить место на диске с Server 2012 Инструмент очистки диска
- Дополнительные методы для освобождения места в Windows Server 2012
- Добавить больше свободного места на диск C: из другого раздела
1. Как освободить место на диске с помощью Server 2012 Инструмент очистки диска
То же самое с другими версиями, Windows Server 2012 имеет встроенную утилиту очистки диска. Она способна быстро и безопасно удалять большинство распространенных типов ненужных и мусорных файлов. Нет необходимости запускать стороннее программное обеспечение, чтобы освободить место на диске Windows Сервер 2012
Шаги, чтобы освободить дисковое пространство в Windows Server 2012 R2 с инструментом очистки диска:
Шаг 1: Press Windows и R вместе на клавиатуре, введите cleanmgr и нажмите «Ввод».
Шаг 2: Выберите диск C: в раскрывающемся списке и нажмите OK.
Шаг 3: Выберите файлы, которые вы хотите удалить в следующем окне. После нажатия кнопки «ОК» программа очистки диска попросит вас подтвердить.
Освободить место на диске в Server 2012 R2 с командой
Если вы хотите освободить место на диске Windows Server 2012 С помощью команды R2 вы можете сделать следующее:
① Выбрать все ненужные файлы автоматически, но подтвердить это самостоятельно
- Press Windows и R вместе на клавиатуре.
- вход cleanmgr /LOWDISK и нажмите Enter.
- Появится диалоговое окно «Очистка диска» со всеми типами файлов, выбранных по умолчанию, поэтому вам просто нужно нажать «ОК» для подтверждения.
② Очистить все ненужные файлы автоматически
- Press Windows и R вместе на клавиатуре.
- вход cleanmgr /VERYLOWDISK и нажмите Enter.
2. Дополнительные методы для освобождения места в Windows Server 2012 R2:
① Удаление программ и функций
Press Windows и X на клавиатуре, выберите «Программы и компоненты», щелкните правой кнопкой мыши элемент, который вы хотите удалить, и нажмите «Удалить».
② Сбросить корзину
Все файлы, которые были удалены нажатием клавиши DEL без клавиши SHIFT, попадут в корзину, где вы можете вручную вернуть эти файлы в исходное местоположение, если удалили их по ошибке. Когда диск системы C почти заполнен, вы можете уменьшить использование дискового пространства или изменить расположение корзины на другой том. шаги:
- Щелкните правой кнопкой мыши «Корзина» на рабочем столе и выберите «Свойства».
- Выберите диск для корзины.
- Выберите «Размер клиента» и введите сумму.
③ Сброс файла подкачки
Файл подкачки использует часть дискового пространства в качестве виртуальной RAM и по умолчанию находится на диске C. Вы можете уменьшить его или поменять на другой раздел, шаги:
- Press Windows и R на клавиатуре, введите sysdm.cpl ,3 и нажмите Enter.
- Нажмите «Настройки» в разделе «Производительность» на вкладке «Дополнительно».
- Нажмите «Изменить» в разделе «Виртуальная память».
- Снимите флажок «Автоматически управлять размером файла подкачки для всех дисков» вверху.
- Выберите диск D: или другой диск, введите значение «Исходный размер» и «Максимальный размер» в поле «Пользовательский размер», а затем нажмите «Установить».
- Выберите диск C: и установите переключатель «Без файла подкачки», затем нажмите «Установить».
- Щелкните ОК.
④ Изменить настройки по умолчанию
Если вы установили программы или используете некоторые Windows services с настройками по умолчанию, вы можете изменить путь вывода на другие разделы. Если там есть файлы, перейдите в другой раздел.
Если вы выполните поиск в Google, вы найдете множество решений для освобождения места на диске. Windows Server 2012 R2. Конечно, вы можете попробовать их все, если у вас есть время. Однако в большинстве случаев методы, упомянутые выше, достаточно быстры и эффективны. Если вам все еще нужно больше свободного места на диске C, лучшим решением будет перераспределить пространство из других разделов.
3. Добавьте больше свободного места на диск C:
Если ваш системный диск C: слишком мал или вы не можете освободить достаточно места после того, как попробовали все вышеперечисленные методы, лучше всего добавьте больше места на диск C из других разделов. Это подразумевает сжатие другого раздела на диске для освобождения места, которое затем можно перенести на диск C. Таким образом, операционная система, программы, настройки и все остальное останутся неизменными.
Скачать NIUBI Partition Editor и следуйте инструкциям в видео, чтобы добавить больше места на диске C:

Если вы используете какие-либо типы оборудования RAID массивы, такие как RAID 1/5/6/10 или бегите Server 2012 в VMware/Hyper-V, выполните те же шаги, и разницы не будет. Помимо сжатия и расширения раздела, это программное обеспечение поможет вам объединить, преобразовать, дефрагментировать, стереть раздел, оптимизировать файловую систему, сканировать поврежденные сектора и многое другое.
Если нет другого раздела данных или недостаточно свободного места на том же диске, вы можете клонировать диск на больший. Во время этого процесса вы можете расширить диск C: (и другие разделы) с помощью дополнительного дискового пространства. Следуйте инструкциям в видео:
Новые ненужные файлы генерируются постоянно, вам лучше расширить диск C как можно больше и запустить Server 2012 Утилита очистки диска для ежемесячного освобождения места на диске.
One of my Windows Server 2012 R2 ran out of space. A quick folder analysis using the free portable tool TreeSize revealed that both Windows.old and WinSxS folders are the ones taking most of the spaces.

On Windows desktop systems, both folders are easy to clean up with the built in tool Disk Cleanup Utility. But, it’s not the case in Windows Server, especially the more recent versions like 2012 R2. You probably could enable Desktop Experience feature to bring back the Disk Cleanup Utility but it won’t guarantee to clean up these two giant folders managed by the system upgrades and updates. If you are facing the same challenge as I do, here are the options you can take away.
WinSxS, aka Windows component store, contains all the files required for a Windows installation as well as any updates to those files within the component store. Therefore, the folder could become quite big over time. Because it’s associated with system installation it’s not a good idea just simply deleting the folder. Rather, utilizing a command-line tool called DISM, Deployment Image Servicing Management, is way more appropriate. It has a parameter /cleanup-imagethat provides a few more advanced options to reduce the size of the WinSxS folder.
First of all, you can run the following to analyze the component store to see what’s included in there.
dism /online /cleanup-image /AnalyzeComponentStore

Then, run the following to remove superseded and unused system files from the system and reset the base so all existing updates cannot be removed after the command is completed.
dism /online /cleanup-image /StartComponentCleanup /ResetBase
It didn’t clean up a whole lot in my case, only claimed back a little over 1 GB space.
Note: If you are somehow still using Windows Server 2008 R2, installing KB2852386 after enabling Desktop Experience feature makes things a lot easy to clean up right with the Disk Cleanup Utility tool.
How to clean up WinSxS folder on Windows 2008 R2
How to clean up Windows.old on Windows Server 2012 R2
With Disk Cleanup out of the equation, manual cleanup seems to be the option left. Thanks to this Q&A at ServerFault, here is what I did to bring back over 50 GB of storage space.
First of all, run Sysinternals junction.exe utility to get a list of all junctions in a text file, junc.txt on my desktop.
junction.exe -s -q c:\windows.old > %UserProfile%\desktop\junc.txt
Then, run the following script in PowerShell to remove all junction points and single symbolic links on the system.
foreach ($line in [System.IO.File]::ReadLines("$env:userprofile\desktop\junc.txt"))
 {
     if ($line -match "^\\\\")
     {
         $file = $line -replace "(: JUNCTION)|(: SYMBOLIC LINK)",""
         & $env:userprofile\desktop\pstools\junction.exe -d "$file"
     }
 }
Replace with the correct path for junction.exe utility and the junc.txt files, if needed.
Once that’s done, run the following to take over ownership of the windows.old folder.
takeown /f c:\windows.old /r /d y
And reassign the full control rights to everyone.
cacls c:\windows.old /t /g everyone:F
Then, finally to remove the whole folder.
rmdir /s /q c:\windows.old
It may take a little while for the command to complete but once it’s done you will be so delighted to see how much space you just brought it back to life. Enjoy.
Approved By
Anuraag Singh
Published On
November 26th, 2024
Reading Time
10 Minutes Reading
Overview: You may be worried about drive space and searching for “how to free up space on C drive in Windows Server 2012 r2”. Then, this should explore this write-up to solve the prevailing concern.
Managing disk space efficiently is a critical task in itself, especially, in the case of server administration. With time, the server workload and volume increase, thus it is essential to ensure that the C drive (system drive) has sufficient space for smooth operation. One of the most sought-after is the Windows Server 2012 R2 system, which is no exception to this scenario.

Over time, the performance issues and potential system failures could be due to the cluttered drive with Windows updates, system service, applications, cache, temporary files, logs, and other unnecessary data. And on one day, you will find the C drive becomes full and the color changed to red in File Explorer.
In this case, it is recommended to free up disk space in Windows 2012 server as soon as possible. Otherwise, your PC will get slow, stuck, or even crash at times. Now, there are several ways to wipe the C drive in Windows Server 2012 (R2) such as using the native Disk Cleanup tool, CMD, or 3rd party data optimization software.
In comparison to other versions of Windows, Disk Cleanup is not enabled by default on Disk Server 2012. If you right-click the C drive with low disk space in File Explorer, you will not find the Cleanup button.
Attempting to run Disk Cleanup via the Run dialog results in an error message stating: “Windows cannot find ‘cleanmgr’.”
What Could Happen When the C drive on the Windows Server 2012, 2016, 2019, and 2022 reaches full capacity?
As discussed earlier, when the C drive Windows Server 2012, 2016, or 2019 reaches its full capacity, it could inhibit the system performance and your workflow. Let’s find in detail the potential effects that it could have:
System Performance Low: Generally, the C drive is associated with numerous applications temporary files, log files, and other system data. Hence, when the C drive where the Windows Server operating system is located runs out of space, could lead to a considerable decrease in system performance.
System Instability and Crashes: An overloaded C drive can cause PC instability and frequent crashes. It usually happens when the OS is unable to write critical system files or temporary files due to lack of space. As a result, it could trigger errors, system freezes, and even system crashes. Further, it can disrupt essential services.
Limited Functionality: When the C drive is occupied, certain system functions may malfunction or become entirely unavailable. For instance, Windows updates and software installations may due to insufficient free space. Moreover, generating a hibernation space for malware attacks.
Data Loss and File Corruption: Performing operations like writing, copying, or saving data on a drive out of space can result in incomplete or corrupted files. The same cases could exist if files were being processed or modified at the time of the crash.
To address such problems, it is essential to take proactive measures on disk space usage on the C drive Windows sever.
Free up Space on C Drive Windows Server 2022/2019/2012 – Absolute Guide
In this world of ever-evolving risk of unauthorized access, it has become essential to take proactive measures to protect your sensitive data. However, the solutions provided below data deletion only to a certain extent. Thus, retrieval of the information is inevitable. Due to this, you can rely on SysTools Ultimate Data Shredding software to erase your digital trails beyond the scope of recovery.
However, the beauty of the tool lies in its versatility making it compatible to run on a wide range of devices, from traditional hard drives to solid-state drives. Moreover, with just a click, harness the power of advanced wiping techniques, leaving no stone unturned in your quest for digital security.
Remarkable Features of the Professional Utility
- This program can wipe all data types such as Files & Folders, Drive Free Space, Hidden Areas, Chat & Browser History, Log files, Temporary files, and other empty spaces.
- It generates a report of every successful data destruction operation.
- This software offers 10+ Wipe methods to free up space on C drive Windows Server 2012 r2/2016/2019/2022.
- Use the tool (Quick selection: File & Folder) to erase recovery traces.
- Cleans caches, logs, temp files, recent files, and app traces.
- Complies with 20+ global standards (NIST, ISO, US DoD 5220.22-m, etc.).
- Wipes data from HDD, SSD, SATA, PATA, NVMe, and more.
Tech#1: Delete Temporary Files to Free Space on C Drive Windows Server 2012 R2
Temporary files have their significance as they help the system processes to execute faster due to which the PC apps store temporary data. But in the long run, these files get accumulated on the C drive damping the computer’s functionality. Here is the step-by-step guide to cleaning these files:
- To begin, press the Windows key + R to open the Run dialog box.
- Next, type “%temp%” and hit Enter. This will open the Temp system apps files & folder.
- Use Ctrl + A on the keyboard to select all data.
- After that, right-click on the Windows pane and go to the “Delete” option.
- Another way of doing the same is by navigating to “C:\Windows\Temp” or “C:\Users\Admin\AppData\Local\Temp” or “C:\Documents and Settings\username\Local Settings\Temp” and repeating the same process to clear the Windows Temp folder.

Tech#2: Freeing Up Windows Server 2012/16/19/22 using Disk Cleanup Utility
The Disk Cleanup application is a built-in software for Windows that helps you create free disk/drive space by removing unwanted files and other system components. Here, the identifiable files can be temporary internet files, log files, and even previous Windows installations. Let’s explore the steps:
Start by pressing the Windows key + R, and type “cleanmgr” in the Run dialog box. This will direct you to the Disk Cleanup utility.
OR
Open File Explorer, right-click C drive and select Properties.
Under the General tab, choose Disk Cleanup.
For removing old Windows Updates:
- From the given options, choose “Clean up system files“.
- Next, pick the drive where you want to perform the delete operation (usually the C drive) in the new window.
- After that, check the box adjacent to “Windows Update Cleanup“. Click “OK.”
- Now, wait for the system to examine the old Windows Update files, and then click “Delete Files” to remove them.
For usually Clean up of any drive contents:
- Select the drive (C:, D:, etc.) and click on the “OK” button.
- This will scan the selected drive for files and components as per the adjusted settings.
- Crucial – Review the list of files and components that are identified. Next, select the ones you want to erase.
- Henceforth, tap on the “OK” tab to start the cleanup process.
- Lastly, hit on the “Delete Files” button to remove the selected files and components.
Tech#3: Free Up Space on C Drive Windows Server 2012 r2 via Uninstalling Unused Programs
There must be several programs on your computer that you may no longer use or need. As these apps could be taking up a significant amount of disk space, especially if the additional components, libraries, or data files are active. Thus, uninstalling unused programs can provide valuable space on your C drive.
Press the Windows key + R to open the Run dialog box. After that, type “appwiz.cpl” to bring the Programs and Features window.
OR
Search for and open the Control Panel. In the Control Panel, select Uninstall a program under Programs.

- First, identify the ones from the list of installed program that you no longer need.
- Right-click on the program, and select “Uninstall” or “Uninstall/Change.”
- Wait for the completion of the uninstallation process.
- Repeat this process for any other unused programs you want to remove.
Tech#4: Free Up Space on C Drive Windows Server 2012 r2/2016/19/22 through Compress System Files and Folders
Compact OS is the built-in feature of Windows that can help you reduce disk space by compressing the system files and folders. Usually, this option compacts files that are not accessed in daily usage. For example – the “C:\Windows\WinSxS” folder. To do this, follow the steps:
- Open the Run dialog box by pressing the Windows + R key.
- Next, type “compact /compactOS:always“. Then, press Enter to enable Compact OS.
- Wait for some time for process completion. It could depend on the size of your system files.
Tech#5: Free up Space on Windows Server C Drive by Moving the Paging File to Another Drive
The paging file is aka the “swap file” or “virtual memory”. The paging file, used by Windows, stores data that exceeds the physical memory (RAM). Located on the C drive by default, it can grow significantly when running multiple programs or working with large files.
- Commence by pressing the Windows key + R button to unclose the Run dialog box.
- Type “sysdm.cpl” in here and press Enter. This will direct you to the System Properties window.
- Click on the “Advanced” tab, and then click the “Settings” button under the “Performance” section.

- In the Performance Options window, click the “Advanced” tab, and then click the “Change” button under the “Virtual Memory” section.

- Uncheck the “Automatically manage paging file size for all drives” option.
- After that, you can pick the C drive option and click the “No paging file” option.
- Click “OK” to apply the changes.
- If you have another drive available, select that drive and choose a custom size for the paging file.
Tech#6: Clean up Space on Windows Server 2012 R2 C Drive by Turn off Hibernation
By default, Windows Server comes with the hibernate mode enabled. Though, it doesn’t have any negative impact on your computer performance. Above all, you don’t need to disable this feature if you do not use it.
The hibernate mode allows you to store a portion of your disk space for the hibernation files, particularly hiberfil.sys. Generally, this specific file holds approximately 75% of your total system RAM. For instance, if you have a PC’s RAM of 8GB, this hiberfil.sys file will consume around 6GB. Thus, if you want to free up this disk space, you can switch off hibernation mode by following the mentioned steps:
Step 1. Press the Windows + R key and then type cmd in the Run box. And click OK to open the CMD.

Step 2. Type powercfg.exe /hibernate off command in the CMD (command prompt) window. After that, hit the Enter key.

In short, this command will turn off the hibernation mode on your PC. Also, it will free space in your C drive Windows Server 2012 r2.
Key Takeaways
In this guide, we have collected 6 different ways mostly sought by the Windows Server experts to free up space on C drive Windows Server r2. This is helpful when your PC runs slow or crashes at times reason can be a low disk space error. However, out of the 6 manual methods, Disk Cleanup is the most opted and proficient approach to clear drive space. Being an ally of yours, we suggest you go with the expert’s suggested solution and experience the vast way of wiping data.
By Mohit Jha
With 5+ years of experience, Mohit is a Microsoft Certified expert known for his cloud migration, cyber security, and digital forensics expertise. He specializes in Microsoft 365, Exchange Server, and Azure AD migration, ensuring seamless transitions for organizations worldwide. His multifaceted role as a meticulous tech writer, diligent researcher, and astute editor underscores his commitment to delivering cutting-edge digital forensics and cloud migration strategies.
View all of Mohit Jha’s posts.