
Содержание
Маршруты — это сетевые установки, которые используются операционной системой для организации трифака и доступа к локальной сети и в Интернет. С помощью этой странички вы научитесь просматривать, удалять и добавлять маршруты на компьютере с ОС Windows от XP до 10. Все эти действия выполняются в командной строке или ее улучшенном и расширенном аналоге PowerShell.
Хочется также сказать о том, что если вы не уверены в своих знаниях, лучше не изменять данные настройки. Т.к. при неправильном использовании маршрутизации вы можете оставить ваш компьюетр без доступа к сети Интернет.
Просмотр маршрутов
Наберите команду
route print

Удаление всех статических маршрутов:
route -f

Добавление статического маршрута:
route -p add 0.0.0.0 mask 0.0.0.0 192.168.95.1

Удаляем все маршруты: route -f

После того, как все маршруты стёрты, естественно пропадёт Интернет. Для того, чтобы он появился вновь, необходимо задать маршрут по умолчанию. Добавляем постоянный маршрут к шлюзу:
route -p add 0.0.0.0 0.0.0.0 192.168.10.254 OK
В Windows XP/2003 Server после этого появится Интернет. Но если у вас Windows 7/8.1/или 2008/2012 Server, необходимо также выполнить команды:
ipconfig /release
ipconfig /renew
Как удалённо очистить таблицу маршрутов
Если вы хотите проделать все эти операции удалённо, вам понадобится программа NetAdapter Repair (подробнее). Дело в том, что после применения команды route -f соединение с сервером будет утрачено. А утилита NetAdapter Repair автоматически перезагрузит компьютер после очистки таблицы маршрутов. Для удалённой очистки необходимо проделать следующие действия:
1 Запустить утилиту NetAdapter Repair от имени Администратора.
2 Установить флажок возле пункта Clear ARP/Route Table.
3 Нажать кнопку Run All Selected:

После выполнения операции пойдёт обратный отсчёт времени и компьютер (сервер) перезагрузится автоматически:
Если что-то непонятно, спрашивайте в комментариях.
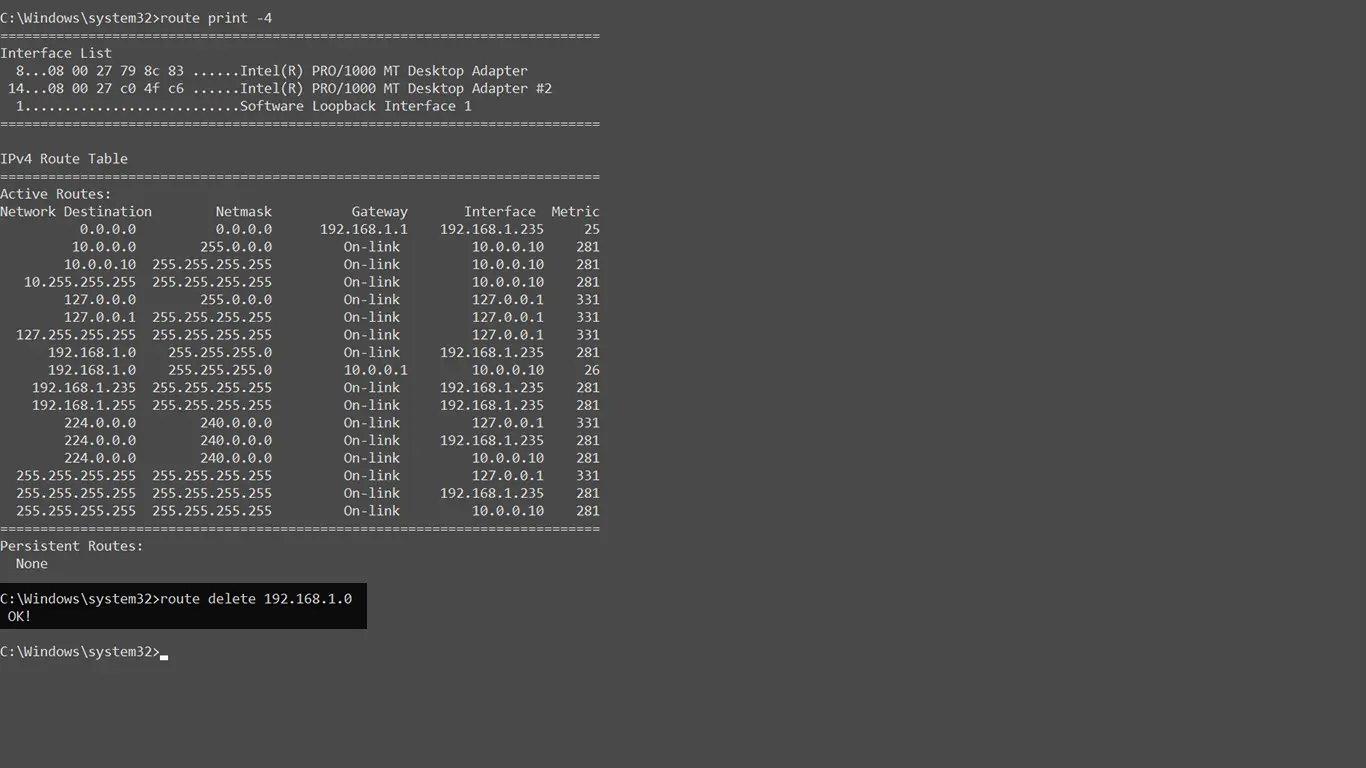
The command to delete a route from the Windows routing table is route delete.
route delete <SUBNET_ID>To delete a route in Windows, use the route delete command followed by the subnet ID (IP address of the destination network/host).
For example, to delete routes to the 192.168.1.0 network, issue the route delete command as follows:
route delete 192.168.1.0To be more specific, for example, to delete the route to the destination network 10.10.0.0 with the subnet mask of 255.255.255.0, enter the route delete command as follows:
route delete 10.0.0.0 mask 255.255.255.0You can issue the route print command to check the Windows routing table.
This file contains hidden or bidirectional Unicode text that may be interpreted or compiled differently than what appears below. To review, open the file in an editor that reveals hidden Unicode characters.
Learn more about bidirectional Unicode characters
| netsh interface ip delete destinationcache |
Sometimes you need to create static route entries to make communication with different networks that are connected via a different gateway. A gateway is simply a network router that routes the network traffic between different networks. When you have more than one gateway (router) on your network, then you may need to implement static route technique on Windows 10/Windows 11 or Windows servers/any Operating system.
A static route will tell the Operating System to send network packets to the appropriate router instead of sending them to the default router. This simple guide shows how to add, delete and modify a static route to the routing table on Windows 11/10 and Microsoft Server Operating Systems.
There are a few useful commands you must know. Route delete, add and print. These commands will be handy to any user who has administrative access and know which router/gateway should be used for which network.
Why Add Static Route?
It mostly depends on the network setup. Usually, you can add these static routes on your default router (if it can support) or core switch. When you have this kind of proper network setup, you do not need to add a static route to each computer separately on the network. But in a few exceptional cases, you may need to implement static routes on individual computers. Here are a few examples.
- You have more than one internet router on the network and you need to send traffic to certain websites (based on their IP addresses) via a different router than the default gateway. Let’s say, for example, all traffic to Netflix can be sent via the 2nd internet router where other website traffic can go through the 1st internet router.
- There are several VLANs or subnets available on the network. Before building the proper routing table on the router or core switch, adding a static route on your Windows computer will help you to test the connectivity see the traffic flow.
- For network security or isolation purpose, certain routes can’t be added to the default gateway device. In this case, as a network administrator, you can add the static route on a local computer to make network communication.
Route Add on Windows 11/10 and Windows Servers
Though there are major changes and interface upgrades in the latest Windows 11, the below steps remain the same.
Make sure you run the below commands on command prompt (or PowerShell) which is opened as Administrator.
Here is the command to add a static route to the routing table.
route ADD destination_network MASK subnet_mask gateway_ip metric_cost
route add 10.10.10.0 mask 255.255.255.0 10.10.29.1
It indicates that any packets to 10.10.10.0 (in class C – 255.255.255.0) network should be forwarded to the 10.10.29.1 router (gateway).
Obviously, the PC/server in which we run this command is in the 10.10.29.0/24 network because it should communicate to the gateway from the same network.
The issue with the above command is when you shut down or restart the computer, these route entries will be removed. To make it permanent and add to the Windows OS routing table, we should use the –p key with the add command. So, adding a persistent (or permanent) static route on Windows 10 command will be like this;
route add –p 10.10.10.0 mask 255.255.255.0 10.10.29.1
Route Print
Route print command is another useful command to view the entries on the routing table and which routes are active at the moment. If you need to modify an entry that is already in the routing table, better to confirm the entries before changing. To do it, use the route print command.
Route print

Also, we can view the persistent routes in a Windows OS by checking the following registry path. Look for the entries in this area before or after modifying any routing table entries.
HKEY_LOCAL_MACHINE->SYSTEM->CurrentControlSet-> Services->Tcpip->Parameters->PersistentRoutes
Route Delete on Windows 11/10 & Windows 2022/2019/2016 Servers
The below command is to delete an existing persistent route from a computer. Even though we added a route entry with the network, network mask and gateway, but to delete, we need to mention the network only. So, it goes like this;
route delete 10.10.10.0
That will delete the 10.10.10.0 route entry from the computer. You do not need to restart the computer to take effect. Adding and deleteting route entries take effect instantly.
Let’s say that after the recent network change, now the network 10.10.10.0 should be routed through the 10.10.29.200 gateway. Obviously, you have to modify the existing route for this network and change the gateway to 10.10.29.200.
So, how to modify the existing route entry? You can’t modify an existing entry.
The simple method is to delete it and add the new entry. So, in this case, you would perform the below commands.
Route delete 10.10.10.0

Route add –p 10.10.10.0 mask 255.255.255.0 10.10.29.200
We hope this simple guide is helpful in understanding the route add, delete and print commands in Windows 10/Windows 11 client PC and other server Operating Systems. Make sure you open the command prompt or PowerShell as Administrator to perform these commands. If you want to use cosmetic variables to identify the fast hops to reach a network, you can use the metric key as described at the Microsoft site here.
Таблицы маршрутов играют решающую роль в определении пути, по которому сетевые пакеты передаются между различными сетями. В Windows таблицы маршрутов иногда могут быть неправильно настроены или загромождены, что приводит к проблемам с сетевым подключением. В этой статье мы рассмотрим различные методы сброса таблиц маршрутов в Windows, сопровождаемые примерами кода. Независимо от того, являетесь ли вы системным администратором или сетевым энтузиастом, это руководство поможет вам эффективно решить проблемы маршрутизации.
Метод 1: использование командной строки
Один из самых простых способов сбросить таблицы маршрутов в Windows — использовать командную строку. Выполните следующие действия:
-
Откройте командную строку от имени администратора.
-
Чтобы просмотреть текущую таблицу маршрутов, введите следующую команду:
route print -
Чтобы удалить все существующие маршруты, введите следующую команду:
route -f -
Чтобы добавить маршрут по умолчанию, введите следующую команду:
route add 0.0.0.0 mask 0.0.0.0 <gateway_ip>Замените
<gateway_ip>на IP-адрес шлюза по умолчанию. -
Проверьте новую таблицу маршрутов, введя команду:
route print
Метод 2: использование PowerShell
PowerShell предоставляет альтернативный метод сброса таблиц маршрутизации. Вот как это сделать:
-
Откройте PowerShell от имени администратора.
-
Чтобы просмотреть текущую таблицу маршрутов, выполните следующую команду:
Get-NetRoute -
Чтобы удалить все существующие маршруты, выполните следующую команду:
Get-NetRoute | Remove-NetRoute -
Чтобы добавить маршрут по умолчанию, выполните следующую команду:
New-NetRoute -DestinationPrefix "0.0.0.0/0" -NextHop <gateway_ip>Замените
<gateway_ip>на IP-адрес шлюза по умолчанию. -
Проверьте новую таблицу маршрутов, выполнив команду:
Get-NetRoute
Метод 3: использование сброса сети (Windows 10 и более поздних версий)
В Windows 10 и более поздних версиях предусмотрена удобная функция сброса сети, которая может помочь сбросить различные сетевые компоненты, включая таблицы маршрутизации. Выполните следующие действия:
- Откройте приложение «Настройки» (клавиша Windows + I).
- Перейдите в раздел «Сеть и Интернет» и выберите вкладку «Статус».
- Прокрутите вниз и нажмите «Сброс сети».
- Нажмите «Сбросить сейчас», чтобы начать процесс сброса сети.
- После сброса перезагрузите компьютер.
Сброс таблиц маршрутизации в Windows может оказаться важным для решения проблем с сетевым подключением. В этой статье мы рассмотрели три различных метода: использование командной строки, PowerShell и функции сброса сети. Независимо от того, предпочитаете ли вы интерфейс командной строки или графический подход, эти методы помогут вам эффективно сбросить таблицы маршрутов. Следуя приведенным примерам кода, вы сможете легко устранить неполадки и оптимизировать конфигурацию сети.