
Сброс изменение кэша подключений, паролей, настроек Windows Reset changing the connection cache , passwords, and Windows settings
«Кэш (кеш) — промежуточный буфер с быстрым доступом, содержащий информацию,
которая может быть запрошена с наибольшей вероятностью.»
Из Wiki.
Удаляем ранее введенную связку пользователь/пароль на сетевую папку Windows
1. Пуск — Выполнить — control userpasswords2
Вкладка «Дополнительно» и «Управление паролями».
2. Пуск — Настройка — Панель Управления — Пользователи и Пароли. Менеджер паролей.
3. Командная строка:
net use * /del
Очищаем кэш DNS
1. Отключаем сетевое подключение, включаем его заново.
2. Командная строка:
ipconfig /flushdns
Изменяем или удаляем настройки ранее использованного сетевого подключения, в частности меняем тип сети
1. Regedit:
HKEY_LOCAL_MACHINE\SOFTWARE\Microsoft\Windows NT\CurrentVersion\NetworkList\Profiles
Ищем по ProfileName название нужной сети. Меняем её тип в параметре Category, где
0 — Общественная, 1 — Частная, 2 — Доменная.
2. С помощью изменения локальных политик безопасности:
secpol.msc или Панель управления — Система и безопасность — Администрирование — Локальная политика безопасности. Находим требуемую сеть и меняем её настройки через свойства.
Последние записи текущего разделаrecent posts chapter
- RDP Wrapper (терминальный сервер для домашней Windows)
- После обновления Windows 7 x64 система не загружается
- Инструменты панели управления Windows из командной строки
- Инструменты и утилиты Windows из командной строки
- Невозможно подключиться к удаленному рабочему столу Windows
Диспетчер учетных данных Windows (Credential Manager) позволяет безопасно хранить учетные записи и пароля для доступа к сетевым ресурсам, веб сайтам и приложениям. Благодаря сохраненным в Credential Manager паролям вы можете подключаться без ввода пароля к сетевым ресурсам, которые поддерживаются проверку подлинности Windows (NTLM или Kerbersos), аутентификацию по сертификату, или базовую проверку подлинности.
Содержание:
- Используем диспетчер учетных данных Windows для хранения паролей
- Управление сохраненными учетными данными Windows из командной строки
- Доступ к менеджеру учетных данных Windows из PowerShell
Используем диспетчер учетных данных Windows для хранения паролей
Диспетчер учетных данных встроен в Windows и позволяет безопасно хранить три типа учетных данных:
- Учетные данные Windows (Windows Credentials) — учетные данные доступа к ресурсам, которые поддерживаются Windows аутентификацию (NTLM или Kerbersos). Это могут быть данные для подключения сетевых дисков или общим SMB папкам, NAS устройствам, сохраненные пароли для RDP подключений, пароли к сайтам, поддерживающих проверку подлинности Windows и т.д;
- Учетные данные сертификатов (Certificate-Based Credentials) – используются для доступа к ресурсам с помощью сертификатов (из секции Personal в Certificate Manager);
- Общие учетные данные (Generic Credentials) – хранит учетные данные для доступа к сторонним приложениям, совместимым с Credential Manager и поддерживающим Basic аутентификацию;
- Учетные данные для интернета (Web Credentials) – сохранённые пароли в браузерах Edge и Internet Explorer, приложениях Microsoft (MS Office, Teams, Outlook, Skype и т.д).
Например, если при доступе к сетевой папке вы включите опцию “Сохранить пароль”, то введенный вами пароли будет сохранен в Credential Manager.

Аналогично пароль для подключения к удаленному RDP/RDS серверу сохраняется в клиенте Remote Desktop Connection (mstsc.exe).
Открыть диспетчер учетных данных в Windows можно:
- из классической панели управления (Control Panel\User Accounts\Credential Manager, Панель управления -> Учетные записи пользователей -> Диспетчер учетных данных);
- изкоманднойстроки:
control /name Microsoft.CredentialManager
На скриншоте видно, что в Credential Manager хранятся два пароля, которые мы сохранили ранее.
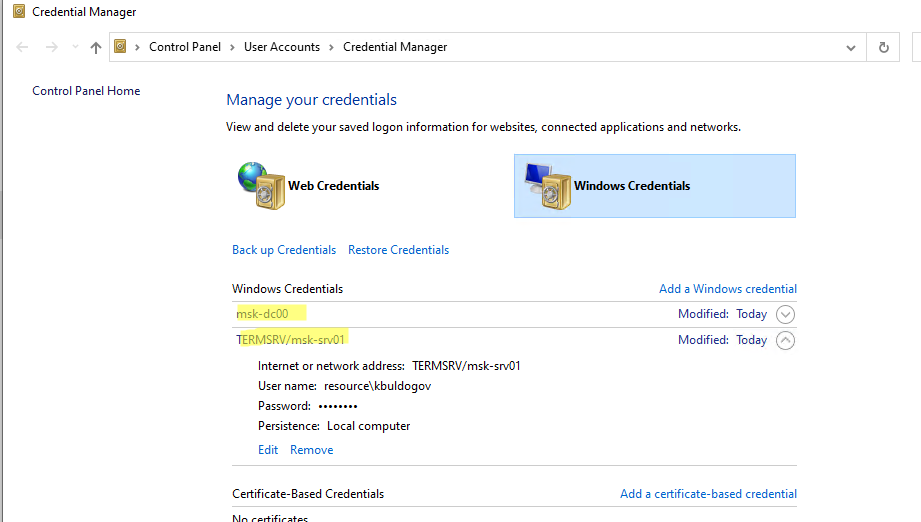
Сохраненный пароль для RDP подключения сохраняется в формате
TERMSRV\hostname
.
Здесь вы можете добавить сохранённый пароль, отредактировать (просмотреть сохраненный пароль в открытом виде из графического интерфейса нельзя) или удалить любую из записей.
Для управления сохраненными паролями можно использовать классический диалоговый интерфейс Stored User Names and Password. Для его запуска выполните команду:
rundll32.exe keymgr.dll,KRShowKeyMgr
Здесь вы также можете управлять сохраненными учетными данными, а также выполнить резервное копирование и восстановление записей в Credential Manager (можно использовать для переноса базы Credential Manager на другой компьютер).
Управление сохраненными учетными данными Windows из командной строки
Вы можете добавить удалить и вывести сохраненные учетные данных в Credentil Manager из командной строки с помощью утилиты cmdkey.
Добавить в диспетчер учетные данные для доступа к серверу FS01:
cmdkey /add:FS01 /user:kbuldogov /pass:Passw0rdd1
Если нужно сохранить доменную учетную запись:
cmdkey /add:fs01.winitpro.local /user:[email protected] /pass:Passw0rdd1
Сохранить учетные данные для доступа к RDP/RDS серверу:
cmdkey /generic:termsrv/MSKRDS1 /user:kbuldogov /pass:Passw0rdd1
Вывести список сохраненных учетных данных:
cmdkey /list
Вывести список хранимых учетных данных для указанного компьютера:
cmdkey /list:fs01.winitpro.local
Удалить ранее сохраненные учетные данные:
cmdkey /delete:FS01
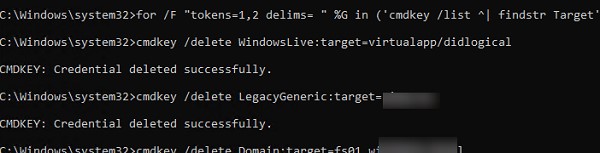
Удалить из Credential Manager все сохраненные пароли для RDP доступа:
For /F "tokens=1,2 delims= " %G in ('cmdkey /list ^| findstr "target=TERMSRV"') do cmdkey /delete %H
Полностью очистить пароли в Credential Manager:
for /F "tokens=1,2 delims= " %G in ('cmdkey /list ^| findstr Target') do cmdkey /delete %H
Также для управления сохраненными учетными данными можно использовать утилиту vaultcmd.Вывести список сохраненных учетных данных типа Windows Credentials:
vaultcmd /listcreds:"Windows Credentials"

Все сохраненные пароли хранятся в защищенном хранилище Windows Vault. Путь к хранилищу можно получить с помощью команды:
vaultcmd /list

По умолчанию это
%userprofile%\AppData\Local\Microsoft\Vault
. Ключ шифрования хранится в файле Policy.vpol. Клю шифровани используется для рашировки паролей в файлах .vcrd.
Для работы Credential Manager должна быть запущена служба VaultSvc:
Get-Service VaultSvc
Если служба отключена, при попытке получить доступ к Credential Manager появится ошибка:
Credential Manager Error
The Credential Manager Service is not running. You can start the service manually using the Services snap-in or restart your computer to start the service.
Error code: 0x800706B5
Error Message: The interface is unknown.
Если вы хотите заблокировать пользователям возможность сохранения сетевых паролей в Credential Manager, нужно включить параметр Network access: Do not allow storage of passwords and credentials for network authentication в разделе GPO Computer Configuration -> Windows Settings -> Security Settings -> Local Policies -> Security Options.
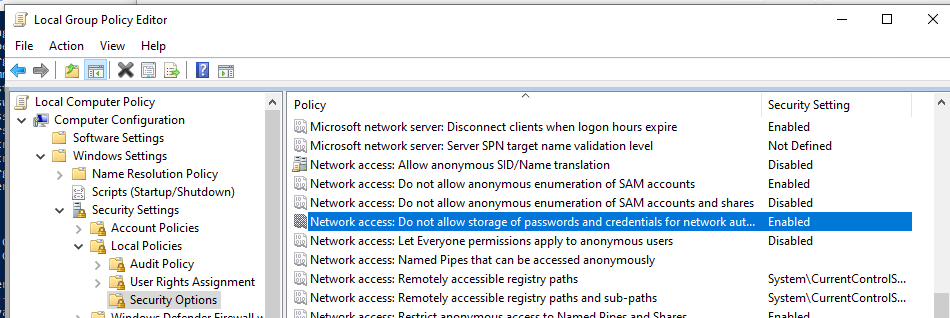
Теперь, если пользователь попытается сохранить пароль в хранилище, появится ошибка:
Credential Manager Error
Unable to save credentials. To save credentials in this vault, check your computer configuration.
Error code: 0x80070520
Error Message: A specified logon session does not exist. It may already have been terminated.
Доступ к менеджеру учетных данных Windows из PowerShell
В Windows нет встроенных командлетов для обращения к хранилищу PasswordVault из PowerShell. Но вы можете использовать модуль CredentialManager из галереи PowerShell.
Установите модуль:
Install-Module CredentialManager

В модуле всего 4 командлета:
- Get-StoredCredential – получить учетные данные из хранилища Windows Vault;
- Get-StrongPassword – сгенерировать случайный пароль;
- New-StoredCredential – добавить учетные данные в хранилище;
- Remove-StoredCredential – удалить учетные данные.
Чтобы добавить новые учетные данные в хранилище CredentialManager, выполните команду:
New-StoredCredential -Target 'contoso' -Type Generic -UserName '[email protected]' -Password '123qwe' -Persist 'LocalMachine'
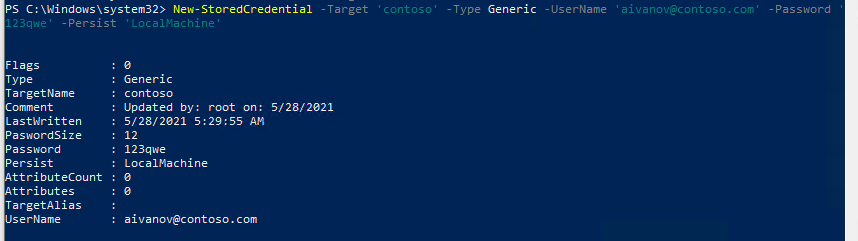
Проверить, есть в хранилище сохраненные данные:
Get-StoredCredential -Target contoso
С помощью командлета Get-StoredCredential вы можете вывести сохраненный пароль, хранящийся в диспетчере учетных данных в отрытом виде.
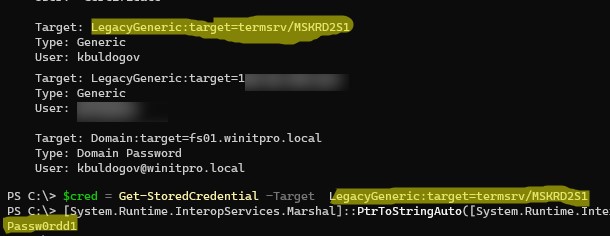
Выведите список сохраненных учетных данных:
cmdkey.exe /list
Скопируйте значение Target для объекта, пароль которого вы хотите извлечь и вставьте его в следующую команду:
$cred = Get-StoredCredential -Target  LegacyGeneric:target=termsrv/MSKRD2S1
[System.Runtime.InteropServices.Marshal]::PtrToStringAuto([System.Runtime.InteropServices.Marshal]::SecureStringToBSTR($cred.Password))
Команда выведет сохраненный пароль в открытом виде.
Также для получения сохраненных паролей из credman в открытом виде можно использовать утилиты типа Mimikatz (смотри пример).
Сохраненные пароли из Credential Manager можно использовать в ваших скриптах PowerShell. Например, в следующем примере я получаю сохраненные имя и пароль в виде объекта PSCredential и подключаюсь с ними к Exchange Online из PowerShell:
$psCred = Get-StoredCredential -Target "Contoso"
Connect-MSolService -Credential $psCred
Также вы можете использовать Get-StoredCredential для безопасного получения сохранённых учетных данных в заданиях планировщика.
Также обратите внимание на модуль PowerShell Secret Management, который можно использовать для безопасного хранения паролей в Windows (поддерживает различные хранилища паролей: KeePass, LastPass, HashiCorp Vault, Azure Key Vault, Bitwarden.
Чтобы удалить сохраненные учетные данные из Windows Vault, выполните:
Remove-StoredCredential -Target Contoso
Народ всем привет!
Как очистить кеш паролей в винде. подключаю шару \\имя компьютера открывается сразу без запроса пароля.
PS в диспетчере учетных данных пусто, ipconfig /flushdns не помогает.
Развернута AD
-
Вопрос задан
-
2787 просмотров
Пригласить эксперта
net use * /del
Вроде так сбрасывал аутентификацию, но это нужно сделать пару-тройку раз, а после проверить открывается без пароля нужный ресурс или нет
Пуск —> Выполнить —> control userpasswords2
Выбираешь вкладку «Дополнительно» и смотришь «Управление паролями».
Но вообще это скорее всего авторизация через AD — видимо ваш AD аккаунт имеет доступ к шаре.
Войдите, чтобы написать ответ
-
Показать ещё
Загружается…
Минуточку внимания
Did you accidentally log in incorrectly when trying to access an SMB share on Windows?
Did you accidentally set up your SMB server authentication wrong but no matter what you do your Windows machine refuses to connect?
This may be because of Windows caching connections silently in the background.
Here’s how you can fix that.
Step 0
Just in case, make sure you clear any unwanted login credentials from your Windows computer.
Open Control Panel and go to User Accounts/CredentialManager, then go to Windows Credentials.
Clear out any unwanted logins that you have here.
Step 1
Open a command prompt.
Type net use to see current background SMB connections made by the computer.
If this list is empty, cached connections are likely not your problem.
If you see your server in this connection list, you can purge these connections.
Type net use * /del to clear all the connections shown.
After, you should be able to log in to your SMB share, assuming everything is set up correctly.
References
- https://forum.terra-master.com/en/viewtopic.php?t=2743
- https://learn.microsoft.com/en-us/previous-versions/windows/it-pro/windows-server-2012-r2-and-2012/gg651155(v=ws.11)
If the cached network username and password are causing issues, follow these steps to completely remove network credentials in Windows 10.
When you first log into a network share, Windows can store those login credentials in the Credential Manager. This is called caching network credentials. Since the login credentials are already available in the Credential Manager, Windows will not prompt you again for the network share password or username. This makes the administrator or network user’s life easy as they don’t have to enter the username and password each and every time to access the network folder.
However, if the network share password is changed or if the initial username and password are wrong then the cached network credential can be a problem. In those cases, you can remove the network username and password from the credential manager.
In this quick guide, let me show the procedure to remove cached network credentials using Credential Manager and Command Prompt.
Remove Network Credentials from Credential Manager
Windows saves all the usernames and passwords in the Credential Manager. To remove the cached network password and username, you have to remove the network share entry from the Credential Manager.
Follow these steps to remove network credentials from the Credential Manager.
- Open Start.
- Search and open “Control Panel“.
- Set “View by” on top right corner to “Large icons” to see all control panel items.
- Click on the “Credential Manager” option.
- After opening the Credential Manager, select the “Windows Credentials” tab within it.
- Here, click on the Network Share password you want to delete.
- From the credential options, click the “Remove” link.

- Click “Yes” in the confirmation/warning window to confirm that you would like to remove the cached network password from the credential manager.


That is it. As soon as you click yes and confirm the action, Windows will remove network credentials. When you try to log into the network share, you will be again prompted for the username and password. If you select the Remember option, Windows will store the network share login details in the Credential Manager.
Use Command Prompt to Remove Cached Network Share Password & Username
To remove cached network share credentials, this is the command you should use. Once you execute the below command, Windows will delete all network share passwords.
net use * /DELETE
Follow the steps below to see how to use the command delete network share password in Windows.
- Open the Start menu.
- Search for “Command Prompt“.
- Right-click on Command Prompt and select the “Run as administrator” option.

- In the admin Command Prompt window, execute the “net use \\ServerName /del” command to delete a specific network share credentials. Replace “ServerName” with the actual network share computer name.
- To remove all cached network credentials use the “net use * /DELETE” command.
- Close the Command Prompt.

As soon as you execute the command, Windows will delete all network share passwords and usernames or a specific network share depending on the command you executed. If there are no cached network credentials, the Command Prompt will show the “There are no entries in the list” message.
I hope that helps. If you are stuck or need some help, comment below and I will try to help as much as possible.
—
If you like this article, check out how to map FTP as a network drive in Windows 10 and how to create network connections shortcut in Windows 10.