
Вы можете запустить средство диагностики памяти одним из следующих способов, (это может работать и для предыдущих версий Windows, начиная с Windows Vista).
a. Нажмите кнопку меню Пуск → Средство администрирования Windows, и дважды кликните на Средство проверки памяти Windows.
Или:
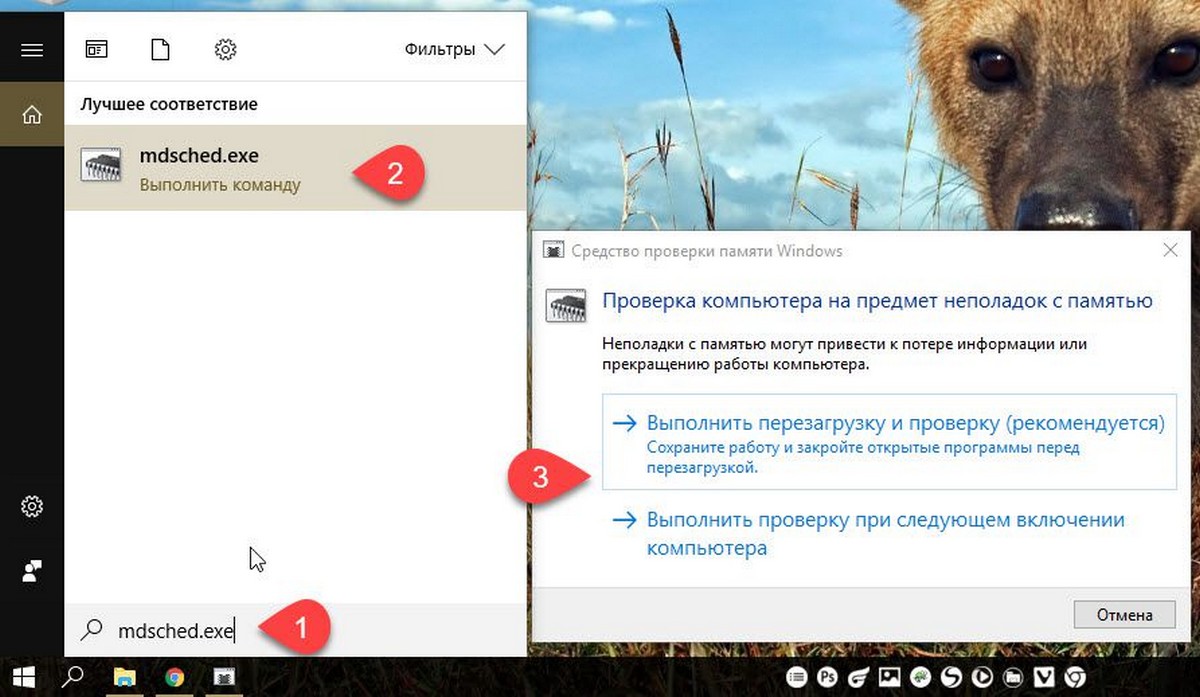
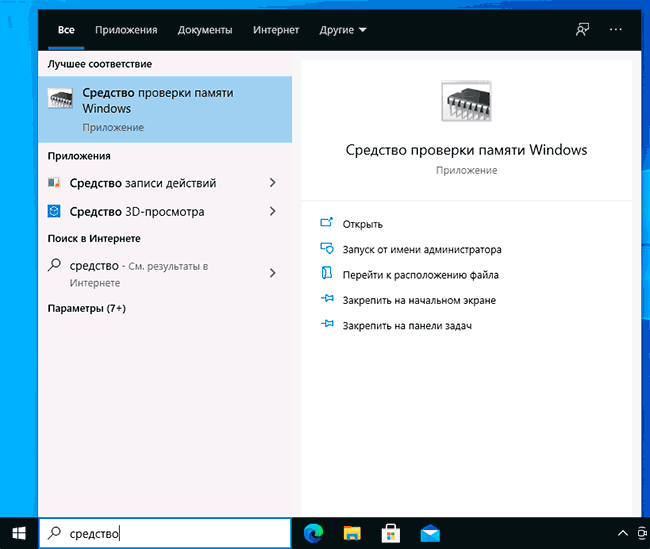
b. Начните набирать mdsched в строке Поиска. Приложение для проверки памяти Windows должно быть первым, дважды кликните по нему.
Или:
c. Перейдите в папку C:\WINDOWS\system32, найдите и дважды кликните- mdsched.exe.
Или:
d. Кликните правой кнопкой мыши на кнопке Пуск, нажмите Выполнить, копировать / вставить mdsched.exe в строку запуска и нажмите ENTER
(Если вы не отключили UAC) Нажмите «Да» в окне UAC, для потверждения.
Средство проверки памяти Windows предложит вам 2 варианта:
a. «Выполнить перезагрузку и проверку (рекомендуется).
Сохраните работу и закройте все открытые программы перед перезагрузкой». Или:
b. «Выполнить проверку при следующем включении компьютера».
После перезагрузки вашего компьютера будет автоматически запущен инструмент проверки памяти Windows.
Вы можете изменить параметры инструмента, нажав F1 (на клавиатуре).
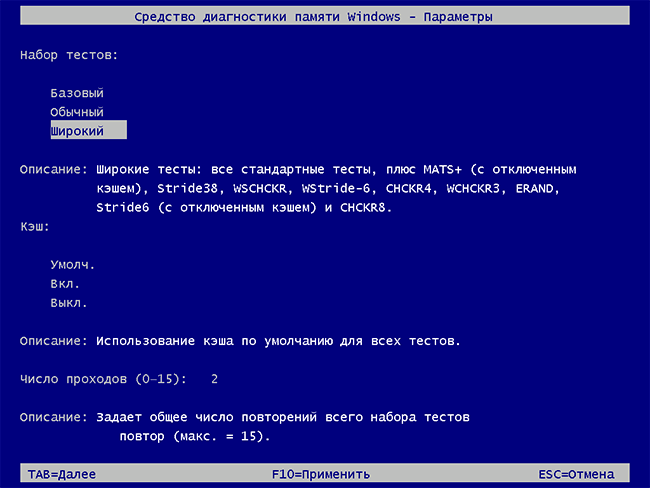
Чтобы перейти к другим параметрам проверки, нажмите TAB (клавиша на клавиатуре). Чтобы тест был достаточно точным, вы должны использовать максимальные значения, т. Е. Широкий тест, кеш-память, число проходов 15.
Настройка параметров Средства диагностики памяти Windows
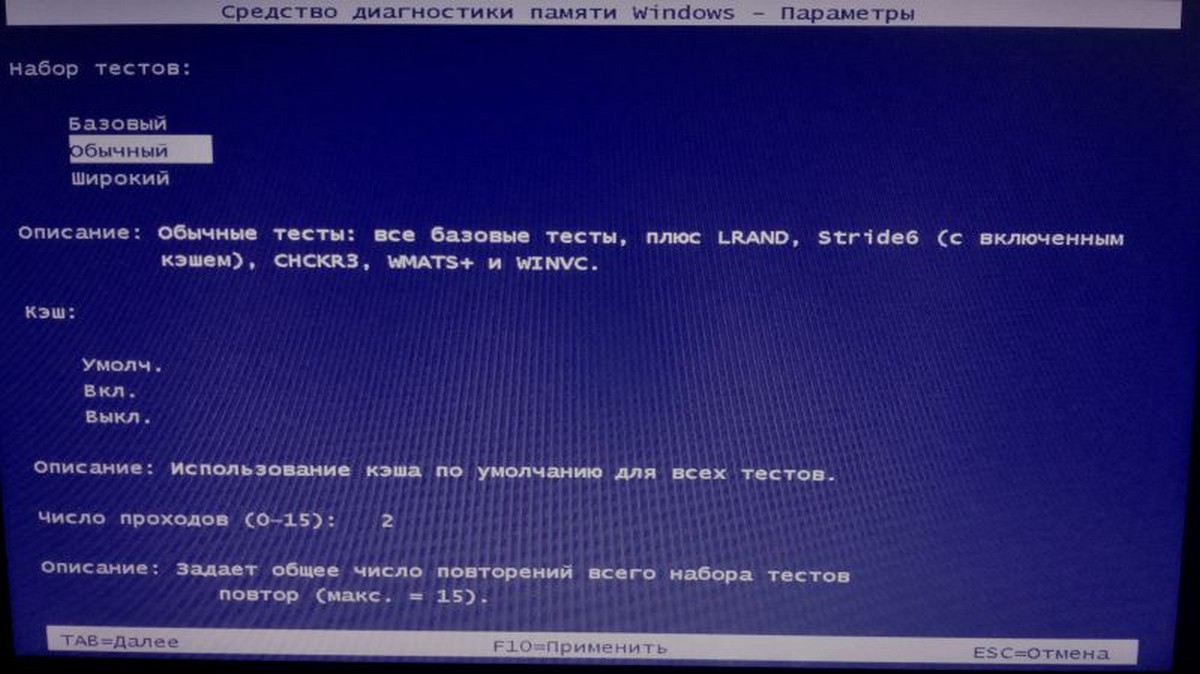
Набор тестов:
Возможные значения: базовый, обычный, широкий.
Базовый → MATS +, INVC, SCHCKR (включен кеш)
Обычный → как указано выше, и LRAND, STRIDE6 (включен кеш), CHCKR3, WMATS +, WINVC
Полный список: MATS +, INVC, SCHCKR (с включенным кешем), LRAND, STRIDE6 (включен кеш), CHCKR3, WMATS +, WINVC
Широкий → как показано выше, и WINVC, MATS + (отключен кеш), STRIDE38, WCHCKR3, ERAND, STRIDE6 (отключен кеш), CHCKR8
Полный список: MATS +, INVC, SCHCKR (включен кеш), LRAND, STRIDE6 (включен кеш), CHCKR3 , WMATS +, WINVC, MATS + (отключен кеш), STRIDE38, WCHCKR3, ERAND, STRIDE6 (кеш отключен), CHCKR
Настройки кэша:
Возможные состояния: По умолчанию, Вкл., Выкл.
Число проходов:
Возможные значения: от 0 (ноль) до 15.
После этого нажмите F10, чтобы применить изменения. Тест начнется автоматически после изменений. Тест может занять много времени, будьте терпеливы. Подождите, пока он закончится, и компьютер сам перезагрузится.
Результаты
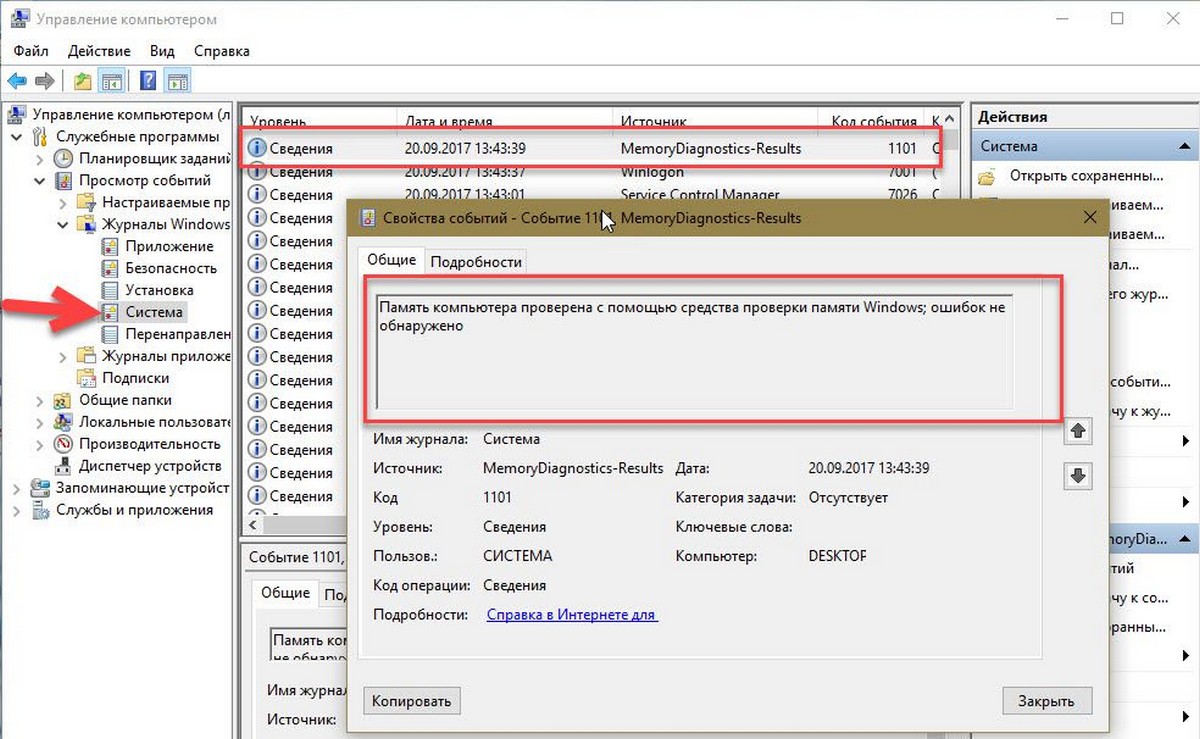
Вы можете найти два события (результаты) работы инструмента проверки памяти Windows в средстве Просмотр событий → Журналы Windows → Система.
Readers help support Windows Report. We may get a commission if you buy through our links.
Read our disclosure page to find out how can you help Windows Report sustain the editorial team. Read more
Mdsched.exe stands for Windows Memory Diagnostics Tool, and it’s used to check the health of your RAM.
The test takes about 5 to 15 minutes, but depending on your memory configuration, sometimes it can take up to 30 minutes. Let’s see how to run Msdched.exe and check its results.
How do I use Mdsched.exe to check the RAM?
How do I use mdsched.exe on Windows 11?
- Press Windows, then type Windows memory diagnostic and click the first result.

- Select the desired option. We suggest using Restart now and check for problems.

- Wait for the process to finish. When it is done, your PC will reboot automatically.
- The scan will now start, so wait for it to finish.


To configure the scan, do the following:
- During the scan, press F1.
- Now you can configure what type of scan you wish to run and how many passes.

- You can switch between different sections with the Tab key and use F10 to save changes.
- We suggest using Standard or Extended scan with at least 5 passes for best results.

How do I check my Mdsched exe results?
- Press the Windows key + X and choose Event Viewer.
- Click Windows Logs and select System. In the right pane, select MemoryDiagnostics-Results.

- Now you should see the mdsched.exe log.

Is the Windows Memory Diagnostics tool reliable?
This is a decent tool for beginners unfamiliar with memory diagnostics. We would suggest more advanced software, such as MemTest86+, for more advanced users.
Can you use mdsched from the command line?
While you can start this tool simply by typing mdsched in any command line, it will just open the graphical interface, so you can’t run it using the command line interface or parameters.
- Ashampoo Driver Updater: How To Download & Install
- 12 Best System Resource Monitoring Tools for Windows PCs
- What is Segmentation Fault: 11 & How to Fix it
Is mdsched.exe safe?
- Microsoft creates the file, and it’s perfectly safe to use.
- If you’re worried that your file is malicious, you can scan it with your antivirus software.
Now that you know what mdsched.exe is, be sure to check our guide on how to run a memory test on Windows 10 or how to perform a Windows 11 RAM test.
In case you’re not a fan of this software and you need something more advanced, there are many great hardware diagnostic tools available.
As you can see, this is a great tool if you want to run hardware diagnostics on Windows 10, so don’t hesitate to use it.
Have you ever used mdsched.exe, and what is your experience with it? Let us know in the comments below.
Madalina Dinita
Networking & Security Specialist
Madalina has been a Windows fan ever since she got her hands on her first Windows XP computer.
She is interested in all things technology, especially emerging technologies — AI and DNA computing in particular.
Prior to joining the WindowsReport team, she worked in the corporate world for a number of years.
Если сбои системы, синие экраны BSoD или иные проблемы при работе Windows 10, 8.1 или Windows 7 наводят вас на мысли о том, что имеются какие-либо проблемы с оперативной памятью компьютера, может иметь смысл выполнить её проверку, а начать можно со встроенного средства диагностики проверки памяти Windows.
В этой инструкции подробно о способах запустить средство проверки памяти средствами Windows, причём даже в тех случаях, когда вход в систему невозможен, а также о возможных вариантах действий в случае, если в результате теста средство диагностики памяти сообщает о том, что были обнаружены проблемы оборудования. На схожую тему: Устранение неполадок Windows 10.
- Способы запуска средства проверки памяти
- Использование средства и просмотр результатов
- Обнаружены проблемы оборудования в средстве диагностики памяти
- Видео инструкция
Как запустить средство проверки памяти в Windows 10 и предыдущих версиях системы
В случае, если операционная система запускается, вход в неё и работа возможны, вы можете использовать один из следующих вариантов запуска средства проверки памяти:
- Найти нужный пункт в разделе «Средства администрирования Windows» меню «Пуск».
- Нажать клавиши Win+R на клавиатуре, ввести mdsched.exe и нажать Enter.

- Открыть панель управления, выбрать пункт «Администрирование» и запустить «Средство проверки памяти Windows».
- Использовать поиск в панели задач Windows 10, начав вводить «Средство проверки памяти». Или встроенные средства поиска в предыдущих версиях ОС.

- Вручную запустить файл C:\Windows\System32\MdSched.exe

Если же ситуация осложняется тем, что Windows не запускается, вход в неё невозможен, либо сразу после него происходят сбои, можно использовать следующие способы запуска средства диагностики оперативной памяти:
- Загрузить компьютер или ноутбук с загрузочной флешки с Windows 10 или другой версией Windows, можно и с загрузочного диска. На экране программы установки нажать клавиши Shift+F10 (Shift+Fn+F10 на некоторых ноутбуках), ввести mdsexe в открывшейся командной строке и нажать Enter. После выбора в утилите проверки пункта «Выполнить перезагрузку и проверку», загружайте компьютер не с флешки, а с обычного загрузочного HDD или SSD.

- Средство проверки памяти можно запустить из среды восстановления Windows 10 — нажав кнопку «Дополнительные параметры» на синем экране с ошибкой или, находясь на экране блокировки Windows 10 (с выбором имени пользователя) нажать по изображенной справа внизу кнопке «Питания», а затем, удерживая Shift, нажать «Перезагрузка». В среде восстановления выбираем «Поиск и устранение неисправностей» — «Дополнительные параметры» — «Командная строка». А в ней, как и в предыдущем случае используем команду mdsched.exe.

- Если у вас есть подготовленный диск восстановления Windows, запуск можно осуществить, загрузившись с него.


Использование средства проверки памяти Windows и просмотр результатов

После запуска средства проверки памяти вам будет предложено перезагрузить компьютер, после согласия, процесс будет выглядеть следующим образом:
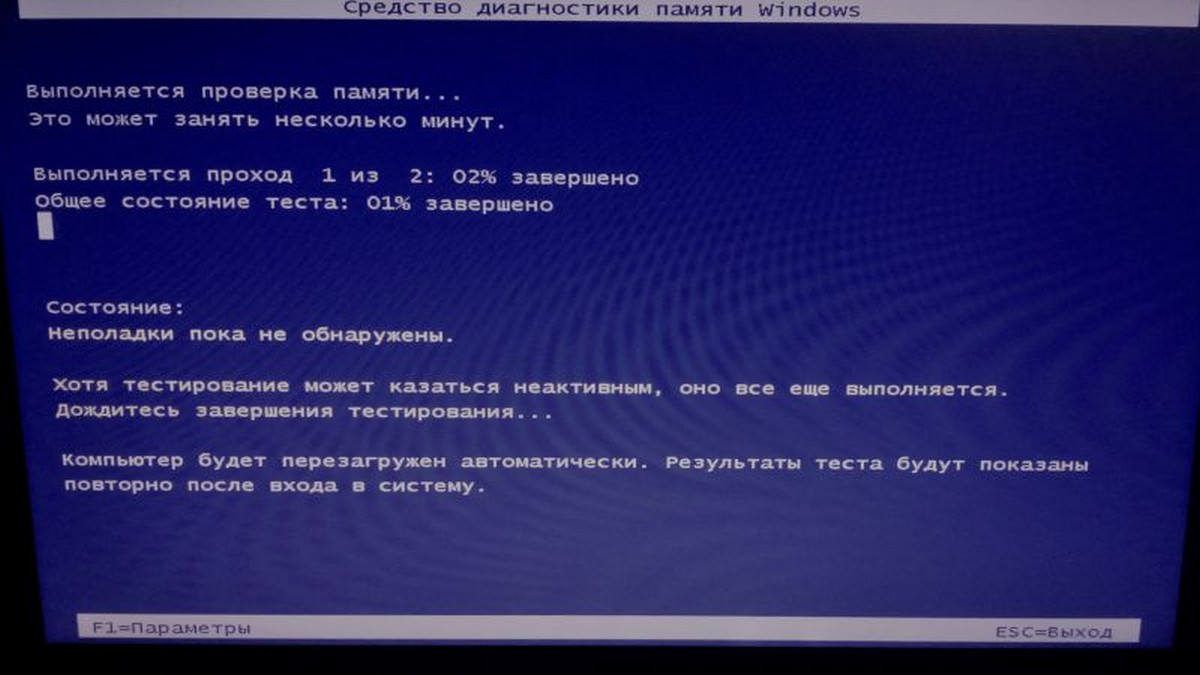
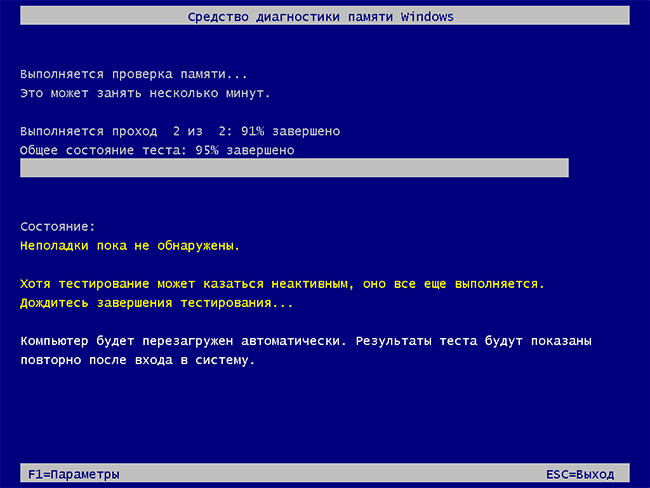
- Начнётся проверка оперативной памяти, которая может занять продолжительное время. Может показаться, что средство диагностики зависло: на всякий случай подождите в такой ситуации 5-10 минут. Если же действительно произошло зависание, не исключено что есть проблемы с оборудованием, вероятно — с оперативной памятью, но не обязательно.

- Если в ходе проверки нажать клавишу F1 (или Fn+F1, если F1 не срабатывает), вы попадёте в настройки средства диагностики памяти Windows. Здесь можно выбрать набор тестов (по умолчанию — обычный), использование кэша, и число проходов. Переключение между разделами настроек выполняется клавишей Tab, изменение параметров — стрелками и вводом цифр (для числа проходов), применение параметров — клавишей F10. После изменения настроек тест перезапускается.
- В ходе проверки вы будете видеть информацию вида «Неполадки пока не обнаружены» или «Были обнаружены проблемы оборудования».
После завершения проверки компьютер будет автоматически перезагружен. Дальнейшие шаги — просмотр результатов.
- После перезагрузки в случае Windows 10 вы можете увидеть уведомление в области уведомлений, сообщающее о результате проверки памяти. Но оно отображается не всегда.
- Можно зайти в просмотр событий, для этого нажимаем Win+R, вводим eventvwr.msc и нажимаем Enter. Там открываем раздел «Журналы Windows» — «Система», находим пункты, где в столбце «Источник» указано MemoryDiagnostics-Results и просматриваем результаты.


Учитывайте, что ошибки, «вылеты», синие экраны и зависания не всегда связаны с проблемами оперативной памяти: если средство диагностики показывает, что всё в порядке, есть и иные возможные причины: отключенный файл подкачки, проблемы с HDD или SSD (или с их подключением, например — неисправный кабель), сторонние антивирусы или, наоборот, вредоносные программы, неправильная работа драйверов оборудования.
Что делать, если были обнаружены проблемы оборудования в средстве диагностики памяти
К сожалению, средство диагностики не сообщает о том, какие именно проблемы были обнаружены в ходе проверки, а лишь рекомендует обратиться к производителю оборудования. Что можно сделать:
- Отключить любые опции ускорения памяти (изменение частоты, таймингов и другие) при наличии соответствующих опций в БИОС или ПО производителя материнской платы или ноутбука.
- Попробовать проверить планки памяти по одной, в других слотах на материнской плате для того, чтобы выяснить, появляются ли проблемы только с одним конкретным модулем памяти или в одном конкретном разъеме.
- Использовать другие утилиты для проверки оперативной памяти при необходимости.
- Прочитать документацию к материнской плате ПК — возможно, это какая-то несовместимость с памятью с конкретными характеристиками (если вы недавно добавили новые модули памяти или только что самостоятельно собрали компьютер).
- Иногда может помочь обновление БИОС.
Видео инструкция
Если вы разобрались, чем была вызвана именно ваша проблема, буду благодарен комментарию к статье: возможно, для кого-то он окажется полезным.
RAM (Random Access Memory) is the part of computer hardware, which is often the cause of many system problems. If you are facing any Blue screen of death (BSOD) Error, Computer frequently hangs, often reboots during RAM intensive use (in games, 3D applications, video and graphics editors) All these problems could be symptoms of hardware problems. A defective memory stick could cause all sorts of problems for your computer. Windows has an awesome tool called Windows Memory Diagnostic tool which you can use to check for possible memory problems, including testing of the Random Access Memory (RAM) on your computer.
Running Memory diagnoses would be a good thing to do as the first step of your troubleshooting process. It can help you to detect the memory problem of your PC. It will just find out RAM problems. The windows memory diagnostic tool runs a comprehensive test and displays the test results so you can take immediate action.
- To open Memory Diagnostic Tool Open the control panel and type ‘memory’ on the search bar. Then click on ‘Windows Memory Diagnostics’ to open it.
- Also, you can type Memory diagnostic Start Menu search You will see the Windows Memory Diagnostic app as the suggestion. Click on it This Will open the windows memory diagnostic tool,
- Alternatively, you can press the Windows key + R, then type mdsched.exe and hit enter to open it.
Now you have to choose between two options: ‘Restart now and check the problems’ or ‘Check for problems the next time I restart my computer.
If you choose to restart and check the problems, make sure to save all your work and close all the running programs on your Windows 10 computer, or do so the next time when starting your computer.
When you restart the Windows, the Memory Diagnostics Tool automatically starts running tests on your PC’s memory. Be patience as it might take some time to finish running the diagnostic tests. The system will also display the progress bar and the status notification during the process.
Advanced options for running the Memory Diagnostics Tool
Here you can press F1 To Access The Advanced options to adjust the tool’s settings When the Memory Diagnostics Tool starts.
You can adjust the following settings:
- Test mix: Choose what type of test you want to run: Basic, Standard, or Extended. The choices are described in the tool.
- Cache: Choose the cache setting you want for each test: Default, On, or Off.
- Pass count: Type the number of times you want to repeat the test.
Now After making changes for advance options press F10 To Apply changes and Start the Test. It might take several minutes for the tool to finish checking your computer’s memory. Once the process is finished, your computer will reboot and return to the Windows desktop.
Now When you log on, It will show you the Result. But sometimes, You may not see the result automatically. In that case, You have to find it manually. The result can be found in the Windows Event Viewer.
Find windows memory diagnostic tool Test Results
To Check Memory Diagnostic Test Results:
- Press Win + R type ‘eventvwr.msc’ into the run dialog box and press enter key
- This will open the Windows Event Viewer Screen.
- Now Locate the ‘Windows Logs’ on the right side and open it and click on system.
- You will see all system logs listed in the middle of the Window, (The list may be huge)
- It is very difficult to find the result from it. So, You have to filter the result so that you can find it very easily Click ‘Find’ on the right pane.
- On the box that pops up, type ‘MemoryDiagnostic’, then click ‘Find Next’.
- The test results will open at the bottom of that same Window.
- Double click the event log entry to see the details and whether there are any errors detected.
Also read:
- How To Fix Windows 10 Memory Management Error Stop code 0x0000001A
- Google Chrome Slow, Not perform well on Windows 10? Try these solutions
- Fix your pc ran into a problem windows 10 Blue Screen Error
- Fix Windows 10 freezes randomly And Restarts Automatically
- Solved: Unknown Hard Error on Windows 10 / 8 / 7 (5 Working Solutions)
You are here:
Home » Windows 10 » 3 Ways To Run Memory Diagnostics Tool In Windows 10
Windows 10 and earlier versions come with a built-in utility called Windows Memory Diagnostics Tool to check for memory problems. In this guide, we will see how to run and use the Windows Memory Diagnostics Tool on a Windows 10 PC.
")
The Memory Diagnostics tool in Windows 10 offers three types of tests: Basic, Standard, and Extended. By default, the utility runs a standard test, which is sufficient in most cases to detect memory problems.
The “Basic” test does MATS+, INVC, and SCHCKR.
In the “Standard” mode, it does all the “Basic” tests, plus LRAND, Stride6 (cache enabled), CHCKR3, WMATS+, and WINVC.
The “Extended” test includes all the tests in the “Standard” test plus MATS+, Stride38, WSCHCKR, WStride-6, CHCKR4, WCHCKR3, ERAND, Stride6, and CHCKR8.
When the utility is running, you can click the F1 key to see advanced options where you can select a test type. The “Standard” test takes about 30 minutes. The “Extended” test might take a few hours to complete.
Once the Memory Diagnostics Tool completes checking the memory for errors, your PC will automatically restart, and you will be able to see the test results after you log on. If no issues are found, you will get a “No memory errors were detected” notification.
Method 1 of 3
Run the Memory Diagnostics utility on a bootable PC
This is the ideal method when your PC is bootable and you want to identify and diagnose problems with your PC’s memory.
Step 1: In the Start/taskbar search field, type mdsched.exe or Windows Memory Diagnostics and then press the Enter key.

Step 2: When you see the following Memory Diagnostic dialog on your screen, save your work, close all running programs, and then click Restart now and check for problems option.

Alternatively, if you don’t want to restart now, click Check for problems the next time I start my computer option.
Step 3: The Memory Diagnostics Tool will automatically run upon rebooting your PC to check for memory problems.
")
When the Memory Diagnostics utility is running, you will be able to see the status, including if the tool has detected any memory problems.
If issues are found, you will get details upon logging in to your account.
Method 2 of 3
Run Memory Diagnostics Tool without booting into Windows 10
If your Windows 10 PC is not bootable for some reason, you can run the Memory Diagnostics Tool even without booting into Windows 10. Here is how to do that.
Step 1: Turn on your PC and navigate to Advanced options. Refer to our how to access Advanced boot options when PC is not booting article for directions.
Step 2: On the Advanced boot options screen, click the Command Prompt tile. Your PC will restart now.
")
Step 3: If you are asked to enter your user account’s password, please do the same. If you have two or more accounts, you will need to select your account and then enter the password for the same.
Step 4: You should now see the Command Prompt window. Type mdsched.exe and press the Enter key.
")
Step 5: Click Restart now and check for problems option to restart your PC and check for memory errors.
")
Refer to the directions in Using Memory Diagnostics Tool in the Windows 10 section of this guide (screen up to see) to know how to use the Memory Diagnostics Tool.
Method 3 of 3
Run Memory Diagnostic tool from Windows 10 recovery media
You can use the Windows 10 recovery drive to start the Windows Memory Diagnostics Tool. Here is how to do that.
Step 1: If you don’t have the recovery drive, refer to our how to prepare a Windows 10 recovery USB drive guide to create one.
Step 2: Configure your PC’s BIOS to boot from USB/DVD. Restart your PC and then boot from the recovery drive.
Step 3: When you get the keyboard layout screen, choose your keyboard layout.
Step 4: On the Choose an option screen, click on Troubleshoot tile.
")
Step 5: On the Advanced options screen, click the Command Prompt tile to open the same. The Command Prompt window should immediately appear on your screen.
")
Step 6: In the Command Prompt, type mdsched.exe and then hit the Enter key.
")
Step 7: When you see the following prompt, click the “Restart now and check for problems” option to reboot your PC and run the Memory Diagnostics utility.
")
To use the Memory Diagnostic utility, refer to the directions in the Using Memory Diagnostics Tool in Windows 10 section of this article (scroll up to see).
How to check if your Intel processor is running properly guide might also interest you.