
-
#1
Hi guys.
I discovered a compatibility issue between Windows Server and OBS.
When running OBS on Windows Server (2019, 2022), the CPU load increases to ~95%. However, broadcasting or recording is not enabled.
Tell me how to fix this?
Thank you very much!

-
#2
OBS needs a physical GPU. If you’re connected with rdp, an emulated GPU is provided by Windows that lacks all accelerated graphics operations required by OBS.
-
#3
OBS needs a physical GPU. If you’re connected with rdp, an emulated GPU is provided by Windows that lacks all accelerated graphics operations required by OBS.
Koala, thanks for your answer.
I have VMware Workstation installed and three virtual machines: Win 10, WinServer 2019 and WinServer 2022.
No problem with Win10:
OBS pending = 10% CPU
OBS recording enabled = 50% CPU.
WinServer 2019 and WinServer 2022 — OBS pending = 98% CPU.
The processors and RAM are the same.
-
#4
Guys, I wanted to add:
if nothing is played, then the CPU load is minimal. And if a VLC playlist or media source is played, then the load reaches 98%
OBS Studio is the most widely used video recording and live-streaming solution.
OBS Streaming Server on Windows Server 2019
Open Broadcaster Software (OBS) is a cross-platform streaming and recording program. Being the most popular streaming tool nowadays, it provides real-time source and device capture, scene composition, encoding, recording, and broadcasting. Transmission of data is primarily done via the Real Time Messaging Protocol (RTMP) and can be sent to any RTMP-supporting destination, including many presets for streaming websites such as YouTube, Twitch, Instagram, and Facebook.
User-friendly and intuitive interface is organized into five sections: scenes, sources, audio mixer, transitions, and controls. Even if it sounds hard to master, be sure that after a few weeks of usage, you will have user experience at your fingertips!
OBS Studio is equipped with a powerful API, enabling plugins and scripts to provide further customization and functionality specific to your needs.
Utilize native plugins for high-performance integrations or scripts written with Lua or Python that interface with existing sources.
Work with developers in the streaming community to get the features you need with endless possibilities.
Whether you’re a beginner or an experienced streamer, OBS Studio offers a comprehensive set of tools to elevate your streaming content.
Virtual Pulse is glad to provide you with this OBS Streaming Server on Windows Server 2019, fully pre-configured and greatly cloud-hardened for great performance in Azure environments. Start your streaming career with us!
Disclaimer:Virtual Pulse does not offer commercial licenses of any of the products mentioned above. OBS Studio is a registered trademark of respective companies. No warranty of any kind, express or implied, is included with this software.
Learn more
Guidance on usage Contact Us
if we directly install obs on windows server 2012. chances are we will encounter an error like the following image:
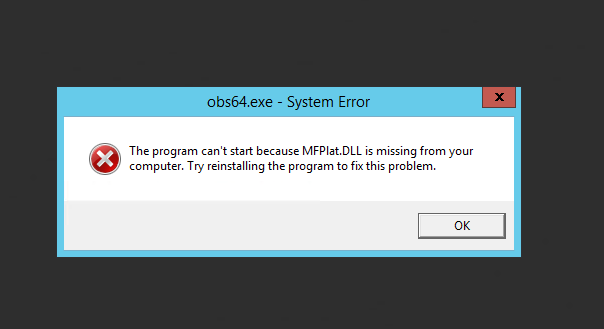
This is because there are several features in Windows 2012 for the desktop that are disabled or don’t exist.
we need to overcome this enable Windows Server Essentials Experience on Server Manager and install Windows Server Essentials Media Pack . here’s the tutorial
Activate Windows Server Essentials
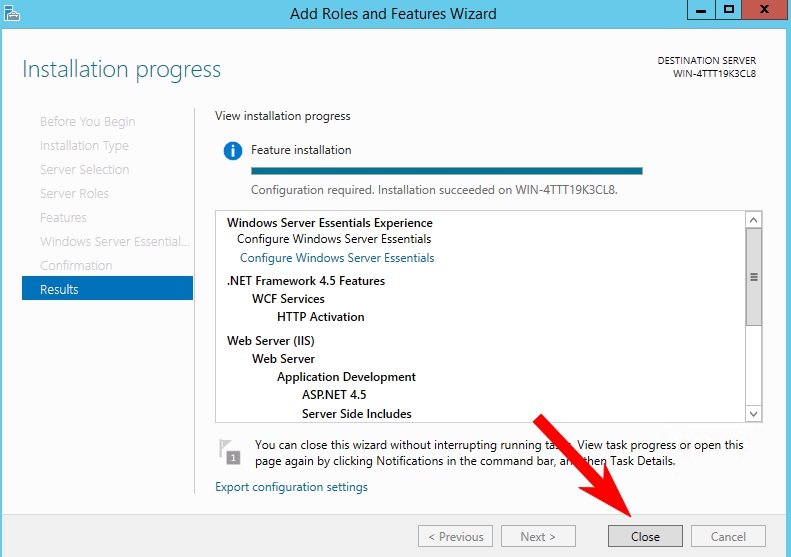
to activate it how to enter Server Manager => Manage => Add Or Remove Features
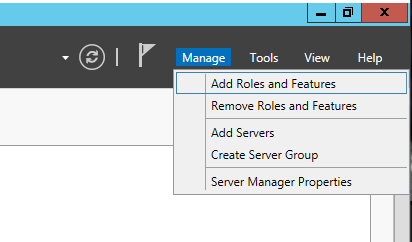
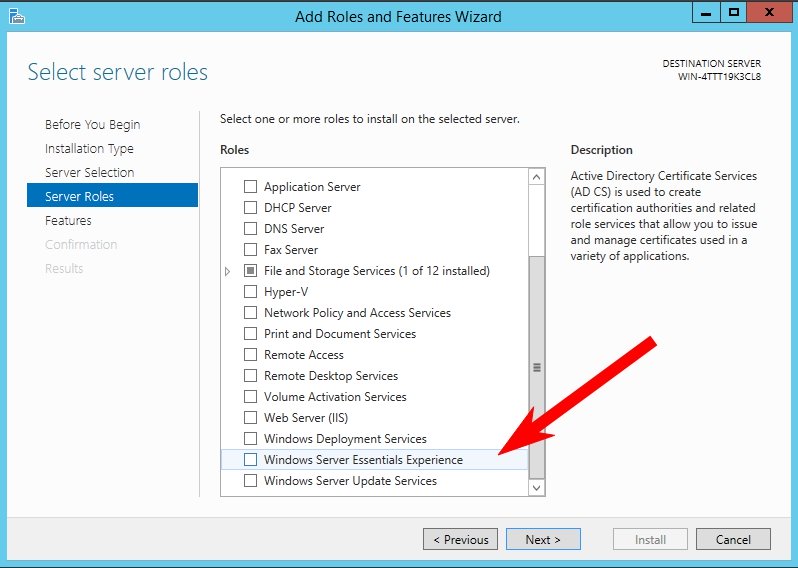
Then Check Windows Server Essentials Experience. after that Next
Continue Next and then click install
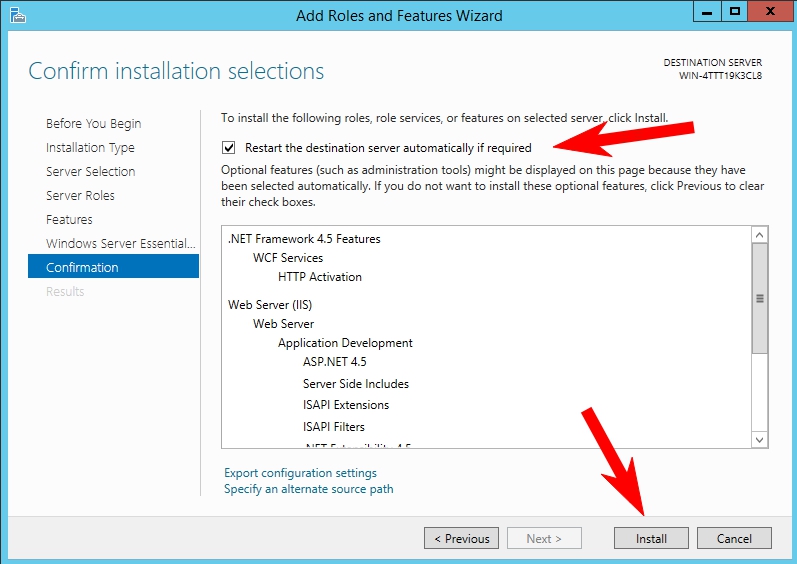
after that click Close
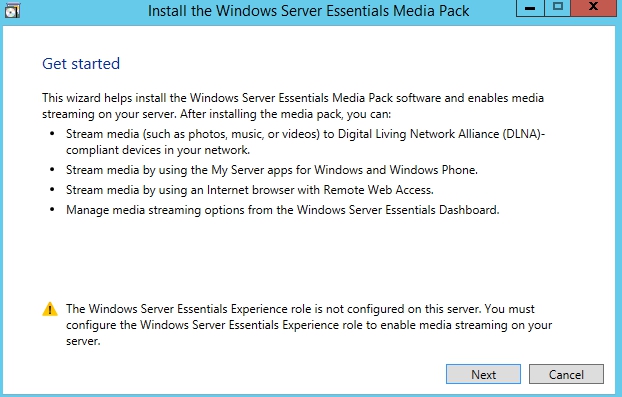
Download Windows Server Essentials Media Pack and Install it
to download it, you can directly open https://vfxwelcome.jay.id/win2012.html on the vps, after that download this section:

after downloading. open and click next as shown below:
after that restart the vps and try to install the OBS again. if there are still problems please contact our support to help with the installation
OBS
Windows server 2019
CONFIGURING AND CONNECTING Windows Server 2019 with OBS Streaming Server
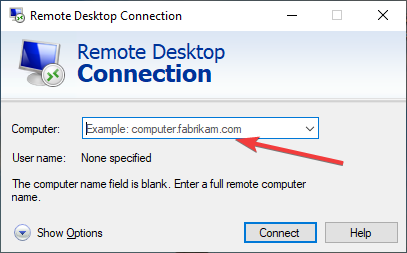
1. Press Win + R.
2. In the window that appears, enter “mstsc.exe” and click “OK”.
3. In the window that appears, enter the IP of the virtual machine and click “Connect”.
4. In the window that appears, enter your username and password and click “OK”.
5. Check the box and click “OK”.
6. After starting the VM on the desktop, you will see the OBS Studio shortcut that you need to open.

7. In the window that appears, select “Yes”.

8. Click “Next”.

9. Next, we need to select the quality of the stream (choose depending on the capacity of your virtual machine), then click “Next”.

10. Select the service you are going to stream on, in our case this is Twitch.
11. To stream on Twitch, you need to connect your account or enter a StreamKey.
12. We have chosen the option to log into your account, after logging in you need to choose a few more settings for streaming to Twitch. Once it has been configured, click “Next”.

13. After completing autoconfiguration, you should click “Apply”.

14. Now you can set up the scene for streaming. In our case, we will add it to the desktop in Source.
15. You can also add capture to your game and webcam.
16. After setting up the scene, click “Start Broadcast”.
17. To check, you can go to your channel and make sure that the stream is on.

OBS is software designed for gamers, designers, artists, or even amateur users who want to share their videos in online streams. Using this software, you can create high-quality recordings by OpenGL or Direct3D and easily share them in online streams. OBS works with a variety of streams such as Twitch, and with the simple user interface provided to you, you can easily stream your videos. You can even add your own streams. The videos produced by this studio will be created in high-quality formats such as MOV, FLV, MKV, MP4, TS. In this article, we try to learn How to Install OBS on Windows 10 RDP. You can see the packages available in Eldernode to purchase the Windows 10 RDP server.
Table of Contents
OBS stands for Open Broadcaster Software and is a video recording and playback software. It is open-source software written in C, C++, and Qt and developed by the OBS Project and a community of independent developers. The interesting thing is that this program supports a wide range of plugins to increase the performance of the program. In the next section, we will mention some of the OBS features and then teach you how to install OBS on Windows 10 RDP. Please be with us.
OBS features
OBS software has great performance and you can add various filters to your videos. If we want to mention some features of OBS software as a list, we can say:
– Existence of dark and light theme
– Ability to filter videos
– Support for various formats
– Ability to add custom streams
– Simple user interface
Follow us in this article to learn How to Install OBS on Windows 10 RDP step by step.
System requirements for OBS installation
To install OBS on Windows 10 RDP, you need to have DirectX 10.1 compatible GPU in your system.
Install OBS on Windows 10 RDP Server
To install OBS, you need to visit the OBS website in the first step. Then on this page, you can download the 64-bit version of OBS by selecting the Download Installer option.
You see that the OBS download begins.
Refer to the path where you downloaded the file. Then double click on it and select Run.
Now you need to click on Next to install OBS Studio.
Click Next again.
Now select the destination folder to install OBS and click on install.
You will see that the installation of OBS Studio begins.
Finally, click on Finish to complete the OBS installation.
Upon successful installation of OBS, you will see the OBS Studio environment in the image below.
Conclusion
OBS is a free and open-source software suite for live recording and playback. OBS is written in C, C ++, and Qt, and OBS provides device source and recording, scene composition, encryption, recording, and playback. This software transmits data mainly through the real-time messaging protocol (RTMP). In this article, we tried to learn how to install OBS on Windows 10 RDP.