
FAQ
[Ноутбук] Устранение неполадок: как устранить проблему, из-за которой фон рабочего стола становится черным
Поддерживаемые продукты: ноутбук, настольный компьютер, моноблок, игровая консоль
После обновления Windows 10 до версии , 2004 (сборка 18362.657) или более поздней на некоторых моделях может возникнуть проблема: фон главного экрана, расширенного экрана или ScreenPad становится черным. Пожалуйста, обратитесь к инструкциям по устранению неполадок ниже.
Вы можете обнаружить, что фон главного экрана, расширенного экрана или ScreenPad стал черным. Если Вы столкнулись с этой проблемой, то Вам нужно сбросить фон для решения проблемы.
Пожалуйста, перейдите к соответствующей инструкции в зависимости от текущей операционной системы Windows на Вашем компьютере:
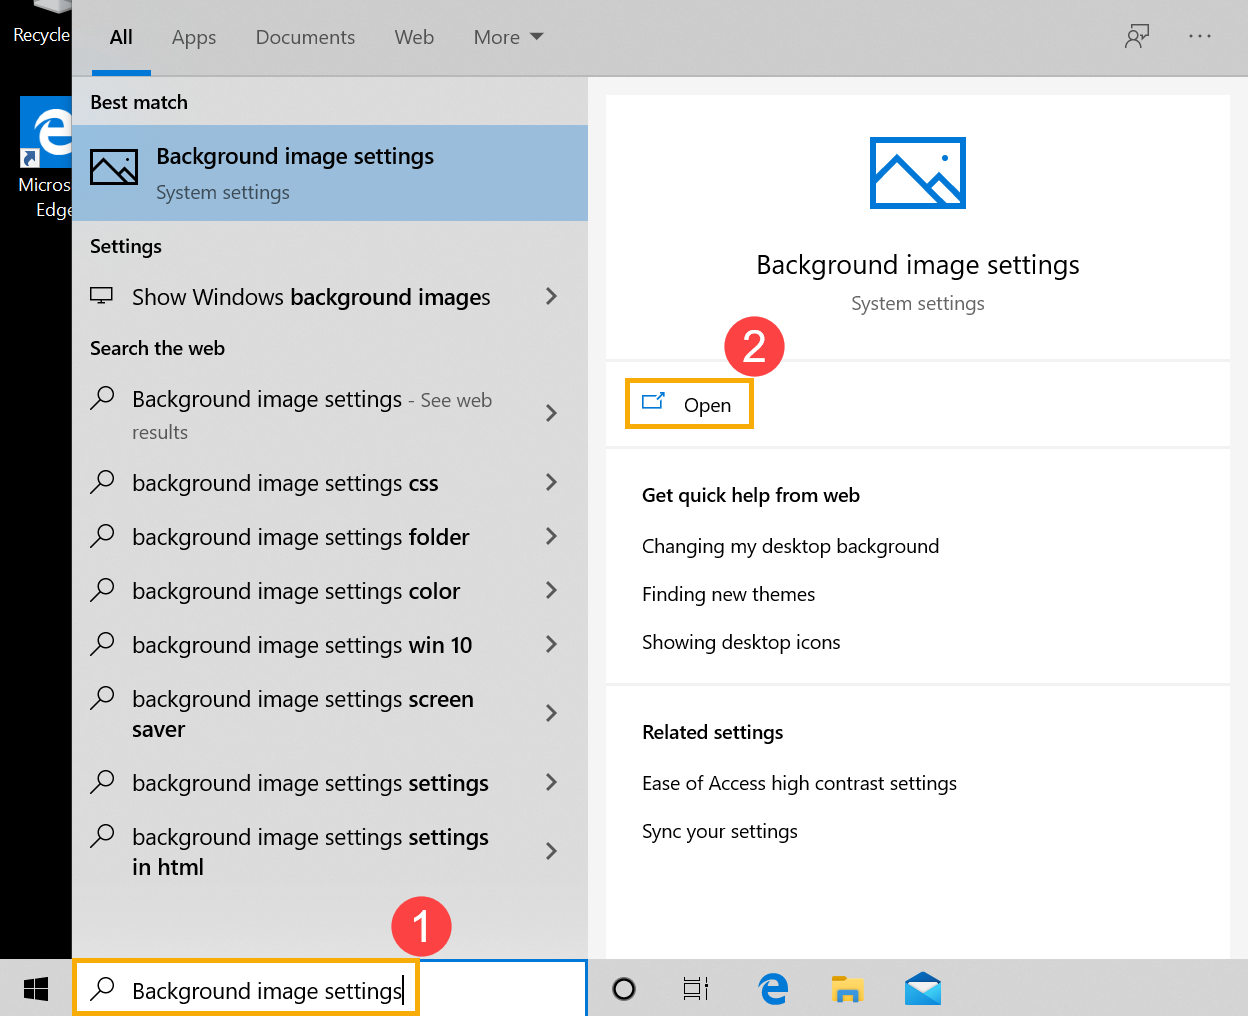
Windows 11Как сбросить фон Рабочего Стола
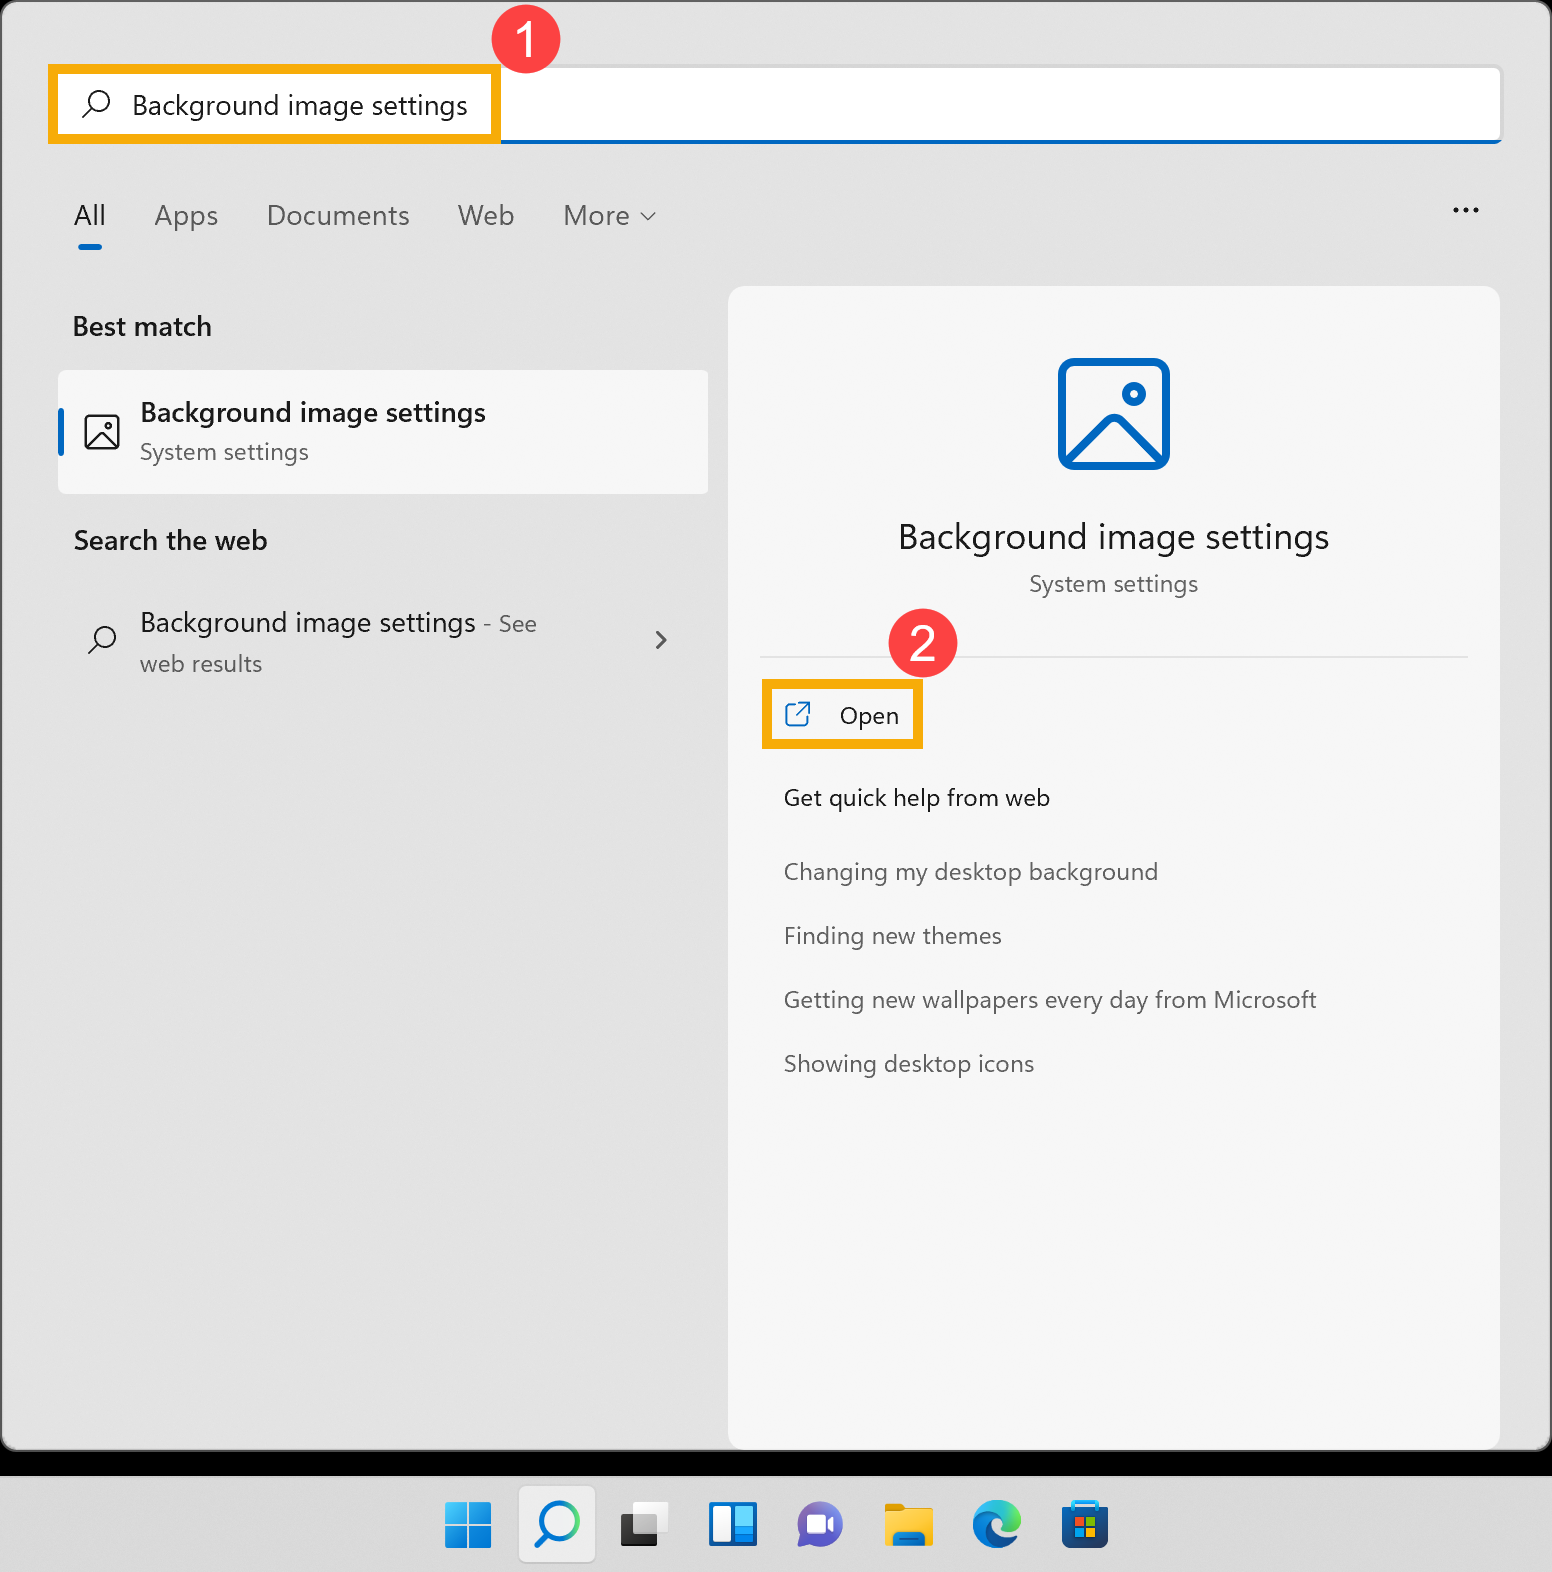
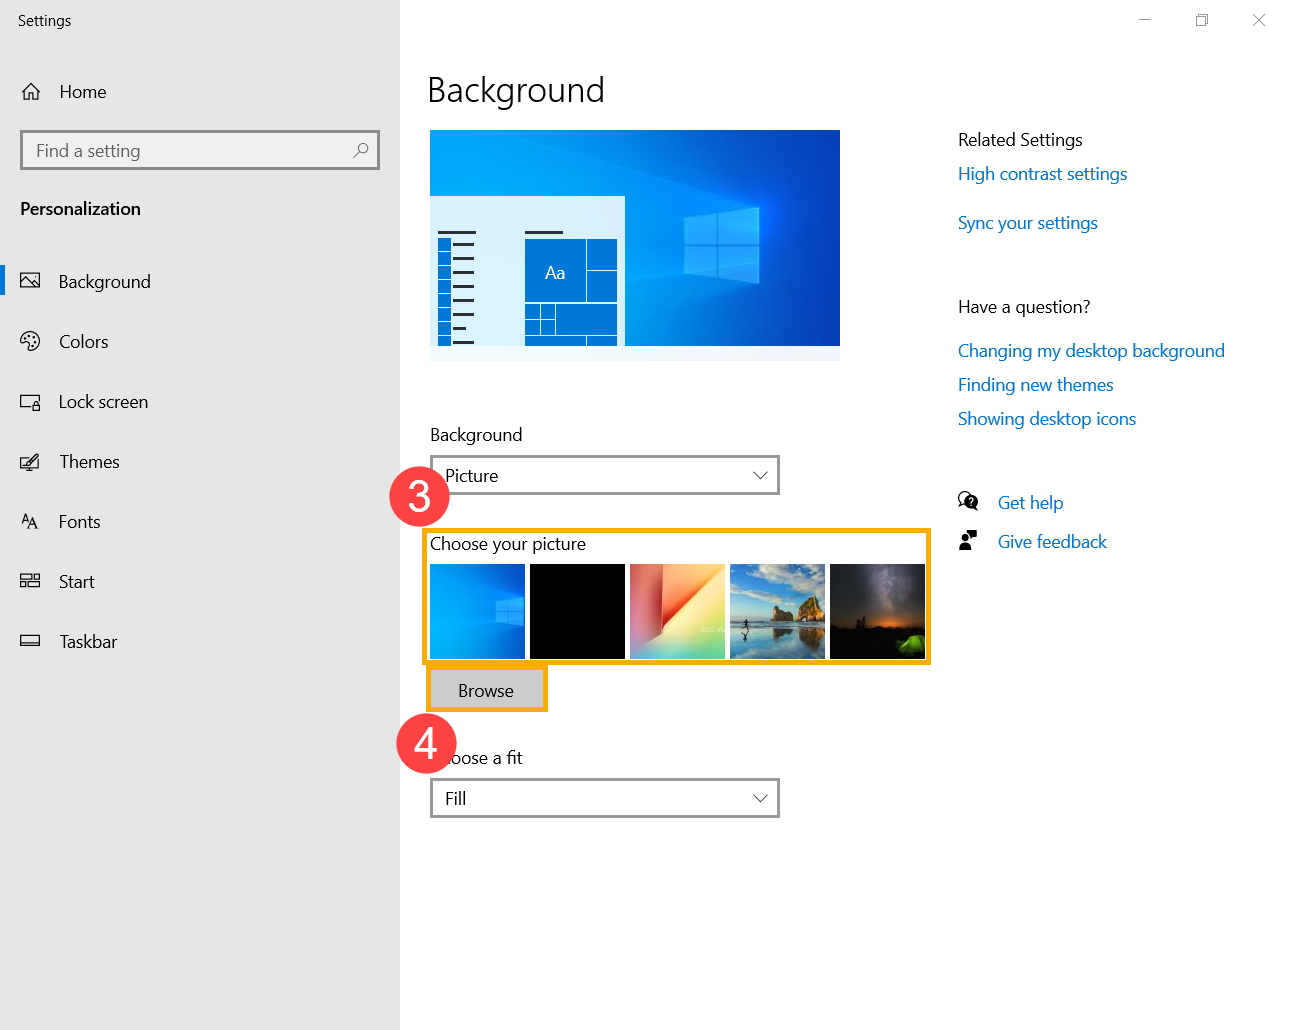
- Введите и найдите [Параметры фонового изображения] ①, затем нажмите [Открыть] ②.

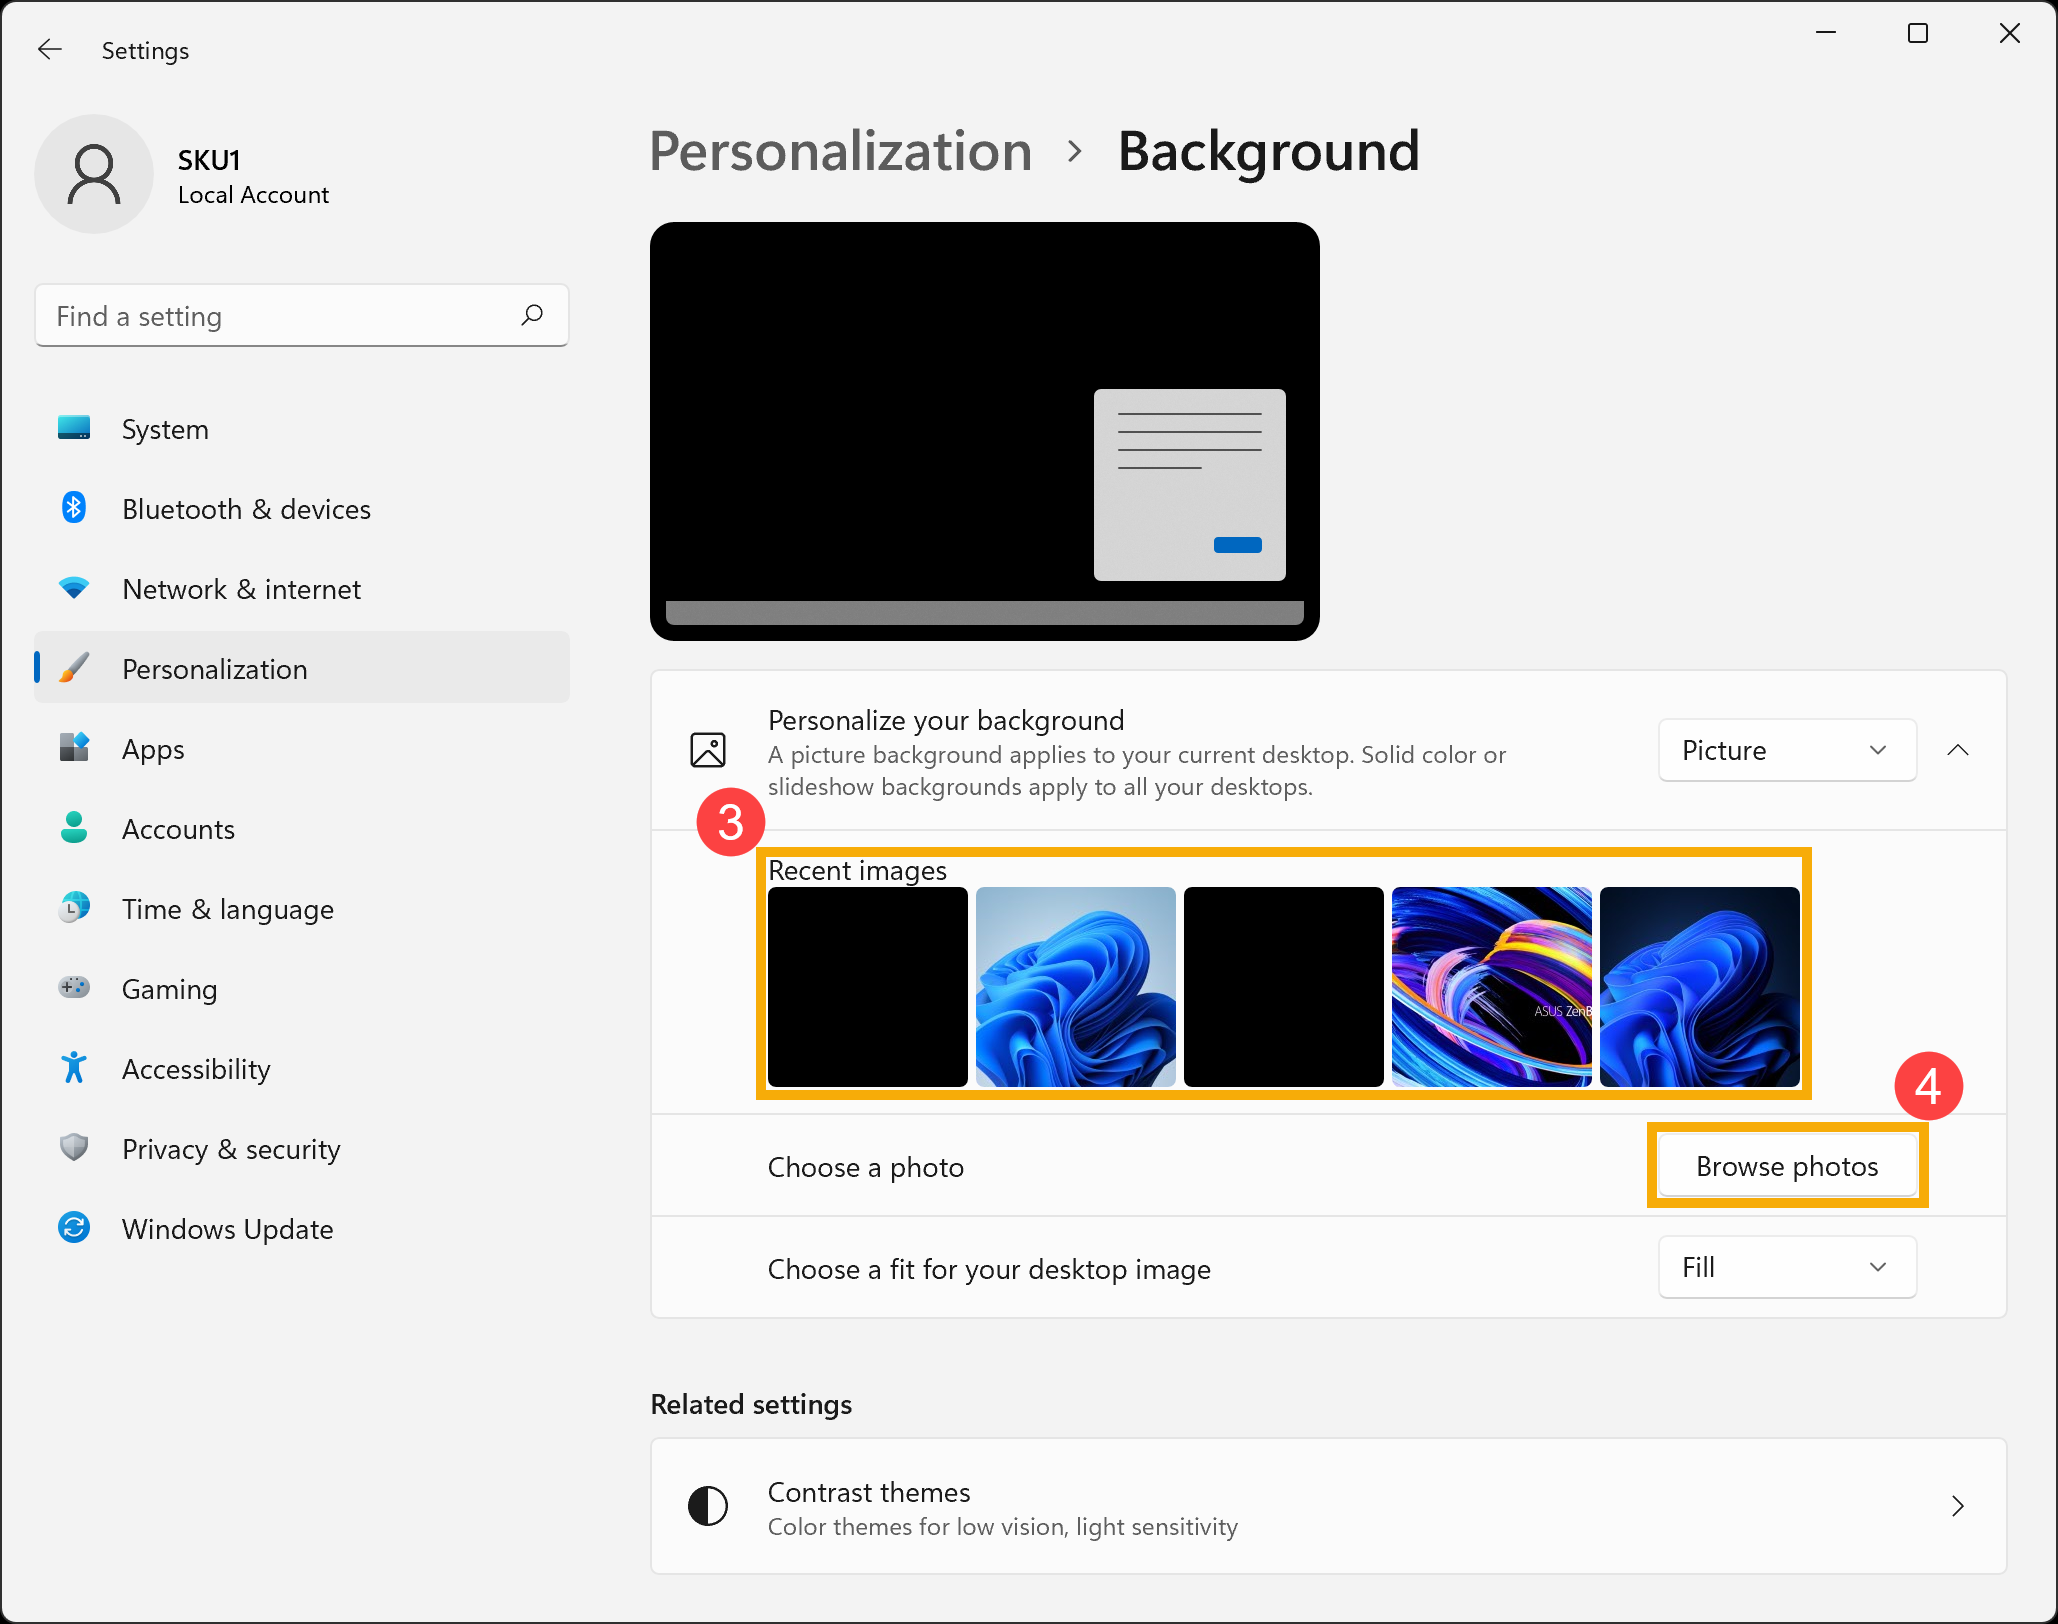
- Выберите Вашу картинку ③ или нажмите [Обзор] ④, чтобы выбрать изображения из других папок для установки в качестве фона Рабочего Стола. Здесь Вы можете узнать больше о [Windows 11/10] Изменить фоновое изображение и тему
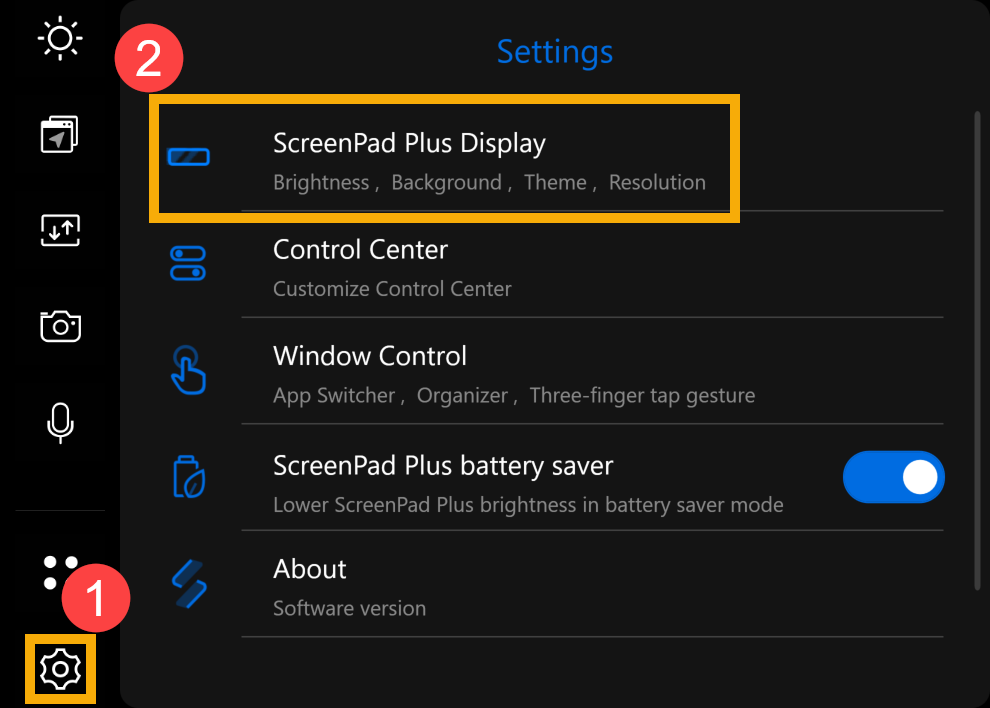
Как сбросить фон ScreenPad
Ниже в качестве примера используется ScreenPad Plus. Здесь Вы можете узнать больше об ASUS ScreenXpert (Screenpad 2.0) — Введение, ScreenPad Plus c ScreenXpert 3 — Введение.
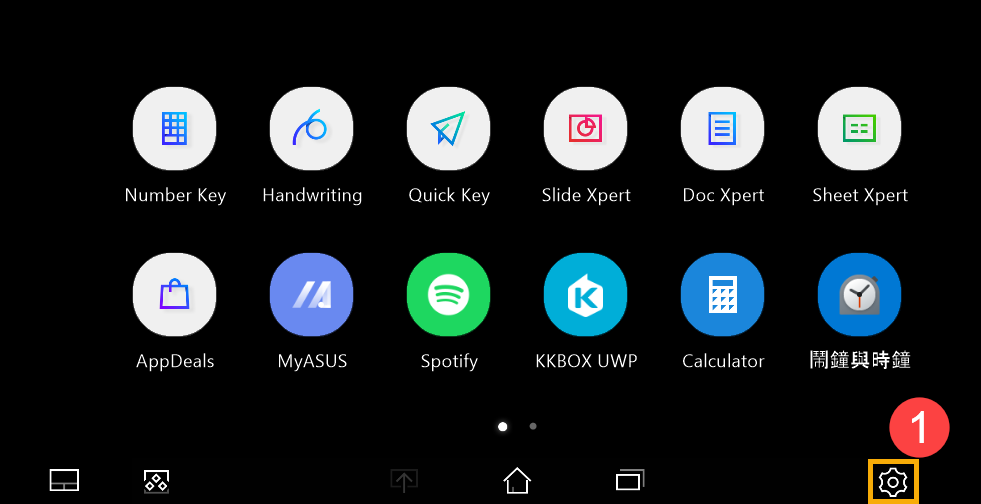
- В ScreenPad Plus нажмите на экране [Настройки] ①, затем выберите [Дисплей ScreenPad Plus] ②.
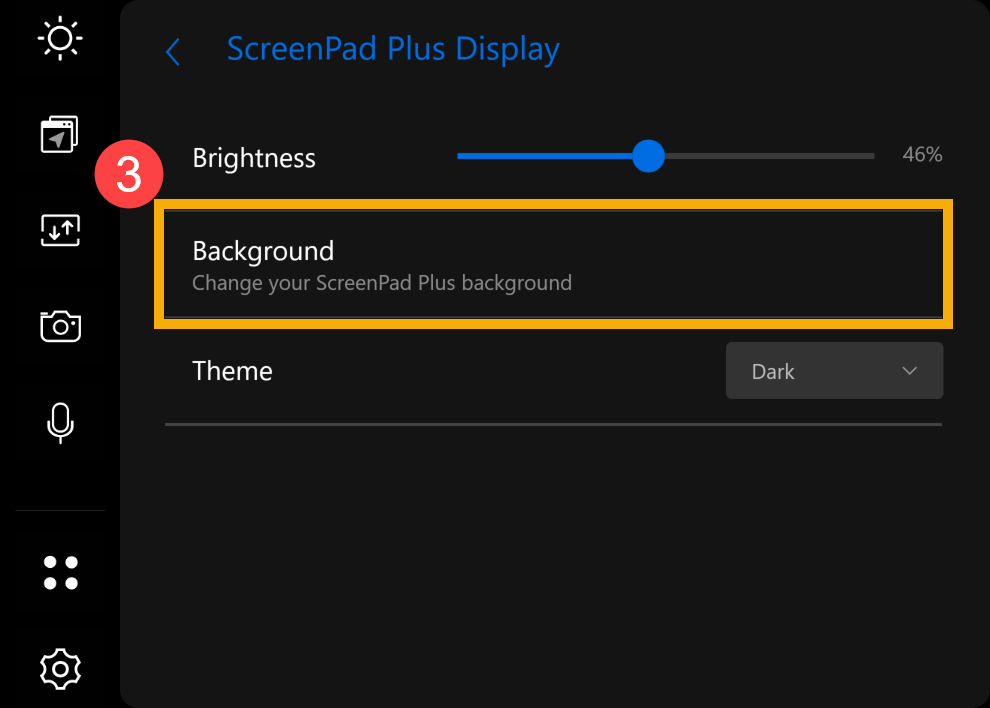
- Нажмите [Фон] ③.
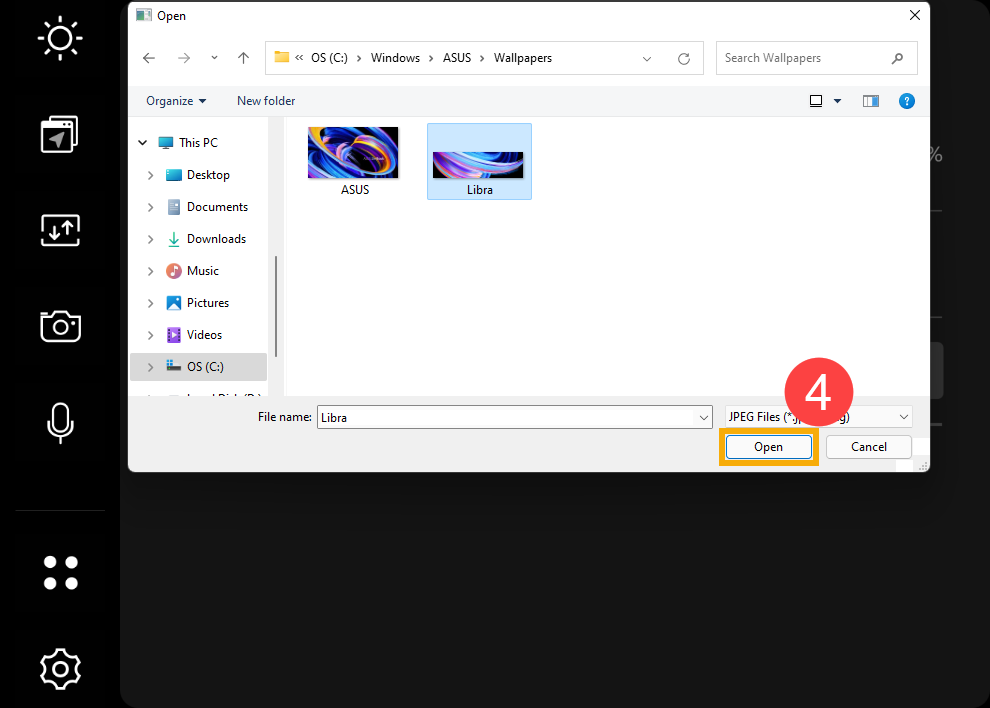
- Выберите изображение с помощью Диспетчера Файлов на экране или выберите любое другое изображение, которое Вам нравится, а затем нажмите [Открыть] ④, чтобы установить его в качестве фона ScreenPad Plus.
Windows 10Как сбросить фон Рабочего Стола
- Введите и найдите [Параметры фонового изображения] ①, затем нажмите [Открыть] ②.
- Выберите Вашу картинку ③ или нажмите [Обзор] ④, чтобы выбрать изображения из других папок для установки в качестве фона Рабочего Стола. Здесь Вы можете узнать больше о [Windows 11/10] Изменить фоновое изображение и тему
Как сбросить фон ScreenPad
Ниже в качестве примера используется ScreenPad Plus. Здесь Вы можете узнать больше об ASUS ScreenXpert (Screenpad 2.0) — Введение, ScreenPad Plus c ScreenXpert 3 — Введение.
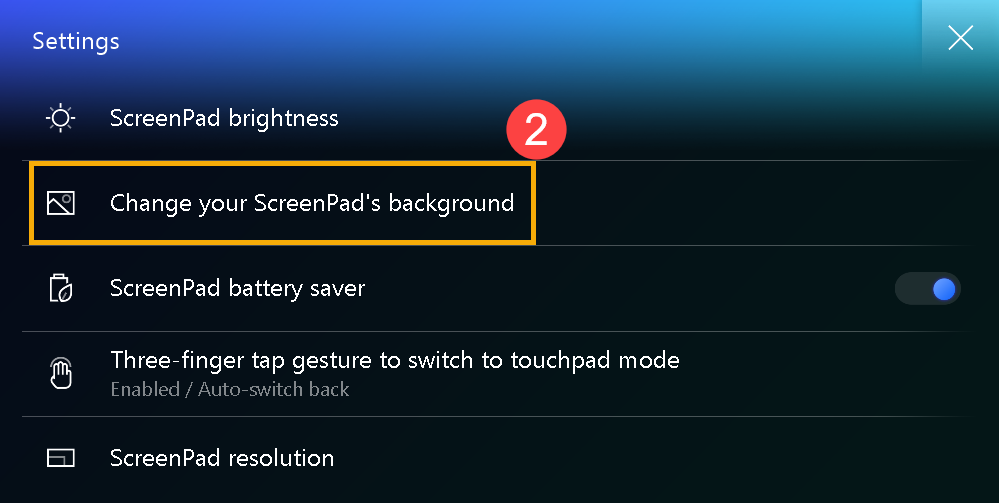
- В ScreenPad нажмите [Настройки] ①, в нижнем правом углу экрана.
- Выберите [Изменить фон ScreenPad] ②.
- Выберите изображение, используя Диспетчер Файлов на главном экране или выберите любые другие изображения, которые Вам нравятся, а затем нажмите [Открыть] ③, чтобы установить в качестве фона экрана.
Если Ваша проблема не решилась, обратитесь, пожалуйста, в Службу Поддержки ASUS для получения дополнительной информации.
Эта информация была полезной?
Yes
No
- Приведенная выше информация может быть частично или полностью процитирована с внешних веб-сайтов или источников. Пожалуйста, обратитесь к информации на основе источника, который мы отметили. Пожалуйста, свяжитесь напрямую или спросите у источников, если есть какие-либо дополнительные вопросы, и обратите внимание, что ASUS не имеет отношения к данному контенту / услуге и не несет ответственности за него.
- Эта информация может не подходить для всех продуктов из той же категории / серии. Некоторые снимки экрана и операции могут отличаться от версий программного обеспечения.
- ASUS предоставляет вышеуказанную информацию только для справки. Если у вас есть какие-либо вопросы о содержании, пожалуйста, свяжитесь напрямую с поставщиком вышеуказанного продукта. Обратите внимание, что ASUS не несет ответственности за контент или услуги, предоставляемые вышеуказанным поставщиком продукта.
Table of contents
- Why Is My Background Black on Windows?
- How Do I Get Rid of a Black Background on My Windows Computer?
- Fix 1: Update graphics or display drivers
- Fix 2: Configure the power options settings
- Fix 3: Switch the “show desktop background image” option on
- Fix 4: Adjust the display settings via the ease of access center
- Fix 5: Use an alternative method to set the desktop background
- Fix 6: Adjust Windows theme and settings
- Fix 7: Identify and resolve software conflicts
- Fix 8: Perform system checks
- Fix 9: Malware and virus scans
- Fix 10: Use the system restore tool
- Conclusion
- FAQ
Encountering an unexpected issue with your Windows PC’s desktop background can be frustrating, especially when it turns entirely black seemingly out of nowhere. Your desktop background is a personal touch that adds character to your computer experience, and its sudden transformation might leave you wondering about the cause and solution. Fortunately, this guide aims to explain why your desktop background might have turned black and, more importantly, provides effective steps to resolve the issue.
Why Is My Background Black on Windows?
As soon as your screen turns black, you will probably start wondering, “Why does my desktop background go black?” Here are a few possible reasons:
- Graphics Driver Issues:
Outdated or corrupted graphics drivers can lead to display problems, including a black desktop background.
- System Updates:
Operating system updates, especially major ones, can alter settings, potentially causing a black PC background.
- Corrupted System Files:
Corrupted system files can affect display settings, resulting in a black screen on Windows 10 PC.
- Malware or Virus:
Malware infections can impact various aspects of your computer, including display settings.
Quick Fix: How to Remove Virus and Other Malware from Windows
- Power Settings:
Power-saving settings might turn off the display, causing it to appear black after inactivity.
- Display Settings Changes:
Incorrect display settings or resolution changes can result in a black desktop background.
Related: [FIXED] Windows 10 Display is Too Big for a Monitor
- Third-Party Software Conflicts:
Certain third-party software might conflict with display settings, leading to a black screen in Windows 10
- Background Slideshow Issues:
If using a background slideshow, a problematic image file can cause a black screen during transitions.
- Operating System Glitches:
Operating system glitches or bugs can affect the display, causing a black PC background.
- User Account Settings:
Specific user account settings might trigger a black computer background for that user.
- Advanced Startup Settings:
Some changes made through advanced startup options could lead to a black PC background.
Investigating these potential causes and troubleshooting them can help resolve the issue of a black background on your computer.
How Do I Get Rid of a Black Background on My Windows Computer?
Before we get into the more complex solutions below, try to simply
change your background image and see if this resolves the problem. If you are still looking at a black screen in your Windows 10/11 computer, try the fixes below.
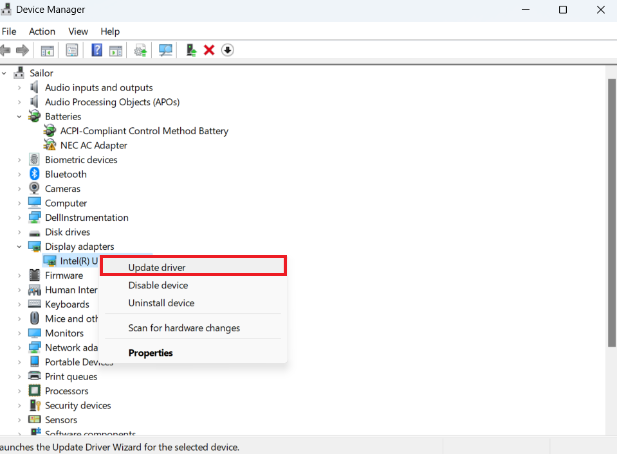
Fix 1: Update graphics or display drivers
- Open Device Manager from the Start menu.
- Expand the Display Adapters section.
- Right-click on your graphics card and select Update driver.
- Follow the on-screen prompts to update your drivers.
PRO TIP
Alternatively, you can use a one-click driver updating software like Auslogics Driver Updater. With it, you can update your drivers automatically and keep them consistently in shape.
Quick Fix: How to Update Graphics Driver in Minutes [Windows 10/11]
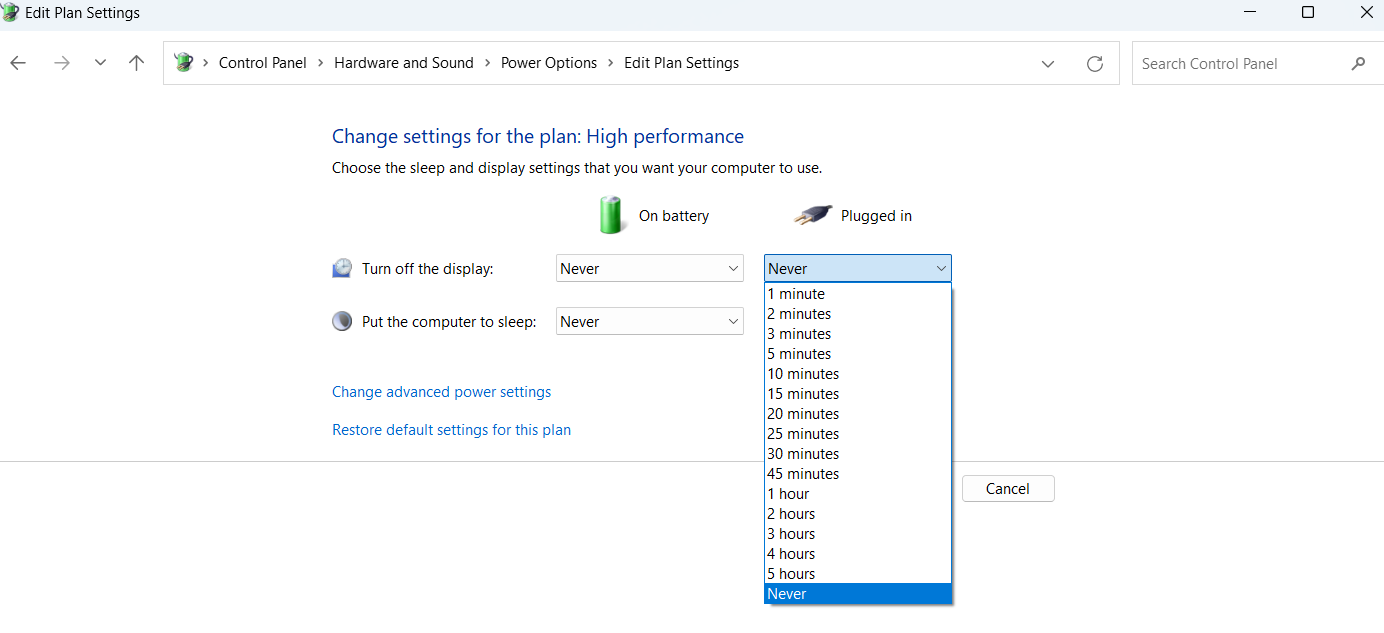
Fix 2: Configure the power options settings
- Go to the Control Panel and search for Power Options.
- Click on Change plan settings for your selected power plan.
- Adjust the Turn off the display and Put the computer to sleep settings to longer time intervals.
Related: Pro Tips: Mastering Advanced Power Settings in Windows 10
Fix 3: Switch the “show desktop background image” option on
- Right-click on your desktop and select Personalize.
- In the Personalization window, go to the Background settings.
- Make sure the Show desktop background image option is turned on.
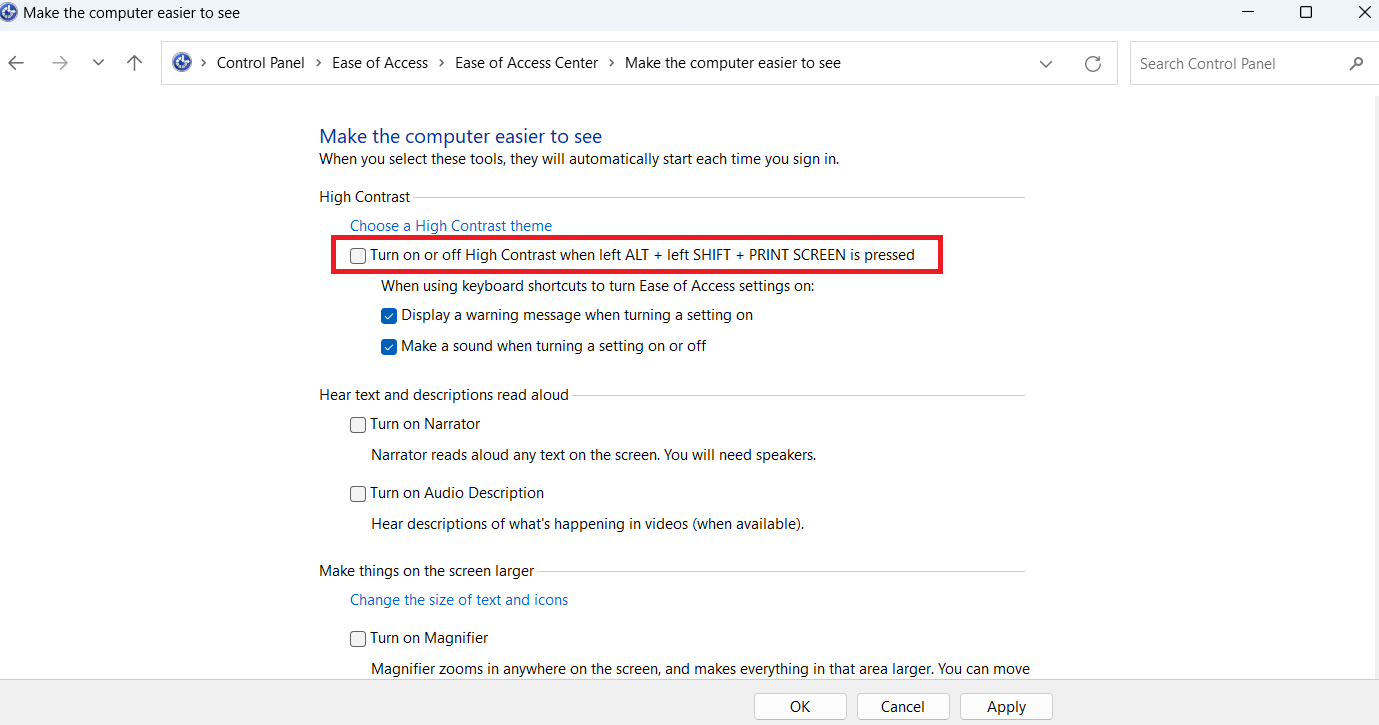
Fix 4: Adjust the display settings via the ease of access center
- Open the Control Panel and search for Ease of Access Center.
- Click on Make the computer easier to see.
- Under the High Contrast section, uncheck the Turn on High Contrast option.
Fix 5: Use an alternative method to set the desktop background
- Right-click on an image and select Set as desktop background.
- Check if the background changes to the selected image.
Fix 6: Adjust Windows theme and settings
- Right-click on your desktop and select Personalize.
- Choose a different theme and see if the background changes.
Fix 7: Identify and resolve software conflicts
- Uninstall recently installed software that might be causing conflicts.
- Restart your computer and check if the issue persists.
Fix this issue quickly
You can try using a safe and totally free tool developed by the Auslogics team of experts.
A few simple steps to troubleshoot the issue:
Download the tiny Auslogics TroubleShooter tool.
Run the application (no installation is needed).
The app will check for the issue mentioned in the article. When the scan is done, check that this is the issue you were looking to solve and click ‘Apply now’ to apply the recommended fix.
You can use the app to troubleshoot other malfunctions for free by simply typing in a brief description of the issue your PC is experiencing. Or you can scan your PC for performance issues using the My Scanner tab.
Also Read: How to Uninstall Programs and Delete Unnecessary Files in Windows 10
Fix 8: Perform system checks
- Run a disk check and system file checker to fix potential errors.
- Open Command Prompt as an administrator and run:
chkdsk /f
fc /scannow
Also Read: Windows Command Prompt: 28 Most Useful CMD Commands [with Examples]
Fix 9: Malware and virus scans
Run a full scan using Windows Defender or your preferred anti-malware tool. Here’s how to scan your PC for malware using Windows Defender:
- Click on the Windows Start button.
- Type Windows Security and press Enter.
- In the Windows Security window, click on “Virus & threat protection” in the left-hand menu.
- Run a Full Scan:
- Under the Virus & Threat Protection section, click on Scan options.
- Click on Full Scan and then click the Scan Now button.
- Windows Defender will start scanning your system for malware and viruses. This process might take a while as it checks all files and locations thoroughly.
- After the scan is complete, Windows Defender will display the scan results.
- If any threats are found, Windows Defender will provide options to take action, such as quarantining or removing the threats.
Review the threats found and choose the actions you want to take. You can select “Clean threat” to remove detected threats or “Quarantine” to isolate them.
PRO TIP
Alternatively, you can use a third-party tool such as Auslogics Anti-Malware to set up automatic scans on your PC and keep your system in check.
Fix 10: Use the system restore tool
If the black desktop background appeared after a Windows update, you would have to revert your system to the settings before the error showed up. Note that in order to use this fix, you need to have created a
system restore point on your PC prior to this event.
Also Read: [FIXED] System Restore Not Working in Windows 10
If you have a system restore point set up, follow the steps below:
- Reboot your computer.
- While the computer is starting up, press and hold the F8 key. This should let you boot into Safe Mode.
- In the search box, type restore, then hit Enter.
- Select System Restore from the results.
- Submit any administrator passwords if you’re prompted to do so.
- Follow the steps provided in the Wizard and select a restore point. You should be able to restore the system to its previous settings before the problem occurs.
Alternatively, you can also try cleaning out the System Registry to ensure that repetitive, damaged, or corrupted files that came with the update can be repaired.
PRO TIP
However, we do not recommend doing this manually. The System Registry is a sensitive database, so vulnerable that simply misplacing a comma can damage your computer.
As such, we recommend using a program like Auslogics Registry Cleaner. This tool creates a backup before performing a scan so that you can easily undo the changes and prevent further damage.
Auslogics Registry Cleaner will search for registry files that need attention and will repair them accordingly.
Remember to restart your computer after performing each step to see if the black computer background issue has been resolved. If none of these methods work, you might want to seek further technical assistance.
Conclusion
A black desktop background on a Windows PC can be caused by various factors, ranging from simple settings adjustments to more complex technical issues. By following the troubleshooting steps mentioned in this guide, users can identify and resolve the root cause of the issue.
Remember that each scenario may require a different solution, so it’s important to diagnose the problem and apply the appropriate fix systematically.
With persistence and the right approach, users can restore their desktop backgrounds to their desired visuals and enjoy a personalized computing experience once again.
FAQ
What is the size of a computer background?
Computer backgrounds, also known as wallpapers, come in various sizes. The standard size for a desktop background is often 1920×1080 pixels (width x height) for Full HD monitors. However, it can vary depending on your monitor’s resolution.
How to make a collage for computer background?
To create a collage for your computer background, you can use graphic design software or online tools. Gather the images you want to include, arrange them in a pleasing layout, and adjust their sizes and positions. Once you’re satisfied, save the collage and set it as your background.
How to change computer background?
Changing your computer background is simple. On Windows, right-click on your desktop, select “Personalize,” choose “Background,” and pick an image from the options provided.
On Mac, go to “System Preferences,” select “Desktop & Screen Saver,” and choose an image from your collection or the pre-installed options.
The Colourful Desktop Wallpaper is such a standard feature in Windows computers that it is difficult to think of a Windows PC without a Desktop Wallpaper or background image of some kind.
Hence, it can be quite annoying to suddenly find your computer displaying a Dark or Black Desktop Background, instead of displaying its usual colourful background.
In general, the problem of a Windows computer displaying a black desktop background image is known to occur while users were trying to Change the Desktop Background image or trying to switch the Desktop Background to Slideshow Mode.
In most cases, the issue of a Windows computer displaying a Black Desktop Bacground can be fixed using the following troubleshooting steps.
Advertisement
1. Enable Show Windows Background Option
Follow the steps below to make sure that “Show Windows Background” option is enabled on your computer.
1. Go to Settings > Ease of Access > click on Other Options in the left-pane. In the right-pane, make sure that Show Windows Background option is enabled.

2. Restart your computer and see if its usual Desktop Background has returned back.
2. Switch Desktop Background Type
Sometimes the simple act of switching to a different background type can fix the problem of Black Desktop background in Windows 10.
1. Go to Settings > Personalization > click on Background in the left-pane. In the right-pane, change the Background type from Color/Picture to Slideshow.

2. Once Slideshow Background appears, you can switch back to your original Colour or Picture Background.
3. Replace Black Desktop Background With Picture
A quick way to get rid of black desktop background in Windows 10 is to replace the Black Desktop Background with any Pictures available on your computer.
1. Open File Explorer and Navigate to Pictures or any other Folder or Location where an image that you want to save as Desktop Background is located.

2. Right-click on the image and click on Set as Desktop Background in the contextual menu.
Advertisement
4. Unselect High Contrast Black
1. Go to Settings > Personalization > click on Colors in the left pane. In the right-pane, scroll down and click on High Contrast Settings link.

2. On the next screen, change High Contrast Black to None.

5. Check Ease Of Access Settings
The problem of a Black Desktop Background in Window 10 could also be due to accidental change in Ease of Access Settings.
1. Open the Control Panel on your computer.

2. On Control Panel screen, make sure that you are in Category View and click on Ease of Access.

3. Next, click on Ease of Access Center > Make the computer easier to see.

4. On the next screen, scroll down and uncheck Remove background images option.

5. Click on Apply and OK to save this setting.
After this set a Wallpaper of your choice as the Background Image on your computer by going to Settings > Personalization > Background.

6. Check Power Plan Settings
The problem of Black Desktop Background in Windows 10 can also be due to Power Settings in Control Panel.
1. Open the Control Panel on your computer.
2. On the Control Panel Screen, make sure that you are in “Category” view and then click on System and Security option.

3. On the System and Security Screen, click on Power Options.

4. Click on Change Plan Settings link located next to the current Power Plan on your computer (See image below).

5. Click on Change Advanced Power Settings link.

6. On the next screen, expand the item for Desktop background settings and make sure that Slide Show is set to Available (See image below).

If Slide Show option was disabled, enable the option for Slide Show and then set a Wallpaper of your choice by going to Settings > Personalization >Background.
7. Corrupt TranscodedWallpaper File
In case none of the above methods are working, it is likely that TranscodedWallpaper File on your computer is corrupted.
1. Right-click on the Start button and click on File Explorer.
2. Navigate to C: Users/User Account/AppData/Roaming/Microsoft/Windows/Themes Folder and Rename TranscodedWallpaper File to TranscodedWallpaper.old.

Note: Enable Show Hidden Files option, in case you are unable to see AppData Folder
3. While you are still in Themes Folder, open Settings.ini File using Notepad, delete contents of this file (if any) and save this file.

After completing above steps, setup a new Desktop Background on your computer by going to Settings > Personalization >Background.
Все способы:
- Вариант 1: Активация Windows 10
- Вариант 2: Выбор нового месторасположения пользовательского изображения
- Вариант 3: Отключение специальных возможностей
- Вопросы и ответы: 2
Важно! В этой статье рассказывается о том, как вернуть фон рабочего стола в случае системного сбоя, который не позволяет выполнить эту процедуры стандартными средствами. Если такой проблемы у вас нет, обратитесь за помощью к другой статье на нашем сайте, в которой рассказывается о том, как установить изображение в качестве фона рабочего стола в штатном режиме.
Подробнее: Изменение фонового изображения в Windows 10
Вариант 1: Активация Windows 10
Если после установки операционной системы фон рабочего стола у вас присутствовал, но спустя месяц заменился на черную заливку, это может быть связано с проблемой активации Windows 10. В таком случае необходимо убедиться, что на вашем компьютере установлена лицензионная версия системы, а при необходимости активировать ее. По этой теме у нас на сайте есть отдельная статья с подробной инструкцией, доступная по ссылке ниже.
Подробнее: Активация операционной системы Windows 10
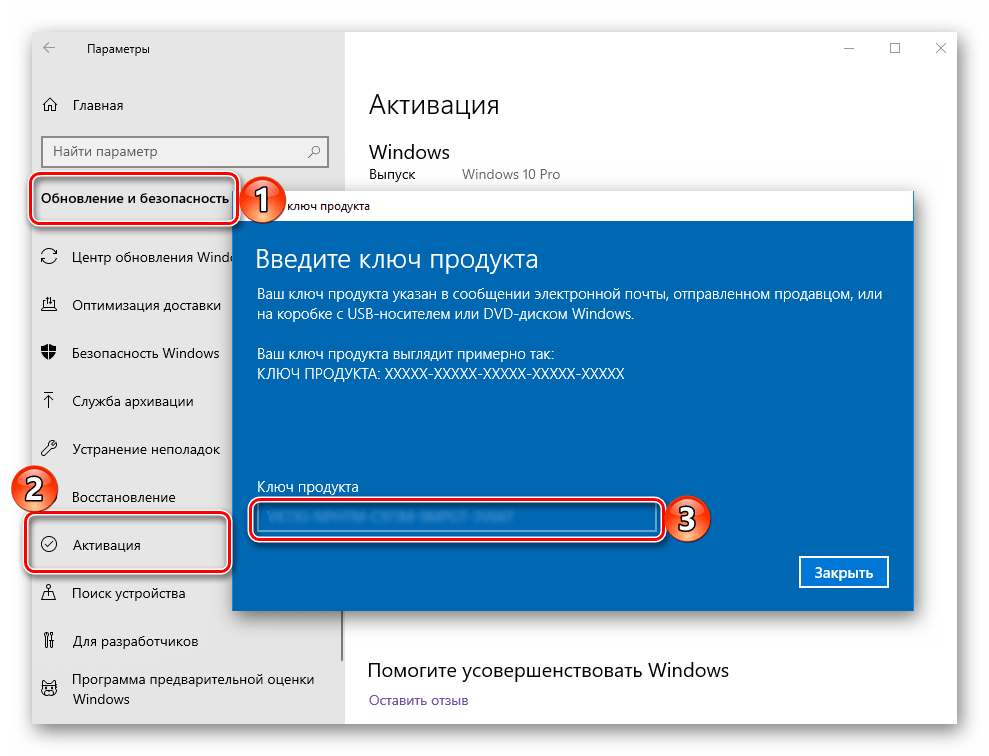
Примечание! При проблемах с активацией Windows 10 в правом нижнем углу экрана отображается соответствующее сообщение. Если оно у вас есть, значит, проблема заключается именно в этом. Воспользуйтесь руководством, приведенном в статье, ссылка на которую дана выше.
Вариант 2: Выбор нового месторасположения пользовательского изображения
Если фон рабочего стола является пользовательским изображением, тогда он мог исчезнуть по причине переноса или удаления исходного файла. Операционная система при попытке отобразить фон ссылается на несуществующий объект, чем и вызвана рассматриваемая в статье проблема.
Чтобы устранить неисправность, необходимо заново указать путь к файлу в настройках персонализации Windows 10:
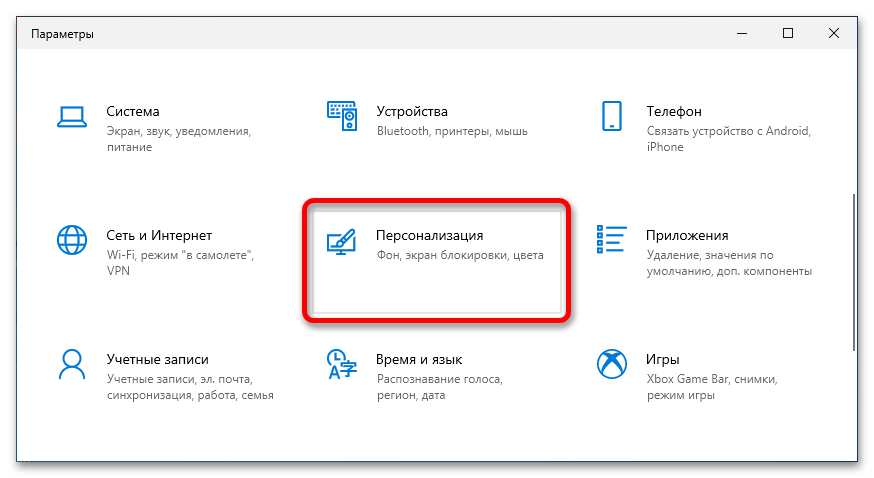
- Откройте параметры операционной системы любым доступным способом. Сделать это можно, например, через контекстное меню кнопки «Пуск». Щелкните по ней правой кнопкой мыши и в появившемся списке опций выберите пункт «Параметры».
Читайте также: Как открыть «Параметры» в Windows 10
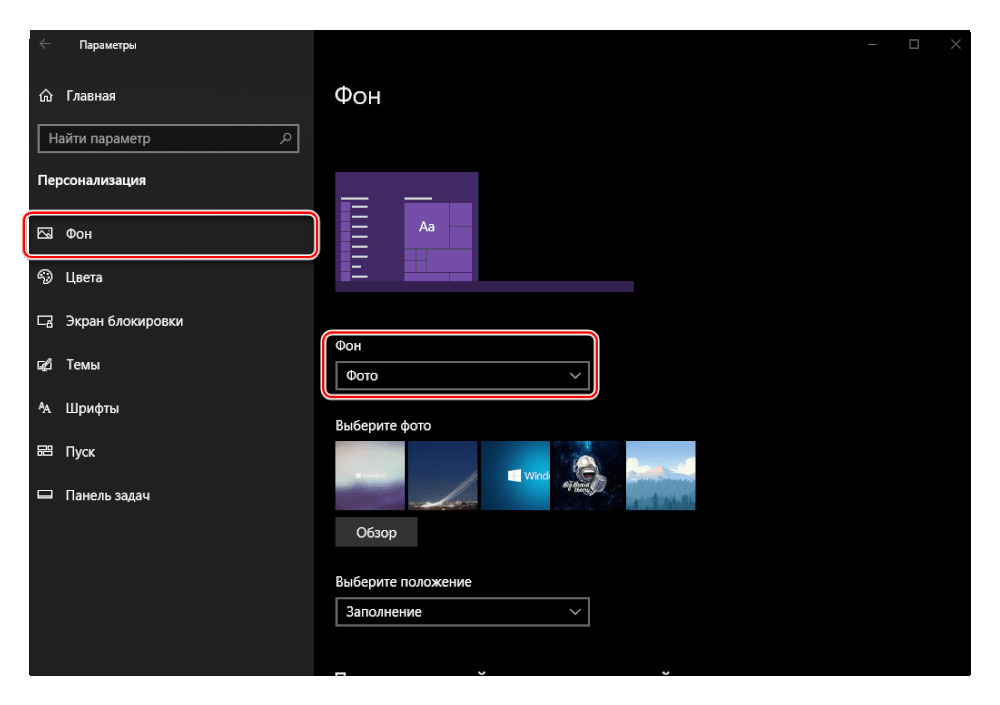
- В появившемся на экране окне проследуйте в раздел «Персонализация», кликнув левой кнопкой мыши по одноименному элементу меню.
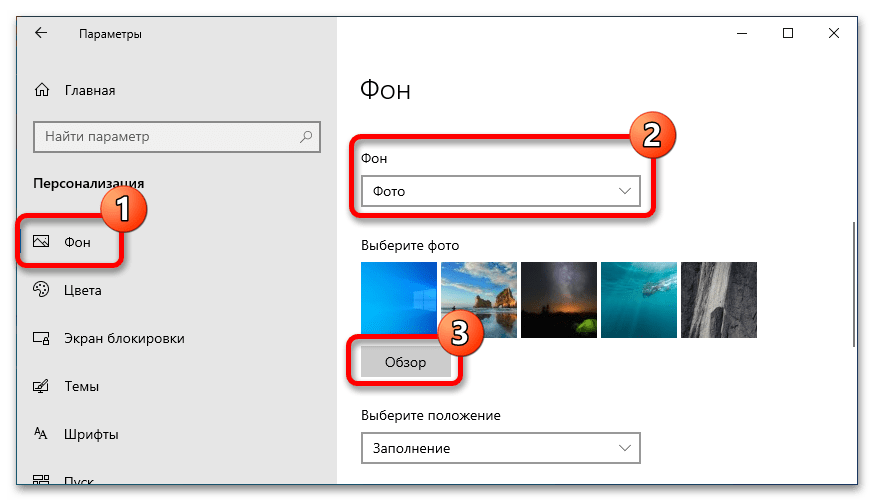
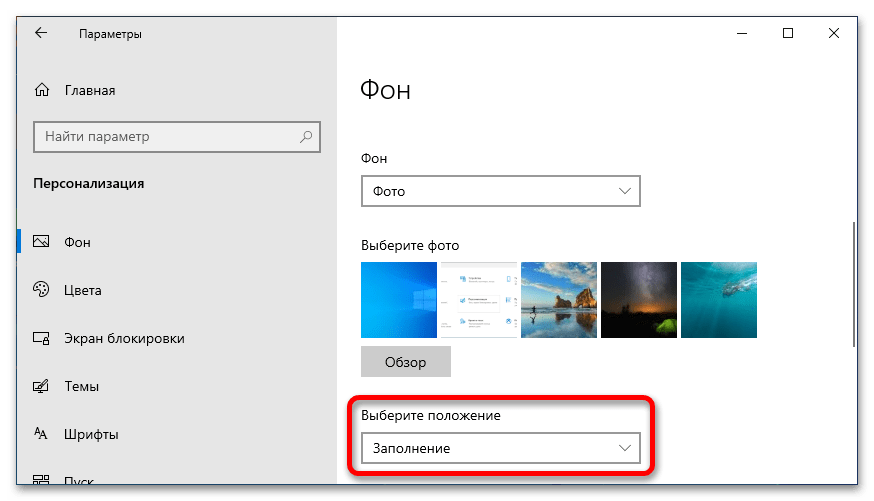
- Воспользовавшись навигацией в левой части интерфейса, перейдите во вкладку «Фон». Первостепенно выберите в выпадающем меню «Фон» значение «Фото», а после кликните по кнопке «Обзор», расположенной в блоке «Выберите фото».
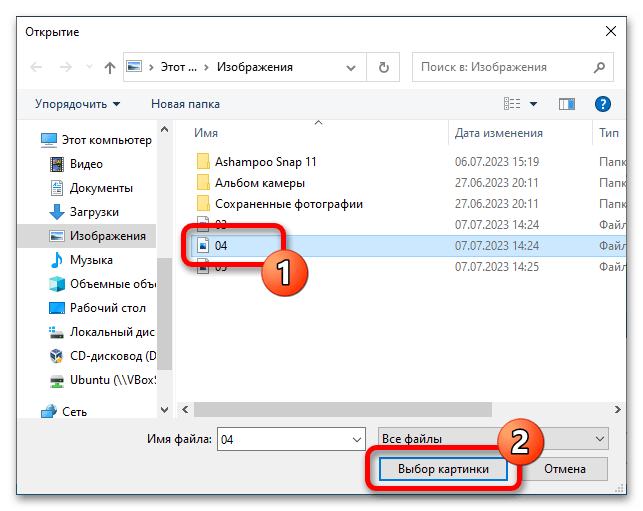
- В появившемся диалоговом окне файлового менеджера перейдите в директорию с изображением, которое хотите установить в качестве фона рабочего стола, выделите его и щелкните по кнопке «Выбор картинки».

После этого изображение сразу должно отобразиться в качестве фона рабочего стола. При необходимости измените его положение, чтобы оно выглядело естественно. Делается это в выпадающем списке «Выберите положение». Поочередно кликните по каждому значению из списка и остановитесь на том, которое подходит лучше всего.
Читайте также: Как сделать красивый рабочий стол в Windows 10
Вариант 3: Отключение специальных возможностей
Если при попытке установить изображение в качестве фона рабочего стола ничего не происходит, есть вероятность, что в настройках операционной системы активирован специальный режим, запрещающий это делать. Необходимо проследовать в соответствующий раздел параметров и внести правки.
- Откройте параметры Windows 10 любым доступным способом. Как говорилось ранее, сделать это можно через контекстное меню кнопки «Пуск». Щелкните по ней правой кнопкой мыши, а затем выберите в появившемся списке пункт «Параметры».
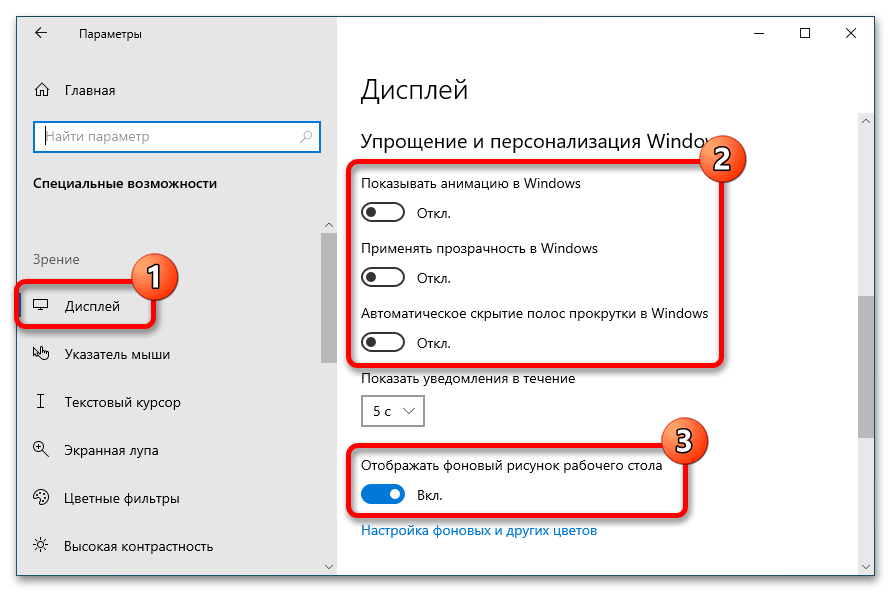
- В открывшемся окне проследуйте в раздел «Специальные возможности», кликнув левой кнопкой мыши по одноименному элементу меню.
- Находясь во вкладке «Дисплей», убедитесь в том, что параметр «Отображать фоновый рисунок рабочего стола» имеет значение «Вкл». При необходимости измените его вручную, кликнув левой кнопкой мыши по переключателю.

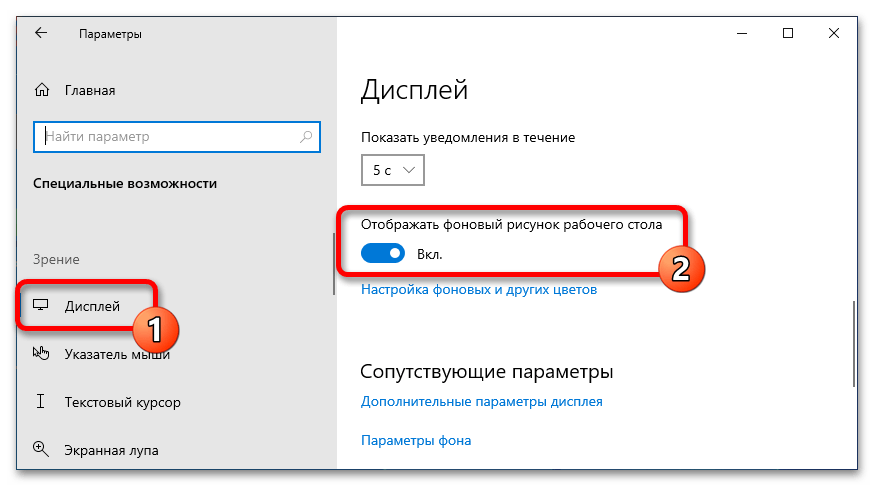
Сразу после этого на рабочем столе должен отобразится фоновый рисунок. Если этого не произошло, установите его заново в настройках персонализации.
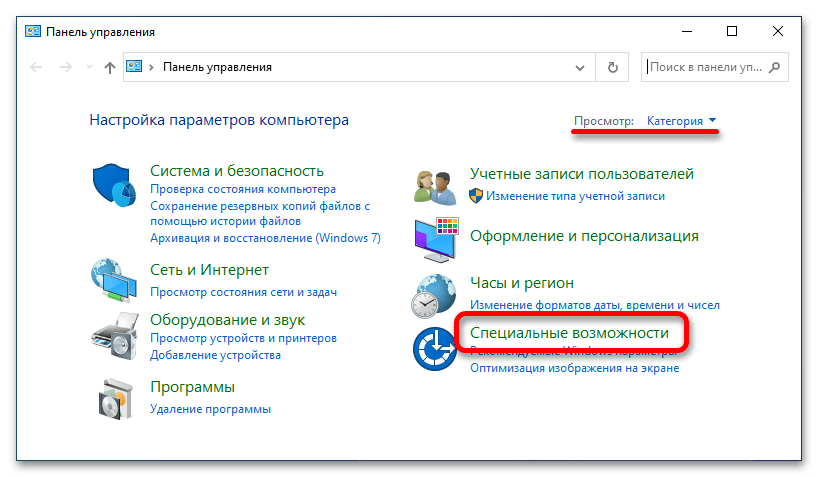
Изменить целевой параметр можно не только в настройках системы, но и через «Панель управления». Если предыдущим способом выполнить поставленную задачу у вас не получилось, воспользуйтесь этой инструкцией:
- Откройте «Панель управления» любым доступным способом. Сделать это можно, например, через системный поиск. Для этого сначала установите курсор в соответствующее поле на панели задач, а затем впишите запрос «Панель управления» и в результатах кликните по одноименному приложению.
Читайте также: Как открыть «Панель управления» в Windows 10
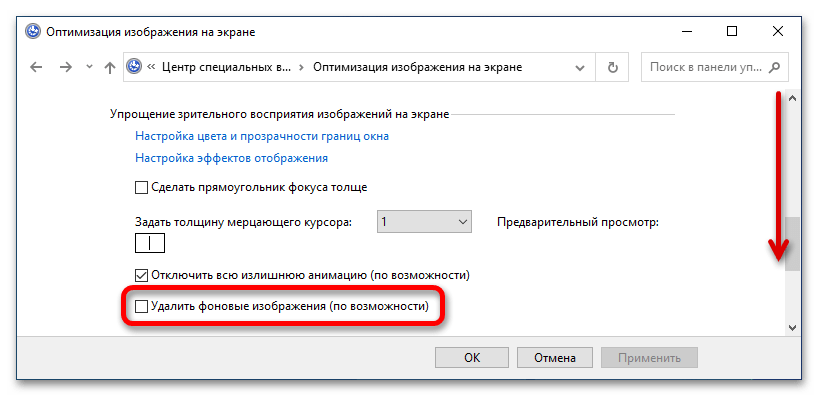
- В появившемся окне проследуйте в раздел «Специальные возможности», щелкнув левой кнопкой мыши по соответствующей ссылке. Если внешний вид «Панели управления» у вас отличается от представленного на изображении ниже, тогда предварительно измените в верхнем правом углу окна параметр «Просмотр» — установите в нем значение «Категория».
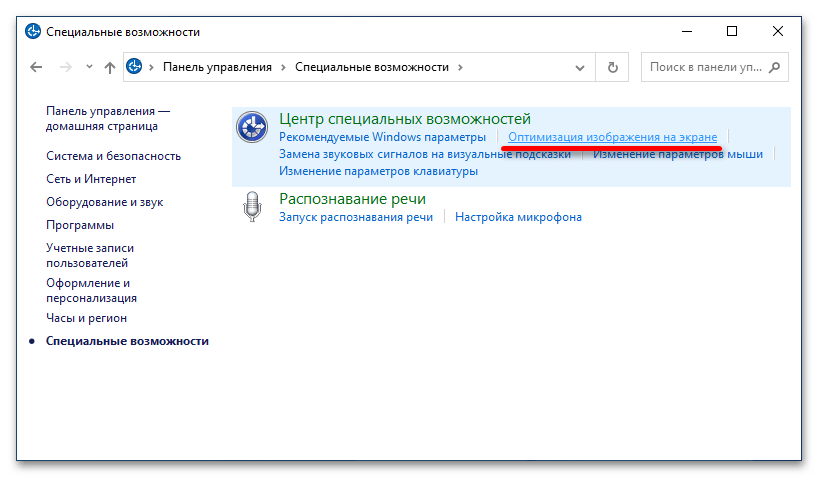
- В новом меню перейдите по ссылке «Оптимизация изображения на экране», которая находится в блоке «Центр специальных возможностей».
- Спуститесь по отобразившейся странице практически в самый низ, после чего убедитесь, что в блоке «Упрощение зрительного восприятия изображений на экране» галочка напротив параметра «Удалить фоновое изображение (по возможности)» отсутствует. Если это не так, тогда уберите ее самостоятельно, воспользовавшись левой клавишей мыши.

В завершение щелкните по кнопке «ОК», чтобы применить внесенные изменения. После этого фон рабочего стола должен автоматически восстановиться. Если этого не произошло, выберите его самостоятельно в настройках персонализации.
Обратите внимание! В разделе настроек «Специальные возможности» есть множество других параметров, которые способны мешать пользовательскому опыту, их рекомендуется отключить. При необходимости обратитесь к тематической статье на нашем сайте, в ней автор поэтапно описывает выполнение этой процедуры.
Подробнее: Отключение специальных возможностей в Windows 10
Наша группа в TelegramПолезные советы и помощь