
Время на прочтение5 мин
Количество просмотров202K
Не секрет, что окончание поддержки Windows Server 2003 все ближе. День Х назначен на 17 июля 2015 года, а значит остается все меньше времени, чтобы успеть перевести свою инфраструктуру на более современные версии операционной системы. На Хабре мы уже делали несколько анонсов об окончании поддержки, на портале Microsoft Virtual Academy опубликован курс по материалам Jump Start, есть перевод статьи о переносе файлового сервера. В этой статье будет рассказано о миграции Active Directory и приведен пошаговый алгоритм, которым поможет вам при реализации переноса.
Перенос Active Directory с Windows Server 2003 на Windows Server 2012 R2 является одной из первоочередных задач, которые необходимо решить в процессе миграции.
На самом деле, перенос Active Directory не несет в себе каких-либо сложностей. Нужно выполнить лишь несколько шагов, о которых будет подробно рассказано далее.
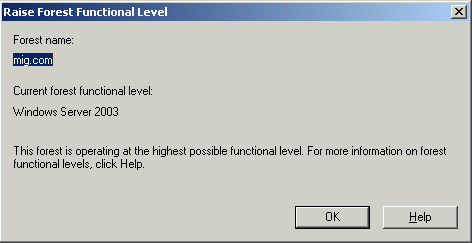
Сначала выполним небольшую настройку на контроллере домена с установленной на нем Windows Server 2003. Обязательно проверьте, что для существующего домена и леса в качестве режима работы (functional level) выбран Windows Server 2003.
Для того, что изменить режим работы домена и леса необходимо запустить оснастку Active Directory Domains and Trust. Для изменения режима работы домена щёлкаем правой кнопкой мыши по домену, для режима работы леса – по Active Directory Domains and Trusts. Выбираем Raise Domain Functional Level и Raise Forest Functional Level соответственно.
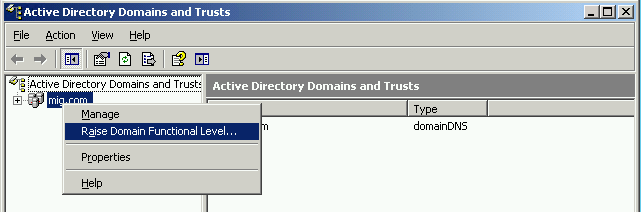
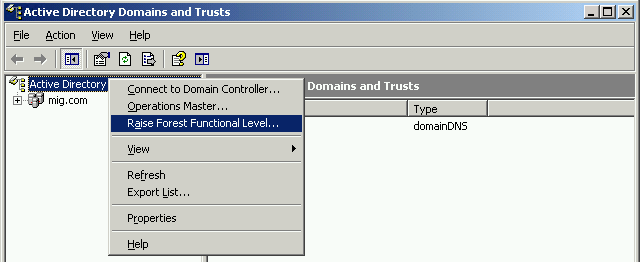
В обоих случаях режим работы должен быть установлен на Windows Server 2003.

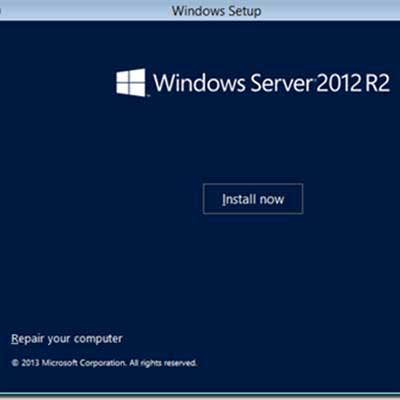
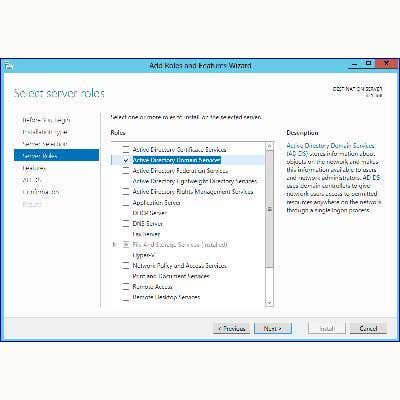
Следующим шагом нам нужно добавить к нашей сети второй контроллер домена под управлением Windows Server 2012 R2. Для этого на сервер с Windows Server 2012 R2 устанавливаем роль Active Directory Domain Services.

После установки добавим новый контроллер домена к существующему домену. Для этого нам нужно будет использовать учетную запись, которая входит в группу Enterprise Admins и обладает соответствующими правами.
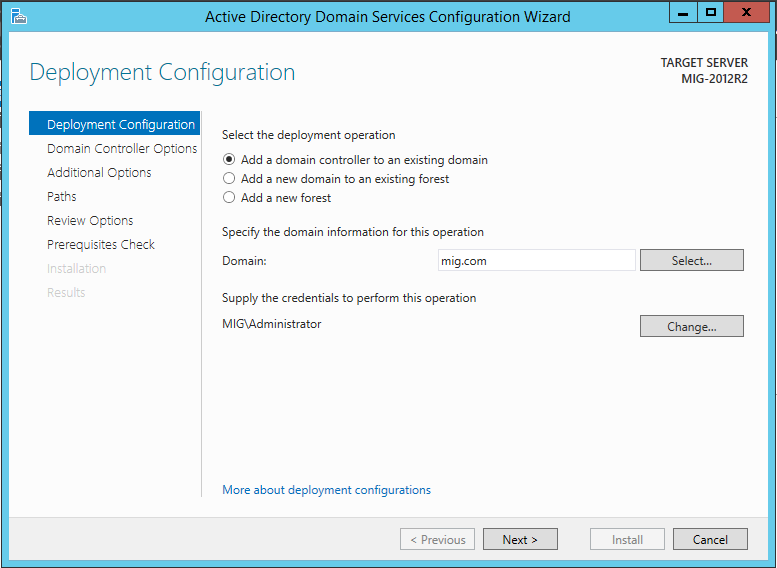
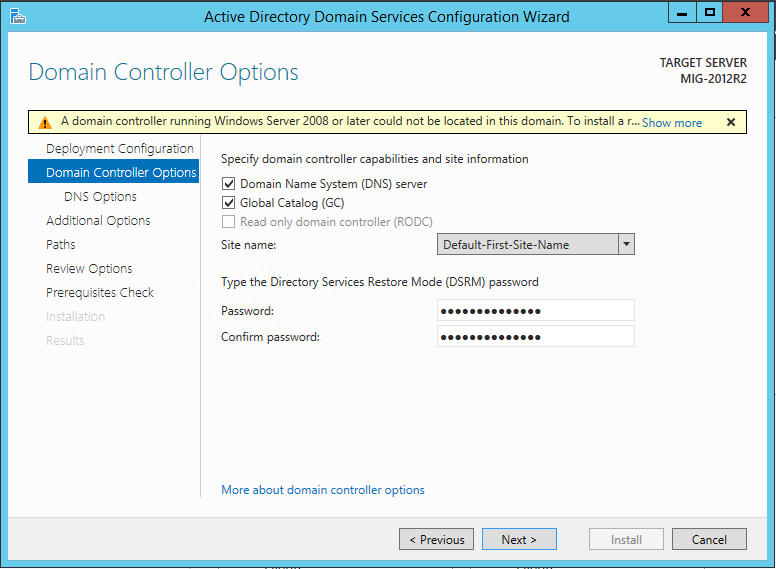
Необходимо указать, будет ли этот сервер выполнять роль DNS сервера и глобального каталога (Global Catalog – GC).
На экране Additional Options нужно указать с какого контроллера домена будет выполнена репликация на существующий. Нужно выбрать контроллер домена под управлением Windows Server 2003.

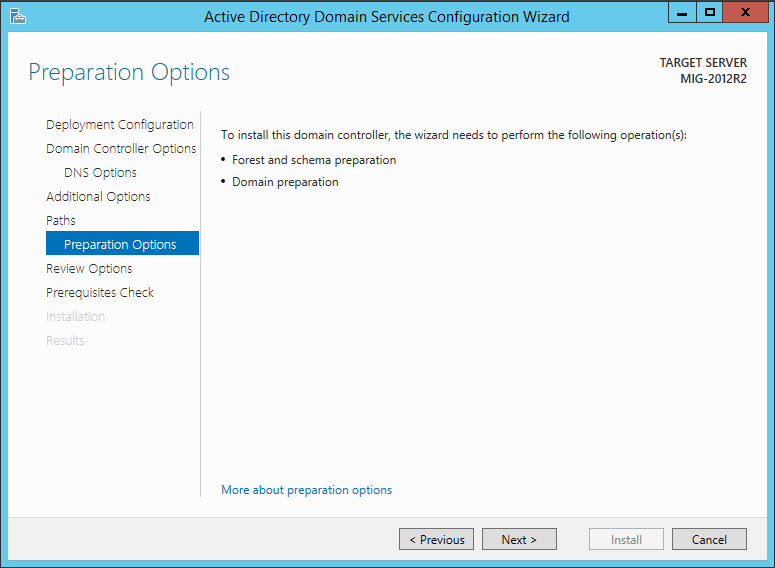
Для установки домена необходимо выполнить подготовку леса, домена и схемы. Если раньше для этого обязательно нужно было запустить команду adprep (причем сделать это надо было до начала конфигурации домена), то теперь эту задачу берет на себя мастер конфигурации ADDS, и подготовка может быть выполнена автоматически.
Далее нужно дождаться завершения установки и перезагрузить компьютер. В итоге, вы получите контроллер домена с установленной на нем Windows Server 2012 R2.
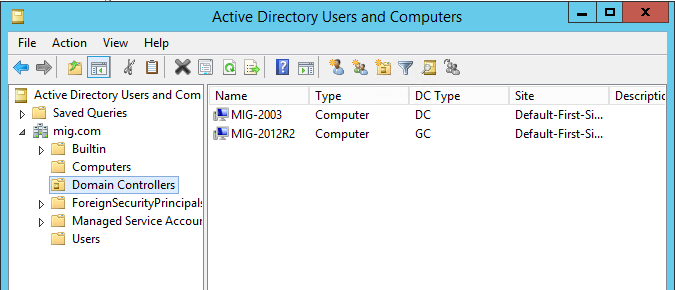
Теперь в оснастке Active Directory Users and Computers мы можем увидеть, что в нашей сети есть два контроллера домена.

После того, как выполнены предварительные шаги, мы можем перейти непосредственно к переносу Active Directory. Выполнять необходимые действия мы будем на контроллере домена под управлением Windows Server 2012 R2 в следующем порядке:
- Перенос роли FSMO (Flexible Single Master Operations)
- Изменение контроллера домена Active Directory
- Изменение Мастера схемы (Schema Master)
- Удаление контроллера домена под управлением Windows Server 2003 из глобального каталога (Global Catalog)
1. Перенос роли FSMO (Flexible Single Master Operations)
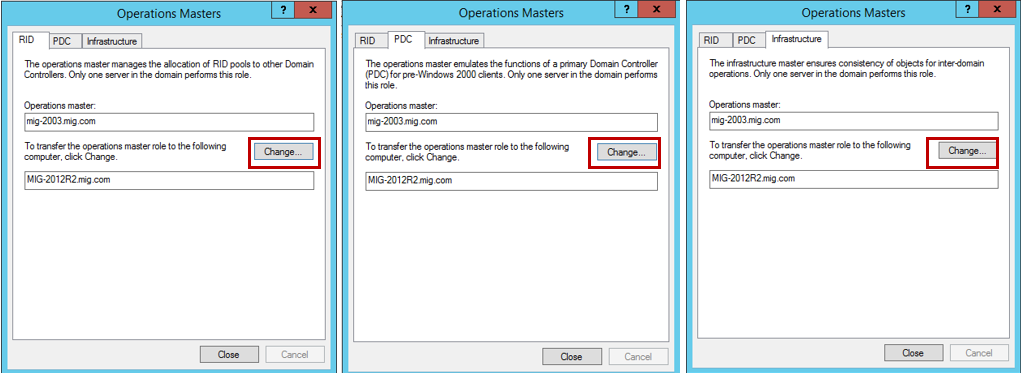
Для того, чтобы перенести роль FSMO, открываем оснастку Active Directory Users and Computers, щёлкаем правой кнопкой мышки по нашему домену и в появившемся подменю выбираем Operations Masters.
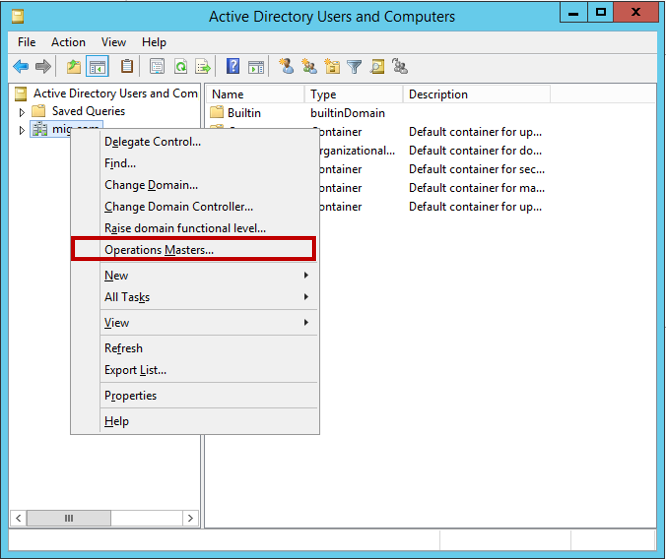
Нам нужно перенести роль хозяина операций. Для этого на каждой вкладке во вновь появившемся окне нажимаем кнопку Change и переносим роль с 2003 сервера на сервер под управлением 2012 R2.
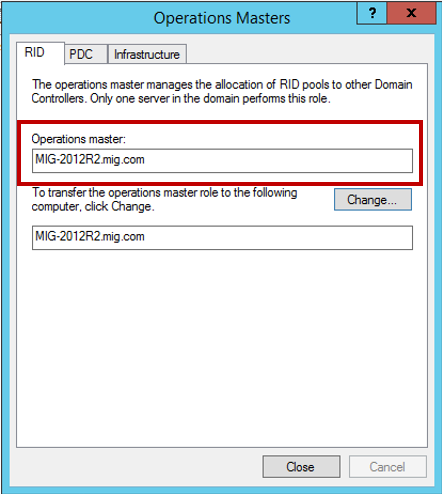
Подтверждаем операцию переноса и дожидаемся ее благополучного завершения. Не забудьте проверить, что в итоге роль хозяина операций теперь находится на сервере под управлением Windows Server 2012 R2:
2. Изменение контроллера домена Active Directory
Теперь переходим к изменению контроллера домена Active Directory. Открываем консоль Active Directory Domains and Trusts, щёлкаем правой кнопкой мышки по лесу и выбираем пункт Change Active Directory Domain Controller.
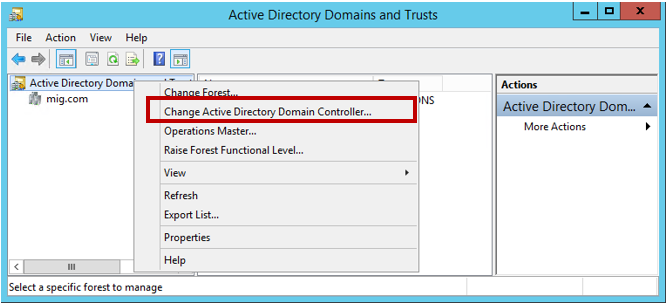
В новом окне выберите пункт This Domain Controller or AD LDS instance и укажите сервер под управлением Windows Server 2012 R2.

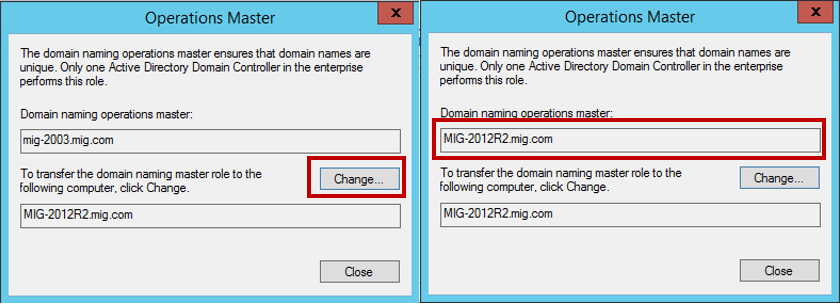
Теперь снова щёлкаем правой кнопкой мышки по лесу и выбираем пункт Operations Master.

Переноси роль хозяина операций именования домена, нажав Change.
3. Изменение Мастера схемы (Schema Master)
Теперь приступаем к изменению мастера схемы (Schema Master). Запустите командную строку с правами Администратора и введите команду regsvr32 schmmgmt.dll
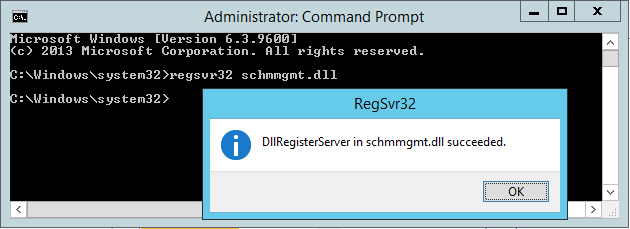
С помощью этой команды происходит первичная регистрация динамической библиотеки DLL, которая является обязательной для оснастки Active Directory Schema.
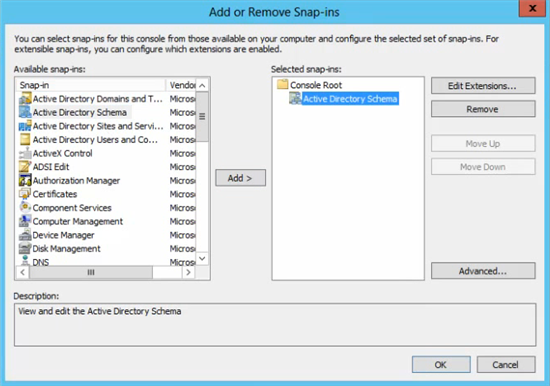
После того, как команда выполнена, можно закрыть командную строку, запустить консоль MMC и добавить оснастку Active Directory Schema (для этого выберите File > Add/Remove Snap—in).
В этой же консоли MMC щёлкаем правой кнопкой мыши по Active Directory Schema и выбираем Change Active Directory Domain Controller. Аналогично действиям, которые мы выполняли в пункте 2, в новом окне выберите пункт This Domain Controller or AD LDS instance и укажите сервер под управлением Windows Server 2012 R2 и нажмите ОК. Появится предупреждение о том, что оснастка схемы Active Directory не подключена. Нажмите ОК для продолжения.
Теперь снова щёлкаем правой кнопкой мышки по лесу и выбираем пункт Operations Master. Для переноса роли хозяина схемы в новом окне нажмите Change.
Теперь можно закрыть MMC консоль, открыть оснастку Active Directory Users and Computers и убедиться, что данные успешно реплицированы на ваш новый сервер под управлением Windows Server 2012 R2. Имейте ввиду, что процесс репликации может занять некоторое время (все зависит от количества объектов Active Directory, которые нужно реплицировать).
4. Удаление контроллера домена под управление Windows Server 2003 из глобального каталога (Global Catalog)
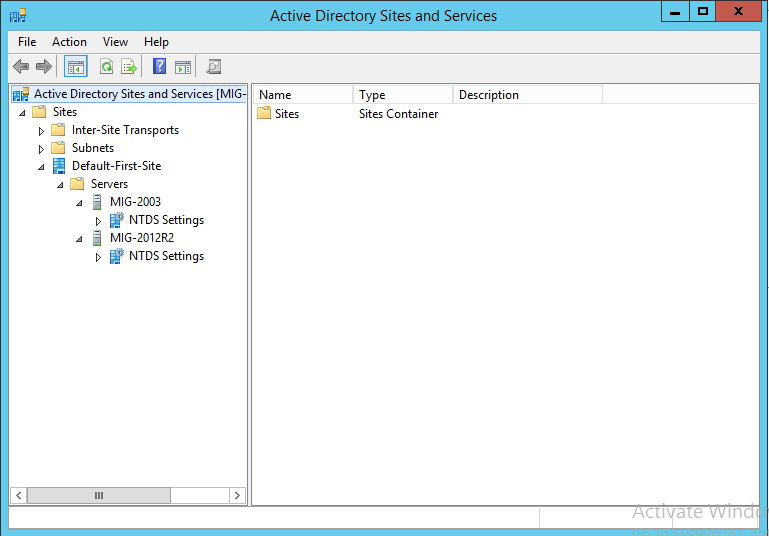
Осталось удалить контроллер домена под управлением Windows Server 2003 из глобального каталога. Для этого открываем Active Directory Sites and Services, разворачивает папку Sites, затем Default-First-Site-Name, затем Servers и, наконец, разворачиваем оба сервера.
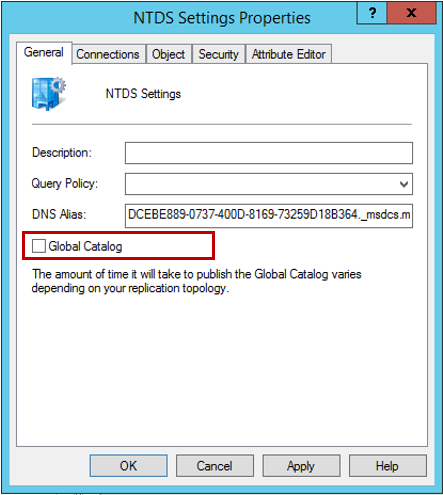
Щёлкните правой кнопкой мышки по NTDS Settings для вашего старого сервера под управление Windows Server 2003, выберите Properties. Во вновь появившемся окне уберите галочку с пункта Global Catalog и нажмите ОК.
В Active Directory Users and Computers контроллер домена на Windows Server 2003 теперь не является глобальным каталогом.
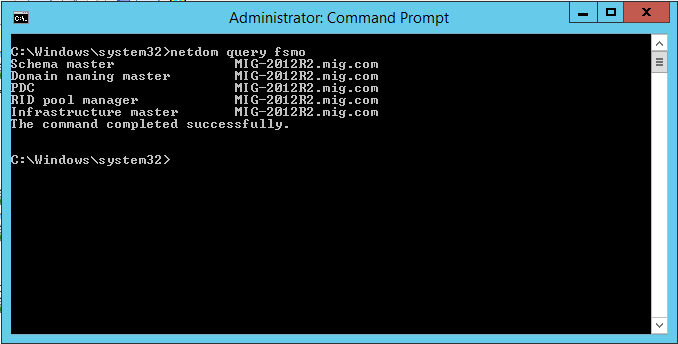
Осталось проверить, что теперь роль FSMO запущена на Windows Server 2012 R2. Для этого в командной строке, открытой с правами Администратора запускаем команду netdom query fsmo
На этом миграция Active Directory завершена. На компьютере под управлением Windows Server 2003 запустите dcpromo (кстати, в Windows Server 2012 R2 dcpromo нет) для того, чтобы понизить роль компьютера с контроллера домена. Если после этого посмотреть на консоль Active Directory Users and Computers, вы увидите, что остался только один контроллер домена – под управлением Windows Server 2012 R2.

Надеюсь, что эта статья будем вам полезной!
Полезные ссылки
- Попробовать Azure бесплатно на 30 дней!
- Изучить курсы виртуальной академии Microsoft
- Основы компьютерной безопасности
- Основы построения доменной сети. Часть 2
- Модернизация инфраструктуры организации с помощью Windows Server 2012 R2
- Переход с VMware на Hyper-V
- Основы построения доменной сети
- Бизнес и облако: лучшие практики решений
- Скачать пробную версию Windows Server 2012 R2
- Загрузить бесплатную или пробную Visual Studio
So as the life of Windows 2003 is finally coming to an end, I am seeing a big push for domain upgrades and the pitfalls that come with it. So I created a walkthrough to help that process go smoother and to help avoid the common issues. I included DHCP in this posting due to the many servers I see that are Domain Controllers and DHCP servers. If you are getting DHCP from another device like another server or router, the steps outlined are still applicable as far as changing the DNS server to point to the new DC before you decommission the old DC.
My environment at the start of the migration:
DC01.matrix.local
OS: Windows 2003 x86 SP1
IP: 192.168.90.1
Subnet: 255.255.255.0
GW: None – completely isolated environment
DNS: 192.168.90.1
Services for clients – DHCP, DNS, Active Directory
DHCP looks like:

Note: Excluded the range 192.168.90.1 – 192.168.90.50 as this is how I would normally deploy DHCP – Statically needed IP Addresses would be within the range that was excluded. Examples would be Routers, Servers and Printers.
DNS zones look like this:

Really everything at this point is default with the exception that I added the reverse zone. Matrix.local and the reverse zone replicated to all DNS servers in domain and the _msdcs zone is replicated to all dns servers in forest.
Client01.matrix.local
OS: Windows 8.1 (I selected this one as client machines tend to get the new stuff especially now with the BYOD or Bring Your Own Device movement)
IP: Dynamically assigned by DC01
Subnet: Dynamically assigned by DC01
GW: None – completely Isolated environment
Client01 is joined to the domain and is able to authenticate, access dns, and gets an IP – the user that is authenticated is Mr. Testy Tester or Matrix\TTester
DC02.matrix.local
OS: Windows 2012R2
IP: Dynamically assigned by DC01
Subnet: Dynamically assigned by DC01
GW: None – completely isolated environment
DNS: 192.168.90.1
Okay, let’s review some configuration items to get us started.
Active Directory:
It’s always best to review the health of active directory to make sure there is no gotchas to sneak up on you. If not installed and you have the install cd for 2003 install the support tools from CD:\Support\Tools\SUPTools.msi or downloaded from http://www.microsoft.com/en-us/download/details.aspx?id=15326.
- From a command prompt run netdom query fsmo as below:

This lets you know where the fsmo’s are located – If any of these has an error where it is unable to locate the role holder, stop because you will need to probably need to seize the role and perform a metadata cleanup.
Seize FSMO Role – http://support.microsoft.com/kb/255504/en-us - Run is a “net share”
These two shares are where your group policies are stored and if they are missing your DC will not act as a domain controller and will not authenticate users.
- Run a repadmin /showreps – if you currently only have 1 dc I would expect the output to look like:
-
Check the Eventlogs for errors relating to Active Directory, File Replication Service, Netlogon, Time
- Directory Service
- System
- File Replication Service


If everything appears normal then we are ready to introduce our 2012 R2 server into the environment. If there are errors stop now and investigate!
Setup the new 2012 R2 Server
- Statically set the IP Address of the server
My IP Address will be 192.168.90.2 / Subnet will be 255.255.255.0 / No Gateway/ DNS 192.168.90.1
Note:
I don’t have a gateway because my test environment does not have internet access, your environment likely does so you will likely have a gateway. - Rename the server and join the domain with your 2012R2 server
- Once you click OK, you will be prompted for credentials – put the credentials of your domain admin account in and press ok.
If you get a message like:Once the server reboots, sign in as the domain admin account
Note: If you are using the default Administrator account, sign into Windows with Domain\Administrator as Windows by default will change the domain to local when it detects a local account with the same name. - Once Server Manager comes up, Click Manage, Add Roles and Features
- The Add Roles and Features Wizard will come up – Click Next
- Make sure Role-based or feature-based installation is selected and click next.
- Verify your sever is the selected server then click next
- Select Active Directory Domain Services, on the popup click Add Features, then Click next
- Click next on the features page
- Click Next on the AD DS page
- Then Click Install


Promote Server to a Domain Controller
- Once that completes Click Close, You will be back on the Server Manager Screen – Click the Flag on the Top Menu and select the link to promote the server to a domain controller
- This will start the process to make this a domain controller
Make sure the Domain information, Add a domain controller to an existing domain, and the current domain administrator is correct.
- This would be a good time to make sure that the user doing the promotion is a member of the Enterprise Admins and Schema Admins group on the 2003 domain controller.
Being a member of these 2 groups will allow you to promote the DC into the domain and perform the necessary schema updates needed for 2012 R2.
- Clicking next on the Active Directory Domain Services Configuration Wizard I received an error
Fixing this issue is fairly simple, we just need to raise the Domain and Forest Functional to 2003
- Open Domains and Trusts on the 2003 DC
Right click on the Active Directory Domains and Trusts, Select Raise Forest Functional Level
If you get a message like:
You will need to do the domain functional level first.
- Open Active Directory Users and Computers
Right click on the domain in the left pain and select Raise Domain Functional Level
Select Windows Server 2003 from the dropdown and click Raise
- Once that completes, and if you have more than one domain controller, replication completes. Go back to Domains and Trusts
Right click and raise Forest Functional Level
Again if there are more than one domain controller it may take a minute to replicate, if not than this change is really quick.
- We are now ready to try the promotion process again, Click Next on the deployment configuration
Note: We get a warning stating that there are no 2008 domain controllers in the domain so this server will be unable to become a read-only domain controller. This is just a warning and nothing to be concerned about.
- Type in the Directory Services Restore Mode password and click next
- Under DNS option there is another warning about DNS delegation, ignore that and click next
- Additional Options: Click Next
- Under Paths, Modify any paths or accept the defaults and click Next
- Under Preparation Options click Next
- Under Review Options, Click Next
- After the Prerequisite Check Runs Click Install
- After install is clicked the forest and domain will be prepped for 2012. Once the install is completed and the server reboots and will then come up as a domain controller in your domain.


Verify Active Directory on the New Server
- One of the first things to validate is that the Netlogon and Sysvol shares
Run net share from PowerShell
- Run repadmin /showreps – notice we get a lot more information this time
- Lets also check that on the 2003 server
- Lets check DNS on the new 2012R2 server
What you want to look at here is to make sure that both DC’s have SRV records inside dns. SRV records is how clients locate available DC’s in which to use for authentication. You can also validate that the same records appear on the 2003 server.
- Check the event logs
- Open Active Directory Users and computers, create a test user validate that it replicates from 2012 to 2003, then rinse and repeat from 2003 to 2012
- Open Group Policy Management console and validate all group policies that are expected to be there are there


Decommission 2003 Server
-
Transfer the FSMO roles to new server
- PDC – http://technet.microsoft.com/en-us/library/cc739670(v=WS.10).aspx
- RID – http://technet.microsoft.com/en-us/library/cc781063(v=ws.10).aspx
- Infrastructure – http://technet.microsoft.com/en-us/library/cc782485(v=ws.10).aspx
- Domain Naming Master – http://technet.microsoft.com/en-us/library/cc738685(v=ws.10).aspx
- Schema – http://technet.microsoft.com/en-us/library/cc759254(v=ws.10).aspx
-
Transfer DHCP services to the new server
- Install the feature on the 2012R2 server
- In Server Manager, Click Manage, Add Roles and Features
- Role-based or Feature-based – Click Next
- Validate 2012 is selected Click Next
- Select DHCP from the list, Click Add features from the Pop-up, Click next
- Click Next
- Click Next
- Click Install
-
Configure the scope for DHCP (I deliberately broke this up into three distinct steps, Setting up DHCP on the new server, deactivating the old server and Activating the new server – this is to allow the cutover to be planned according to a migration schedule. In an actual migration I would lower the lease times to something really short 2 days to allow clients to renew their leases from the new server without administrative intervention)
- Click Complete DHCP configuration
- Click Next
- Select Skip AD Authorization (We already have an Authorized DHCP server)
- Select Commit
- Select Tools, DHCP
- In DHCP MMC, Drill down to IPv4, Right Click and select New Scope
- Under New Scope Wizard select Next
- Name your new Scope and click Next
- Set your Range up and Click Next
- Set up your Exclusion Range
- Setup your Lease Duration Time
- Select Yes to configure the scope Options, Select Next
- Set your gateway address
- On Domain Name and DNS Servers, Remove any old DNS servers so that only the new 2012 Server is listed
- Leave Wins Blank, Click Next
- On Activate Scope, Select No, I will activate this scope later, Then Select Next
- Click Finish
- Click Complete DHCP configuration
-
Deactivate the 2003 DHCP Server
- Right Click the Scope and Select Deactivate – I am deactivating the scope – in case the server is reathorized later – the server will not automatically start handing out IP’s
- Right Click the Server and Unauthorize
- Right Click the Scope and Select Deactivate – I am deactivating the scope – in case the server is reathorized later – the server will not automatically start handing out IP’s
-
Turn on DHCP on the new 2012R2 Server
- In the DHCP MMC, Right Click the Server Name and select Authorize
- Right Click the Scope and Select Activate
- DHCP Console should appear similiarly to:
- In the DHCP MMC, Right Click the Server Name and select Authorize
-
Validate clients receive DHCP Address from the new server
- Check current settings, notice that the lease from the old server is still good so this client has not yet requested a renewal on the lease, this is important because the DNS server for the client has changed – if we were to demote the 2003 server at this time the clients would have issues resolving and authenticating
- On the client run IPConfig /Release
- On the Client run IPconfig /renew
- Then Validate that the 2012 R2 server handed the clients IP Address
- Check current settings, notice that the lease from the old server is still good so this client has not yet requested a renewal on the lease, this is important because the DNS server for the client has changed – if we were to demote the 2003 server at this time the clients would have issues resolving and authenticating
- Once all FSMO’s, DHCP to all clients have been updated shut down the old server for a few days to make sure nothing was missed and that clients are able to authenticate to Active Directory, Get to the internet, etc
-
Last step is to demote the 2003 server
- Run DCPromo on 2003, Click Next
- Do not select this is the last domain controller in the domain, Click Next
- Type a new Local Administrator Password, Click Next
- Click Next on the Summary Screen
- Active Directory will then be removed, and the server will be rebooted
- Run DCPromo on 2003, Click Next


Migration To Server 2012 Tips
Customers that haven’t upgraded to Windows Server 2012 are either living in denial or under a rock. Those that don’t migrate off Server 2003 face a range of consequences from security issues, no longer meeting legal and regulatory requirements, and encountering possible application failure. Microsoft stops supporting Server 2003 July 14.
Before you take the upgrade plunge, it’s important to know what you’re up against. Upgrading from Server 2003, on paper, sounds like a deceptively simple three-step process that includes hardware discovery, assessing your software and network needs, and full-on migration. Sounds easy enough. But it’s not.
Complicating matters are hardware and application compatibility. What tools should I use? And whom do I turn to for help when an Active Directory bogey can’t join a company’s domain?
Where to turn, and where do you start? Let’s dive in with this basic overview of how to upgrade to Windows Server 2012 from 2003.

Avoiding Application Complications With Virtualization
Best practices assume that you will have gone through a full inventory of hardware and software. That said, it’s important to keep in mind virtualizing is an easy way to reduce the need for physical hardware. Once the hardware and software inventory is complete, maybe Software-as-a-Service is the right fit for a customer.
Migrating from Windows Server 2003 to 2012 can be a healthy kick in the pants to solution provider revenue and can provide customers with a fresh approach to solving legacy business problems.

Ounce Of Active Directory Prevention Is Worth A Pound Of Cure
Care and attention to preparing the migration of the Active Directory is a requisite step for moving to Server 2012. A common hiccup is avoiding the migration out-of-date accounts and making sure valid ones aren’t given a premature heave-ho.
What you’ll quickly learn is the devil is in the details when determining if an account is stale or active, so post-migration, you’re not faced with customers whose computers are no longer able to join a company’s domain. Also, any dead computers with leftover Active Directory records are likely to create problems you want to head off now before they happen down the road.
File Server Migration
The one-two punch in migration doesn’t stop with Active Directory. That’s where it starts. File and storage services — including data, shared folders, and operating system settings — are also key components to the server migration when it comes to moving from the source server to a destination server running Windows Server 2012 R2.
Before beginning the file and storage service migration, install Windows 2012 on the destination server and make sure it is in sync with the source server. Then make sure identical File Services role services has been installed on the source and destination server. Next, install Windows Server Migration Tools on the destination server, follow the instructions, but not before opening the UDP port 7000 and being certain that it is not in use by other applications.
Application Aggravations
Migrating applications from Windows Server 2003 to 2012 is a must. Many applications can be updated without a hitch, while other customers have mission-critical applications that are unsupported by Windows Server 2012. Those unsupported apps can create security and reliability issues when thrown into an unsupported environment.
Microsoft says itself that «applications must be upgraded to the latest version. Use technology to counter incompatibilities Windows Server 2003 to Windows Server 2012 R2.» Microsoft suggests using a different app or SaaS offering to achieve the same business result with little impact to your business workflow.
Customers with mission-critical applications that are unsupported by Windows Server 2012 have options. Windows Server 2012 R2 offers a compatibility mode to run such applications, but it’s not foolproof. The other option is reaching out to third-party app makers, such as AppZero that will take applications, package them up, and make them a virtualized instance that can run on Windows Server 2012.
Migrating Terminal Service Licenses and Resources
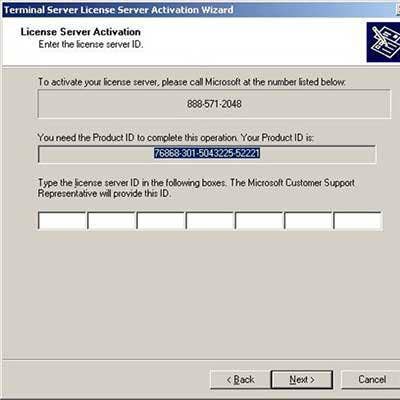
After migrating apps and storage there is also that nagging issue of transferring Windows Server 2003 Terminal Services licenses from the existing server to a Server 2012. To do so is a three-step process.
First, activate the new license server. Next, deactivate the old server. Lastly, move all the licenses from the old server to the new server. To do this, you will need to contact Microsoft Clearinghouse over the telephone. Be prepared with the paperwork for the original TS licenses, as this data needs to be provided to clearinghouse personnel. If the original paperwork is lost, then you need to contact your Microsoft TAM (Technical Account Manager) to obtain copies.

Testing Boxes
Testing servers before they go back online is an essential last step when it comes to quality assurance and guaranteeing business continuity. Nearly all OEMs have their own tools. Dell has Dell Diagnostics that Runs off a USB stick or DVD. JAM Software has a tool called HeavyLoad that stress-tests new servers. Check with an OEM if you’re refurbishing existing hardware and need testing software.

Backup Plans
As with all great migration plans, so are hatched the contingency plans. Create a rollback plan before your Server 2012 implementations go live, reduce the risk of disruption of end users. Microsoft suggests pulling the trigger on your rollback plan if you run into these traps:
— Users cannot log on to their accounts after migration.
— Users cannot access resources after migration.
— User migration is incomplete; for example, passwords did not migrate.
— User migration was successful, but user workstation migration or local profile translation failed.

С 14 июля 2015 года корпорация Microsoft заканчивает поддержку операционной системы Windows Server 2003 и Windows Server 2003 R2. До этого момента Microsoft продолжает выпускать только критически важные обновления, но после указанной даты обновления и исправления будут более недоступны, а любой центр обработки данных, работающий на этих ОС после указанной даты, не будет соответствовать требованиям безопасности и государственного регулирования.
Окончание поддержки и последние дни операционной системы Windows Server 2003 означают, что вам необходимо убедиться, что для приложений и нагрузок, обслуживающих бизнес в рамках платформы Windows Server 2003, существует план миграции на Windows Server 2012 R2 или Microsoft Azure.
Вам необходимо осуществить:
- Сбор данных: выявление нагрузок о серверах Windows Server 2003, ролях сервера, приложениях
- Анализ: необходимо тщательно рассмотреть все задачи и классифицировать их по важности, сложности и риску
- Выбор пути миграции: определение целевых систем миграции, например, Windows Server 2012 R2 или Office 365
- Миграцию: приступите к миграции, используя средства и службы корпорации Microsoft и ВЦ «ИнфоСофт»
Вопросы по окончанию поддержки и переходу на Windows Server 2012 вы можете задать нашим специалистам