
How to Upgrade Domain Controller running Windows Server 2003 to Windows Server 2016 Domain Controller?
Despite Windows Server 2003 being out of Microsoft support since July 2015, many organizations still rely on this out-of-date operating system for business operations, and many more still use it as part of their primary domain controller infrastructure. This is a major security concern, and it is essential to upgrade the domain controller as Microsoft is no longer releasing any security updates or Windows Updates for Windows Server 2003.
This detailed guide explains the step-by-step process of upgrading Active Directory from 2003 to 2016. Before you start, please ensure you have updated Windows Server 2003 to the very latest available through Windows Update.
Prerequisites:
- Update Windows Server 2003 with the latest patches available through Windows Update
- A fresh licensed copy of Windows Server 2016.
Step 1 – Update Windows Server 2003
Objective: Ensure that Windows Server 2003 is updated to the latest patch level to maintain security and compatibility during the upgrade process.
Preparing for the Update:
- Backup: Before beginning, update Windows Server 2003 with the latest patches available through Windows Update.
- Check Disk Space: Ensure that there’s sufficient disk space for the updates. A minimum of 1GB free space is recommended.
Choosing the Right Browser:
- Internet Explorer Issues: Older versions of Internet Explorer on Windows Server 2003 can have compatibility issues with ActiveX Controls, which are essential for Windows Update.
- Recommended Browsers: Use updated versions of Firefox or Chrome for a smoother experience.
Accessing Windows Update:
- Click on the Start button.
- Navigate to Programs.
- Go to All Programs.
- Select Windows Update.
Installing Updates:
- Once on the Windows Update page, click on Express Install to install high-priority updates. Alternatively, you can choose Custom Install to select specific updates.
- Review the list of available updates. Ensure that all critical updates and service packs are selected.
- Click Install Updates. The system might prompt you to accept terms and conditions. Read and accept them to proceed.
- Wait for the updates to download and install. This might take a while depending on the number and size of updates.
- Once updates are installed, you might be prompted to restart your server. Ensure that all your applications are saved, and then proceed with the restart.
Post-Update Checks:
- After the restart, log back into the server.
- Navigate back to the Windows Update page to check if there are any more updates available. Sometimes, certain updates become available only after installing prerequisite updates.
- Ensure that all updates are installed and that the server is running smoothly.
Step 2 – Understanding the Upgrade Path
Direct Upgrade Limitations:
- Windows Server 2003 cannot be directly upgraded to Windows Server 2016. If you attempt this, you’ll encounter a setup error. This limitation is due to significant architectural and functional differences between the two server versions.
Indirect Upgrade Path:
- While there’s a theoretical path to upgrade from Windows Server 2003 to Windows Server 2008, and then from 2008 to 2016, it comes with challenges:
- This path is only viable if you’re running a 64-bit version of Windows Server 2003.
- The process involves multiple steps and can be prone to errors, making it a less-than-ideal solution. It’s also time-consuming and may introduce unexpected issues due to the age and differences between the server versions.
- It’s essential to ensure that all applications and services are compatible with each intermediate server version during the upgrade.
32-bit Version Limitations:
- If you’re operating on a 32-bit version of Windows Server 2003, a direct or indirect upgrade to Windows Server 2016 is not feasible. This is because Windows Server 2016 doesn’t support 32-bit architectures.
Checking Your Server Version:
- To determine whether you’re running a 32-bit or 64-bit version of Windows Server 2003:
- Click on the “Start” button.
- Select “Run” from the menu.
- In the “Run” dialog box, type “WinVer” and press Enter.
- A window will pop up displaying the version and architecture of your Windows Server. Look for “x64 Edition” for 64-bit or “x86 Edition” for 32-bit.
Recommendation: Given the complexities and potential pitfalls of the upgrade process, it’s often more efficient and safer to set up a fresh installation of Windows Server 2016 on a new machine and then migrate roles, features, and data from the old server.
Step 3 – Preparing for the Upgrade
AIM: To ensure a smooth transition from Windows Server 2003 to Windows Server 2016, preparing adequately is crucial. This step focuses on the prerequisites and initial setup required for the upgrade.
Choosing the Upgrade Path:
Given the complexities and potential issues with direct upgrades, the most reliable method is to set up a fresh installation of Windows Server 2016. Once this is done, you can migrate the domain controller services from Windows Server 2003 to the new 2016 server.
Understanding the Prerequisites:
Before initiating the upgrade, it’s essential to meet specific criteria to ensure the process’s success. These prerequisites are:
Domain Functional Level:
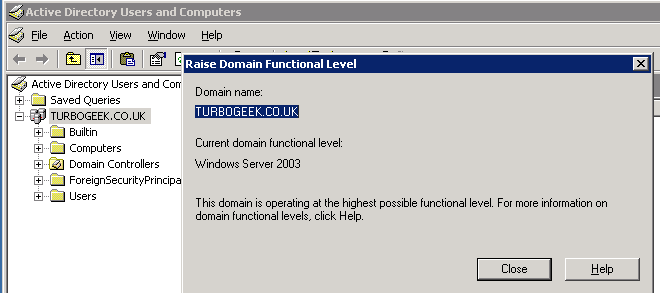
- Your Windows Server 2003 Domain Controller should be operating at the “Windows Server 2003” Domain Functional Level.
- If your server is currently on “Windows Server 2000 Mode”, upgrading to the “Windows Server 2003” Domain Functional Level is imperative. This ensures compatibility and smooth migration to the 2016 server.To check and upgrade your Domain Functional Level:
- Open the ‘Active Directory Users and Computers’ tool on your Windows Server 2003 machine.
- Right-click on the domain root name and select “Raise domain functional level”.
- If it’s not already set to “Windows Server 2003”, choose this option and apply the change.
Windows Server 2016 Setup:
- A dedicated server machine is required for the new installation.
- This server should have a fresh, licensed copy of Windows Server 2016 installed. Ensure that the server meets the minimum hardware requirements for Windows Server 2016, including RAM, processor speed, and storage capacity.
- It’s also recommended to install all critical updates for Windows Server 2016 before proceeding with the migration.
Backup and Documentation:
Before making any significant changes, it’s a best practice to:
- Take a complete backup of your Windows Server 2003, including all Active Directory data. This ensures you have a fallback option in case of unforeseen issues.
- Document your current server configuration, network settings, and any custom configurations. This will be useful for reference during the migration process.
Step 4 – Check the Domain Functional Level on Windows Server 2003
Objective: Before migrating to Windows Server 2016, ensuring that your current Windows Server 2003 is operating at the correct Domain Functional Level (DFL) is crucial. This step will guide you through the process of checking and, if necessary, adjusting the DFL.
Access Active Directory Users and Computers:
- Click on the
Startbutton. - Navigate to
Administrative Tools. - Select
Active Directory Users and Computers.
Check the Domain Functional Level:
- In the left pane, locate your domain root name (e.g.,
turbogeek.co.uk). - Right-click on the domain root name.
- From the context menu, select
Properties. - In the properties window, navigate to the
Generaltab. Here, you can view the current Domain Functional Level.
Raise the Domain Functional Level (if necessary):
- If the displayed Domain Functional Level is not “Windows Server 2003”:
- Right-click on the domain root name again.
- Select
Raise domain functional level. - In the pop-up window, choose “Windows Server 2003” from the available options.
- Click
OKand thenApply.
Note: If you cannot raise the DFL, ensure that all domain controllers are running at least Windows Server 2003 and that no domain controllers are running older versions like Windows 2000.
Prepare for Migration to Windows Server 2016:
- Remember, when you eventually migrate to Windows Server 2016, the Forest Functional Level will also need to be updated to “Windows Server 2016”.
- Before initiating the migration, ensure you have a machine with a basic installation of Windows Server 2016 ready. This machine will be crucial for the migration process.
Step 5 – Building the Windows Server 2016 Domain Controller
Prerequisites:
- Ensure you have a Windows Server 2016 machine already set up.
Setting up Active Directory Domain Services (ADDS):
- Open Server Manager.
- Navigate to Add Roles & Features.
- Select and install the Active Directory Domain Services role from the list of roles.
- Once the ADDS role is successfully installed, return to Server Manager.
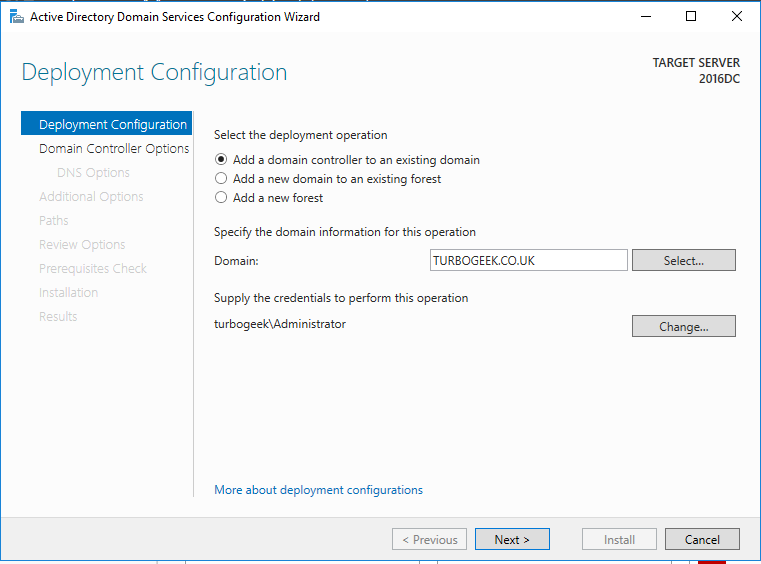
- Choose the option to Promote this server to a domain controller.
Configuring the Domain Controller:
- Select Add a domain controller to an existing domain on the deployment configuration page.
- Enter the name of your existing domain.
- Provide the Domain Admin credentials and click Next.
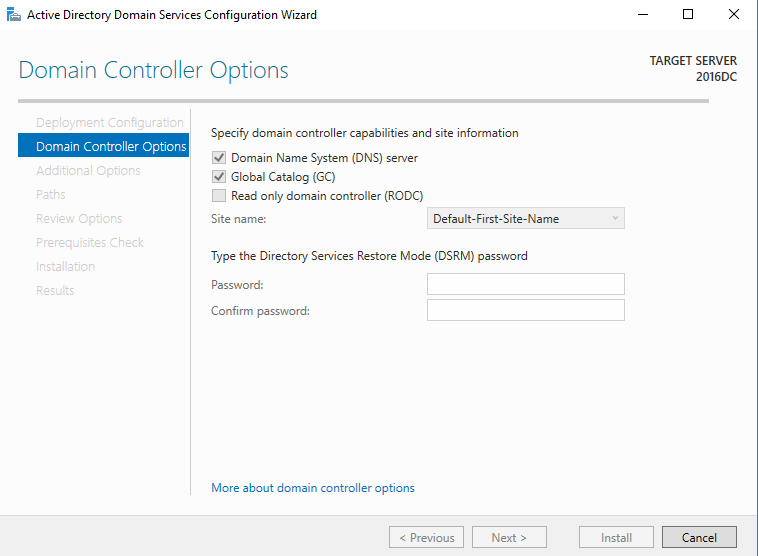
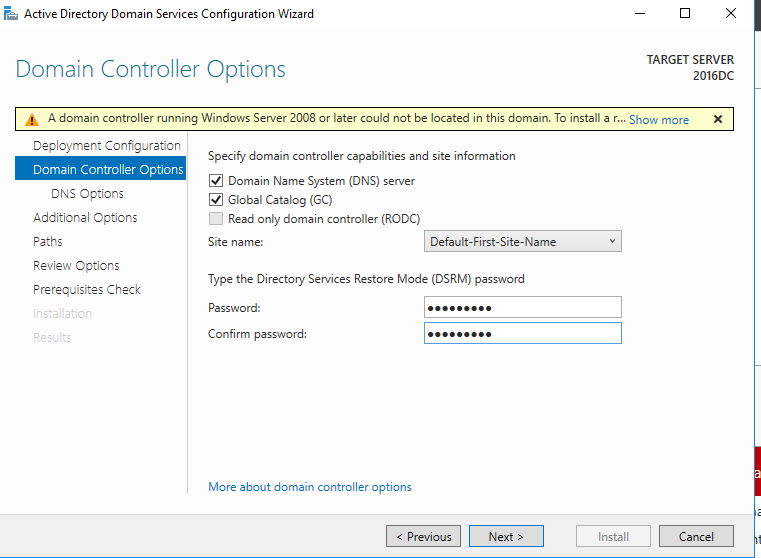
Domain Controller Options:
- On the Domain Controller Options page, ensure you select both Domain Name System (DNS) and Global Catalog.
- Click Next.
- You may encounter a warning stating, “A Domain controller running Windows Server 2008 or later could not be located on this domain”. This warning can be safely ignored for now.
- Set a Directory Services Restore Mode (DSRM) password. This password is crucial for restoring the domain controller in case of failures. Ensure you remember or securely store this password.
- Click Next.
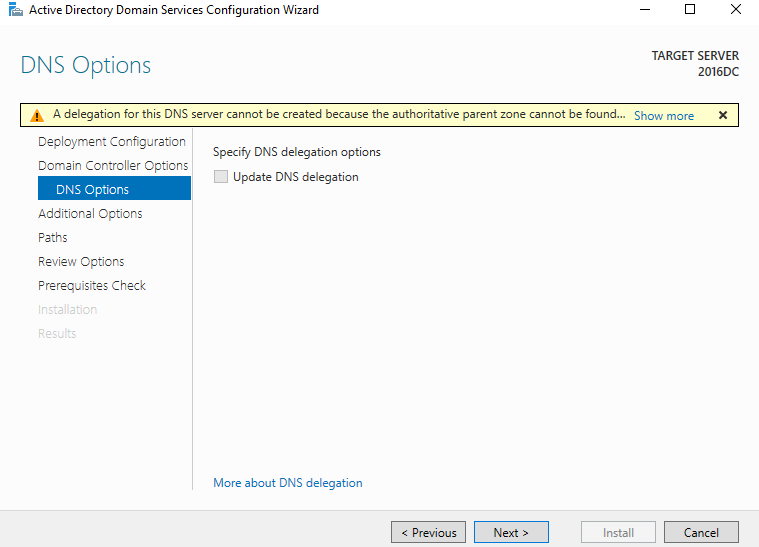
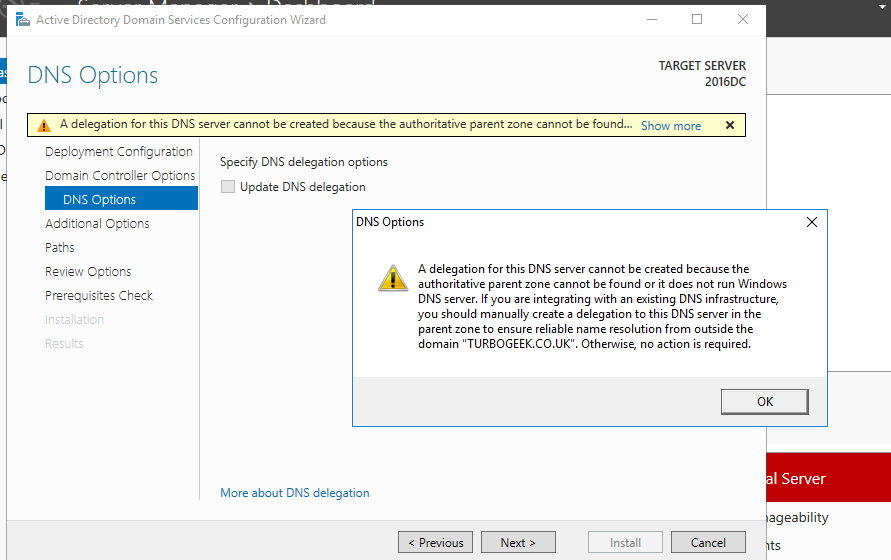
Addressing DNS Warnings:
- You might receive a warning on the DNS Options page: “A delegation for this DNS server cannot be created because the authoritative parent zone cannot be found”. This indicates a potential issue with DNS delegation.
- If you attempt to proceed by clicking Next, you might encounter an error related to the DNS authoritative parent zone.
- To address this, you’ll need to ensure proper DNS configurations are in place, which might involve creating a new DNS delegation or ensuring the DNS server settings are correctly configured.
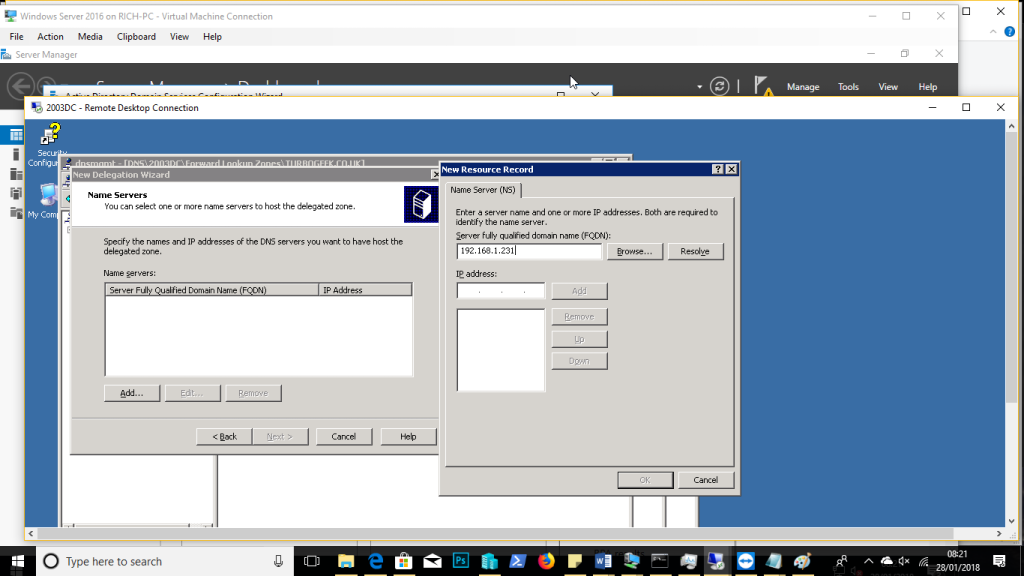
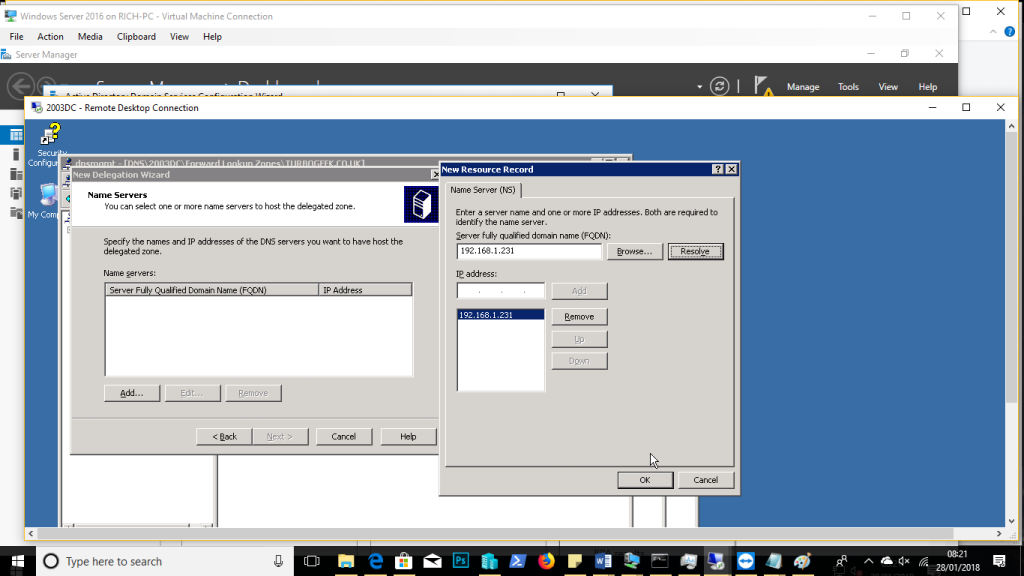
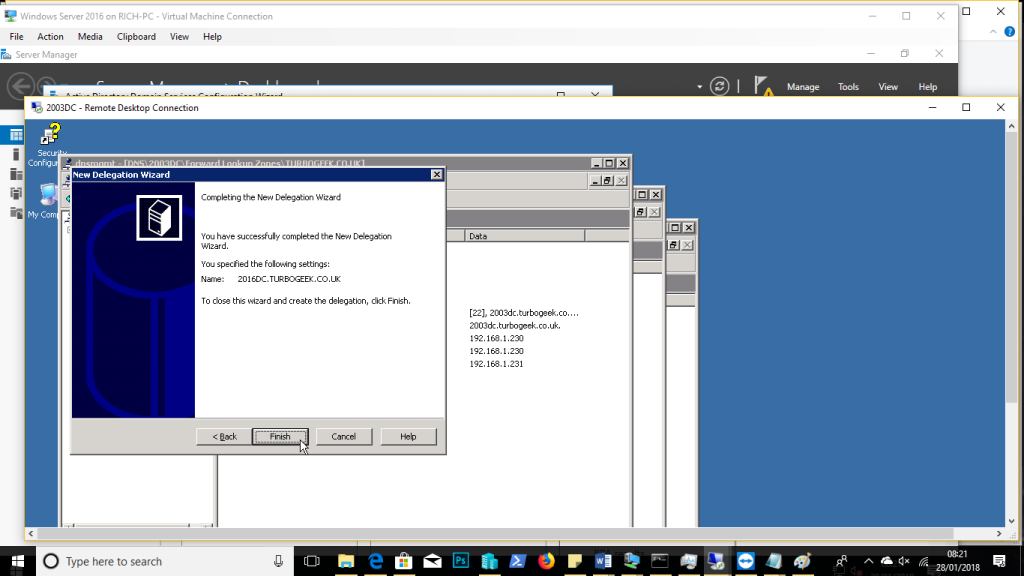
Step 6 – Fix DNS Delegation
Addressing DNS Delegation on Server 2003:
- Open the DNS Manager application on your Server 2003 Domain Controller (or dedicated DNS server).
- Navigate: Start > Run > Type
dnsmgmt.mscand press Enter.
- Navigate: Start > Run > Type
- In the DNS Manager, create a new Delegation Zone.
- Point this new zone to the IP address of your Server 2016.
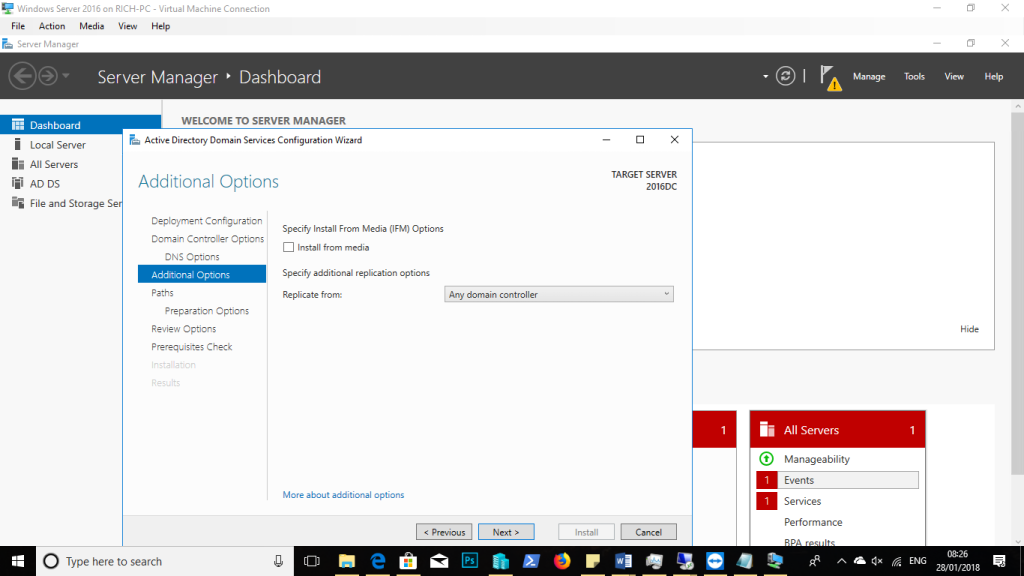
Continuing Installation on Server 2016:
- Switch back to your Server 2016 Domain Controller.
- On the DNS Options page, click Next. You should no longer encounter the previous error with the DNS delegation fixed.
- On the Additional Options screen, ensure the option “Replicate from ANY DOMAIN CONTROLLER” is selected.
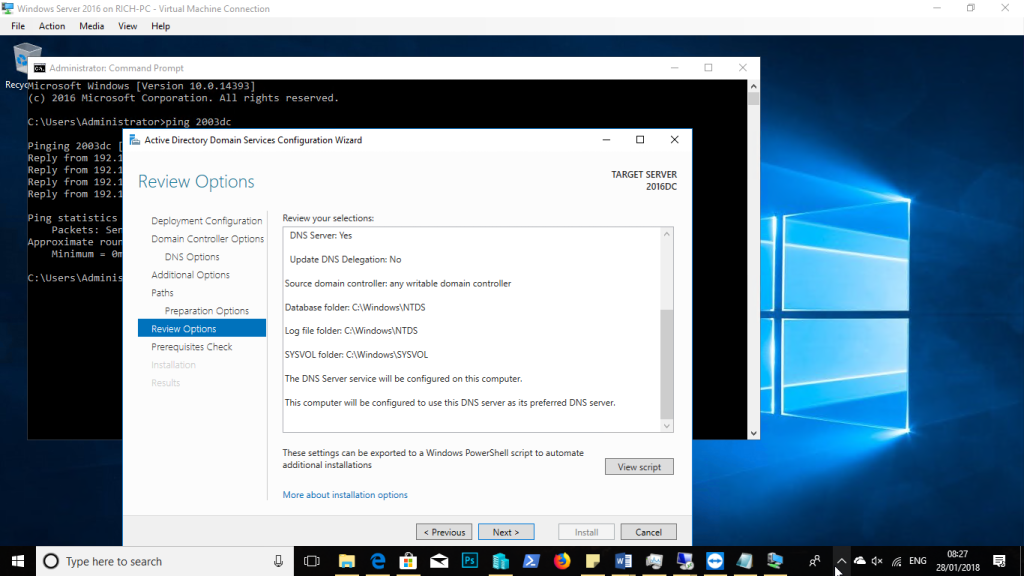
- Click Next on the Review Options page.
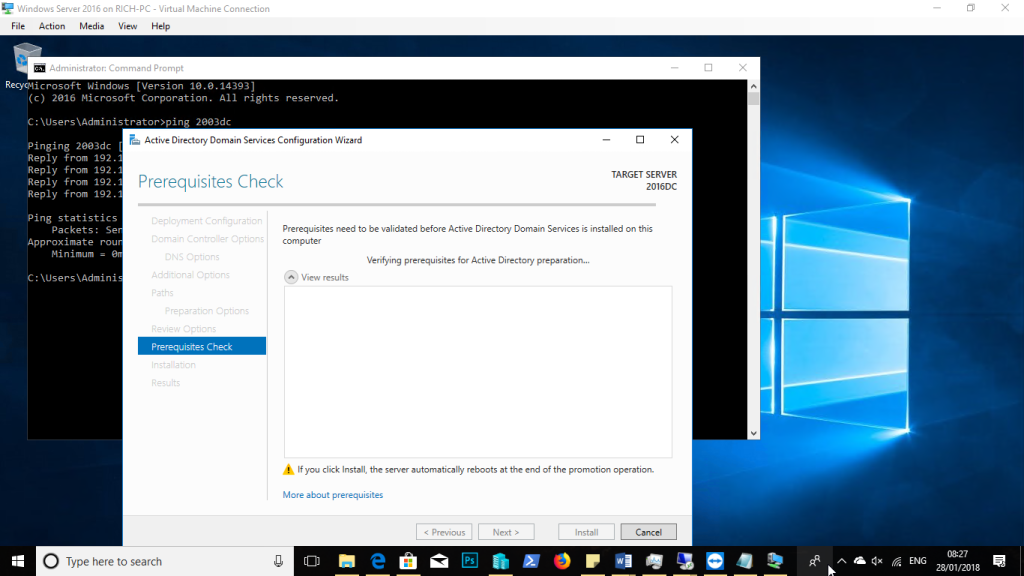
- The system will now check all prerequisites for the installation.
- Ensure all checks complete successfully.
- Click Next to finalize the addition of the Server 2016 machine as a domain controller.
- Once the process completes, you’ll have successfully upgraded and added the Server 2016 as a domain controller.
Step 7 – Post Upgrade Tasks
Domain Synchronization:
- After the upgrade, allowing the domain to synchronize fully is crucial.
- Ideally, let the synchronization process run uninterrupted for 48 hours. This ensures all domain data is updated and consistent across domain controllers.
Handling the Server 2003 Domain Controller:
- Turn off the Server 2003 domain controller. This will prevent it from actively participating in the domain.
- However, do not decommission or remove the Server 2003 domain controller immediately. Windows provides a grace period of 180 days before the server is considered “tombstoned” or permanently out of sync.
- During this grace period, monitor the new Server 2016 domain controller for any issues or discrepancies. This provides a safety net in case you need to revert to the Server 2003 domain controller.
Enhancing Redundancy:
- To add redundancy and ensure high availability, set up an additional Server 2016 domain controller. This ensures that if one domain controller faces issues, the other can take over, minimizing downtime.
Updating Domain Functional Level:
- Once you’re confident in the stability of your Server 2016 domain controllers and have decommissioned the Server 2003 domain controller, it’s time to update the domain functional level.
- Update the domain functional level to “Windows Server 2016”. This allows you to leverage the latest features and security enhancements provided by Windows Server 2016.
Additional Resources:
- If you have any questions or need further clarification on any steps, refer to the official Microsoft Q&A about Windows Server 2003 end of life. This resource provides comprehensive information and answers to common queries.
Post Views: 3,131
Windows 2016 Server as Additional Domain Controller
Setup a new Windows 2016 Server with latest patches installed and join to existing AD Domain
Verify the DNS Server is pointing to the existing Windows 2003 AD Domain Controller
Get-DnsClientServerAddress -AddressFamily IPv4

InterfaceAlias               Interface Address ServerAddresses
                             Index     Family
--------------               --------- ------- ---------------
Ethernet0                            5 IPv4    {192.168.1.170}
Join to AD Domain and reboot
$cred = New-Object System.Management.Automation.PsCredential("mylab\administrator", (ConvertTo-SecureString "P@ssw0rd!@#$" -AsPlainText -Force))
$DomainName = "mylab.local"

Add-Computer -DomainName $DomainName -Credential $cred
Restart-Computer
Raise Forest & Domain Functional Level to Windows 2003
Raise Domain Functional Level from Windows 2000 Native to 2003 in Active Directory User and Computers
Right click on AD Domain and select Raise Domain Functional Level

Raise the current Domain Functional Level from Windows 2000 mixed to Windows Server 2003

Click OK to proceed

Domain Functional Level had been raised to Windows 2003 successfully

Raise Forest Functional Level from Windows 2000 to 2003 in Active Directory Domains and Trusts

Raise the Current Forest Functional Level from Windows 2000 to Windows Server 2003

Forest Functional Level had been raised to Windows 2003 successfully

New Additional AD Domain Controller
Login to the new Windows 2016 Server as Domain Administrator to
Disable Windows Firewall or verify that all the required ports are alllowed by following Firewall Ports Required to Join AD Domain & Firewall Ports Required for AD Replication
#Disable Windows Firewall
Set-NetFirewallProfile -Profile Domain,Public,Private -Enabled False
Promote it as Additional Domain Controller and Reboot
#Install AD Domain Services
install-windowsfeature AD-Domain-Services -IncludeManagementTools

#Addtional Domain Controller
$Password = "P@ssw0rd!@#$" | ConvertTo-SecureString -AsPlainText -Force

Install-ADDSDomainController -DomainName “mylab.local” `
-InstallDns:$true `
-NoRebootOnCompletion:$false `
-SafeModeAdministratorPassword $Password `
-Force:$true
New Windows 2016 Server had been promoted as additional domain controller successfully

Verify the AD Replication between Windows 2003 & 2016 AD Domain Controller are working fine with «repadmin /replsum»

Verify NETLOGON & SYSVOL is shared on Windows 2016 AD Domain Controller

Create a new GPO in Windows 2016 AD Domain Controller and verify the new GPO is displayed in Windows 2003 AD Domain Controller

Open DNS Manager and verify all the DNS records are displayed

Login to Windows 2016 DC, and run the following PowerShell
#Verify the placement of existing FSMO Roles
Get-ADDomain | Select-Object InfrastructureMaster, RIDMaster, PDCEmulator
Get-ADForest | Select-Object DomainNamingMaster, SchemaMaster

#Move all FSMO Roles to Windows 2016 DC
Move-ADDirectoryServerOperationMasterRole -Identity “WIN2016” –OperationMasterRole DomainNamingMaster,PDCEmulator,RIDMaster,SchemaMaster,InfrastructureMaster
Update Directory Access in Exchange 2003
Open Exchange System Manager, and right click on Servers – AD01 – Properties – Directory Access
Change the Configuration Domain Controller, Domain Controllers & Global Catalog Servers to the new Windows 2016 DC

Uncheck Automatically Discover Servers, and add WIN2016 manually
Reboot the Exchange 2003 Server with the new configuration to ensure that it is working fine
Decommissioning of Windows 2003 Domain Controller
- Remove Windows 2003 Domain Controller with dcpromo
- Change the DNS Server to point to Windows 2016 DC prior reboot the server
Verify Exchange 2003 is functioning
- Verify all Exchange related services are started
- Verify inbound & outbound Email is working fine
Migration of Windows 2003 to 2016 is completed successfully for now.
We are going to use the same lab to verify the steps required to migrate from Exchange 2003 to Office 365 soon.
Appendix
A. Windows Server 2019 & Windows 10 failed to join to Windows 2003 AD Domain as SMBv1 is disabled by default

Verify the SMBv1 is disabled and enabled it with PowerShell
# Verify the SMBv1 is disabled
Get-WindowsOptionalFeature -Online -FeatureName "SMB1Protocol"


FeatureName      : SMB1Protocol
DisplayName      : SMB 1.0/CIFS File Sharing Support
Description      : Support for the SMB 1.0/CIFS file sharing protocol, and the Computer Browser protocol.
RestartRequired  : Possible
State            : Disabled
CustomProperties :
                   ServerComponent\Description : Support for the SMB 1.0/CIFS file sharing protocol, and the Computer
                   Browser protocol.
                   ServerComponent\DisplayName : SMB 1.0/CIFS File Sharing Support
                   ServerComponent\Id : 487
                   ServerComponent\Type : Feature
                   ServerComponent\UniqueName : FS-SMB1
                   ServerComponent\Deploys\Update\Name : SMB1Protocol

# Enable SMBv1
Enable-WindowsOptionalFeature -Online -FeatureName "SMB1Protocol" -All
B. No Network Card Driver found in Windows XP running on VMware Workstation 15.5 Pro
Delete ethernet0.virtualDev = «e1000» manually in .vmx file
Install a copy of windows 2008 Server
The first thing you will want to do is set the I.P. Address of the network to something static.
From the inital configuration tasks, make sure the time zone is correct, change the name of the server to something helpful like w2k8dcp, download and install updated, and enable remote desktop. This is especially useful if you are running your server inside a V.M. (and you really should).
Next, goto add features, and select desktop experience. Accept to install any required services (ink and handwriting services) wait for the installation to finish. You will notice that the features you just installed require you to restart your server. Go ahead and do so. Note that this reboot will take a few minutes depending on your hardware, and the server will reboot twice in order to finish the installation.
From the Windows 2008 Installer DVD copy support\adprep.exe to the windows 2003 server. Open an elevated command prompt and navigate to the folder where you copied adprep.exe, and run the command “adprep /forestprep”. Note for 32 bit systems, you need to copy adprep32.exe
C:\tmp>adprep /forestprep
The screen will fill up with a lot of ……….. while the command executes, when it finishes, if all goes well it will report “Adprep successfully updated the forest-wide information.”
Next execute “adprep /domainprep”
c:\tmp>adprep /domainprep
If you receive the error “Adprep detected that the domain is not in native mode, Adprep has not stopped without making changes” you need to “raise the domain and funtion level”
Finally run “adprep /domainprep /gpprep
c:\tmp>adprep /domainprep /gpprep
Open “Server Manager” and click on change system properties
Enter a Computer description, and click on the change button
Enter a computer name, select “Member of Domain:” and type in your domain name in the sapce provided.
Click the OK button, and enter the Administartor credentials in the appropriate fields, and if all goes well you should be greeted with a “Welcome to yourdomain.com domain”
You will be asked to restart the windows.
Next we need to promote our server to domain controller. Hit Start -> run and type “dcpromo”
Select “Use advanced mode installation” and click next
You will then see a warning about new higher security defaults which might affect some older systems. Read carefully in case you have any legacy system that will be impacted by the new security protocols. Then click next.
In Choose a deplyment configuration, select “Existing forest” and “Add a domain controller to an existing domain
In the next screen, make sure that the domain forest is correct, and under alternate credentials enter a username and password for the domain who is part of the enterprise admins group.
Click next and select the domain for the additional domain controller.
You will receive a prompt telling you that “You will not be able to install a read-only domain controller in this domain because “adprep /rodprep” was not run yet. If you wish to install a read-only d.c. go ahead and run the command on the Windows 2003 server, if not, click the “yes” button to accept the prompt and continue.
In Select a site, leave everything as is and click next
The wizard will now examine the DNS configuration. This may take a while so just relax.
Finally in Additional Domain Controller Options, make sure DNS server and Global catalog are selected, and click next
In the next screen “Install fom Media”, select Replicate data over the network from an existing domain controller
In the next screen select the current DNS server (or let the wizard choose an appropriate domain controller). next
Leave the location of Database, Log Files, and Sysvol untouched and click next
Assign a password to the “Directory Service Restore Mode” you will need this password when the brown stuff hits the fan and you need to restore your directory services. Do not forget this password !
You are now at the summary screen. Check that the summary screen shows what you want your new server to do, and click next.
The new configuration of your active directory will now take place. Depending on the size of the domain.
When the process finishes, you will be asked to restart the server. Open “Active Directory Users and Computers, and you should see all your users and computers replicated from your 2003 server. A look at DNS Manager should also show the replicated DNS entries.
Install windows 2016 Server
Give it a static ip, and a descriptive computer name (W2K16DCP)
Enable RDP
Reboot
Since we have already done all the preparations on the windows 2003 server, adding the 2016 server will be even more straightforward.
From Server Manager, click on Configure this local server
Check your timzeone, remote management is enabled, remote desktop is enabled, that Ethernet 0 has a static ip, and that windows updates are enabled.
Reboot if asked to
Next check if you can ping you current DC by Name, if not check your network settings, especially the DNS section.
From the server manager dahsboard, choose Add roles and features, and select “Role-Based or feature based installation”. Next
From server selection, select your current server and click Next
From Select server roles select “Active Directory Domain Services”
Leave the features on the next screen as they are, and click Next, and wait for the installation to finish
Go back to server manager, and you will see an exclamation mark in a yellow triangle just to the left of the manage / tools / view / help menu. Click on it, and from the drop down that appears, click on “Promote this server to a domain controller”
From the next screen, select “Add a domain controller to an existing domain”, Specify yourdoman in Domain:, and type in yourdomain’s enterprise administrator credentials (by clicking on the Change button”. The account name must be in the format yourdomain.com\administrator and the password
In the next screen, supply a DSRM password, which you need to keep safe for a very rainy day. You will need this password.
In the next screen, select Update DNS delegation, and click next.
Choose the Root DNS Server in the replicate from : drop down
In the paths screen, leave everything as is and click next.
Click next in the Preparation Options Screen
Review all your options in the Review Options screen
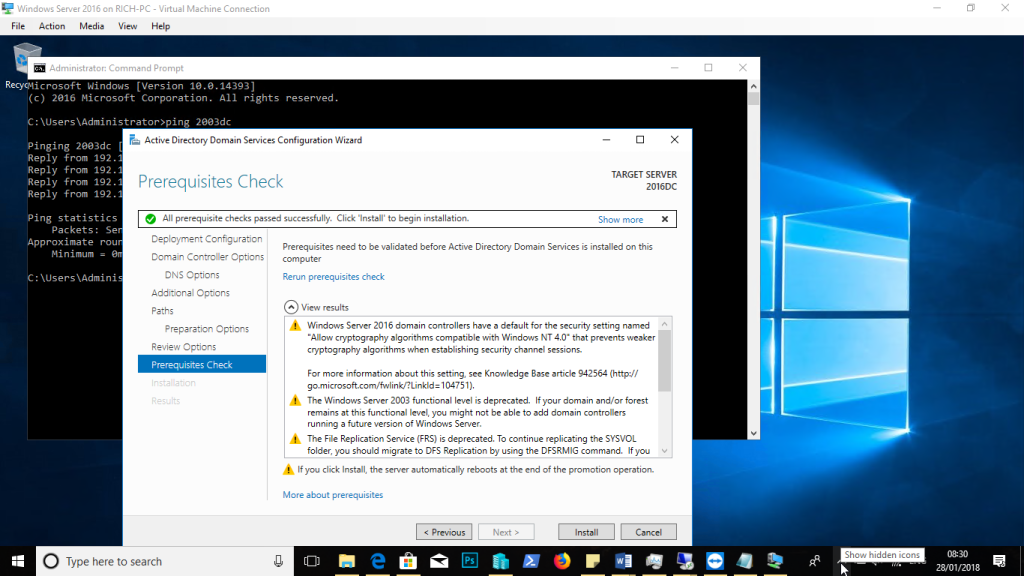
In the prerequisites Check Screen, make sure the last line reads “All prerequisite checks passed successfully, Click ‘Install’ to begin installation.
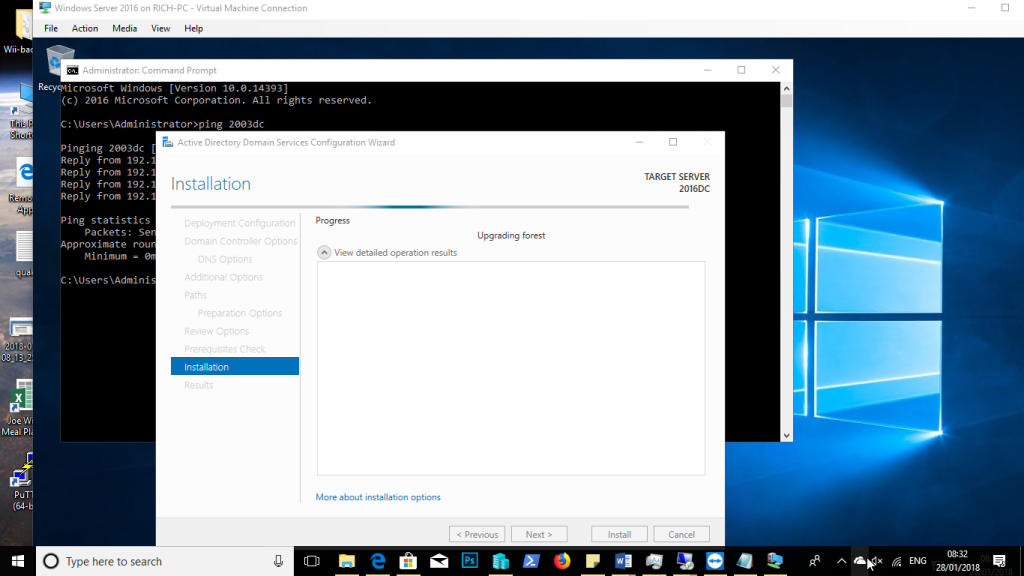
This will take a few minutes, so you can now sit back and relax. You might see a few warnings cropping up on the screen during the installation. Review them to see if any of them are critical and require your attention.
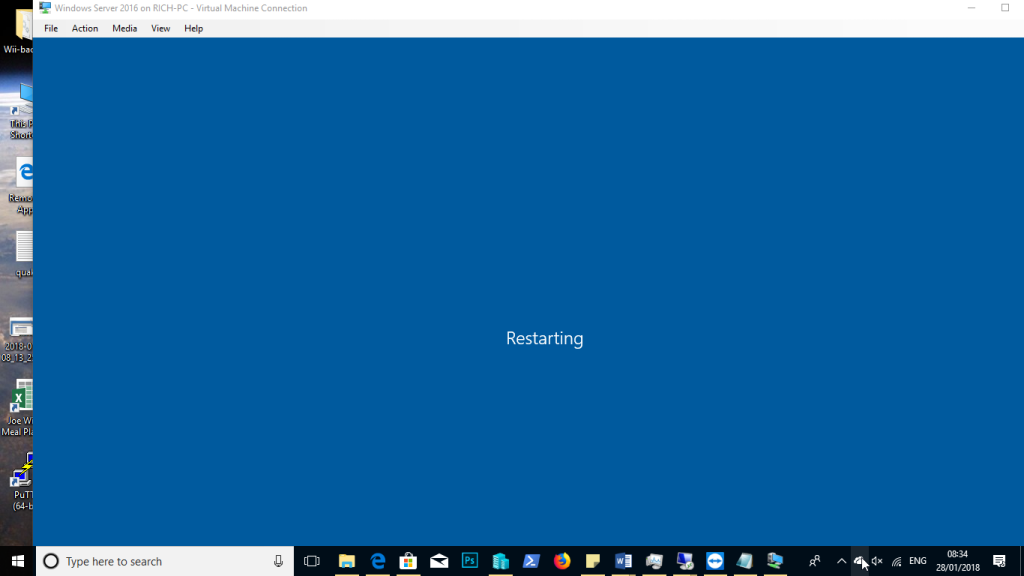
The server will most likely reboot once the migration finishes. When it comes up again, it will be a DC in your domain
I recently had a client project that involved upgrading their Active Directory to Windows 2016. Their domain and functional levels were both Windows 2000 (!) so we had to do some work to get them up to date.
Their primary DHCP services were running out of two locations, with two DHCP servers at each—all of them running windows 2003. Normally when you do a DHCP migration from newer versions of windows server, you can simply use the GUI tools to do a DHCP backup and restore, but since there are so many version differences here, we must use NETSH.
Step One: Export the DHCP Database
To start off, you’ll need to log into the Windows 2003 server and open a command prompt. Then issue the following commands:
Mkdir c:\temp\dhcpexport
NETSH
DHCP
Server \\<server ip address>
Export c:\temp\dhcpexport\server-database all
Exit
This will export the entire database with scope options and leases—the leases are the important part as we don’t want the new server giving out duplicate IP addresses since it doesn’t know what clients have already been issued which IP addresses from the scope.
Step Two: Import the Database
Next, copy the database file to your new Windows Server 2016; preferably, make a new directory on that server. Once you have copied the file to your 2016 server, open an administrative command prompt and issue the following commands:
NETSH
DHCP
Server \\<server ip address>
import c:\temp\dhcpexport\server-database all
Exit
Now you can open the DHCP management console and verify that the scopes, reservations, scope options, and leases have all successfully been imported.
Configuring DHCP Failover
For my customer, they were using split scopes, so once I had the primary scope imported, I removed the scope exclusions for the second server, then made my new secondary windows 2016 server a failover partner. DHCP failover is a much better option for a modern DHCP deployment than the old split scope method and allows for a much easier and simpler-to-manage DHCP server.
This can be configured by right-clicking your IPv4 (or IPv6) option under your new server and selecting “Configure Failover”
At the first screen, click next, then select your target failover server. Your target must be at least Windows 2012 or greater revision.
On the next screen, you can then select your failover options.
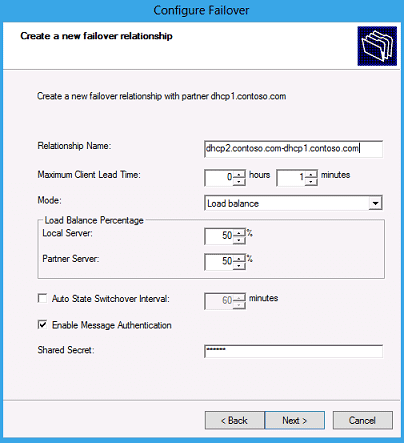
Then click next
Joe Hanning, PEI

VISIT THE NEWEST TUTORIAL
How to Migrate Active Directory and DNS from Microsoft Server 2012 to 2019
Introduction..
This article will give you the guidance to perform server migration from Windows server 2003 to Windows Server 2016. To make things easier entire tutorial is divided into 5 steps.
- Prepare Server 2003 for Migration
- Install Active Directory and promote (Server 2016)
- Confirm Replication & DNS in Server 2003 and 2016
- Transfer FSMO roles to the new server (Server 2016)
- Uninstall Old DC (Server 2003)
01. Prepare Server 2003 for Migration
In the Server 2003, Raise domain and forest functional levels to Windows Server 2003


02. Install Active Directory and promote (Server 2016)
Configure appropriate network settings. (Keep in mind that after server migration DNS server will be changed)
Join Server 2016 to the existing domain

Install Active Directory


Select Active Directory Domain Services and DNS server


After Installation completes Select Promote This Server to a Domain Controller

Keep the default Selection Add a domain controller to existing domain..

Type DSRM password


Click Install and Wait for a bit until installation completes and restarts

03. Confirm Replication & DNS in Server 2003 and 2016
Replicate using Active Directory Sites and Services


Check DNS


04. Transfer FSMO roles to the new server (Server 2016)
There are 5 FSMO roles which you have to Transfer From server 2003 to the new server 2016. You can do that either using powershell commands or GUI.
- Schema master
- Domain naming master
- RID master
- PDC emulator
- Infrastructure master
Type Netdom Query FSMO powershell command in the new server 2016 to check the current FSMO roles and their owner

Transfer the RID master, PDC emulator and Infrastructure Master Roles
Server Manager > Tools > Active Directory Users and Computers
In the MMC right click on the domain name and select operations masters
Change all three of them

Transfer domain naming master role
Server Manager > Tools > Active Directory Domains and Trusts
In the MMC, right click on Active Directory Domains and Trusts > Operations Master…

Transfer schema master role
Type run command regsvr32 schmmgmt.dll and Press OK in the next window

Type run command mmc
File > Add/Remove Snap-in…

Add Active Directory Schema and Press OK

Right click Active Directory Schema and click Change Active Directory Domain Controller
Select New Server 2016 from the list and Press OK


Right click Active Directory Schema > Operation Master and Press Change

Confirm that all the 5 FSMO roles have been moved to the new 2016 DC using Netdom Query FSMO command

05. Uninstall Old DC (Server 2003)
Now it is time to get rid of the old DC.
Type DCPromo in the RUN

Keep the default (do not tick Delete the domain because this server is the last domain controller in the domain)

Type Password

Click Next..


Click Finish to End the Removal process

Restart the Server

Notice that In the Server 2016, old Server is moved From Domain Controllers to Computers
