
Updating OpenSSL on Windows 10 is a straightforward process that ensures your security protocols are up-to-date. First, check your current version and uninstall it if necessary. Then, download the latest version from the official OpenSSL website, extract the files, and install the application on your system. Finally, confirm the update by checking the version again. By following these steps, you can maintain a secure and efficient system.
In this section, we’ll walk through the steps to update OpenSSL on Windows 10. This process involves uninstalling the old version, downloading the new one, and confirming the update.
Step 1: Check Current OpenSSL Version
First, determine which version of OpenSSL is currently installed on your computer.
Open a command prompt window and type “openssl version”. This command will display the installed version number. Knowing your current version helps you decide if an update is necessary.
Step 2: Uninstall Old Version (If Necessary)
If your OpenSSL version is outdated, uninstall it from your system.
Go to the Control Panel, navigate to Programs, and locate OpenSSL. Click uninstall to remove it. This step ensures that no old files interfere with the new installation.
Step 3: Download New Version
Visit the official OpenSSL website to download the latest version.
Make sure you choose the correct version for Windows. Download the installer to your preferred location. This step is crucial for obtaining the most secure and updated version.
Step 4: Install OpenSSL
Run the downloaded installer to install the new version on your system.
Follow the on-screen instructions to complete the installation. Ensure you select the right options for your system needs. Installing correctly will enable all the new features and security patches.
Step 5: Verify Installation
Finally, confirm the successful installation of the updated OpenSSL version.
Open a command prompt window and type “openssl version” again. Ensure the displayed version matches the one you downloaded. Verification guarantees that you have the latest version running.
Once you’ve completed these steps, OpenSSL on your Windows 10 system will be updated. You can rest easy knowing your security protocols are current and robust.
Tips for Updating OpenSSL on Windows 10
- Back Up Your Data: Before starting the update process, back up important data in case of unexpected errors.
- Use Official Sources: Only download OpenSSL from the official website to avoid malicious software.
- Stay Informed: Regularly check for OpenSSL updates to keep your system secure.
- Follow Instructions: Carefully follow the installation instructions to prevent errors.
- Restart Your System: After installation, restart your computer to ensure changes take effect.
Frequently Asked Questions
What is OpenSSL?
OpenSSL is a software library that provides secure communication over networks.
Why should I update OpenSSL?
Updating ensures you have the latest security fixes and improvements.
Can I update OpenSSL without uninstalling the old version?
It’s recommended to uninstall the old version to avoid conflicts.
Is it safe to download OpenSSL from the internet?
Only download OpenSSL from the official website to ensure safety.
How often should I update OpenSSL?
Check for updates regularly, ideally monthly, to maintain security.
Summary
- Check current OpenSSL version.
- Uninstall old version if necessary.
- Download the new version.
- Install OpenSSL.
- Verify installation.
Conclusion
Updating OpenSSL on Windows 10 is not just about staying current; it’s about safeguarding your system from potential vulnerabilities. By routinely checking for updates, uninstalling outdated versions, and installing the latest release, you ensure that your data is protected with the most robust security measures available. This process might seem a bit technical, but with a little patience and attention to detail, anyone can do it.
As you navigate through the digital world, OpenSSL acts like a knight in shining armor, guarding your fortress against intruders. So, take the time to understand these steps and apply them whenever necessary. The peace of mind that comes with knowing your system is secure is worth the effort.
And remember, technology evolves, and keeping your software updated is key to staying one step ahead of potential threats. If you’ve found this guide helpful, consider sharing it with others who might benefit. After all, a safer internet starts with informed individuals.
Matt Jacobs has been working as an IT consultant for small businesses since receiving his Master’s degree in 2003. While he still does some consulting work, his primary focus now is on creating technology support content for SupportYourTech.com.
His work can be found on many websites and focuses on topics such as Microsoft Office, Apple devices, Android devices, Photoshop, and more.
If you’re looking to update OpenSSL on Windows 10, you’ve come to the right place. This process involves downloading the latest version of OpenSSL, uninstalling the old one, and then installing the new version. It’s pretty simple and straightforward if you follow the steps correctly. Let’s dive right in.
Updating OpenSSL on your Windows 10 machine ensures you have the latest security patches and features. This step-by-step guide will walk you through the process to ensure a smooth update.
Step 1: Download the latest OpenSSL
First, head over to the official OpenSSL website and download the latest version.
To do this, open your web browser and navigate to the OpenSSL download page. Make sure to choose the correct Windows version compatible with your system architecture (32-bit or 64-bit).
Step 2: Uninstall the old version of OpenSSL
Next, remove the current version of OpenSSL from your system.
Go to ‘Control Panel’, click on ‘Programs and Features’, find OpenSSL in the list, right-click on it, and select ‘Uninstall’. Follow the prompts to complete the uninstallation process.
Step 3: Install the new version of OpenSSL
Now it’s time to install the new version you downloaded earlier.
Run the installer file you downloaded. Follow the on-screen instructions, making sure to choose the correct installation paths and options that suit your needs.
Step 4: Update system environment variables
After the installation, update your system’s environment variables to point to the new OpenSSL installation.
Go to ‘Control Panel’, click on ‘System’, then ‘Advanced system settings’. Under the ‘Advanced’ tab, click on ‘Environment Variables’ and update the ‘Path’ variable to include the new OpenSSL directory.
Step 5: Verify the installation
Finally, ensure the new OpenSSL version is properly installed and configured.
Open a Command Prompt and type openssl version. This command should return the version number of the newly installed OpenSSL.
After you complete these steps, your Windows 10 system will have the latest version of OpenSSL installed, offering improved security and performance.
Tips for Updating OpenSSL Windows 10
- Always back up your system before making significant changes like updating software.
- Double-check the architecture (32-bit or 64-bit) of your Windows installation to download the correct version of OpenSSL.
- Make sure you have administrative privileges on your Windows account to install and uninstall software.
- Keep a copy of the old OpenSSL installer as a backup in case you need to revert to the previous version.
- Run the Command Prompt as an Administrator to ensure all commands work correctly, especially when modifying system variables.
Frequently Asked Questions
What is OpenSSL?
OpenSSL is a robust, full-featured open-source toolkit for implementing the Secure Sockets Layer (SSL) and Transport Layer Security (TLS) protocols.
Why do I need to update OpenSSL?
Updating OpenSSL ensures you have the latest security patches and features, protecting your data and system from vulnerabilities.
How do I know if my OpenSSL update was successful?
After completing the update, open Command Prompt and type openssl version. It should display the version of the newly installed OpenSSL.
Can I update OpenSSL without uninstalling the old version?
It’s generally recommended to uninstall the old version to avoid conflicts and ensure a clean installation.
What should I do if I encounter issues during the update?
Check forums, the official OpenSSL documentation, or seek help from IT professionals to troubleshoot and resolve any issues.
Summary
- Download the latest OpenSSL.
- Uninstall the old version.
- Install the new version.
- Update system environment variables.
- Verify the installation.
Conclusion
Updating OpenSSL on Windows 10 might seem daunting at first, but with these steps, it’s a breeze. Keeping OpenSSL up-to-date is crucial for maintaining the security and functionality of your applications. Always ensure you’re downloading from the official site to avoid any malicious software.
By following this guide, you not only ensure a smooth update process but also keep your system in top-notch condition. If you run into any issues, don’t hesitate to consult the resources available online or seek professional help. Remember, a secure system is a happy system! So, go ahead and update OpenSSL on your Windows 10 machine today.
Kermit Matthews is a freelance writer based in Philadelphia, Pennsylvania with more than a decade of experience writing technology guides. He has a Bachelor’s and Master’s degree in Computer Science and has spent much of his professional career in IT management.
He specializes in writing content about iPhones, Android devices, Microsoft Office, and many other popular applications and devices.
Read his full bio here.
OpenSSL is used to secure communication over computer network against for protection. This open source cryptography library that implements the Transport Layer Security (TLS) and Secure Sockets Layer (SSL) protocols is designed to secure communications over computer networks against eavesdropping. It is used by majority of HTTPS websites and Internet Servers.
To update OpenSSL Windows 10 the most easiest and convenient method will be to take a complete backup of your save files and completely uninstalling OpenSSL then downloading the latest version and installing it.
Uninstall OpenSSL on Windows 10
Step 1: On Desktop Right click on OpenSSL icon and select Open File Location.
Step 2: Look for file name uninst000, Uninstall or Uninstaller and double click on it.
Step 3: Follow the uninstall wizard and reboot your computer.
Step 4: On your computer open the same directory and delete everything if anything is left.
Step 5: Click on Start icon and type regedit in the search bar.
Step 6: Open Registry Editor and find the registry key or entries that contains the program’s name.
HKEY_CURRENT_USER\Software\(OpenSSL or the publisher’s name)\
HKEY_LOCAL+MACHINE\SOFTWARE\(OpenSSL or the publisher’s name)\
Step 7: Make a backup of them for emergency purpose and delete those files from your computer.
Reboot your computer to complete the procedure.
Install OpenSSL on Windows 10
Step 1: Open Internet Browser on your computer.
Step 2: Search for OpenSSL on the search bar and open the official website.
Step 3: Choose the latest version that is compatible on your computer and download the files (download will be free as it is a open source software)
Step 4: Run the EXE or MSI with default configuration and follow the installation procedure to complete the set-up wait patiently as it will take some time.
Set Environment Variable
Step 1: Click Start icon and search for Environment Variables.
Step 2: In System Properties click on Environment Variables.
Step 3: A Window will open with User Variables and System Variables. In the user variables section, select Path and click Edit.
Step 4: Click on browse and to where openssl.exe is at and select that folder then click OK.
General location will be This PC > Windows (C:) > Power Files > OpenSSL – Win64 > bin
Step 5: Click OK on this screen and in subsequent screens.
Open Command Prompt by typing cmd in RUN dialogue box.
Type “openssl version” on CLI to ensure that you have updated your OpenSSL version on Windows 10.
In Windows explorer navigate to the install location for example C:\OpenSSL-Win64\bin\ and run the openssl with administrator privileges.
If the OpenSSL open in a command prompt window then you have successfully installed the latest version.
To update OpenSSL Windows 10 we have provided you with every methods and detailed instruction on those methods. In theory it look difficult but it is rather easy when you start the process.
In the age of cyber warfare, being paranoid is the only reasonable attitude and that means, among other things, being paranoid about software updates.
Take for example OpenSSL. This open source cryptography library that implements the Transport Layer Security (TLS) and Secure Sockets Layer (SSL) protocols is designed to “secure communications over computer networks against eavesdropping”, but guess what: it has been riddled with bugs since its inception. This may be unavoidable, to a certain degree — after all, we are speaking about software. Even so, the inherent flaws of OpenSSL should not be an excuse for not keeping the version you use as bullet-proof as possible. Let’s not forget that your car is most likely hackable by a 15 year old and yet you still (presumably) lock the doors.
While you can’t do much about the yet-to-be-identified bugs, you can at least protect your systems from those bugs that have been already patched up and widely documented.
Too bad the official OpenSSL website offers Linux sources only.
While Linux distributions routinely come loaded with OpenSSL, this is not the case for Windows… or shall we say “Windows distributions”. (Didn’t Microsoft want to “Linuxify” its flaggship OS? Never mind.) If you want to run it, you need a Windows binary, and unless you are willing to compile it yourself, you have to to rely on someone else.
Here is how you can set up OpenSSL on Windows without having to deal with the code.
Step 1. Get hold of the binaries
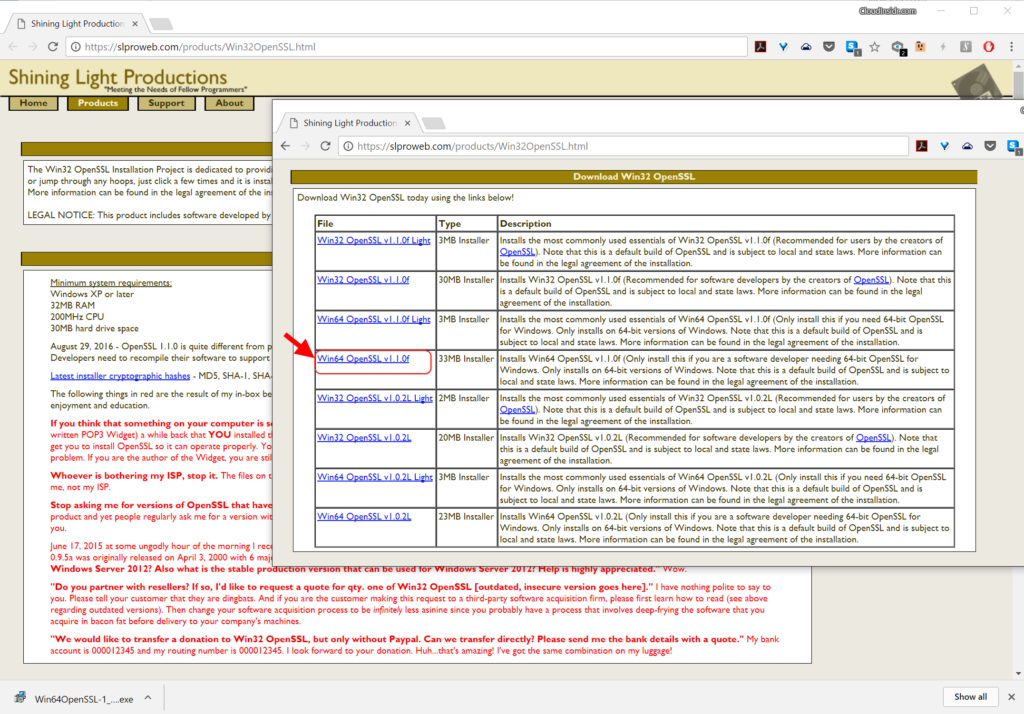
Finding Windows binaries of OpenSSL is not an easy task, but don’t get discouraged. They do exist. To download them, navigate to:
https://slproweb.com/products/Win32OpenSSL.html
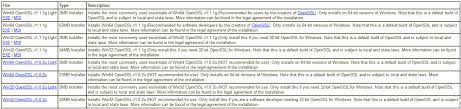
Don’t be fooled by the Win32 string in the URL nor by the navigation pointing you to a seemingly ancient download page from way back in 2004 (from the “Products” tab through the “Win32 OpenSSL link”). Scroll down the page to the section “Download Win32 OpenSSL”, ignoring the confusing string. Now you need to pick the right binary from the list. For each version, there are two basic types: the full installer and the light installer.
Download the one named “Win64 OpenSSL v1.1.0f” (or a higher-numbered version once it becomes available) to get the full installer.
The current version as of this writing (OpenSSL 1.1.0h) is very different from previous releases. It is not the same thing at all so pay attention to the release numbers! The worst thing you can do is use an old version that has documented bugs that anyone could exploit following a howto!
Step 2. Run the installer
We recommend installing OpenSSL outside of your Windows system directory.
Step 3. Start the OpenSSL binary
To invoke OpenSSL, you can simply right-click on it in the Windows Explorer at its install location, for example in:
C:\OpenSSL-Win64\bin\
then choose “Run as Administrator”.
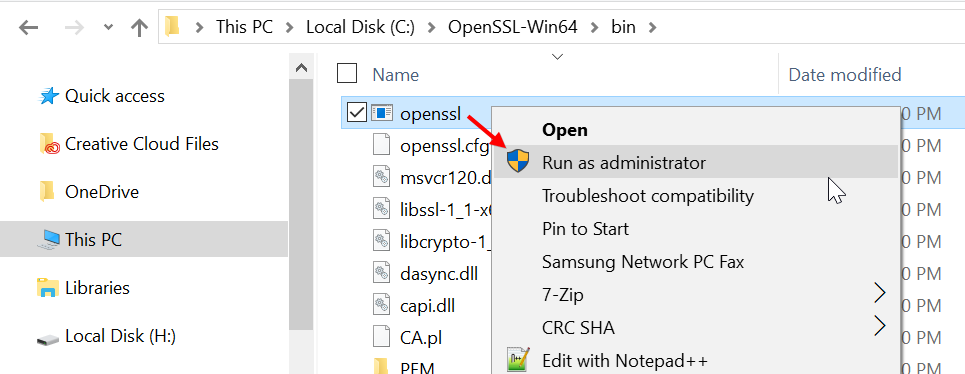
It will open a cmd window with the OpenSSL command prompt. Here is what to expect.

Now you are ready to start creating your OpenSSL keys. (Speaking of which: users of the remote access utility PuTTY can export an OpenSSH key from PuTTYgen.) When using OpenSSL on Windows in this way, you simply omit the openssl command you see at the prompt. For example, to generate your key pair using OpenSSL on Windows, you may enter:
openssl req -newkey rsa:2048 -nodes -keyout key.pem -x509 -days 365 -out certificate.pem
and follow the onscreen instructions as usual. To review the certificate:
openssl x509 -text -noout -in certificate.pem
and so forth.
TABLE OF CONTENTS
- About OpenSSL
- Download OpenSSL
- Installing OpenSSL
- Windows Installer
- Winget Package Manager
- ZIP File
- OpenSSL Screenshot
- OpenSSL Documentation
- Checking SSL / TLS Certificate Validity with Certify One
- Compiling OpenSSL From Source
- Release Policy
- Source
- Build Script
- Compilation
- Integrating OpenSSL with Your Visual Studio Project
- Sample Project
- Additional Include Directories
- Additional Library Directories
- Additional Dependencies
- Basic Troubleshooting
- FireDaemon Software Development Services
- Privilege Escalation Mitigation
- Compatibility and Support Matrix
- License, Warranty, and Support
- Useful Links
- Acknowledgments
- Buy SSL / TLS Certificates
About OpenSSL
OpenSSL is a popular open-source, publicly available software library that provides a robust, full-featured set of cryptographic functions and tools to secure communications over computer networks. When we build and ship FireDaemon Certify One, FireDaemon Fusion, and FireDaemon Lozenge we try to ensure they contain the most recent version of OpenSSL. We thought it would be useful to make our OpenSSL Binary Distribution available to you to download and use free of charge. The key advantages of using our OpenSSL Binary Distribution for Microsoft Windows over others that are available are:
- No need to deploy various software tools to attempt to compile the source from scratch. Our build script is available if you do want to compile OpenSSL yourself
- No external dependencies. Installing or distributing the Visual C++ Redistributable Runtime (MSVC) is unnecessary. There is an implicit dependency on the Windows Universal C Runtime (UCRT), which is included by default in all modern versions of Microsoft Windows
- Packaged for simple deployment and use case scenarios, including standalone, embeddable, deployable, or portable
- Digitally signed with our Extended Validation (EV) code signing certificate to avoid Windows SmartScreen warnings and increase trust by Sectigo’s authentication and verification procedures on us: FireDaemon Technologies Limited and validatable binary integrity to meet your compliance requirements.
Download OpenSSL
Below, you will find pre-compiled OpenSSL executables (EXE) and libraries (DLL) for Microsoft Windows Operating Systems in the form of installer and ZIP files. OpenSSL can be used standalone or integrated into any Windows application. The installers, EXEs and DLLs are digitally signed with our Extended Validation (EV) code signing certificate. We do not have an EAR CCL ECCN for our Binary Distributions. This is intentional. You must seek independent legal advice before using/integrating/exporting our Binary Distributions in your products if you believe you are subject to export controls.
|
Download OpenSSL Binary Distributions for Microsoft Windows |
|
|
OpenSSL 3.5.0 LTS Windows Installer x64 April 2025 SHA2-256 99F778ADA6DDE8499C62299323CB868D7B35C571CF82F1165C36009A2FD456DB Git commit openssl-3.5.0-0-g636dfadc70 |
OpenSSL 3.5.0 LTS ZIP x86+x64+ARM64 April 2025 SHA2-256 9AC6B98D947E558E6ADBBC9CC9EAF504B3540BAB90767CF71E3582A14F75AFBD Git commit openssl-3.5.0-0-g636dfadc70 |
|
OpenSSL 3.0.16 LTS ZIP x86+x64 February 2025 SHA2-256 EAEE11E6ED1DE4E5B6A95E5837AC66ABE842B5E9F6477C8CECBE417FE4704508 Git commit openssl-3.0.16-0-gfa1e5dfb14 |
OpenSSL 1.1.1w LTS ZIP x86+x64 September 2023 SHA2-256 1870B15BF6749E65FFBBADF52CDFF3EE0E9F02943550BF4395574BB432AF3EB8 Git commit OpenSSL_1_1_1w-0-ge04bd3433f |
|
To calculate/verify the SHA2-256 checksums above, please use FireDaemon Lozenge! OpenSSL maintains a list of 3rd-party maintained binary distributions of OpenSSL. Please review our Release Policy before downloading and using this distribution. OpenSSL 1.1.1y or later is only available to OpenSSL customers who have a Premium Support Contract. |
Installing OpenSSL
Windows Installer
You can download the Windows installers in the «Download OpenSSL» section above. Installation is straightforward. OpenSSL is installed into the following file system locations, which is specified during the build and follow OpenSSL’s conventions.
%PROGRAMFILES%\FireDaemon OpenSSL 3
%PROGRAMFILES%\Common Files\FireDaemon SSL 3
You can silently install OpenSSL with the following command in an elevated command prompt (noting APPDIR and ADJUSTSYSTEMPATHENV are optional):
FireDaemon-OpenSSL-x64-3.5.0.exe /exenoui /exelog fdopenssl3.log /qn /norestart REBOOT=ReallySuppress APPDIR="C:\Program Files\FireDaemon OpenSSL 3" ADJUSTSYSTEMPATHENV=yes
You can silently uninstall OpenSSL with the following commands:
:: To uninstall at an elevated command prompt, first verify the product GUID
wmic product where name="FireDaemon OpenSSL 3" get IdentifyingNumber

:: Then uninstall silently using msiexec
msiexec /x {34DB0C5E-1E16-46D4-8125-F12F723FD49C} /quiet /noreboot

:: You can also use the original FireDaemon OpenSSL installer
FireDaemon-OpenSSL-x64-3.5.0.exe /x // /quiet

:: Or uninstall using PowerShell
$app = Get-WmiObject Win32_Product | where { $_.name -eq "FireDaemon OpenSSL 3" }
$app.Uninstall()
Winget Package Manager
Instead of downloading and installing the Windows Installer, you can use the Microsoft package manager called winget. Winget is built into Windows 10, 11, and Server 2025 or can be installed manually. To install FireDaemon OpenSSL, open a command prompt on your computer, then:
:: Search for FireDaemon OpenSSL
winget search FireDaemon.OpenSSL

:: Show the FireDaemon OpenSSL package contents
winget show FireDaemon.OpenSSL

:: Install FireDaemon OpenSSL interactively
winget install FireDaemon.OpenSSL --interactive

:: Install FireDaemon OpenSSL silently (default)
winget install FireDaemon.OpenSSL --silent

:: Show installed packages
winget list FireDaemon

:: Uninstall FireDaemon OpenSSL
winget uninstall FireDaemon.OpenSSL
ZIP File
Instead of using the installer or package manager, you can download one of the ZIP files in the «Download OpenSSL» section above.
- Follow the instructions below if you have downloaded one of the ZIP files above and want to deploy OpenSSL manually (e.g. on the local hard disk or a USB drive for a portable installation)
- Download the appropriate FireDaemon OpenSSL Binary Distribution ZIP file via the links above.
- Unpack the contents of the folder found in the ZIP file to a temporary directory (e.g. C:\Temp)
- Copy the contents (i.e. the files and directories contained within) of the x64 folder or x86 folder to your target directory (e.g. C:\OpenSSL)
- Copy the ssl folder and contents to the target directory (e.g. C:\OpenSSL).
The commands to copy the files correctly from the location where you unpacked the ZIP file (assuming C:\Temp) are as follows:
: For OpenSSL 1.1.1 LTS
cd C:\Temp\openssl-1.1

: For OpenSSL 3.0 LTS
cd C:\Temp\openssl-3.0

: For OpenSSL 3.5
cd C:\Temp\openssl-3

: Copy the binaries specific to your platform
: Copy 64-bit binaries
robocopy x64 C:\OpenSSL /E

: Or, copy 32-bit binaries. Don't copy both!
robocopy x86 C:\OpenSSL /E

: Copy the ssl folder
robocopy ssl C:\OpenSSL\ssl /E
Your directory structure should look as follows:
C:\OpenSSL>dir /b
bin
include
lib
ssl
To use OpenSSL, open an elevated Command Prompt (adjusting the path in OPENSSL_HOME to suit your manual installation):
: You can set OPENSSL_HOME=%~dp0 in a batch script for portable installs
set OPENSSL_HOME=C:\OpenSSL
set OPENSSL_CONF=%OPENSSL_HOME%\ssl\openssl.cnf
set PATH=%OPENSSL_HOME%\bin;%PATH%
cd /d %OPENSSL_HOME%
openssl version -a
To create a certificate signing request and private key using the same environment variables as above:
openssl genrsa -out server.key 4096
openssl req -new -key server.key -out server.csr -sha256
openssl x509 -req -days 365 -in server.csr -signkey server.key -out server.crt
OpenSSL Screenshot
Below is a screenshot showing the certificate signing request in an elevated PowerShell:

OpenSSL Documentation
Please refer to OpenSSL’s documentation.
Checking SSL / TLS Certificate Validity with Certify One
FireDaemon Certify One allows you to audit, check, inspect, and validate SSL / TLS certificates and certificate chains. Fortify also has a browser-based TLS Encryption Check Tool available.
Compiling OpenSSL From Source
Release Policy
Whenever we release an updated version of FireDaemon Fusion, FireDaemon Certify One, or OpenSSL gets updated with security fixes, we will provide the latest tagged version of the OpenSSL stable branch. The currently deployed OpenSSL library commit versions are listed underneath the download links above. Commit is described viz:
git describe --always --tag --long --first-parent --dirty
Source
We directly pull from OpenSSL’s official GitHub repository.
Build Script
You can use our build script to create the binary distributions. The build script has the following dependencies:
- Visual Studio Community Edition
- Git for Windows
- Strawberry Perl.
Compilation
The actual command line to build OpenSSL is as follows (where %toolset% is VC-WIN32-HYBRIDCRT and VC-WIN64A-HYBRIDCRT, respectively):
perl ..\Configure %toolset% no-ssl3 no-zlib no-comp no-autoload-config no-makedepend --prefix="%installdir%" --openssldir="%commoninstalldir%"
Integrating OpenSSL with Your Visual Studio Project
You must configure your project’s properties to use the headers and libraries in FireDaemon OpenSSL in your Visual Studio project.
Sample Project
We have included a sample Visual Studio Project in the OpenSSL 3 ZIP file. The sample project can be found in the «projects» folder.
Additional Include Directories
Prepend «C:\Program Files\FireDaemon Open SSL 3\include»; to Property Pages -> C/C++ -> General -> Additional Include Directories in your project per the screenshot below adjusting the prepended path to suit your installation. In our case, we use a pre-defined User Macro called OpenSslIncludeDir. You can also specify this path on the command line:
/I"C:\Program Files\FireDaemon OpenSSL 3\include"

Additional Library Directories
Prepend «C:\Program Files\FireDaemon Open SSL 3\lib»; to Property Pages -> Linker -> General -> Additional Library Directories in your project per the screenshot below adjusting the prepended path to suit your installation. In our case, we use a pre-defined User Macro called OpenSslLibraryDir. You can also specify this path on the command line:
/LIBPATH:"C:\Program Files\FireDaemon OpenSSL 3\lib"

Additional Dependencies
Prepend libcrypto.lib;libssl.lib; to Property Pages -> Linker -> Input -> Additional Dependencies in your project per the screenshot below. You can also specify this on the command line:
/DYNAMICBASE "libcrypto.lib" "libssl.lib"

Basic Troubleshooting
If you run into issues compiling or linking FireDaemon OpenSSL, please review the tips below to help you debug your project:
- Ensure you have set up your Visual Studio project correctly per the previous section
- When compiling OpenSSL yourself, ensure you choose the correct target platform. For example, ./configure <toolset> where <toolset> can be triplets including VC-WIN64A and Cygwin-x86_64. The complete list of toolsets can be found by typing perl ..\configure LIST
- Verify that the versions of libssl.lib and libcrypto.lib are correct by using dumpbin.exe which is available in the Windows SDK. dumpbin /ALL libssl.lib should refer to libssl-3.dll. dumpbin /ALL libcrypto.lib should refer to libcrypto-3.dll
- Use /VERBOSE when linking to verify the libraries found and used by the linker
- Use Dependencies to verify the dependencies of your built executable
- Ensure you build, rebuild, or clean your project to avoid stale dependencies, outdated object files, and other artifacts and detritus that may have accumulated in your project
- Double-check, then triple-check your compiler and linker command line to ensure your project is not referring to folders or directories that may contain other versions of OpenSSL libs and DLLs
- Use pre-defined User Macros in your project to ensure you explicitly reference the correct OpenSSL include, lib, and bin directories (e.g. OpenSslIncludeDir, OpenSslLibDir, OpenSslBinDir).
FireDaemon Software Development Services
We offer paid commercial software development services to assist you in building and integrating OpenSSL into your project or product. Please contact us for rates and availability.
Privilege Escalation Mitigation
When building OpenSSL, the build scripts bake the default location of the library (i.e. the installation directory) and the SSL configuration into the final product. By default, OpenSSL automatically loads the SSL configuration file from the default file system location. This leads to an easily exploitable privilege escalation scenario documented in CVE-2019-12572. Our build of OpenSSL mitigates this flaw using the following preventative measures:
- The target directories we have chosen are Windows’ default system program files directories, assuming a 64-bit architecture with a shared configuration file directory common to both x64 and x86:
- x64: C:\Program Files\FireDaemon OpenSSL 3, C:\Program Files\Common Files\FireDaemon SSL 3
- x86: C:\Program Files (x86)\FireDaemon OpenSSL 3, C:\Program Files\Common Files\FireDaemon SSL 3
- To mitigate security issues even on non-default installations, we built the library so that it doesn’t automatically load the SSL configuration. Hence, when using the OpenSSL tools or the DLLs in your products, you have to explicitly load the SSL configuration.
- All FireDaemon software products that utilise OpenSSL initialise the OpenSSL library at runtime using a flag that prevents the loading of the default configuration.
Compatibility and Support Matrix
The table below provides a compatibility and support matrix, mapping compatible Microsoft Windows operating system versions to specific FireDaemon OpenSSL software versions.
| OpenSSL Versions |
OpenSSL 3.5, 3.0 LTS, & 1.1.1 LTS |
|
| Windows Operating System Version | 32-bit (x86) | 64-bit (x64) |
| Windows XP (1) | ||
| Windows Vista (1) | ||
| Windows 7 (1) | ||
| Windows 8 (1) | ||
| Windows 8.1 (1) | ||
| Windows 10 | ||
| Windows 11 | ||
| Server 2008 (2) | ||
| Server 2008 R2 (2) | ||
| Server 2012 | ||
| Server 2012 R2 | ||
| Server 2016 | ||
| Server 2019 | ||
| Server 2022 | ||
| Server 2025 |
(1) Windows Desktop Operating System is End of Support
(2) Windows Server Operating System is End of Support
| Compatible / Supported | The software is designed to be installed on the Microsoft Windows operating system. We actively support the operating system version plus software version combination, provided that the 32-bit (x86) version is deployed on a 32-bit (x86) operating system and the 64-bit (x64) version is deployed on a 64-bit (x64) operating system. Please see the License, Warranty, and Support section below. |
| Compatible / Unsupported | The software product can be installed on the Microsoft Windows operating system version. We do not support the operating system version plus software version combination. This is typically due to the operating system version reaching End of Support. |
| Incompatible / Unsupported | The software product should not or does not install on the Microsoft Windows operating system version or work. We do not support the operating system version plus software version combination. |
License, Warranty, and Support
Our OpenSSL Binary Distribution is free to use and redistribute. Product use, redistribution, and warranty are governed by the OpenSSL License. If you have questions regarding OpenSSL, wish to report bugs, or require implementation guidance, please consider joining the OpenSSL Community.
Useful Links
- OpenSSL History
- OpenSSL Events
- OpenSSL Corporation Mission
- OpenSSL Corporation 2024 Annual Report
- OpenSSL Library Release Lifecycle and Roadmap
- OpenSSL Sponsorship
- OpenSSL Webinars
Acknowledgments
This product includes:
- Software developed by the OpenSSL Project for use in the OpenSSL Library
- Cryptographic software written by Eric Young
- Software written by Tim Hudson.